Archive for February 2012

VMware Labs (Flings)

VMware Labs is VMware’s home for collaboration. They see collaboration as the information exchange that takes place internally and externally. On this site you can play around with the latest innovations coming out of VMware and share feedback and ideas directly with their engineers. VMware Labs is also the place where VMware engineers can share their cool and useful tools with you. With this in mind, Labs is made up of the following components:

Flings

VMware’s engineers work on tons of pet projects in their spare time, and are always looking to get feedback on their projects (or “flings”). Why flings? A fling is a short-term thing, not a serious relationship but a fun one. Likewise, the tools that are offered here are intended to be played with and explored. None of them are guaranteed to become part of any future product offering and there is no support for them. They are, however, totally free for you to download and play around with them!

Website

http://labs.vmware.com/flings

RV Tools

This looks like a really useful tool for the VMware Admins out there

http://www.robware.net/

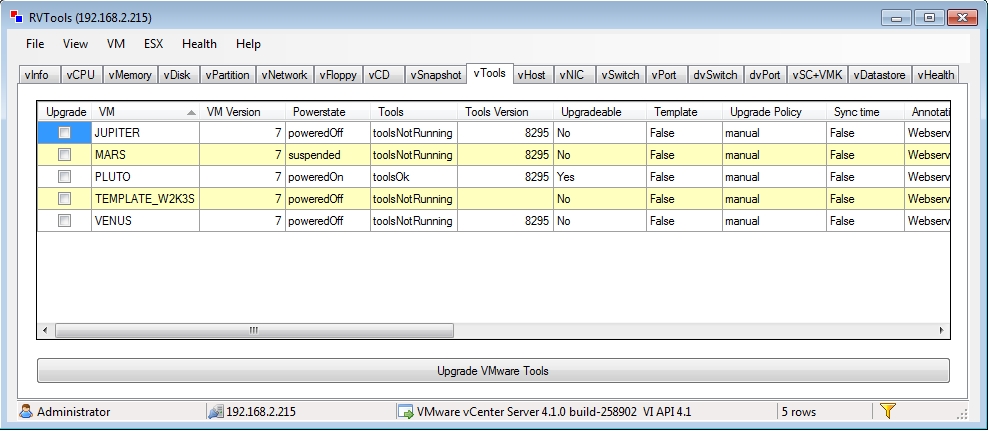
RVTools is a windows .NET 2.0 application which uses the VI SDK to display information about your virtual machines and ESX hosts. Interacting with VirtualCenter 2.5, ESX 3.5, ESX3i, ESX4i and vSphere 4 RVTools is able to list information about cpu, memory, disks, nics, cd-rom, floppy drives, snapshots, VMware tools, ESX hosts, nics, datastores, service console, VM Kernel, switches, ports and health checks. With RVTools you can disconnect the cd-rom or floppy drives from the virtual machines and RVTools is able to list the current version of the VMware Tools installed inside each virtual machine. and update them to the latest version.

Intel-VT and AMD-V Technology

Early virtualization efforts relied on software emulation to replace hardware functionality. But software emulation can be a slow and inefficient process. Because many virtualization tasks were handled through software, VM behavior and resource control were often poor, resulting in unacceptable VM performance on the server.

Processors lacked the internal microcode to handle intensive virtualization tasks in hardware. Both Intel Corp. and AMD addressed this problem by creating processor extensions that could offload the repetitive and inefficient work from the software. By handling these tasks through processor extensions, traps and emulation of virtualization, tasks through the operating system were essentially eliminated, vastly improving VM performance on the physical server.

AMD

AMD-V (AMD virtualization) is a set of hardware extensions for the X86 processor architecture. Advanced Micro Dynamics (AMD) designed the extensions to perform repetitive tasks normally performed by software and improve resource use and virtual machine (VM) performance.

AMD Virtualization (AMD-V) technology was first announced in 2004 and added to AMD’s Pacifica 64-bit x86 processor designs. By 2006, AMD’s Athlon 64 X2 and Athlon 64 FX processors appeared with AMD-V technology, and today, the technology is available on Turion 64 X2, second- and third-generation Opteron, Phenom and Phenom II processors

Intel-VT

Intel VT (Virtualization Technology) is the company’s hardware assistance for processors running virtualization platforms.

Intel VT includes a series of extensions for hardware virtualization. The Intel VT-x extensions are probably the best recognized extensions, adding migration, priority and memory handling capabilities to a wide range of Intel processors. By comparison, the VT-d extensions add virtualization support to Intel chipsets that can assign specific I/O devices to specific virtual machines (VM)s, while the VT-c extensions bring better virtualization support to I/O devices such as network switches.

Three alternative techniques now exist for handling sensitive and privileged instructions to virtualize the CPU on the x86 architecture:

  1. Full virtualization using binary translation
  2. OS assisted virtualization or paravirtualization
  3. Hardware assisted virtualization (first generation)

Full virtualization using binary translation

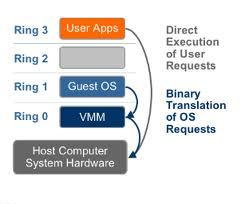
X86 operating systems are designed to run directly on the bare-metal hardware, so they naturally assume they fully ‘own’ the computer hardware. As shown in the figure below, the x86 architecture offers four levels of privilege known as Ring 0, 1, 2 and 3 to operating systems and applications to manage access to the computer hardware

While user level applications typically run in Ring 3, the operating system needs to have direct access to the memory and hardware and must execute its privileged instructions in Ring 0. Virtualizing the x86 architecture requires placing a virtualization layer under the operating system (which expects to be in the most privileged Ring 0) to create and manage the virtual machines that deliver shared resources.
Further complicating the situation, some sensitive instructions can’t effectively be virtualized as they have different semantics when they are not executed in Ring 0. The difficulty in trapping and translating these sensitive and privileged instruction requests at runtime was the challenge that originally made x86 architecture virtualization look impossible.
VMware resolved the challenge in 1998, developing binary translation techniques that allow the VMM to run in Ring 0 for isolation and performance, while moving the operating system to a user level ring with greater privilege than applications in Ring 3 but less privilege than the virtual machine monitor in Ring 0.

OS Assisted Virtualization or Paravirtualization

“Para-“ is an English affix of Greek origin that means “beside,” “with,” or “alongside.” Given the meaning “alongside virtualization,” paravirtualization refers to communication between the guest OS and the hypervisor to improve performance and efficiency.
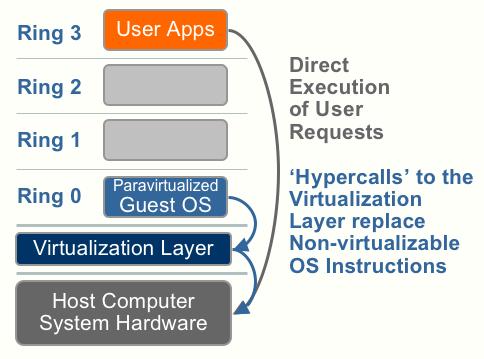
Paravirtualization, as shown  the picture below, involves modifying the OS kernel to replace nonvirtualizable instructions with hypercalls that communicate directly with the virtualization layer hypervisor. The hypervisor also provides hypercall interfaces for other critical kernel operations such as memory management, interrupt handling and time keeping. Paravirtualization is different from full virtualization, where the unmodified OS does not know it is virtualized and sensitive OS calls are trapped using binary translation. The value proposition of paravirtualization is in lower virtualization overhead, but the performance advantage of paravirtualization over full virtualization can vary greatly depending on the workload

Hardware assisted virtualization (first generation)

Going back to the first descriptions of the processors Hardware Assist capabilities – Hardware vendors are rapidly embracing virtualization and developing new features to simplify virtualization techniques. First generation enhancements include Intel Virtualization Technology (VT-x) and AMD’s AMD-V which both target privileged
instructions with a new CPU execution mode feature that allows the VMM to run
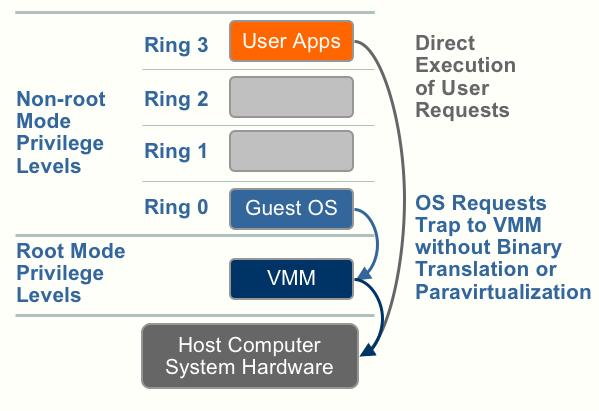
in a new root mode below ring 0. As depicted in the figure below, privileged and sensitive calls are set to automatically trap to the hypervisor, removing the need for either binary translation or paravirtualization. The guest state is stored in Virtual Machine Control Structures (VT-x) or Virtual Machine Control Blocks (AMD-V).
Processors with Intel VT and AMD-V became available in 2006, so only newer systems contain these hardware assist features.

Vmware Document describing Full Virtualization, Paravirtualisation and Hardware Assist

http://www.vmware.com/files/pdf/VMware_paravirtualization.pdf

Configure Port Groups to properly isolate network traffic and VLAN Tagging

VLANs provide for logical groupings of stations or switch ports, allowing communications as if all stations or ports were on the same physical LAN segment. Confining broadcast traffic to a subset of the switch ports or end users saves significant amounts of network bandwidth and processor time.
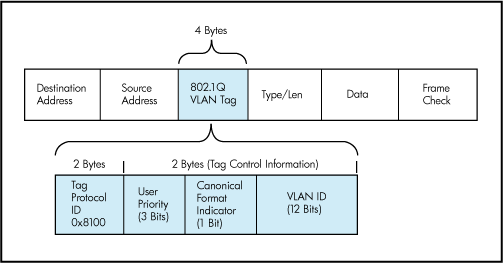
In order to support VLANs for VMware Infrastructure users, one of the elements on the virtual or physical network has to tag the Ethernet frames with 802.1Q tag as per below

The most common tagging is 802.1Q, which is an IEEE standard that nearly all switches support. The tag is there to identify which VLAN the layer 2 frame belongs to. vSphere can both understand these tags (receive them) as well as add them to outbound traffic (send them)

There are three different configuration modes to tag (and untag) the packets for virtual machine frames

  1. VST (VLAN range 1-4094)
  2. VGT (VLAN ID 4095 enables trunking on port group)
  3. EST (VLAN ID 0 Disables VLAN tagging on port group)

1. VST (Virtual Switch Tagging)

This is the most common configuration. In this mode, you provision one port group on a virtual switch for each VLAN, then attach the virtual machine’s virtual adapter to the port group instead of the virtual switch directly.

The virtual switch port group tags all outbound frames and removes tags for all inbound frames. It also ensures that frames on one VLAN do not leak into a different VLAN.

Use of this mode requires that the physical switch provide a trunk. E.g The ESX host network adapters must be connected to trunk ports on the physical switch.

The port groups connected to the virtual switch must have an appropriate VLAN ID specified

switchport trunk encapsulation dot1q
switchport mode trunk
switchport trunk allowed vlan x,y,z
spanning-tree portfast trunk

Note: The Native VLAN is not tagged and thus requires no VLAN ID to be set on the ESX/ESXi portgroup.

2. VGT (Virtual Guest Tagging)

You may install an 802.1Q VLAN trunking driver inside the virtual machine, and tags will be preserved between the virtual machine networking stack and external switch when frames are passed from or to virtual switches. Use of this mode requires that the physical switch provide a trunk

3. EST (External Switch Tagging)

You may use external switches for VLAN tagging. This is similar to a physical network, and VLAN configuration is normally transparent to each individual physical server.
There is no need to provide a trunk in these environments.

All VLAN tagging of packets is performed on the physical switch.

ESX host network adapters are connected to access ports on the physical switch.

The portgroups connected to the virtual switch must have their VLAN ID set to 0.

See this example snippet of a code from a Cisco switch port configuration:

switchport mode access
switchport access vlan x

Virtual Distributed Switches

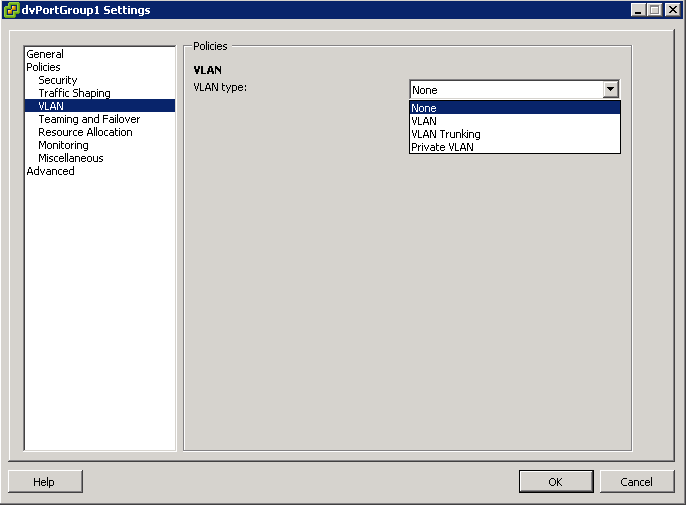
In vSphere, there’s a new networking feature which can be configured on the distributed virtual switch (or DVS). In VI3 it is only possible to add one VLAN to a specific port group in the vSwitch. in the DVS, you can add a range of VLANs to a single port group. The feature is called VLAN trunking and it can be configured when you add a new port group. There you have the option to define a VLAN type, which can be one of the following:

  • None
  • VLAN
  • VLAN trunking
  • Private VLAN. But this can only be done on the DVS, not on a regular vSwitch. See screendumps below (both from vSphere environment)

VLAN7

The VLAN policy allows virtual networks to join physical VLANs.

  • Log in to the vSphere Client and select the Networking inventory view.
  • Select the vSphere distributed switch in the inventory pane.
  • On the Ports tab, right-click the port to modify and select Edit Settings.
  • Click Policies.
  • Select the VLAN Type to use.
  • Select VLAN Trunking
  • Select a VLAN ID between 1- 4094
  • Note: Do not use VLAN ID 4095

What is a VLAN Trunk?

A VLAN trunk is a port on a physical switch that has the ability to listen and pass traffic for multiple VLANs. Trunks are used primarily to pass traffic between multiple switches.

In Cisco networks, trunking is a special function that can be assigned to a port, making that port capable of carrying traffic for any or all of the VLANs accessible by a particular switch. Such a port is called a trunk port, in contrast to an access port, which carries traffic only to and from the specific VLAN assigned to it. A trunk port marks frames with special identifying tags (either ISL tags or 802.1Q tags) as they pass between switches, so each frame can be routed to its intended VLAN. An access port does not provide such tags, because the VLAN for it is pre-assigned, and identifying markers are therefore unnecessary.

A quick note on the relationship between VLANs and vSwitch port groups. A VLAN can contain multiple port groups, but a port group can only be associated with one VLAN at any given time. A prerequisite for VLAN functionality on a vSwitch (vSS or vDS) is that the vSwitch uplinks must be connected to a trunk port on the physical switch. This trunk port will also need to include the associated VLAN ID range, enabling the physical switch to pass VLAN tags to the ESXi host. So why is any of this important? A trunk port can store and distribute multiple VLAN tags, enabling multiple traffic types to flow independently (at least logically), across the same uplink or group of uplinks in the case of teamed NICs

Use case for using VLAN trunking would be if you have multiple VLANs in place for logical separation or to isolate your VM traffic but you have a limited amount of physical uplink ports dedicated for your ESXi hosts

Networking Policies

Policies set at the standard switch or distributed port group level apply to all of the port groups on the standard switch or to ports in the distributed port group. The exceptions are the configuration options that are overridden at the standard port group or distributed port level.

  • Load Balancing and Failover Policy
  • VLAN Policy
  • Security Policy
  • Traffic Shaping Policy
  • Resource Allocation Policy
  • Monitoring Policy
  • Port Blocking Policies
  • Manage Policies for Multiple Port Groups on a vSphere Distributed Switch

Useful Post (Thanks to Mohammed Raffic)

http://www.vmwarearena.com/2012/07/vlan-tagging-vst-est-vgt-on-vmware.html?goback=.gde_42087_member_239011765

VMware NIC Teaming Settings

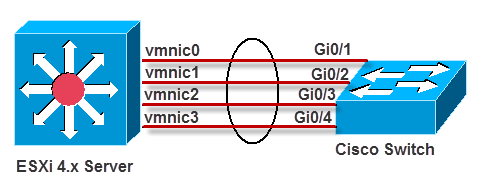
Benefits of NIC teaming include load balancing and failover: However, those policies will affect outbound traffic only. In order to control inbound traffic, you have to get the physical switches involved.

  • Load balancing: Load balancing allows you to spread network traffic from virtual machines on a virtual switch across two or more physical Ethernet adapters, providing higher throughput. NIC teaming offers different options for load balancing, including route based load balancing on the originating virtual switch port ID, on the source MAC hash, or on the IP hash.
  • Failover: You can specify either Link status or Beacon Probing to be used for failover detection. Link Status relies solely on the link status of the network adapter. Failures such as cable pulls and physical switch power failures are detected, but configuration errors are not. The Beacon Probing method sends out beacon probes to detect upstream network connection failures. This method detects many of the failure types not detected by link status alone. By default, NIC teaming applies a fail-back policy, whereby physical Ethernet adapters are returned to active duty immediately when they recover, displacing standby adapters

NIC Teaming Policies

Network Teaming Setting

Description

Route based on the originating virtual port Choose an uplink based on the virtual port where the traffic entered the virtual switch.
Route based on IP hash Choose an uplink based on a hash of the source and destination IP addresses of each packet. For non-IP packets, whatever is at those offsets is used to compute the hash.Used for Etherchannel when set on the switch
Route based on source MAC hash Choose an uplink based on a hash of the source Ethernet.
Route based on physical NIC load Choose an uplink based on the current loads of physical NICs.
Use explicit failover order Always use the highest order uplink from the list of Active adapters which passes failover detection criteria

There are two ways of handling NIC teaming in VMware ESX:

  1. Without any physical switch configuration
  2. With physical switch configuration (EtherChannel, static LACP/802.3ad, or its equivalent)

There is a corresponding vSwitch configuration that matches each of these types of NIC teaming:

  1. For NIC teaming without physical switch configuration, the vSwitch must be set to either “Route based on originating virtual port ID”, “Route based on source MAC hash”, or “Use explicit failover order”
  2. For NIC teaming with physical switch configuration—EtherChannel, static LACP/802.3ad, or its equivalent—the vSwitch must be set to “Route based on ip hash”

Considerations for NIC teaming without physical switch configuration

Something to be aware of when setting up NIC Teaming without physical switch configuration is that you don’t get true load balancing as you do with Etherchannel. The following applies to the NIC Teaming Settings

Route based on the originating virtual switch port ID

Choose an uplink based on the virtual port where the traffic entered the virtual switch. This is the default configuration and the one most commonly deployed.
When you use this setting, traffic from a given virtual Ethernet adapter is consistently sent to the same physical adapter unless there is a failover to another adapter in the NIC team.
Replies are received on the same physical adapter as the physical switch learns the port association.

* This setting provides an even distribution of traffic if the number of virtual Ethernet adapters is greater than the number of physical adapters.

Route based on source MAC hash

Choose an uplink based on a hash of the source Ethernet MAC address.
When you use this setting, traffic from a given virtual Ethernet adapter is consistently sent to the same physical adapter unless there is a failover to another adapter in the NIC team.
Replies are received on the same physical adapter as the physical switch learns the port association.

* This setting provides an even distribution of traffic if the number of virtual Ethernet adapters is greater than the number of physical adapters.

Choosing a network adapter for your virtual machine

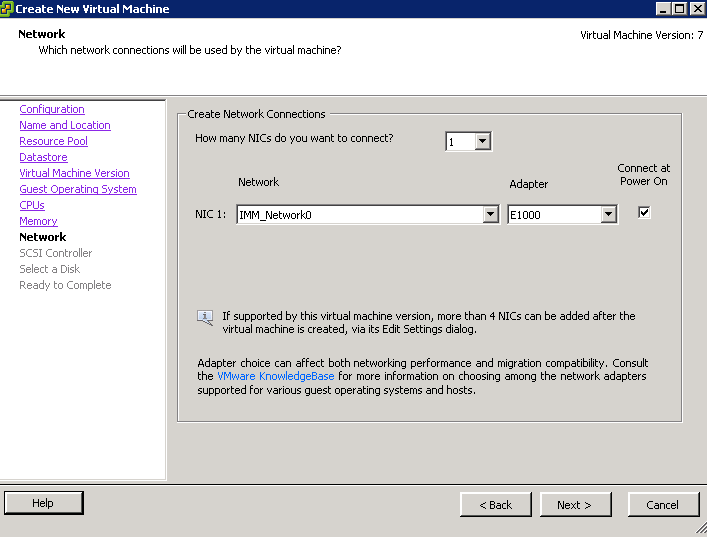
When creating a Virtual machine, VMware will normally offer you several choices of network adaptor depending on what O/S you select.

Network Adaptor Types

  • Vlance – An emulated version of the AMD 79C970 PCnet32- LANCE NIC, an older 10Mbps NIC with drivers available in most 32-bit guest operating systems except Windows Vista and later. A virtual machine configured with this network adapter can use its network immediately.
  • VMXNET – The VMXNET virtual network adapter has no physical counterpart. VMXNET is optimized for performance in a virtual machine. Because operating system vendors do not provide built-in drivers for this card, you must install VMware Tools to have a driver for the VMXNET network adapter available.
  • Flexible – The Flexible network adapter identifies itself as a Vlance adapter when a virtual machine boots, but initializes itself and functions as either a Vlance or a VMXNET adapter, depending on which driver initializes it. With VMware Tools installed, the VMXNET driver changes the Vlance adapter to the higher performance VMXNET adapter.
  • E1000— An emulated version of the Intel 82545EM Gigabit Ethernet NIC. A driver for this NIC is not included with all guest operating systems. Typically Linux versions 2.4.19 and later, Windows XP Professional x64 Edition and later, and Windows Server 2003 (32-bit) and later include the E1000 driver.Note: E1000 does not support jumbo frames prior to ESX/ESXi 4.1.
  • E1000e – This feature would emulate a newer model of Intel gigabit NIC (number 82574) in the virtual hardware. This would be known as the “e1000e” vNIC. e1000e would be available only on hardware version 8 (and newer) VMs in vSphere5. It would be the default vNIC for Windows 8 and newer (Windows) guest OSes. For Linux guests, e1000e would not be available from the UI (e1000, flexible vmxnet, enhanced vmxnet, and vmxnet3 would be available for Linux).
  • VMXNET 2 (Enhanced) – The VMXNET 2 adapter is based on the VMXNET adapter but provides some high-performance features commonly used on modern networks, such as jumbo frames and hardware offloads. This virtual network adapter is available only for some guest operating systems on ESX/ESXi 3.5 and late
  • VMXNET 3– The VMXNET 3 adapter is the next generation of a paravirtualized NIC designed for performance, and is not related to VMXNET or VMXNET 2. It offers all the features available in VMXNET 2, and adds several new features like multiqueue support (also known as Receive Side Scaling in Windows), IPv6 offloads, and MSI/MSI-X interrupt delivery.VMXNET 3 is supported only for virtual machines version 7 and later, with a limited set of guest operating systems:
  • 32- and 64-bit versions of Microsoft Windows XP,7, 2003, 2003 R2, 2008, and 2008 R2
  • 32- and 64-bit versions of Red Hat Enterprise Linux 5.0 and later
  • 32- and 64-bit versions of SUSE Linux Enterprise Server 10 and later
  • 32- and 64-bit versions of Asianux 3 and later
  • 32- and 64-bit versions of Debian 4
  • 32- and 64-bit versions of Ubuntu 7.04 and later
  • 32- and 64-bit versions of Sun Solaris 10 U4 and later

New Features

  • TSO, Jumbo Frames, TCP/IP Checksum Offload

You can enable Jumbo frames on a vSphere Distributed Switch or Standard switch by changing the maximum MTU. TSO (TCP Segmentation Offload is enabled on the VMKernel interface by default but must be enabled at the VM level. Just change the nic to VMXNet 3 to take advantage of this feature

  • MSI/MSI‐X support (subject to guest operating system
    kernel support)

A Message Signaled Interrupt is a write from the device to a special address which causes an interrupt to be received by the CPU. The MSI capability was first specified in PCI 2.2 and was later enhanced in PCI 3.0 to allow each interrupt to be masked individually. The MSI-X capability was also introduced with PCI 3.0.  It supports more interrupts – 26 per device than MSI and allows interrupts to be independently configured.

MSI, Message Signaled Interrupts, uses in-band pci memory space message to raise interrupt, instead of conventional out-band pci INTx pin. MSI-X is an extension to MSI, for supporting more vectors. MSI can support at most 32 vectors while MSI-X can support up to 2048. Using msi can lower interrupt latency, by giving every kind of interrupt its own vector/handler. When kernel see the message, it will directly vector to the interrupt service routine associated with the address/data. The address/data (vector) were allocated by system, while driver needs to register handler with the vector. 

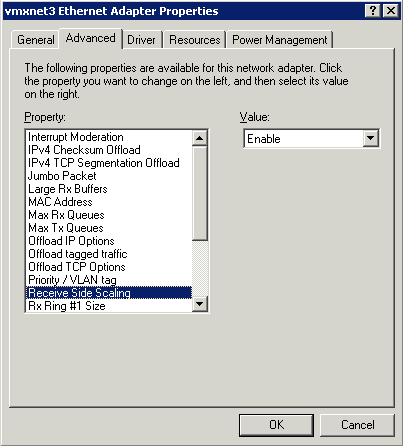
  • Receive Side Scaling (RSS, supported in Windows 2008 when explicitly enabled)

When Receive Side Scaling (RSS) is enabled, all of the receive data processing for a particular TCP connection is shared across multiple processors or processor cores. Without RSS all of the processing is performed by a single processor, resulting in inefficient system cache utilization

RSS is enabled on the Advanced tab of the adapter property sheet. If your adapter does not support RSS, or if your operating system does not support it, the RSS setting will not be displayed.

rss

  • IPv6 TCP Segmentation Offloading (TSO over IPv6)

IPv6 TCP Segmentation Offloading significantly helps to reduce transmit processing performed by the vCPUs and improves both transmit efficiency and throughput. If the uplink NIC supports TSO6, the segmentation work will be offloaded to the network hardware; otherwise, software segmentation will be conducted inside the VMkernel before passing packets to the uplink. Therefore, TSO6 can be enabled for VMXNET3 whether or not the hardware NIC supports it

  • NAPI (supported in Linux)

The VMXNET3 driver is NAPI‐compliant on Linux guests. NAPI is an interrupt mitigation mechanism that improves high‐speed networking performance on Linux by switching back and forth between interrupt mode and polling mode during packet receive. It is a proven technique to improve CPU efficiency and allows the guest to process higher packet loads

New API (also referred to as NAPI) is an interface to use interrupt mitigation techniques for networking devices in the Linux kernel. Such an approach is intended to reduce the overhead of packet receiving. The idea is to defer incoming message handling until there is a sufficient amount of them so that it is worth handling them all at once.

A straightforward method of implementing a network driver is to interrupt the kernel by issuing an interrupt request (IRQ) for each and every incoming packet. However, servicing IRQs is costly in terms of processor resources and time. Therefore the straightforward implementation can be very inefficient in high-speed networks, constantly interrupting the kernel with the thousands of packets per second. Overall performance of the system as well as network throughput can suffer as a result.

Polling is an alternative to interrupt-based processing. The kernel can periodically check for the arrival of incoming network packets without being interrupted, which eliminates the overhead of interrupt processing. Establishing an optimal polling frequency is important, however. Too frequent polling wastes CPU resources by repeatedly checking for incoming packets that have not yet arrived. On the other hand, polling too infrequently introduces latency by reducing system reactivity to incoming packets, and it may result in the loss of packets if the incoming packet buffer fills up before being processed.

As a compromise, the Linux kernel uses the interrupt-driven mode by default and only switches to polling mode when the flow of incoming packets exceeds a certain threshold, known as the “weight” of the network interface

  • LRO (supported in Linux, VM‐VM only)

VMXNET3 also supports Large Receive Offload (LRO) on Linux guests. However, in ESX 4.0 the VMkernel backend supports large receive packets only if the packets originate from another virtual machine running on the same host.

Page Files

If there were no such thing as virtual memory, then once you filled up the available RAM your computer would have to say, “Sorry, you can not load any more applications. Please close another application to load a new one.”

With virtual memory, what the computer can do is look at RAM for areas that have not been used recently and copy them onto the hard disk. This frees up space in RAM to load the new application.

The read/write speed of a hard drive is much slower than RAM, and the technology of a hard drive is not geared toward accessing small pieces of data at a time. If your system has to rely too heavily on virtual memory, you will notice a significant performance drop. The key is to have enough RAM to handle everything you tend to work on simultaneously then, the only time you “feel” the slowness of virtual memory is is when there’s a slight pause when you’re changing tasks. When that’s the case, virtual memory is perfect.

When it is not the case, the operating system has to constantly swap information back and forth between RAM and the hard disk. This is called thrashing, and it can make your computer feel incredibly slow.

 The area of the hard disk that stores the RAM image is called a page file. It holds pages of RAM on the hard disk, and the operating system moves data back and forth between the page file and RAM. On a Windows machine, page files have a .SWP extension

On Linux it is a separate partition (i.e., a logically independent section of a HDD) that is set up during installation of the operating system and which is referred to as the swap partition.

A common recommendation is to set the page-file size at 1.5-times the system’s RAM. In reality, the more RAM a system has, the less it requires page files. You should base your page-file size on the maximum amount of memory your system is committing. Your page-file size should equal your system’s peak commit value (which covers the unlikely situation in which all the committed pages are written to the disk-based page files).

Locating the Page File (Windows)

Paging file configuration is in the System properties, which you can get to by typing “sysdm.cpl” into the Run dialog, clicking on the Advanced tab, clicking on the Performance Options button, clicking on the Advanced tab (this is really advanced), and then clicking on the Change button:

You’ll notice that the default configuration is for Windows to automatically manage the page file size.

Finding Committed Memory

In Windows XP and Server 2003, you can find the peak-commit value under the Task Manager Performance tab

However, this option wasn’t included in Windows Server 2008 and Vista. To determine Server 2008 and Vista peak-commit values, you have two options:

  1. Download Process Explorer from the Microsoft “Process Explorer v11.20” web page. Open the .zip file and double click procexp.exe. Click View on the toolbar and select System Information. Under Commit Charge (K), find the Peak value
  2. Use Performance Monitor to log the Memory – Committed Bytes counter, and review the log to find the Maximum value.

Make sure you run the server with all of its expected workloads to ensure it’s using the maximum amount of memory while you’re monitoring

Maximum Page File Sizes

Windows XP/2003

When that option is set on Windows XP and Server 2003,  Windows creates a single paging file that’s minimum size is 1.5 times RAM if RAM is less than 1GB, and 3 times RAM if it’s greater than 1GB, and that has a maximum size that’s three times RAM.

Windows Vista/2008

On Windows Vista and Server 2008, the minimum is intended to be large enough to hold a kernel-memory crash dump and is RAM plus 300MB or 1GB, whichever is larger. The maximum is either three times the size of RAM or 4GB, whichever is larger.

Limits

Limits related to virtual memory are the maximum size and number of paging files supported by Windows.

32-bit Windows has a maximum paging file size of 16TB (4GB if you for some reason run in non-PAE mode) (Physical Address Extension (PAE) is a feature to allow (32-bit) x86 processors to access a physical address space (including random access memory and memory mapped devices) larger than 4 gigabytes.)

64-bit Windows can having paging files that are up to 16TB on x64  and 32TB on IA64 and 3 For all versions, Windows supports up to 16 paging files, where each must be on a separate volume.

Some feel having no paging file results in better performance, but in general, having a paging file means Windows can write pages on the modified list (which represent pages that aren’t being accessed actively but have not been saved to disk) out to the paging file, thus making that memory available for more useful purposes (processes or file cache). So while there may be some workloads that perform better with no paging file, in general having one will mean more usable memory being available to the system (never mind that Windows won’t be able to write kernel crash dumps without a paging file sized large enough to hold them).

VMware and Page Files

When creating VM’s in VMware either Linux or Windows, VMware by default makes the Page File the same size as the assigned Memory. A 1:1 Mapping

E.g 60GB Disk +32GB Page File = 92GB Total Storage taken

This came up in a meeting we had to discuss why some of our VM’s which were assigned 255GB memory were taking up so much storage space!!!

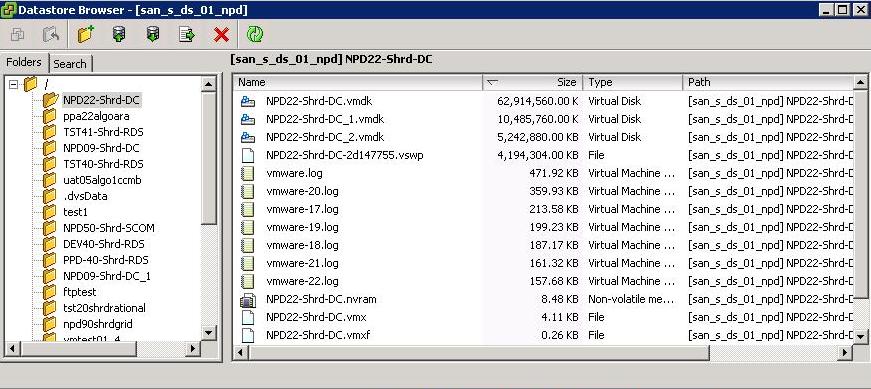
The file on VMware for the swap is called VM-NAME.vswp if you have a look in the Datastore Browser for a VM
From a Forum

*.vswp file – This is the VM swap file (earlier ESX versions had a per host swap file) and is created to allow for memory overcommitment on a ESX server. The file is created when a VM is powered on and deleted when it is powered off. By default when you create a VM the memory reservation is set to zero, meaning no memory is reserved for the VM and it can potentially be 100% overcommitted. As a result of this a vswp file is created equal to the amount of memory that the VM is assigned minus the memory reservation that is configured for the VM. So a VM that is configured with 2GB of memory will create a 2GB vswp file when it is powered on, if you set a memory reservation for 1GB, then it will only create a 1GB vswp file. If you specify a 2GB reservation then it creates a 0 byte file that it does not use. When you do specify a memory reservation then physical RAM from the host will be reserved for the VM and not usable by any other VM’s on that host. A VM will not use it vswp file as long as physical RAM is available on the host. Once all physical RAM is used on the host by all its VM’s and it becomes overcommitted then VM’s start to use their vswp files instead of physical memory. Since the vswp file is a disk file it will effect the performance of the VM when this happens
VMware Resource Pools

What is a Resource Pool?

A Resource Pool provides a way to divide the resources of a standalone host or a cluster into smaller pools. A Resource Pool is configured with a set of CPU and Memory resources that the virtual machines that run in the Resource Pool share. Resource Pools are self-contained and isolated from other Resource Pools.

Using Resource Pools

After you create a Resource Pool, the vCenter Server manages the shared resource and allocates them to VMs within the Resource Pool. Using these you can

  • Allocate processor and memory resources to virtual machines running on the same host or cluster
  • Establish minimum, maxmimum and proportional resource shares for CPU and memory
  • Modify allocations while virtual machines are running
  • Enable applications to dynamically acquire more resources to accomodate peak performance.
  • Access control and delegation—When a top-level administrator makes a resource pool available to a department-level administrator, that administrator can then perform all virtual machine creation and management within the boundaries of the resources to which the resource pool is entitled by the current
    shares, reservation, and limit settings. Delegation is usually done in conjunction with permissions settings.

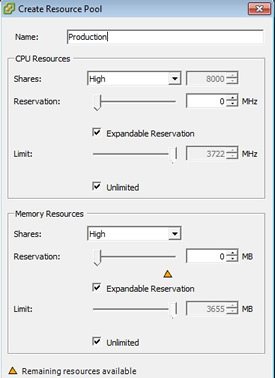
For each resource pool, you specify reservation, limit, shares, and whether the reservation should be expandable

Resource Pool Creation Example

This procedure example demonstrates how you can create a resource pool with the ESX/ESXi host as the parent resource.
Assume that you have an ESX/ESXi host that provides 6GHz of CPU and 3GB of memory that must be shared between your marketing and QA departments. You also want to share the resources unevenly, giving one department (QA) a higher priority. This can be accomplished by creating a resource pool for each department and using the Shares attribute to prioritize the allocation of resources.
The example procedure demonstrates how to create a resource pool, with the ESX/ESXi host as the parent resource.

Procedure

  1. In the Create Resource Pool dialog box, type a name for the QA department’s resource pool (for example,RP-QA).
  2. Specify Shares of High for the CPU and memory resources of RP-QA.
  3. Create a second resource pool, RP-Marketing. Leave Shares at Normal for CPU and memory.
  4. Click OK to exit.

If there is resource contention, RP-QA receives 4GHz and 2GB of memory, and RP-Marketing 2GHz and 1GB.

Otherwise, they can receive more than this allotment. Those resources are then available to the virtual machines in the respective resource pools.

Resource Pool Shares

If you have 3 Resource Pools which are Low, Normal and High, then VMware will allocate the following shares/ratio of total resources

  • High=8000
  • Medium=4000
  • Low=2000

If you have 2 Resource Pools which are Normal and High, then VMware will allocate the following shares/ratio of total resources

  • 6600
  • 3300

Note: The share values would only kick in when the host was having resource contention issues

Can you over-commit memory within resource pools?

The resource pools are expandable and you can over commit them but you will run into performance issues so its not advised to do this so its better to have enough memory assigned to them.

Interesting Point- May need further clarification

It has been suggested that a High, Medium, Low model was best and in general I lean towards this model, however there is one, often overlooked problem with this method. To illustrate with an example if you have a Resource Pool with 2000 shares and contains 4 VM’s then 2000/4 = 500 shares per VM. Imagine you have a High Resource Pool with 8000 shares and 10 VM’s then 8000/16 = 500 shares per VM. This indicates that all the virtual machines would actually receive the same amount of resource shares in the cluster. Take that one step further and increase the number of VM’s to 20, then 8000/20 = 400 in fact less shares that those in the Low Resource Pool.

Duncan Epping describes the above really well in the below article

http://www.yellow-bricks.com/2010/02/22/the-resource-pool-priority-pie-paradox/

and further information

Resource Pools have become a hot topic due to the vSphere 4 Design class.  This class apparently was codesigned with some VCDXs.  It became clear during the design that even VCDXs had misconceptions about how RPs actually worked.  This misconception has actually led to the coursework explicitly calling out RPs as something to be careful of,  or even just flat our avoid.  The rec is to use shares on VMs. If you have High (8000), Normal (4000), and Low (2000) RPs for the purpose of controlling shares and they each have 4 VMs in them,  then the RPs will work the way most of us thought they would work.  However,  if you move 4 of the VMs to the High then you have 8H, 2N, and 2L.  When there is contention the shares will look like this: H – 8000 shares / 8 VMs = 1000 shares per VM N – 4000 shares / 2 VMs = 2000 shares per VM L – 2000 shares / 2 VMs = 1000 shares per VM In this scenario your High RP VMs are acutally getting less then the Normal VMs and equal to the L VMs.   So basically the only way for the RPs to work the way that WE want them to is to maintain a balanced # of VMs per RP or if they are unbalanced make sure that the lower tiered RPs contain more VMs than the higher tiers. Remmember shares only come into play during times of resource contention.  So if you have no contention then the RPs are used for anything but organization.

VMware Snapshots Explained

A VMware snapshot is a copy of Virtual Machine Disk file (VMDK) at a particular moment in time. By taking multiple snapshots, you can have several restore points for a virtual machine (VM). While more VMware snapshots will improve the resiliency of your infrastructure, you must balance those needs against the storage space they consume.

The size of a snapshot file can never exceed the size of the original disk file. Any time a disk block is changed, the snapshot is created in the delta file and simply updated as changes are made. If you changed every single disk block on your server after taking a snapshot, your snapshot would still be the same size as your original disk file. But there’s some additional overhead disk space that contains information used to manage the snapshots. The maximum overhead disk space varies and it’s based on the Virtual Machine Files System block size

Block Size Maximum VMDK Size Max Overhead
1MB 256GB 2GB
2MB 512GB 4GB
4MB 1024GB 8GB
8MB 2048GB 16GB

The overhead disk space that’s required can cause the creation of snapshots to fail if a VM’s virtual disk is close the maximum VMDK size for a VMFS volume. If a VM’s virtual disk is 512 GB on a VMFS volume with a 2 MB block size, for example, the maximum snapshot size would be 516 GB (512 GB + 4 GB), which would exceed the 512 GB maximum VMDK size for the VMFS volume and cause the snapshot creation to fail

Snapshots grow in 16 MB increments to help reduce SCSI reservation conflicts. When requests are made to change a block on the original disk, it is instead changed in the delta file. If the previously changed disk block in a delta file is changed again it will not increase the size of the delta file because it simply updates the existing block in the delta file.

The rate of growth of a snapshot will be determined by how much disk write activity occurs on your server. Servers that have disk write intensive applications, such as SQL and Exchange, will have their snapshot files grow rapidly. On the other hand, servers with mostly static content and fewer disk writes, such as Web and application servers, will grow at a much slower rate. When you create multiple snapshots, new delta files are created and the previous delta files become read-only. With multiple snapshots each delta file can potentially grow as large as the original disk file

Different Types of snapshot files

*–delta.vmdk file: This is the differential file created when you take a snapshot of a VM. It is also known as the redo-log file. The delta file is a bitmap of the changes to the base VMDK, thus it can never grow larger than the base VMDK (except for snapshot overhead space). A delta file will be created for each snapshot that you create for a VM. An extra delta helper file will also be created to hold any disk changes when a snapshot is being deleted or reverted. These files are automatically deleted when the snapshot is deleted or reverted in snapshot manager.

*.vmsd file: This file is used to store metadata and information about snapshots. This file is in text format and will contain information such as the snapshot display name, unique identifier (UID), disk file name, etc. It is initially a 0 byte file until you create your first snapshot of a VM. From that point it will populate the file and continue to update it whenever new snapshots are taken.

This file does not cleanup completely after the snapshots are taken. Once you delete a snapshot, it will still increment the snapshot’s last unique identifier for the next snapshot.

*.vmsn file: This is the snapshot state file, which stores the exact running state of a virtual machine at the time you take that snapshot. This file will either be small or large depending on if you select to preserve the VM’s memory as part of the snapshot. If you do choose to preserve the VM’s memory, then this file will be a few megabytes larger than the maximum RAM memory allocated to the VM.

This file is similar to the VMware suspended state (.vmss) file. A .vmsn file will be created for each snapshot taken on the VM; these files are automatically deleted when the snapshot is removed

Deleting or reverting to snapshots

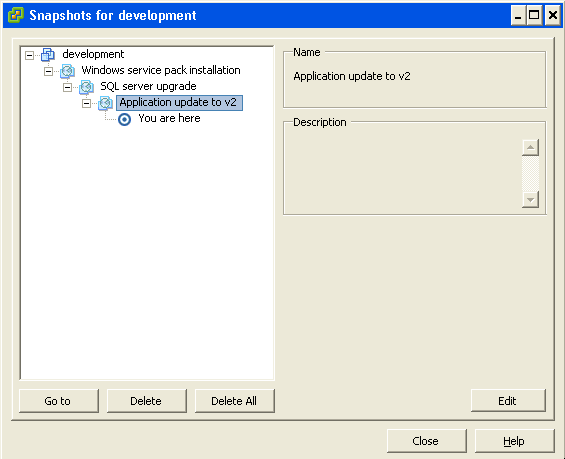
When you delete all snapshots for a VM, all of the delta files that are created are merged back into the original VMDK disk file for the VM and then deleted. If you choose to delete only an individual snapshot, then just that snapshot is merged into its parent snapshot. If you choose to revert to a snapshot, the current disk and memory states are discarded and the VM is brought back to the reverted-to state. Whichever snapshot you revert to then becomes the new parent snapshot. The parent snapshot, however, is not always the most recently taken snapshot. If you revert back to an older snapshot, it then becomes the parent of the current state of the virtual machine. The parent snapshot is always noted by the “You are here” label under it in the Snapshot Manager.

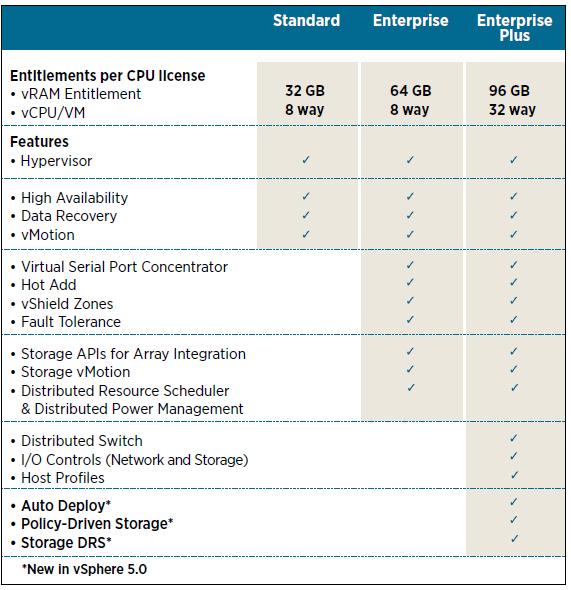
vSphere 5.0 Versions and Features

Just a quick post for reference to features and functionality gained from each version of vSphere 5