Archive for Objective 8 Perform Scripting and Automation

Given a sample script, modify the script to perform a given action

LogIcon

Basic Script 1

This script will connect to the vCenter Server and get all VMs in a folder followed by starting those VMs in a folder

$vms = get-vm -Location Test-Folder
# Start each vm in the folder
ForEach($vm in $vms)
{
start-vm -RunAsync -VM $vm -Confirm:$false
}

Basic Script 2

This script will go and find any VMs which have their CD Drive connected

Get-VM | Where-Object {$_ | Get-CDDrive |  Where-Object { $_.ConnectionState.Connected -eq “true”  } } |  Select-Object Name

Advanced Reporting Script

This script should only show RDMs but for both compatibility modes

http://communities.vmware.com/message/1063909

$RDMs = @()
foreach($vm in (Get-View -ViewType “VirtualMachine”)) {
    foreach($dev in ($vm.Config.Hardware.Device | where {($_.gettype()).Name -eq “VirtualDisk”})) {
        if(($dev.Backing.CompatibilityMode -eq “physicalMode”) -or ($dev.Backing.CompatibilityMode -eq “virtualMode”)) {
            $objRdm = “” | select VMName, VMDK, UUID, DiskLabel, SCSIBus, SCSIDevice, Mode
            $objRdm.VMName = $vm.Name
            $objRdm.VMDK = $dev.Backing.FileName
            $objRdm.UUID = $dev.Backing.LunUuid
            $objRdm.DiskLabel = $dev.DeviceInfo.Label
            $objRdm.SCSIBus = ( $vm.Config.Hardware.Device | ? { $_.Key -eq $dev.ControllerKey }).BusNumber
            $objRdm.SCSIDevice = $dev.UnitNumber
            $objRdm.Mode = $dev.Backing.CompatibilityMode
            $RDMs += $objRdm
        }
    }
}

$report = @()

foreach ($cluster in (Get-View -ViewType “ClusterComputeResource”)) {
    $vmhostsview = $cluster.host | % { Get-View $_ }
    $vmhostview = $vmhostsview | Select -first 1
    $ScsiLuns = $vmhostsview | % { $_.Config.StorageDevice.ScsiLun } | Select -unique *
    $UUIDs = $ScsiLuns | Select -unique UUID
    $Datastores = $vmhostsview | % { $_.Config.FileSystemVolume.MountInfo } | % { $_.Volume } | Select -Unique *
    $HostLUN = $vmhostsview | % { $_.Config.StorageDevice.ScsiTopology.Adapter } | % { $_.Target | % { $_.LUN } } | Select -unique *
    foreach ($UUID in $UUIDs) {
        $Lun = $ScsiLuns | ? { $_.UUID -eq $UUID.UUID } | Select -first 1
        $objVolume = “” | Select Cluster, VolumeName, CanonicalName, DisplayName, VolumeType, CapacityGB, BlockSizeMb, VMFSVersion, LunType, Vendor, Model, HostLUN, VM, VMDiskLabel, VMSCSIBus, VMSCSIDevice, Revision, ScsiLevel, UUID
        $objVolume.Cluster = $cluster.Name
        $objVolume.CanonicalName = $Lun.CanonicalName
        $objVolume.HostLUN = ($HostLUN | ? { $_.ScsiLun -eq $Lun.Key } | select -unique LUN).LUN
        $objVolume.UUID = $Lun.Uuid
        $objVolume.CapacityGB = $Lun.Capacity.Block * $Lun.Capacity.BlockSize / 1GB
        $objVolume.DisplayName = $Lun.DisplayName
        $objVolume.LunType = $Lun.LunType
        $objVolume.Vendor = $Lun.Vendor
        $objVolume.Model = $Lun.Model
        $objVolume.Revision = $Lun.Revision
        $objVolume.ScsiLevel = $Lun.ScsiLevel
        foreach ($vol in $Datastores) {
            if ($vol.extent | % { $_.diskname -eq $Lun.CanonicalName}) {
                $objVolume.VolumeName = $vol.Name
                $objVolume.BlockSizeMb = $vol.BlockSizeMb
                $objVolume.VMFSVersion = $vol.Version
                $objVolume.VolumeType = “vmfs”
            }
        }
        foreach ($rdm in $RDMs) {
            if ($Lun.Uuid -eq $rdm.UUID) {
                $objVolume.VolumeName = $rdm.VMDK
                $objVolume.VM = $rdm.VMName
                $objVolume.VMDiskLabel = $rdm.DiskLabel
                $objVolume.VMSCSIBus = $rdm.SCSIBus
                $objVolume.VMSCSIDevice = $rdm.SCSIDevice
                if ($rdm.Mode -eq “virtualMode” ) { $objVolume.VolumeType = “rdm” }
                if ($rdm.Mode -eq “physicalMode”) { $objVolume.VolumeType = “rdmp” }
            }
        }
        $report += $objVolume
    }
}
$report | Export-Csv “C:\report.csv” -NoTypeInformation -UseCulture

Running PowerShell Scripts

  • Launch PowerShell
  • Make sure Set-ExecutionPolicy RemoteSigned is the policy
  • Run the script by entering the full path to the script (c:\scripts\myscript.ps1), or if it’s in the current directory, prefix it with a period followed by a backslash (.\myscript.ps1).

Identify environment variables usage

index

PowerShell providers

A PowerShell provider, or PSProvider, is an adapter. It’s designed to take some kind of data storage and make it look like a disk drive. PowerShell Providers are .NET programs that allow us to work with data stores as if they were mounted drives. This simplifies accessing external data outside the PowerShell environment. For example, we can access the registry as if it were a file system. You can see a list of installed providers right within the shell:

  • get-psprovider

env1

Notice that each provider has different capabilities. This is important, because it
affects the ways in which you can use each provider. These are some of the common
capabilities you’ll see:

  • ShouldProcess—Means the provider supports the use of the -WhatIf and -Confirm parameters, enabling you to “test” certain actions before committing to them.
  • Filter—Means the provider supports the -Filter parameter on the cmdlets that manipulate providers’ content.
  • Credentials—Means the provider permits you to specify alternate credentials when connecting to data stores. There’s a -credential parameter for this.
  • Transactions—Means the provider supports the use of transactions, which allows you to use the provider to make several changes, and then either roll back or commit those changes as a single unit.

PowerShell Drives “PSDrive”

We connect to PowerShell Providers by mounting the Providers PowerShell Drive(PSDrive). Most Providers have only one PSDrive, the exceptions are the FileSystem Provider(depends on the number of drives on the system) and the Registry Provider(HKLM and HKCU).

You use a provider to create a PSDrive. A PSDrive uses a single provider to connect to some actual data storage. You’re essentially creating a drive mapping, much like you might have in Windows Explorer, but a PSDrive, thanks to the providers, is able to connect to much more than disks. Run the following command to see a list of currently connected drives:

  • get-psdrive

env2

You can change to these drives by typing the below. Windows environment variables are visible as a PS drive called Env:

  • set-location -path env:
  • Try typing dir
  • You can also type it all in one as get-child-item env: or dir env:

envvariable

The PowerShell Environment Provider

The Environment Providers are equivalent to running the “set” command in a windows CMD command shell. It provides a listing of all the environment variable defined on the system. Graphically, you can view the environment variables by going to System Properties > Advanced Tab > Click the “Environment Variables” button

shell

Use Datastore and Inventory Providers

index

The Inventory Provider

The Inventory Provider (VimInventory ) is designed to expose a raw inventory view of the inventory items from a server. It enables interactive navigation and file-style management of the VMware vSphere inventory.
By creating a PowerShell drive based on a managed object (such as a datacenter), you obtain a view of its contents and the relationships between the items. In addition, you are able to manipulate objects (move, rename or delete them) by running commands from the vSphere PowerCLI console.

When you connect to a server with Connect-VIServer, the cmdlet builds two default inventory drives: vi and vis

  • The vi inventory drive shows the inventory on the last connected server.
  • The vis drive contains the inventory all vSphere servers connected with in the current vSphere PowerCLI session.

You can use the default inventory drives or create custom drives based on the default ones

psdrive

To view the content of a default inventory drive

  • Access the vi inventory drive by typing cd vi:
  • Type dir

vi

The Datastore Provider

The Datastore Provider (VimDatastore) is designed to provide access to the contents of one or more datastores. The items in a datastore are files that co ntain configuration, virtua l disk, and the other data associated with a virtua l machine.All file operations are case-sensitive.

When you connect to a server with Connect-VIServer , the cmdlet builds two default datastore drives:

  • vmstore: The vmstore drive displays the datastores available on the last connected vSphere server.
  • vmstores:  The vmstores drive contains all datastores available on all vSphere servers connected within the current vSphere PowerCLI session. You can use the default inventory drives or create custom drives based on the default ones

To browse a default datastore drive

  • Access the vmstore drive – set-location vmstores: or type cd vmstore:
  • List the drive content:dir
  • Follow the commands down

Capture

Use Web Service Access Cmdlets

index

What are the Web Service Access Cmdlets?

The vSphere PowerCLI 4.1 list of cmdlets includes two Web Service Access cmdlets:

  • Get-View
  • Get-VIObjectByVIView

They enable access to the programming model of the vSphere SDK for .NET from PowerShell and can be used to initiate vSphere .NET objects. Each object:

  • Is a static copy of a server-side managed object and is not automatically updated when the object on the server changes.
  • Includes properties and methods that correspond to the properties and operations of the server-side managed object. For more informat ion about server-side object methods and properties, check the VMware vSphere API Reference Guide

Using the Web Service Access cmdlets for low-level VMware vSphere management requires some knowledge of both PowerShell scripting and the VMware vSphere API

The reason people seem to be using the Get-View cmdlet is the fact it is known to be faster than using other PowerCLI cmdlets for getting info (such as Get-VM, Get-VMHost, Get-Datastore, etc.) Some things can’t be done using powercli cmdlets, and they need to be executed using views and their methods. Views also  provide access to specific managers like license manager, alarm manager etc…

Example 1

These 2 commands do the same thing

  • $vm = Get-View -ViewType VirtualMachine -Filter @{“Name” = “hostname”}
  • $vm = Get-VM hostname | Get-View

web

Example 2: Filter vSphere Objects

This procedure illustrates the use of the Get-View cmdlet in combination with a filter. The filter parameter is a HashTable containing one or more pairs of filter criteria. Each of the criteria consists of a property path and a value that represents a regular expression pattern used to match the property.

The filter in this procedure gets a list of the powered on virtual machines whose guest OS names contain “Windows XP”. The Get-View cmdlet then initiates shutdown for each guest operating system in the list.

shell2

Example 3: To modify the CPU levels of a virtual machine

This example shows how to modify the CPU levels of a virtual machine using combination of the Get-View and Get-VIObjectByVIView cmdlets

shell3

Viewtype from get-view supports those views:

  • ComputeResource
  • ClusterComputeResource
  • Datacenter, Datastore
  • Network
  • DistributedVirtualPortgroup
  • DistributedVirtualSwitch
  • Folder
  • HostSystem
  • ResourcePool
  • VirtualApp
  • VirtualMachine
  • VmwareDistributedVirtualSwitch

Guide

vSphere PowerCLI Administration Guide

Useful Websites

http://franckrichard.blogspot.co.uk/2011/06/optimize-your-vmware-powershell-part-1.html

http://vnugglets.com/2012/08/even-faster-powercli-code-with-get-view.html

Use basic and advanced Cmdlets to manage VMs and ESX Hosts

index

Some useful commands for working with PowerCLI on VMware objects

The best thing to do is to get lots of practice in with these commands

powershell

The most useful PowerShell book

This book is great for beginners and a complete introduction to PowerShell. The concepts can then be applied to PowerCLI

POWERSHELLBOOK

Useful PowerShell GUIs

Note: These will be useful for practicing Powershell with the concepts you learn being able to be applied to PowerCLI

PowerGUI

This is a free tool that is extremely useful to use PowerCLI productively and comes with a ton of pre-created scripts. That tool is PowerGUI and it includes the VMware Community PowerPack.

SAPIEN PrimalScript and PrimalForms

Two commercial tools

PowerSE and PowerWF

A free editor and a commercial workflow solution from

Idera PowerShell Plus

An editor and console environment

VMware Onyx

This tool acts as a proxy server between your vSphere Client and vCenter server. The Onyx console shows you everything you do in the vSphere Client generated as a PowerCLI script (automatically) that you can use and modify however you like

Install and Configure Update Manager PowerShell Library

index

Update Manager PowerShell Library

VMware Update Manager – PowerShell Library may be installed and used on any machine that has VMware Infrastructure Toolkit (for Windows) installed and access to a VirtualCenter server. It does not require to be installed on the same machine as the VMware Update Manager or the VirtualCenter Server.

You can install Update Manager – PowerShell Library the following ways

  • A stand-alone Windows installer
  • As a part of the installation process of the VMware Update Manager (Update Manager server or Update Manager plug-in)

Prerequisites

To install and use Update Manager – PowerShell Library 1.0 , you need to have installed the following:

  • .NET 2.0 SP1
  • Windows PowerShell 1.0
  • VI Toolkit (for Windows) 1.5 Download Here
  • Update Manager – PowerShell Library 1.0 works only with Update Manager 1.0 Update

Installing Update Manager – PowerShell Library Using the Stand-Alone
Installer

  • Install the VI Toolkit for Windows 1.5
  • Click on the exe. Click Next

tool1

  • Accept License Agreement

tool2

  • Select Destination folder and click Next

tool3

  • Create Desktop Shortcut if required

tool4

  • Click Install and say yes to the below message

tool5

  • Click Finish and Launch VMware VI Toolkit

tool6

Installing Update Manager – PowerShell Library Using Update Manager Installer

The VMware Update Manager (Server or User Interface Plugin) installer provides an option to install Update Manager – PowerShell Library if you already have VI Toolkit (for Windows) installed on the target system.
To install the VMware Update Manager – PowerShell Library as part of the VMware Update Manager (Update Manager Server or Update Manager plugin) installation

  • Launch the VMware Update Manager installer and follow the wizard instructions.
  • In the VMware Update Manager Toolkit page, select the Install VMware Update Manager Toolkit check box.
  • Proceed with the VMware Update Manager installation.

Getting Started with Update Manager – PowerShell Library

The VMware Update Manager – PowerShell Library provides a set of 13 cmdlets for downloading software updates, creating baselines, and for scanning and remediating virtual machines or hosts. These cmdlets are stored in the VMware.VUMAutomation plug-in, and are available through the VI Toolkit (for Windows) console.

  • To get started with Update Manager – PowerShell Library, launch the VI Toolkit (for Windows) console from the Windows Start menu or by clicking the VI Toolkit shortcut icon.
  • To get a list of all Update Manager – PowerShell Library cmdlets, run the Get-Command with the -PSSnapin parameter:

POWERCLI

Install and Configure vSphere PowerCLI

index

What is vSphere PowerCLI?

vSphere PowerCLI provides easy-to-use C# and PowerShell interface to VMware vSphere APIs. It ships with a number of cmdlets that you can use to perform various administration tasks on VMware vSphere components

Installation Pre-Requisites

  • .NET 2.0 SP1
  • Windows PowerShell 1.0/2.0/3.0

Supported Operating Systems
VMware vSphere PowerCLI 5.0 is supported on the 32-bit and 64-bit versions of the following Windows operating systems:

  • Windows 7
  • Windows Server 2008
  • Windows Vista
  • Windows XP Service Pack 2
  • Windows 2003 Server Service Pack 2

Supported VMware Environments

vSphere PowerCLI 5.0 is compatible with the following VMware environments:

  • VMware ESXi 5.0
  • vCenter Server 5.0
  • VMware ESX 4.1/vCenter Server 4.1
  • VMware ESXi 4.1
  • VMware ESX 4.0 Update 2/vCenter Server 4.0 Update 2
  • VMware ESX 4.0 Update 1/vCenter Server 4.0 Update 1
  • VMware ESX 4.0i Update 1
  • VMware ESX 3.5 Update 5
  • VMware ESXi 3.5 Update 5
  • VMware VirtualCenter 2.5 Update 6
  • VMware ESX 3.0.3 Update 1

Identify Cmdlet Concepts

PowerShell cmdlets use a consistent verb-noun structure, where the verb specifies the action and the noun specifies the object to operate on. PowerShell cmdlets follow consistent naming patterns, which makes it easy to figure out how to construct a command if you know the object you want to work with.
All command categories take parameters and arguments. A parameter starts with a hyphen and is used to control the behavior of the command. An argument is a data value consumed by the command.

PowerShell

 PowerCLI Components

To use these snap-ins, you must add them using the add-pssnapin cmdlet.

Example

  • add-pssnapin vmware.vimautomation.core

power

Installing

  • Download PowerCLI from the VMware website
  • Click the exe and install
  • You may get a message such as below

Power2

  • And this message – Click Continue

power3

  • Click Next

power4

  • Click Next

power5

  • Click Next

power7

  • Keep the default selection

power8

  • Click Install

power9

Configuring PowerCLI

Set the properties for Remote Signing

For security reasons, Windows PowerShell supports an execution policy feature. It determines whether scripts are allowed to run and whether they must be digitally signed. By default, the execution policy is set to Restricted, which is the most secure policy. If you want to run scripts or load configuration files, you can change the execution policy by using the Set-ExecutionPolicy cmdlet. For more information about the execution policy and script digital signing in Windows PowerShell, run Get-Help About_Signing.

  • Right click on the PowerCLI icon and selecy Run as Administrator
  • Type Set-ExecutionPolicy RemoteSigned

power10

Slow Startup

I experienced a really slow start-up from PowerCLI. It had something to do with internet access and checking the certificates. I disabled this by doing the below

  • Open the Control Panel → Go To Internet Options → Go to the Advanced tab → Go to the Security Section
  • Un-check the “Check for publisher’s certificate revocation” check-box

TIP

Certificate Errors

Certificate error can generally be ignored but if you want to make sure they don’t come up try typing the following

  • Set-PowerCLIConfiguration -invalidCertificateAction ignore -confirm:$false

power11

Guides

vSphere PowerCLI User Guide

PowerCLI cmdlet Reference

PowerShell Community

http://communities.vmware.com/community/vmtn/server/vsphere/automationtools/powercli

VMware vMA

suse-linux-logo

What is the VMware vSphere vMA?

The vSphere Management Assistant (vMA) is a SUSE Linux Enterprise Server 11‐based virtual machine that includes prepackaged software such as the vSphere command‐line interface, and the vSphere SDK for Perl.

Why use vMA?

  • vMA allows administrators to run scripts or agents that interact with ESXi hosts and vCenter Server systems without having to authenticate each time.
  • Used to remotely manage ESXi hosts
  • Central location to execute system management scripts

vMA Capabilities

  • vMA provides a flexible and authenticated platform for running scripts and programs.
  • As administrator, you can add vCenter Server systems and ESXi hosts as targets and run scripts and programs on these targets. Once you have authenticated while adding a target, you need not login again while running a vSphere CLI command or agent on any target.
  • As a developer, you can use the APIs provided with the VmaTargetLib library to programmatically connect to vMA targets by using Perl or Java.
  • vMA enables reuse of service console scripts that are currently used for ESXi administration, though minor modifications to the scripts are usually necessary.
  • vMA comes preconfigured with two user accounts, namely, vi‐admin and vi‐user.
  • As vi‐admin, you can perform administrative operations such as addition and removal of targets. You can also run vSphere CLI commands and agents with administrative privileges on the added targets.
  • As vi‐user, you can run the vSphere CLI commands and agents with read‐only privileges on the target.
  • You can make vMA join an Active Directory domain and log in as an Active Directory user. When you run commands from such a user account, the appropriate privileges given to the user on the vCenter Server system or the ESXi host would be applicable.
  • vMA can run agent code that make proprietary hardware or software components compatible with VMware ESX. These code currently run in the service console of existing ESX hosts. You can modify most of these agent code to run in vMA, by calling the vSphere API, if necessary. Developers must move any agent code that directly interfaces with hardware into a provider.

vMA Component Overview

When you install vMA, you are licensed to use the virtual machine that includes all vMA components.

  • SUSE Linux Enterprise Server 11 SP1 – vMA runs SUSE Linux Enterprise Server on the virtual machine. You can move files between the ESXi host and the vMA console by using the vifs vSphere CLI command.
  • VMware Tools – Interface to the hypervisor.
  • vSphere CLI – Commands for managing vSphere from the command line. See the vSphere Command‐Line Interface Installation and Reference Guide.
  • vSphere SDK for Perl – Client‐side Perl framework that provides a scripting interface to the vSphere API. The SDK includes utility applications and samples for many common tasks.
  • Java JRE version 1.6 – Runtime engine for Java‐based applications built with vSphere Web Services SDK.
  • vi‐fastpass ‐ Authentication component.

Requirements

  • AMD Opteron, rev E or later
  • Intel processors with EM64T support with VT enabled.
  • vSphere 5.0
  • vSphere 4.1 or later
  • vSphere 4.0 Update 2 or later
  • vCenter Application 5.0

vSphere Authentication Mechanism

vMA’s authentication interface allows users and applications to authenticate with the target servers using vi‐fastpass or Active Directory. While adding a server as a target, the Administrator can determine if the target needs to use vi‐fastpass or Active Directory authentication. For vi‐fastpass authentication, the credentials that a user has on the vCenter Server system or ESXi host are stored in a local credential store. For Active Directory authentication, the user is authenticated with an Active Directory server.

When you add an ESXi host as a fastpass target server, vi‐fastpass creates two users with obfuscated passwords on the target server and stores the password information on vMA:

  • vi‐admin with administrator privileges
  • vi‐user with read‐only privileges

The creation of vi‐admin and vi‐user does not apply for Active Directory authentication targets. When you add a system as an Active Directory target, vMA does not store any information about the credentials. To use the Active Directory authentication, the administrator must configure vMA for Active Directory.

After adding a target server, you must initialize vi‐fastpass so that you do not have to authenticate each time you run vSphere CLI commands. If you run a vSphere CLI command without initializing vi‐fastpass, you will be asked for username and password. You can initialize vi‐fastpass by using one of the following methods:

  • Run vifptarget -s esx1.testdomain.local
  • Call the Login method in a Perl or Java program
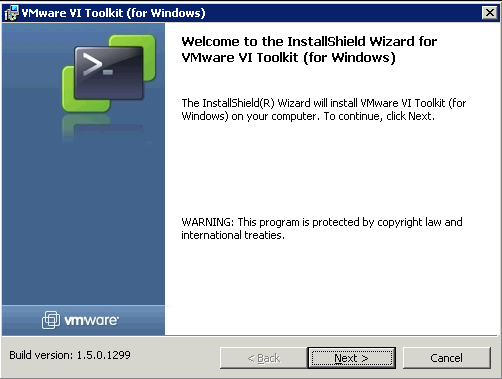
Installing vMA

Download the vMA from the following location

https://my.vmware.com/web/vmware/details?productId=229&downloadGroup=VMA50

  • Use a vSphere Client to connect to a system that is running the supported version of ESXi or vCenter Server.
  • If connected to a vCenter Server system, select the host to which you want to deploy vMA in the inventory pane.
  • Select File > Deploy OVF Template. The Deploy OVF Template wizard appears.
  • Select Deploy from a file or URL if you have already downloaded and unzipped the vMA virtual appliance package.

VMA5

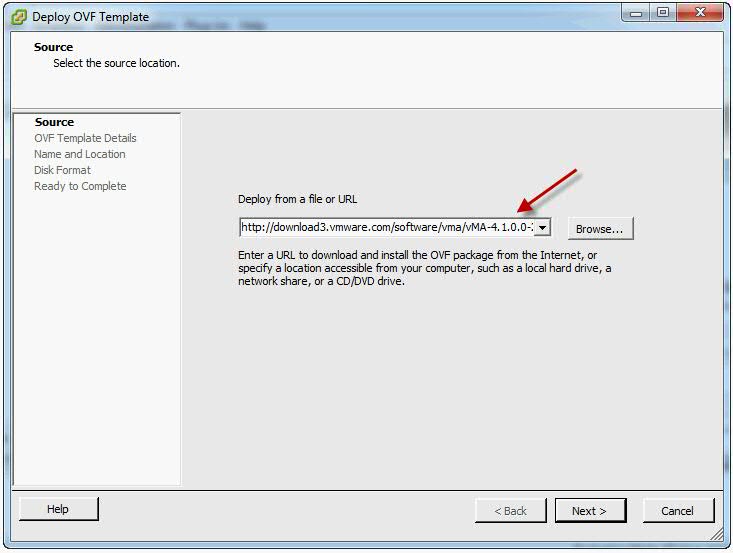
  • Click Browse, select the OVF, and click Next.

VMA6

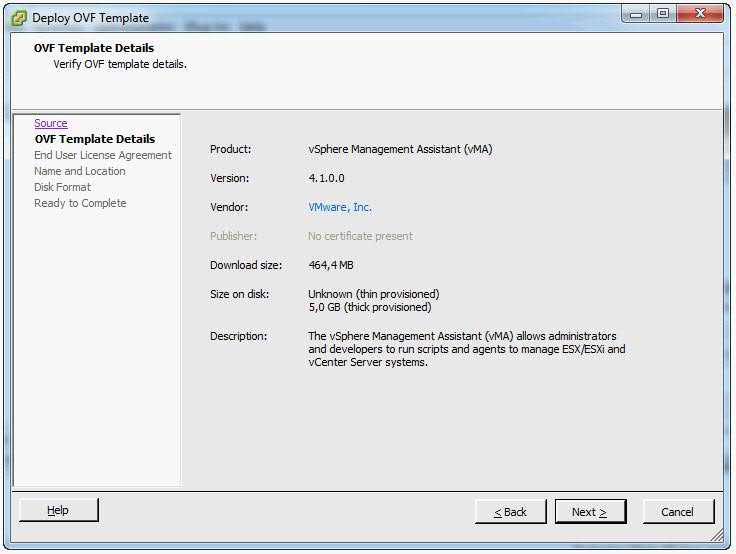
  • Click Next when the OVF template details are displayed.
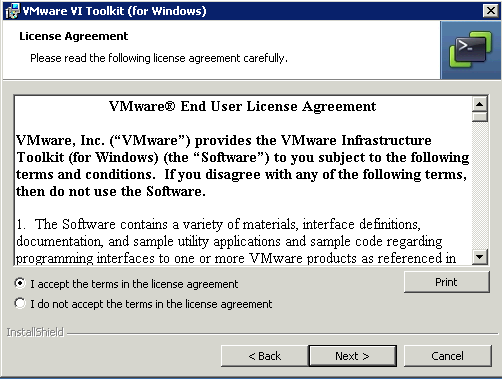
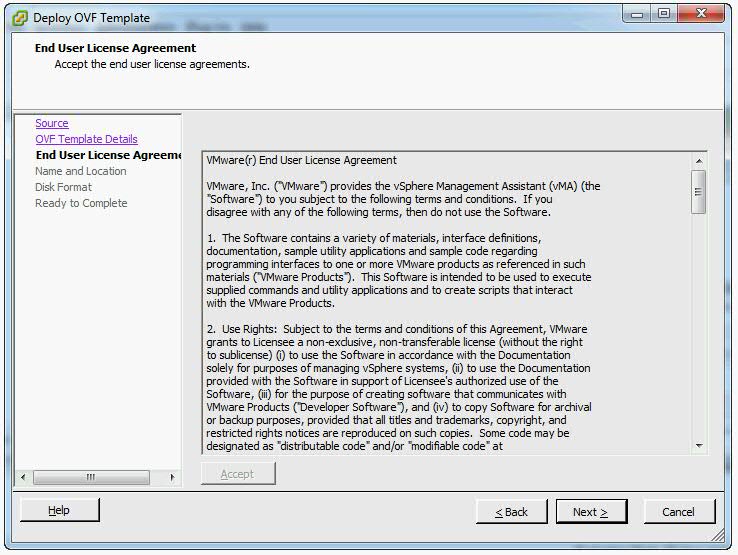
  • Accept the license agreement and click Next.

VMA7

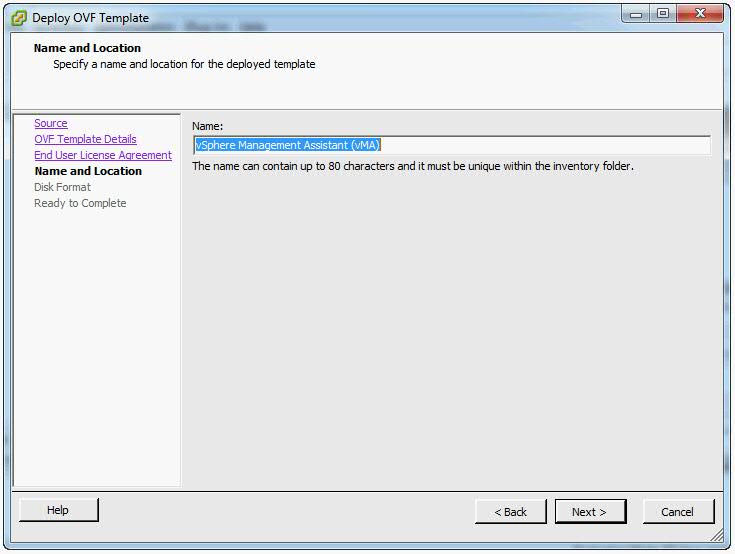
  • Specify a name for the virtual machine. You can also accept the default virtual machine name. Select an inventory location for the virtual machine when prompted. If you are connected to a vCenter Server system, you can select a folder.

VMA8

  • If connected to a vCenter Server system, select the resource pool for the virtual machine. By default, the top‐level root resource pool is selected.
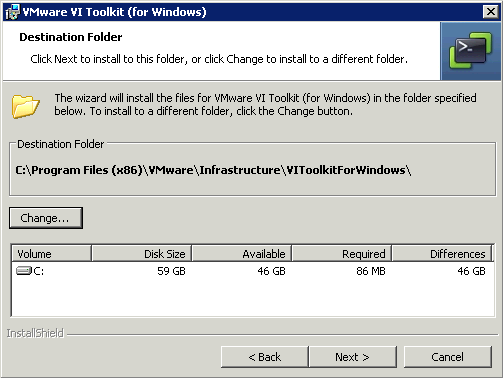
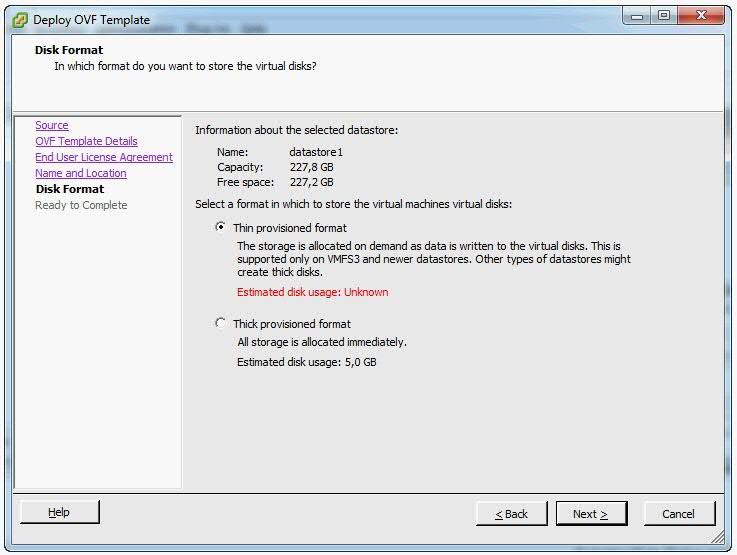
  • If prompted, select the datastore to store the virtual machine on and click Next.
  • Select the required disk format option and click Next.

VMA9

  • Finish
  • IMPORTANT. Enure that vMA is connected to the management network on which the vCenter Server system and the ESXi hosts that are intended vMA targets are located.

vma10

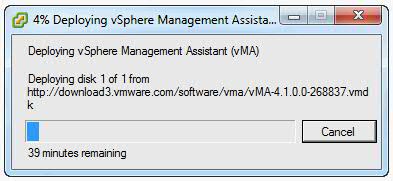
  • Review the information and click Finish.
  • The wizard deploys the vMA virtual machine to the host that you selected. The deploy process can take several minutes.
  • In the vSphere Client, right‐click the virtual machine, and click Power On.
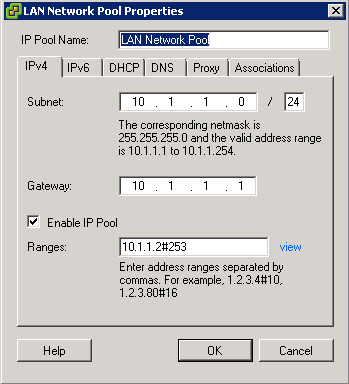
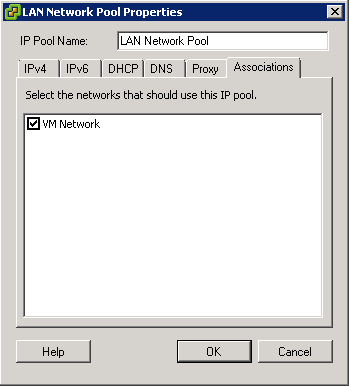
  • You may encounter a network IP Pool error message. If you do follow the link below and make sure you set up your IP pools like the example below
  • http://kb.vmware.com.Id=2007012

Capture

Capture2

  • Select the Console tab and answer the network configuration prompts
  • When prompted, specify a password for the vi‐admin user. You will first have to enter the old password which is vmware. The system will then only accept a strong password for the change
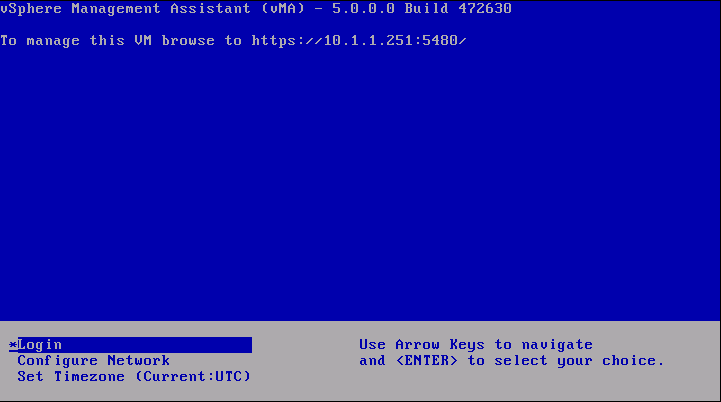
  • vMA is now configured and the vMA console appears. The console displays the URL from which you can access the Web UI.

Upgrading or Updating

Upgrading

IMPORTANT: You cannot upgrade a previous version of vMA to vMA 5.0. You must install a fresh vMA 5.0 instance.

Updating

You can download software updates including security fixes from VMware and components included in vMA, such as the SUSE Linux Enterprise Server updates and JRE.

  • Access the Web UI on Port 5480
  • Log in as vi‐admin.

vma

  • Click the Update tab and then the Status tab.
  • Open the Settings tab and then from the Update Repository section, select a repository.
  • Click Check Updates.
  • Click Install Updates.
  • You can also set an automatic download schedule for updates

Configure vMA for Active Directory Authentication

Configure vMA for Active Directory authentication so that ESXi hosts and vCenter Server systems added to Active Directory can be added to vMA without having to store the passwords in vMA’s credential store. This is a more secure way of adding targets to vMA.

  • Ensure that the DNS server configured for vMA is the same as the DNS server of the domain. You can change the DNS server by using the vMA Console or the Web UI
  • Ensure that the domain is accessible from vMA.
  • Ensure that you can ping the ESXi and vCenter server systems that you want to add to vMA and that pinging resolves the IP address to , where domainname is the domain to which vMA is to be added.
  • From the vMA console, run the following command
  •  sudo domainjoin-cli join dacmt.local administrator
  • When prompted, provide the Active Directory administratorʹs password.

vma-ad

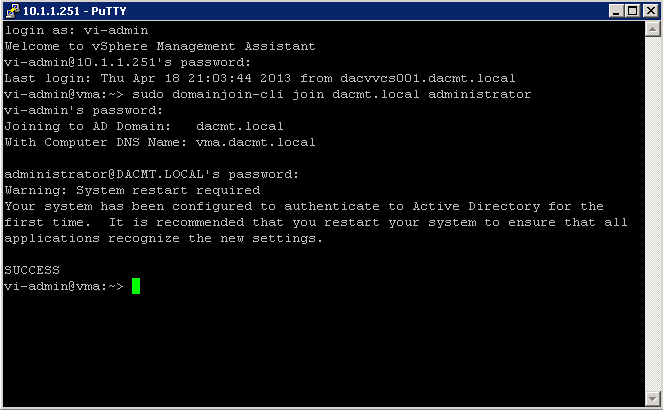
  • On successful authentication, the command adds vMA as a member of the domain. The command also adds entries in the /etc/hosts file with vmaHostname.domainname.
  • Restart vMA
  • Now, you can add an Active Directory target to vMA
  • Note: You can also access the Web UI

Add Target Servers to vMA

After you configure vMA, you can add target servers that run the supported vCenter Server or ESXi version. For vCenter Server, and ESXi system targets, you must have the name and password of a user who can connect to that system

To add a vCenter Server system as a vMA target for Active Directory Authentication

  • Log in to vMA as vi‐admin.
  • Add a server as a vMA target by running the following command

vifp addserver vc1.mycomp.com –authpolicy adauth –username ADDOMAIN\user1

Here, –authpolicy adauth indicates that the target needs to use the Active Directory authentication. If you run this command without the –username option, vMA prompts for the name of the user that can connect to the vCenter Server system. You can specify this user name as shown in the following example:

If –authpolicy is not specified in the command, then fpauth is taken as the default authentication policy.

  • Verify that the target server has been added by typing

vifp listservers –long

  • Set the target as the default for the current session:

vifptarget –set | -s

  • Verify that you can run a vSphere CLI command without authentication by running a command on one of the ESXi hosts, for example:

esxcli –server –vihost network nic list

  • The command runs without prompting for authentication information.

IMPORTANT: If the name of a target server changes, you must remove the target server by using vifp removeserver with the old name, then add the server using vifp addserver with the new name

vma2

To add a vCenter Server system as a vMA target for fastpass Authentication

  • Log in to vMA as vi‐admin
  • Add a server as a vMA target by running the following command:

vifp addserver vc2.mycomp.com –authpolicy fpauth

Here, –authpolicy fpauth indicates that the target needs to use the fastpass authentication.

  • Specify the username when prompted: MYDOMAIN\user1Specify the password for that user when prompted.
  • Review and accept the security risk information.
  • Verify that the target server has been added.

vifp listservers –long

  • Set the target as the default for the current session.

vifptarget –set | -s

  • Verify that you can run a vSphere CLI command without authentication by running a command on one of the ESXi hosts, for example:

esxcli –server –vihost network nic list

IMPORTANT: If the name of a target server changes, you must remove the target server by using vifp removeserver with the old name, then add the server using vifp addserver with the new name

To add an ESXi host as a vMA target

  • Log in to vMA as vi‐admin.
  • Run addserver to add a server as a vMA target.

vifp addserver Serverxyz

  • You are prompted for the target server’s root user password.Specify the root password for the ESXi host that you want to add.
  • vMA does not retain the root password. Instead, vMA adds vi‐admin and vi‐user to the ESXi host, and stores the obfuscated passwords that it generates for those users in the VMware credential store.

In a vSphere client connected to the target server, the Recent Tasks panel displays information about the users that vMA adds. The target server’s Users and Groups panel displays the users if you select it.

  • Verify that the target server has been added:

vifp listservers

  • Set the target as the default for the current session.

vifptarget –set | -s Serverxyz

  • Verify that you can run a vSphere CLI command without authentication by running a command, for example:

esxcli network nic list

Running vSphere CLI for the Targets

If you have added multiple target servers, by default, vMA executes commands on the first server that you added. You should specify the server explicitly when running commands.

To run vSphere CLI for the targets

  • Add servers as vMA targets.

vifp addserver vCenterserver
vifp addserver serverxyz

  • Verify that the target server has been added:

vifp listservers

  • Run vifptarget.

vifptarget -s serverxyz

  • The command initializes the specified target server. Now, this server will be taken as the default target forthe vSphere CLI or vSphere SDK for Perl scripts.
  • Run vSphere CLI or vSphere SDK for Perl scripts, by specifying the target server. For example:

esxcli –server serverxyz network nic list

Target Management Example Sequence

The following sequence of commands adds an ESXi host, lists servers, runs vifptarget to enable vi‐fastpass, runs a vSphere CLI command, and removes the ESXi host.

  • vifp addserver serverxyz.company.com
  • Type password: <password, not echoed to screen>
  • vifp listservers
  • serverxyz.company.com ESX
  • vifptarget –set serverxyz.company.com
  • esxcli storage core path list

cdrom vmhba0:1:0 (0MB has 1 paths and policy of fixed
Local 0:7:1 vmhba0:1:0 On active preferred

  • vifp removeserver server1.company.com
  • <password, not echoed to screen>

Enable the vi-user for the first time

  • Log into vMA as vi-admin
  • Set a password for the vi-user account
  • sudo passwd vi-user

Note: The vi-admin is not “root” and receives all its privileges from the configuration of sudo. Sudo is a delegation system that allows “root” to allow other users privileges above and beyond merely being a “user.”

Adding another user alongside vi-admin and vi-user

‘sudo useradd username -p password’

Use vmkfstools to manage VMFS Datastores

Useful Command Ref

http://vmetc.com/wp-content/uploads/2007/11/man-vmkfstools.txt

vmkfstools

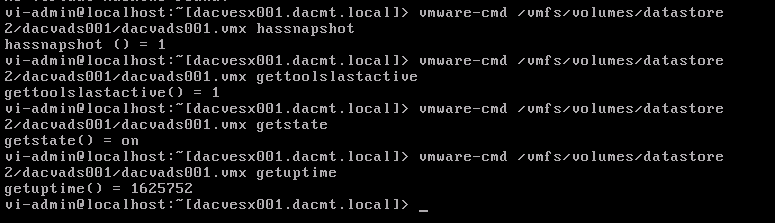
Use vmware-cmd to manage VMs

Useful Command Ref

http://www.vmware.com/support/developer/vcli/vcli41/doc/reference/vmware-cmd.html

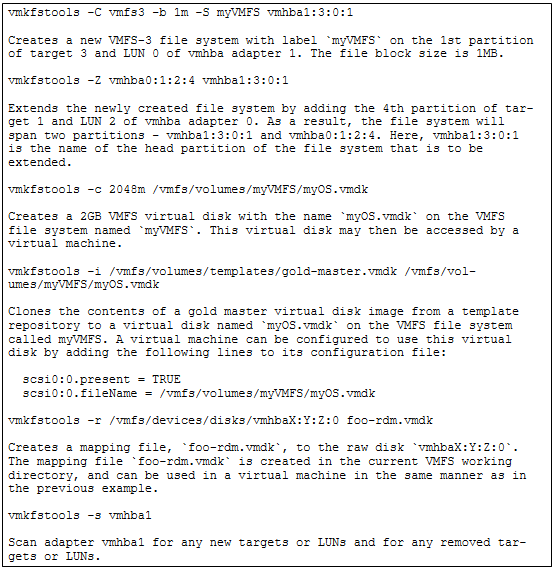
Example showing 4 different commands

vmware-cmd

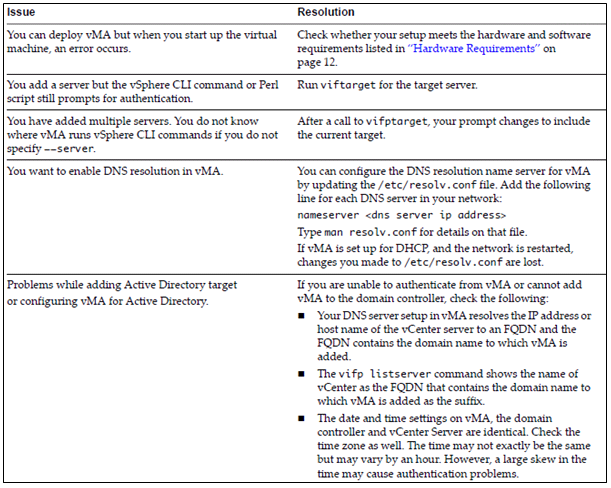
Troubleshoot common vMA errors and conditions

vma

VMware TV

http://www.youtube.com/watch?v=cIh4QT0-hdY

Changing the IP Address or Hostname of vMA

https://communities.vmware.com/people/ravinder1982/blog/2012/06/15/changing-ip-address-or-hostname-of-vma