Archive for July 2013

Optimising SQL Server for VMware vCenter

images

SQL Modifications

I am using Microsoft SQL Server 2008 R2 running on Microsoft Windows Server 2008 R2. It is always worth having some knowledge about your Database software whether it be Oracle, SQL or DB2 etc and worth knowing how to optimise this software to work correctly for VMware vCenter whilst maintaining backups and maintenance plans for further minimization of issues and/or performance problems

Memory

  • Right-click the topmost SQL Server object, usually named with the machine name or local.
  • Choose Properties.
  • Choose the Memory page.
  • Set “Maximum Server Memory (in MB)” to something useful for the server. Probably something like 25%-50% of the RAM on the host.
  • The more memory you can give it the better, as the database will cache data in RAM, but you also want to leave room in RAM for the OS (2 GB) and some file cache.

sql1a

Recovery Model

  • Right-click the relevant Database in SQl Management Studio
  • Click Properties
  • Select Options
  • Set the Recovery Model to “Simple.” Click OK.

sql2

Configure Microsoft SQL Server TCP/IP for JDBC

If the Microsoft SQL Server database has TCP/IP disabled and the dynamic ports are not set, the JDBC connection remains closed. The closed connection causes the vCenter Server statistics to malfunction. You can configure the server TCP/IP for JDBC.

This task applies to remote Microsoft SQL Server database servers. You can skip this task if your database is local.

  • Select Start > All Programs > Microsoft SQL Server > Configuration Tool > SQL Server Configuration Manager
  • Select SQL Server Network Configuration
  • Protocols for Instance name
  • Enable TCP/IP
  • Open TCP/IP Properties and set the entries as per the below screen print
  • Click on the IP Addresses tab

sql3

  • Restart the SQL Server service from SQL Server Configuration Manager > SQL Server Services.
  • Start the SQL Server Browser service from SQL Server Configuration Manager > SQL Server Services.

Maintenance of your SQL Server Databases

  • Start the Microsoft SQL Server Management Studio again and log in as the sa user. Open the Management folder.

sql4

  • Right-click Maintenance Plans. Select Maintenance Plan Wizard.

sql5

  • Click Next
  • On the Select Plan Properties page give it the name WeeklyMaintenancePlan. Select Single schedule for the entire plan or no schedule

sql6

  • Click the Change button to pick when you want it to run.

sql7

  •  Schedule the job to occur when there is little occurring on the system. E.g No backups or antivirus scanning
  • Click Next and choose your Maintenance Tasks

sql8

  • Select the order for the Maintenance Tasks to run in

sql9

  • For Define Database Integrity Check Select All databases, including indexes.
  • You have the choices below

sql11

  • Click OK and it will bring you back to the Define Database Integrity Check

sql10

  •  For Define Reorganize Index select All databases, compact large objects.

sql12

  • For Define Rebuild Index select All Databases, reorganize pages with the default amount of free space. Also check Keep index online while reindexing. Note: The Keep index online option appears to be an Enterprise version feature, and you may see failures with it enabled on other SQL Server versions.

sql13

  • For Define Update Statistics select All Databases, all existing statistics, full scan

sql14

  •  Next on the Define Backup Database (Full) Task, enter the following

sql15

  • Backup Type = Full
  • Databases = All Databases
  • Backup Set will expire after = 14 Days
  • Backup to Disk = Selected
  • Create a backup file for every Database = Selected
  • Choose a folder according to where you want to back up
  • Backup File Extension = bak
  • Set backup compression = Use the default server settings. The Compress Backup option seems like a good one but it isn’t supported on 64-bit SQL Server. It’ll let you set it, then fail on execution
  • Next Define Maintenance Cleanup Task

sql16

  •  Delete files of the following type = Backup Files
  • Search Folder and delete files based on an extension = Choose your backup folder
  • File extension = bak
  • File age = 4 weeks or your choice
  • Next you are on to the Report Options Page

sql17

  •  Check the Summaries and Click Finish

sql18

  • Go into the Maintenance Plans folder now, right click on this job, and choose Execute to see if it runs. Check the logs if it doesn’t.
  • Your location may be different but as a rough guide, the log location is c:\Program Files\Microsoft SQL Server\MSSQL10.MSSQLSERVER\MSSQL\Log

Defragmenting VirtualCenter performance data indexes on a Microsoft SQL database

For troubleshooting or maintenance purposes it may be necessary to defragment the indexes on your Microsoft SQL database server.
Fragmentation of indexes occurs when the logical order of pages is different from the physical order on the disk. In VirtualCenter fragmentation occurs most noticeably due to the statistics collection and consolidation.

When the indexes are excessively fragmented, performance of queries to the VirtualCenter database is slow.

http://kb.vmware.com/selfservice/microsites/search.do?language=en_US&cmd=displayKC&externalId=1003990

Warning: If you do not have experienced DB administrators, shutdown the VMware VirtualCenter Server service and do a backup prior to performing any kind of database maintenance. If you have experienced DB administrators you can do the tasks online

Regular Reorganize Database Task

One of the performance suggestions buried in the VMware KB is to regularly reorganize the indexes, since the historical statistics tables get unwieldy. You can do this manually or schedule a job to do it by running the Maintenance Plan Wizard. Choose only Reorganize Indexes and set the schedule to recur every six hours, every day (or however often you want.This keeps the logical fragmentation of the indices down.

Click through the pages of the wizard until you get to “Define Reorganize Index Task.” Have it only reindex VCDB, choose “Tables and views” in the Object selection, and check “Compact large objects.” Click through until you’re done.

Using VMware’s Host Agent Pre Upgrade Checker and Database Pre Upgrade Checker

tickit

About the vCenter Host Agent Pre-Upgrade Checker

The vCenter Host Agent Pre-Upgrade Checker produces a report showing known issues that might prevent a successful upgrade of the vCenter Host Agent software.

To ensure a successful upgrade to vCenter Server 5, you must diagnose and fix any potential problems on the managed ESX/ESXi hosts. You can run the vCenter Host Agent Pre-Upgrade Checker for in-place upgrades from vCenter Server 4.x to vCenter Server 5.0

checker1

vCenter Host Agent runs on all managed ESX/ESXi hosts. This software coordinates actions received from vCenter Server. When you add a host to vCenter Server, the agent is installed on the physical ESX/ESXi host. When you upgrade to vCenter Server 5, the agent residing on each ESX/ESXi host must be upgraded as well.

During a vCenter Server upgrade, the existing agent software is uninstalled and the updated agent software is installed in its place. If the upgrade fails, the updated agent software might not be installed and the host might become unreachable by VirtualCenter 2.5 Update 6 or later, vCenter Server 4.x, or by vCenter Server 5.0. To avoid this condition, you can run the vCenter Host Agent Pre-Upgrade Checker before you try to upgrade to vCenter Server 5.

The vCenter Host Agent Pre-Upgrade Checker checks to make sure that the agent software is ready to be upgraded. Some of the checks include checking to make sure that the host is reachable, the disk space is sufficient, the network is functioning, the file system is intact, and required patches are applied. Each time you run the tool, the system queries VMware.com and downloads any new updates for the tool. This action ensures that as new upgrade issues are discovered, the tool remains as useful as possible

Important

A successful vCenter Host Agent pre-upgrade check does not guarantee a successful upgrade to vCenter Server 5. An upgrade to vCenter Server involves multiple components, and the tool checks only one component: the vCenter Host Agent. Also, the tool checks only known issues. Other issues might be present that the tool does not check.

The vCenter Host Agent Pre-Upgrade Checker does not fix the reported issues. You must resolve the reported issues manually and rerun the tool to verify that the issues are resolved.

Run the vCenter Host Agent Pre-Upgrade Checker

Prerequisites

  • Verify that VirtualCenter 2.5 Update 6 or later or vCenter Server is installed on a Windows machine that is supported by vCenter Server 5.
  • Verify that the VirtualCenter 2.5 Update 6 or vCenter Server machine has a DSN configured that is compatible with vCenter Server 5.
  • Verify that the VirtualCenter 2.5 Update 6 or vCenter Server database is supported by vCenter Server 5. If necessary, upgrade the database to work with vCenter Server 5. The MSDE database was supported in experimental mode in VirtualCenter Server 2.0.x, but is not supported in vCenter Server 5. The vCenter Host Agent Pre-Upgrade Checker will not detect the database. Upgrade to a supported database before using the tool. See Supported Database Upgrades.
  • Verify that the ESX/ESXi hosts are managed by VirtualCenter 2.5 Update 6 or later or by vCenter Server.   Verify that VirtualCenter Agent or vCenter Host Agent software is running on each managed ESX/ESXi host.
  • Verify that Microsoft .NET Framework Version 2.0 is installed on the VirtualCenter 2.5 Update 6 or later system.
  • Verify that you have Internet connectivity from the VirtualCenter 2.5 Update 6 or later or vCenter Server system. This allows new updates to be applied to the tool and allows you to view the reports and the Knowledge Base (KB) articles associated with the reports.

Procedure

On the VirtualCenter 2.5 Update 6 or later or vCenter Server system you are upgrading from, download the vCenter Server 5 installation package or insert the vCenter Server 5 installation DVD. Take one of the following actions to start the Pre-Upgrade Checker.

  1. In the installation package or on the DVD, navigate to \vpx\agentupgradecheck and run the AgentUpgradeChecker.exe executable file.
  2. Start the vCenter Server installer autorun.exe and select vCenter Host Agent Pre-Upgrade Checker from the Utility list.

Next

  • Select the DSN for the VirtualCenter or vCenter Server system you are upgrading from and select the login credentials that are appropriate for that DSN.
  • If you are not sure which credential type to select, check which authentication type is configured for the DSN (Control Panel > Administrative Tools > ODBC Data Sources > System DSN).   If the DSN requires a login for the credential type in use, enter a user name and password and click Next.
  • Select an option for scanning all hosts or specific hosts.

checker2

  • Click Run Precheck.The tool takes 30-40 seconds for each host.
  • When the check is complete, click Next.
  • View the pre-upgrade reports.
  • To view the report for an individual host, click the link next to the host name.
  • To view a summary report for all hosts, click View Report.

You have a list of issues to resolve before you upgrade to vCenter Server 5

  • From the report, use the linked KB articles to research and resolve the issues for each host. After you resolve the issues, rerun the vCenter Host Agent Pre-Upgrade Checker. Repeat this process until you resolve all the reported issues, and proceed with your upgrade to vCenter Server 5.

VMware’s Database Pre Upgrade Checker

Before you upgrade vCenter Server, you can run the VMware vCenter Server Database Pre-Upgrade Checker on your current vCenter Server database to reveal problems that could prevent the upgrade or affect the performance of your database after the upgrade. You can use the Pre-Upgrade Checker for these upgrades:

  • On a VirtualCenter 2.5 Update 6 or later database before you upgrade to vCenter Server 4.x.
  • On a vCenter Server 4.0.x database before you upgrade to vCenter Server 4.1.x, 5.0.x, or 5.1.x.
  • On a vCenter Server 4.1.x database before you upgrade to vCenter Server 5.0.x or 5.1.x.
  • On a vCenter Server 5.0.x database before you upgrade to vCenter Server 5.1.x.

Note: You do not need to run the Pre-Upgrade Checker for minor update releases: for example, from version 4.0 to version 4.0 Update 3.

What the Pre-Upgrade Checker Checks

The Pre-Upgrade Checker compares your VCDB database signature profile with a known correct standard for your VCDB database version. A database signature profile is a representation of database structure and dependent objects. The Pre-Upgrade Checker creates a signature profile configuration file for your existing (pre-upgrade) database and compares it with the known correct signature profile for your VCDB database version. If the Pre-Upgrade Checker identifies a difference between your database signature profile and the known VCDB signature profile, the check fails. If your VCDB database signature profile matches the known signature profile, the check verifies that your database can be upgraded.

The Pre-Upgrade Checker also performs these checks.

  • Check for multiple schemas in the customer database.
  • Database user and role check. Checks that the given database user has the correct privilege to upgrade.
  • Table and structure check. No data checks are included in this check.
  • SQL compatibility mode check for Microsoft SQL Server. Determines whether the compatibility mode is set to an appropriate and supported level.

The Pre-Upgrade Checker outputs a single .zip file, which contains both the database signature file and the message log from running the Pre-Upgrade Checker.

Note: The Pre-Upgrade Checker works only with vCenter Server installations on Windows. The Pre-Upgrade Checker does not work with the vCenter Server Appliance

VMware Link

Follow this link for install and further information

http://kb.vmware.com/selfservice/microsites/search.do?language=en_US&cmd=displayKC&externalId=2004286

Installing SSO as part of the vSphere 5.x Upgrade process

ssoicon

SSO

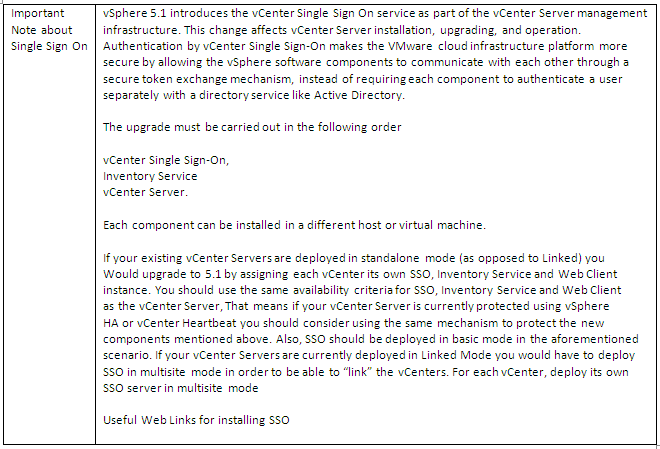
vSphere 5.1 introduces vCenter Single Sign On as part of the vCenter Server management infrastructure. This change affects vCenter Server installation, upgrading, and operation. Authentication by vCenter Single Sign On makes the VMware cloud infrastructure platform more secure by allowing the vSphere software components to communicate with each other through a secure token exchange mechanism, instead of requiring each component to authenticate a user separately with a directory service like Active Directory

How vCenter Single Sign-On Affects vCenter Server Upgrades

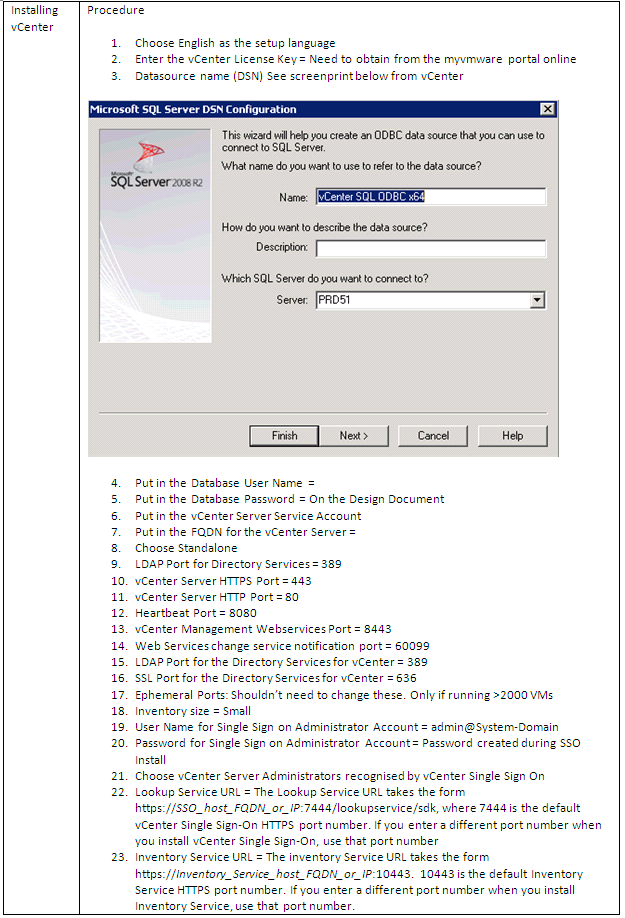
  • When you upgrade to vCenter Server 5.1, the upgrade process installs vCenter Single Sign-On first and then upgrades vCenter Server.
  • In upgrades to vCenter Server versions earlier than vCenter Server 5.1, both the local operating system users and Active Directory users that are registered with vCenter Server before the upgrade continue to work with the upgraded vCenter Server. This behavior changes in vCenter Server 5.1.
  • In vCenter Server 5.1, if vCenter Single Sign-On is running on a virtual machine or physical machine that is joined to an Active Directory domain, Single Sign-On will automatically discover the existing Active Directory domain and add it as an identity source during the Single Sign-On installation process. If Single Sign-On is not running on a virtual machine or physical machine that is in the same domain as Active Directory, you must use the vSphere Web Client to log in to vCenter Server and add the Active Directory domain to Single Sign-On.
  • If you install vCenter Single Sign-On and vCenter Server on the same physical machine or virtual machine, Single Sign-On recognizes existing local operating system users. After the upgrade, you can log in to vCenter Server with a registered local operating system user ID.
  • If you install vCenter Single Sign-On and vCenter Server on different hosts or virtual machines, the former local operating system users who managed login access to vCenter Server are not available to Single Sign-On.
  • When you install vCenter Single Sign-On in multisite mode or clustered high availability mode, all pre-upgrade permissions for local operating system users are lost. In vCenter Server 5.1, the term “local operating system users” refers to those local users in the Single Sign-On host machine instead of the vCenter Server host machine or virtual machine.
  • After the upgrade, if no super administrator remains (the administrative user or group for the root folder), you must provide a valid user or group to be used as super administrator during installation. This situation can occur due to changes in user stores from pre-5.1 to 5.1 versions of vSphere.

vCenter Single Sign-On Deployment Modes

vCenter Server provides several ways to deploy vCenter Single Sign-On to best serve your vSphere environment

You can deploy vCenter Single Sign-On in one of three modes.

  • Basic

Basic Mode installs a standalone version of vCenter Single Sign-On. Multiple vCenter Server and Inventory Service instances can point to it. If the Single Sign-On server or the virtual machine hosting the server fails, administrators cannot access vCenter Server, but ESXi hosts continue to function normally. Multiple Active Directory and OpenLDAP instances can be added as identity sources.

  • High Availability Cluster

Cluster Mode installs to two or more vCenter Single Sign-On Instances in High Availability mode. All instances use the same database and point to the same identity sources. Single Sign-On administrator users, when connected to vCenter Server through the vSphere Web Client, will see the primary Single Sign-On instance.

  • Multisite

Multisite is designed for deployments with multiple physical locations. Installing a Single Sign-On instance at each site allows fast access to local authentication-related services. Each Single Sign-On instance is connected to the local instances of the AD (LDAP) servers and has its own database with local users and groups. In each datacenter, you can install Single Sign-On in standalone or clustered mode, pointing to the identity sources in that location.

Multisite deployment is useful when a single administrator needs to administer vCenter Server instances that are deployed on geographically dispersed sites. To view all vCenter Server instances from a single vSphere Web Client, you must configure the vCenter Server instances in Linked Mode.

vCenter Single Sign On Components

vCenter Single Sign On includes these components: STS (Security Token Service), an administration server, vCenter Lookup Service, and the RSA SSPI service.

When you install vCenter Single Sign-On, the following components are deployed.

  • STS (Security Token Service)

The STS service issues Security Assertion Markup Language (SAML) tokens. These security tokens pass information about a system user between an identity provider and a web service. This service enables a user who has logged on through vCenter Single Sign-On to use multiple web-service delivered applications without authenticating to each one.

  • Administration Server

The Administration Server configures the vCenter Single Sign-On server and manages users and groups.

  • vCenter Lookup Service

The Lookup Service contains topology information about the vSphere infrastructure, enabling vSphere components to connect to each other securely.

  • RSA SSPI service

The Security Support Provider Interface ia a Microsoft Windows based API used to perform authentication against Security Support Providers such as NTLM and Kerberos.

Identity Sources for vCenter Server with vCenter Single Sign On

vCenter Server 5.1 with vCenter Single Sign On adds support for several new types of user repository. vCenter Server versions earlier than version 5.1 supported Active Directory and local operating system users as user repositories. vCenter Server 5.1 supports the following types of user repositories as identity sources.

  • Active Directory
  • OpenLDAP
  • Local operating system
  • System

Required vCenter Single Sign-On Database Users

When you use an existing database rather than the database bundled with vCenter Single Sign-On, the installation process requires database users with certain permissions.

When you install Single Sign-On installation using an existing database, the installer requires you to enter the user names and passwords of an existing database administrator and a database user.

When you install Single Sign-On with the bundled Microsoft SQL Server 2008 R2 Express database, the installer creates two users:

  • A database administrator user (for example, RSA_DBA) and password, which are used to set up the Single Sign-On database schema.
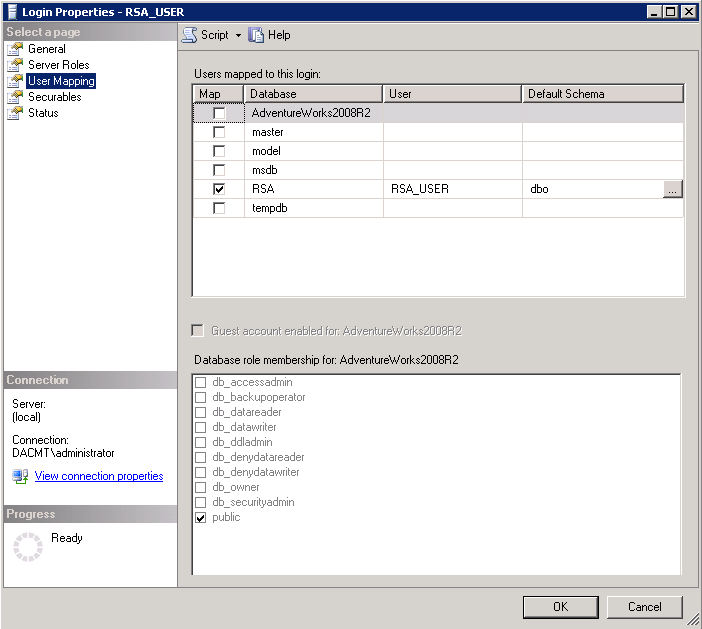
  • A database user (for example, RSA_USER) and password, which are used to perform certain steps after the installation. The installer prompts you to enter the passwords for these users.

The RSA_DB is used for creating the schema (DDL) and requires DBO Permissions. RS_USER reads and writes data (Only DML)

Prerequisite for the vCenter Single Sign On Database

  • Create a vCenter Single Sign On database, unless you plan to install the bundled database.
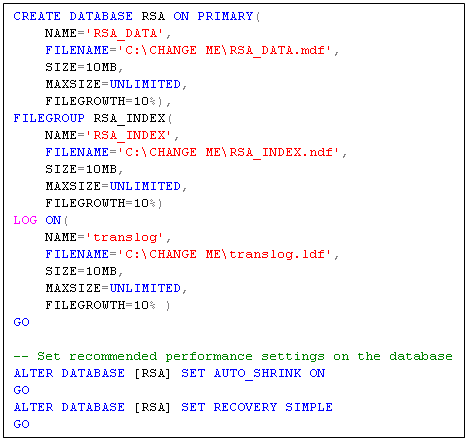
  • If you are using an existing database with your vCenter Single Sign-On installation or upgrade, make sure that the table spaces are named RSA_DATA and RSA_INDEX. Any other table space names will cause the vCenter Single Sign-On Installation to fail.
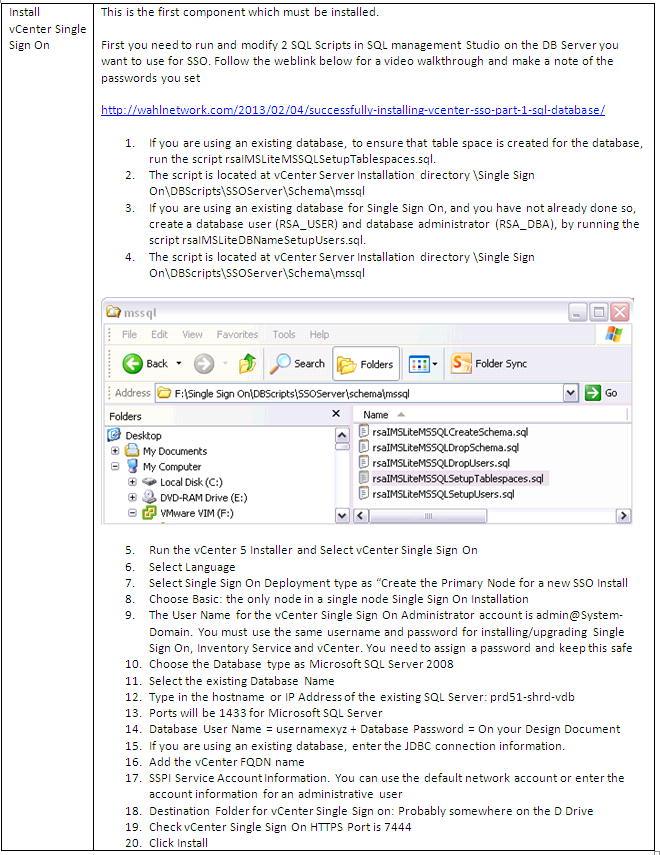
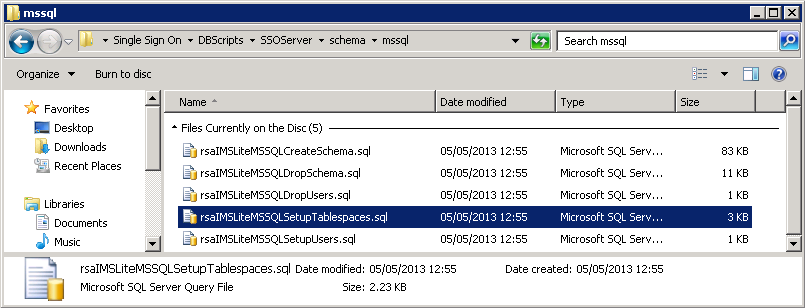
  • If you are using an existing database for Single Sign On, to ensure that table space is created for the database, run the script rsaIMSLiteDBNameSetupTablespaces.sql. The script is included in the vCenter Server installer download package, at

vCenter Server Installation directory\Single Sign On\DBScripts\SSOServer\Schema\msssql

  • You can run the script prior to the vCenter Server upgrade, or during the upgrade, when you are prompted by the Single Sign On installer. You can leave the installer to run the script, and resume the installer after you run the script.
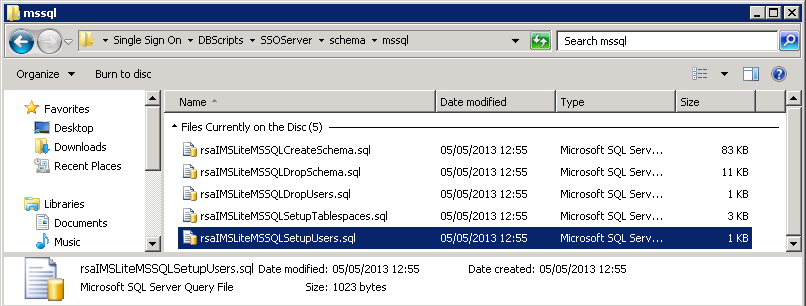
  • If you are using an existing database for Single Sign On, you must create a database user (RSA_USER) and database administrator (RSA_DBA) to use for the Single Sign On database installation and setup. To create these users, run the script rsaIMSLiteDBNameSetupUsers.sql. The script is included in the vCenter Server installer download package, at

vCenter Server Installation directory\Single Sign On\DBScripts\SSOServer\Schema\msssql

Procedure

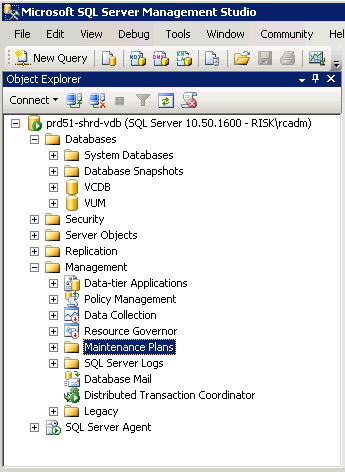
  • Log into your SQL Management Server
  • Open SQL Management Studio
  • Double click on the first script

SQLTABLE

  • This will automatically open in SQL Management Studio
  • Read the notes at the top of the script
  • There are several places you need to change paths according to your environment – see below where it says CHANGE ME

sqlscript

  • Next Click Execute on the SQL Management Studio Toolbar
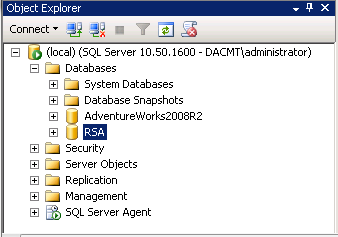
  • It should say Command(s) completed successfully and you should see the newly created RSA Database

rsa

  • Next double click on the second script

SQLUSER

  • This will open in SQL Management Studio and you will need to modify the passwords as you require as per below
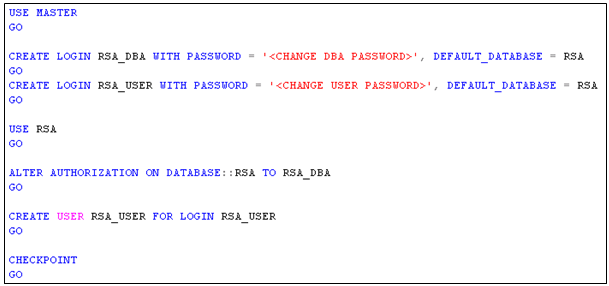
sqluserscript

  •  Click Execute
  • It should say Command(s) completed successfully
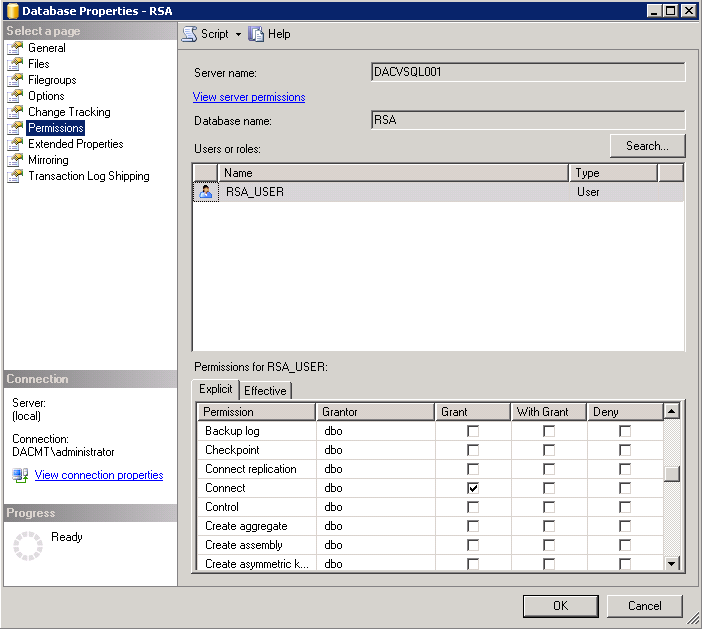
  • You should now see the following permissions set on the RSA Database Properties

dbperms

  • And check the Default Security in SQL Management Studio to make sure your users have been created

sqlperms2

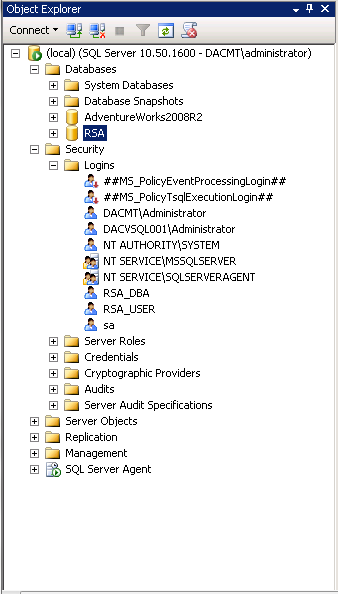
  • Check the Properties of the RSA_USER account
  • Make sure it is mapped to the RSA Database

rsa1

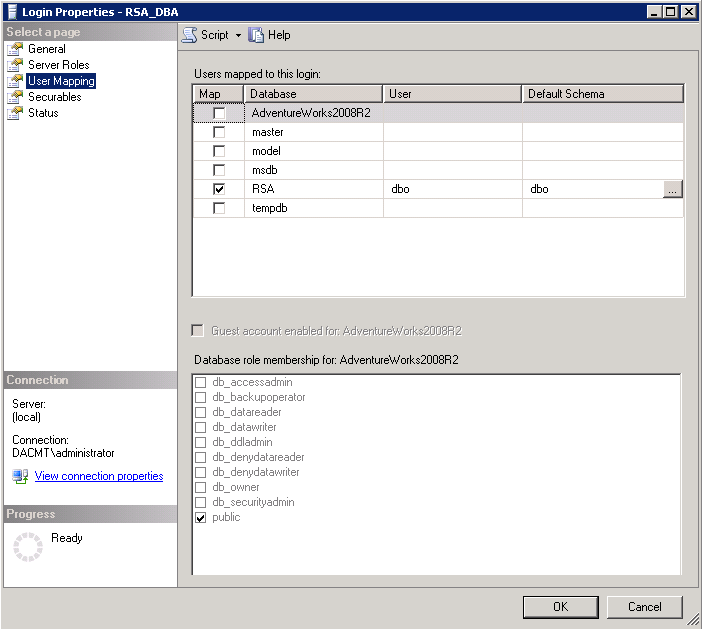
  • Check the Properties of the RSA_DBA account
  • Make sure it is mapped to the RSA Database

rsa2

Procedure following the vCenter SQL Scripts

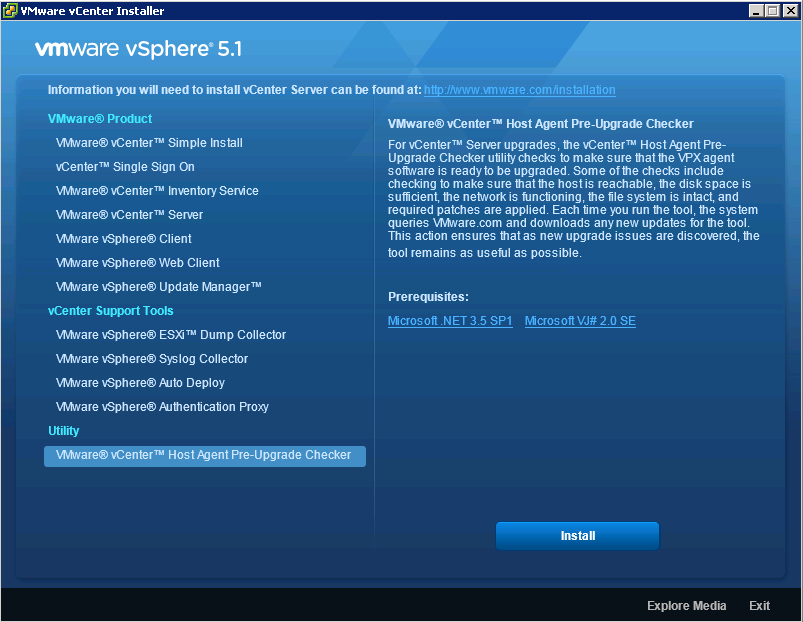
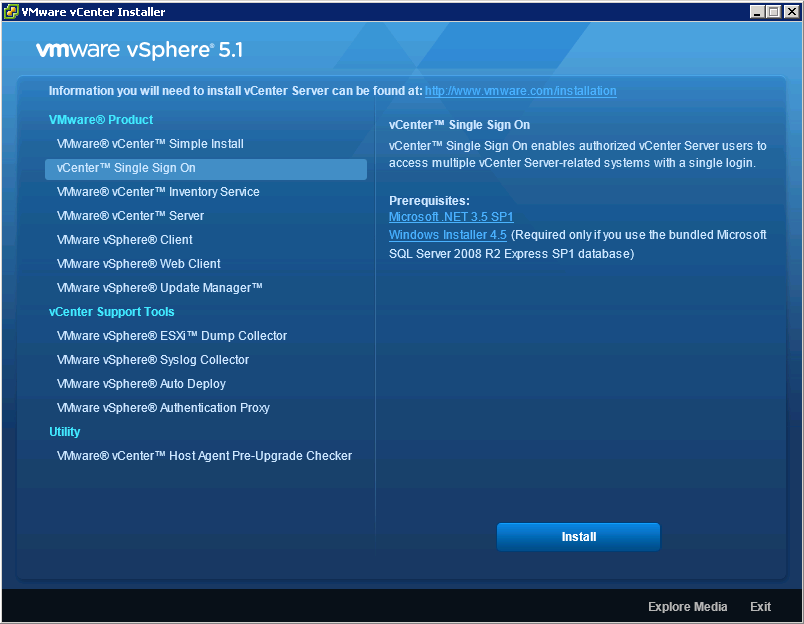
  • In the software installer directory, double-click the autorun.exe file to start the installer.
  • Select vCenter™Single Sign On and click Install.

sso_1

  • Follow the prompts in the installation wizard to choose the installer language

sso_2

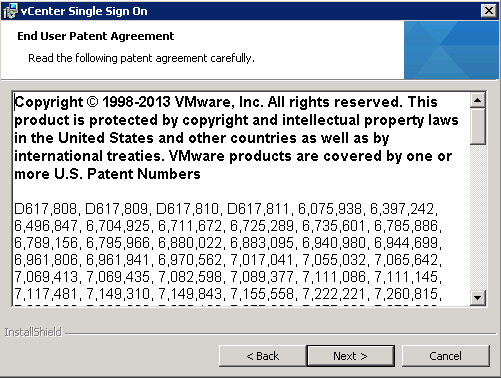
  • Agree to the end user patent and license agreements.

sso_3

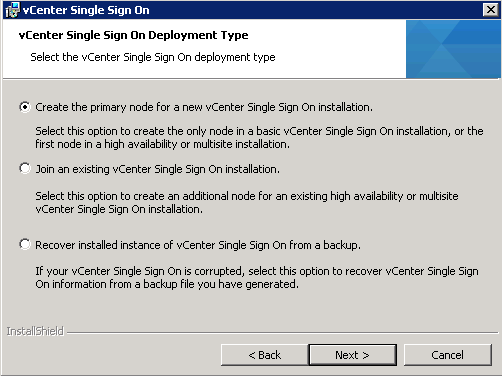
  • Select Create the primary node for a new Single Sign On installation.

sso_4

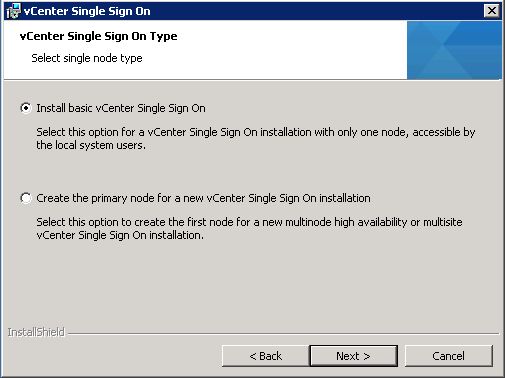
  • Select Install basic vCenter Single Sign On. Note: Even if you don’t want multiple instances now, you may want them in the future therefore you can keep your options open by selecting the second option – “Create the primary node for a new vCenter Single Sign-On installation

sso_5

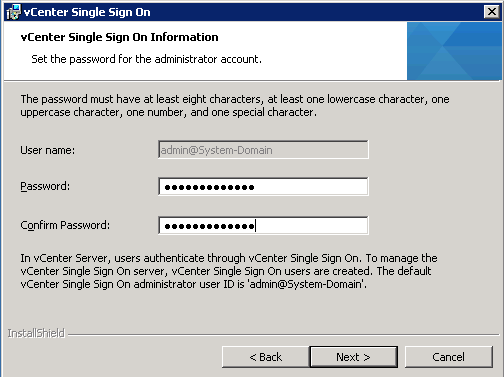
  • Set the password for the vCenter Single Sign-On administrator account.
    The password must have at least eight characters, at least one lowercase character, one uppercase character, one number, and one special character.

sso_6

  • Select the database type for vCenter Single Sign-On. I am going to use “Use an existing supported database”

sso_7

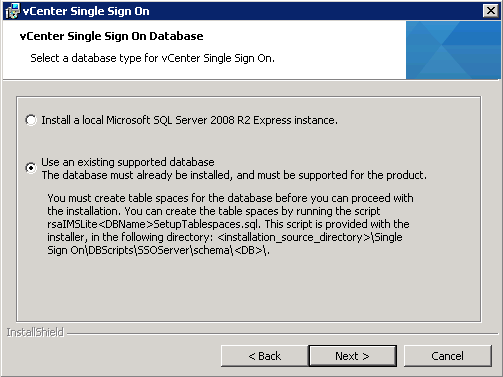
  • Enter in the details of your previously created SSO DB and relevant users. If you are using an existing database, enter the JDBC connection information.

sso_14

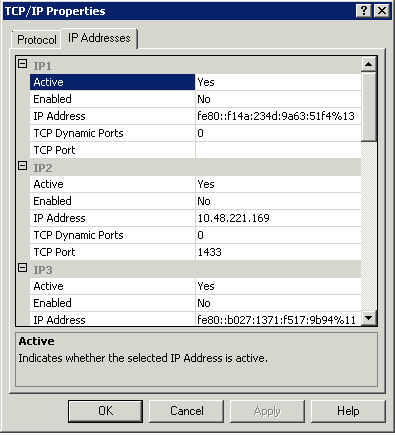
  • If you get the following error, do the following

sso_9

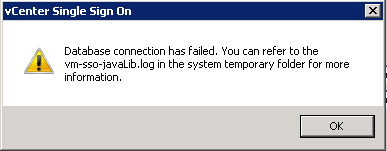
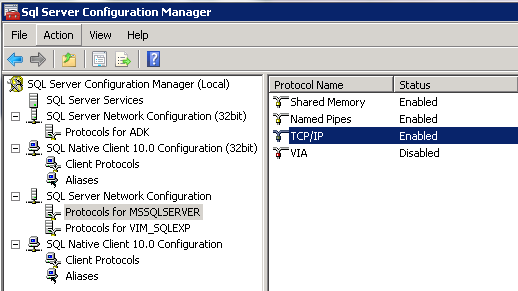
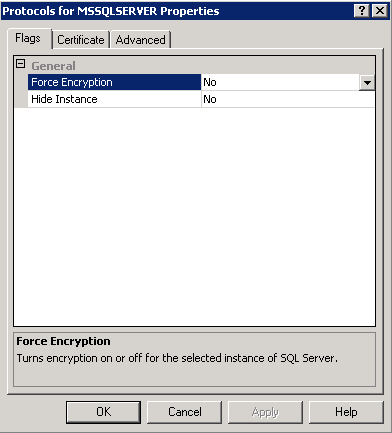
  • Go to SQL Server Configuration Manager > SQL Server Network Configuration > Protocols for MSSQLSERVER. Double click on TCP/IP and make sure under IPAll, you have the correct SQL Port number.

sso_11

  • and you will get this box

sso_12

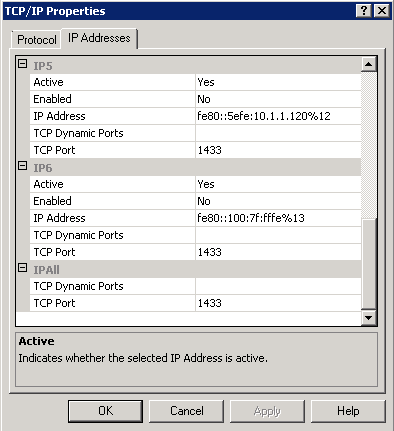
  • Note: I had another SQL Instance using 1433 which I had to change to another port number then change my MSSQLSERVER Instance TCP Port to 1433. Note: Restart the relevant services following these changes
  • Also check the following setting. Go to SQL Server Configuration Manager > SQL Server Network Configuration > Right click on Protocols for MSSQLSERVER. Force encryption should be No at the moment

sso_10

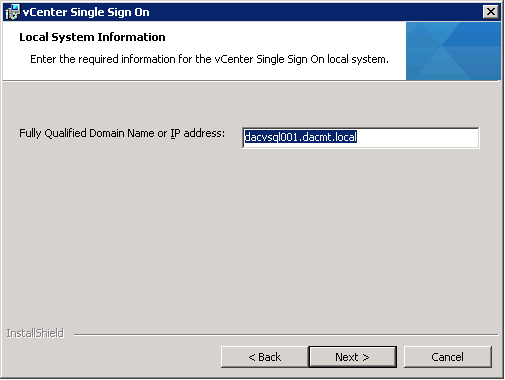
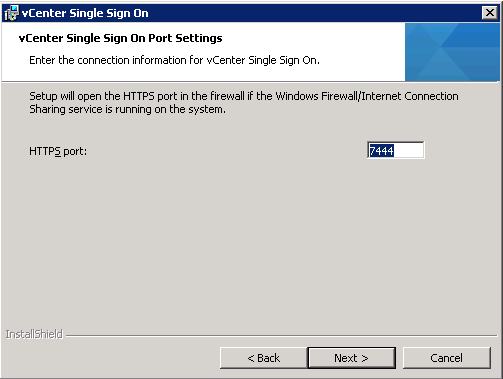
  • Enter the FQDN or IP address for the vCenter Single Sign-On host machine.

sso_13

  • (Optional) Enter the SSPI service account information.

sso15

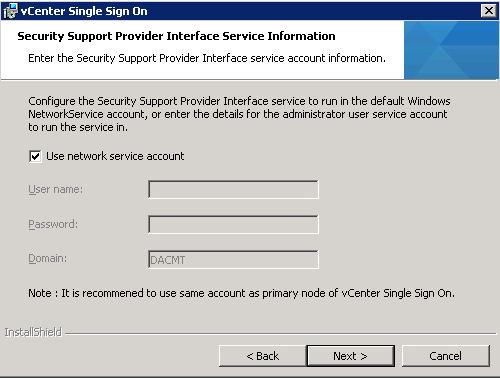
  • You can use the default Windows NetworkService account, or enter the account information for a administrator user. This step applies only if you logged in as a domain account user to install Single Sign-On.
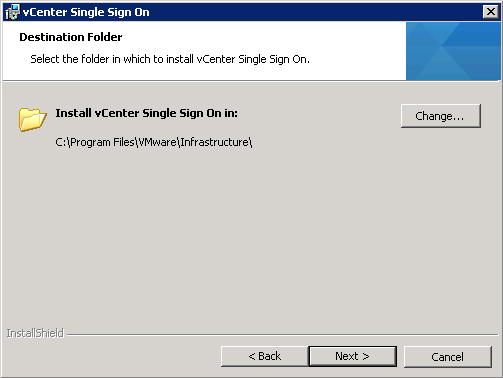
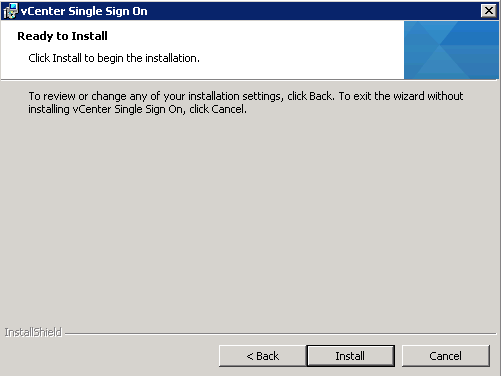
  • Choose a destination folder for installation

sso16

  • Choose your SSL Port

sso_17

  • Ready to Install > Click Install

sso_18

Useful Video Walkthrough courtesy of Christopher Wahl

http://wahlnetwork.com/2013/02/04/successfully-installing-vcenter-sso-part-1-sql-database/

VMware SSO FAQ

http://kb.vmware.com/selfservice/microsites/search.do?language=en_US&cmd=displayKC&externalId=2034918

Cloning Virtual Machines in VMware

double

Understanding Clones

A clone is a copy of an existing virtual machine. The existing virtual machine is called the parent of the clone. When the cloning operation is complete, the clone is a separate virtual machine — though it may share virtual disks with the parent virtual machine.

  • Changes made to a clone do not affect the parent virtual machine. Changes made to the parent virtual machine do not appear in a clone.
  • A clone’s MAC address and UUID are different from those of the parent virtual machine.

If you want to save the current state of the virtual machine, so you can revert to that state in case you make a mistake, take a snapshot. If you want to make a copy of a virtual machine for separate use, create a clone.

Full and Linked Clones

There are two types of clone:

  • A full clone is an independent copy of a virtual machine that shares nothing with the parent virtual machine after the cloning operation. Ongoing operation of a full clone is entirely separate from the parent virtual machine.
  • A linked clone is a copy of a virtual machine that shares virtual disks with the parent virtual machine in an ongoing manner. This conserves disk space, and allows multiple virtual machines to use the same software installation.

Full Clones

A full clone is an independent virtual machine, with no need to access or maintain an ongoing connection to the parent virtual machine. Because a full clone does not share virtual disks with the parent virtual machine, full clones generally perform better than linked clones. However, full clones take longer to create than linked clones. Creating a full clone can take several minutes if the files involved are large.

Linked Clones

A linked clone is made from a snapshot of the parent. All files available on the parent at the moment of the snapshot continue to remain available to the linked clone. Ongoing changes to the virtual disk of the parent do not affect the linked clone, and changes to the disk of the linked clone do not affect the parent.

A linked clone must access the parent. Without access to the parent, a linked clone is disabled.

Linked clones are created swiftly, so you can easily create a unique virtual machine for each task you have. You can also easily share a virtual machine with other users by storing the virtual machine on your local network, where other users can quickly make a linked clone. This facilitates collaboration: for example, a support team can reproduce a bug in a virtual machine, and an engineer can quickly make a linked clone of that virtual machine to work on the bug

The Clone Virtual Machine Wizard

The Clone Virtual Machine Wizard guides through the process of making a clone. You do not need to locate and manually copy the parent virtual machine files. The Clone Virtual Machine Wizard automatically creates a new MAC address and other unique identifiers for the clone.

Warning: Before you power on the virtual machine clone, understand the following

  • Virtual machines clones are issued a new Universally Unique Identifier (UUID). This affect user scripts and API calls to the UUID of the virtual machine.
  • Virtual machines clones are issued new MAC addresses for attached virtual network adapters. This may have an effect on software or licensing that is sensitive to MAC address changes.
  • Guest operating systems for virtual machine clones may share computer names and static IP addresses with their original counterparts. Be sure to account for this prior to power-on

Procedure

Right click on the VM you want to clone

  • Select Clone

Clone1

  •  Put in a name and choose your Inventory location

Clone2

  •  Choose the Host

Clone3

  • Choose your Virtual Disk Format
  • Choose your Datastore

Clone4

  • Click Next
  • Choose to Power on the Machine after creation
  • Choose one of the 2 Customisation options (I have an existing specification)
  • It is not recommended to choose Do Not Customise

Clone5

  • Click Next
  • Review and edit virtual hardware if you need to
  • Finish

clone6

Guest Operating System Customization Requirements in VMware

untitled

What is Guest Operating System Customization

Customizing guest operating systems can help prevent conflicts that can result if virtual machines with identical settings are deployed from a template or cloning, such as conflicts due to duplicate computer names and IP Addresses

You can specify the customization settings by choosing to launch the Guest Customization wizard during the cloning or deployment process. Alternatively, you can create customization specifications, which are customization settings stored in the vCenter Server database. During the cloning or deployment process, you can select a customization specification to apply to the new virtual machine.

Quick Note on Sysprep

The guest operating system customization feature in vCenter Server uses the functions of the Sysprep tool.

Microsoft has a different version of Sysprep for each release and service pack of Windows. You must use the version of Sysprep specific to the operating system you are deploying.The differences are not immediately visible in the packaging and documentation of the service packs

Guest16

You will find the various versions of sysprep in the following directories on vCenter

sysprep

Guest Operating System Customization Requirements

Guest operating system customization is supported only if a number of requirements are met.

  • The most current version of VMware Tools must be installed on the virtual machine or template to customize the guest operating system during cloning or deployment.
  • The guest operating system being customized must be installed on a disk attached as SCSI node 0:0 in the virtual machine configuration.
  • Virtual machines that reside on hosts running ESX Server 3.0.x or earlier have additional disk requirements:

Windows Requirements

  • On a Windows guest operating system, the active partition (the partition containing boot.ini) and the system partition (the partition containing the system directory, for example, \WINNT or WINDOWS) must be on the same virtual disk. The active partition and the system partition do not need to be the same partition
  • Microsoft Sysprep tools must be installed on the vCenter Server system. See Installing the Microsoft Sysprep Tools.
  • Microsoft Sysprep tools must be installed on the vCenter Server system. See Installing the Microsoft Sysprep Tools.
  • The ESX/ESXi host that the virtual machine is running on must be 3.5 or later
  • Guest operating system customization is supported on multiple Windows operating systems. To verify customization support for Windows operating systems and compatible ESX/ESXi hosts, see VMware vSphere Compatibility Matrix

Linux Requirements

  • On a Linux guest operating system, the virtual disk containing the system partition (the partition containing the /etc directory) must reside on the SCSI 0:0 node.)
  • Perl must be installed in the Linux guest operating system.
  • The clone or template must have a root volume formatted with an ext2, ext3, or ReiserFS file system

Procedure

  • Log into vCenter
  • Click Home > Customization Specification Manager
  • Click New
  • Choose Windows or Linux for the Target Virtual Machine O/S
  • Choose a name for your Customization Specification Information

Guest1

  • Click Next
  • Type in Name and Organisation

Guest2

  • I would use Choose “Use the Virtual Machine Name”

Guest3

  • Click Next
  • Put in your Volume Licensing Key
  • Include Server Licensing Information if you are customising a server guest operating system
  • Select Per Seat or Per Server

Guest4

  • Click Next
  • Put in a password for the Admin account
  • Select whether you want to login automatically (Choice is up to you)

Guest5

  • Click Next
  • Choose Timezone

Guest6

  • Click Next
  • Specify any Run once commands

Guest7

  • Click Next and this takes you into Network customisation
  • You can choose Typical or Custom.

Guest8

  • Typical will just assign a DHCP Address which you can change afterwards
  • With Custom, you get the following choices

Guest9

  • If you click New, it will let you add a new adapter say if you wanted a second nic for backup

Guest10

  • If you click the radio button to the side, you get a whole set of options as per below

Guest11

  • Click Next
  • Choose whether you want to join your domain automatically

Guest12

  • Click Next
  • Generate a new SID

Guest13

  • Click Next
  • Review your settings

Guest14

  • Finish

Upgrading vSphere 4.1 to vSphere 5.1

core4

Upgrading is a multistage process in which procedures must be performed in a particular order. Follow the process outlined in this high-level overview to ensure a smooth upgrade with a minimum of system downtime. Make sure that you understand the entire upgrade process before you attempt to upgrade. If you do not follow the safeguards, you might lose data and lose access to your servers. Without planning, you might incur more downtime than is necessary

  • vCenter Single Sign-On
  • Inventory Service
  • vCenter Server

Datacentres continue to evolve. This evolution involves increasingly larger and more complex datacentres. Due to technologies such as cloud computing and distributed applications, administrators must have scalable tools and services to manage these environments in the most efficient manner possible. The longer you do not upgrade the less new beneficial features you will be able to take advantage of to provide an improved and scalable platform

Example Environment

This is an upgrade document targeted at

  • 1 x MS Windows 2008 R2 VMware vCenter VM
  • 1 x MS SQL Server 2008 R2 VM running the VMware vCenter DB + Update Manager DB
  • 25 x VMware ESXi 4.1 U3 Hosts
  • No external Certificates

Planning Tasks

The upgrade to vCenter Server 5.1 includes a database schema upgrade and an upgrade of the vCenter Server Software.

vSphere 5.1 introduces vCenter Single Sign On service as part of the vCenter Server management infrastructure. This change affects vCenter Server installation, upgrading, and operation

You need to check every single point of the VMware Upgrade Guide and make sure you know exactly what you are doing and how to recover from any potential issues

Always use the “Run as Administrator” option. It can cause you to get random error messages because your account even if it is administrator can be denied rights to certain actions

  • Check the Interoperability Matrix

Step0

  • Check Host BIOS Version and Upgrade if necessary

Step0b

  • Make sure hosts reach the minimum hardware configuration

Step2

  • Make sure vCenter meets the minimum hardware requirements

Step3

  •  Make sure Single Sign On meets the minimum hardware requirements

Step4

  • Make sure Inventory Service meets the minimum requirements (if installed separately)

Step5

  • Make sure Inventory Service meets the minimum requirements (if installed on the same server as vCenter)

Step6

  • Make sure the server you install vSphere client on is supported

Step7

  • Make sure the server and web browser is supported for vSphere Web Client

Step8

  • Check JVM Settings (Can be set during vCenter Install)

Step9

  • Check the Database Authentication Mode

Step10

  • Make sure TCP/IP is enabled in SQL Server Configuration Manager

Step21

  • Always check with your vendor. E.g Dell, HP, IBM to see if they offer a customised ISO for VMware vSphere EXi5.X. These can provide extra features and functionality you may not get from the vanilla version via VMware

Step11

  • Make sure Active Directory, DNS and time synchronisation is working correctly

Step37

  • Upgrade your current licensing via your portal

Step12

  • Backup your vCenter and vCenter Update Manager Database via Backup Software and within SQL Management Studio

Step13

  • Backup SSL Certs to a separate location

Step14

  • Run the vCenter Host Agent Pre-Upgrade Checker and resolve any issues

Step15

  • Snapshot the vCenter DB Server and the vCenter VM (If Virtual Servers)

Step16

  • Stop the VMware Virtual Center Service

Step17

  • Important Notes about SSO

Step23

  • Install vCenter Single Sign On

Step38

  • Confirm Active Directory Domains

Step36

  • Install the vCenter Web Client

Step27

  • Upgrade the Inventory Service

Step22

  • Important Notes about the vCenter Install

Step25

  • Install vCenter

Step24

  • Upgrade the vSphere Client to v5.1

Step26

  •  Upgrade Update Manager

Step29

  • Upgrade the Update Manager Client Plugin

Step30

  • Upgrade the Hosts

Step31

  • Upgrade VMware Tools

Step32

  • Upgrade VM Hardware Version

Step33

  • Upgrade Datastores from VMFS3 to VMFS5

Step34

  • Upgrade Virtual Distributed Switches to v5.1

Step35