Sharing Configuration
Once you have a volume, create at least one share so that the storage is accessible by the other computers in your network. The type of share you create depends upon the operating system(s) running in your network, your security requirements, and expectations for network transfer speeds. The following types of shares and services are available
- Apple (AFP) Shares
The Apple File Protocol (AFP) type of share is the best choice if all of your computers run Mac OS X.
- Unix (NFS) Shares
The NFS type of share is accessible by MAC OS X, Linux, BSD, and the professional/enterprise versions (not the home editions) of Windows. It is a good choice if there are many different operating systems in your network. Depending upon the operating system, it may require the installation or configuration of client software on the desktop.
NFS typically is generally more accessible because it’s a file level protocol and sits higher up on the network stack. This makes it very appealing when working with VMware virtual disks aka vmdk’s simply because they also exist at the same layer. NFS is ubiquitous across NAS vendors and can be provisioned by multiple agnostic implementation endpoints. An NFS protocol hosts the capability to be virtualized and encapsulated within any Hypervisor instance either clustered or standalone. The network file locking and share semantics of NFS grant it a multitude of configurable elements which can serve a wide range of application
- Windows (CIFS) Shares
This type of share is accessible by Windows, MAC OS X, Linux and BSD Computers but it is slower than an NFS Share due to the single threaded design of Samba. It provides more configuration options than NFS and is a good choice on a network containing only Windows systems. However, it is a poor choice if the CPU on the FreeNAS™ system is limited; if your CPU is maxed out, you need to upgrade the CPU or consider another type of share.
http://www.freenas.org/images/resources/freenas8.2/freenas8.2_guide.pdf
iSCSI
iSCSI is a protocol standard for the consolidation of storage data. iSCSI allows FreeNAS™ to act like a storage area network (SAN) over an existing Ethernet network. Specifically, it exports disk devices over an Ethernet network that iSCSI clients (called initiators) can attach to and mount. Traditional SANs operate over fibre channel networks which require a fibre channel infrastructure such as fibre channel HBAs, fibre channel switches, and discrete cabling. iSCSI can be used over an existing Ethernet network, although dedicated networks can be built for iSCSI traffic in an effort to boost performance. iSCSI also provides an advantage in an environment that uses Windows shell programs; these programs tend to filter “Network Location” but iSCSI mounts are not filtered. FreeNAS™ uses istgt to provide iSCSI.
Before configuring the iSCSI service, you should be familiar with the following iSCSI terminology:
CHAP: an authentication method which uses a shared secret and three-way authentication to determine if a system is authorized to access the storage device and to periodically confirm that the session has not been hijacked by another system. In iSCSI, the initiator (client) performs the CHAP authentication.
Mutual CHAP: a superset of CHAP in that both ends of the communication authenticate to each other. Initiator: a client which has authorized access to the storage data on the FreeNAS™ system. The client requires initiator software to connect to the iSCSI share.
Target: a storage resource on the FreeNAS™ system.
Extent: the storage unit to be shared. It can either be a file or a device.
LUN: stands for logical unit number and represents a logical SCSI device. An initiator negotiates with a target to establish connectivity to a LUN; the result is an iSCSI connection that emulates a connection to a SCSI hard disk. Initiators treat iSCSI LUNs the same way as they would a raw SCSI or IDE hard drive; rather than mounting remote directories, initiators format and directly manage filesystems on iSCSI LUNs
High Level Overview of iSCSI in FreeNas
- Decide if you will use authentication, and if so, whether it will be CHAP or mutual CHAP. If using authentication, create an authorized access.
- Create either a device extent or a file extent to be used as storage.
- Determine which hosts are allowed to connect using iSCSI and create an initiator.
- Create at least one portal.
- Review the target global configuration parameters.
- Create a target.
- Associate a target with an extent.
- Start the iSCSI service in Services -> Control Services
Instructions
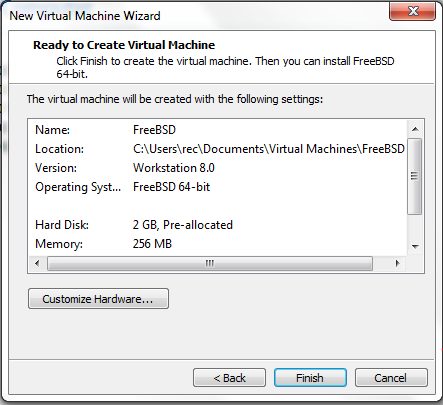
- Log into your FreeNas Box – Instructions detailed in previous post
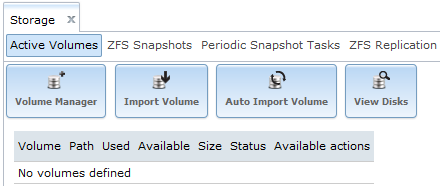
- Make sure you have added Disks to the FreeNas Machine and created a volume right up to the point of the previous post or follow the quick steps below
- Navigate to Storage > Volume Manager
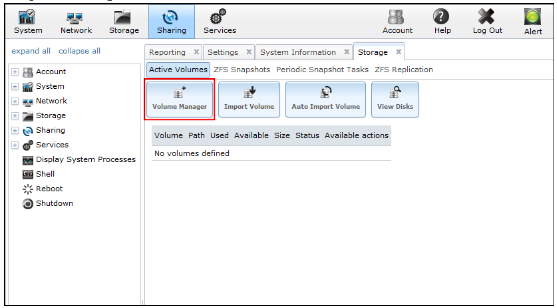
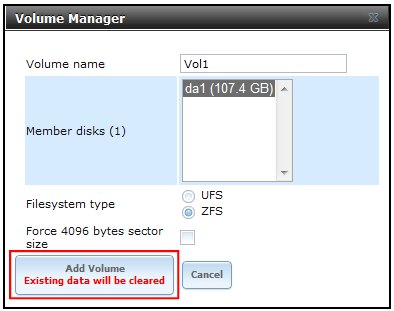
- Enter a Volume Name, select disk(s), select Filesystem Type ZFS then click Add Volume. It defaults to Vol1 but I names mine VMware as I want to label it clearly for use as a VMware iSCSI volume
- Click Storage, Volume Manager and click in the existing volume you have below

- Select the fifth button from the left which is to Create a ZFS Volume
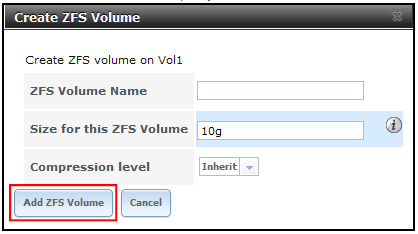
- Click Add ZFS Volume
- Once created it will then be listed below as per below screenprint

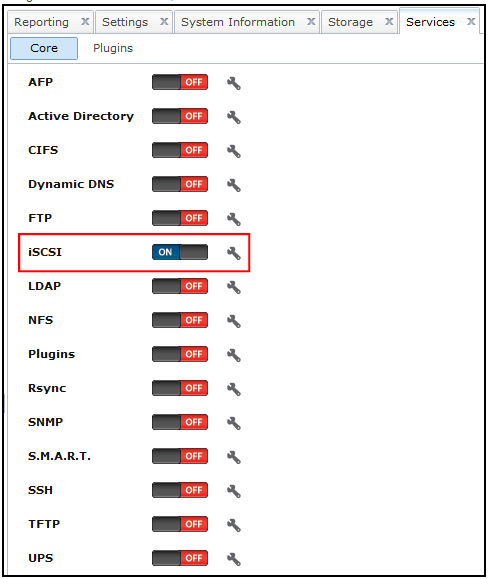
- Click the Services box at the top of FreeNas and turn on the iSCSI service
- If you will be using CHAP or mutual CHAP to provide authentication, you must create an authorized access in Services – ISCSI – Authorized Accesses – Add Authorized Access

- Explanation of boxes shown below

- Go to iSCSI > Initiators – Add Initators – Keep ALL in the boxes or type in the servers separated by a comma which you want to be able to connect

- Next go to iSCSI > Portal and Click Add Portal. You can keep this on 0.0.0.0.This will cause it to listen on all IP Addresses for the initiator or select your IP Address for the FreeNas unit. I have selected my FreeNas IP Address

- Go to Target Global Configuration
- In Discovery Auth Method, choose CHAP
- In Discovery Auth Group, choose 1
- Leave the other settings unless you know what you’re doing

- Next go to iSCSI > Target – Add Target
- Enter a Target Name and Alias. Select the Portal and Initiator Group IDs, and Authentication Group number and click Save at the bottom

- Next go to iSCSI > Device Extents. Device extents allows an unformatted disk, a zvol, or an existing HAST device to be exported via iSCSi
There are 2 iSCSI extent types called File Extents or Disk Extents. File Extents which allows you to export a portion of a volume by creating a file and using it as a virtual disk. It can take advantage of snapshots and other volume features. Device extents allows entire disks to be exported by iSCSI. Can perform better than file extents in certain situations but the entire disk is exported instead of a piece as in file extents
- Specify your extent name and the Disk Device should show up as your ZFS Volume which you created earlier in the steps

- Click Associated Targets
- Click Add Extent to Target
- Select your previously created Target and Extent

- It is Best Practive to associate extents to targets in a one to one manner although the software will allow multiple extents to be associated to a target
- Once ISCSI has been configured, in order to access the data on the iSCSI share, clients will need to use iSCSI initiator software. Clients are available for Windows 7/2003/2008 or VMware
- Log into VMware using the vClient
- Click on the VMware Host
- Select Configuration
- Select Storage Adapters
- Click on iSCSI Software Adapter
- Click Properties of the Software iSCSI adapter click General > Configure
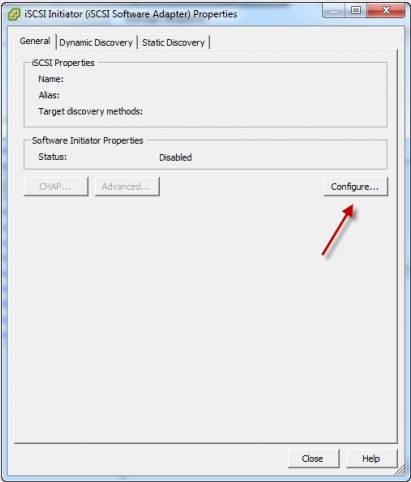
- Tick Status > Enable
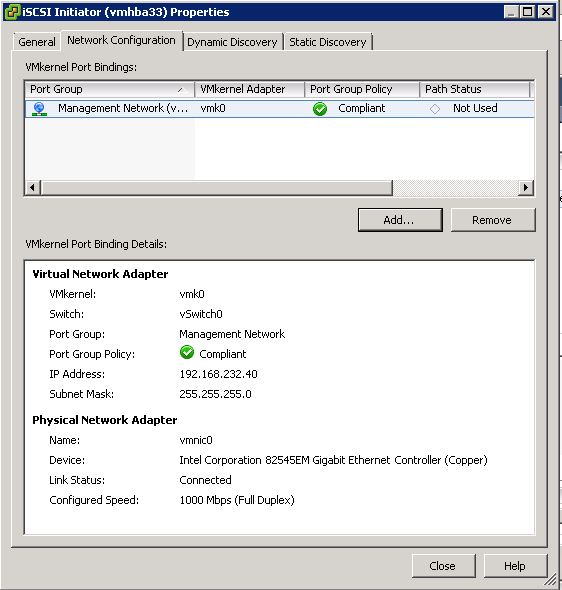
- Click on Network Configuration
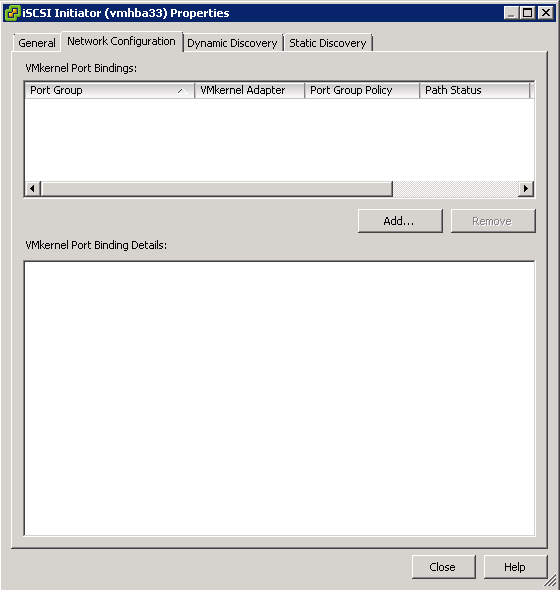
- Click Add and choose the Management Network
- Click Dynamic Discovery and click Add
- Add Send Target Server > iSCSI Server will be the Freenas Server IP
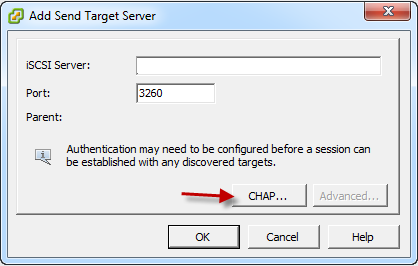
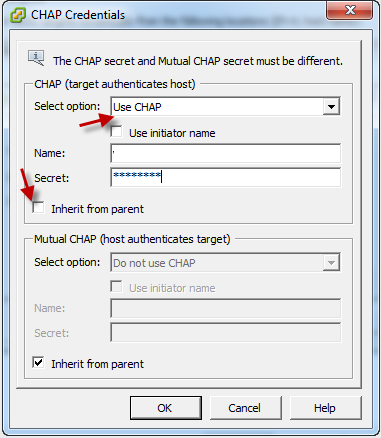
- Click CHAP
- Enter your user ID for the iSCSI user which you set up on your Freenas box as above steps
- Note: I had to put this to No Chap to get it to work on vSphere 5 iSCSI adaptor settings but try it anyway, you can always change this if needed without changing any of the Freenas settings
- A rescan of the HBA will be carried out
- Go to Storage
- Click Add Storage
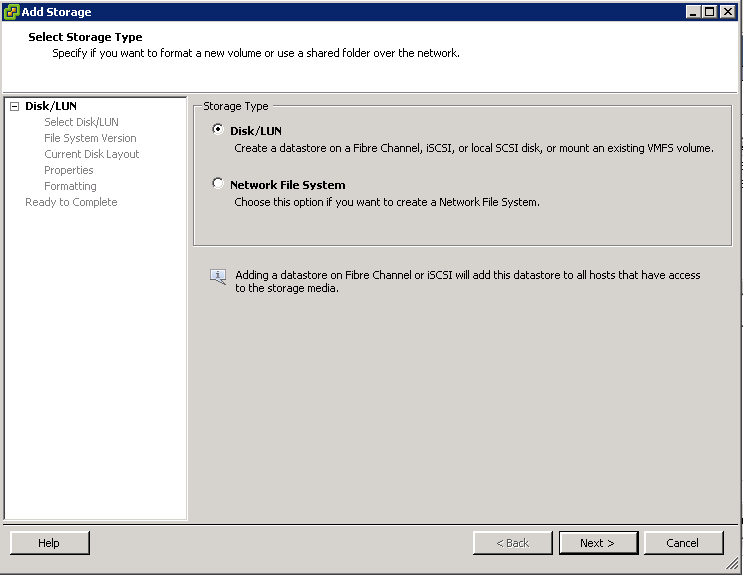
- Choose Disk/LUN
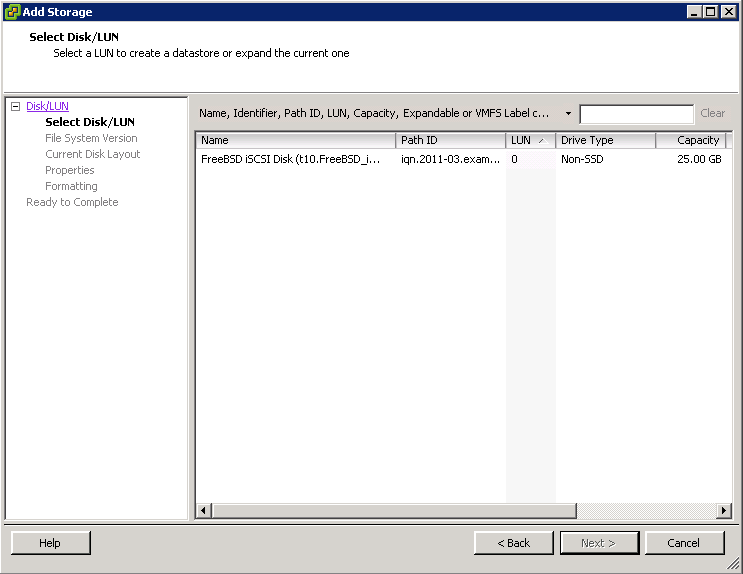
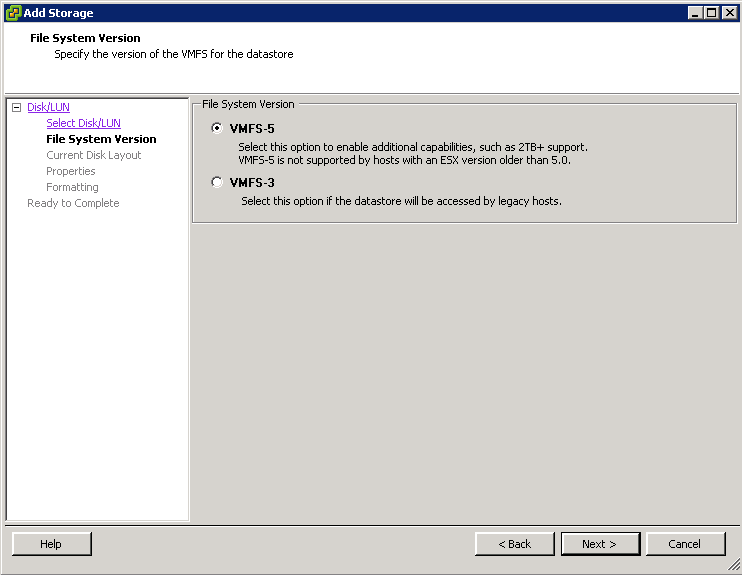
- Choose VMFS Version
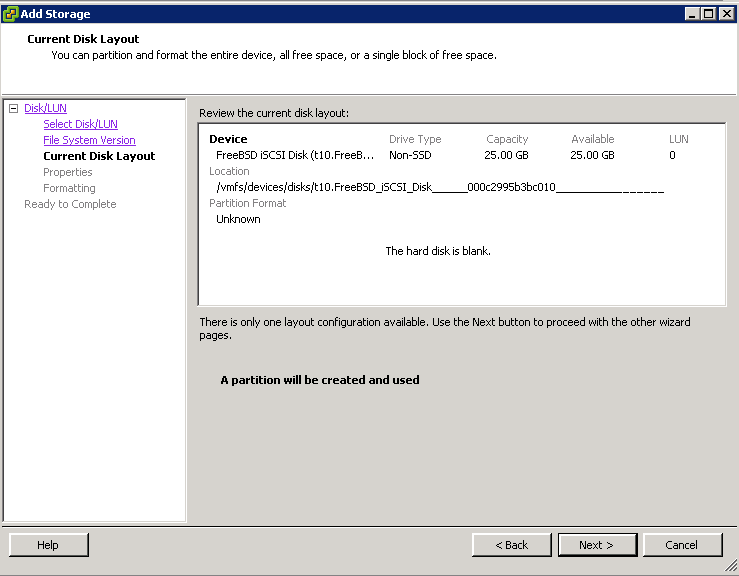
- Review the Current Disk Layout
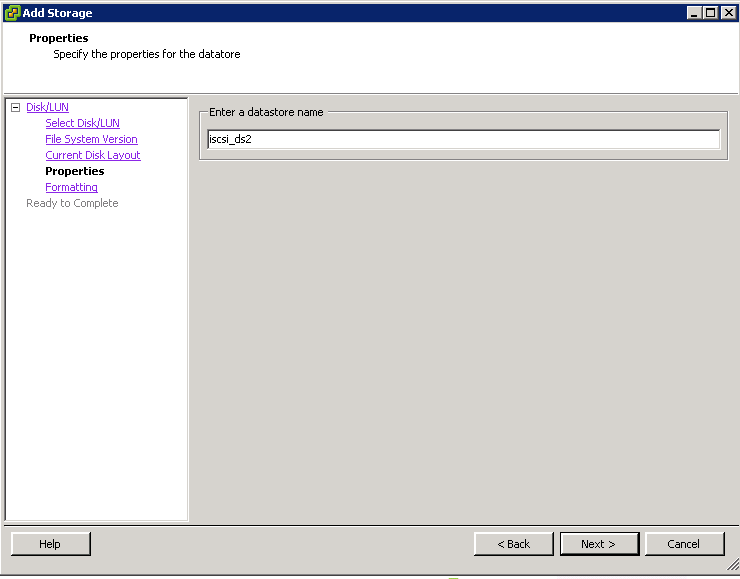
- Click Next and Enter a Datastore name
- Click Next
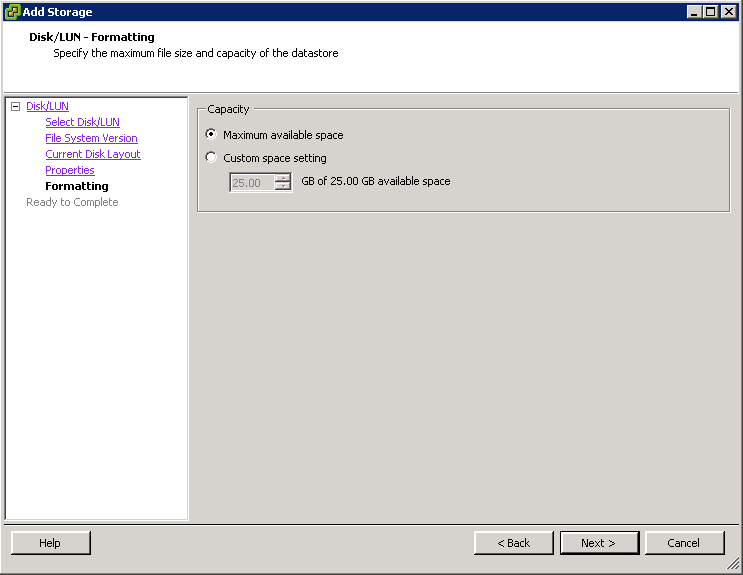
- Choose Disk/LUN formatting
- Click Next
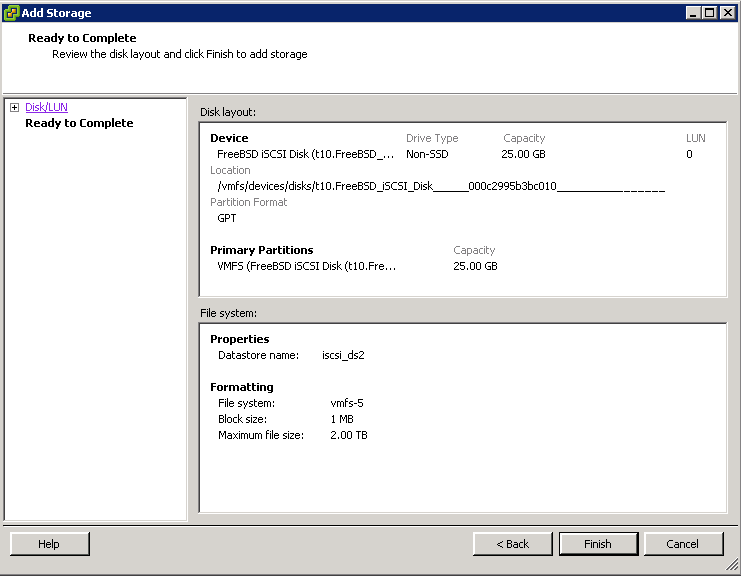
- Review and Finish
- Test Storage vMotion
If you want to add your iSCSI target as a disk to a Windows Server