Tag Archive for storage

Identify Logs used to troubleshoot storage issues

images

Logs

Located in var/log

Log

The logs you will want to look at for storage issues are likely to be

  • /var/log/vmkeventd.log

VMkernel deamon related log

  • /var/log/vmkernel.log

Generic NMP messages, iSCSI and fibre channel messages, driver, device discovery, storage and networking devices

  • /var/log/vpxa.log

vCenter Server vpxa agent logs, including communication with vCenter Server and the Host Management hostd agent

  • /var/log/hostd.log

Host management service logs, including virtual  machine and host Task and Events, communication with the vSphere Client  and vCenter Server vpxa agent, and SDK connections

  • /var/log/vmkwarning.log

Generic storage messages, like disconnects. A summary of Warning and Alert log messages excerpted from the VMkernel logs.

  • /var/log/storagerm

If SIOC is enabled then all the logs regarding that will be here

  • vCenter logs

Tune ESXi host Storage Configuration

tools

Tuning Configurations

  • Always use the Vendors recommendations whether it be EMC, NetApp or HP etc
  • Document all configurations
  • In a well-planned virtual infrastructure implementation, a descriptive naming convention aids in identification and mapping through the multiple layers of virtualization from storage to the virtual machines. A simple and efficient naming convention also facilitates configuration of replication and disaster recovery processes.
  • Make sure your SAN fabric is redundant (Multi Path I/O)
  • Separate networks for storage array management and storage I/O. This concept applies to all storage protocols but is very pertinent to Ethernet-based deployments (NFS, iSCSI, FCoE). The separation can be physical (subnets) or logical (VLANs), but must exist.
  • If leveraging an IP-based storage protocol I/O (NFS or iSCSI), you might require more than a single IP address for the storage target. The determination is based on the capabilities of your networking hardware.
  • With IP-based storage protocols (NFS and iSCSI) you channel multiple Ethernet ports together. NetApp refers to this function as a VIF. It is recommended that you create LACP VIFs over multimode VIFs whenever possible.
  • Use CAT 6 cabling rather than CAT 5
  • Enable Flow-Control (should be set to receive on switches and
    transmit on iSCSI targets)
  • Enable spanning tree protocol with either RSTP or portfast
    enabled. Spanning Tree Protocol (STP) is a network protocol that makes sure of a loop-free topology for any bridged LAN
  • Configure jumbo frames end-to-end. 9000 rather than 1500 MTU
  • Ensure Ethernet switches have the proper amount of port
    buffers and other internals to support iSCSI and NFS traffic
    optimally
  • Use Link Aggregation for NFS
  • Maximum of 2 TCP sessions per Datastore for NFS (1 Control Session and 1 Data Session)
  • Ensure that each HBA is zoned correctly to both SPs if using FC
  • Create RAID LUNs according to the Applications vendors recommendation
  • Use Tiered storage to separate High Performance VMs from Lower performing VMs
  • Choose Virtual Disk formats as required. Eager Zeroed, Thick and Thin etc
  • Choose RDMs or VMFS formatted Datastores dependent on supportability and Aplication vendor and virtualisation vendor recommendation
  • Utilise VAAI (vStorage APIs for Array Integration) Supported by vSphere 5
  • No more than 15 VMs per Datastore
  • Extents are not generally recommended
  • Use De-duplication if you have the option. This will manage storage and maintain one copy of a file on the system
  • Choose the fastest storage ethernet or FC adaptor (Dependent on cost/budget etc)
  • Enable Storage I/O Control
  • VMware highly recommend that customers implement “single-initiator, multiple storage target” zones. This design offers an ideal balance of simplicity and availability with FC and FCoE deployments.
  • Whenever possible, it is recommended that you configure storage networks as a single network that does not route. This model helps to make sure of performance and provides a layer of data security.
  • Each VM creates a swap or pagefile that is typically 1.5 to 2 times the size of the amount of memory configured for each VM. Because this data is transient in nature, we can save a fair amount of storage and/or bandwidth capacity by removing this data from the datastore, which contains the production data. In order to accomplish this design, the VM’s swap or pagefile must be relocated to a second virtual disk stored in a separate datastore
  • It is the recommendation of NetApp, VMware, other storage vendors, and VMware partners that the partitions of VMs and the partitions of VMFS datastores are to be aligned to the blocks of the underlying storage array. You can find more information around VMFS and GOS file system alignment in the following documents from various vendors
  • Failure to align the file systems results in a significant increase in storage array I/O in order to meet the I/O requirements of the hosted VMs
  • Try using sDRS
  • Turn on Storage I/O Control (SIOC) to split up disk shares globally across all hosts accessing that datastore
  • Make sure your multipathing is correct. Active/Active arrays use Fixed, Active/Passive use Most Recently used and then you have ALUA
  • Change queue depths to 64 rather than the default 32 if required. Set the parameter Disk.SchedNumReqOutstanding to 64 in vCenter
  • VMFS and RDM are both good for Random Reads/Writes
  • VMFS and RDM are also good for sequential Reads/Writes of small I/O block sizes
  • VMFS best for sequential Reads/Writes at larger I/O block sizes

Understand interactions between virtual storage provisioning and physical storage provisioning

handshake

Key Points

All these points have been covered in other blog posts before so these are just pointers. Please search for further information on this blog

  • RDM in Physical Mode
  • RDM in Virtual Mode
  • Normal Virtual Disk (Non RDM)
  • Type of Virtual hardware. E.g Paravirtual/Non Paravirtual
  • VMware vStorage APIs for Array Integration (VAAI)
  • Three virtual disk modes: Independent persistent, Independent nonpersistent, and Snapshot
  • Types of Disk (Thin, Thick, Eager Zeroed)
  • Partition alignment
  • Consider Disk queues, HBA queues, LUN queues
  • Consider hardware redundancy. E.g Multiple vkernel ports corresponding to iSCSI
  • Storage I/O Control
  • SAN Multipathing
  • Host power management settings: Some of the power management features in newer server hardware can increase storage latency

Identify storage provisioning methods

Overview of Storage Provisioning methods

Storage

Types of Storage

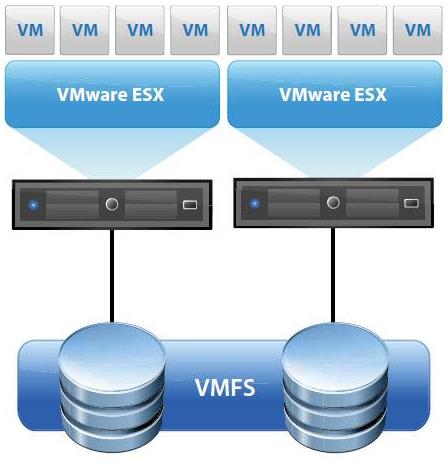
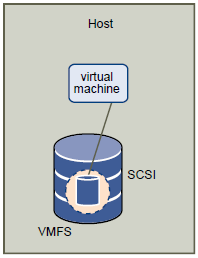
Local (Block Storage)

Local storage can be internal hard disks located inside your ESXi host, or it can be external storage systems located outside and connected to the host directly through protocols such as SAS or SATA. The host uses a single connection to a storage disk. On that disk,
you can create a VMFS Datastore, which you use to store virtual machine disk files.Although this storage configuration is possible, it is not a recommended topology. Using single connections between storage arrays and hosts creates single points of failure (SPOF) that can cause interruptions when a connection becomes unreliable or fails.
ESXi supports a variety of internal or external local storage devices, including SCSI, IDE, SATA, USB, and SAS storage systems. Regardless of the type of storage you use, your host hides a physical storage layer from virtual machines

Local

Networked Storage

Networked storage consists of external storage systems that your ESXi host uses to store virtual machine files remotely. Typically, the host accesses these systems over a high-speed storage network.
Networked storage devices are shared. Datastores on networked storage devices can be accessed by multiple hosts concurrently. ESXi supports the following networked storage technologies.
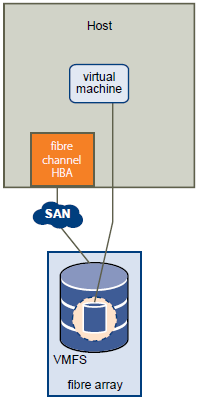
FC (Block Storage)

Stores virtual machine files remotely on an FC storage area network (SAN). FC SAN is a specialized high-speed network that connects your hosts to high-performance storage devices. The network uses Fibre Channel protocol to transport SCSI traffic from virtual machines to the FC SAN devices.
To connect to the FC SAN, your host should be equipped with Fibre Channel host bus adapters (HBAs). Unless you use Fibre Channel direct connect storage, you need Fibre Channel switches to route storage traffic.

FCOE (Block Storage)

If your host contains FCoE (Fibre Channel over Ethernet) adapters, you can connect to your shared Fibre Channel devices by using an Ethernet network.

FC

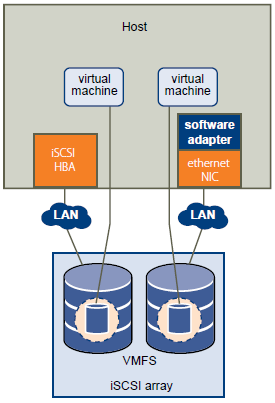
Internet SCSI (iSCSI) (Block Storage)

Stores virtual machine files on remote iSCSI storage devices. iSCSI packages SCSI storage traffic into the TCP/IP protocol so that it can travel through standard TCP/IP networks instead of the specialized FC network. With an iSCSI connection, your host serves as the initiator that communicates with a target, located in remote iSCSI storage systems. ESXi offers the following types of iSCSI connections:

  • Hardware iSCSI Your host connects to storage through a third-party adapter capable of offloading the iSCSI and network processing. Hardware adapters can be dependent and independent. This is shown on the left adapter on the picture below
  • Software iSCSI Your host uses a software-based iSCSI initiator in the VMkernel to connect to storage. With this type of iSCSI connection, your host needs only a standard network adapter for network connectivity. This is shown on the right adapter on the picture below

iSCSI

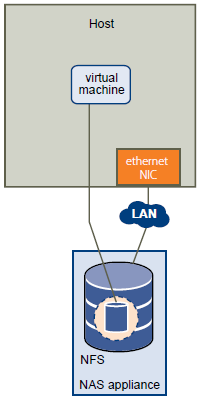
Network-attached Storage (NAS) (File Level Storage)

Stores virtual machine files on remote file servers accessed over a standard TCP/IP network. The NFS client built into ESXi uses Network File System (NFS) protocol version 3 to communicate with the NAS/NFS servers. For network connectivity, the host requires a standard network adapter.

NFS

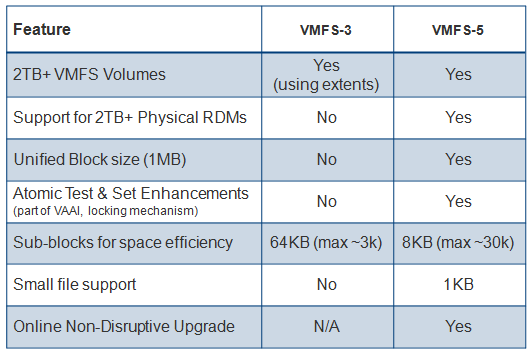
Comparison of Storage Features

storage2

Predictive and Adaptive Schemes for Datastores

When setting up storage for ESXi systems, before creating VMFS datastores, you must decide on the size and number of LUNs to provision. You can experiment using the predictive scheme and the Adaptive Scheme
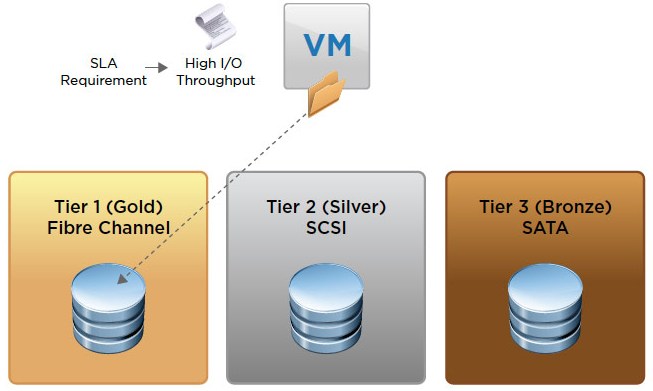
Predictive

  • Provision several LUNs with different storage characteristics.
  • Create a VMFS datastore on each LUN, labeling each datastore according to its characteristics.
  • Create virtual disks to contain the data for virtual machine applications in the VMFS datastores created on LUNs with the appropriate RAID level for the applications’ requirements.
  • Use disk shares to distinguish high-priority from low-priority virtual machines.

NOTE: Disk shares are relevant only within a given host. The shares assigned to virtual machines on one host have no effect on virtual machines on other hosts.

  • Run the applications to determine whether virtual machine performance is acceptable.

Adaptive

When setting up storage for ESXi hosts, before creating VMFS datastores, you must decide on the number and size of LUNS to provision. You can experiment using the adaptive scheme.

  • Provision a large LUN (RAID 1+0 or RAID 5), with write caching enabled.
  • Create a VMFS on that LUN.
  • Create four or five virtual disks on the VMFS.
  • Run the applications to determine whether disk performance is acceptable
  • If performance is acceptable, you can place additional virtual disks on the VMFS. If performance is not acceptable, create a new, large LUN, possibly with a different RAID level, and repeat the process. Use migration so that you do not lose virtual machines data when you recreate the LUN.

Tools for provisioning storage

  • vClient
  • Web Client
  • vmkfstools
  • SAN Vendor Tools

VMware Link

http://www.vmware.com/files/pdf/techpaper/Storage_Protocol_Comparison.pdf


Upgrade VMware Storage Infrastructure

VMFS1

When upgrading from vSphere 4 to vSphere 5, it is not required to upgrade datastores from VMFS-3 to VMFS-5. This might be relevant if a subset of ESX/ESXi 4 hosts will remain in your environment. When the decision is made to upgrade datastores from version 3 to version 5 note that the upgrade process can be performed on active datastores, with no disruption to running VMs

Benefits

  • Unified 1MB File Block Size

Previous versions of VMFS used 1,2,4 or 8MB file blocks. These larger blocks were needed to create large files (>256GB). These large blocks are no longer needed for large files on VMFS-5. Very large files can now be created on VMFS-5 using 1MB file blocks.

  • Large Single Extent Volumes

In previous versions of VMFS, the largest single extent was 2TB. With VMFS-5, this limit is now 64TB.

  • Smaller Sub-Block

VMFS-5 introduces a smaller sub-block. This is now 8KB rather than the 64KB we had in previous versions. Now small files < 8KB (but > 1KB) in size will only consume 8KB rather than 64KB. This will reduce the amount of disk space being stranded by small files.

  • Small File Support

VMFS-5 introduces support for very small files. For files less than or equal to 1KB, VMFS-5 uses the file descriptor location in the metadata for storage rather than file blocks. When they grow above 1KB, these files will then start to use the new 8KB sub blocks. This will again reduce the amount of disk space being stranded by very small files.

  • Increased File Count

VMFS-5 introduces support for greater than 100,000 files, a three-fold increase on the number of files supported on VMFS-3, which was 30,000.

  • ATS Enhancement

This Hardware Acceleration primitive, Atomic Test & Set (ATS), is now used throughout VMFS-5 for file locking. ATS is part of the VAAI (vSphere Storage APIs for Array Integration) This enhancement improves the file locking performance over previous versions of VMFS.

Considerations for Upgrade

  • If your datastores were formatted with VMFS2 or VMFS3, you can upgrade the datastores to VMFS5.
  • To upgrade a VMFS2 datastore, you use a two-step process that involves upgrading VMFS2 to VMFS3 first. Because ESXi 5.0 hosts cannot access VMFS2 datastores, use a legacy host, ESX/ESXi 4.x or earlier, to access the VMFS2 datastore and perform the VMFS2 to VMFS3 upgrade.
  • After you upgrade your VMFS2 datastore to VMFS3, the datastore becomes available on the ESXi 5.0 host, where you complete the process of upgrading to VMFS5.
  • When you upgrade your datastore, the ESXi file-locking mechanism ensures that no remote host or local process is accessing the VMFS datastore being upgraded. Your host preserves all files on the datastore
  • The datastore upgrade is a one-way process. After upgrading your datastore, you cannot revert it back to its previous VMFS format.
  • Verify that the volume to be upgraded has at least 2MB of free blocks available and 1 free file descriptor.
  • All hosts accessing the datastore must support VMFS 5
  • You cannot upgrade VMFS3 volumes to VMFS5 remotely with the vmkfstools command included in vSphere CLI.

Comparing VMFS3 and VMFS5

VMFS5

Instructions for upgrading

  • Log in to the vSphere Client and select a host from the Inventory panel.
  • Click the Configuration tab and click Storage.
  • Select the VMFS3 datastore.
  • Click Upgrade to VMFS5.

vmfs4

  • A warning message about host version support appears.
  • Click OK to start the upgrade.

vmfs6

  • The task Upgrade VMFS appears in the Recent Tasks list.
  • Perform a rescan on all hosts that are associated with the datastore.

Upgrading via ESXCLI

  • esxcli storage vmfs upgrade -l volume_name

esxcli1

Other considerations

  • The maximum size of a VMDK on VMFS-5 is still 2TB -512 bytes.
  • The maximum size of a non-passthru (virtual) RDM on VMFS-5 is still 2TB -512 bytes.
  • The maximum number of LUNs that are supported on an ESXi 5.0 host is still 256
  • There is now support for passthru RDMs to be ~ 60TB in size.
  • Non-passthru RDMs are still limited to 2TB – 512 bytes.
  • Both upgraded VMFS-5 & newly created VMFS-5 support the larger passthru RDM.

Configure and Administer Profile Driven Storage

What is Profile Driven Storage?

Profile Driven Storage enables the creation of Datastores that provide different levels of service. You can use Virtual Machine storage profiles and storage capabilities to ensure storage provides different levels of

  • Capacity
  • Performance
  • Availability
  • Redundancy

By doing this we create levels of compliance the Virtual Machines are linked to in order to maintain ongoing management and placed on storage that is suitable for its use.

storageprofile0

Profile driven storage is composed of 2 components where a user defined capability can be used alongside a Storage capability.

  • Storage capabilities which details the features that a storage system offers provided by a VASA Vendor provider
  • User defined capabilities which can be associated with multiple datastores

storageprofile

Instructions for creating Profile Driven Storage

A VM storage profile is attached to a Storage capability. In turn a Storage Capability profile is attached to a datastore.

  • View the System defined storage capabilities that your storage system defines

vasa

  • Create a user-defined storage capability for your Virtual Machines
  • Go to VM Storage Profiles in vCenter

Capture

  • Click Enable VM Storage Profiles

Capture2

  • View the box which appears and enable these for a host or a cluster and click Close

Capture3

  • Click Manage Storage Capabilities

Capture4

  • Click Add
  • Type a name for your storage capability. E.g Gold Storage, Silver Storage, Replicated Storage
  • Add a description if you want and click OK

Capture5

  • Next click Create VM Storage Profile
  • Type a name and a description

Capture6

  • Select the Storage capability you require from what we created at the start of these instructions. E.g Gold Storage, Silver Storage, Replicated Storage

Capture7

  • Click Next and Finish
  • Go to Datastores and Datastore Clusters
  • Right click a Datastore and select Assign User Defined Storage Capability

Capture8

  • Select the capability you created.
  • Now you can create a VM and within the setup wizard on the storage tab, you can select a storage profile to use which will immediately show you which Datastores are compatible and which ones are not
  • On a VM you can also see from the summary tab whether the profile is compliant or not as per below screenprint

compliant

  • And you can also right click on a VM and manage a profile or check profile compliance

Capture10

Resolving Non Compliant VMs

A non-compliant machine must storage migrate the virtual disks it owns:

  • Enter the Host and Clusters view
  • Select a non-compliant virtual machine
  • Right-Click the Virtual Machine and click Migrate
  • On the migration type screen, click Change Datastore, click Next
  • On the storage screen, optionally select the new disk format for post-migration
  • Select the VM Storage Profile to bring into compliance for the non-compliant VM.
  • If you are migrating an individual virtual disk within a VM, Click Advanced
  • Select the virtual disk you want to move to the new storage profile and then click the Browse under the Datastore column
  • Verify that the VM Storage Profile is correct, if not select the appropriate VM Storage Profile
  • Select a Compatible Datastore Cluster to place your non-compliant virtual disk
  • Optionally, you may disable SDRS for this virtual machine
  • Click OK
  • Click Next
  • Verify your settings at the completion screen and select show all storage recommendations
  • Verify that you agree with the migration recommendations and then click Apply Recommendations
  • Repeat the section above, Check Storage Profile Compliance

How to shrink VMware VMDKs

Shrinking a Virtual Disk

Shrinking a virtual disk reclaims unused space in the virtual disk and reduces the amount of space the virtual disk occupies on the host.
Shrinking a disk is a two-step process. In the preparation step, VMware Tools reclaims all unused portions of disk partitions (such as deleted files) and prepares them for shrinking. This step takes place in the guest operating system.
In the shrink step, the VMware application reduces the size of the disk based on the disk space reclaimed during the preparation step. If the disk has empty space, this process reduces the amount of space the virtual disk occupies on the host drive. The shrink step takes place outside the virtual machine.

When can you not shrink a disk?

Shrinking disks is not allowed under the following circumstances:

  • The virtual machine is hosted on an ESX/ESXi server. ESX/ESXi Server can shrink the size of a virtual disk only when a virtual machine is exported. The space occupied by the virtual disk on the ESX/ESXi server, however, does not change.
  • You pre-allocated all the disk space to the virtual disk when you created it. Must be Thick provisioned drive for Shrinking
  • The virtual machine contains a snapshot.
  • The virtual machine is a linked clone or the parent of a linked clone.
  • The virtual disk is an independent disk in non-persistent mode.
  • The file system is a journaling file system, such as an ext4, xfs, or jfs file system.

Prerequisites

■  On Linux, Solaris, and FreeBSD guests, run VMware Tools as the root user to shrink virtual disks. If you shrink the virtual disk as a nonroot user, you cannot prepare to shrink the parts of the virtual disk that require root-level permissions.

■  On Windows guests, you must be logged in as a user with Administrator privileges to shrink virtual disks.

■  Verify that the host has free disk space equal to the size of the virtual disk you plan to shrink.

■  Verify that all your hard disks are thick or this will produce an error when you click Shrink

Procedure

  • Click the Shrink tab in the VMware Tools control panel.


  • If the disk cannot be shrunk, the tab shows a description of the reason.

  • Select the partitions to shrink and click Prepare to Shrink.

If you deselect some partitions, the whole disk still shrinks. The deselected partitions, however, are not wiped for shrinking, and the shrink process does not reduce the size of the virtual disk as much as it would with all partitions selected.
VMware Tools reclaims all unused portions of disk partitions (such as deleted files) and prepares them for shrinking. During this phase, you can still interact with the virtual machine

  • When a prompt to shrink disks appears, click Yes.

The virtual machine freezes while VMware Tools shrinks the disks. The shrinking process takes considerable time, depending on the size of the disk.

  • When a message box appears that confirms the process is complete, click OK

The Newer Compact Command

Some newer versions of VMware products include a Compact button or menu command, which performs the same function as the Shrink command. You can use the Compact command when the virtual machine is powered off. The shrinking process is much quicker when you use the Compact command.

Method 1 – Using VMware Converter to shrink or extend a disk

  • Install VMware Converter on the machine you want to convert
  • Start the VMware Converter Application
  • Select File > New > Convert Machine > Select Powered on Machine
  • Specify the Powered On Machine as Local Machine
  • Note, you can also select File > New > Convert Machine > VMware Infrastructure Virtual Machine if you want to shrink a VM which is powered off but you will need VMware Converter installed on another machine

  • Click Next

  • In Destination Type, select VMware Infrastructure Virtual Machine
  • Put in vCenter Server Name
  • Put in User Account
  • Put in Password
  • Click Next

  • Type a different name for your VM. You cannot use the same name
  • Select the same Resource Pool you use for the machine you want to convert
  • Click Next

  • Choose a destination Resource Pool or host
  • Click Next

  • Click Edit on Data to Copy

  • Select Advanced

  • Select Destination Layout
  • Select the disk you want to change the size of by clicking the drop down button and select Change Size

  • Click Next
  • You will reach the Summary Page
  • Click Finish and the following window will open and show you the running task

  • Power off the original VM
  • Power up the new cloned VM and check everything works ok
  • Delete the original VM

Best Practices for using VMware Converter

http://kb.vmware.com/selfservice/microsites/search.do?language=en_US&cmd=displayKC&externalId=1004588

Changing the Blocksize a Datastore uses in VMware vSphere 4

To recreate a datastore with a different block size

The block size on a datastore cannot be automatically changed as it is a file system property that can only be specified when the datastore is initially created.

The only way to increase the block size is to move all data off the datastore and recreate it with the larger block size. The preferred method of recreating the datastore is from a console or SSH session, as you can simply recreate the file system without having to make any changes to the disk partition.

Note: All data on a VMFS volume is lost when the datastore is recreated. Migrate or move all virtual machines and other data to another datastore. Back up all data before proceeding.

Block Sizes

The below table lists the size of file/VMDK that can be placed on Datastores formatted with the different Block Size

From the ESX/ESXi console:

Note: This procedure should not be performed on a local datastore on an ESX host where the operating system is located, as it may remove the Service Console privileged virtual machine which is located there.

  • Storage vMotion, move, or delete the virtual machines located on the datastore you would like to recreate with a different block size.
  • Log into the Local Tech Support Mode console of the ESX/ESXi host
  • Use the esxcfg-scsidevs -m command to obtain the disk identifier (mpx, naa, or eui) for the datastore you want to recreate.See below
  • esxcfg-scsidevs -m
  • Use vmkfstools to create a new VMFS datastore file system with a different block size over the existing one: See below
  • vmkfstools -C VMFS-type -b Block-Size -S Datastore-Name/vmfs/devices/disks/Disk-Identifier:Partition-Number
  • E.g. vmkfstools -C vmfs3 -b 8m -S DatastoreXYZ /vmfs/devices/disks/naa.600605b0032807b0155c9e990e4d1a83:1
  • It should then come up with the following Confirmation when complete

  •  Rescan from all other ESX hosts with the vmkfstools -V command.

From the VI / vSphere Client

Note: This procedure should not be performed on a LUN containing the ESX/ESXi operating system, as it may require additional effort to recreate the partition table.

  • Storage vMotion, move, or delete the virtual machines located on the datastore you would like to recreate with a different block size.
  • Select the ESX/ESXi host in the inventory and click the Configuration tab.
  • Select the Storage under hardware, right-click the datastore and choose Delete.

Note: Do not do this on a datastore located on the same disk/LUN as the ESX/ESXi operating system.

  • Rescan for VMFS volumes from the other hosts that can see the datastore.
  • Create the new datastore with the desired block size on one of the hosts using the Add Storage Wizard.
  • Rescan for VMFS volumes from all other hosts that can see the datastore

Zombie VMDKs

A Zombie VMDK is as mentioned usually a VMDK which isn’t used anymore by a VM. You can double check this by checking if the disk is still linked to the VM which it should be a part off. If it isn’t you can delete it from the datastore via the datastore browser. I would suggest moving it first before you delete is, just in case

Storage/Datastore Reclamation in VMware

Sometimes, it is worth doing a storage reclamation exercise through all your VMware Datastores in order to remove old folder, files and to check that nothing miscellaneous is going on.

What can you find?

In vCenter > Datastores > Performance Tab, you can find the graph showing all the files it can detect with the selection “Other VM Files” OR “Other” which is what we’re interested in.

When we checked this out on the Host back-end logged in via Putty, we can see the below. The ./ files are not usual to find on LUNs/Datstores and indicate that there are SAN snapshots existing on here

/vmfs/volumes/4e0da454-902c23bf-cb36-e61f13f7c69b # ls -l

SERVER01
SERVER02
SERVER03

/vmfs/volumes/4e0da454-902c23bf-cb36-e61f13f7c69b # find . -exec ls -lh {} \; | grep flat

SERVER01-flat.vmdk
SERVER01_1-flat.vmdk
SERVER01_2-flat.vmdk
SERVER01_3-flat.vmdk

./SERVER01/SERVER01_3-flat.vmdk
./SERVER01/SERVER01_2-flat.vmdk
./SERVER01/SERVER01_1-flat.vmdk
./SERVER01/SERVER01-flat.vmdk

Conclusion

You will need to ask your Storage Admin to check out your LUNs and make sure that any old snapshots are either required or can be deleted.

It is worth keeping an eye on all of this as we found we had nearly 2TB of LUN Snapshots lurking around taking up valuable and expensive storage space.