
What is Oracle RAC?
This enables the utilization of commodity hardware to reduce total cost of ownership and to provide a scalable computing environment that supports various application workloads. Oracle RAC is Oracle’s premier shared disk database clustering technology
Pre-Requisites
- vSphere 5 or 6 or VirtualBox also works very well
- 2 x Oracle Linux 7 VMs (2 vCPUs and 6GB RAM)
- Oracle Grid Infrastructure 12c Release 1 (12.1.0.2)
- Oracle Database Enterprise Edition 12.1.0.2.0 for Linux x86-64
- 1 x 50GB O/S disk on each node
- 3 x 20GB CSR disks (Multi-writer enabled on Disk 2/3/4) on node 1 only and added to node 2 as existing disks
- 1 x 25GB DB Disk (Multi-writer enabled on Disk 5) on node 1 only and added to node 2 as an existing disk
- 1 x 25GB Redo Disk (Multi-writer enabled on Disk 6) on node 1 only and added to node 2 as an existing disk
IP Addresses
- 2 x LAN IP addresses
- 2 x Private IP addresses
- 2 x VIP IP addresses
- 3 x SCAN IP addresses
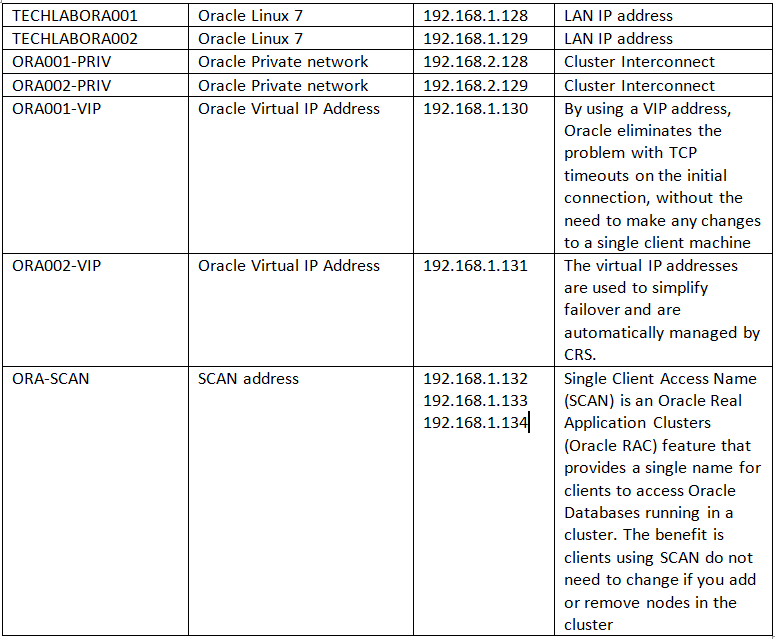
- Note: I had to add 3 A records in DNS pointing to 192.168.1.132, 192.168.1.133 and 192.168.1.133 for the scan IPs
- See this link for more info on DNS and SCAN names http://www.oracle.com/technetwork/products/clustering/overview/scan-129069.pdf
Software
Download the following software.
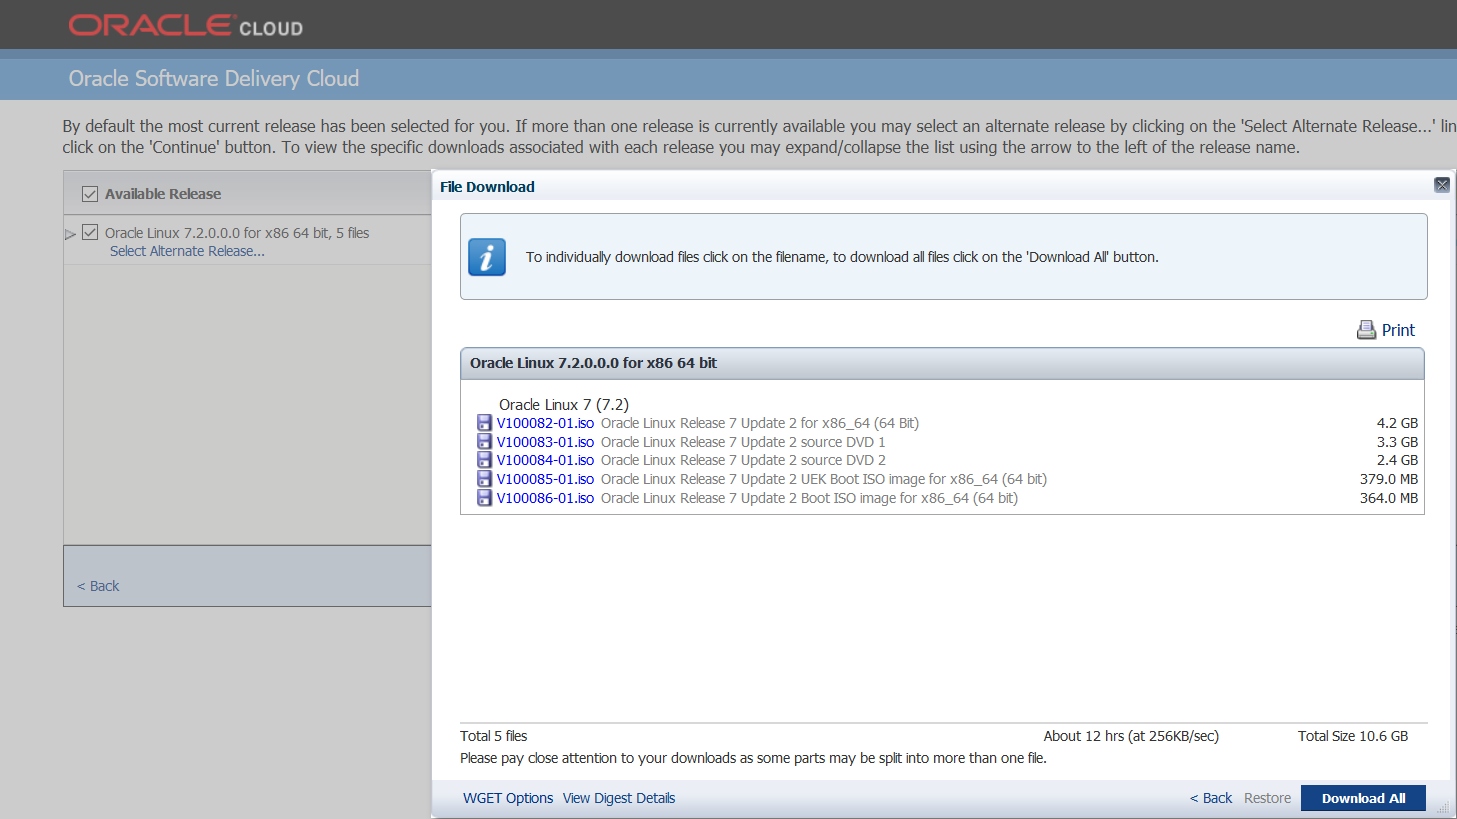
- Oracle Linux; Once in the Oracle Cloud service, select “Oracle Linux” and “x86 64-bit”.
- VirtualBox (Use if you don’t have a vSphere 5/6 installation)
- Oracle Database 12c Release 1 (12.1.0.1.0) (use Linux x86-64, then “See All” link).
- Oracle Database 12c Release 1 Grid Infrastructure (12.1.0.1.0) for Linux x86-64 (use Linux x86-64, then “See All” link).
Instructions for the first VM
Note: There may be points where it is good to snapshot your VMs if you need a point to go back to if anything goes wrong. It took me a while to work all this out and snapshots were very useful 🙂
- Download Oracle Linux from http://edelivery.oracle.com/linux
- Create 2 VMs
- Add 6 disks to the first VM and just the O/S disk on the second VM
- 1 x O/S disk on each node
- 3 x CSR disk (Multi-writer enabled on Disk 2/3/4) on node 1 only and added to node 2 as an existing disks. (Must be independent persistent)
- 1 x DB Disk (Multi-writer enabled on Disk 5) on node 1 only and added to node 2 as an existing disk (Must be independent persistent)
- 1 x Redo Disk (Multi-writer enabled on Disk 6) on node 1 only and added to node 2 as an existing disk (Must be independent persistent)
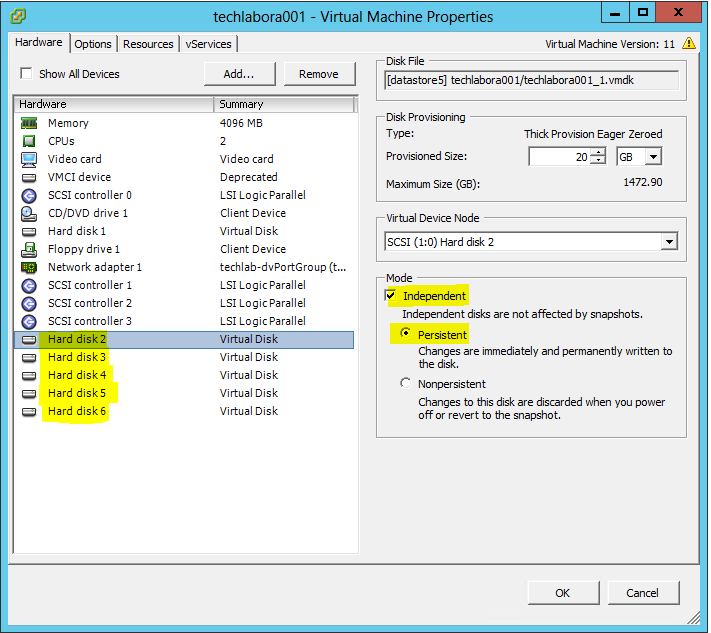
- Log into the web client and go to the second VM
- You will need to add all the extra disks as existing disks to the second VM
- Next you need to set the multi-writer flag on both VMs – The multi-writer has to be set on the non O/S disks in the vSphere Web Client not the c# client in vSphere 6 or the settings do not stay and you will find you cannot power on the second VM. In vSphere 5 you can still use the c# client to set the multi-writer flag in the Configuration parameters of the VM as seen below.
- Link for Information here
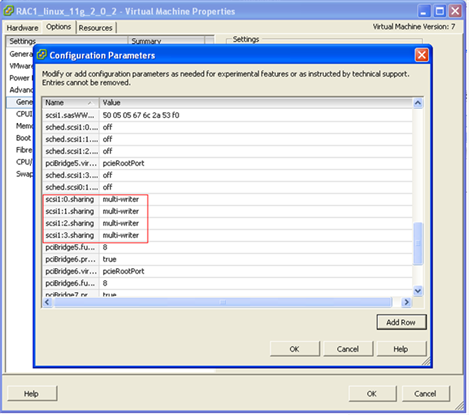
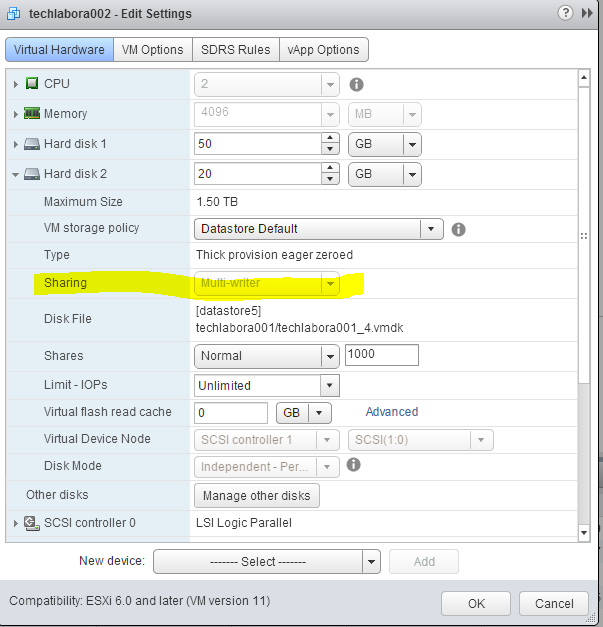
- VMFS is a clustered file system that disables (by default) multiple virtual machines from opening and writing to the same virtual disk (.vmdk file). This prevents more than one virtual machine from inadvertently accessing the same .vmdk file. The multi-writer option allows VMFS-backed disks to be shared by multiple virtual machines. This option is used to support VMware fault tolerance along with Oracle RAC, which allows a primary virtual machine and a standby virtual machine to simultaneously access a .vmdk file.
- You will also need to add the configuration parameter disk.enableUUID and set the value to true. This step is necessary so that the VMDK always presents a consistent UUID to the VM, thus allowing the disk to be mounted properly. For each of the virtual machine nodes (VMs) that will be participating in the cluster, follow the steps below from the vSphere client. VMware by default does not pass through the device UUID’s for the disks so the Oracle documentation (the udev rules) will fail to work because they depend on the UUID’s to create the ASM symlinks in DEV
- Attach the Oracle Linux iso to the first VM
- This link is useful – https://oracle-base.com/articles/linux/oracle-linux-7-installation
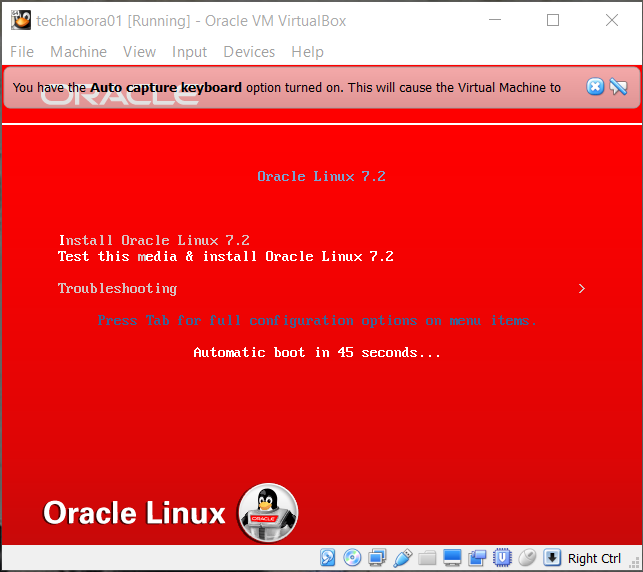
- Let it run through bootup then select your language

- You will now see the below screen
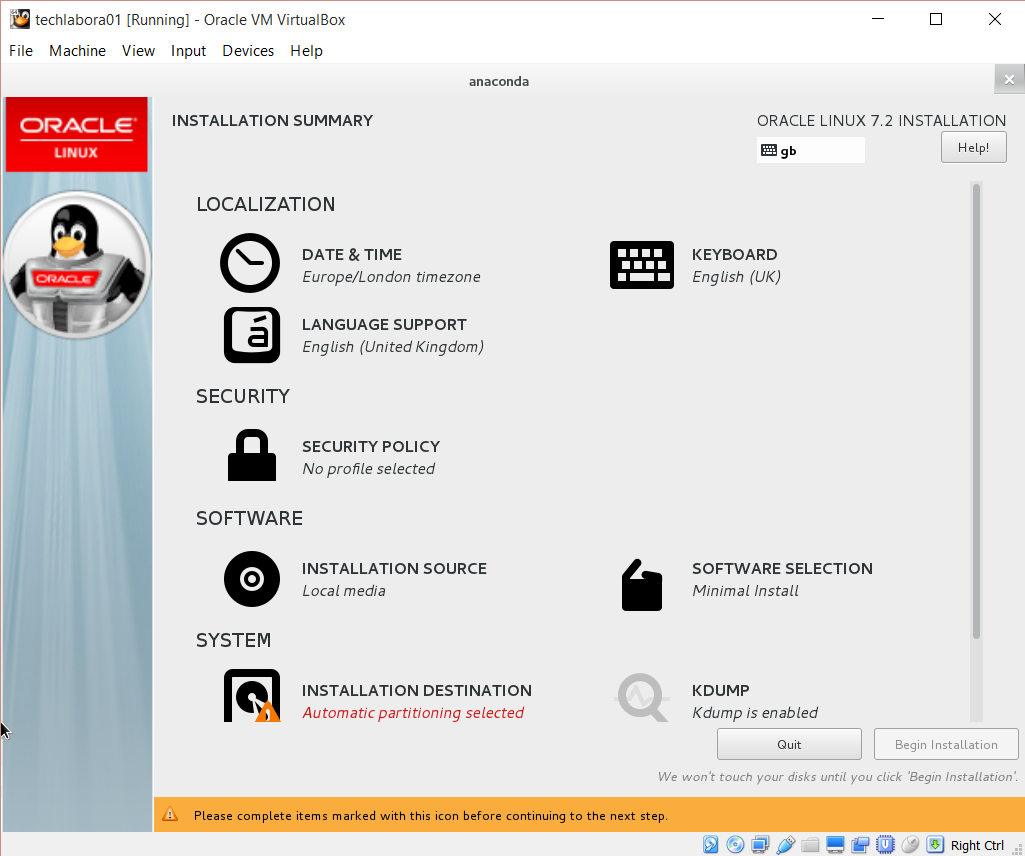
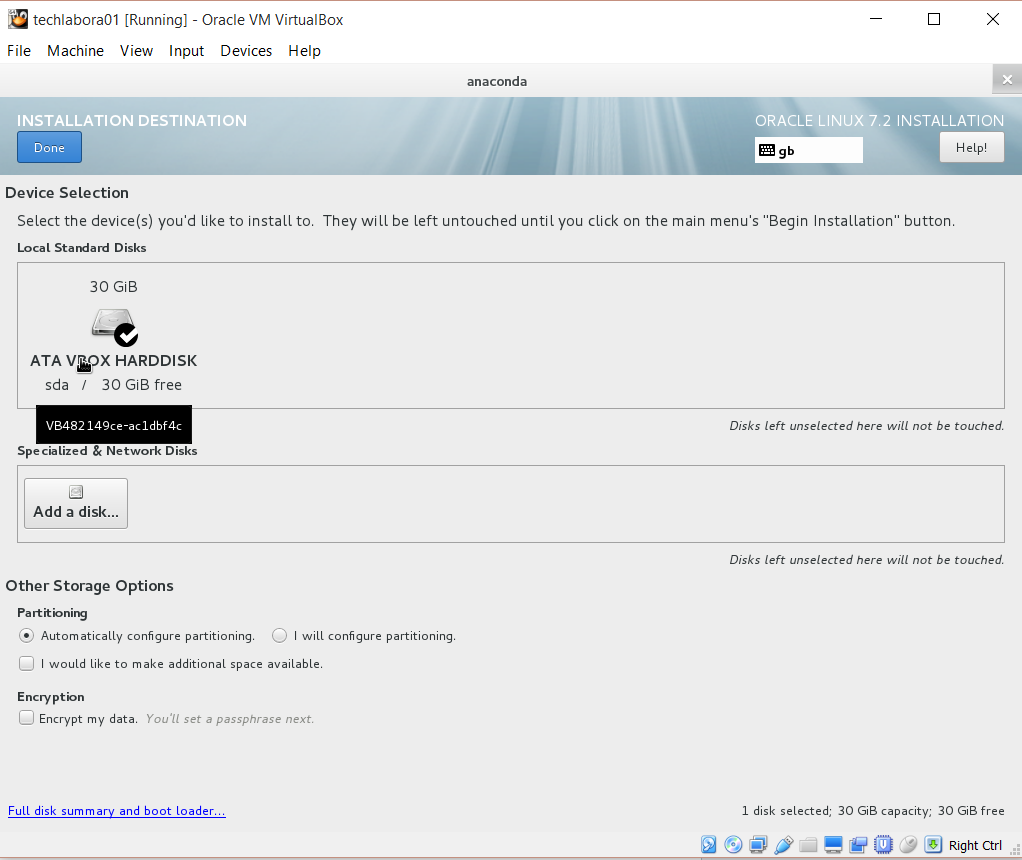
- Click on System and check the hard drive layout
- I left it on automatic partitioning
- Click on network and put in host and network name settings
- Click Configure to put in IPv4 IP Address, Netmask and Gateway settings
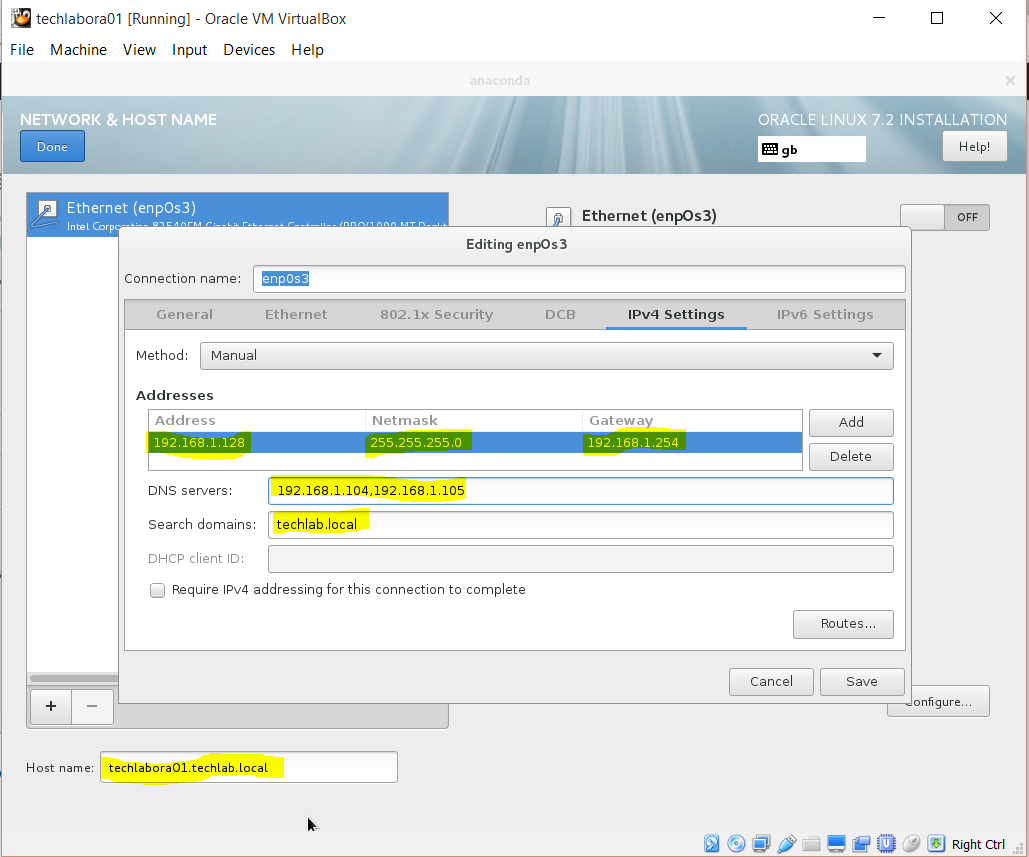
- Click Save then move the network connection slider to On
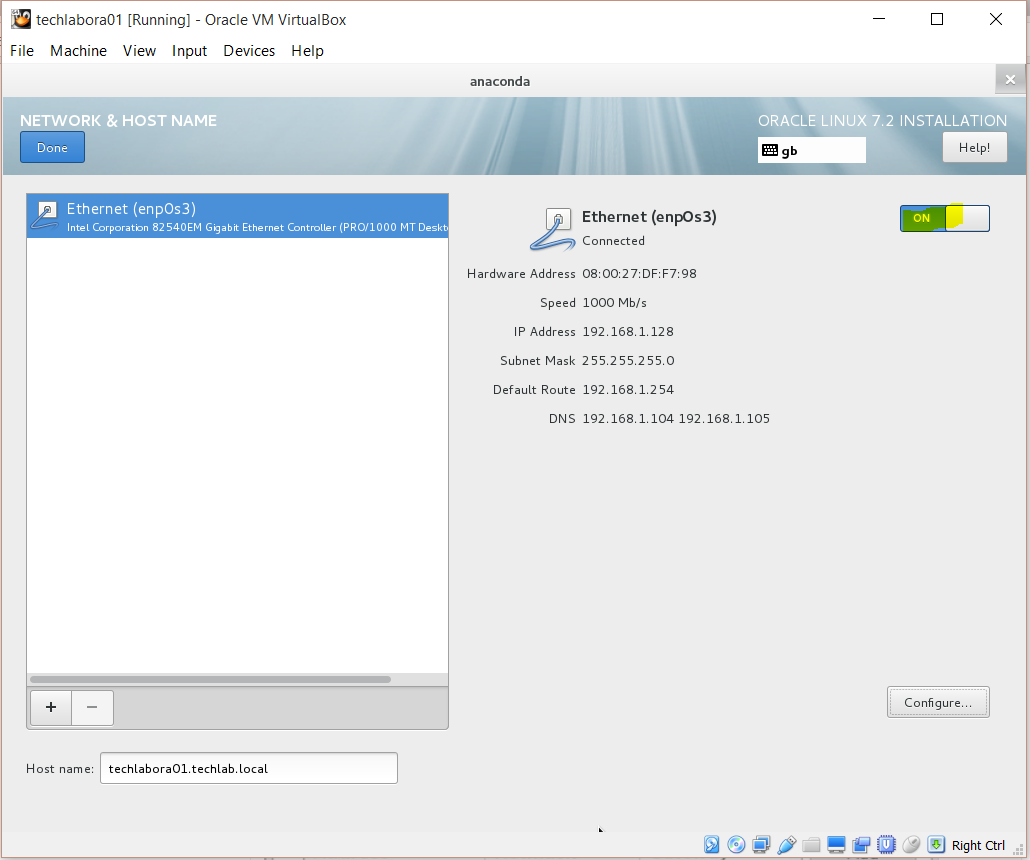
- Click Done
- Click on Software Selection > Select Server with GUI
- You may want to choose to install a GUI desktop. This is never recommended for a production environment. For ease of maintenance, you can click on the SOFTWARE SELECTION button and choose to install a “Server with GUI” option and choose the KDE desktop.
- I also selected Java Platform / Performance Tools and Development Tools
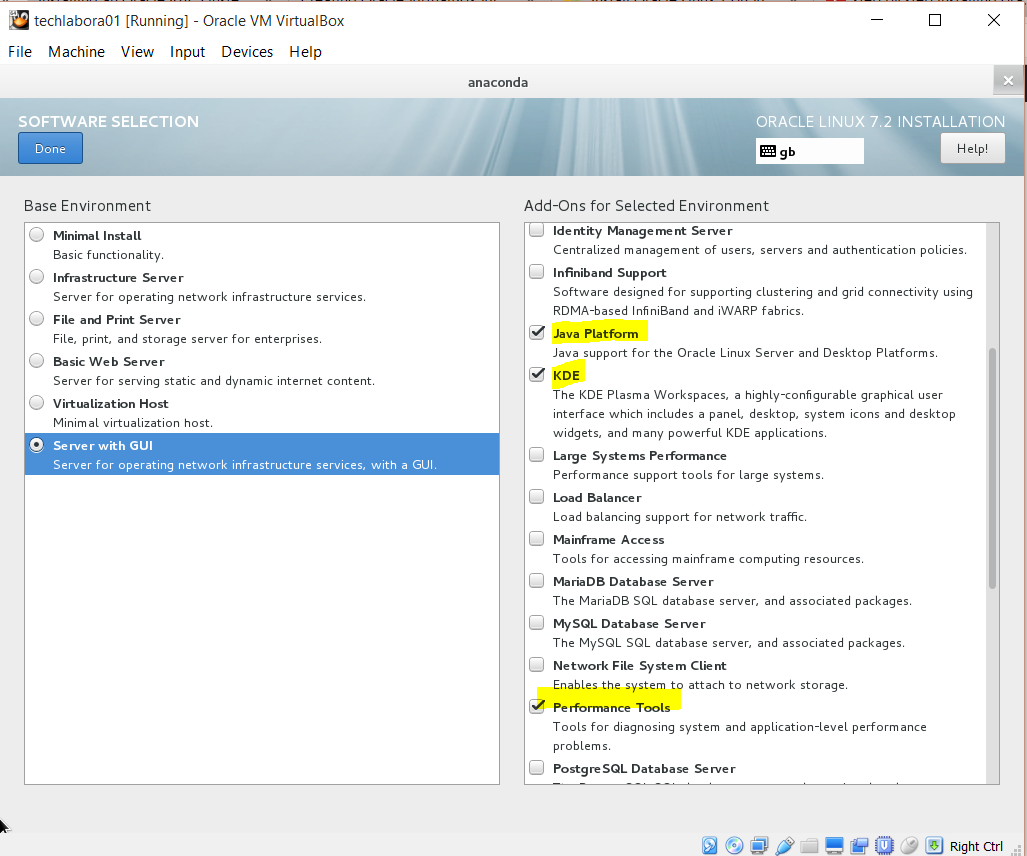
- Click on the Begin Installation button after you select all the options that you want installed
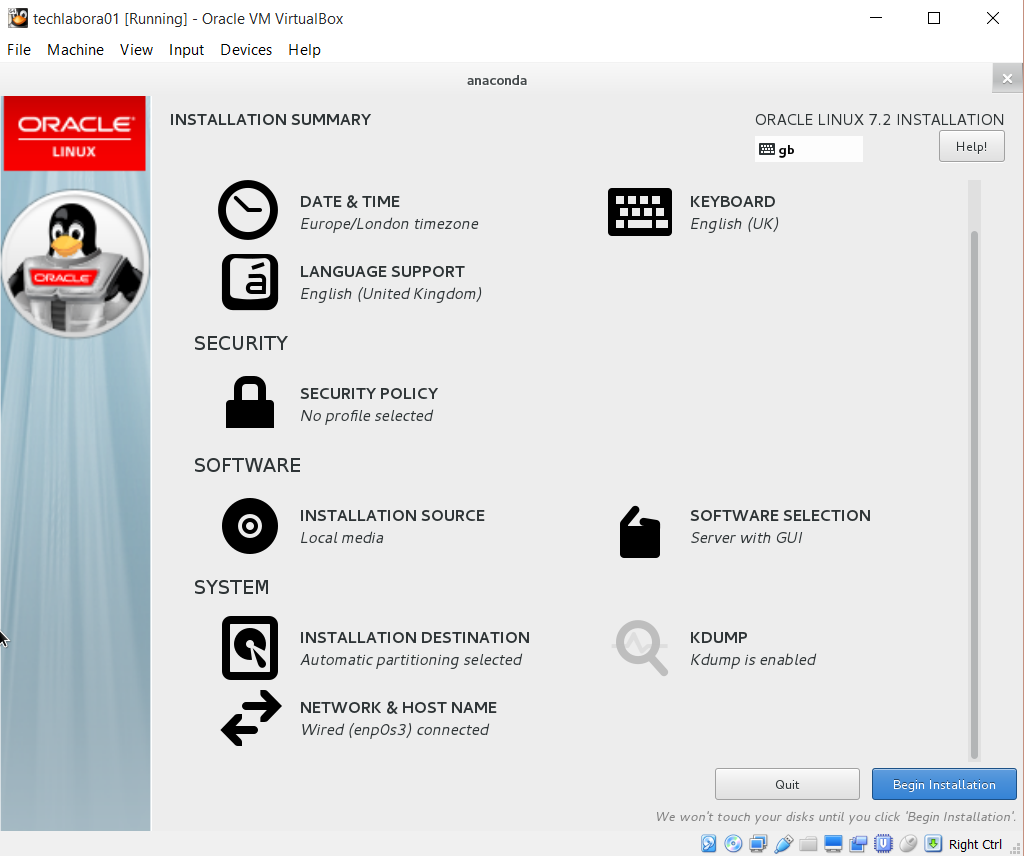
- You will now see the screen below
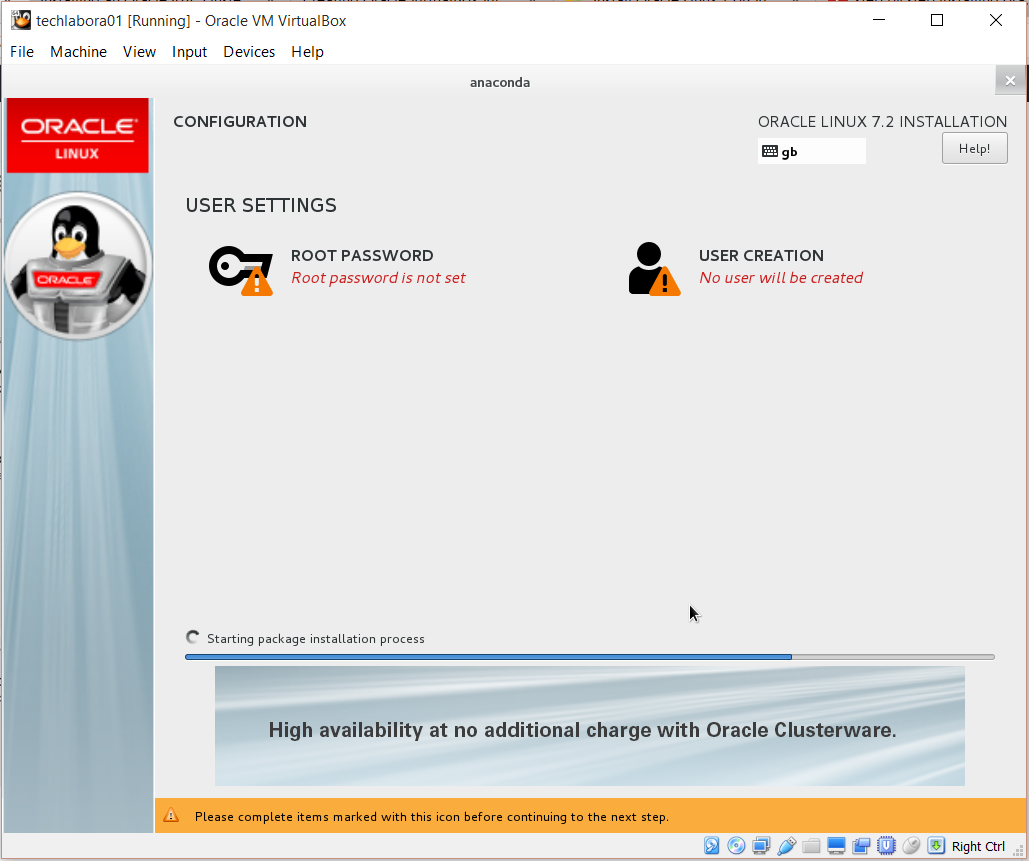
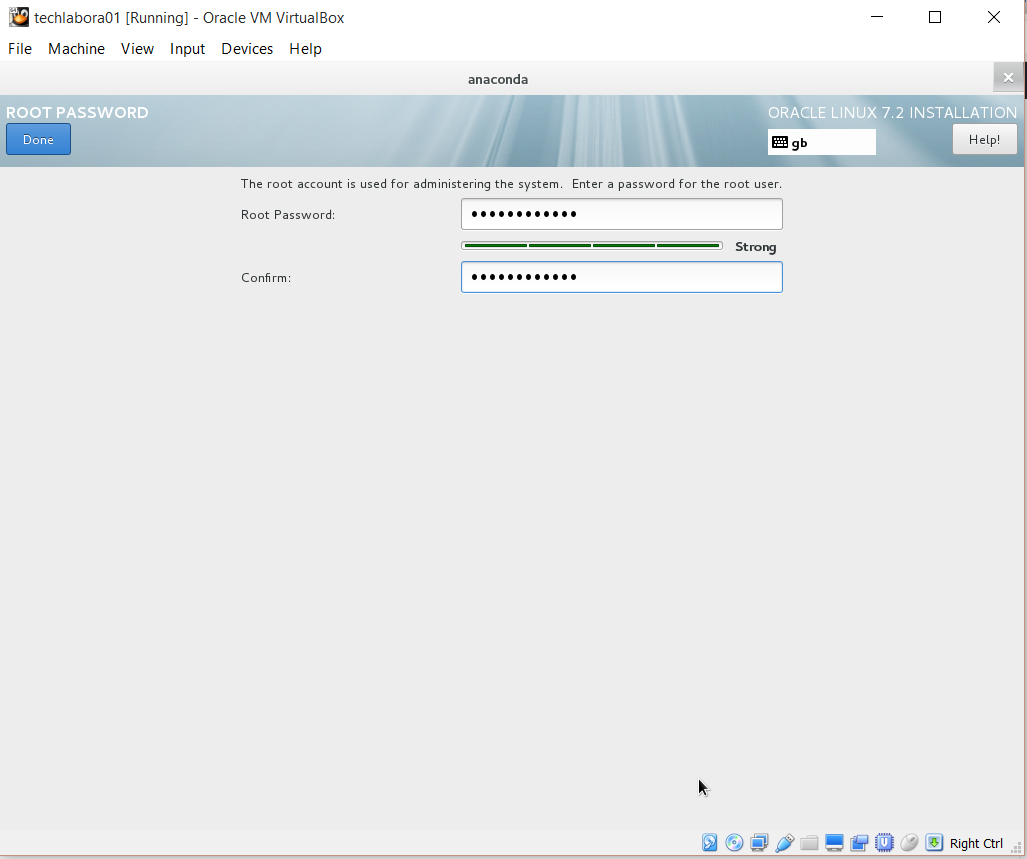
- Set a root password
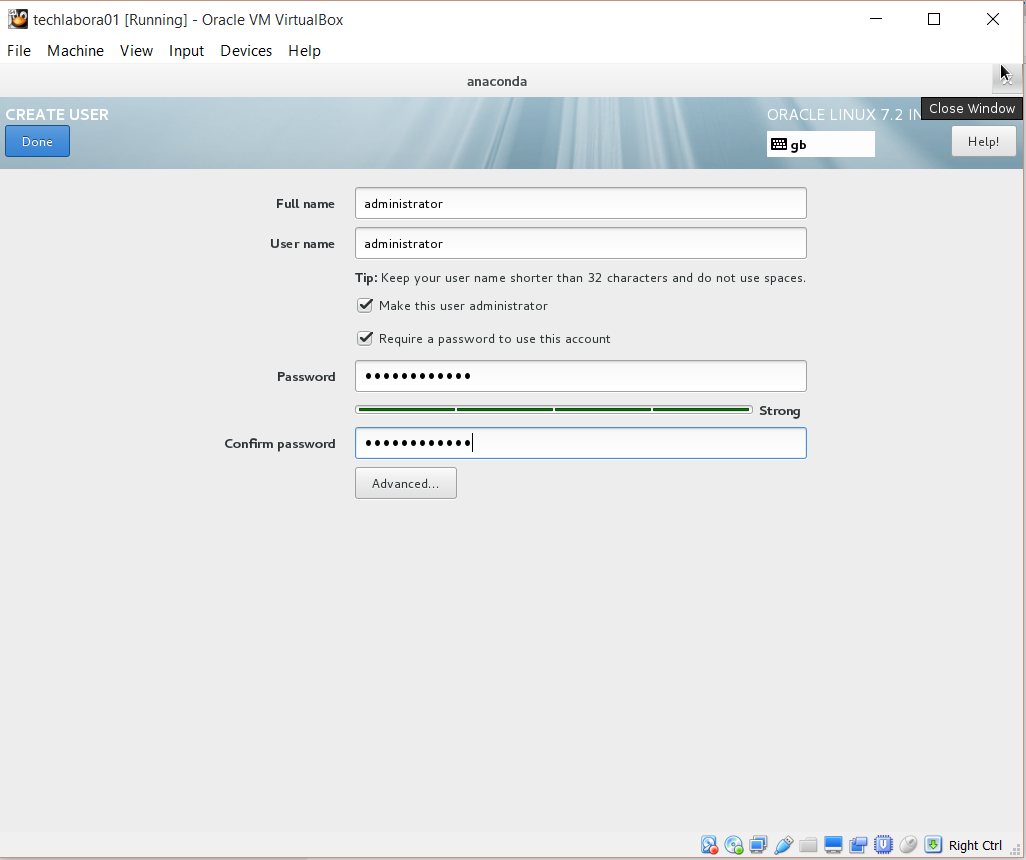
- Next enter a username who will be the administrator
- It will now install
- Once installation is complete, reboot your machine
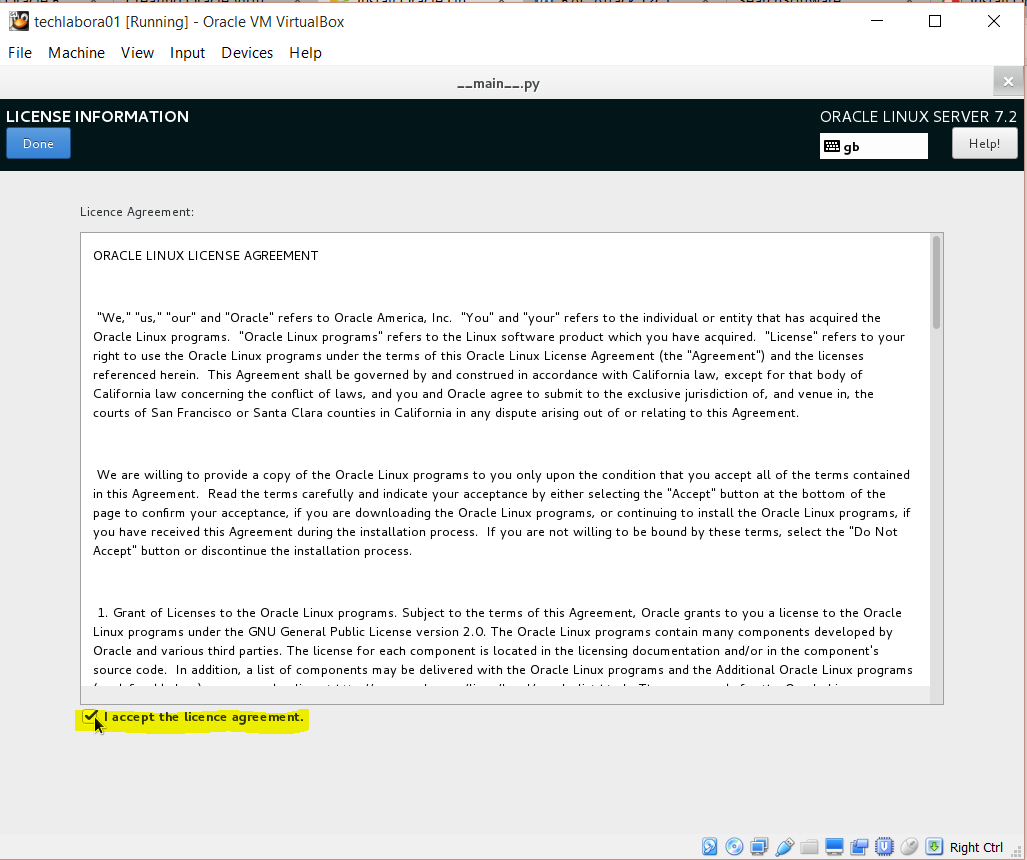
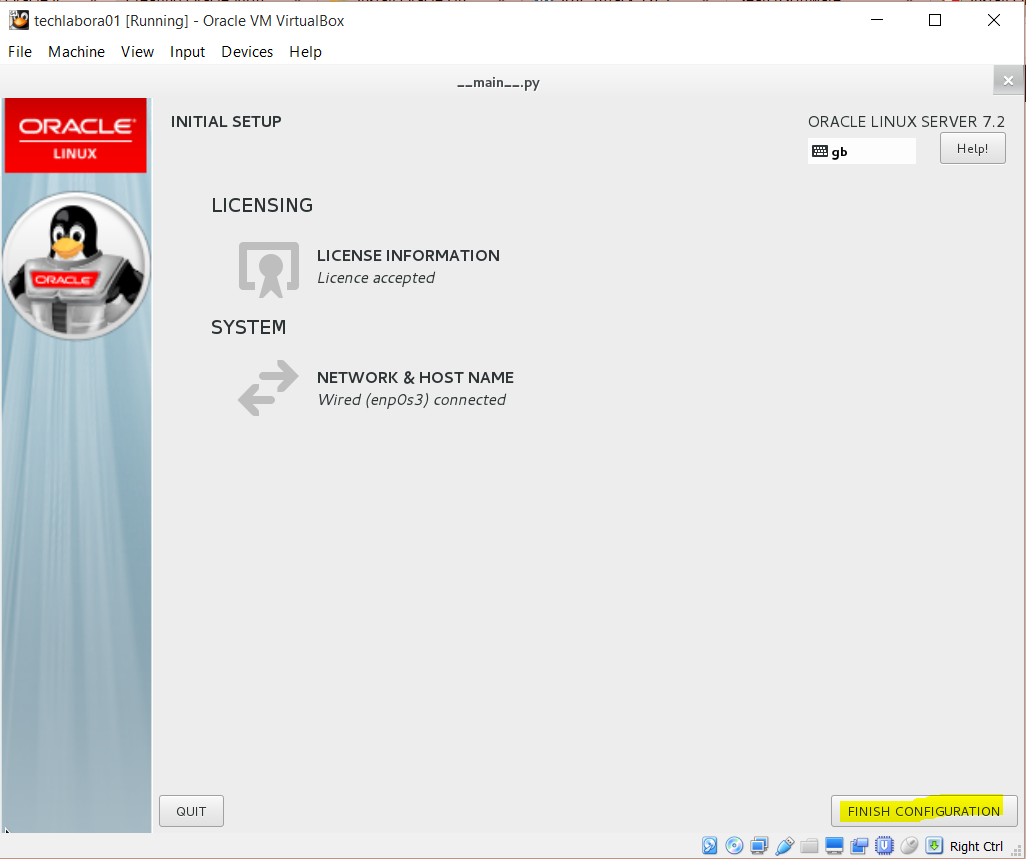
- You should now see the below screen
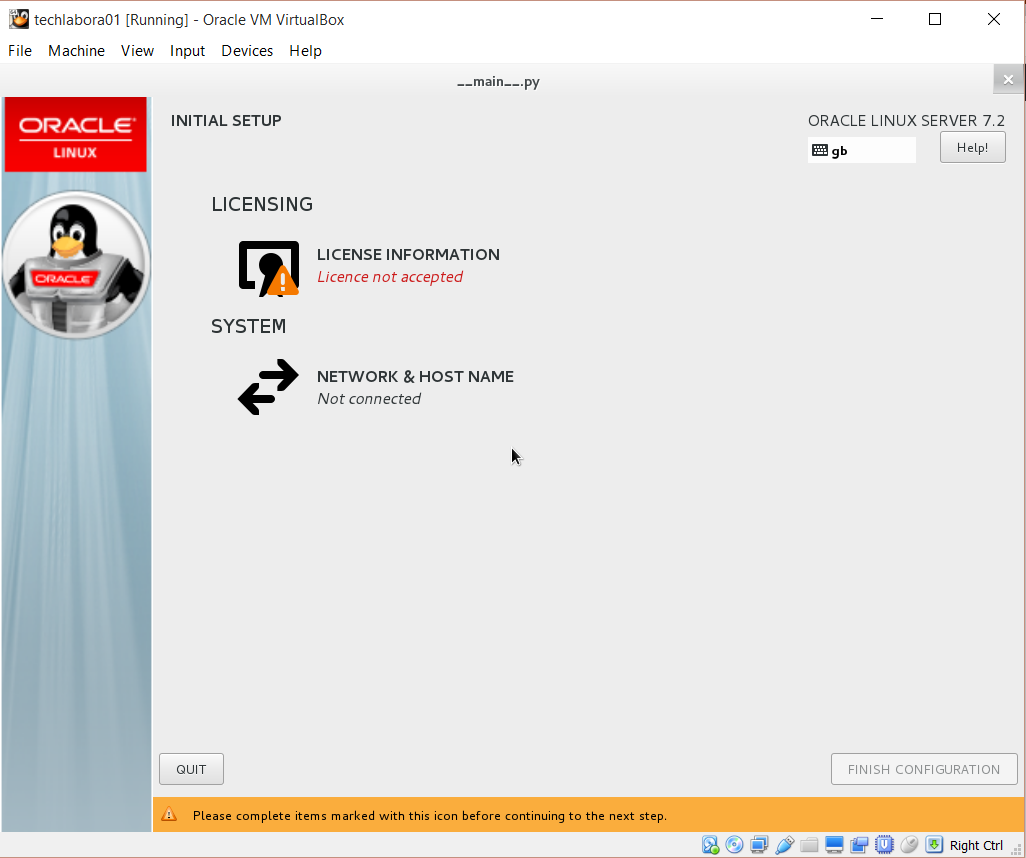
- Accept the license agreement
- Check the network configuration and click Finish Configuration
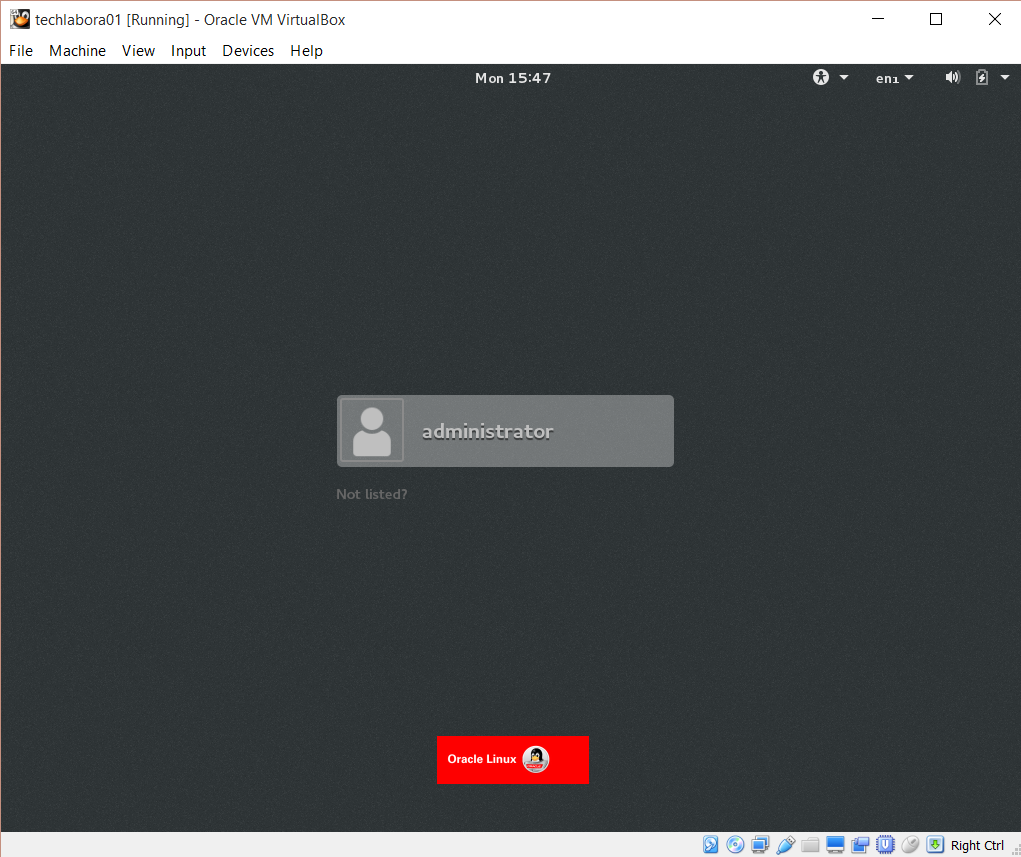
- You will now see the login page
- Log in using your admin account which you setup
- You will now see the below screen
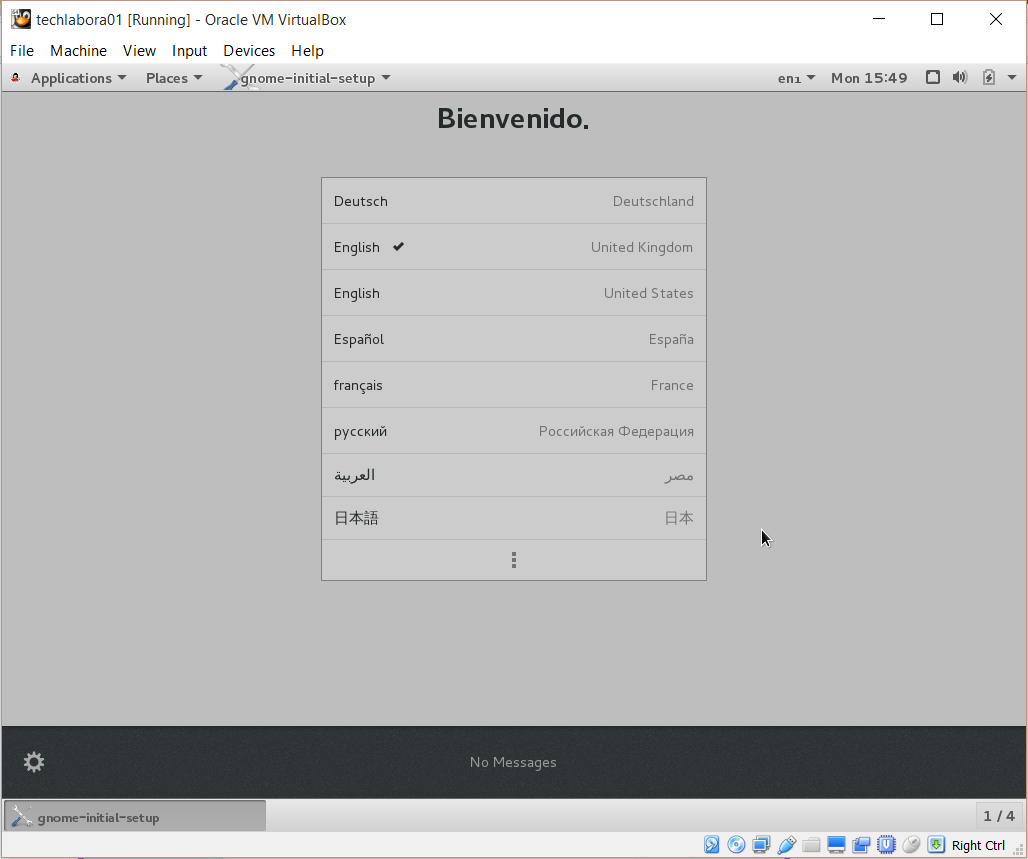
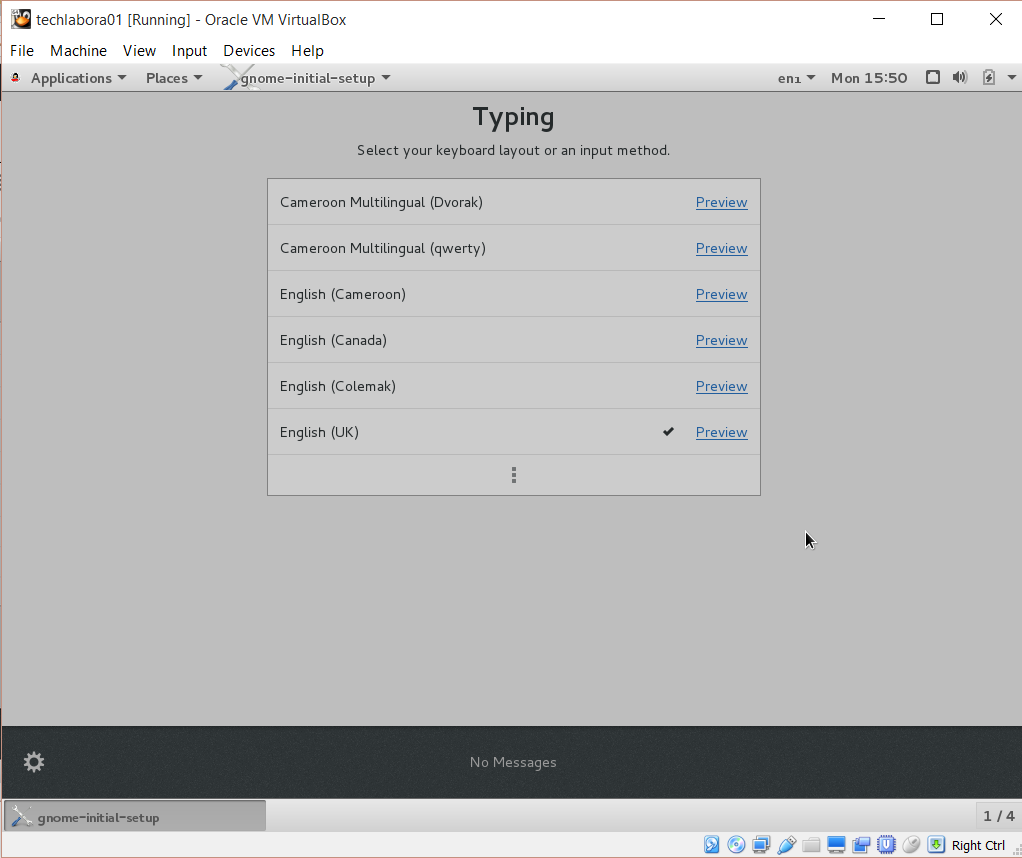
- On the typing screen select your language
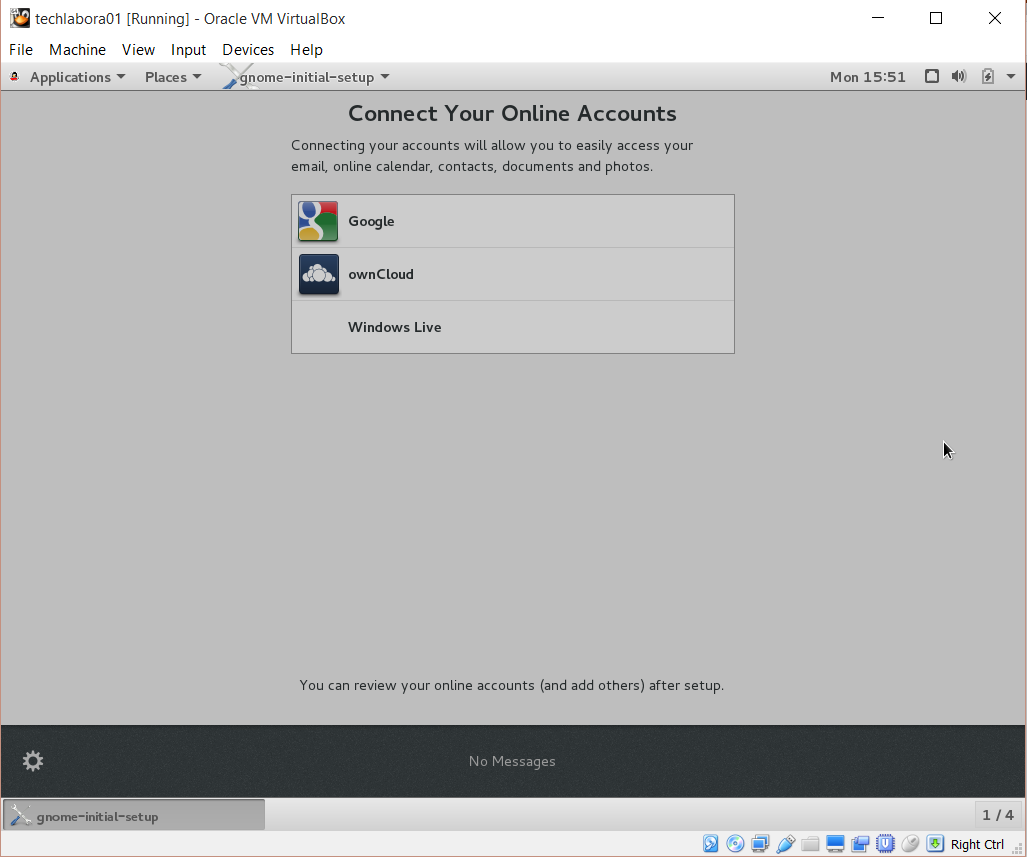
- Skip the email account setup
- You should now see the screen below
- Install Oracle on the second node
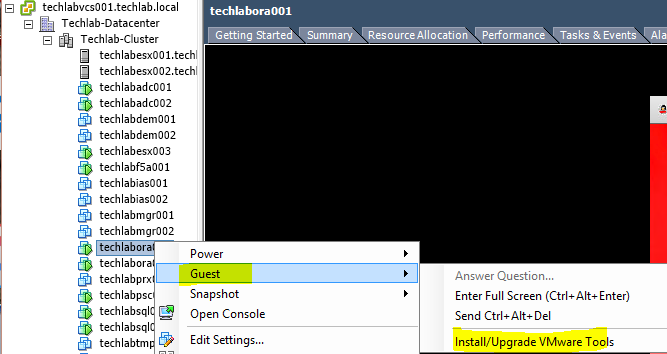
- Next update VMware Tools on both nodes – Attach the iso to the VM
- Log in to Putty and type the below commands
- ls media to check nothing is previously mounted to /media
- mount /dev/cdrom /media/
- cd /media
- ls
- cp VMwareTools9.10.5.tar.gz /tmp/
- cd /tmp
- ls
- tar xvzf VMwareTools9.10.5.tar.gz
- cd vmware-tools-distrib
- ./vmware-tools.pl -default
- rm -rf vmware-tools-distrib
- rm -rf VMwareTools9.10.5.tar.gz
- If there is an issue with VMware Tools saying VMware Tools not installed on the system then type
- rm -f /etc/vmware-tools/locations
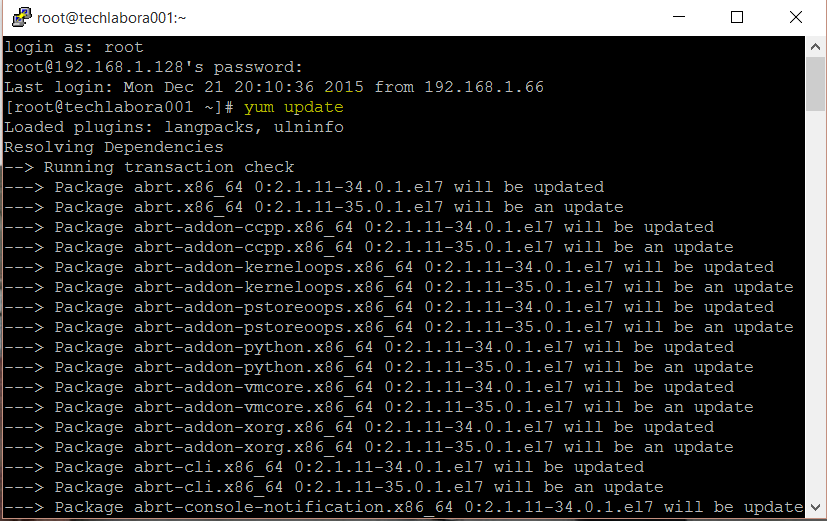
- Next Open Putty and run yum update -y on both nodes
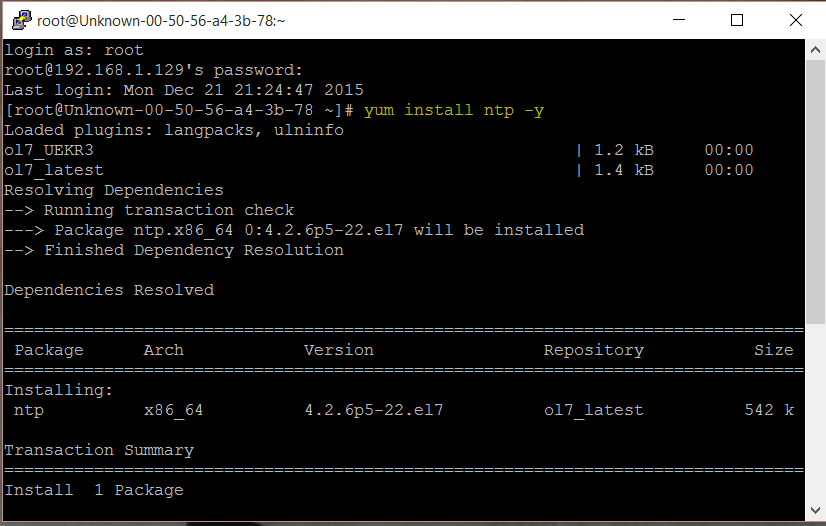
- Next type yum install ntp -y on both nodes
- Next Oracle have provided a pre-requisite checker
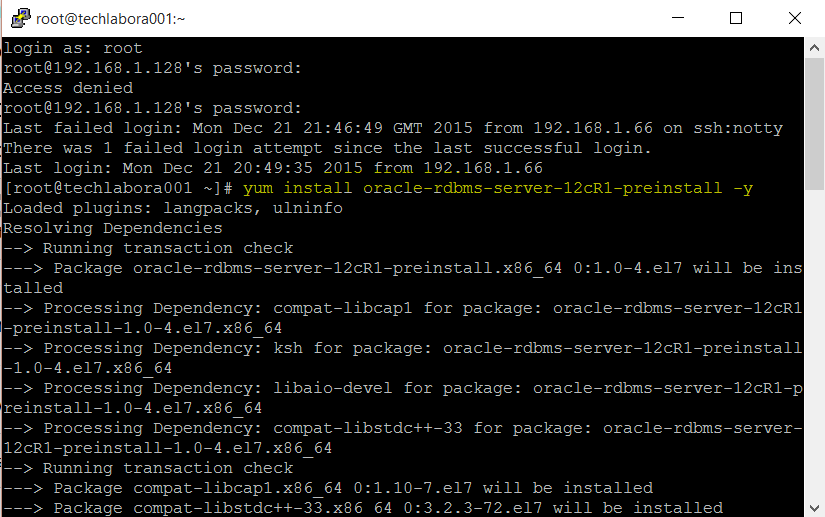
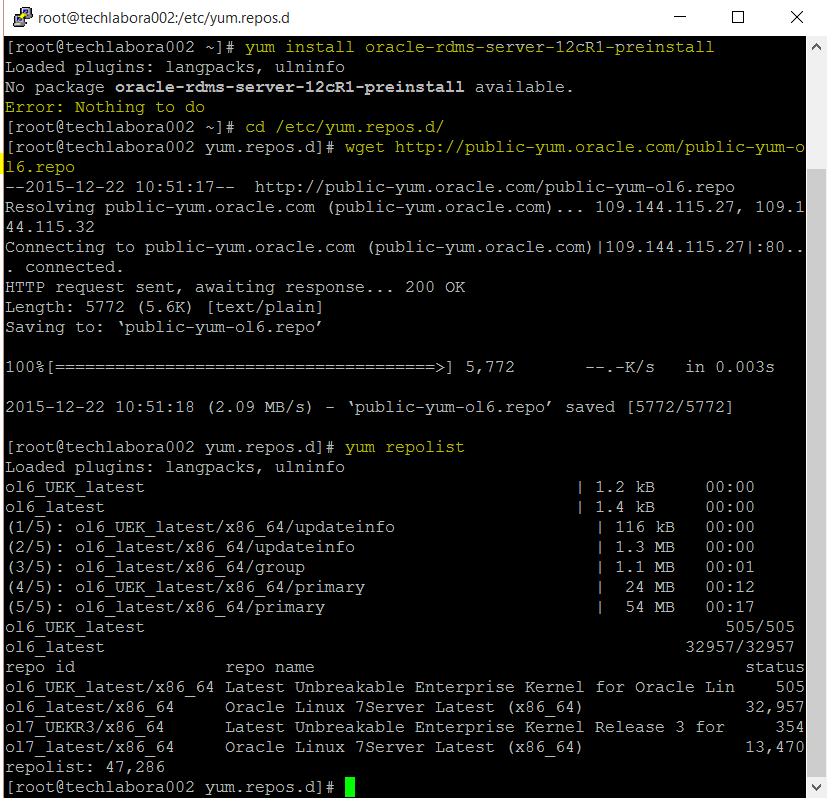
- Type yum install oracle-rdbms-server-12cR1-preinstall -y on both nodes
- Note: If you get an message saying No package oracle-rdms-server-12cR1-preinstall available then try typing
- cd /etc/yum.repos.d/
- wget http://public-yum.oracle.com/public-yum-ol7.repo
- yum repolist
- yum install oracle-rdbms-server-12cR1-preinstall -y
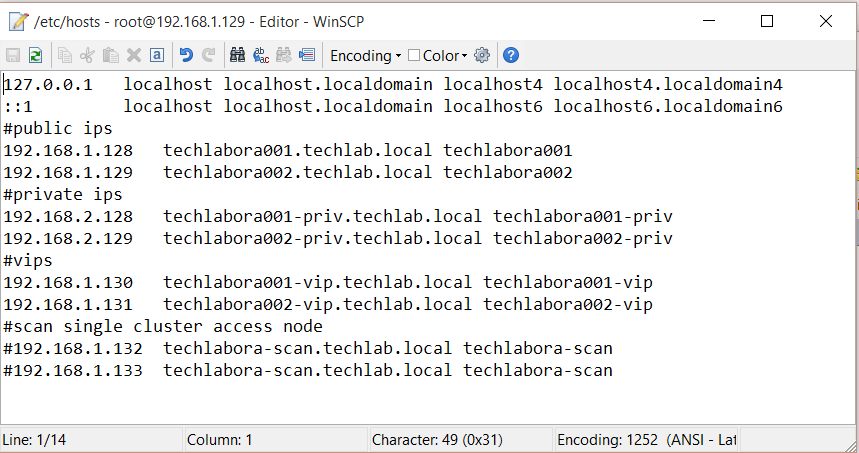
- WINSCP into the VM and modify the host file to reflect both nodenames and IP addresses on both nodes
- The SCAN address is commented out of the hosts file because it must be resolved using a DNS, so it can round-robin between 3 addresses on the same subnet as the public IPs. The DNS can be configured on the host machine using BIND or Dnsmasq, which is much simpler. If you are using Dnsmasq, put the RAC-specific entries in the hosts machines “/etc/host” file, with the SCAN entries uncommented, and restart Dnsmasq.
- Set the password for the Oracle user on both nodes
- Type passwd oracle and change password

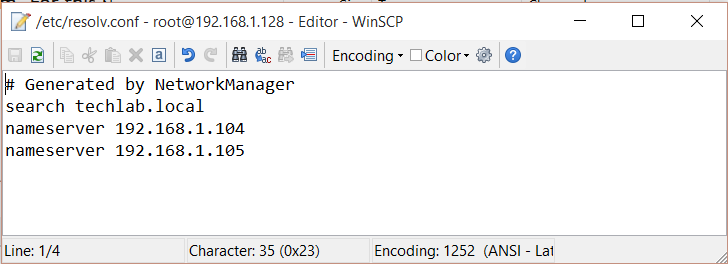
- Make sure the “/etc/resolv.conf” file on both nodes includes a nameserver entry that points to the correct nameserver. Also, if the “domain” and “search” entries are both present, comment out one of them. For this installation my “/etc/resolv.conf” looked like this.
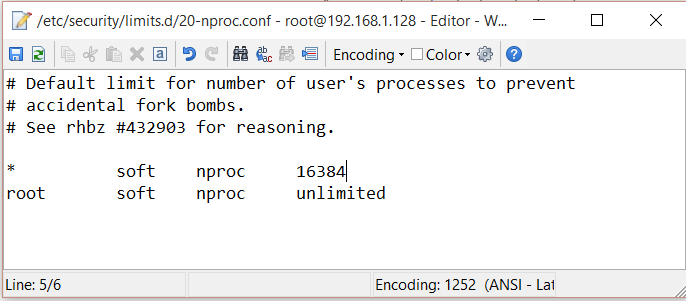
- On both nodes amend the “/etc/security/limits.d/20-nproc.conf” file from 4096 to 16384
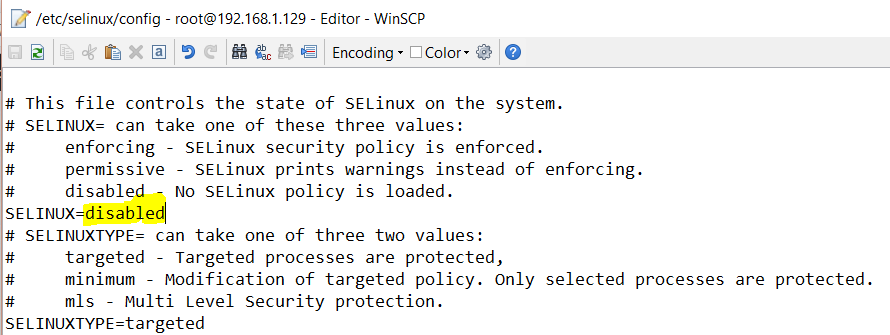
- Change the setting of SELinux on both nodes to disabled by editing the “/etc/selinux/config” file, making sure the SELINUX flag is set as follows.
- Next we are going to disable the Linux firewall on both nodes, which will otherwise interfere with the RAC install. First let’s make sure the firewall service is stopped
- Type systemctl stop firewalld
- Type systemctl disable firewalld

- Either configure NTP, or make sure it is not configured so the Oracle Cluster Time Synchronization Service (ctssd) can synchronize the times of the RAC nodes. If you want to deconfigure NTP do the following, which is what I did for this installation.

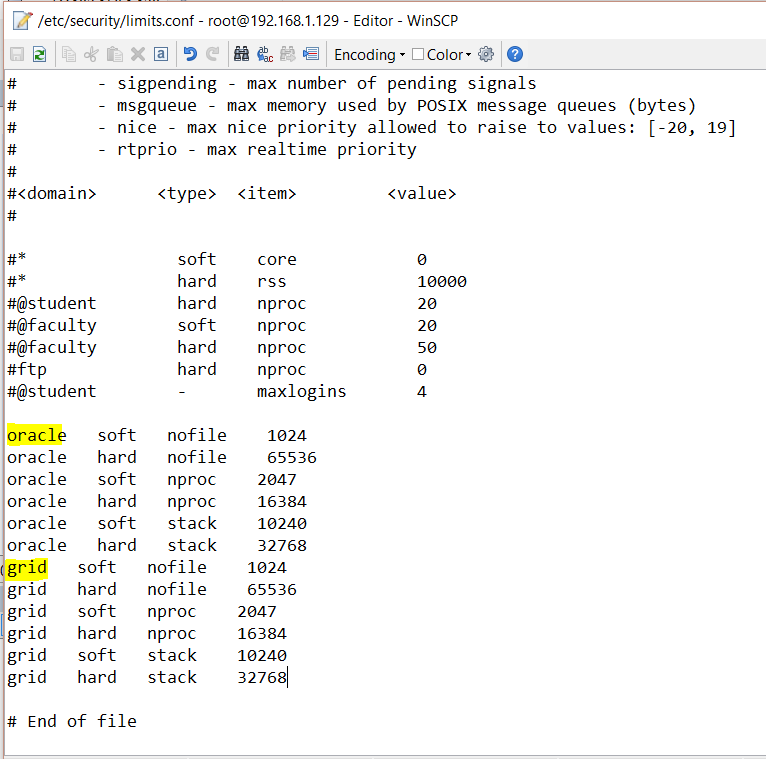
- Add the following lines to the “/etc/security/limits.conf” file.
oracle   soft   nofile    1024
oracle   hard   nofile    65536
oracle   soft   nproc    2047
oracle   hard   nproc    16384
oracle   soft   stack    10240
oracle   hard   stack    32768
grid     soft   nofile   1024
grid     hard   nofile   65536
grid     soft   nproc    2047
grid     hard   nproc    16384
grid     soft   stack    10240
grid     hard   stack    32768
- Add or amend the following lines to the “/etc/sysctl.conf” file on both nodes. Note this file is probably OK… I didn’t need to adjust it.
fs.file-max = 6815744
kernel.sem = 250 32000 100 128
kernel.shmmni = 4096
kernel.shmall = 1073741824
kernel.shmmax = 4398046511104
net.core.rmem_default = 262144
net.core.rmem_max = 4194304
net.core.wmem_default = 262144
net.core.wmem_max = 1048576
fs.aio-max-nr = 1048576
net.ipv4.ip_local_port_range = 9000 65500
- Run /sbin/sysctl -p
- Create the directories in which the Oracle software will be installed on both nodes
- mkdir -p /u01/app/12.1.0.2/grid
- mkdir -p /u01/app/oracle/product/12.1.0.2/db_1
- chown -R oracle:oinstall /u01
- chown oracle:oinstall /u01/app/oracle
- chmod -R 775 /u01/

- Add in groups on both nodes
- Note you will see from the screenprint below that the pre-requisites installer from Oracle creates 2 groups but not the rest so we still need to create them
- groupadd -g 54321 oinstall
- groupadd -g 54322 dba
- groupadd -g 54323 oper
- groupadd -g 54324 backupdba
- groupadd -g 54325 dgdba
- groupadd -g 54326 kmdba
- groupadd -g 54327 asmdba
- groupadd -g 54328 asmoper
- groupadd -g 54329 asmadmin
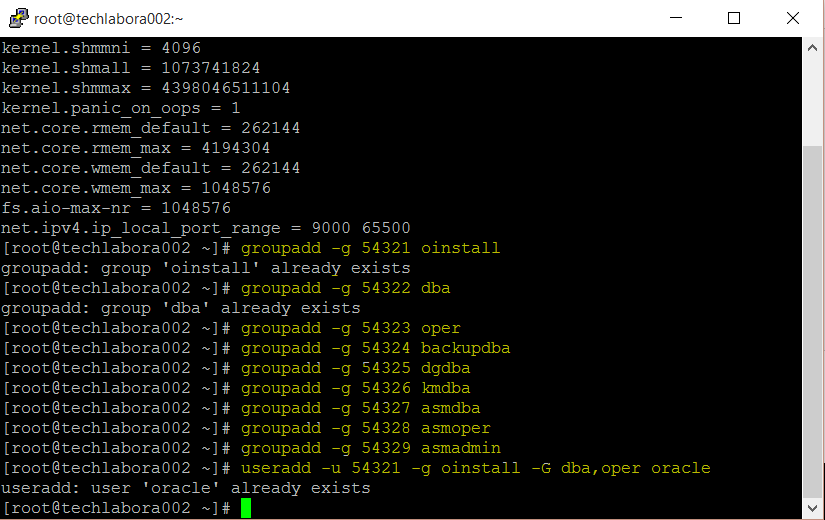
- The user oracle was already created by the rdbms preinstall package with oinstall and dba groups. But it is not member of all newly created groups. Also, it has no rights for ASM, and is not able to see ASM disks to create a database. For that, the oracle user needs the asmdba group. You can drop and recreate the user, or just alter its parameters with this command:
- /usr/sbin/usermod -g oinstall -G dba,backupdba,dgdba,kmdba,oper,asmdba,asmadmin oracle
- Grid Infrastructure needs a software owner, member of oinstall, which is not created by the rdbms preinstall package. It is advised to create a dedicated user:
- /usr/sbin/useradd -u 54322 -g oinstall -G asmadmin,asmdba,asmoper grid
- Type passwd grid and change the password
- These are the groups which are set up

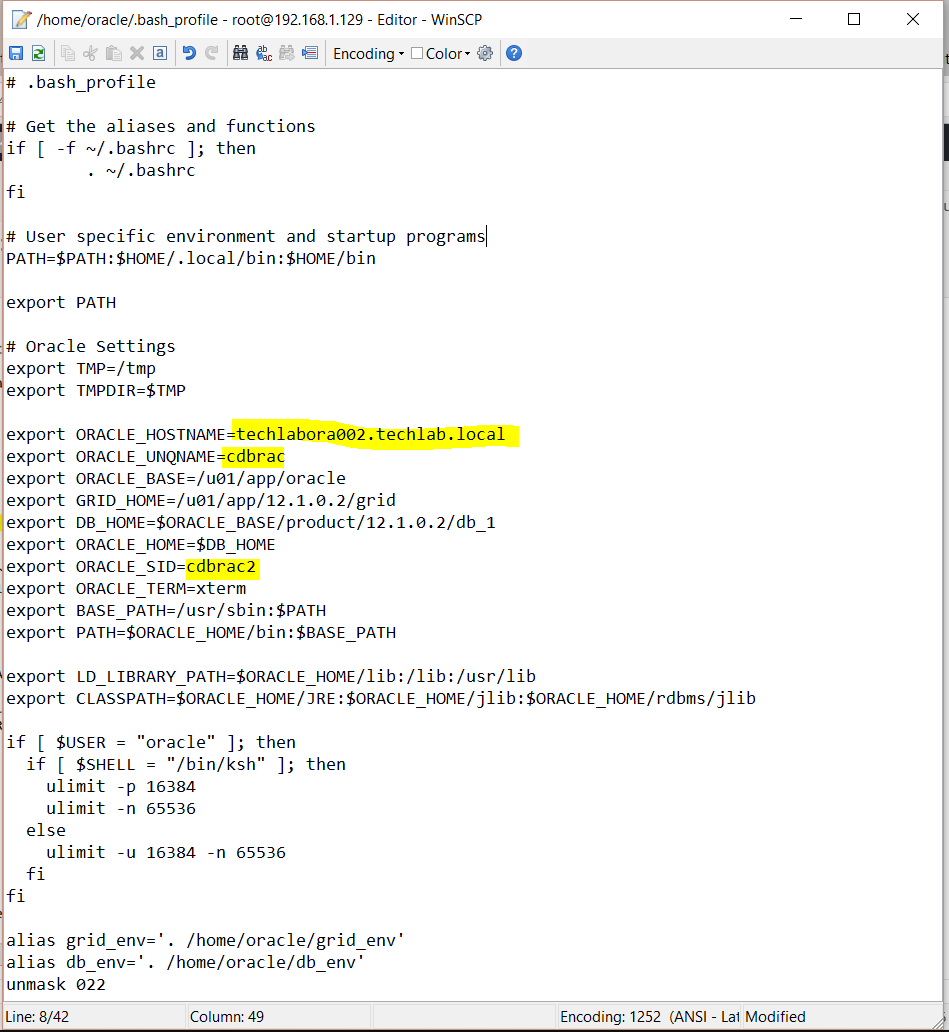
- You now need to edit the following lines at the end of the “/home/oracle/.bash_profile” file
- To do this I opened WinSCP and navigated to /home/oracle
- Click on Hidden at the bottom right hand corner
- You should now see the hidden .bash_profile file
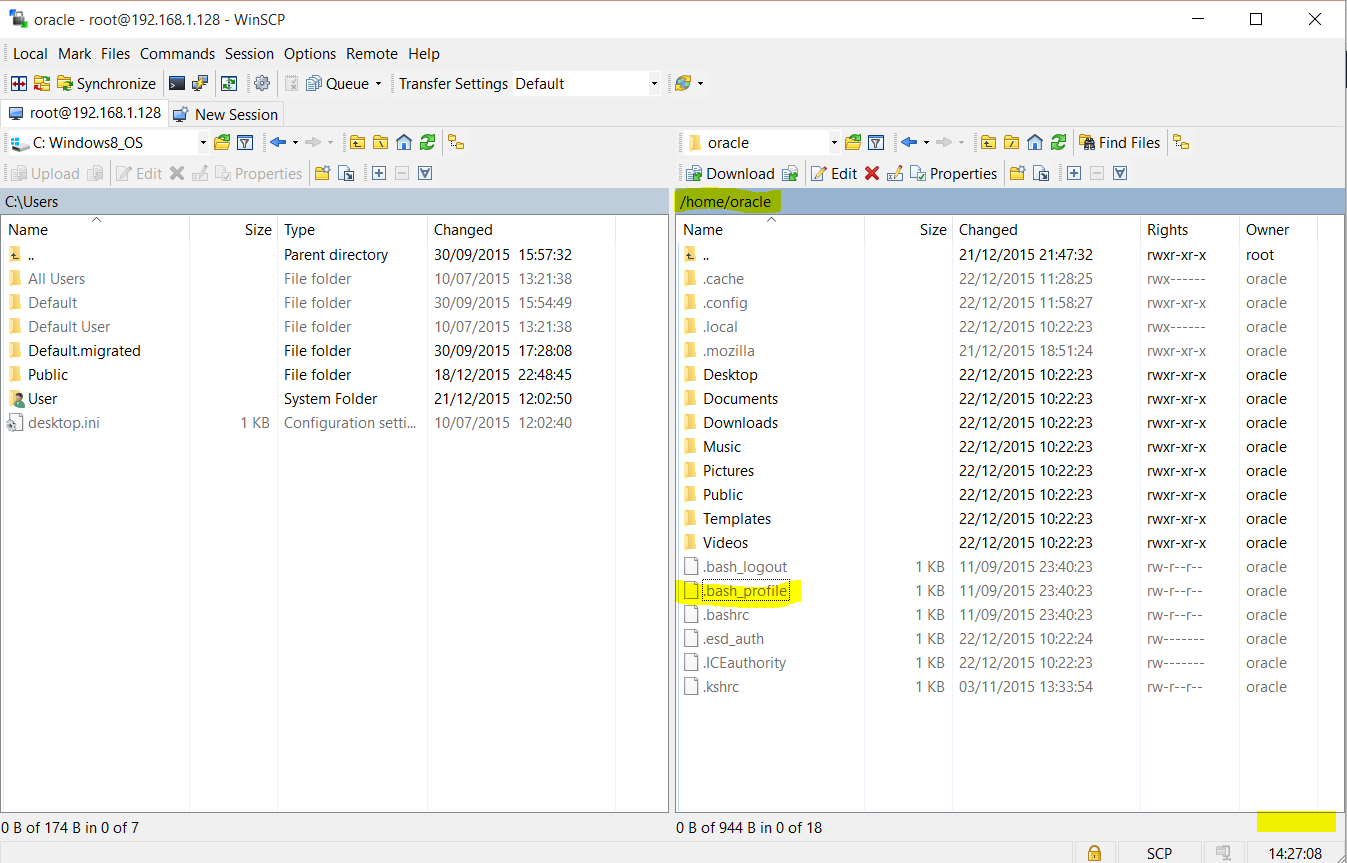
- Copy the file to your desktop and you now need to add the following lines to the end of the file
# Oracle Settings
export TMP=/tmp
export TMPDIR=$TMP

export ORACLE_HOSTNAME=techlabora001.techlab.local
export ORACLE_UNQNAME=cdbrac
export ORACLE_BASE=/u01/app/oracle
export GRID_HOME=/u01/app/12.1.0.2/grid
export DB_HOME=$ORACLE_BASE/product/12.1.0.2/db_1
export ORACLE_HOME=$DB_HOME
export ORACLE_SID=cdbrac1
export ORACLE_TERM=xterm
export BASE_PATH=/usr/sbin:$PATH
export PATH=$ORACLE_HOME/bin:$BASE_PATH

export LD_LIBRARY_PATH=$ORACLE_HOME/lib:/lib:/usr/lib
export CLASSPATH=$ORACLE_HOME/JRE:$ORACLE_HOME/jlib:$ORACLE_HOME/rdbms/jlib

if [ $USER = "oracle" ]; then
  if [ $SHELL = "/bin/ksh" ]; then
    ulimit -p 16384
    ulimit -n 65536
  else
    ulimit -u 16384 -n 65536
  fi
fi

alias grid_env='. /home/oracle/grid_env'
alias db_env='. /home/oracle/db_env'
umask 022
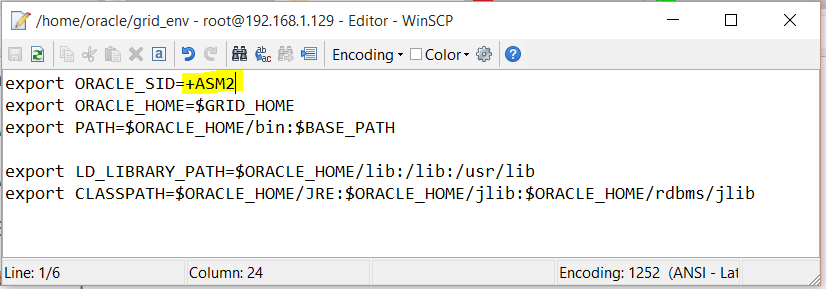
- Next Create a file called “/home/oracle/grid_env” with the following contents.
export ORACLE_SID=+ASM1
export ORACLE_HOME=$GRID_HOME
export PATH=$ORACLE_HOME/bin:$BASE_PATH

export LD_LIBRARY_PATH=$ORACLE_HOME/lib:/lib:/usr/lib
export CLASSPATH=$ORACLE_HOME/JRE:$ORACLE_HOME/jlib:$ORACLE_HOME/rdbms/jlib
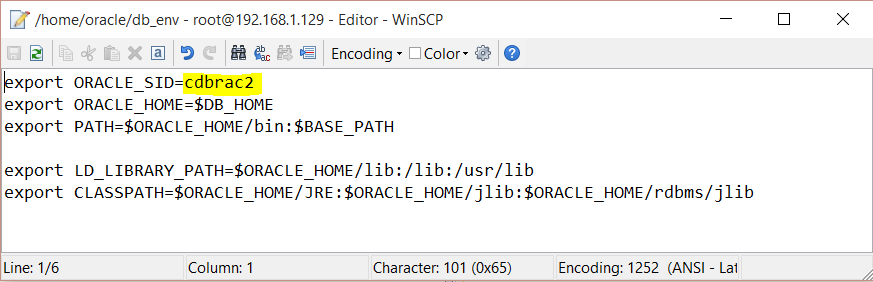
- Next Create a file called “/home/oracle/db_env” with the following contents.
export ORACLE_SID=cdbrac1
export ORACLE_HOME=$DB_HOME
export PATH=$ORACLE_HOME/bin:$BASE_PATH

export LD_LIBRARY_PATH=$ORACLE_HOME/lib:/lib:/usr/lib
export CLASSPATH=$ORACLE_HOME/JRE:$ORACLE_HOME/jlib:$ORACLE_HOME/rdbms/jlib
- We now need to edit the “/home/oracle/.bash_profile” file on the “techlabora002” node to correct the ORACLE_SID and ORACLE_HOSTNAME values.
- Note: At the bottom of the file it says unmask and meant to say umask
- Create and edit the /home/oracle/grid_env file and edit as below
- Create and edit the /home/oracle/db_env file and edit as below
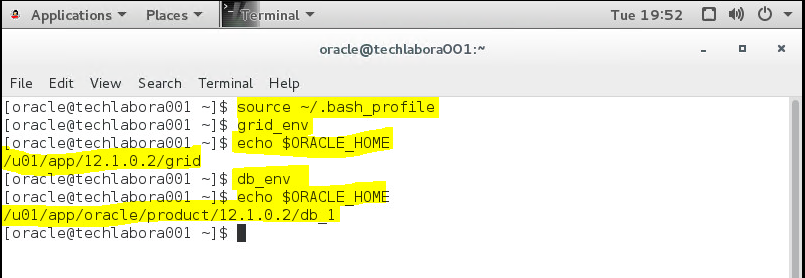
- Once the “/home/oracle/.bash_profile” has been run, you will be able to switch between environments as follows.
- I logged in as oracle to both nodes and ran the following
- Follow this link below or my instructions underneath to set a swap file space on both nodes.
http://it-toolkit.blogspot.co.uk/2015/07/increase-swapfile-space-on-oracle.html
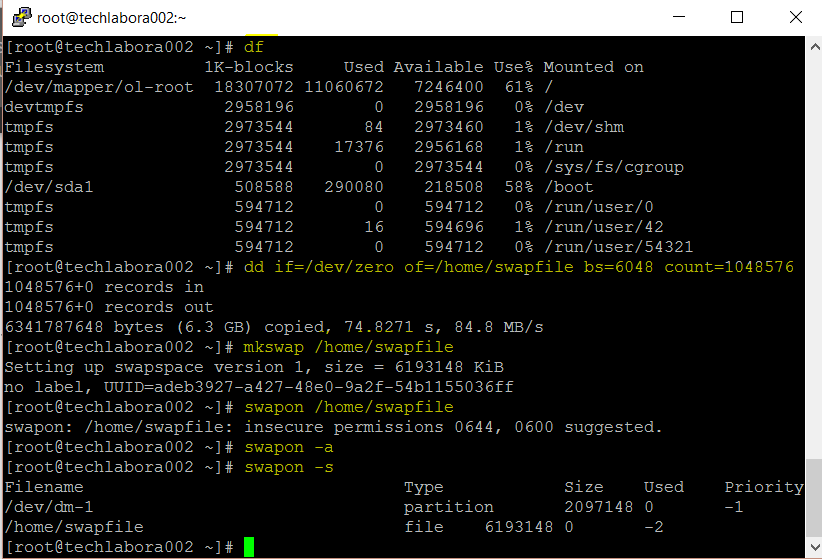
- Putty into each node and run the following
- dd if=/dev/zero of=/home/swapfile bs=6048 count=1048576
- mkswap /home/swapfile
- swapon /home/swapfile
- swapon -a
- swapon -s
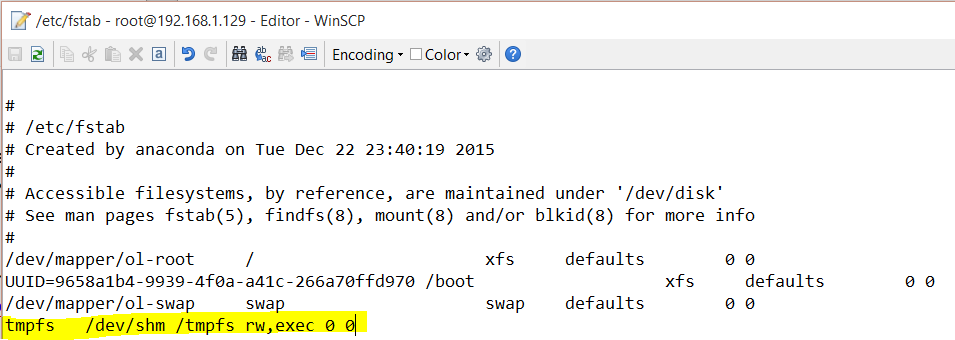
- WinSCP into each node and update /etc/fstab (Important)

- Next do the following
- Open /etc/fstab/ and add the highlighted line to the bottom
- tmpfs /dev/shm /tmpfs rw,exec 0 0
- Then run in Putty the following command
- mount -o remount,size=4g /dev/shm
![]()
- The reason we do this is during the installer pre-requisite checker, it will sometimes error falsely. This error of /dev/shm is because of a bug in cluvfy which comes with 12.1.0.2 Grid Infrastructure. I don’t get any errors after doing the above
- Next Type chkconfig avahi-daemon off on both nodes
- On each node add the following to /etc/pam.d/login file on both nodes
- session required /lib64/security/pam_limits.so session required pam_limits.so
- session required pam_limits.so
- Next on both nodes unzip the grid files
- cd /tmp/grid
- unzip linuxamd64_12102_grid_1of2.zip -d /tmp/grid
- unzip linuxamd64_12102_grid_2of2.zip -d /tmp/grid
- Restart both nodes
- When both nodes have started, check they can both ping all the public and private IP addresses
- At this point I shut both servers down and took a snapshot
- Power both nodes back on again
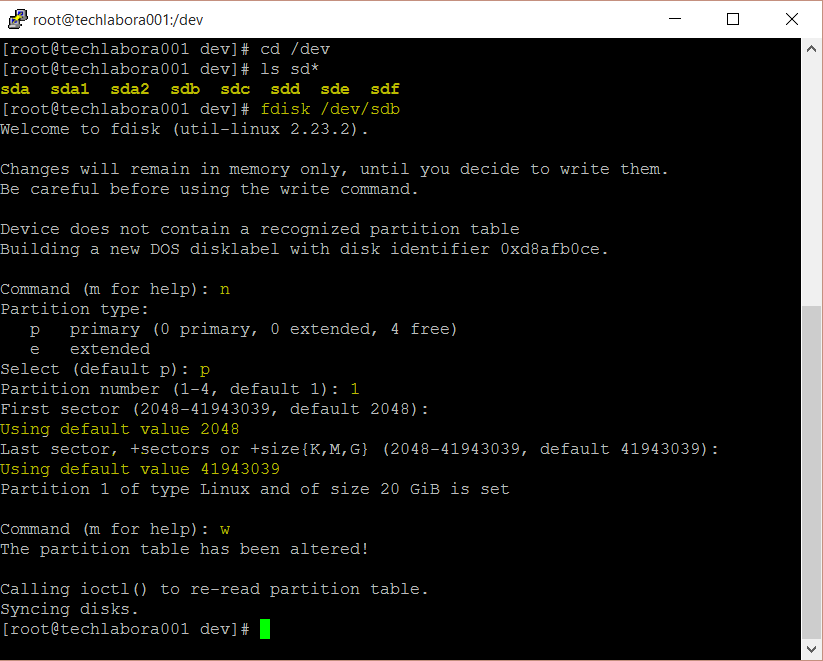
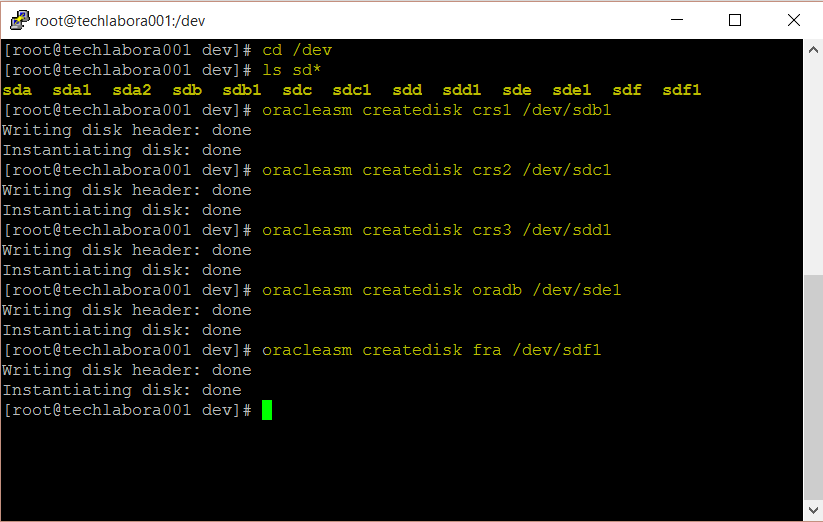
- Next we need to format the disks originally added to Node 1 only on node 1
- Format the 5 disks which will be sdb, sdc, sdd, sde, and sdf
- As an example for the first disk, type fdisk /dev/sdb
- Type n for new
- Type p for primary
- Type 1 for partitionPress enter
- Press enter
- Press enter
- Press w
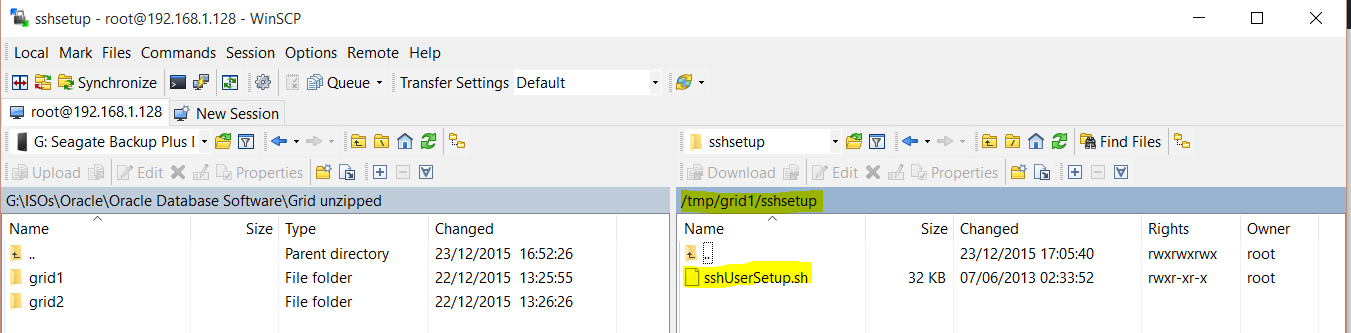
SSH
The OUI (Oracle Universal Installer) is run on one node, and uses SSH and scp commands to run command and copy files on remote nodes during the install. SSH must be configured on all members of the cluster to avoid each command to prompt for a password. This configuration can be done during install process, with the OUI, or with a script provided by Oracle and available in /software/grid/sshsetup.
You need to run the sshUserSetup.sh script for both oracle and grid accounts:
- Log into Node 1 using Putty and navigate to the grid folder you placed in the /tmp folder followed by navigating to the sshsetup folder
- Note I checked this in WinSCP before logging in to Putty. You can see the sshUserSetup.sh script below
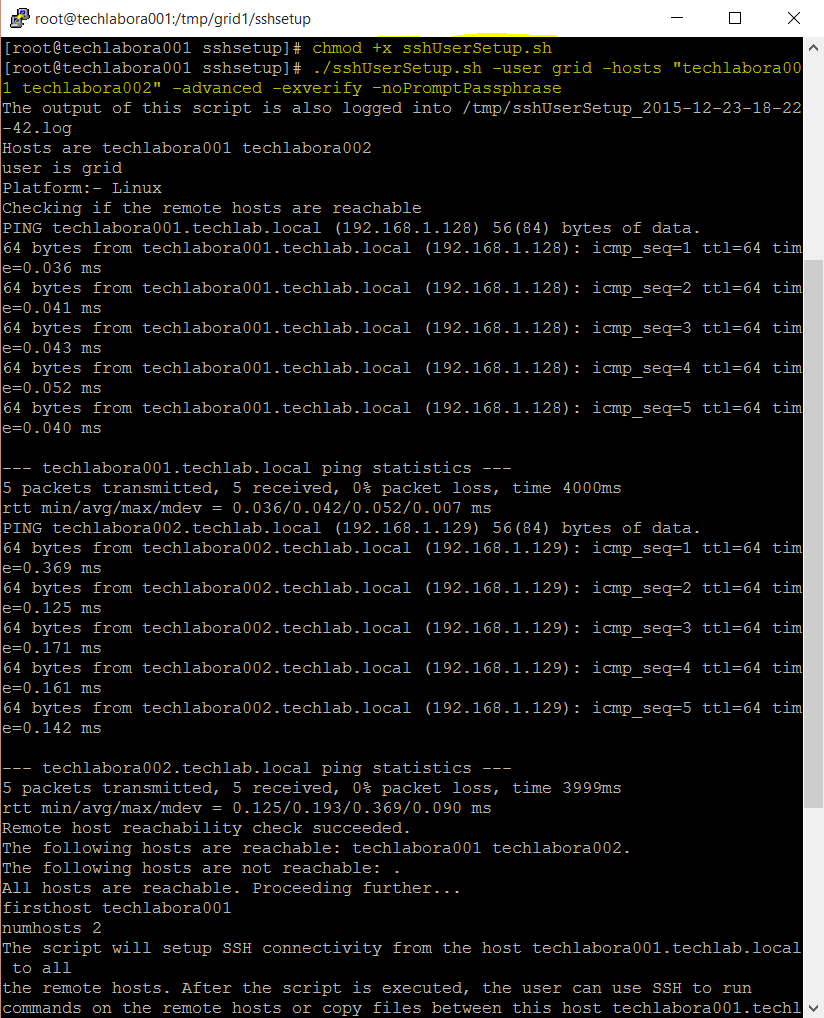
- Within Putty, you need to enable execute permissons (chmod +x sshUserSetup.sh)
- Then type ./sshUserSetup.sh -user grid -hosts “techlabora001 techlabora002” -advanced -exverify –noPromptPassphrase
- You will be prompted to enter some inputs
- Do you want to continue and let the script make the changes Say Yes
- Say No to creating a passphrase
- Put in the grid password several times
- You should now see the below
- Next you need to run the same command but change the user to oracle
- Type ./sshUserSetup.sh -user oracle -hosts “techlabora001 techlabora002” -advanced -exverify –noPromptPassphrase
- Putty into the second node
- Within Putty, you need to enable execute permissons (chmod +x sshUserSetup.sh)
- Then type ./sshUserSetup.sh -user grid -hosts “techlabora001 techlabora002” -advanced -exverify –noPromptPassphrase
- Then type ./sshUserSetup.sh -user oracle -hosts “techlabora001 techlabora002” -advanced -exverify –noPromptPassphrase
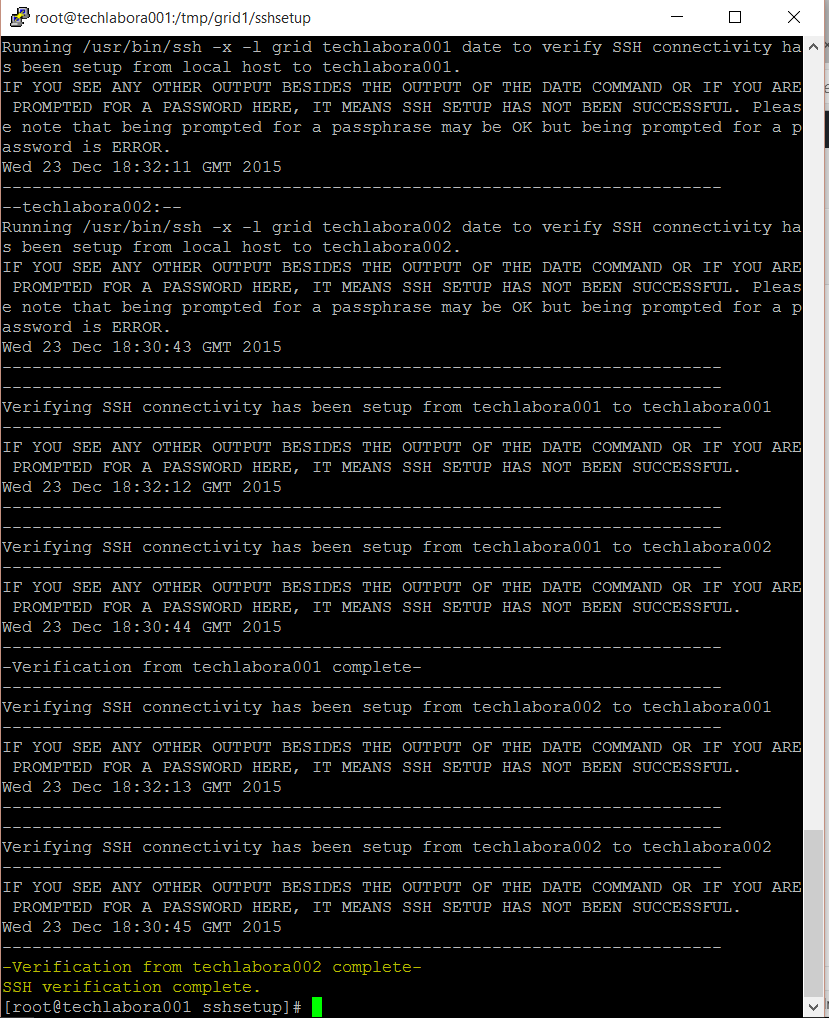
- Once you have set up the ssh, test it in Putty by typing ssh techlabora001 or techlabora002 from one node to another to test connectivity
ASM
The installation and configuration procedures in this section should be performed on both of the Oracle RAC nodes in the cluster. Creating the Automatic Storage Management (ASM) disks, however, will only need to be performed on a single node within the cluster (Node1).
ASM will be used as the shared file system and volume manager for Oracle Clusterware files (OCR and voting disk), Oracle Database files (data, online redo logs, control files, archived redo logs), and the Fast Recovery Area.
ASM distributes the I/O load across all available resources to optimize performance, while removing the need for manual I/O tuning. ASM helps DBAs manage a dynamic database environment by allowing them to grow the database size without any database downtime for storage allocation modification. Oracle ASM is easier to manage than conventional file systems, and is designed to provide optimal performance for Oracle database deployments.
ASM provides redundancy by mirroring against disk failures. ASM stripes data evenly across a number of disks in the disk group, and maintains a uniform distribution of extents as the storage configuration changes
With the introduction of Oracle ASM, administrators can expand storage capacity without having to take the database offline; additional ASM disks can be added to an existing ASM disk group for increased storage capacity. It is a best practice that all ASM disks belonging to the same disk group are similarly sized. Therefore, when adding new ASM disks to an existing disk group, it is recommended to configure the new disks with similar sizes as the existing ASM disks of the same disk group.
Adding or dropping ASM disks will automatically trigger ASM to rebalance the I/O that spreads data across all available disks in the disk group for optimal performance and utilization; this rebalancing involves physical movement of file extents. The impact to the online database activity is generally low, because the rebalance is done at one allocation unit at a time. However, Oracle recommends that you schedule the rebalance operation during off‐peak hours.
To use Oracle ASM, two or three packages are required, depending on the situation. Here, we consider using ASMLib instead of Raw devices. So three packages will be required:
- oracleasm-support
- oracleasmlib
- The driver oracle asm (For this package, it depends of your kernel. If your server is configured with the default Unbreakable Enterprise Kernel (UEK), the driver is already compiled in the kernel. If you are using the Red Hat compatible kernel, you must install the following package (for Oracle Linux 6)
Instructions
- Log into Putty
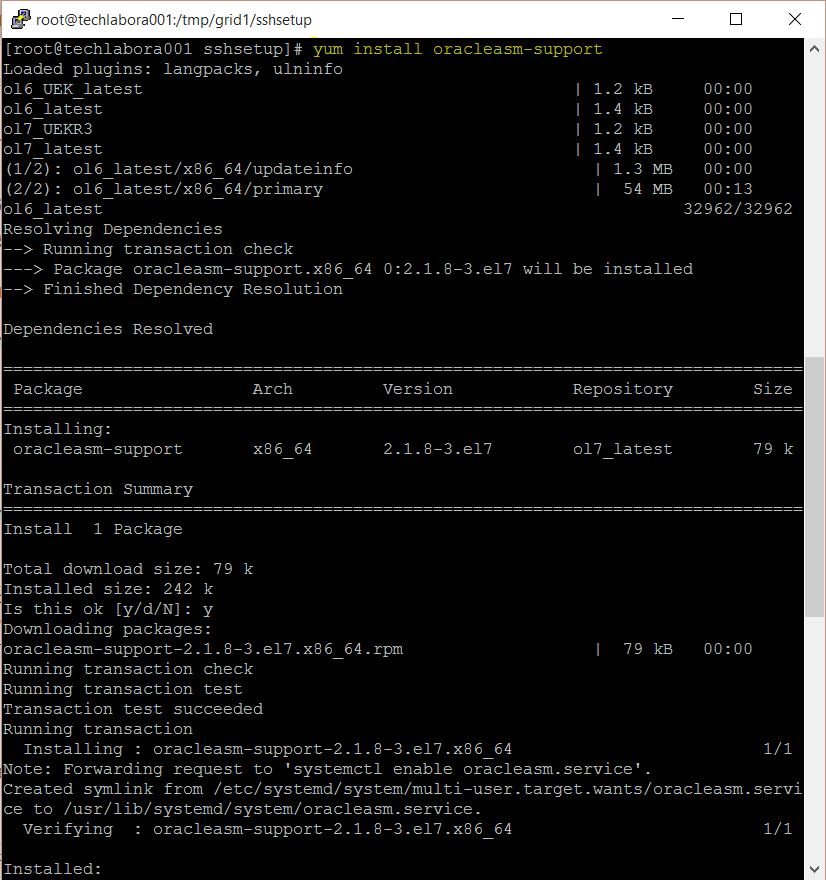
- Install ASM Support
- Type yum install oracleasm-support
- Next we need ASMLIB
- ASMLib is a support library for the Automatic Storage Management feature of the Oracle Database. Oracle provides a Linux specific implementation of this library
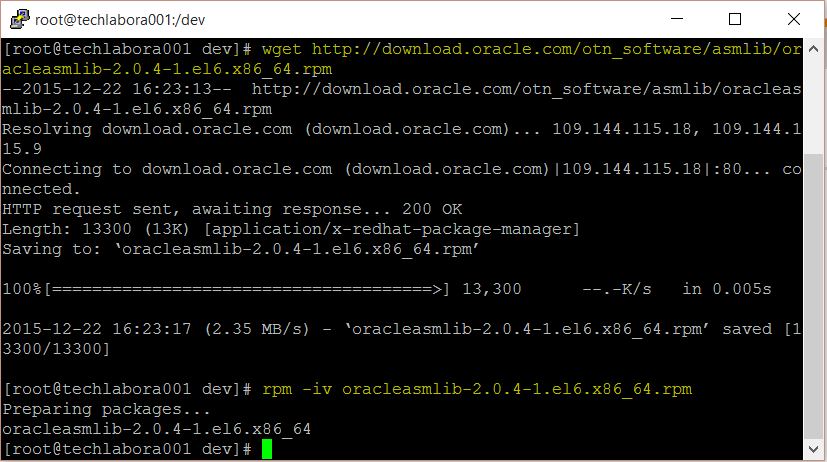
- Type wget http://download.oracle.com/otn_software/asmlib/oracleasmlib-2.0.12-1.el7.x86_64.rpm
- Type rpm -iv oracleasmlib-2.0.12-1.el7.x86_64.rpm
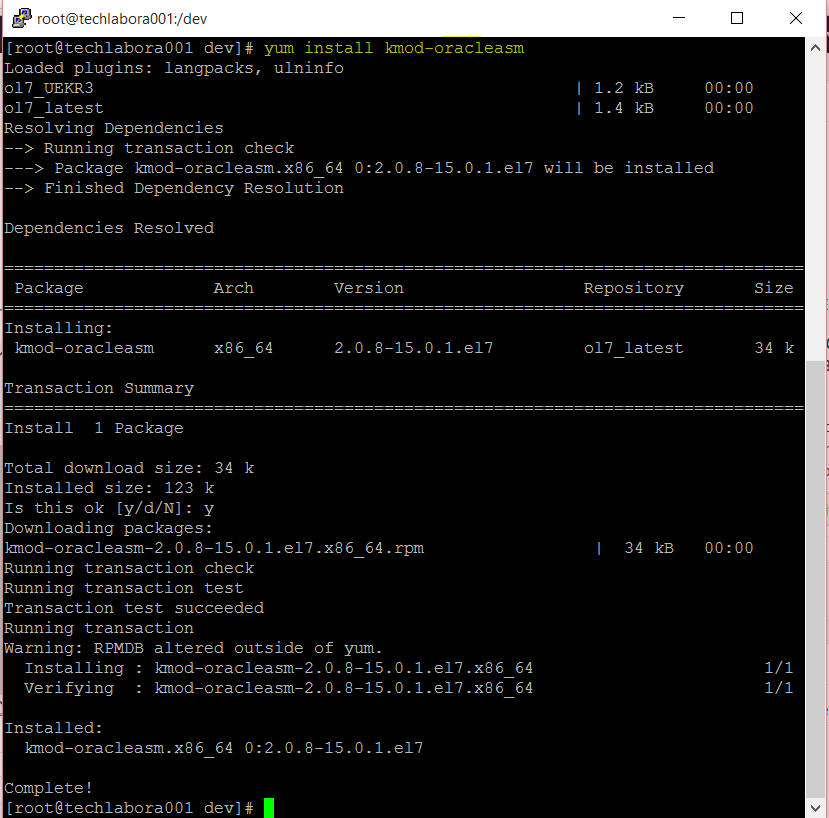
- Type yum install kmod-oracleasm (May not need this. Oracle Linux 7 has the unbreakable kernel)
- Next do the same on the second node
- Next we need to configure and load the asm kernel module on both nodes
- Type /usr/sbin/oracleasm configure -i
- grid
- asmadmin
- y
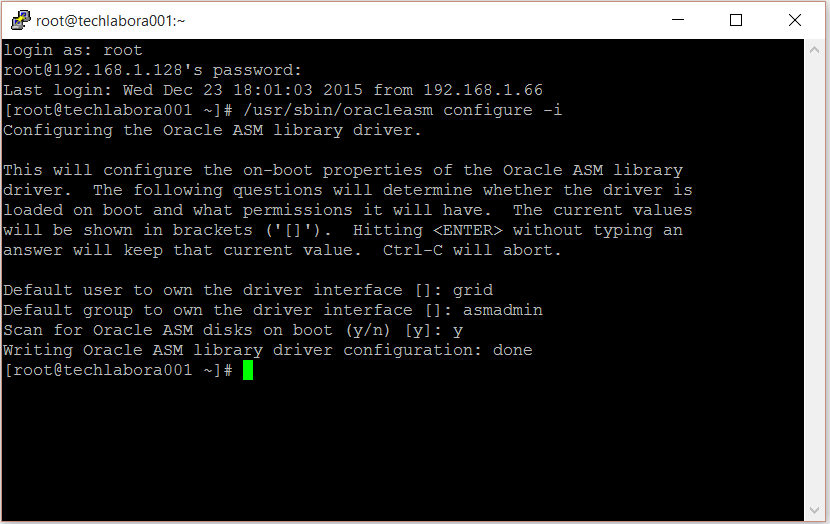
The script completes the following tasks:
- Creates the /etc/sysconfig/oracleasm configuration file
- Creates the /dev/oracleasm mount point
- Mounts the ASMLib driver file system
- Next, initialize ASM module on both nodes:
- Type /usr/sbin/oracleasm init

- Next add the disks to the first node only
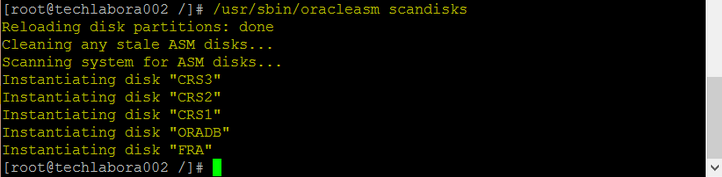
- Next go to the second node and you can type
- /usr/sbin/oracleasm scandisks
- You can also type /usr/sbin/oracleasm status
- If you want to check the disks type
- /usr/sbin/oracleasm listdisks

- Now we can start to install our Grid Infrastructure
- Previously we downloaded and zipped the relevant grid files into the /tmp/grid/grid folder
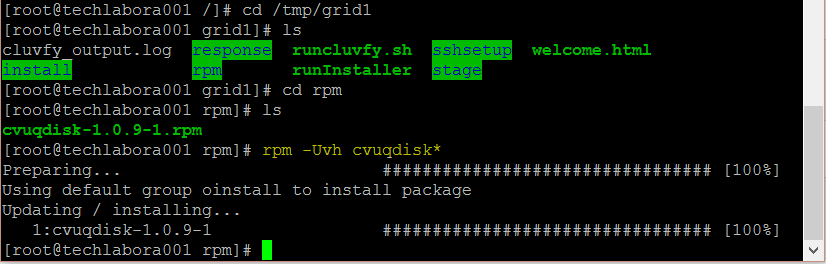
- Install cvuqdisk. The file you are looking for to start with is cvuqdisk in the /tmp/grid/grid/rpm folder
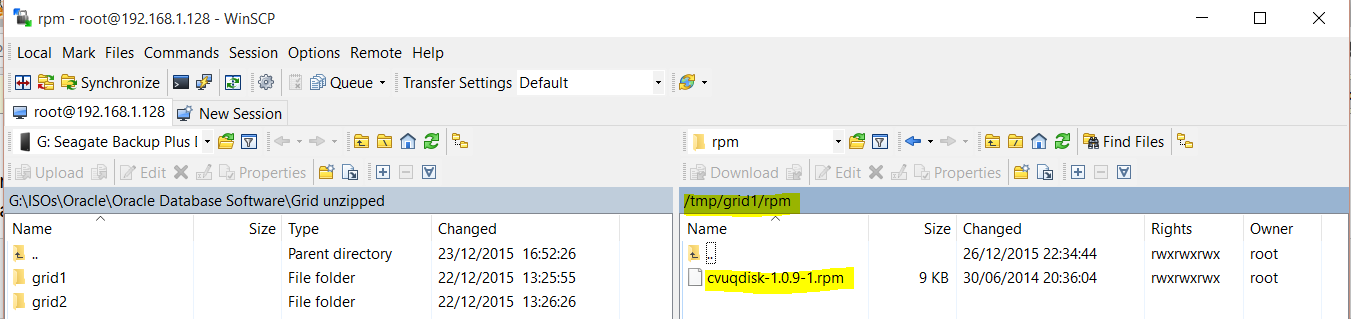
- Type rpm -Uvh cvuqdisk*
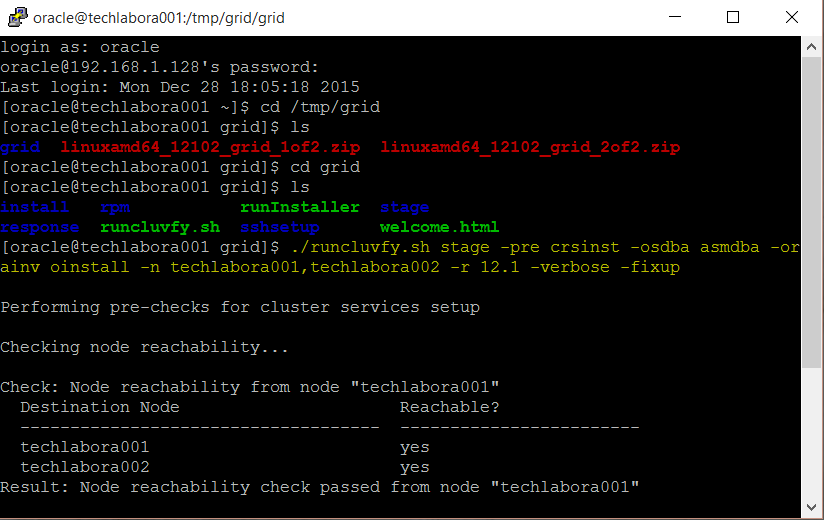
- Next there is a tool in the Grid software called runcluvfy. This is a tool provided by Oracle. It checks all software and hardware pre requisites on each node to make sure the install can be done. This tool is called before installing grid infrastructure, before adding a node, or before adding a database.
- Run the following as the Oracle user
- Type cd /tmp/grid/grid
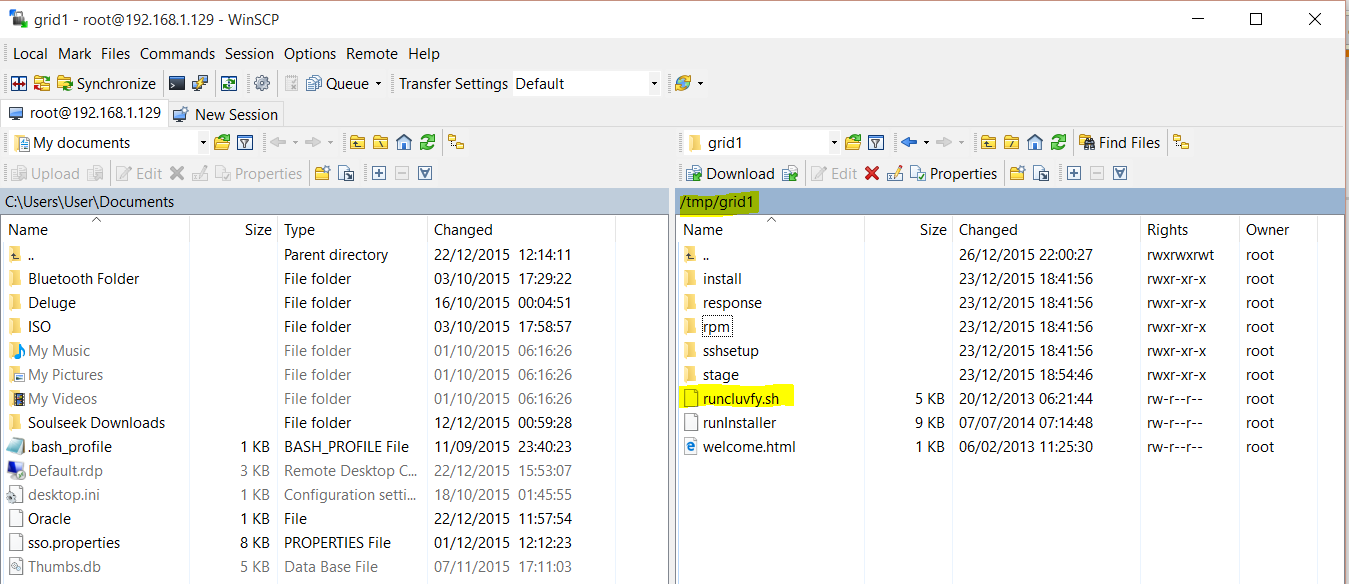
- Type ./runcluvfy.sh stage -pre crsinst -osdba asmdba -orainv oinstall -n techlabora001,techlabora002 -r 12.1 -fixup -verbose
- Check the output for any tests which didn’t pass. I initially had an issue where it wouldn’t start at all in the below screenprint

- Fixed by adding the hostname in /etc/hostname. for some reason it has unknown:00:50:56 etc
- So a correct view is below
- Next log into your Node 1 as the grid user
- Open a terminal session
- Navigate to /tmp/grid/
- Type ./runInstaller

- The Oracle Installer will now run
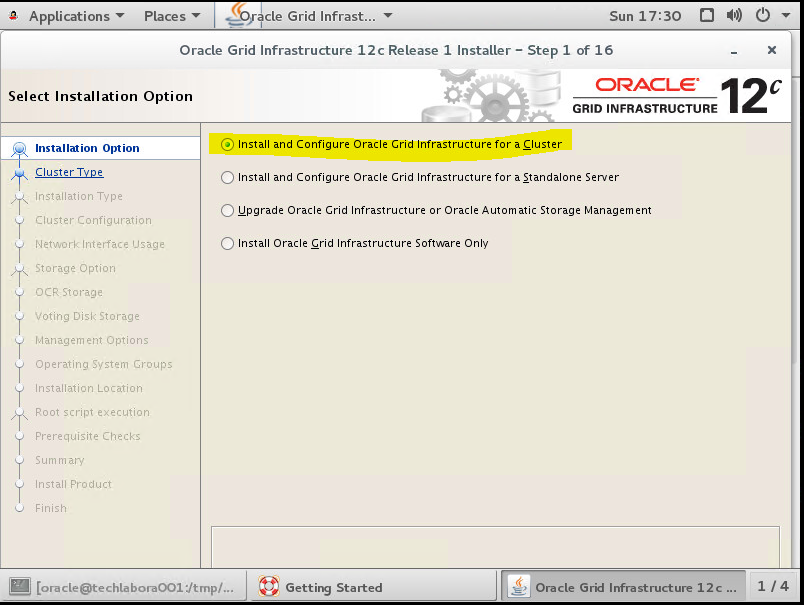
- Select the “Install and Configure Oracle Grid Infrastructure for a Cluster” option, then click the “Next” button.
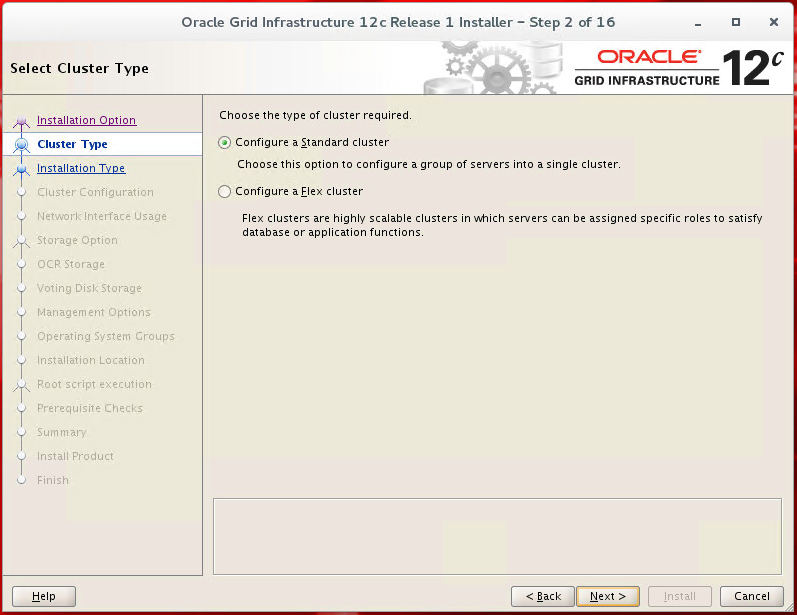
- Choose Configure a Standard cluster
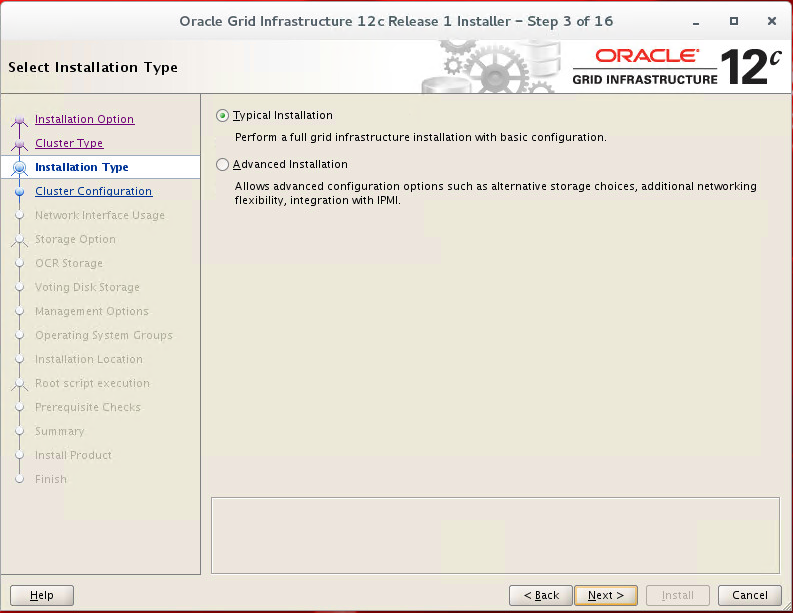
- Choose Typical
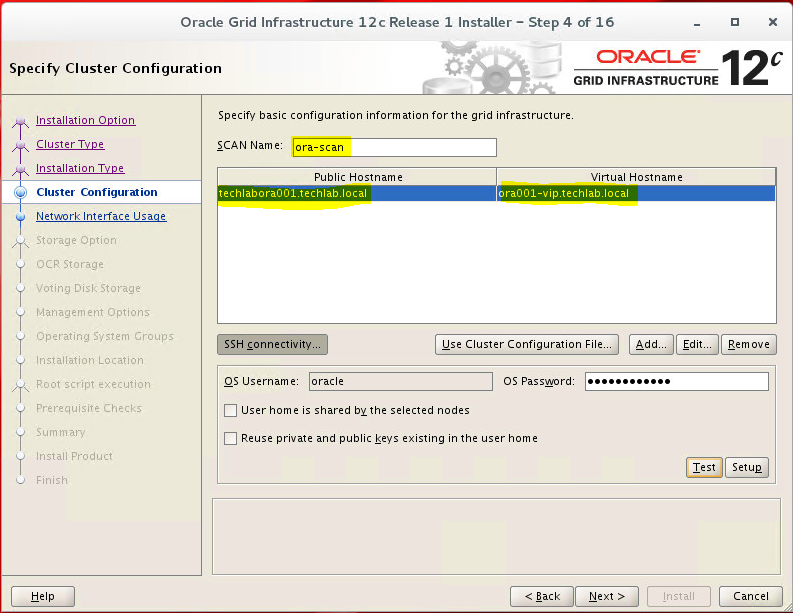
- Put in the correct SCAN name and public and virtual addresses
- Click Add and put in your second node details
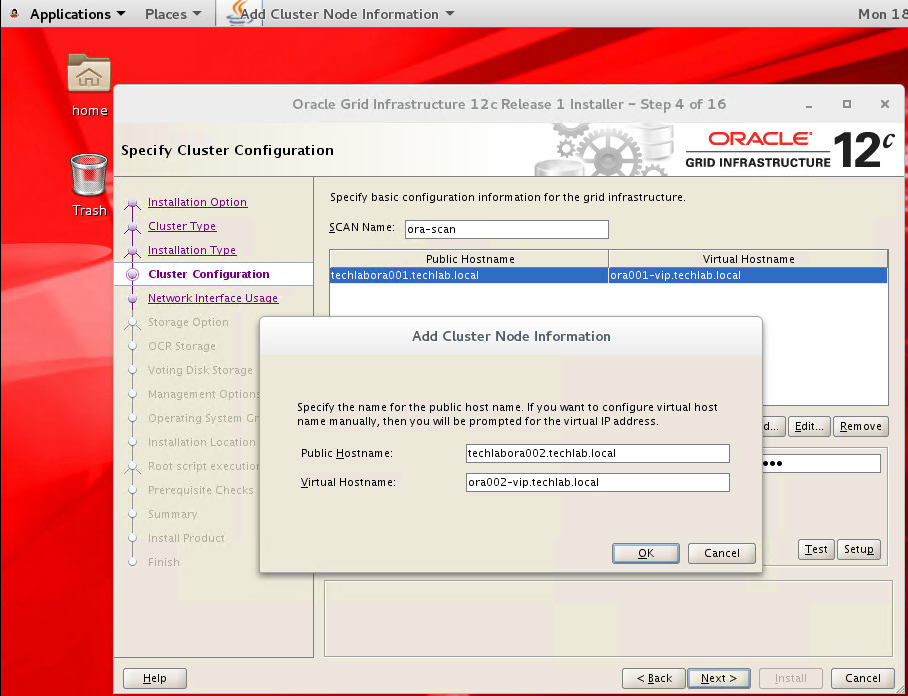
- You should now see both your nodes
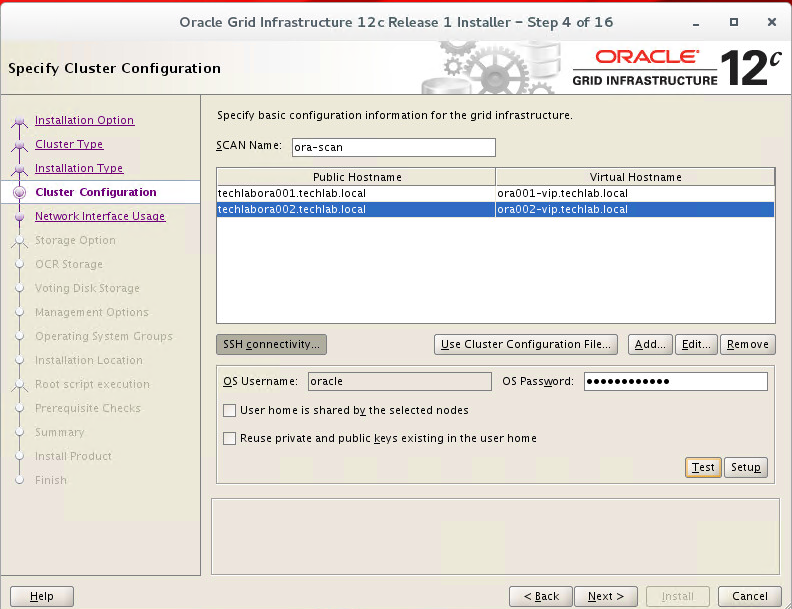
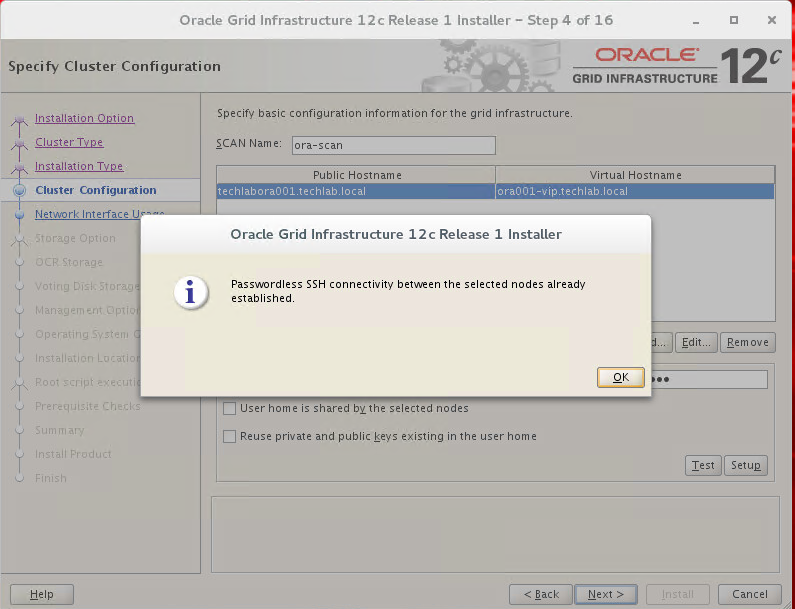
- Click SSH Connectivity and test it. It should come back with the below screen
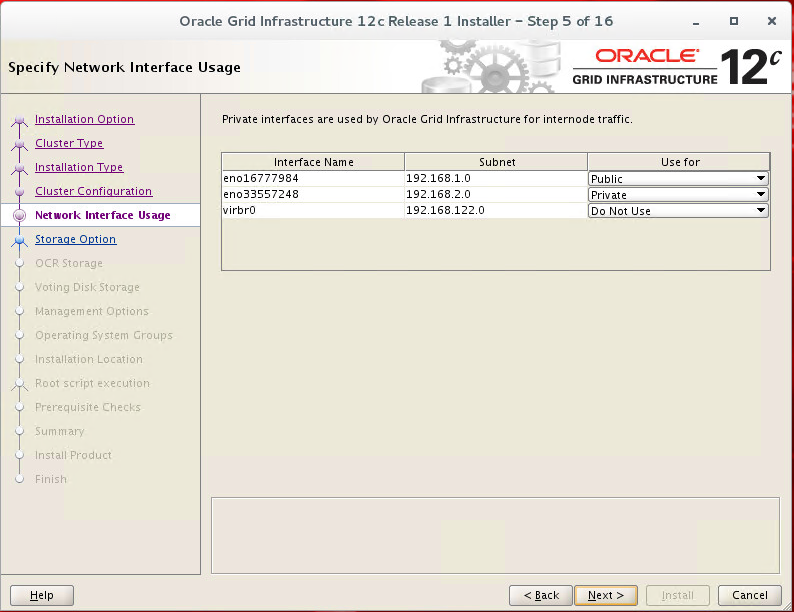
- Check the public and private networks are specified correctly. If the NAT interface is displayed, remember to mark it as “Do Not Use”. Click the “Next” buttonCheck the network interfaces
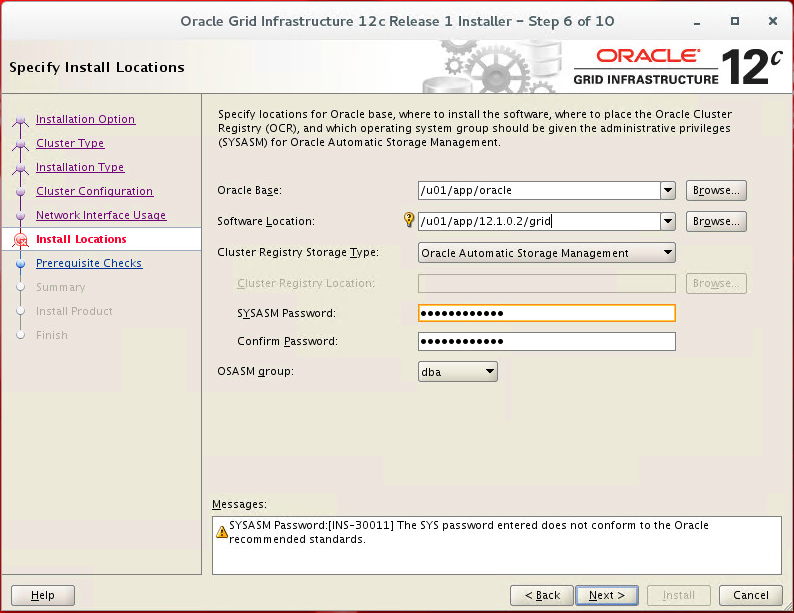
- Enter /u01/app/oracle as the Oracle Base
- Enter “/u01/app/12.1.0.2/grid” as the software location and “Automatic Storage Manager” as the cluster registry storage type. Enter the ASM password, select “dba” or “asmadmin” as the group and click the “Next” button.
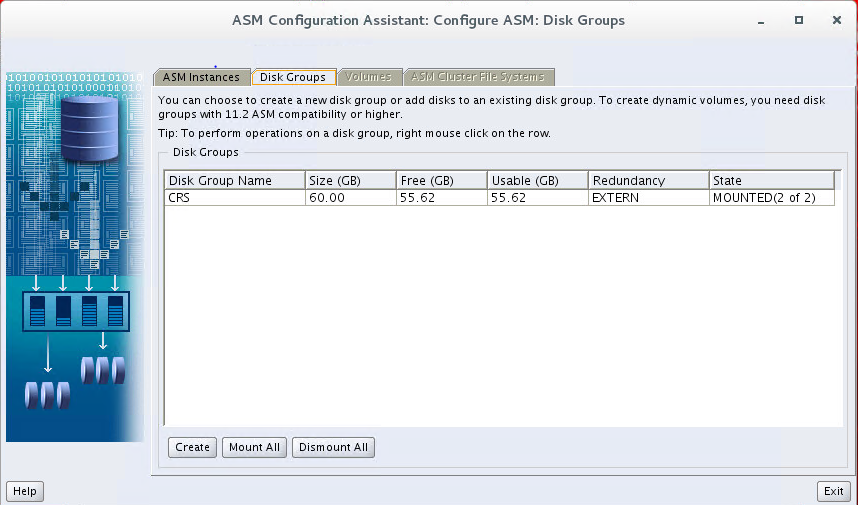
- I left my disk group name as CRS
- Set the redundancy to “External” and select your disks
NORMAL REDUNDANCY – Two-way mirroring, requiring two failure groups.
HIGH REDUNDANCY – Three-way mirroring, requiring three failure groups.
EXTERNAL REDUNDANCY – No mirroring for disks that are already protected using hardware RAID or mirroring
- If you don’t see your disks straight away then click the “Change Discovery Path” button and set the path to “/dev/oracleasm/disks/*” OR ORCL:*. (See a few screenprints down after the troubleshooting)
- I selected just my CRS disks as I will create another disk group later
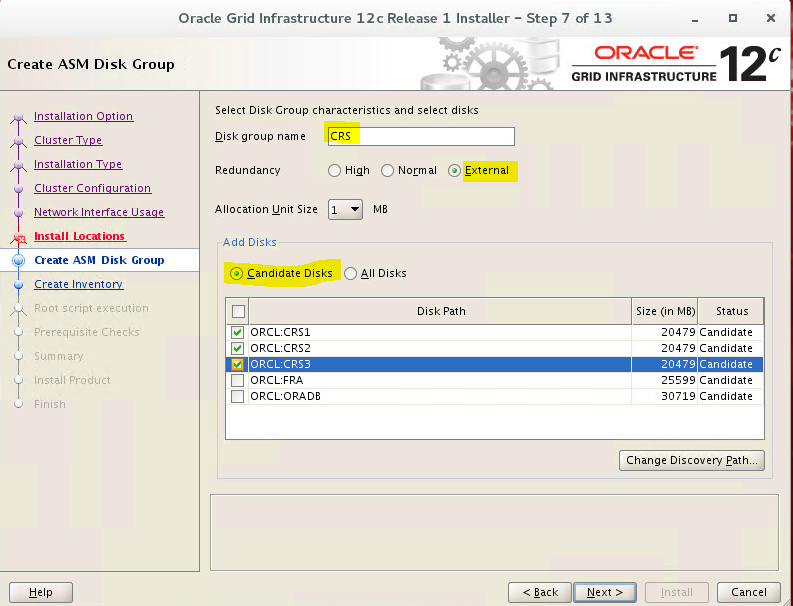
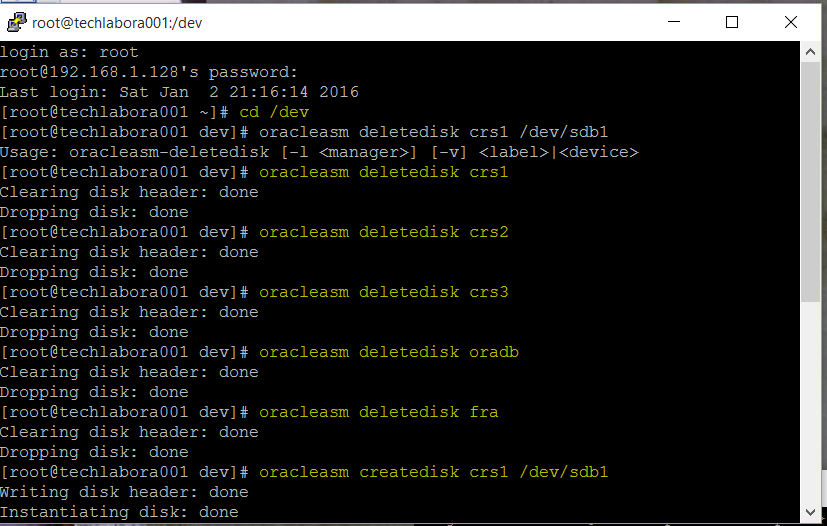
- Also I found in one installation I tried the disks just wouldn’t appear because I had run through the installer once and it had failed but used the disks, I needed to delete and recreate my disks as per below which was a pain but at least easy to rectify
- Back to the ASM Disk Group wizard
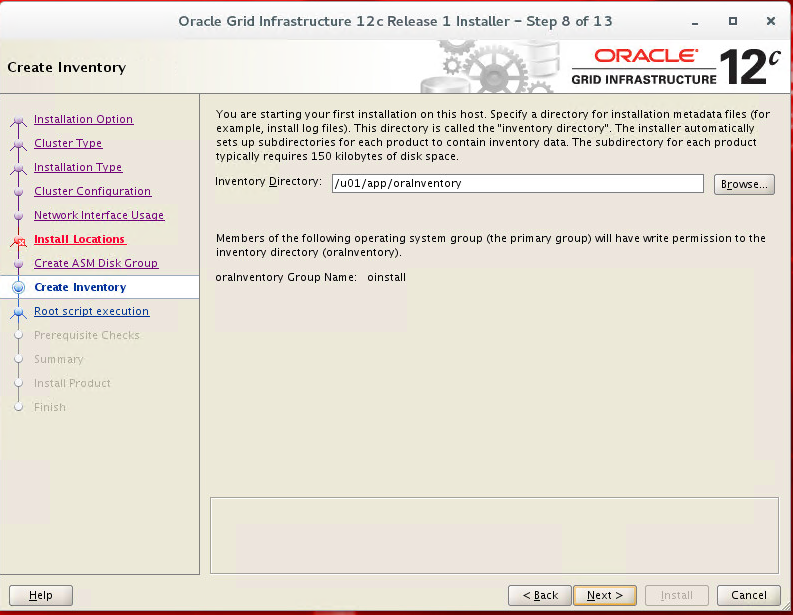
- Accept the default inventory
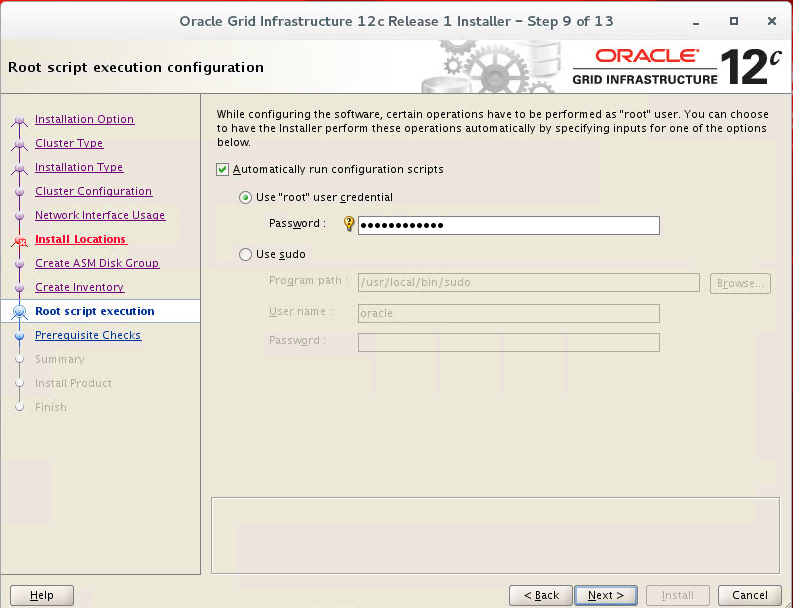
- If you want the root scripts to run automatically, enter the relevant credentials
- Or run them manually
- run the /u01/app/oraInventory/orainstRoot.sh
- and /u01/app/11.2.0/grid/root.sh scripts
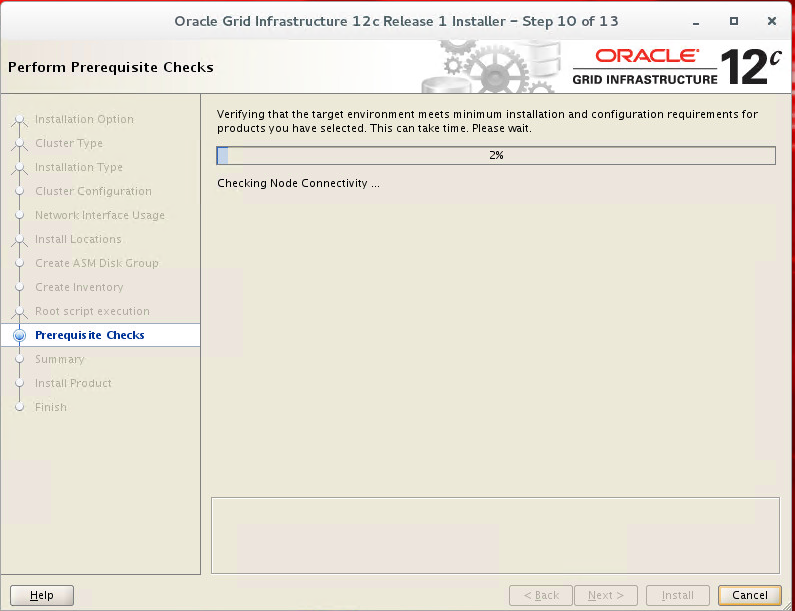
- You will now see the pre-requisites being checked
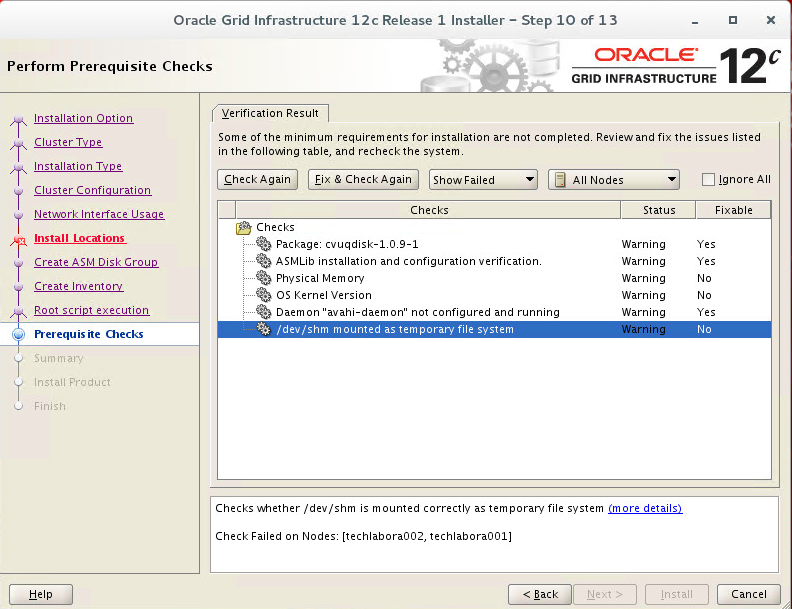
- You will see I have some errors
- Some are fixable, some will just need to be investigated and then you can run a check again (Note: After taking this screenprint I have added all the steps to stop these messages in the steps previously!)
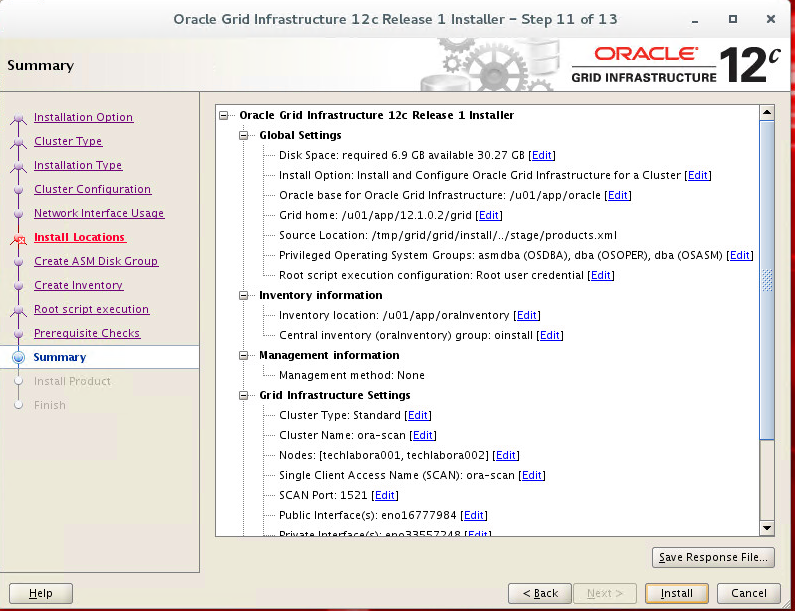
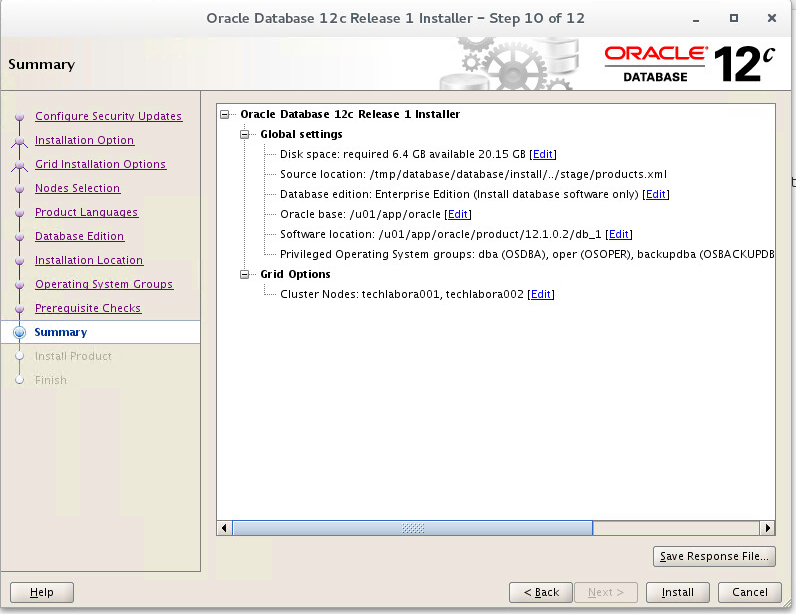
- Once the pre-requisites are complete, click Next and check the summary
- It should then run through the install
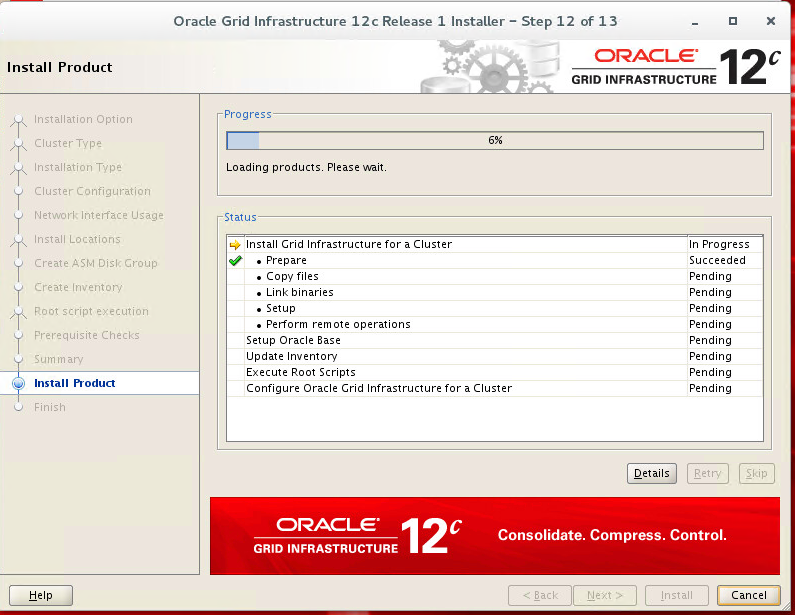
- It will stop and ask you about running scripts – Say yes
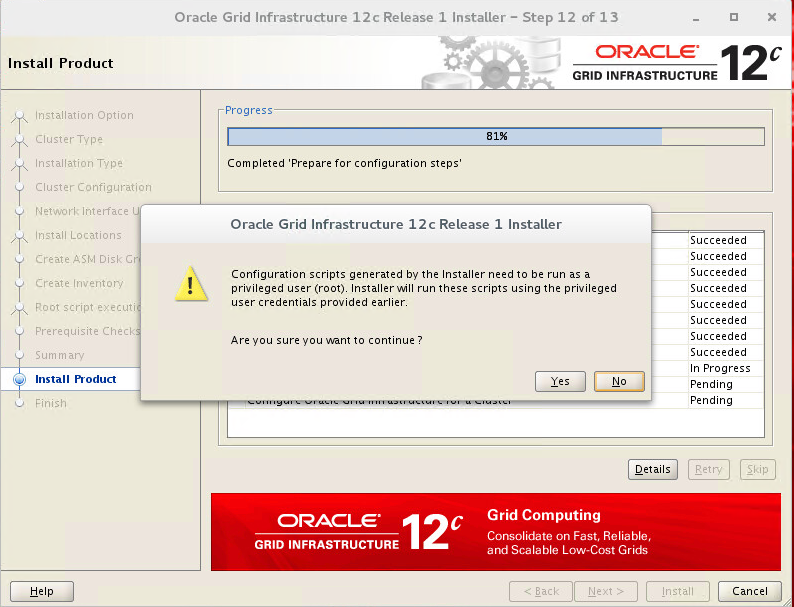
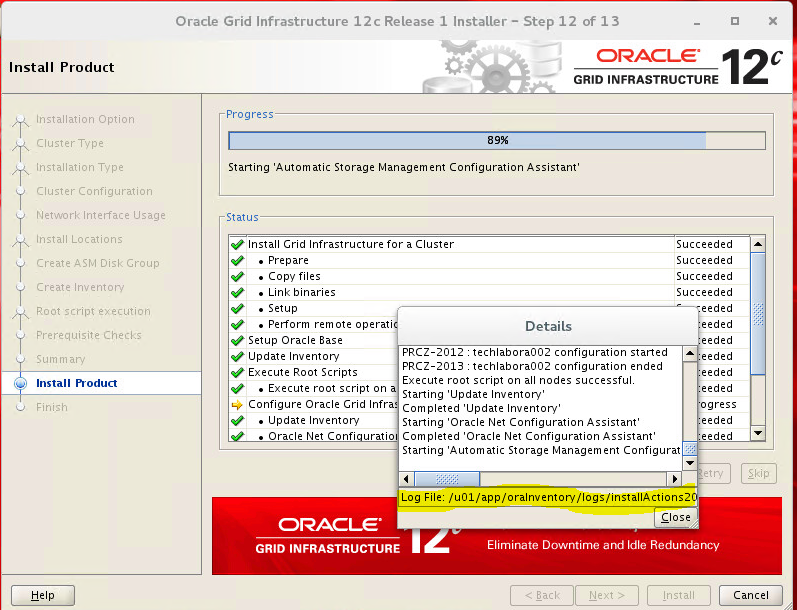
- You can click Details on the installer screen to see what is happening
- Highlighted in yellow is the install log which you can use in the event of any issues
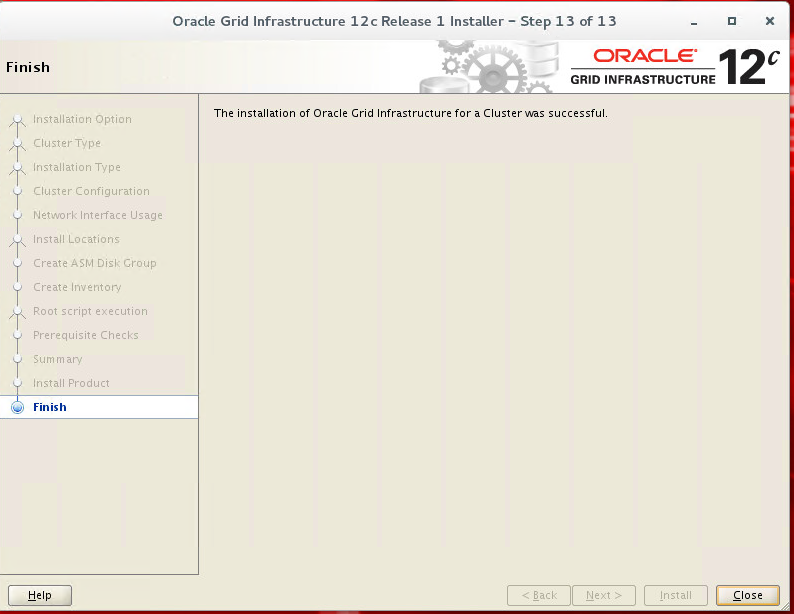
- Once it has completed, you should see the below screen
- Next we can run some commands to check the cluster
CRSCTL
CRSCTL is an interface between you and Oracle Clusterware, parsing and calling Oracle Clusterware APIs for Oracle Clusterware objects.
Oracle Clusterware 11g release 2 (11.2) introduced cluster-aware commands with which you can perform check, start, and stop operations on the cluster. You can run these commands from any node in the cluster on another node in the cluster, or on all nodes in the cluster, depending on the operation.
You can use CRSCTL commands to perform several operations on Oracle Clusterware, such as:
- Starting and stopping Oracle Clusterware resources
- Enabling and disabling Oracle Clusterware daemons
- Checking the health of the cluster
- Managing resources that represent third-party applications
- Integrating Intelligent Platform Management Interface (IPMI) with Oracle Clusterware to provide failure isolation support and to ensure cluster integrity
- Debugging Oracle Clusterware components
Testing the cluster
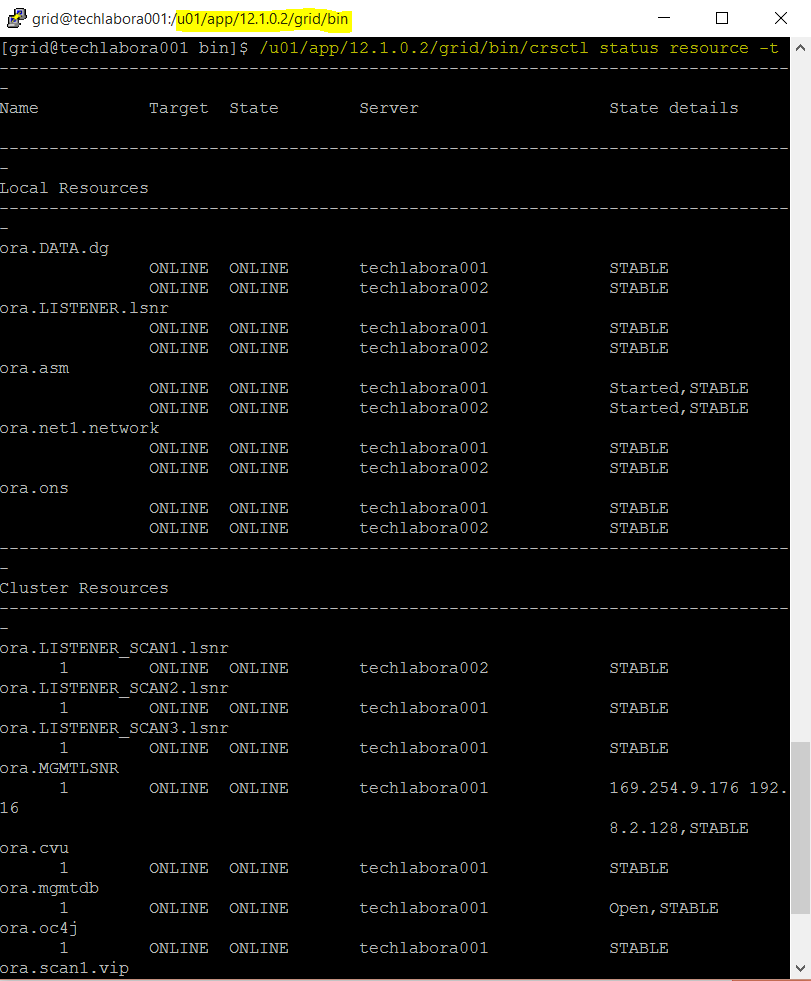
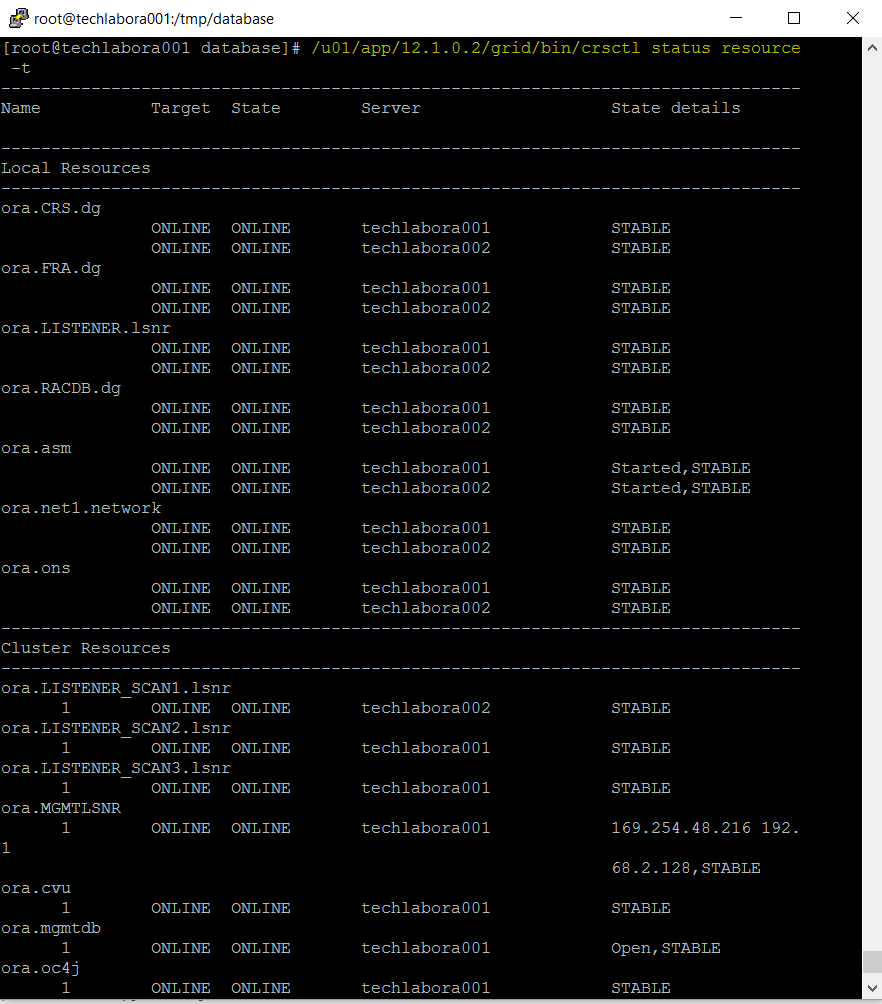
- type /u01/app/12.1.0.2/grid/bin/crsctl status resource -t
- Check for cluster nodes
- Type /u01/app/12.1.0.2/grid/bin/olsnodes -n

- Check the CRS status on the first node as the grid user
- Type /u01/app/12.1.0.2/grid/bin/crsctl check crs

- Check for cluster registry (OCR)
- Type /u01/app/12.1.0.2/grid/bin/ocrcheck

- Check voting disk
- Type /u01/app/12.1.0.2/grid/bin/crsctl query css votedisk

- The number of voting disks in ASM is derived by the redundancy of the diskgroup.
- 1 Vote disk with external redundancy, 3 with normal and 5 with high redundancy.
Usefu Cluster Troubleshooting Link
Next Oracle Database 12c software installation
Useful video link
- Copy the database files into the Oracle Linux /tmp folder and unzip them
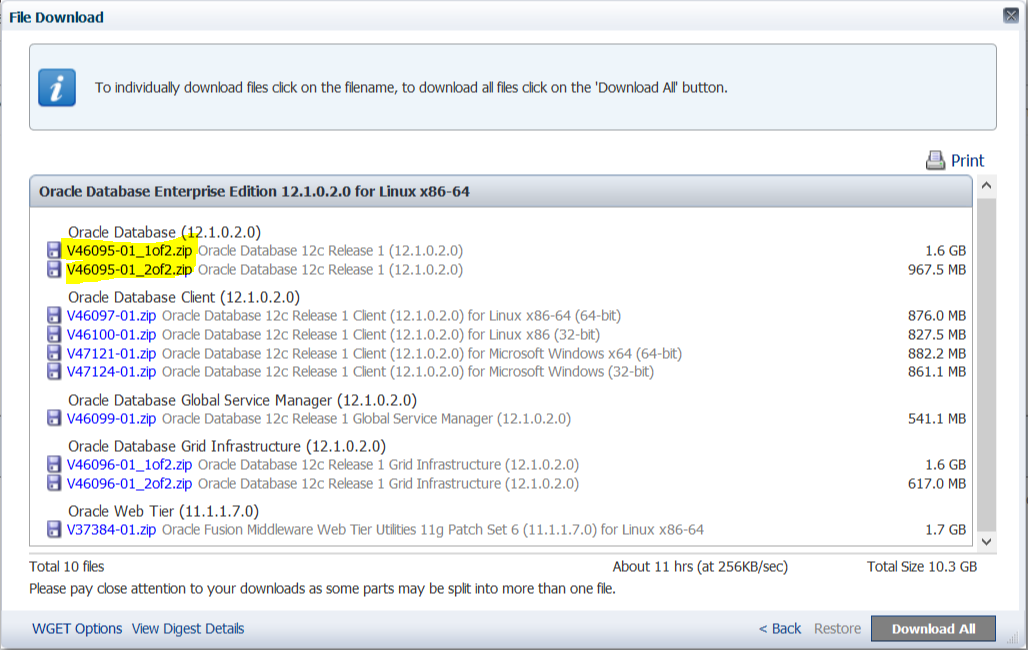
- cd /tmp/database
- unzip V46095-01_1of2.zip -d /tmp/database
- unzip V46095-01_2of2.zip -d /tmp/database
- In this section, we will create two additional ASM disk groups using the ASM Configuration Assistant ( asmca). These new ASM disk groups will be used later in this guide when creating the clustered database
- Log into Node 1 as grid
- Type cd /u01/app/12.1.0.2/grid/bin/asmca and you should now get the below box
- From the disk group tab click Create
- Put in a name for your Disk Group
- Select disk/disks
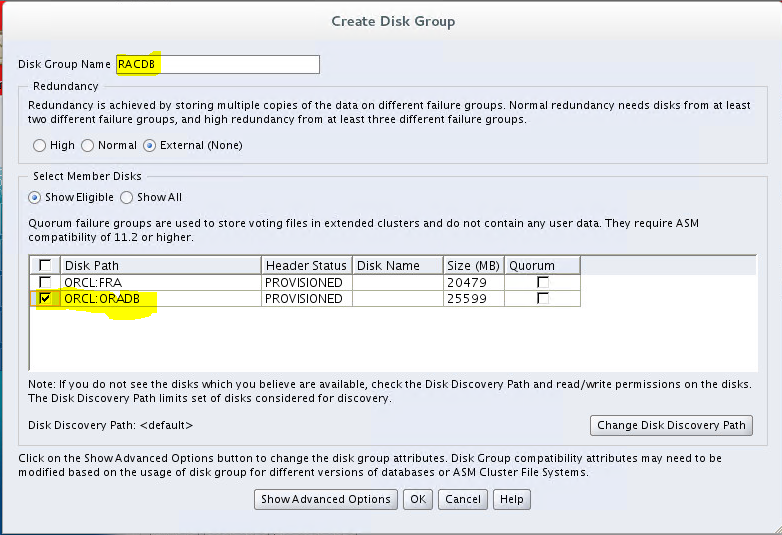
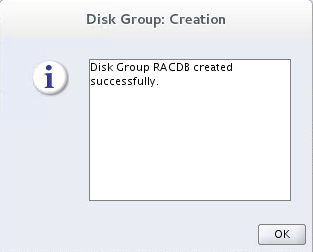
- You should see the confirmation message
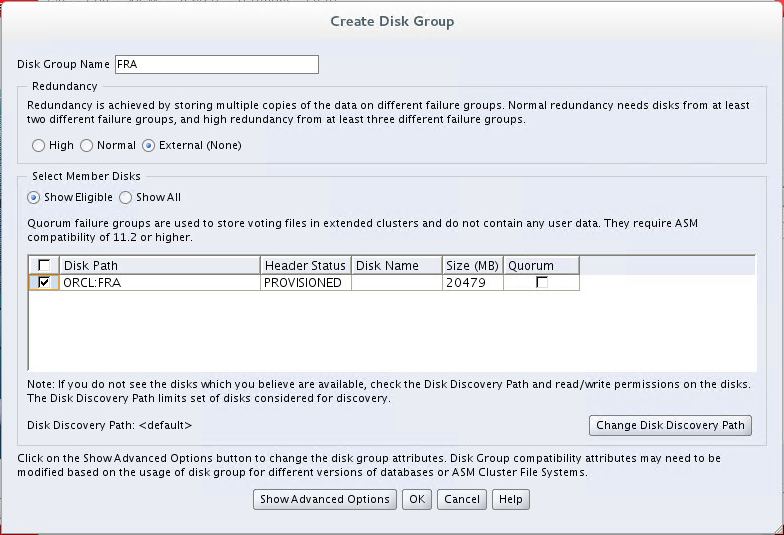
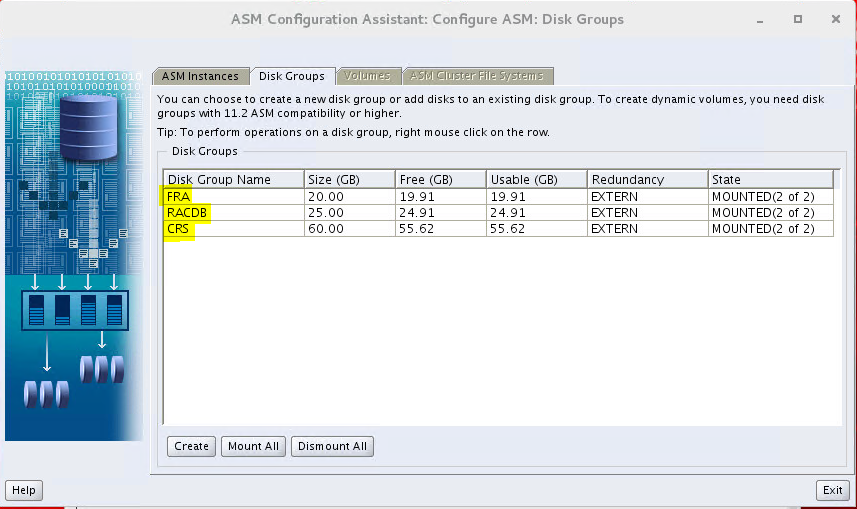
- Next create the FRA disk group
- From the disk group tab click Create
- Put in a name for your Disk Group – FRA
- Select disk/disks
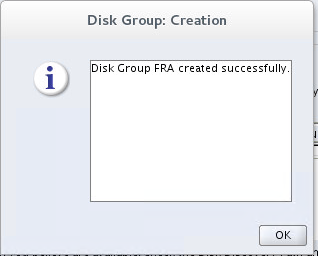
- Make sure you get a confirmation message
- You should now see all your disks
- Check the cluster services are up before starting the installer
- Type /u01/app/12.1.0.2/grid/bin/crsctl status resource -t
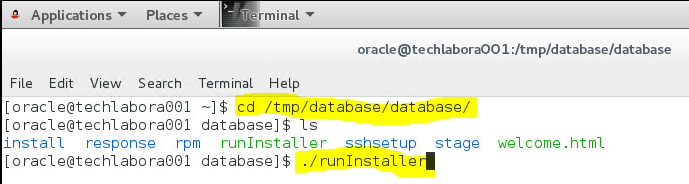
- Log into the first RAC node as the oracle user and start a terminal session
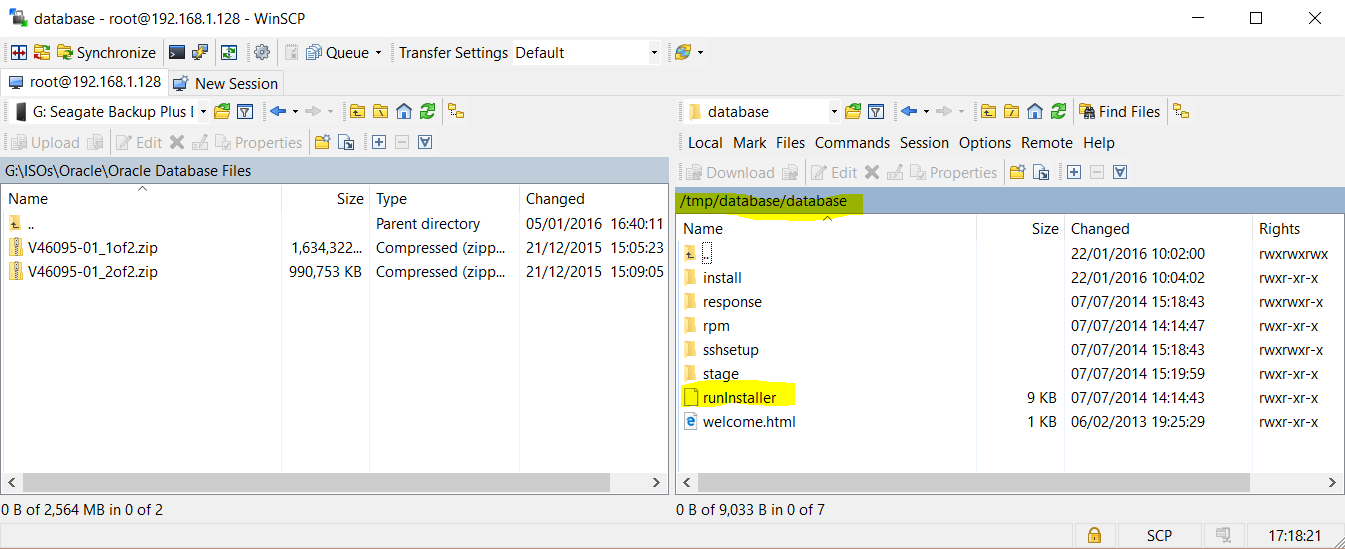
- Type cd /tmp/database/database
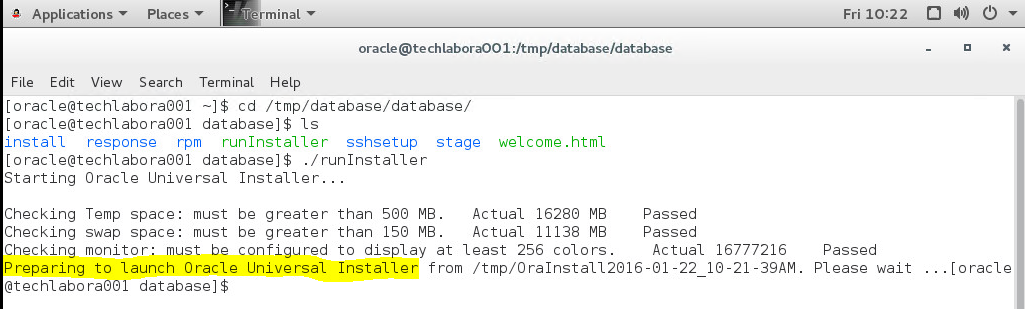
- ./runInstaller
- The installer should start
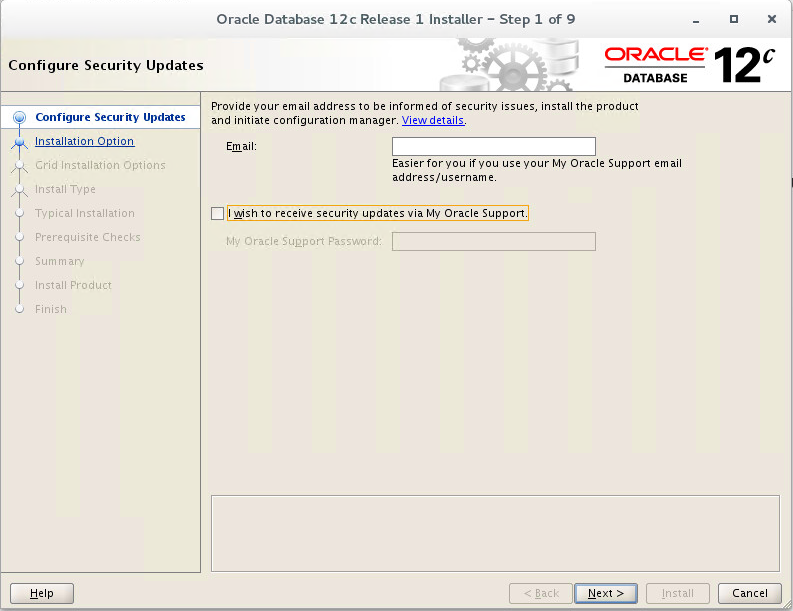
- Uncheck the security updates checkbox and click the “Next” button and “Yes” on the subsequent warning dialog.
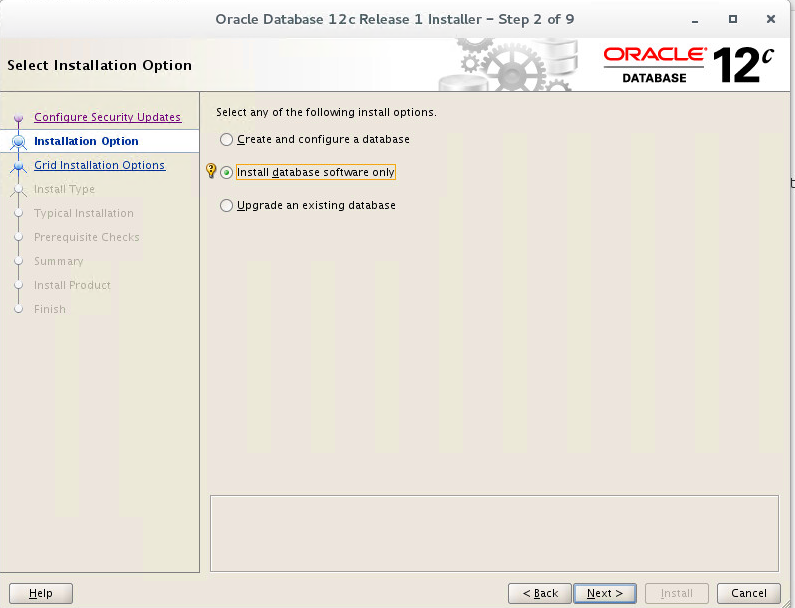
- Select Install Database software only
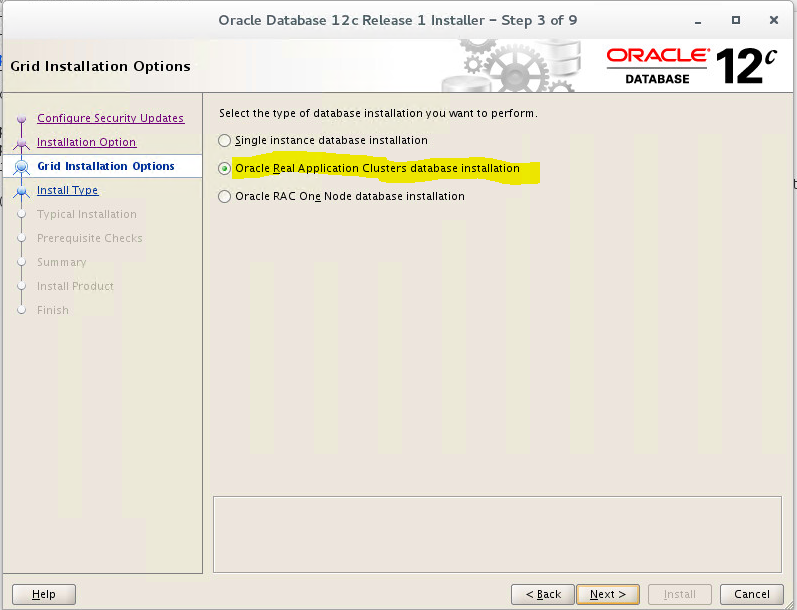
- Accept the “Oracle Real Application Clusters database installation” option by clicking the “Next” button.
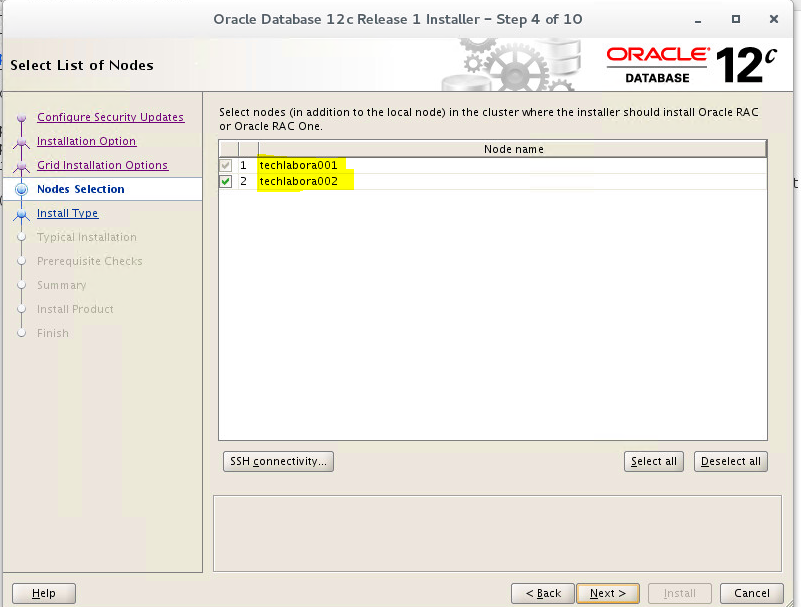
- Make sure both nodes are selected
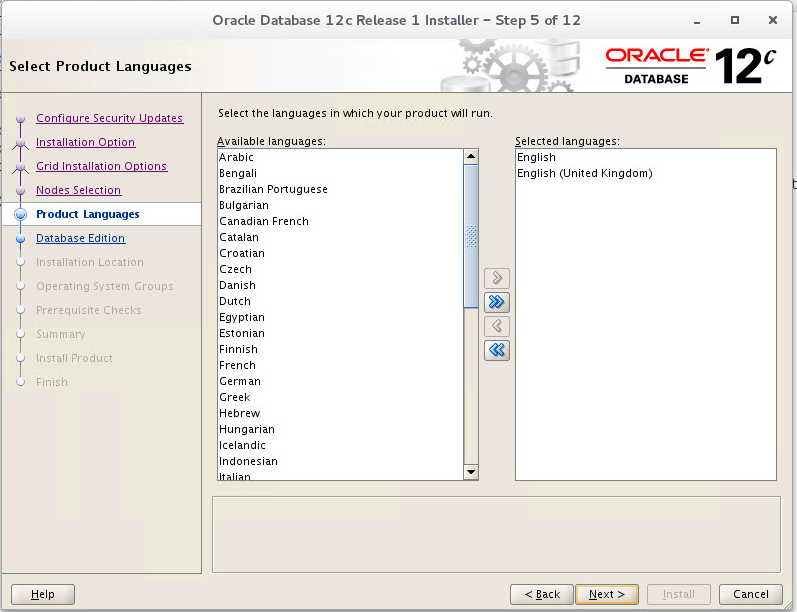
- Choose your language
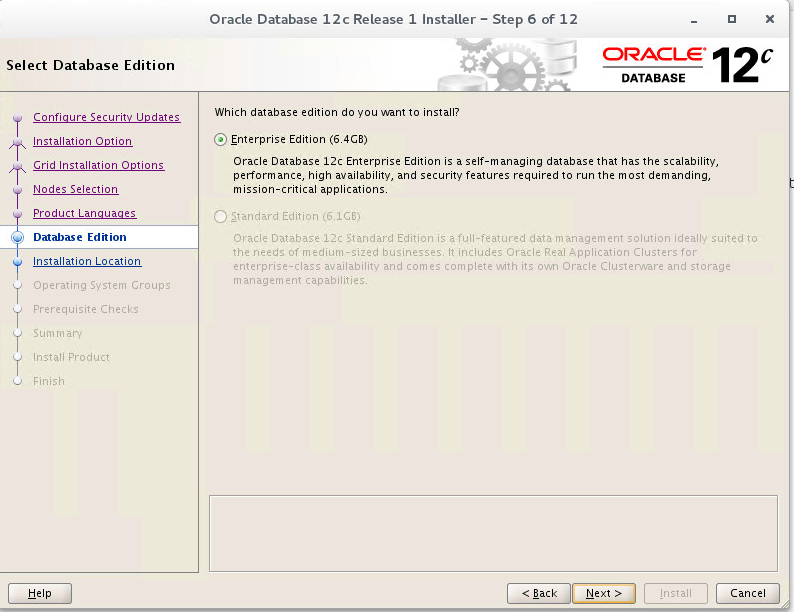
- Choose your database edition
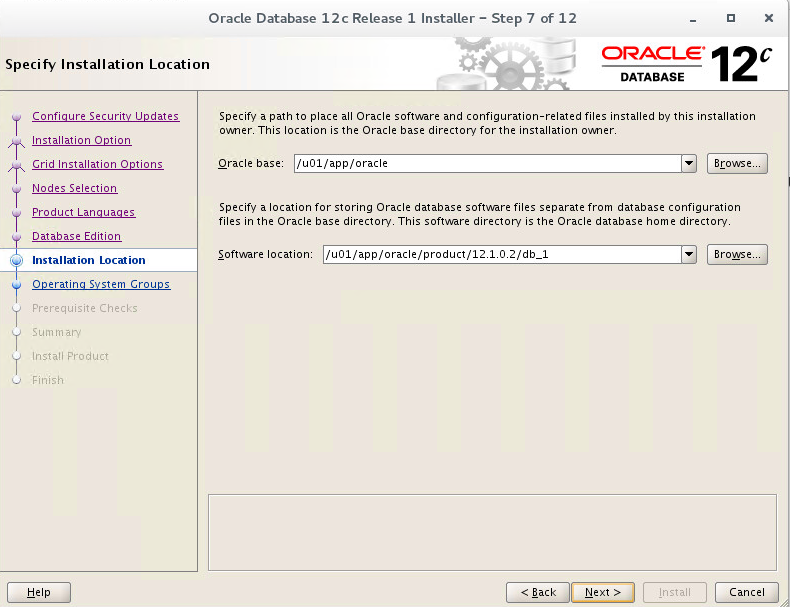
- Enter “/u01/app/oracle” as the Oracle base and “/u01/app/oracle/product/12.1.0.2/db_1” as the software location, then click the “Next” button
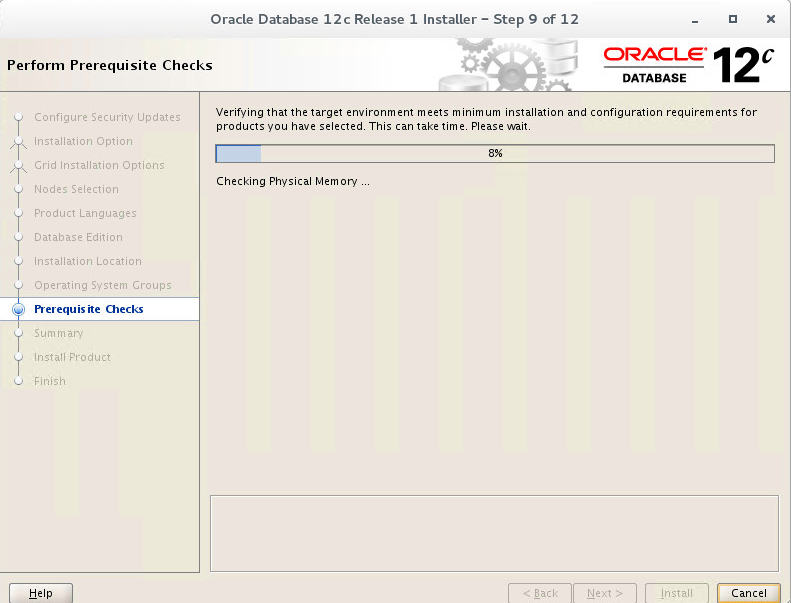
- It will then run through pre-requisite checking
- I got one error to fix
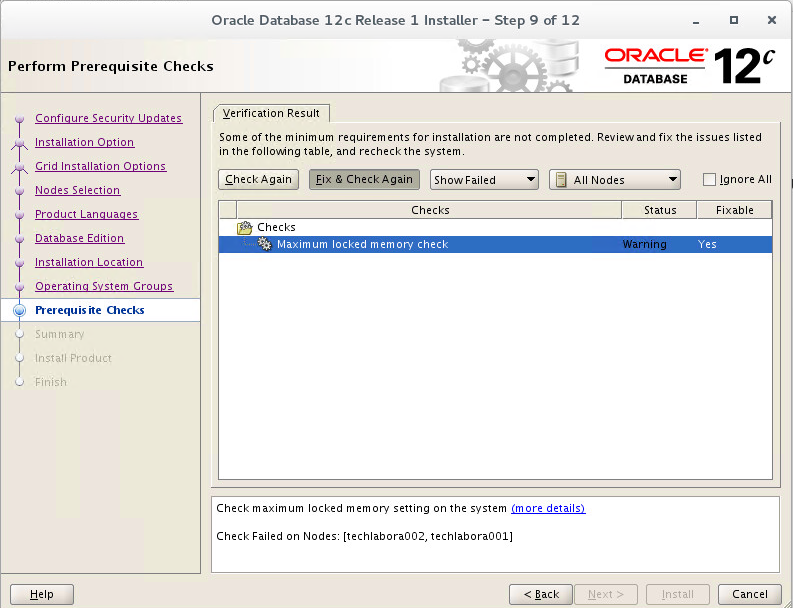
- I clicked fix and check again and got the below screen
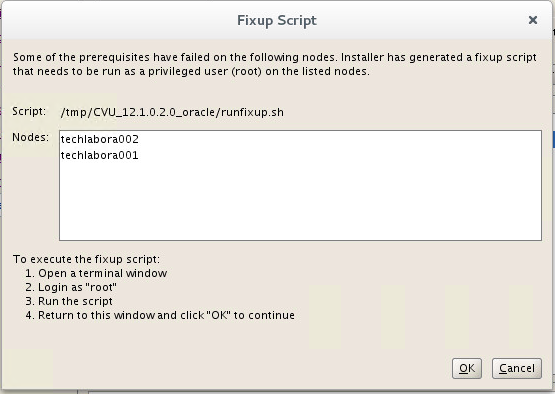
- So I ran the below on both nodes

- Then clicked OK on the message and it worked fine and took me to the next screen below
- It will then run through the installer
- You can click on details to see where it up to

- During the install the following message will pop up
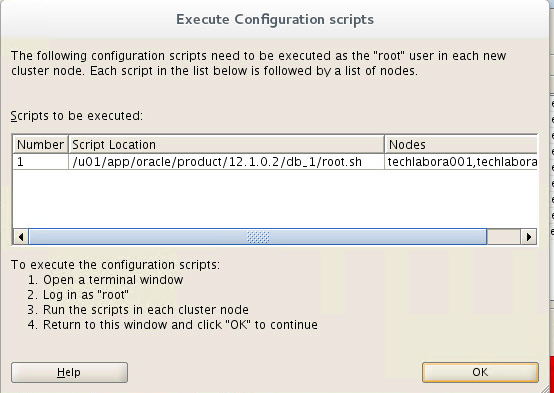
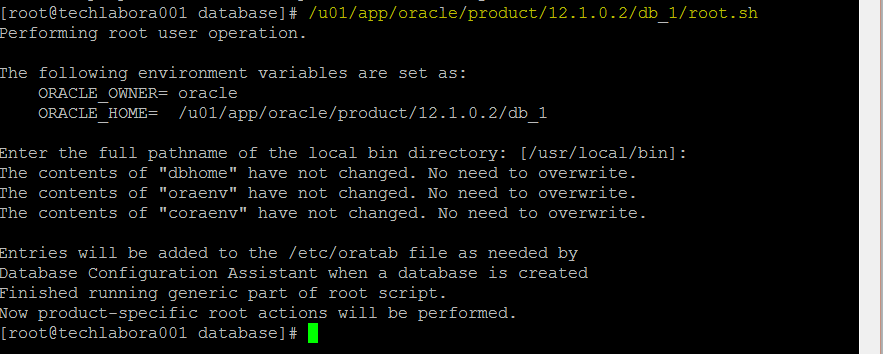
- I putty’d into each node as root and ran /u01/app/oracle/product/12.1.0.2/db_1/root.sh
- Go back to the installer and click on OK
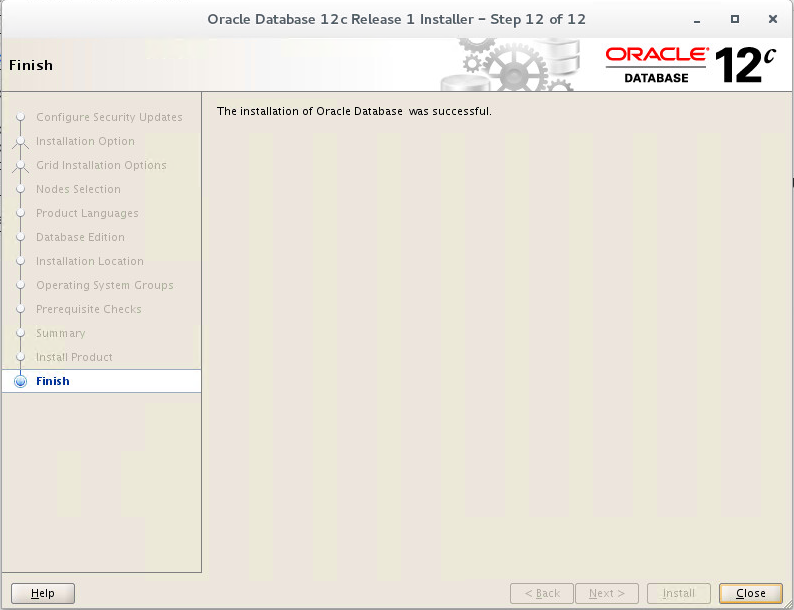
- Hopefully now your installation should be successful
Creating a new database
Oracle Link to follow and for explanations and descriptions
http://docs.oracle.com/cd/B16276_01/doc/server.102/b14196/install003.htm
- Log into Putty as oracle
- You can type dbca or type the path to the runInstaller (instructions paths are below but I used dbca)

- If you get the below message you will need to modify the permissions on the /u01/app/oracle/cfgtoollogs/dbca folder

- At this point I have found you also need to change the permissions on the /u01/app/oracle/admin folder on both nodes or you will get to the end of the wizard and it will fail straightaway with permissions

- You will now see the below screen
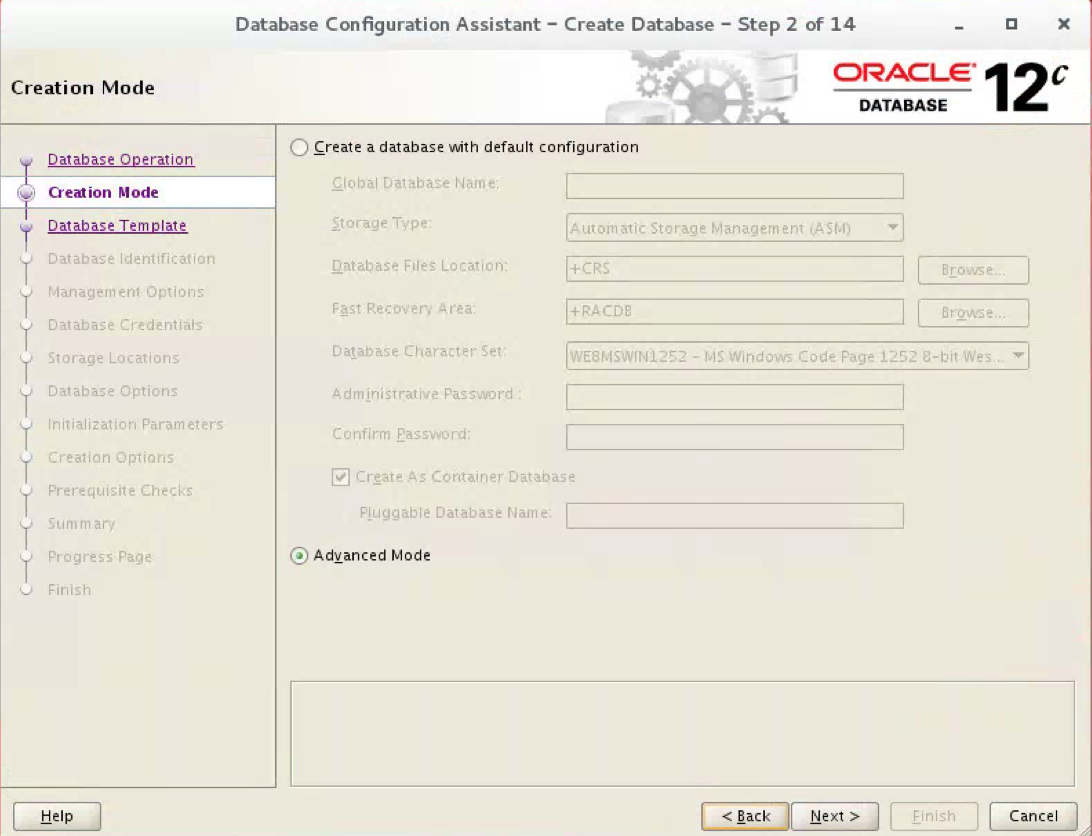
- Choose Advanced Mode then we can see all the options you get
- You then see the below screen
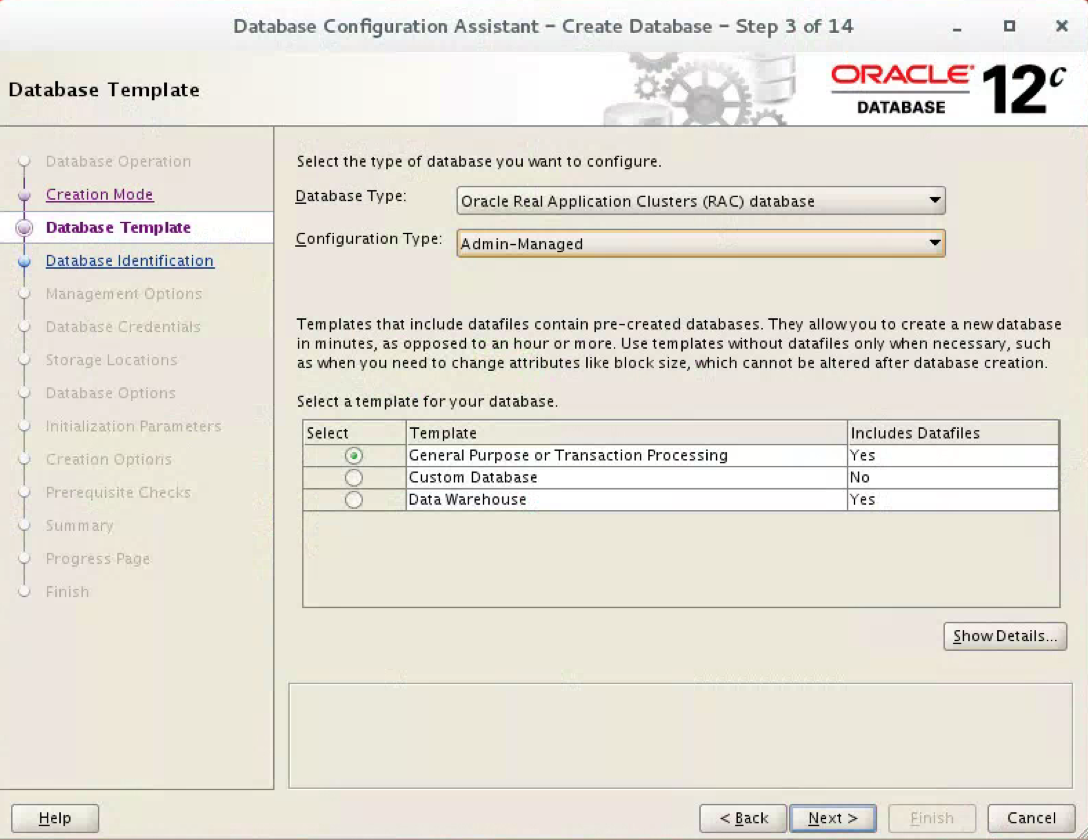
- Administrator-managed: Database administrators define on which servers a database resource should run, and place resources manually as needed. This is the management strategy used in previous releases.
- Policy managed: Database administrators specify in which server pool (excluding generic or free) the database resource will run. Oracle Clusterware is responsible for placing the database resource on a server.
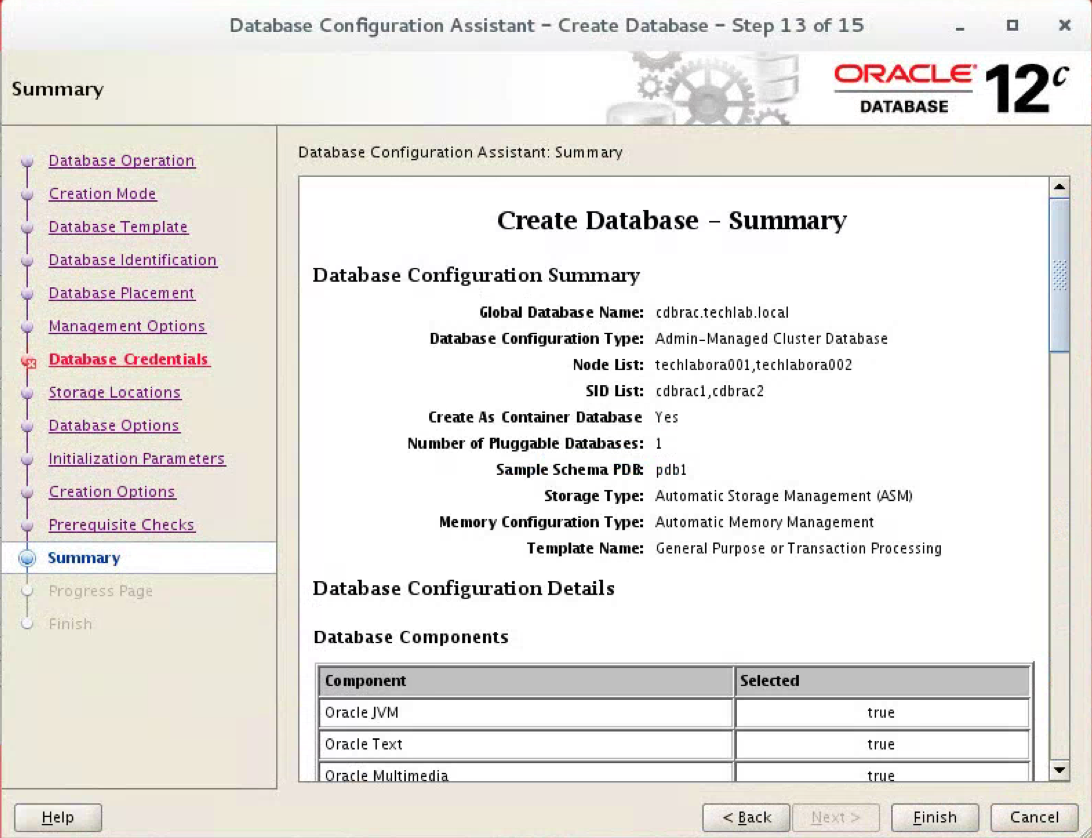
- Put in cdbrac for the name
Good Link for understanding Server Pools
https://martincarstenbach.wordpress.com/2013/06/17/an-introduction-to-policy-managed-databases-in-11-2-rac/
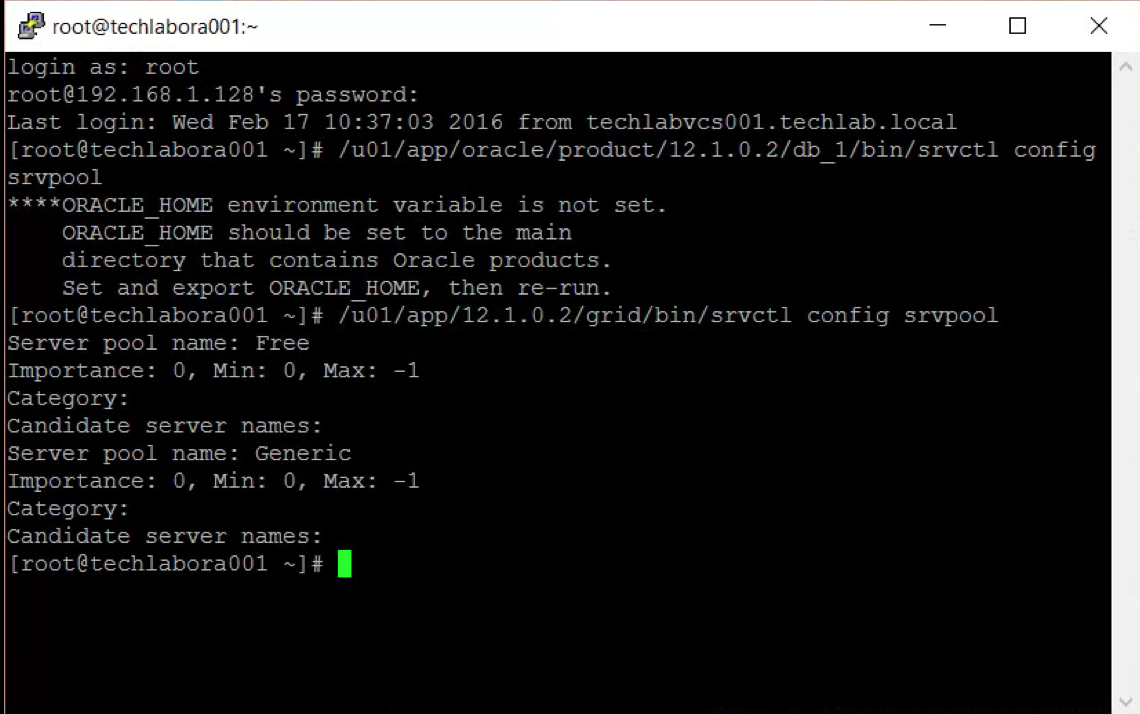
- You can run the following command to check what server pools there are
- /u01/app/oracle/product/12.1.0.2/db_1/bin/srvctl config srvpool
- You will now be at the below screen
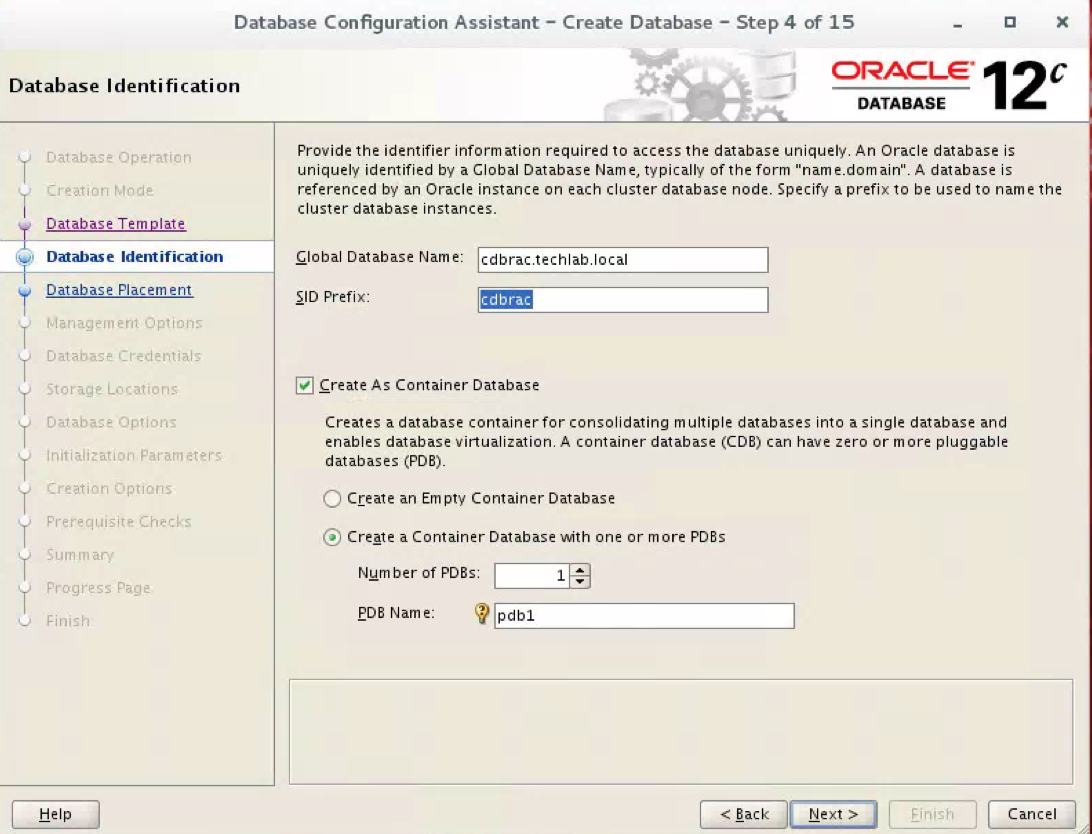
- Put in a Global Database Name – In my case cdbrac.techlab.local
- The SID prefix is cdbrac
- Select Create as Container Database
- Select Create a Container database with one or more PDBs and name it pdb1
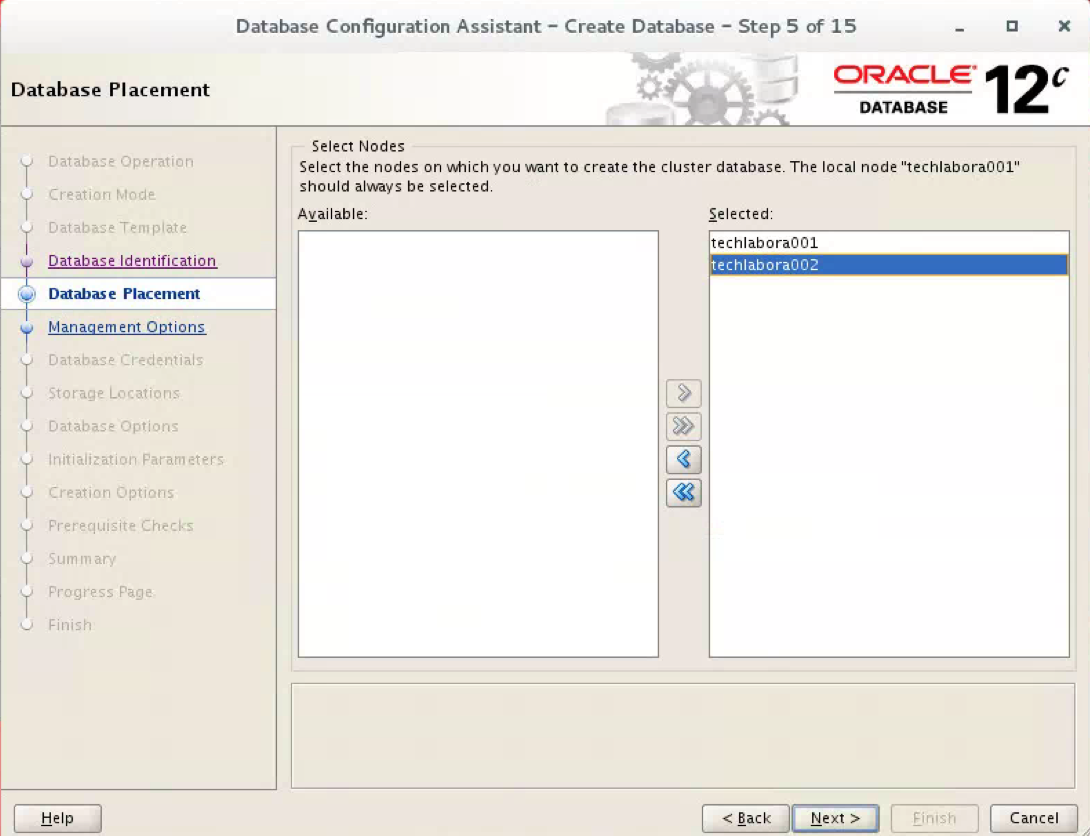
- On the Database placement, select Nodes
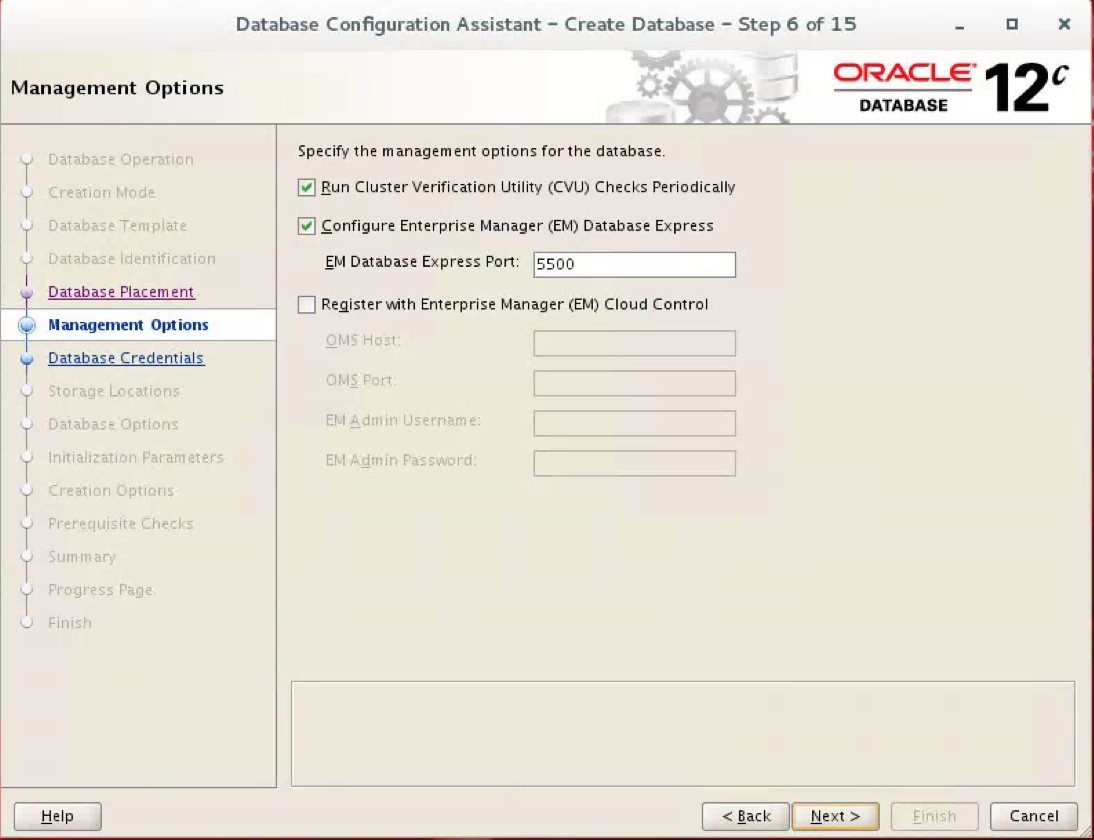
- Next choose your management options
- Next set your database credentials
- I chose to use the same for all accounts
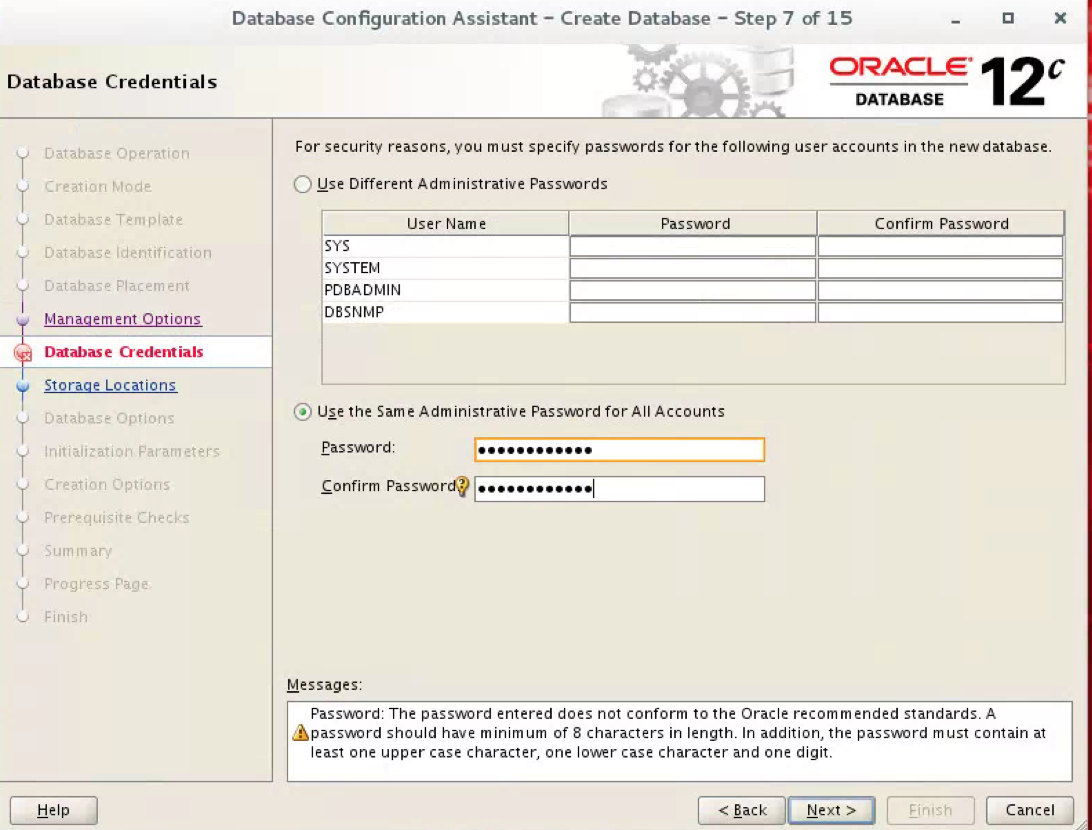
- Click Next
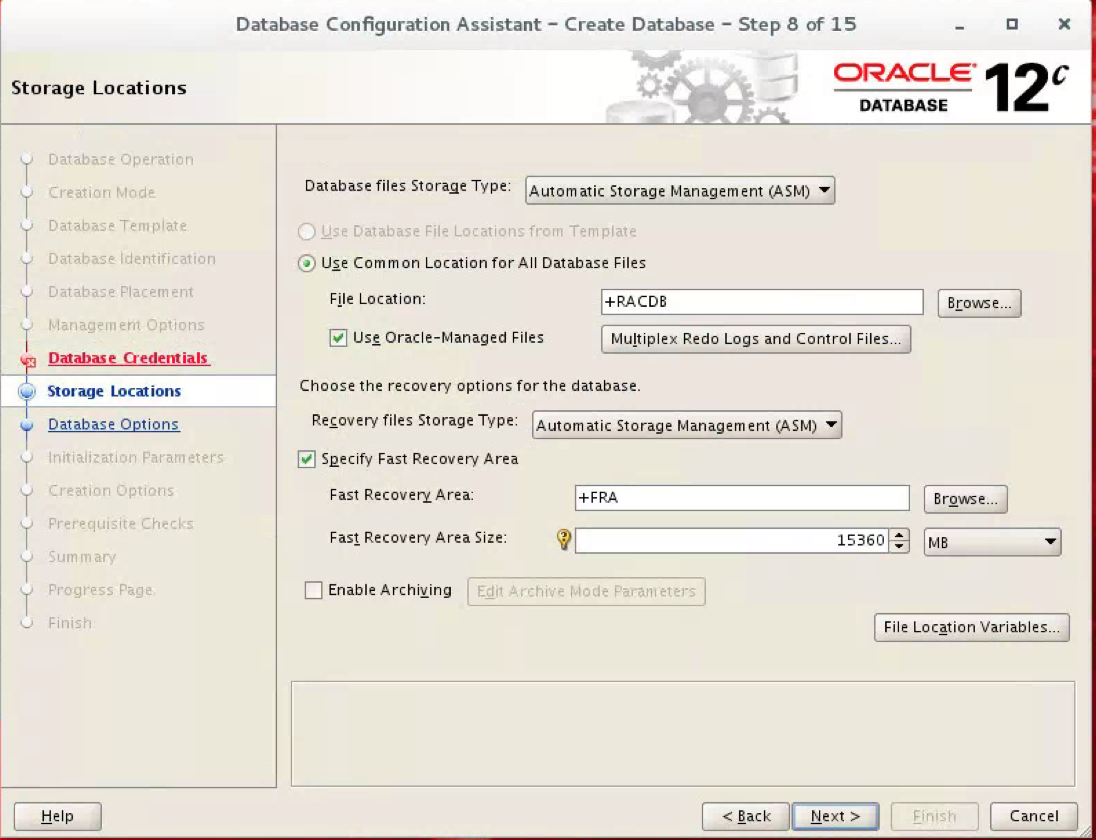
- The next screen sets Storage Locations
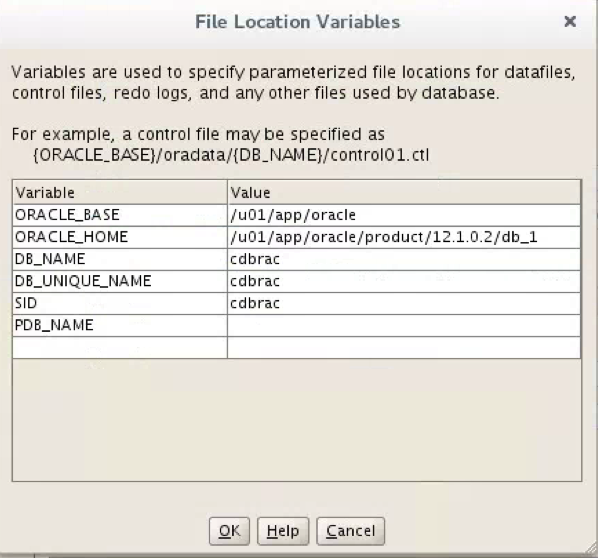
- If you click on File Location variables you will see the below screen
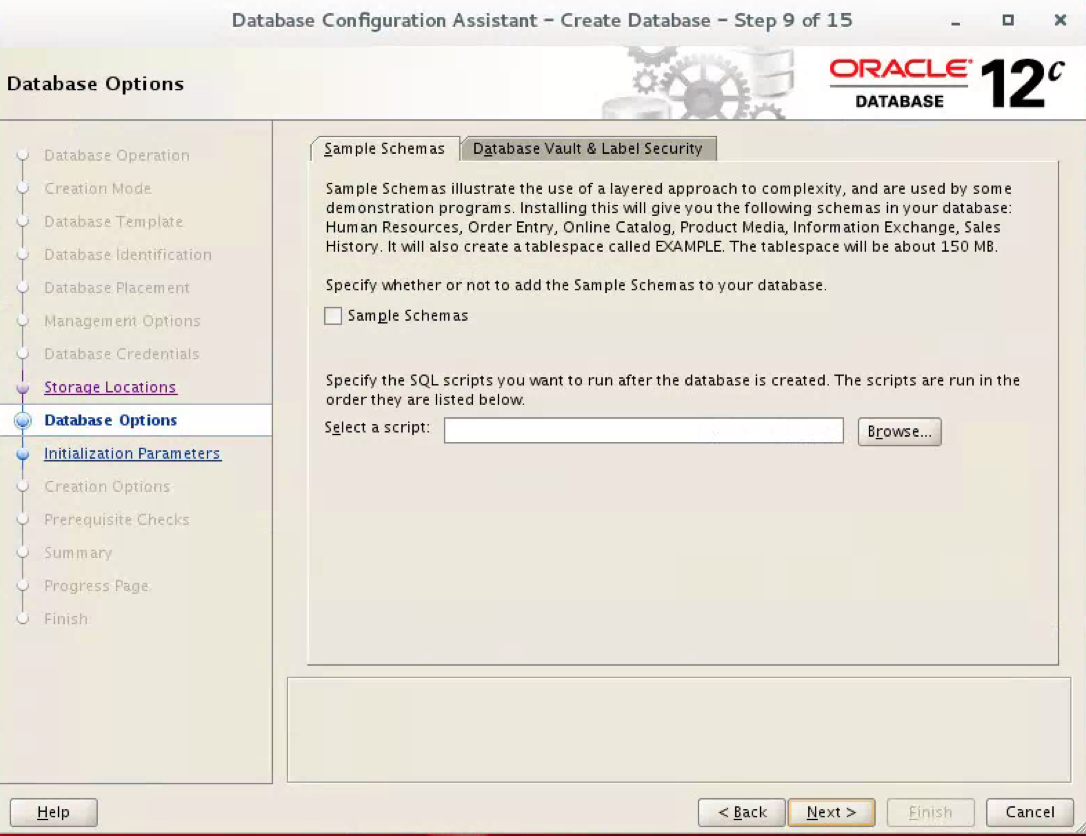
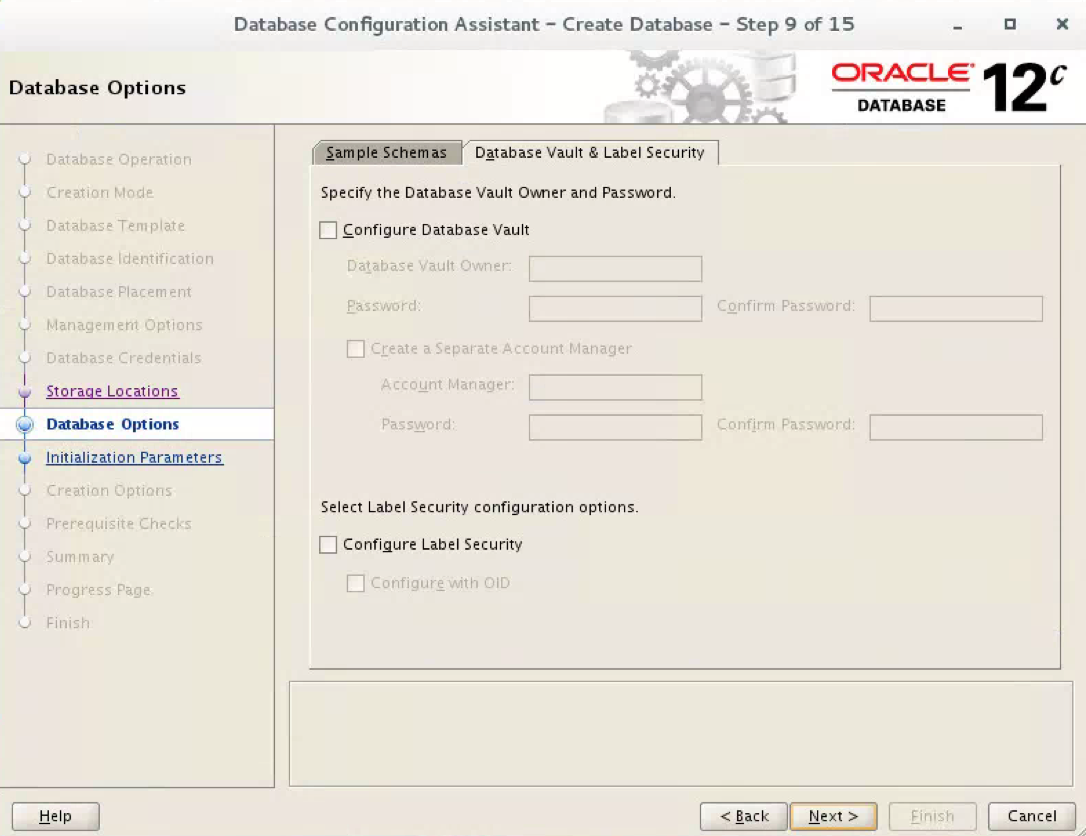
- On the Database Schemas page, just leave this as it is
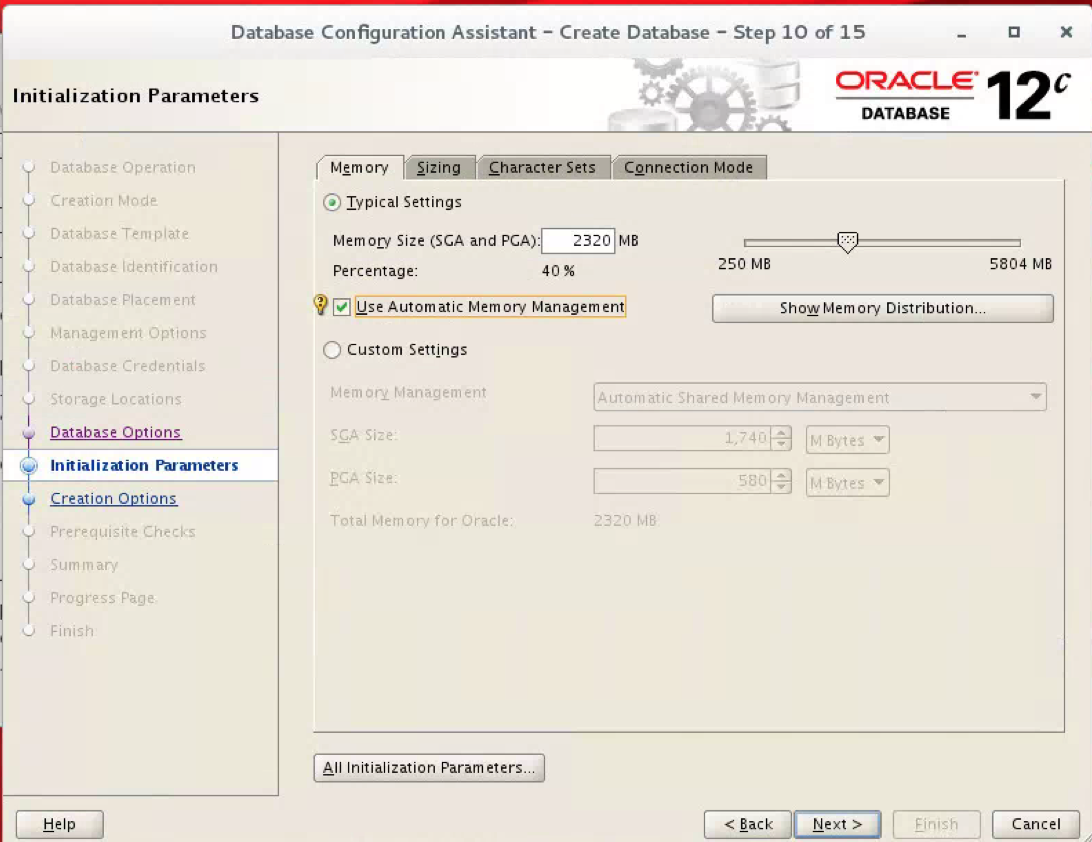
- In the Initialisation Parameters window for memory, select Automatic memory management
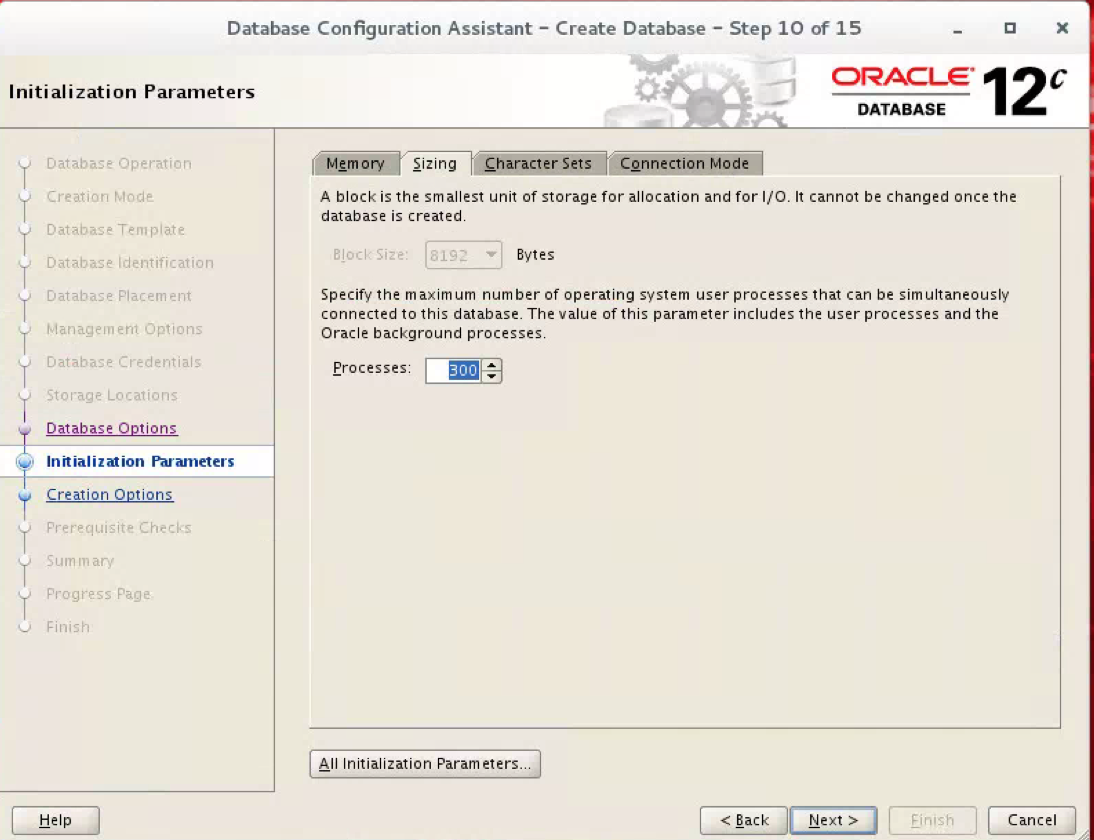
- In the Sizing tab, keep the default
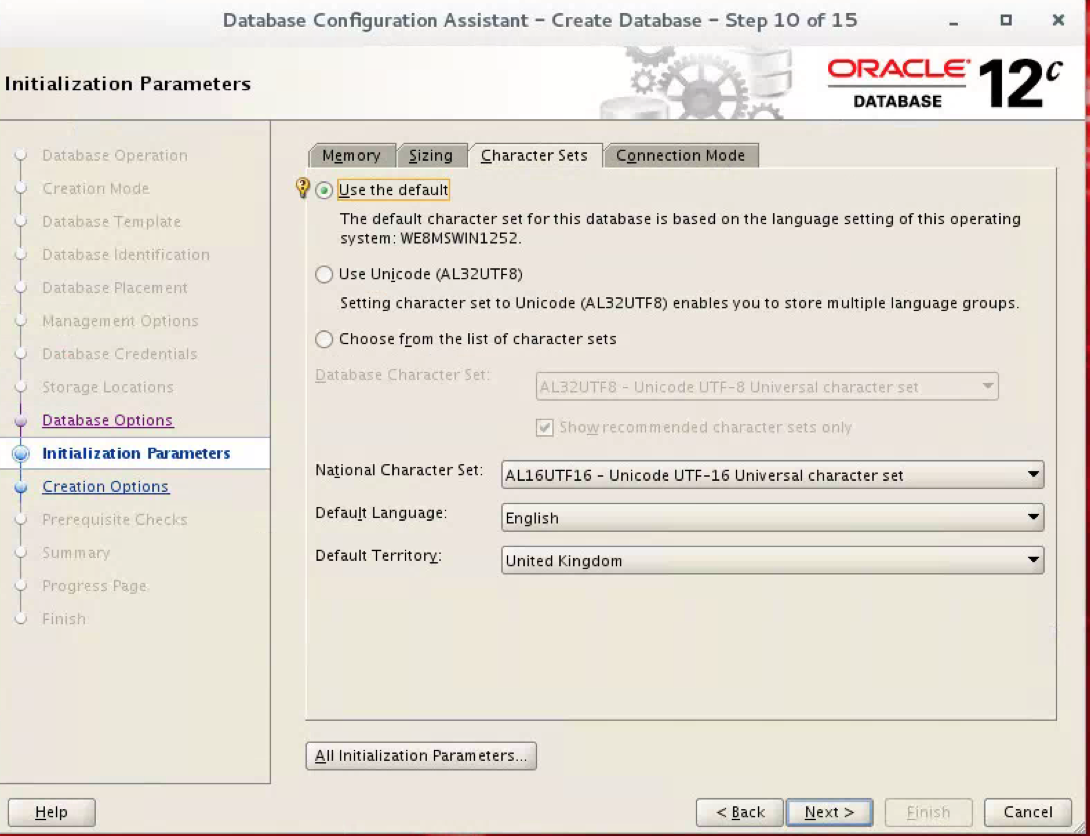
- For character sets, just keep the defaults although read the below
- Oracle recommends using Unicode for all new system deployments. Migrating legacy systems to Unicode is also recommended. Deploying your systems today in Unicode offers many advantages in usability, compatibility, and extensibility. Oracle Database enables you to deploy high-performing systems faster and more easily while utilizing the advantages of Unicode. Even if you do not need to support multilingual data today, nor have any requirement for Unicode, it is still likely to be the best choice for a new system in the long run and will ultimately save you time and money as well as give you competitive advantages in the long term
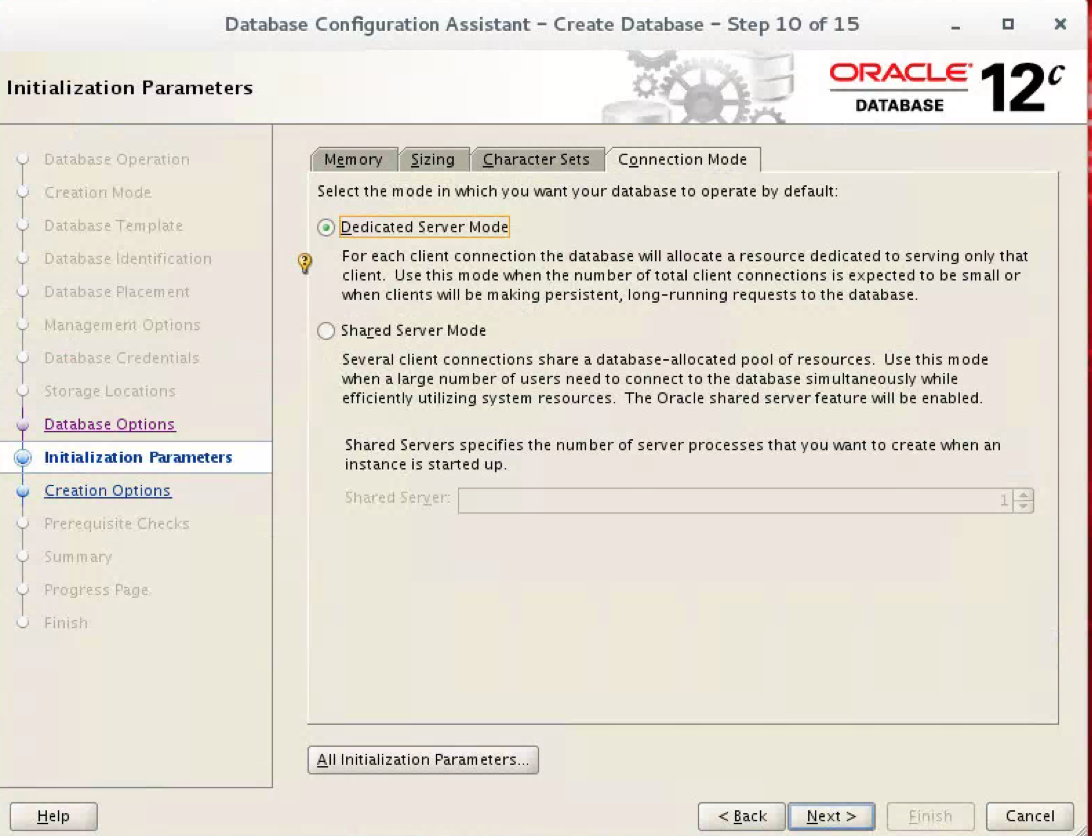
- In Connection Mode, I chose Dedicated Mode as it is only a test database with myself connecting
- Select Next
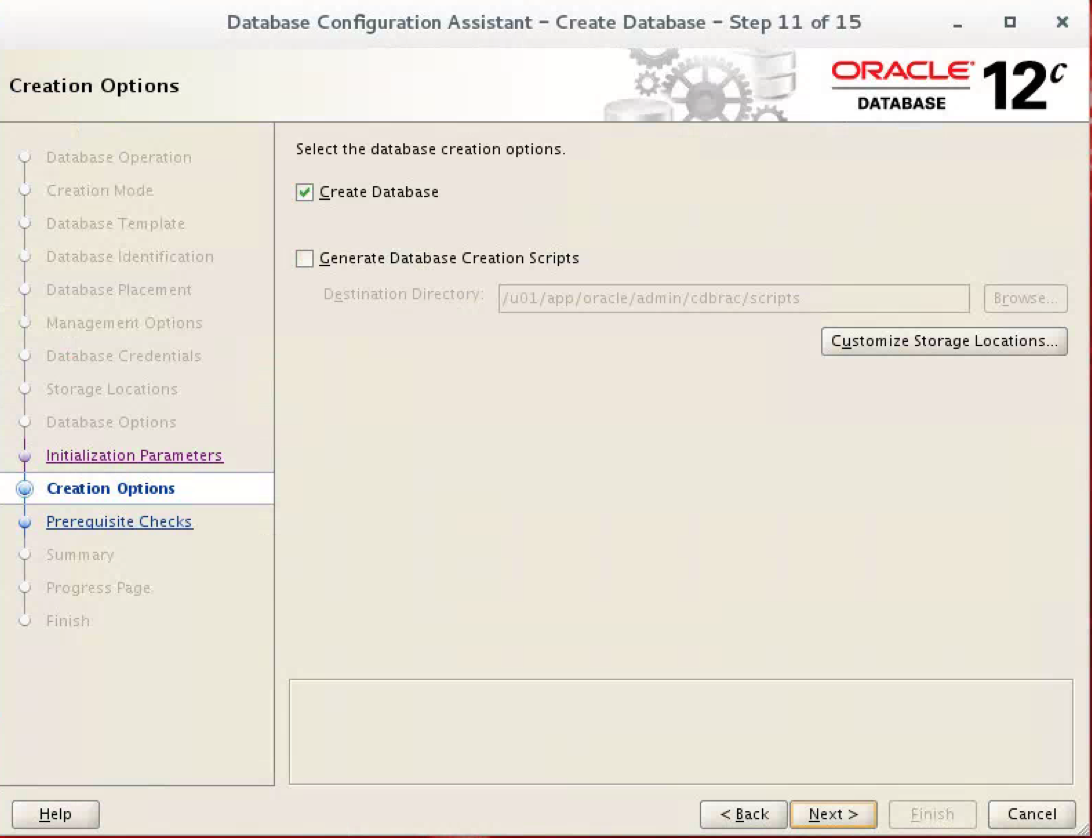
- Select Create Database
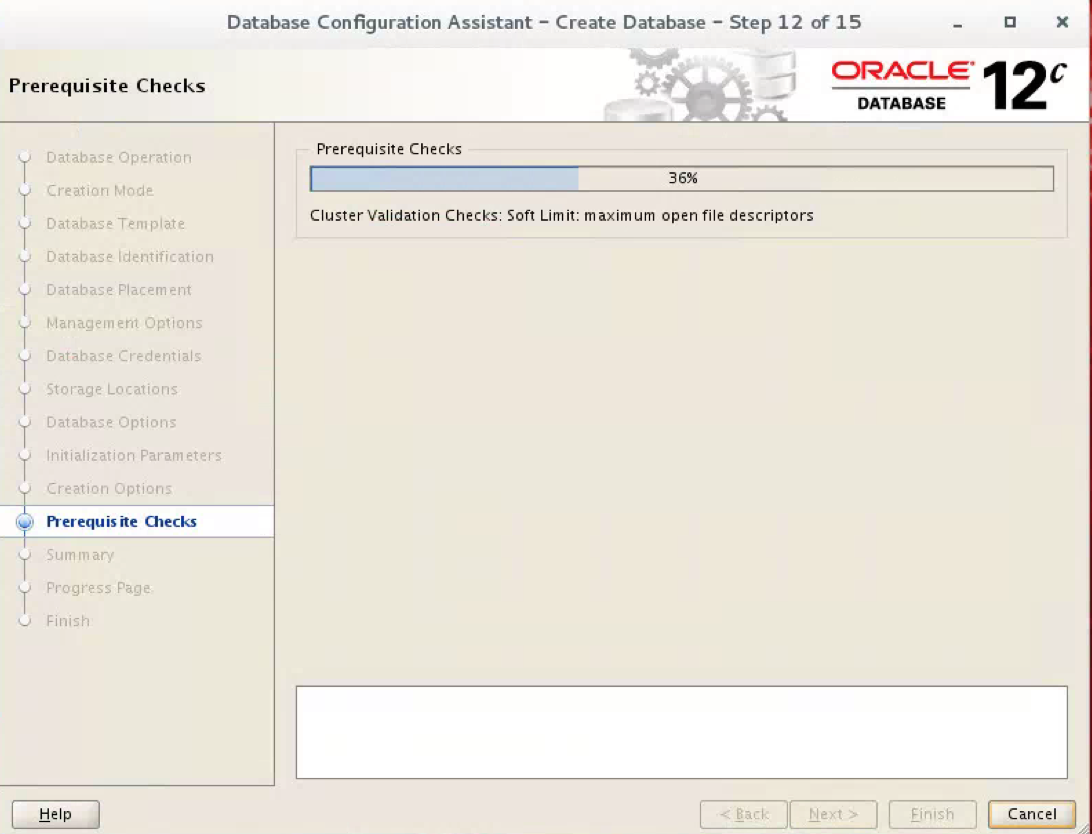
- It will now run through Pre-requisite checks
- You will now see a screen of all your settings to check
- Click Finish
- You should now see the Progress Page
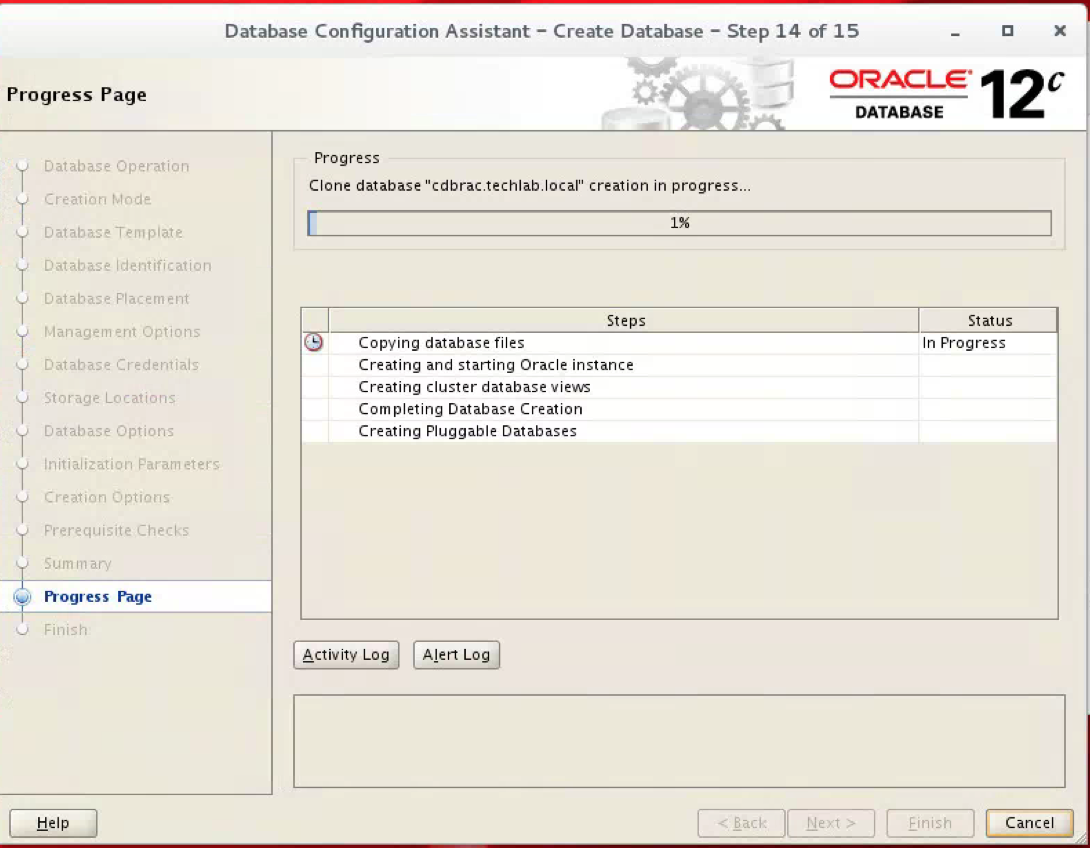
- The final screen should complete the wizard and show you the details

Check the Status of the RAC
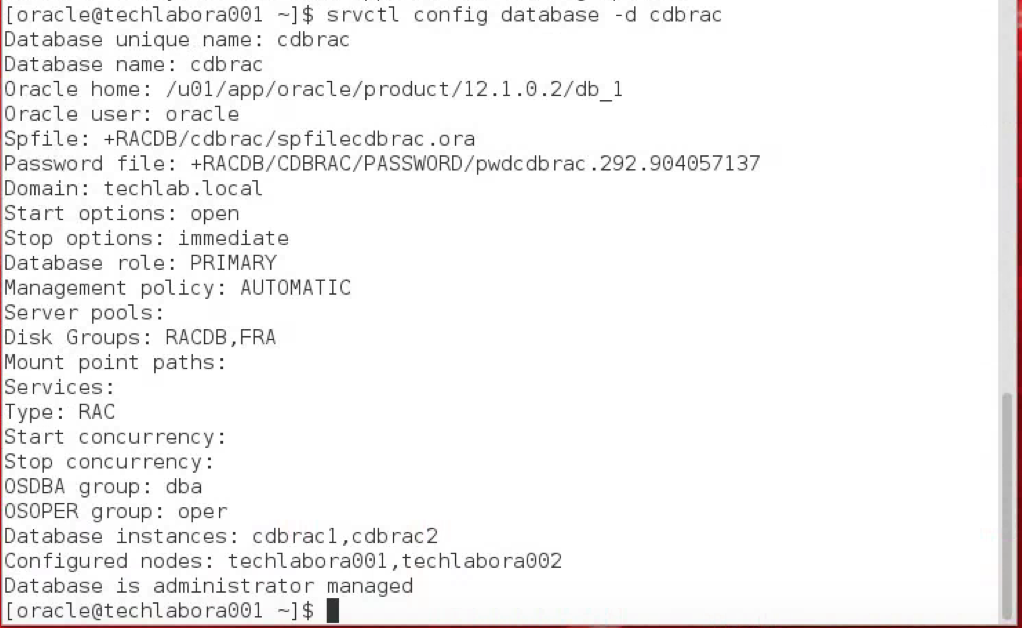
There are several ways to check the status of the RAC. The srvctl utility shows the current configuration and status of the RAC database.
Using SQLPLUS
- I logged into a Terminal Session of my Oracle VM
- Sometimes I found I had to type the paths again as per below

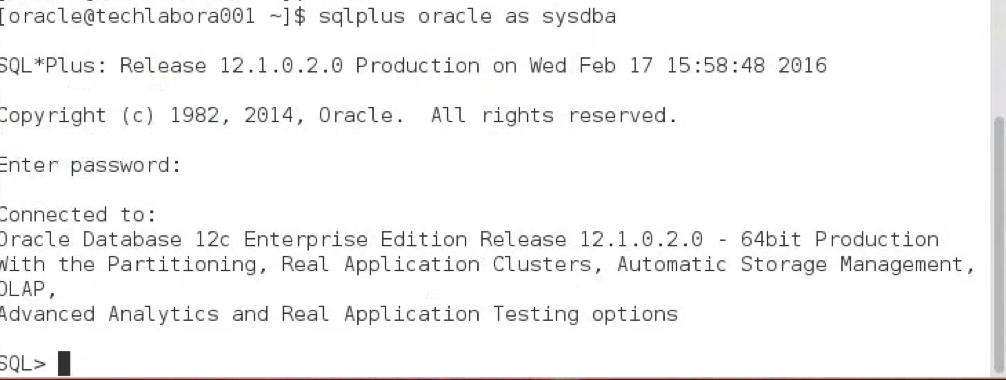
- Open a Putty session
- Type sqlplus oracle as sysdba
- Type the password
- I found I could log in using
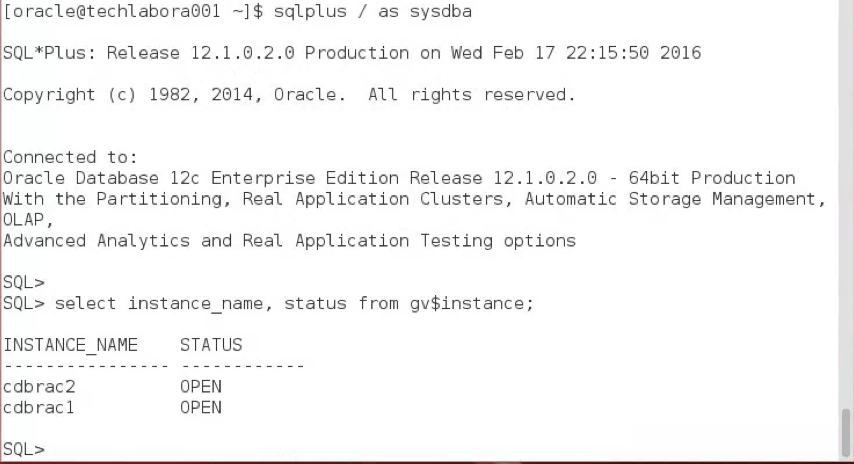
- sqlplus / as sysdba
- sqlplus oracle as sysdba
- Type select instance_name, status from gv$instance;
- You can also type srvctl status database -d cdbrac to check the database is running across both nodes

Checking OS Kernel version (Just for notes/info)
- Type uname -r to see the Oracle version on both nodes

- Run yum update kernel
- You can also run yum list kernel* to see what’s been installed and what is available to install

