Archive for September 2014

Using Windows 2008 R2 File Auditing

guard

What is File Auditing?

In order to track file and folder access on Windows Servers, it is necessary to enable file and folder auditing and then identify the files and folders that are to be audited. Once correctly configured, the server security logs will then contain information about attempts to access or otherwise manipulate the designated files and folders. It is important to note that file and folder auditing is only available for NTFS volumes.

In Windows Server 2008 R2 and Windows 7, all auditing capabilities have been integrated with Group Policy. This allows administrators to configure, deploy, and manage these settings in the Group Policy Management Console (GPMC) or Local Security Policy snap-in for a domain, site, or organizational unit (OU). Windows Server 2008 R2 and Windows 7 make it easier for IT professionals to track when precisely defined, significant activities take place on the network.

The nine basic audit policies under Computer Configuration\Policies\Windows Settings\Security Settings\Local Policies\Audit Policy allow you to configure security audit policy settings for broad sets of behaviors, some of which generate many more audit events than others. An administrator has to review all events that are generated, whether they are of interest or not.

Auditing1

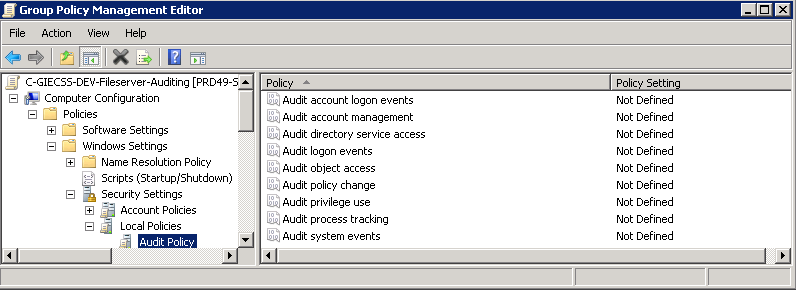
In Windows Server 2008 R2 and Windows 7, administrators can audit more specific aspects of client behavior on the computer or network, thus making it easier to identify the behaviors that are of greatest interest. For example, in Computer Configuration\Policies\Windows Settings\Security Settings\Local Policies\Audit Policy, there is only one policy setting for logon events, Audit logon events. In Computer Configuration\Policies\Windows Settings\Security Settings\Advanced Audit Policy Configuration\System Audit Policies, you can instead choose from eight different policy settings in the Logon/Logoff category. This provides you with more detailed control of what aspects of logon and logoff you can track

Auditing2

Planning

In addition, to plan and deploy security event auditing policies, administrators need to address a number of operational and strategic questions, including:

  • Why do we need an audit policy?
  • Which activities and events are most important to our organization?
  • Which types of audit events can we omit from our auditing strategy?
  • How much administrator time and network resources do we want to devote to generating, collecting, and storing events, and analyzing the data?

Requirements

  1. Auditing has to be enabled in the system’s security policy and in the Access Control List of a resource to successfully log events
  2. Audit policy can be enabled either through group policy or the local security policy
  3. If this is a Windows Server 2008 R2 or later operating system I recommend using the Advanced Audit Policy Configuration (Computer Configuration\Windows Settings\Security Settings\Advanced Audit Policy Configuration\Audit Policies\) as opposed to the older Audit Policy (Computer Configuration\Windows Settings\Security Settings\Local Policies\Audit Policy\)
  4. Do not mix use of both Advanced Audit Policy Configuration and the older Audit Policy: If you enable audit policy through Advanced Audit Policy Configuration either through group policy or the local security policy, I recommend using the Advanced Audit Policy Configuration at every level (local policy, site, domain and OU-linked group policy)

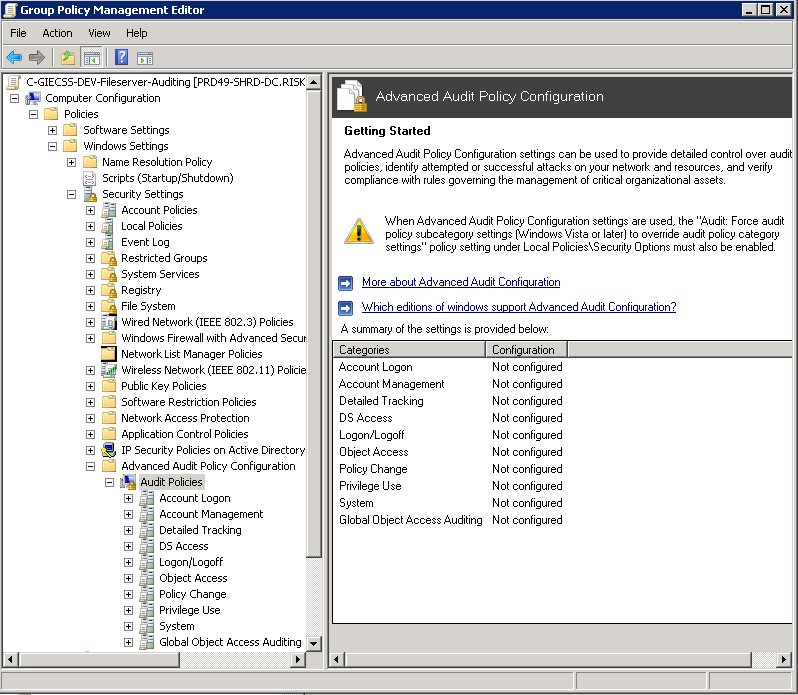
Configuring an Advanced Audit Policy

  • Create a Group Policy Object and name it something to the effect of File Server Audit Policy
  • Edit the GPO, browse to Computer Configuration\Windows Settings\Security Settings\Advanced Audit Policy Configuration\Audit Policies
  • For more information on each setting click the following link
  • http://technet.microsoft.com/en-us/library/dd772712%28v=ws.10%29.aspx
  • Select Object Access
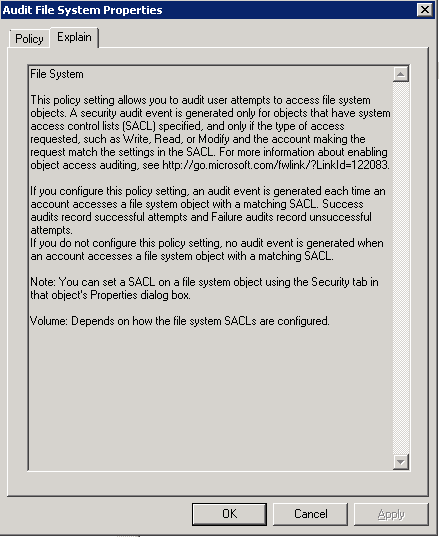
  • In the Sub Category, select Audit File System. Put a tick in Configuring the following audit events and select whether you want to audit for Success or Failure

Auditing3

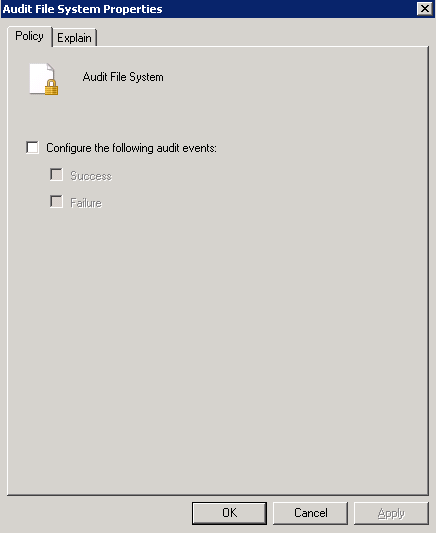
  • If you click on Explain, this will tell you exactly what this policy does

Auditing4

  • Once file and folder access auditing has been enabled the next step is to configure which files and folders are to be audited. As with permissions, auditing settings are inherited unless otherwise specified. By default, configuring auditing on a folder will result in access to all child subfolders and files also being audited. Just as with inherited permissions, the inheritance of auditing settings can be tuned off for either all, or individual files and folders.
  • To configure auditing for a specific file or folder begin by right clicking on it in Windows Explorer and selecting Properties. In the properties dialog, select the Security tab and click on Advanced. In the Advanced Security Settings dialog select the Auditing tab. Auditing requires elevated privileges. If not already logged in as an administrator click the Continue button to elevate privileges for the current task. At this point, the Auditing dialog will display the Auditing entries list containing any users and groups for which auditing has been enabled as shown below.

Auditing5

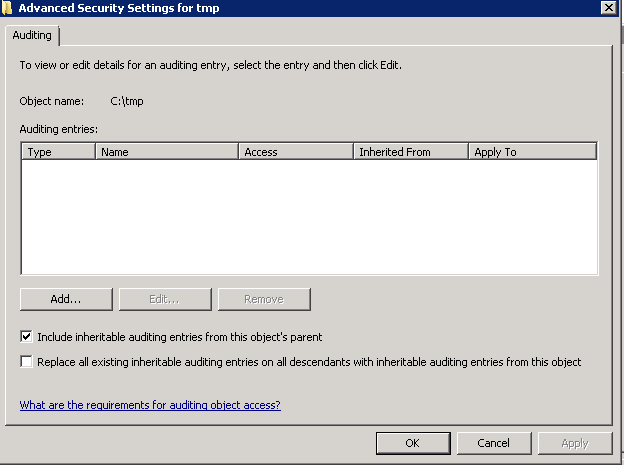
  • You can add Active Directory Security Groups or you can put the Everyone Group
  • Use the drop down list to control whether the auditing setting is to be applied to the current file or folder, or whether it should propagate down to all children files and/or sub-folders. Once configured, click on OK to dismiss current dialog and then Apply the new auditing settings in the Auditing Entries dialog.
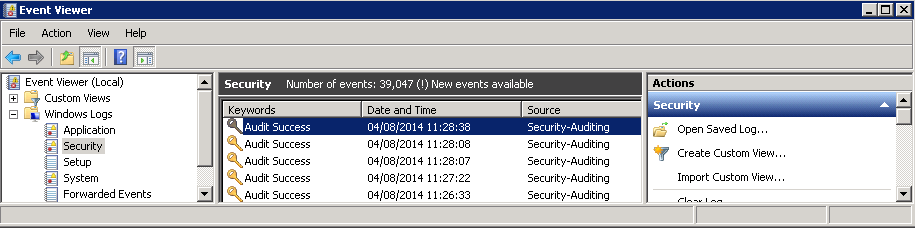
  • From this point on, access attempts on the selected file or folder by the specified users and groups of the types specified will be recorded in the server’s security logs which may be accessed using the Events Viewer

Auditing6

Links

http://technet.microsoft.com/en-us/library/dd560628%28v=ws.10%29.aspx

Active Directory Certificate Services on Windows Server 2012

Certificate

Active Directory Certificate Services

Active Directory Certificate Services (AD CS) is an Identity and Access Control security technology that provides customizable services for creating and managing public key certificates used in software security systems that employ public key technologies.

What is a Certificate?

  • An Electronic document which contains information
  • Has an Issuer
  • Contains who the certificate is issued to
  • Contains an expiry date
  • Contains a public key which allows data to be encrypted only by someone who has the Private Key
  • Contains a digital signature which proves the certificate came from a trusted source and provides a checksum to the certificate for checking the certificate has not be altered

Features in AD CS

By using Server Manager, you can set up the following components of AD CS:

  • Certification authorities (CAs). Root and subordinate CAs are used to issue certificates to users, computers, and services, and to manage certificate validity.
  • Web enrollment. Web enrollment allows users to connect to a CA by means of a Web browser in order to request certificates and retrieve certificate revocation lists (CRLs).
  • Online Responder. The Online Responder service decodes revocation status requests for specific certificates, evaluates the status of these certificates, and sends back a signed response containing the requested certificate status information.
  • Network Device Enrollment Service. The Network Device Enrollment Service allows routers and other network devices that do not have domain accounts to obtain certificates.
  • Certificate Enrollment Web Service. The Certificate Enrollment Web Service enables users and computers to perform certificate enrollment that uses the HTTPS protocol. Together with the Certificate Enrollment Policy Web Service, this enables policy-based certificate enrollment when the client computer is not a member of a domain or when a domain member is not connected to the domain.
  • Certificate Enrollment Policy Web Service. The Certificate Enrollment Policy Web Service enables users and computers to obtain certificate enrollment policy information. Together with the Certificate Enrollment Web Service, this enables policy-based certificate enrollment when the client computer is not a member of a domain or when a domain member is not connected to the domain.

cert15

Benefits of AD CS

Organizations can use AD CS to enhance security by binding the identity of a person, device, or service to a corresponding private key. AD CS gives organizations a cost-effective, efficient, and secure way to manage the distribution and use of certificates.

Applications supported by AD CS include

  • Secure/Multipurpose Internet Mail Extensions (S/MIME)
  • Secure wireless networks
  • Virtual private network (VPN)
  • Internet Protocol security (IPsec)
  • Encrypting File System (EFS)
  • Smart card logon
  • Secure Socket Layer/Transport Layer Security (SSL/TLS)
  • Digital signatures.

Among the new features of AD CS are:

  • Improved enrollment capabilities that enable delegated enrollment agents to be assigned on a per-template basis.
  • Integrated Simple Certificate Enrollment Protocol (SCEP) enrollment services for issuing certificates to network devices such as routers.
  • Scalable, high-speed revocation status response services combining both CRLs and integrated Online Responder services

Hardware and software considerations

AD CS requires Windows Server 2008 and Active Directory Domain Services (AD DS). Although AD CS can be deployed on a single server, many deployments will involve multiple servers configured as CAs, other servers configured as Online Responders, and others serving as Web enrollment portals. CAs can be set up on servers running a variety of operating systems, including Windows Server 2008, Windows Server 2003, and Windows 2000 Server. However, not all operating systems support all features or design requirements, and creating an optimal design will require careful planning and testing before you deploy AD CS in a production environment

A limited set of server roles is available for a Server Core installation of Windows Server 2008 and for Windows Server 2008 for Itanium-based systems. AD CS cannot be installed on Server Core or Itanium-based installations of Windows Server 2008.

Managing AD CS

You can use either Server Manager or Microsoft Management Console (MMC) snap-ins to manage AD CS role services. Use the following steps to open the snap-ins:

  • To manage a CA, use the Certification Authority snap-in. To open the Certification Authority snap-in, click Start, click Run, type certsrv.msc, and click OK.
  • To manage certificates, use the Certificates snap-in. To open the Certificates snap-in, click Start, click Run, type certmgr.msc, and click OK.
  • To manage certificate templates, use the Certificate Templates snap-in. To open the Certificate Templates snap-in, click Start, click Run, type certtmpl.msc, and click OK.
  • To manage an Online Responder, use the Online Responder snap-in. To open the Online Responder snap-in, click Start, click Run, type ocsp.msc, and click OK.

Installing Certificate Services. Setting up an Enterprise CA

  • Open Server Manager
  • Click Add Roles and Features

cert1

  • Select Role based or feature based installation

cert2

  • Select Destination Server

cert3

  • Select Active Directory Certificate Services

cert4

  • Click Add Features

cert5

  • Click Next on Select Features

cert6

  • Read the Active Directory Certificate Services Page and click Next

cert7

  • On the Select Role Services, select Certification Authority and Online Responder

cert9

  • Read the Web Server Role (IIS) Page

cert10

  • Select IIS Role Services

cert11

  • Check the Confirm Installation Selections Page

cert12

  • Finish
  • On the Dashboard Page, you will see a warning triangle saying Further Configuration is needed
  • Click Configure Active Directory Services

cert13

  •  Specify the Credentials to configure Certificate Services

cert14

  • Select Role Services to Configure

cert16

  • Choose Enterprise CA

cert17

  • Specify CA type. Choose Root CA

A root CA is the CA that is at the top of a certification hierarchy. It must be trusted unconditionally by clients in your organization. All certificate chains terminate at a root CA. Whether you use enterprise or stand-alone CAs, you need to designate a root CA.

Since the root CA is the top CA in the certification hierarchy, the Subject field of the certificate that is issued by a root CA has the same value as the Issuer field of the certificate. Likewise, because the certificate chain terminates when it reaches a self-signed CA, all self-signed CAs are root CAs. The decision to designate a CA as a trusted root CA can be made at the enterprise level or locally by the individual IT administrator.

A root CA serves as the foundation upon which you base your certification authority trust model. It guarantees that the subject’s public key corresponds to the identity information shown in the subject field of the certificates it issues. Different CAs might also verify this relationship by using different standards; therefore, it is important to understand the policies and procedures of the root certification authority before choosing to trust that authority to verify public keys.

The Root CA is the most important CA in your hierarchy. If your root CA is compromised, all CAs in the hierarchy and all certificates issued from it are considered compromised. You can maximize the security of the root CA by keeping it disconnected from the network and by using subordinate CAs to issue certificates to other subordinate CAs or to end users

cert18

  • Specify the type of the Private Key
  • Create a new Private Key

cert19

  • Specify the Cryptographic Options
  • Accept the default values

cert20

  • Specify the name of the CA

cert21

  • Specify the validity Period
  • Defaults to 5 years

cert22

  • Specify the Database Location

cert23

  • Check the Confirmation

cert24

  • Check Results
  • Click on the Web Links to learn more

cert25

  • Now you can hold down the Windows Key and Q which will open the Aero view
  • Select Certificate Services which will open the below

cert26

Configure the CA

After a root or subordinate CA is installed, you must configure the Authority Information Access (AIA) and CRL distribution point (CDP) extensions before the CA issues any certificates. The AIA extension specifies where to find up-to-date certificates for the CA. The CDP extension specifies where to find up-to-date CRLs that are signed by the CA. These extensions apply to all certificates that are issued by that CA.

Configuring these extensions ensures that this information is included in each certificate that the CA issues so that it is available to all clients. This ensures that PKI clients experience the least possible number of failures due to unverified certificate chains or certificate revocations, which can result in unsuccessful VPN connections, failed smart card sign-ins, or unverified email signatures.

As a CA administrator, you can add, remove, or modify CRL distribution points and the locations for CDP and AIA certificate issuance. Modifying the URL for a CRL distribution point only affects newly issued certificates. Previously issued certificates will continue to reference the original location, which is why you should establish these locations before your CA distributes any certificates.

Consider these guidelines when you configure CDP extension URLs:

  • Avoid publishing delta CRLs on offline root CAs. Because you do not revoke many certificates on an offline root CA, a delta CRL is probably not needed.
  • Adjust the default LDAP:/// and HTTP:// URL locations on the Extensions tab of the certification authority’s Properties Extension tab according to your needs.
  • Publish a CRL on an HTTP Internet or extranet location so that users and applications outside the organization can perform certificate validation. You can publish the LDAP and HTTP URLs for CDP locations to enable clients to retrieve CRL data with HTTP and LDAP.
  • Remember that Windows clients always retrieve the list of URLs in sequential order until a valid CRL is retrieved.
  • Use HTTP CDP locations to provide accessible CRL locations for clients running non-Windows operating systems.

cert27

Active Directory Certificate Services Best Practices

http://microsoftguru.com.au/2012/11/10/active-directory-certificate-services-best-practices/

Microsoft lab for building a two-tier certification authority PKI hierarchy

http://technet.microsoft.com/library/hh831348.aspx

Accessing the help files

  • Click Start > Run > Type hh certmgr.chm