What is McAfee Device Control?
McAfee Host Data Loss Prevention software is one of the core security functions which protects enterprises from the risk associated with unauthorized transfer of data from within or outside the organization. Data loss is defined as confidential or private information leaving the enterprise as a result of unauthorized communication through channels such as applications, physical devices, or network protocols.
Memory sticks are the smallest, easiest, cheapest, and least-traceable method of downloading large amounts of data, which is why they are often considered the “weapon of choice” for unauthorized data transfer. McAfee Device Control allows monitoring and controlling external device behaviour based on the device attributes rather than the content being copied. Using McAfee Device Control, devices attached to enterprise computers, such as smart phones, removable storage devices, Bluetooth devices, MP3 players, or Plug and Play devices, can be monitored, blocked, or configured to be read-only.
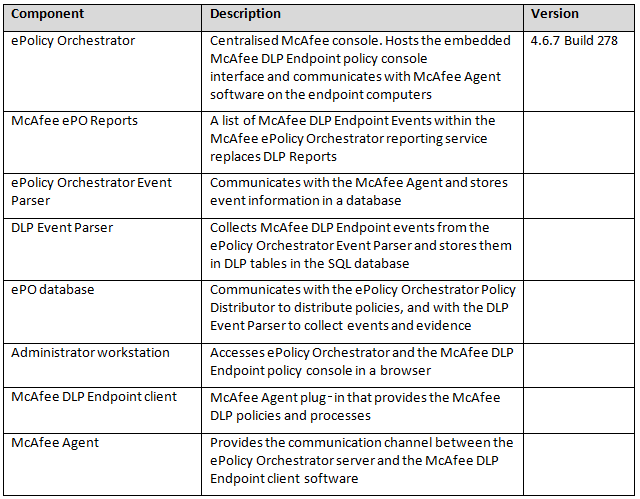
Components of McAfee Device Control
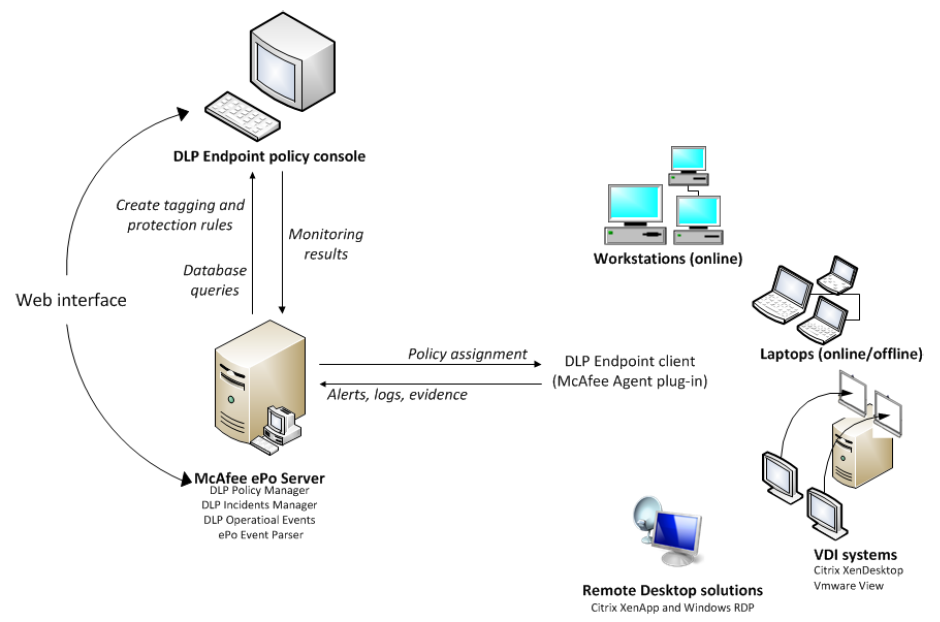
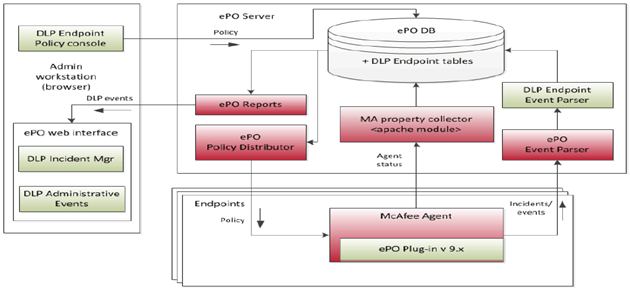
(McAfee DLP Endpoint) software is a content based agent solution that inspects enterprise users’ actions concerning sensitive content in their own work environment, their computers.
McAfee DLP Endpoint software version 9.3 runs in McAfee ePolicy Orchestrator (McAfee ePO™) software, the centralized policy manager for security products and systems. Version 9.3 can be installed in ePolicy Orchestrator 4.5, 4.6, or 5.0.
Recommended Architecture
The recommended installation for a simple McAfee Data Loss Prevention Endpoint implementation is on a single server together with McAfee ePolicy Orchestrator software
Installation Steps
We need to presume that you have already installed the McAfee ePolicy Orchestrator software on a server which runs with Microsoft SQL Server as this is the Central Management Software which the various parts of the Endpoint Suite connect in to.
- Check all pre-requisites are met for the ePolicy Orchestrator server to work with McAfee Device Control
- Disable Microsoft Enhanced Security Configuration on the ePolicy Orchestrator server
- Verify that Microsoft .NET Framework 3.5 SP1, 4.0, or 4.5 is installed on the ePolicy Orchestrator server.
- Verify that the ePolicy Orchestrator server name is listed under Trusted Sites in the Internet Explorer security settings.
- Create and Configure Repository Folders on the ePolicy Orchestrator Server Repository folders contain information used by the McAfee DLP Endpoint software for creating policies and for reporting.
Two folders and network shares must be created, and their properties and security settings must be configured appropriately. The folders do not need to be on the same computer as the McAfee DLP Endpoint Database server, but it is usually convenient to put them there.• d:\dlp_resources\
• d:\dlp_resources\evidence
• d:\dlp_resources\whitelistEvidence folder — Certain protection rules allow for storing evidence, so you must designate, in advance, a place to put it. If, for example, an email is blocked, a copy of the email is placed in the Evidence folder.Whitelist folder — Text fingerprints to be ignored by the endpoint software are placed in a whitelist repository folder. An example is standardized text such as disclaimers or copyright. McAfee DLP Endpoint software saves time by skipping these chunks of text that are known to not include sensitive content.Check Sharing and Security settings according to Page 26 of the Product Guide for McAfee Data Loss Prevention Endpoint 9.3.
- Some of the installation scripts require the NETWORK SERVICE account to have write permission for the C:\Windows\Temp folder. In secure systems, this folder might be locked down. In that case, you must temporarily change the permissions for this folder. Otherwise, the installation fails. McAfee recommend completing all software installations before resetting the permissions.
- Right click the evidence / whitelist folder and select Properties.
- Click the Sharing tab, then click Advanced sharing. Select the Share this folder option.
- Modify Share name to evidence$ / whitelist$. Click OK
- Click the Security tab, then click Advanced.
- In the Permissions tab, deselect the Include inheritable permissions from the object’s parent option. A confirmation message explains the effect this change will have on the folder.
- Click Remove. The Permissions tab in the Advanced Security Settings window shows all permissions eliminated.
- Click Add to select an object type.
- In the Enter the object name to select field, type Domain Computers, then click OK
- The Permission Entry dialog box is displayed.
- In the Allow column, select:
- Create Files/Write Data and Create Folders/Append Data for the evidence folder
- List Folder/Read Data for the whitelist folder
- Verify that the Apply onto option says This folder, subfolders and files, then click OK. The Advanced Security Settings window now includes Domain Computers.
- Click Add again to select an object type.
- In the Enter the object name to select field, type Administrators, then click OK to display the Permission Entry dialog box. Set the required permissions.
- Next Download McAfee Device Control 9.3 from the McAfee website and save to the D Drive of SHS-MGT-001 and unzip
- This will contain the license key in a text file an the mgmt zip and an agent zip
- Install the McAfee Data Loss Prevention Endpoint extension. The default installation is a 90-day license for McAfee Device Control software. If you purchased a license for full McAfee Data Loss Prevention Endpoint software, you must upgrade the license after you complete the installation.
- The McAfee DLP Endpoint software extension and the Help module are installed in ePolicy Orchestrator.
- Note: McAfee DLP Endpoint software does not currently support the McAfee ePolicy Orchestrator 4.6 and 5.0 Software Manager Feature
- In ePolicy Orchestrator, select Menu | Software | Extensions, then click Install Extension. Browse to the D Drive and locate the zip file called D:\McAfee Device Control\McAfeeDeviceControl93300Licensedunzipped \McAfeeDeviceControl93300Licensed\TAG_MGMT_9_3_300_16\Signed Extension\DLPE_Package_9_3_300_16_1.zip
- Click OK. The extension is installed
- The following applications are installed:
- McAfee DLP Endpoint policy console (in ePolicy Orchestrator | Data Protection
- McAfee DLP Monitor (in ePolicy Orchestrator | Data Protection)
- DLP Event Parser
- Click OK.
- After doing that, you will have to use the license key that there is inside the DLP package in a .txt to activate it.
- Next Initialize the McAfee DLP Endpoint policy console
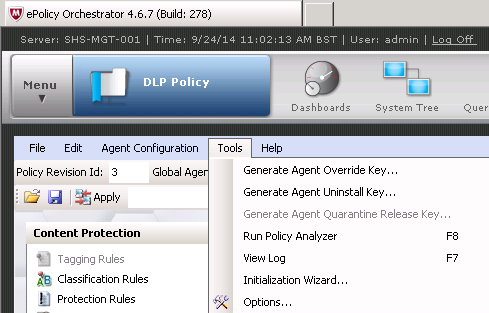
- Note: The wizard can be run at any time by selecting Initialization Wizard from the Tools menu in the McAfee DLP Endpoint policy console.
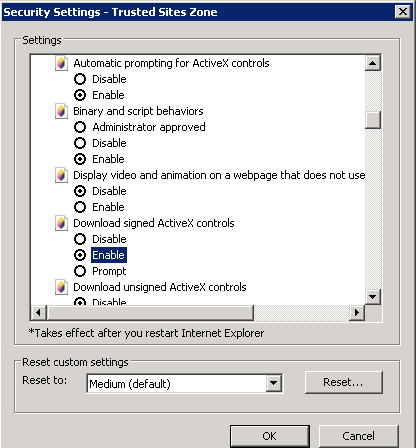
- The McAfee DLP Endpoint Management Tools installer and McAfee DLP Endpoint policy console initialization wizard use ActiveX technology. To prevent the installer from being blocked, verify that the following are enabled in Internet Explorer
- Tools | Internet Options | Security | Custom level:
- Automatic prompting for ActiveX controls
- Download signed ActiveX controls
- In ePolicy Orchestrator, select Menu | Data Protection | DLP Policy.
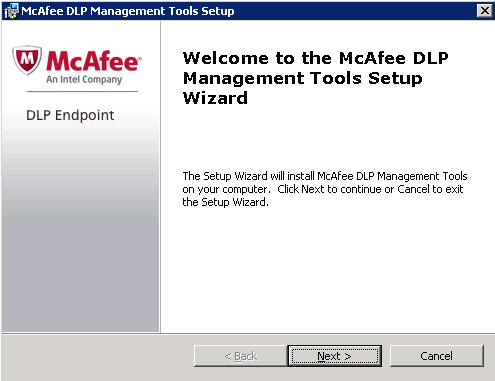
- The McAfee DLP Endpoint Management Tools installer runs and, after a brief delay, the Welcome window of the DLP Management Tools Setup wizard appears.
- Accept the License Agreement
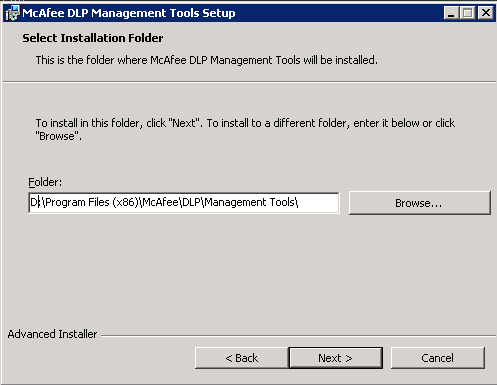
- Select Installation folder
- After the McAfee DLP Endpoint Management Tools installation has completed, the McAfee DLP Endpoint policy console begins loading. If you have an existing policy, you are prompted to convert it to the new format.
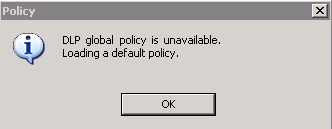
- If no previous policy exists, the message DLP global policy is unavailable. Loading default policy appears. Click OK to continue
- When the message Agent configuration is unavailable. Loading a default agent appears, click OK
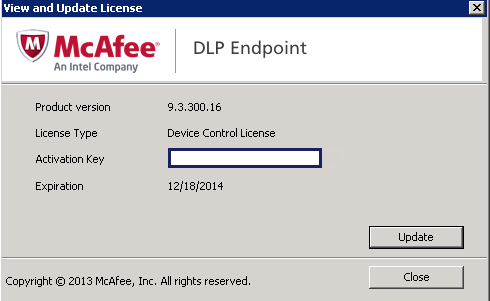
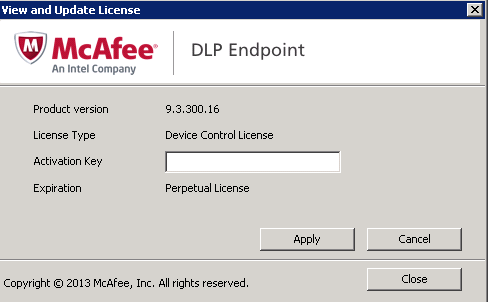
- You may get a box with View/Update License
- Click Update
- Put in the License key as per below
- Click Apply and you will get the below message. Click Yes
- Click OK to close the message box, and click Close to close the Update License window, then log off ePolicy Orchestrator.
- Log on to ePolicy Orchestrator to complete the upgrade.
- From the Agent Configuration menu, select Edit Global Agent Configuration.
- Go to the File Tracking tab and select Device Control and full content protection.
- Go to the Miscellaneous tab. Only the Agent Popup service, Device Blocking, and Reporting Service modules are selected. Select the remaining modules you require to enable them and click OK
- On the Toolbar, click Apply. The policy changes are applied to ePolicy Orchestrator.
- In ePolicy Orchestrator, issue a wake-up call to deploy the policy change to the workstations.
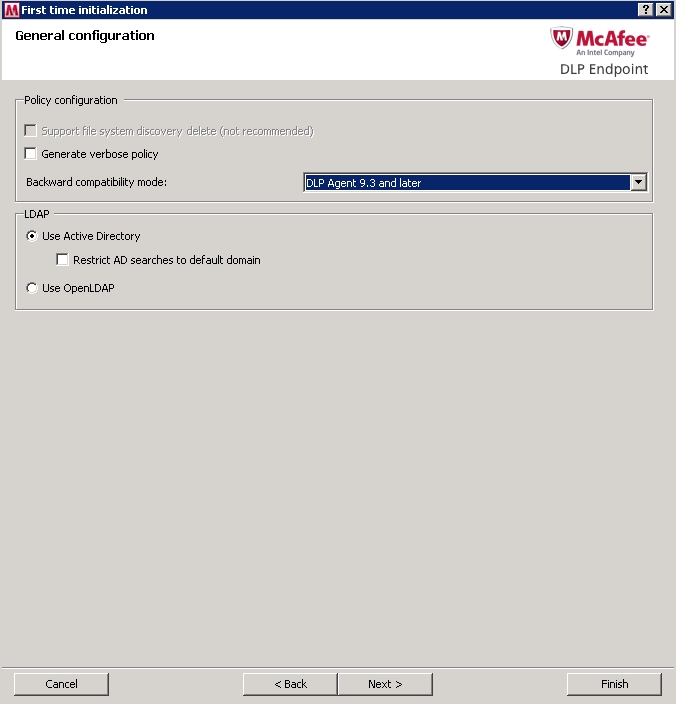
- When the McAfee DLP Endpoint policy console First Time Initialization wizard appears, complete the following steps:
- Select the Backward Compatibility Mode
- For troubleshooting, when you need to review an easily readable version of the policy, select Generate verbose policy. For most installations, we recommend leaving these checkboxes deselected.
- Select your directory access protocol: Microsoft Active Directory or OpenLDAP. When using Microsoft AD in very large organizations where search times could be excessive, select Restrict AD searches to default domain.
- Configure the Agent Override Key Password EPOAdm1n!. McAfee DLP Endpoint software requires strong passwords, that is, at least 8 characters with at least one each uppercase, lower case, digit, and special character (symbol).
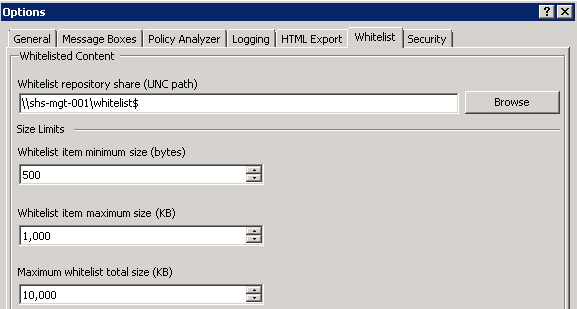
- Browse to the Whitelist storage share, then click Next. The UNC whitelist path is required to apply the policy to ePolicy Orchestrator. Size limits are displayed, but cannot be changed in the Initialization wizard.
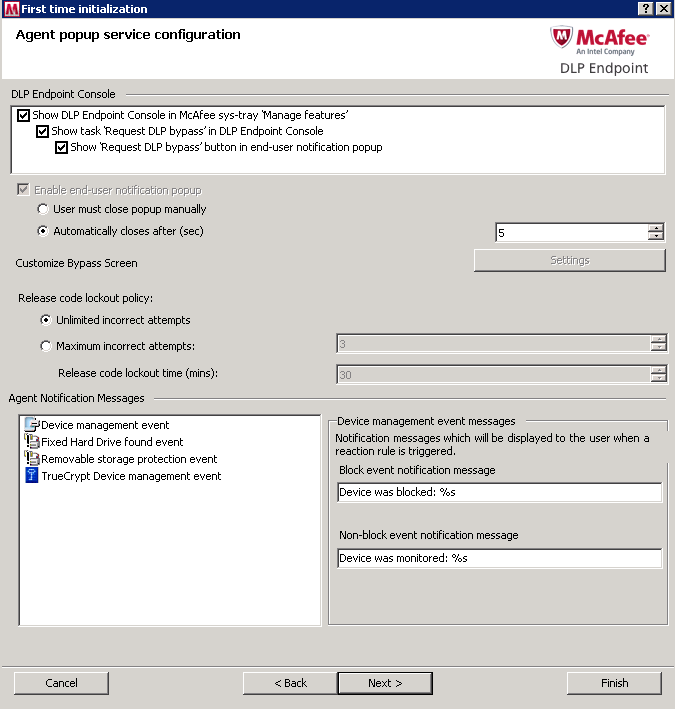
- Modify the agent popup service options (optional). Agent popup managed features are displayed, but cannot be changed in the Initialization wizard. Manual/automatic popup close and release code lockout policy can be set. Modify the default notification messages (optional). Select each event type in turn, and type the message in the text field. Click Next.
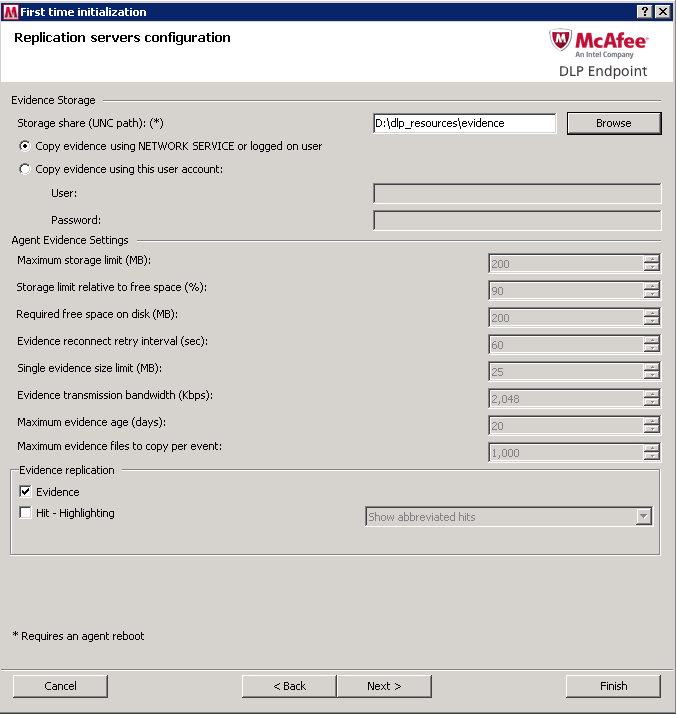
- Browse to the evidence storage share and click Next. The evidence storage path is required to apply the policy to ePolicy Orchestrator. Select a user account and password for copying evidence (optional). Set the required Evidence Replication option. Click Next.
- Note: The Storage share will be \\shs-mgt-001\evidence$
- Click Finish and Apply McAfee Initial Configuration
- Check in the McAfee DLP Endpoint package to ePolicy Orchestrator.
- Any enterprise computer with data protected by McAfee software must have the McAfee Agent installed, making it a managed computer. To add data loss protection, you must also deploy the McAfee DLP Endpoint plug in for McAfee Agent. The installation can be performed using the ePolicy Orchestrator infrastructure.
- In McAfee ePolicy Orchestrator, select Menu | Software | Master Repository.
- In the Master Repository, select Actions | Check In Package.
- Select package type Product or Update (.ZIP), browse to ..\HDLP_Agent_9_2_0_xxx.zip, then click Next.
- The Check in Package page appears.
- Review the details on the screen, then click Save. I have currently added this to Evaluation rather than current
- The package is added to the master repository
Defining and Deploying Policies
- The final stage of McAfee DLP Endpoint software installation is to define a policy, deploy McAfee DLP Endpoint agents to the managed computers, and verify the installation. (See following steps)
- Follow Page 43 of the DLP Endpoint Product Guide to create a default Classification and Protection rule as per below instructions
The rule described is an example of a simple rule that can be used to test the system.
Create a classification rule:
- In the McAfee DLP Endpoint policy console navigation pane under Content Protection, select Classification Rules.
- Right‑click in the Classification Rules window and select Add New | Content Classification Rule. Rename the rule Email Classification Rule.
- Double‑click the rule icon to modify the rule.
- In step 1 of the rule creation wizard, select either of the options (ANY or ALL) then scroll down the text patterns list and select Email Address. Click Next three times, skipping to step 4.
- In step 4 of the rule creation wizard, click Add New to create a new category. Name it Email Category, click OK to accept the new category, then click Finish.
- Right‑click the rule icon and select Enable.
Create a protection rule
- In the McAfee DLP Endpoint policy console navigation pane under Content Protection, select Protection Rules.
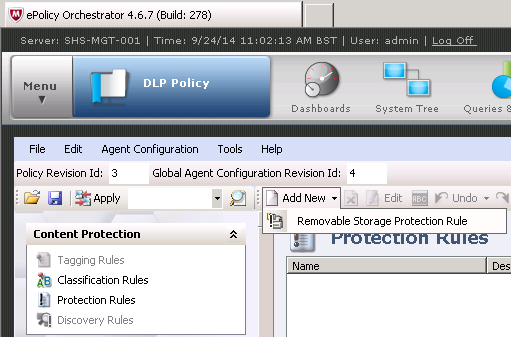
- Right‑click in the Protection Rules window and select Add New | Removable Storage Protection Rule.
- Double‑click the rule icon to modify the rule.
- Click through to step 2 of the rule creation wizard and add the Email Category created when creating the classification rule in the Included column.
- Click through to step 7 of the rule creation wizard. Select Monitor then click Finish.
- Right‑click the rule icon and select Enable.
- From the Tools menu, select Run Policy Analyzer. You should receive warnings, but no errors.
- If you receive errors, they probably come from improper initialization, such as not specifying an evidence folder or override password. You can rerun the initialization from the Tools menu to correct this.
- On the toolbar, click Apply. The policy is applied to McAfee ePolicy Orchestrator.
Deploy McAfee DLP Endpoint Agent with ePolicy Orchestrator
Before policies can be applied, McAfee DLP Endpoint must be deployed to the endpoint computers by ePolicy Orchestrator.
- Create a new subgroup – System Tree > System Tree Actions > Create new subgroup
- In the System Tree, select the level at which to deploy McAfee DLP Endpoint.
- If you select a level under My Organization, the right-hand pane displays the available workstations. You can also deploy McAfee DLP Endpoint to individual workstations. (Need to select which Test Machines to use)
- In the Name field, type a suitable name, for example, Install DLP Endpoint. Typing a description is optional.
- Click the Assigned Client Tasks tab. Select Actions | New Client Task Assignment.
- The Client Task Builder wizard opens.
- In ePolicy Orchestrator 4.6 and 5.0, in the Product field, select McAfee Agent. In the Task Type field, select Product Deployment. Click Create New Task
- In the Products and Components field, select Data Loss Prevention 9.3.0.xx. The Action field automatically resets to Install.
- In ePolicy Orchestrator 4.6 and 5.0, click Save.
- Change the Schedule type to Run immediately. Click Next.
- Review the task summary. When you are satisfied that it is correct, click Save. The task is scheduled for the next time the McAfee Agent updates the policy. To force the installation to take place immediately, issue an agent wake-up call.
- After McAfee DLP Endpoint has been deployed, restart the managed computers.
Verify the installation
After installing McAfee DLP Endpoint software, you should verify the installation in the McAfee DLP Monitor.
- Verify the McAfee DLP Endpoint installation and apply the policy enforcement by using the cmdagent.exe /s command. See the McAfee ePolicy Orchestrator McAfee Agent documentation for more information.
- Select Menu | Data Protection | DLP Operational Events. Click an event to view the details.
- Verify the McAfee DLP Endpoint client software installation from the McAfee system tray icon on the endpoint computer by selecting About. Scroll through the information for McAfee DLP Endpoint.
Deploy Policies with McAfee ePolicy Orchestrator and Device Console
McAfee DLP Endpoint policies contain definitions, rules, assignment groups and agent configuration. A policy is first applied (saved) to the ePolicy Orchestrator server, then assigned (deployed) to the endpoints.
McAfee DLP Endpoint works with three policies:
- DLPE policy
- Agent configuration
- Computer assignment group
DLPE policy is created in the McAfee DLP Endpoint policy console; agent configuration and computer assignment group are created in ePolicy Orchestrator. Each of these policies is assigned the revision number 1 when it is created, and the number is incremented each time the policy is changed. The revision number is important for supporting troubleshooting processes, to ensure that policy changes are actually applied to the endpoint computers. It is also used when requesting an agent bypass or uninstall key. Both the McAfee DLP Endpoint policy console in ePolicy Orchestrator and the DLP Endpoint console on the client computer display the current policy revision numbers.
Before applying a policy, verify that:
- All settings are configured correctly.
- All rules are enabled
- User assignment groups (where required) are assigned to each rule.
- The agent configuration and the computer assignment groups are assigned to the relevant groups and computers in the ePolicy Orchestrator Policy Catalog.
The below steps are what was used to set up the current Policy to Block USB Devices based on2 Active Directory Global Groups which Allow or Deny
- Log into EPO
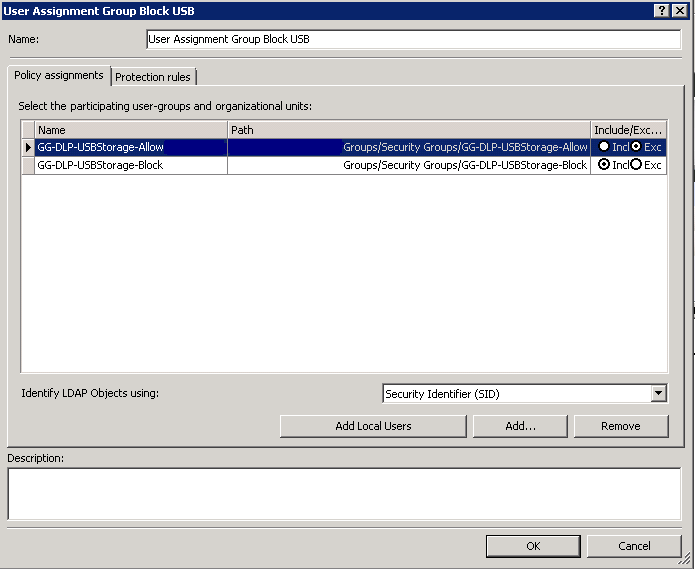
- Click on Menu > Data Protection > DLP Policy > Policy Assignment > User Assignment Groups > Add New
- Click Add and add the GG-DLP-USBStorage-Allow group. Click on Exclude to exclude this group from the Block Rule
- Click Add and add the GG-DLP-USBStorage-Block group. Click on Include to include this group in the Block Rule
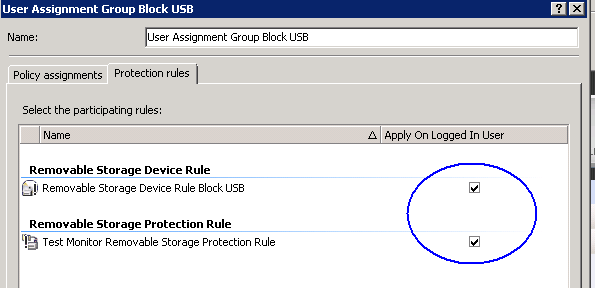
- Click on Protection Rules and put a tick in Apply on Logged on User
- Click on Protection Rules
- Go to Device Management > Device Definitions
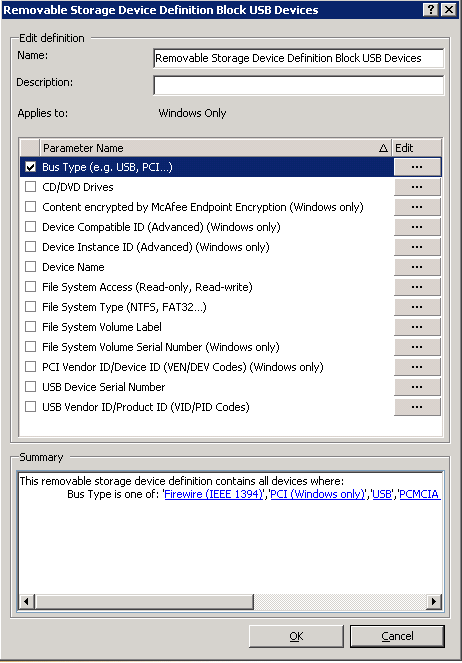
- Click on Add New and give it a name Removable Storage Device Definition Block USB Devices
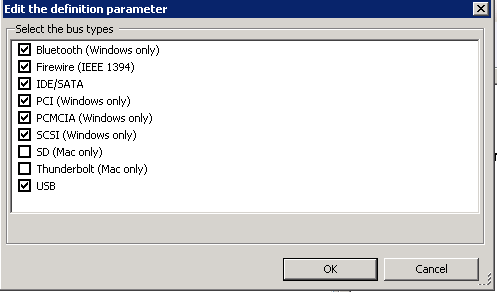
- Double click on this and select Bus Type (USB,PCI) and put a tick here and click the Edit button
- When you click the Edit button, select the following
- Click OK
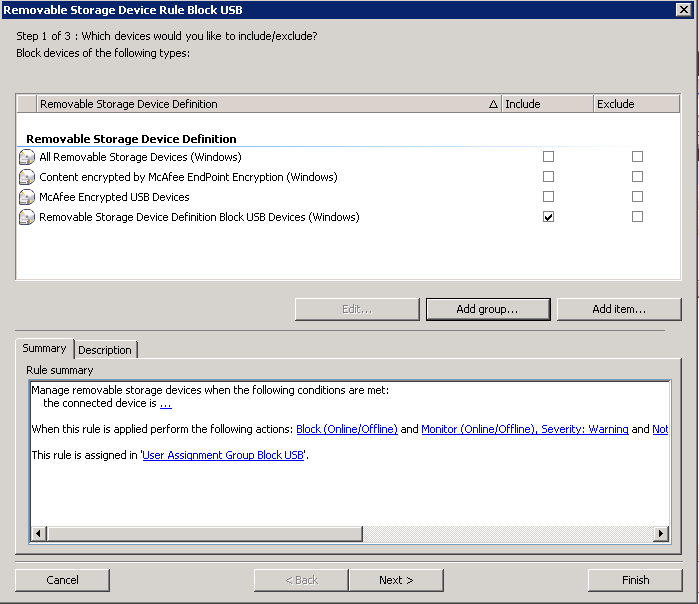
- Go to Device Management > Device Rules > Click Add New
- Call it Removable Storage Device Rule Block Rule
- Select to include the previously created Device Definition – name Removable Storage Device Definition Block USB Devices
- Click Next
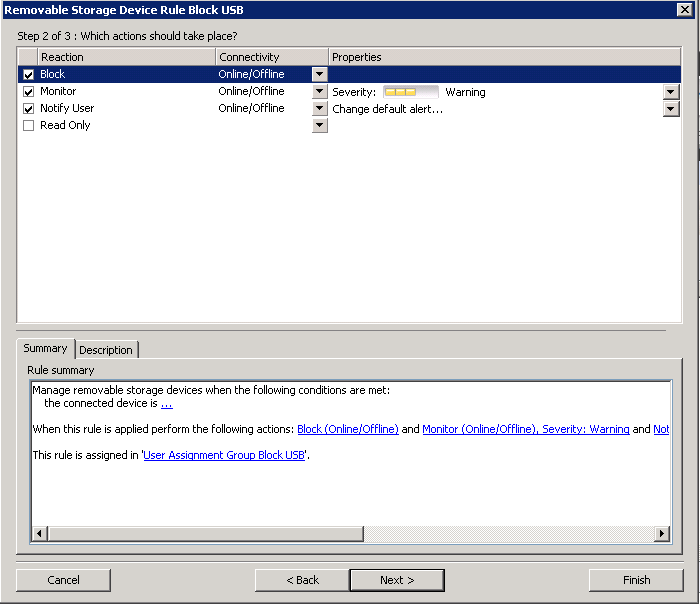
- Choose what actions to take. Note: It may be best to Monitor for a few weeks so you can see what devices your users are plugging in.
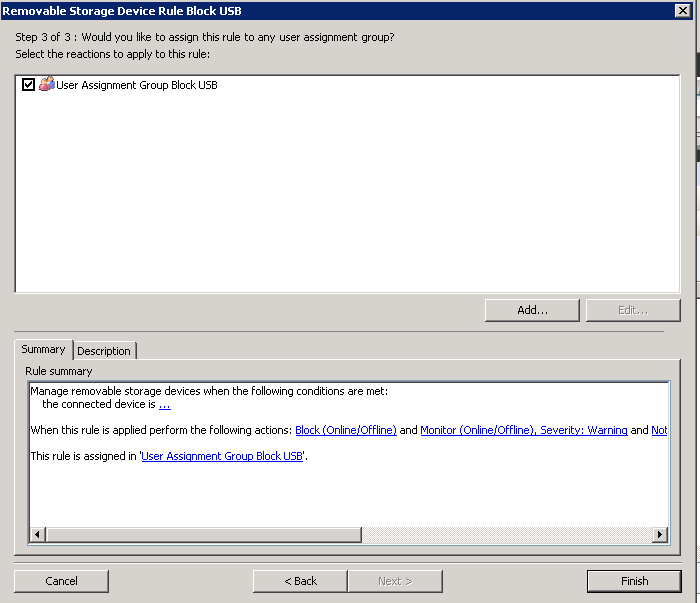
- Assign the rule to the Assignment User group you created
- Click Finish
- Apply the System PolicyWhen a policy is completed, it must be applied to ePolicy Orchestrator. From there, it is deployed to the managed computers that enforce the policy.
- In ePolicy Orchestrator, select Menu | Data Protection | DLP Policy
- Verify the policy before applying it: select Tools | Run Policy Analyzer.
- From the McAfee DLP Endpoint policy console File menu, select Apply to ePO. The Applying to ePO window appears.
- The policy is saved to the ePolicy Orchestrator database, and an administrative event is generated.
Assign a policy or agent configuration
Policies applied to ePolicy Orchestrator must be assigned and deployed to managed computers in order to be used.
- In ePolicy Orchestrator, click System Tree.
- Locate the directory containing the computers that will be assigned a policy, and select them.
- Select Actions | Agent | Wake Up Agents.
- Select Agent Wake‑Up Call, and set Randomization to 0 minutes. Click OK.
- When the agent wake‑up call is completed, you are returned to the System Tree. Reselect the computers that will be assigned a policy, and click Actions | Agent | Set Policy & Inheritance.
- On the Assign Policy page, select the Product, Category, and Policy to be applied.
- Click Save.
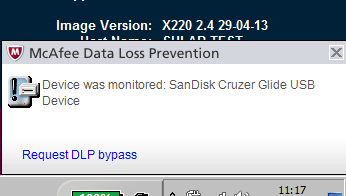
What happens now if a blocked User plugs a USB Device in?
They will see the below McAfee message pop up in the bottom of the screen
How do you view these events in the ePolicy Orchestrator/DLP Console?
- Go to Menu > Data Protection > DLP Incident Manager . There are 2 filters set up to show any Device Plug or Unplug Event or you can simply scroll through the log. You should see any devices which have been picked up under the block policy
- You can also have a look at the Threat Event Log which also shows these types of events although the DLP Incident Manager has more comprehensive information
Information on Smartphones
Info on iPhones (It looks like McAfee have confirmed that we cannot allow phones to be Read Only and allow charging at the moment. Symantec have also confirmed the same)
This has proved to be a tricky one.
When an USB iPhone Connector is connected to USB port of Computer, the iPhone installs a set of drivers (or ITunes Software identifies the iPhone). Until and unless the Drivers can be installed or detection takes place the Phone would not be charged. IPhone also carries the HDD within it. So, when you insert the Connector, it detects the HDD as well. (You can see the iPhone HDD in the My Computer option)
It is also worth reading the below article which relates to a recently reported USB Flaw which reinforces the idea that we should not be allowing people to plug mobile phones into end points.
http://www.bbc.co.uk/news/technology-29475566
The only information I have found on this is the following for allowing Apple devices to charge and make them read only is below (Needs testing w/c 13/10/14)
- Create a Removable Storage Device Definition for Apple devices using Vendor ID – 05AC for Apple.
- Create a Removable Storage Device Rule with Actions of Monitor and Read Only.
- Apply to Everyone and Local User Assignment Group.
You cannot create a Plug and Play Device rule for Apple devices that will make them Read Only – you can only Block, Monitor and Notify User for those rules. In order for you to be able to allow your devices to charge and be RO you will need to create your rules as above because a blocking P&P rule does not allow the device to charge.
If the above rule does not work for you please review your other rules – if you have other rules that “Block” and can be associated with Apple Devices then that device will be blocked as Device Control will go with the most secure rule
How to create granular device rules. E.g Per Device per User
OK So when we first put this in it was very generic. Users were either allowed to plug USB devices in or were not. What we were asked to do next was to block Everyone generally but then allow devices rules which were literally per device per user. The below steps show you how to do this.
Create one Device rule which blocks all devices to everyone
- First of all you need to monitor what devices are actually being used on your network and what have been picked up by McAfee
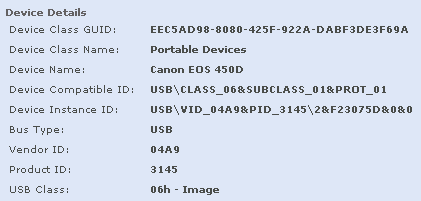
- So as an example we monitored our infrastructure and as a result we will pick one example which a Canon EOS 450D Camera which came up in the DLP Incident Manager which you can see below
- We now need to create a Device Definition for this device and also an AD User Group who will be allowed access to these which will be included in a User Assignment Group
- Log into ePolicy Orchestrator and click on Menu > Data Protection > DLP Policy
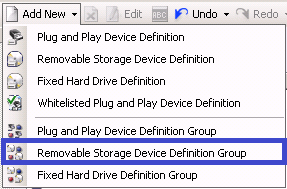
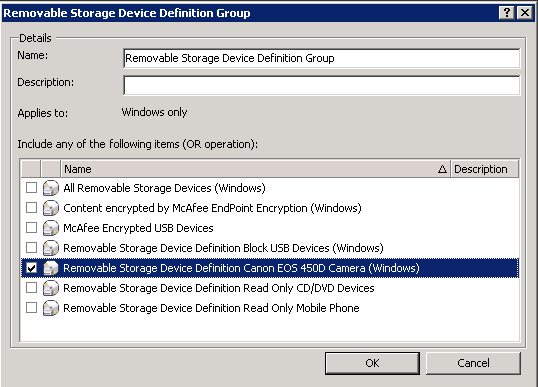
- Scroll down to Device Management and click on Device Definitions > Add New Removable Storage Definition Group and name it as you wish
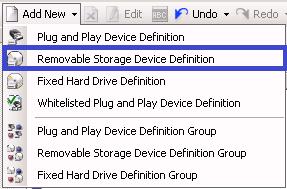
- Click Add New again and choose Removable Storage Device Definition
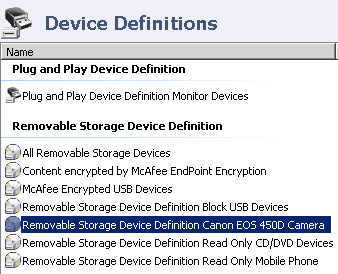
- I have named this Device Definition so it can easily be recognised
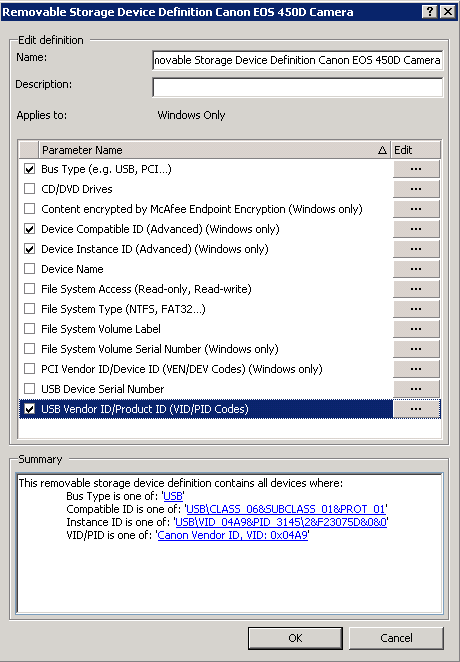
- Double click on this rule and add as much detail into this Definition as possible to distinguish this camera based on the information in the DLP Incident Manager
- Click OK
- Now go to your Removable Storage Device Definition Group and add in the Device Definition you just created
- Click OK
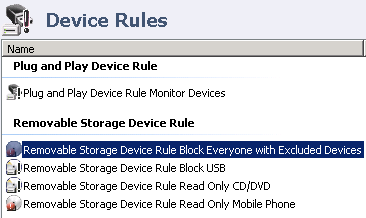
- Next create one Device Rule which blocks all devices to everyone.
- Click on Device Rules
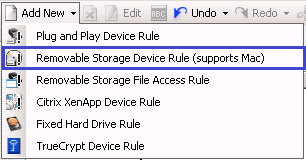
- Add New Removable Storage Device Rule
- Call it something recognisable
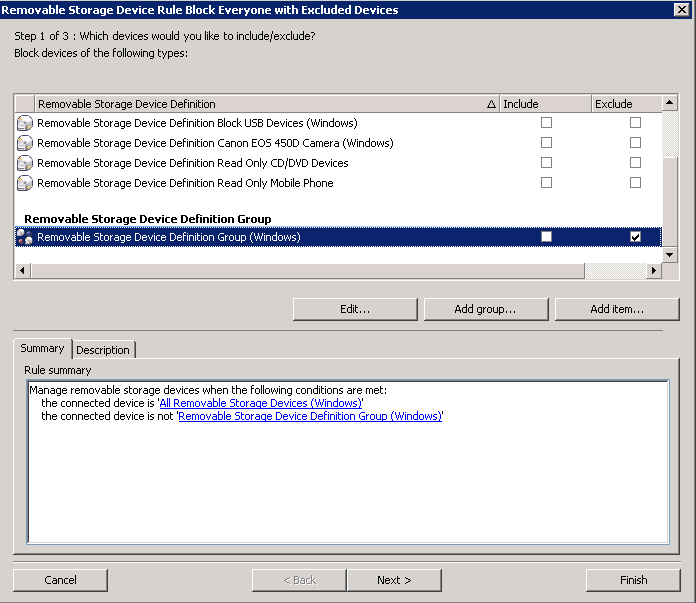
- Double click on this rule
- You want to put a tick in Include for All Removal Storage Devices (Windows)
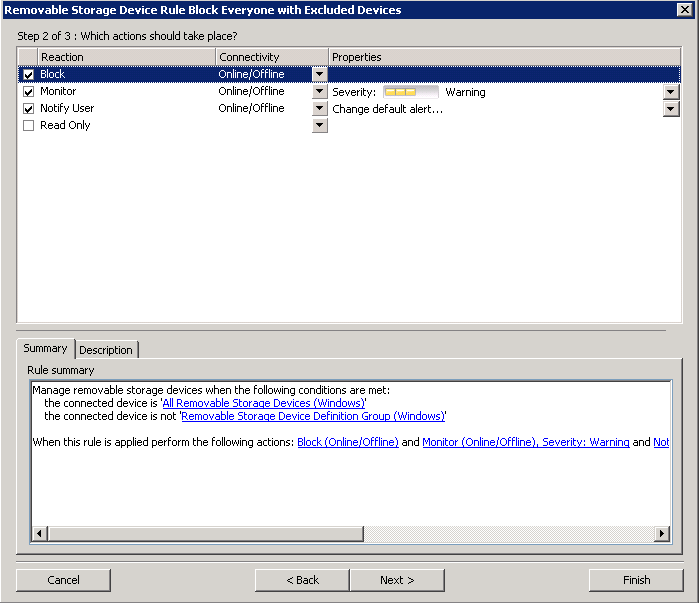
- You want to put a tick in Exclude for your Removable Storage Definition Group (Windows) I’ve just shown you the Excluded tick as I can’t get both in the screenprint
- Click Next
- Put a tick in Block, Monitor and Notify User
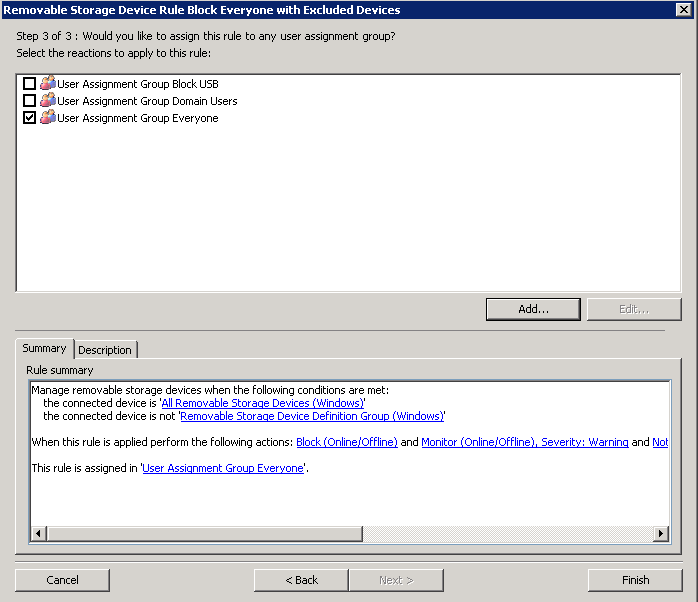
- Create a User Assignment Group for the Everyone Group and put a tick in here
- Click Finish
- Next we have to create a separate device rule for each Device-User pair, include the device definition, set Reaction to Block,
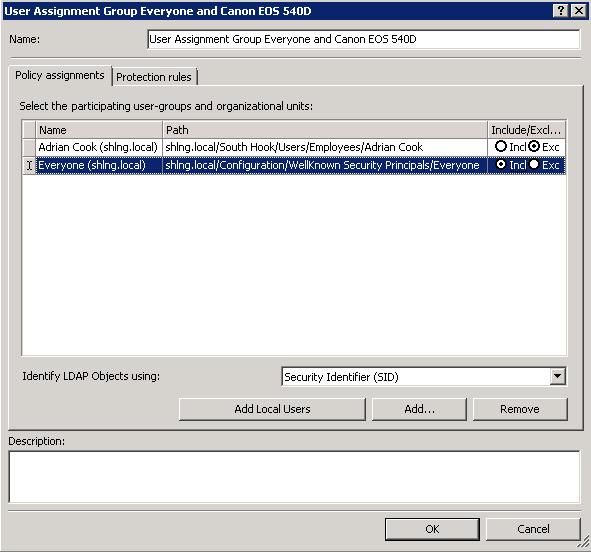
- Include “Everyone” and exclude that particular user to whom you want to allow the device.
- First of all we need to create a new User Assignment Group which contains the Everyone Group and the Users we want to allow
- Next Click on Device Management > Device Rules Add New> Removable Storage Device Rule (supports MAC)
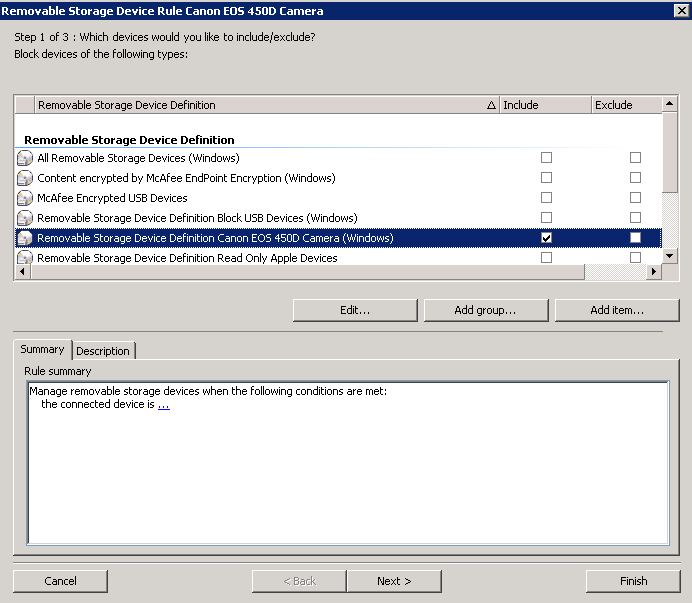
- Call it Removable Storage Device Rule Canon EOS 450D Camera
- Double click on the rule and include the Canon EOS 540D Devie Definition and click Include on your Device Definition for the Canon EOS 540D Camera
- Click Next
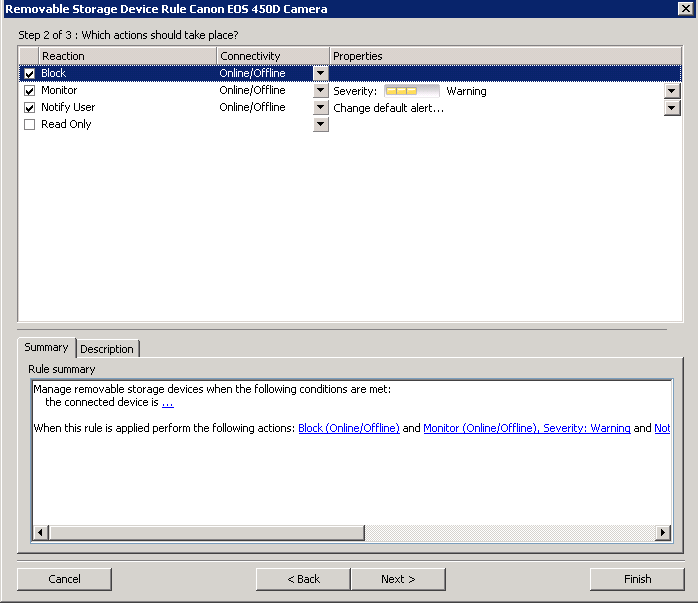
- Choose Block, Monitor and Notify
- Click Next
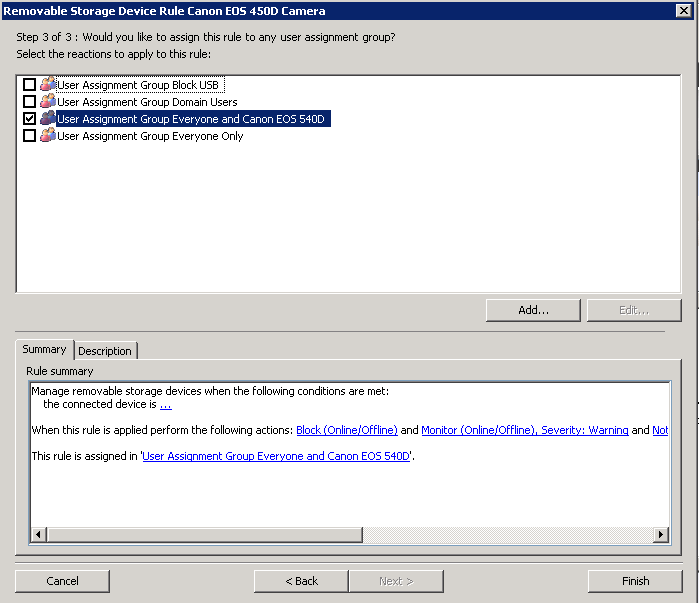
- Choose your User Assignment Group which says User Assignment Group Everyone and Canon EOS 540D
- Click Finish
- Now you have added the 2 Device Rules which should block Everyone but the users you select from accessing a Canon EOS 540D Camera

