Archive for Storage

Resetting LUNS on vSphere 5.5

lunreset

The Issue

Following a networking change there was a warm start on our IBM V7000 storage nodes\cannisters that caused an outage to the VMware environment in the sense that locks on certain LUNs caused a mini-APD (all Paths Down) This issue occurs if the ESXi/ESX host cannot reserve the LUN. The LUN may be locked by another host (an ESXi/ESX host or any other server that has access to the LUN). Typically, there is nothing queued for the LUN. The reservation is done at the SCSI level.

Caution: The reserve, release, and reset commands can interrupt the operations of other servers on a storage area network (SAN). Use these commands with caution.

Note: LUN resets are used to remove all SCSI-2 reservations on a specific device. A LUN reset does not affect any virtual machines that are running on the LUN.

Instructions

  • SSH into the host and type esxcfg-scsidevs -c to verify that the LUN is detected by the ESX host at boot time. If the LUN is not listed then rescan the storage

lunreseta

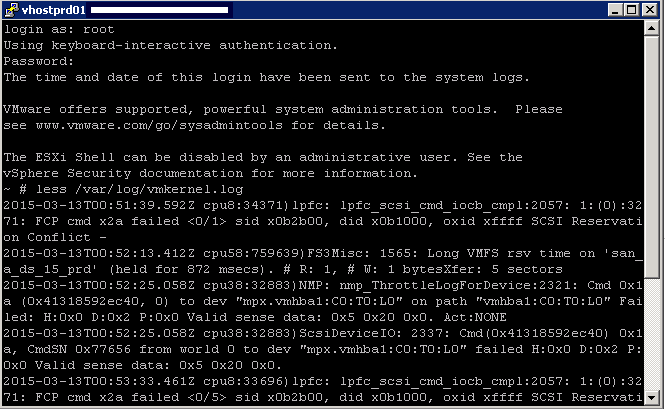
  • Next type cat /var/log/vmkernel.log
  • press Shift+G to reach the end of the file

lunresetb

  • You will see messages in the log such as below
  • x0b1800, oxid xffff SCSI Reservation Conflict –
    2015-01-23T18:59:57.061Z cpu63:32832)lpfc: lpfc_scsi_cmd_iocb_cmpl:2057: 3:(0):3271: FCP cmd x16 failed <0/4> sid x0b2700, did
  • You will need to find the naa ID or the vml ID of the LUNs you need to reset.
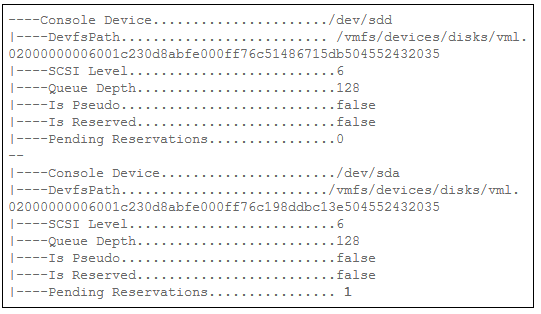
  • You can do this by running the command esxcfg-info | egrep -B5 “s Reserved|Pending”
  • The host that has Pending Reserves with a value that is larger than 0 is holding the lock.

lunreset3

  • We then had to run the below command to reset the LUNs
  • vmkfstools -L lunreset /vmfs/devices/disks/naa.60050768028080befc00000000000116

lunresetc

  •  Then run vmkfstools -V to rescan
  • Occasionally you may need to restart the management services on particular hosts by running /sbin/services.sh restart in a putty session then restart the vCenter service but it depends on your individual situation

Using the partedUtil command line utility on ESXi and ESX

partedUtilpic.bmp

What is the partedUtil Utility?

You can use the partedUtil command line utility to directly manipulate partition tables for local and remote SAN disks on ESX and ESXi. The partedUtil command line only is supported for disk partitioning from ESXi 5.0. The command line utility fdisk does not work with ESXi 5.0.

Note: VMFS Datastores can be created and deleted using the vSphere Client connected to ESX/ESXi or to vCenter Server. It is not necessary to manually create partitions using the command line utility

Caution: There is no facility to undo a partition table change other than creating a new partition table. Ensure that you have a backup before marking any change. Ensure that there is no active I/O to a partition prior to modifying it.

We came across this tool when we had issues deleting a datastore. It was recommended we try deleting the partition on the datastore which allowed us to completely remove it from vCenter in the end.

What actions can partedUtil do?

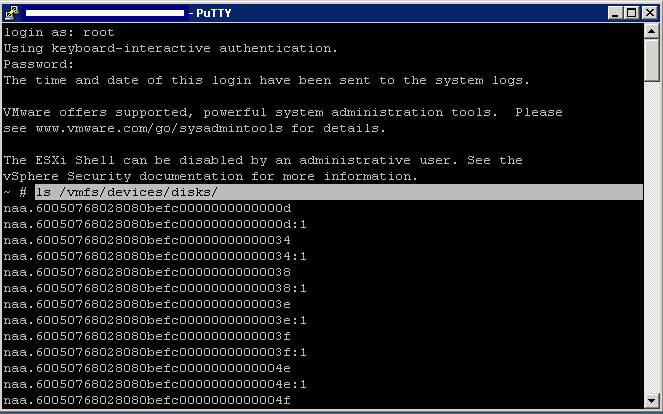
  • Retrieve a list of Disk devices
  • ls /vmfs/devices/disks/

partedUtilb (2)

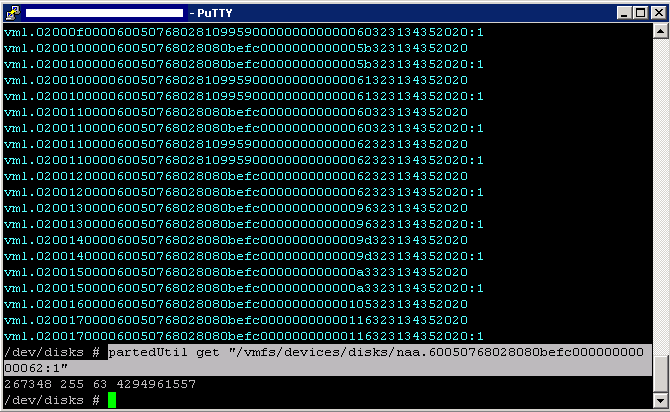
  • Printing an existing partition table
  • partedUtil getptbl “/vmfs/devices/disks/DeviceName”

partedUtilb (1)

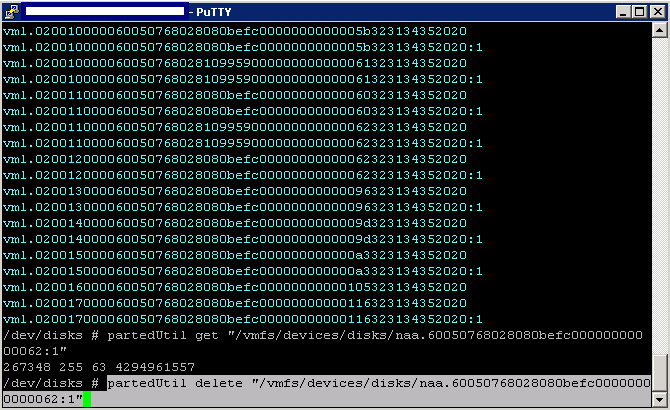
  • Delete a partition table
  • partedUtil delete “/vmfs/devices/disks/DeviceName” PartitionNumber

partedUtil3

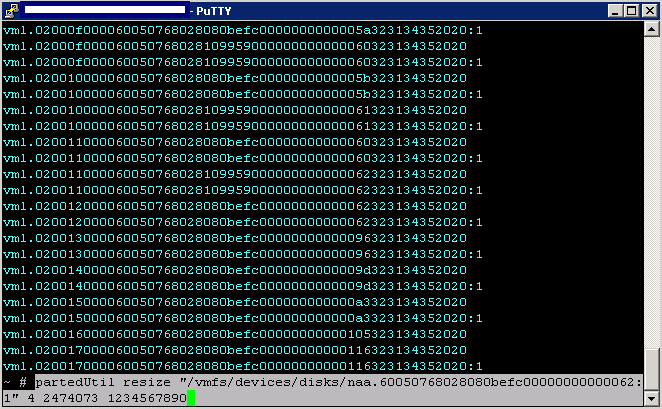
  • Resize a partition
  • partedUtil resize “/vmfs/devices/disks/DeviceName” PartitionNumber NewStartSector NewEndSector

partedUtil4

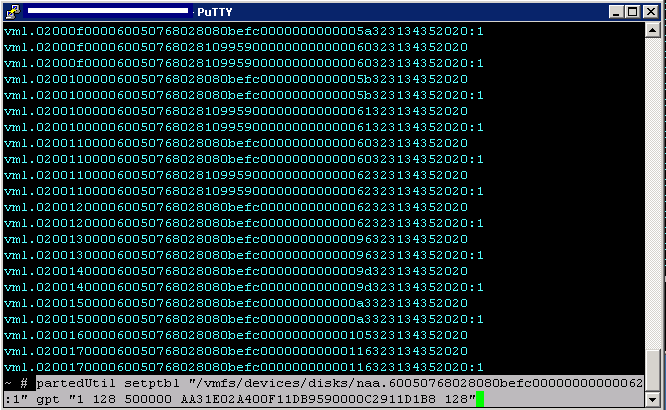
  • Create a new partition table
  • partedUtil setptbl “/vmfs/devices/disks/DeviceName” DiskLabel [“partNum startSector endSector type/guid attribute”]*

partedUtil6

Links

http://kb.vmware.com/selfservice/microsites/search.do?language=en_US&cmd=displayKC&externalId=1036609

http://kb.vmware.com/selfservice/microsites/search.do?language=en_US&cmd=displayKC&externalId=2008021


Changing the queue depth for QLogic and Emulex HBAs in VMware 4

ladies-que-2

If the performance of your hardware bus adapters (HBAs) is unsatisfactory, or your SAN storage processors or heads are over-utilized, you can adjust your ESXi/ESX hosts’ maximum queue depth value. The maximum value refers to the queue depths reported for various paths to the LUN. When you lower this value, it throttles the ESXi/ESX host’s throughput and alleviates SAN contention concerns if multiple hosts are over-utilizing the storage and are filling its command queue.

When one virtual machine is active on a LUN, you only need to set the maximum queue depth. When multiple virtual machines are active on a LUN, the Disk.SchedNumRegOutstanding value is also relevant. The queue depth value, in this case, is equal to whichever value is the lowest of the two settings: adapter queue depth or Disk.SchedNumReqOutstanding

Instructions

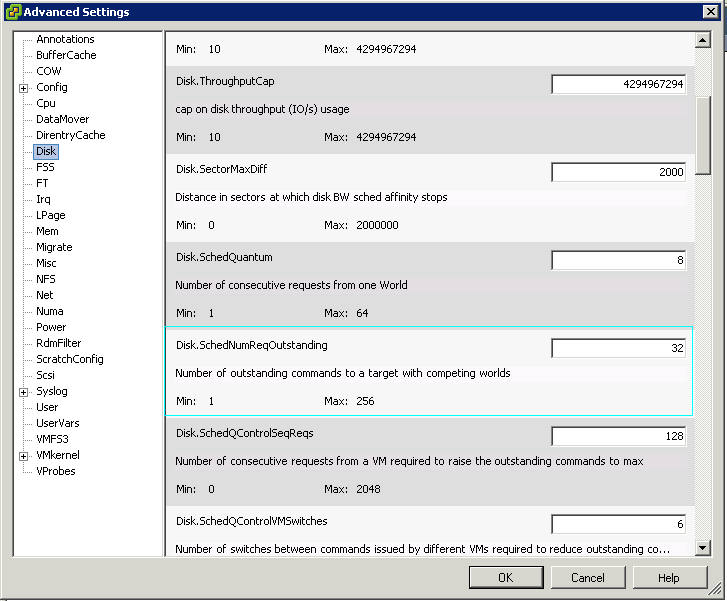
  • On vSphere 4, go to Hosts and Clusters > Configuration > Software . Advanced Settings
  • Highlight Disk and scroll down to Disk.SchedNumReqOutstanding

queuedepth1

  • Change Queue Depth to 64
  • Open Putty or Local Console
  • Verify which HBA module is currently loaded by entering one of these commands on the service console:
  • vmkload_mod -l | grep qla
  • vmkload_mod | grep lpfc

queuedepth2

  • As you can see the first command did not return anything but the second command returned information about the Emulex driver
  • To modify Q Logic, do the following

qlogic2

  • To modify Emulex, do the following

emulex

  • For multiple instances of Emulex HBAs being presented to a system, use:

emulex2

  • Reboot your host
  • Run this command to confirm if your changes are applied
  • esxcfg-module -g driver. Where driver is your QLogic or Emulex adapter driver module, such as lpfc820 or qla2xxx.

VMware Links

http://kb.vmware.com/selfservice/microsites/search.do?cmd=displayKC&docType=kc&docTypeID=DT_KB_1_1&externalId=1267

Unable to clear the Hardware Status warnings/errors in vCenter Server

Unable to clear the Hardware Status warnings/errors in vCenter Server

Purpose

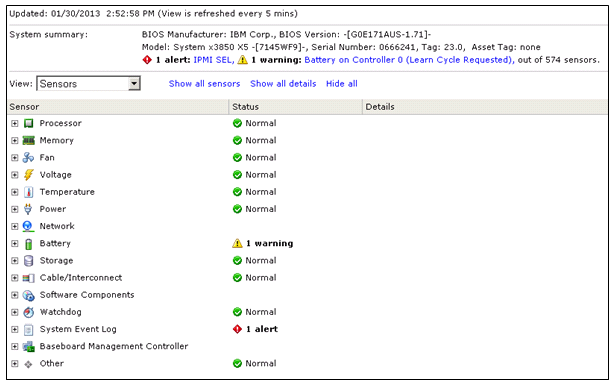
This article provides steps to clear the warnings/errors in the Hardware Status tab of a host within vCenter Server.

The Hardware Status tab shows warnings/errors related to hardware components. In some cases, these warnings and errors are not cleared even after you ensure that the hardware faults are resolved and trigger vCenter Server alarms. In these cases, you may have to clear these warnings/errors manually.

sensor1

Resolution

To clear the warnings/errors from the Hardware Status tab:
  • Go to Hardware Status tab and select the System event log view.
  • Click Reset event log
  • Click Update. The error should now be cleared.
  • Select the Alerts and warnings view.
  • Click Reset sensors.
  • Click Update. The memory should now be cleared.
  • If the error is not cleared, connect to the host via SSH.
  • Restart the sfcbd service
  • To restart the service in ESXi, run this command:
  • services.sh restart
  • To restart the service in ESX, run this command
  • service sfcbd restart
  • Click Update. The error should now be cleared.
  • Note: If the warning/error is cleared after a reset in Step 2 and Step 5, you need not restart the management agents

ESXi / ESX 4/5hosts with visibility to RDM LUNs being used by MSCS nodes with RDMs may take a long time to boot or during LUN rescan

The Problem

We were finding some of our IBM x3850 VMware ESXi 4.X Servers were taking a long time to boot up, somewhere in the region of 30 minutes which was unacceptable during upgrades and general maintenance. We are running vSphere 4.1 U3.

The Explanation

During a boot of an ESXi host, the storage mid-layer attempts to discover all devices presented to an ESXi host during the device claiming phase. However, MSCS LUNs that have a permanent SCSI reservation cause the boot process to elongate as the ESXi host cannot interrogate the LUN due to the persistent SCSI reservation placed on a device by an active MSCS Node hosted on another ESXi host.

Configuring the device to be perennially reserved is local to each ESXi host, and must be performed on every ESXi host that has visibility to each device participating in an MSCS cluster

Solution for VMware vSphere 4.X

Modify this advanced configuration option below on the affected ESXi/ESX hosts to speed up the boot process:

  • ESXi/ESX 4.1: Change the advanced option scsi.CRTimeoutDuringBoot TO 1
  • ESXi/ESX 4.0: Change the advanced option scsi.UWConflictRetries to 80

We also adjusted a setting in the BIOS

  • Log onto IMM of the server (see Server list for IMM IP address), and remote control to server. Reboot
  • Enter BIOS when prompted by pressing F1.
  • Go to System settings>Devices and I/O ports>Enable/disable Adaptor Option ROM Support
  • Disable any empty slots in UEFI option ROM

Solution for VMware vSphere 5.X

  1. Determine which RDM LUNs are part of an MSCS cluster.
  2. From the vSphere Client, select a virtual machine that has a mapping to the MSCS cluster RDM devices.
  3. Edit your virtual machine settings and navigate to your Mapped RAW LUNs.
  4. Select Manage Paths to display the device properties of the Mapped RAW LUN and the device identifier (that is, the naa ID)
  5. Take note of the naa ID, which is a globally unique identifier for your shared device.
  6. Log into Putty and type the following commands. One per line for each RDM Disk

Server 1 Database Server example with 4 X RDM LUNs example

  • esxcli storage core device setconfig -d naa.60050768028080befc000000000000z1 –perennially-reserved=true
  • esxcli storage core device setconfig -d naa.60050768028080befc000000000000z2 –perennially-reserved=true
  • esxcli storage core device setconfig -d naa.60050768028080befc000000000000z3 –perennially-reserved=true
  • esxcli storage core device setconfig -d naa.60050768028080befc000000000000z4 –perennially-reserved=true

Confirm that the correct devices are marked as perennially reserved by running the command:

  • esxcli storage core device list | less

More Information

http://kb.vmware.com/externalId=1016106

http://www-947.ibm.com/support

Using multiple SCSI Controllers within VMware

VMware highly recommends using multiple virtual SCSI controllers for the database virtual machines or virtual machines with high I/O load. The use of multiple virtual SCSI controllers allows the execution of several parallel I/O operations inside the guest operating systemVMware also highly recommends separating the Redo/Log I/O traffic from the data file I/O traffic through separate virtual SCSI controllers. As a best practice, you can use one controller for the operating system and swap, another controller for DB Log, and one or more additional controllers for database data files (depending on the number and size of the Database files)

Limits

  • 4 x SCSI Controllers
  • 15 Disks per SCSI Controller

SCSI Controllers

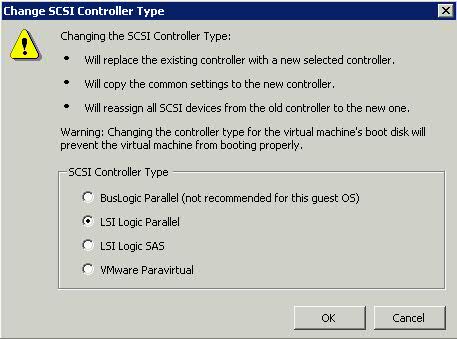
BusLogic Parallel

  •  Older guest operating systems default to the BusLogic adapter.
  • Considered Legacy

LSI Logic Parallel

  • The LSI Logic Parallel adapter and the LSI Logic SAS adapter offer equivalent performance. Some guest operating system vendors are phasing our support for Parallel SCSI in favor of SAS, so if your virtual machine and guest operating system support SAS, choose LSI SAS to maintain future compatibility

LSI Logic SAS

  • LSI Logic SAS is available only for virtual machines with hardware version 7

VMware Paravirtual

  • Paravirtual SCSI (PVSCSI) controllers are high performance storage controllers that can result in greater throughput and lower CPU use. PVSCSI controllers are best suited for high-performance storage environments.
  • PVSCSI controllers are available for virtual machines running hardware version 7 and later.
  • PVSCSI only supports the following guest OS’s – Windows 2003, Windows 2008 and Red Hat Enterprise Linux 5.
  • Hot add or remove requires a bus rescan from within the guest operating system.
  • Disks on PVSCSI controllers might not experience performance gains if they have snapshots or if memory on the ESXi host is over committed
  • SCS clusters are not supported.
  • PVSCSI controllers do not support boot disks, the disk that contains the system software, on Red Hat Linux 5 virtual machines. Attach the boot disk to the virtual machine by using any of the other supported controller typeS

Do I choose the PVSCSI or LSI Logic virtual adapter on ESX 4.0 for non-IO intensive workloads?

VMware evaluated the performance of PVSCSI and LSI Logic to provide a guideline to customers on choosing the right adapter for different workloads. The experiment results show that PVSCSI greatly improves the CPU efficiency and provides better throughput for heavy I/O workloads. For certain workloads, however, the ESX 4.0 implementation of PVSCSI may have a higher latency than LSI Logic if the workload drives low I/O rates or issues few outstanding I/Os. This is due to the way the PVSCSI driver handles interrupt coalescing.One technique for storage driver efficiency improvements is interrupt coalescing. Coalescing can be thought of as buffering: multiple events are queued for simultaneous processing. For coalescing to improve efficiency, interrupts must stream in fast enough to create large batch requests. Otherwise, the timeout window will pass with no additional interrupts arriving. This means the single interrupt is handled as normal but after an unnecessary delay.The behavior of two key storage counters affects the way the PVSCSI and LSI Logic adapters handle interrupt coalescing:

  • Outstanding I/Os (OIOs): Represents the virtual machine’s demand for I/O.
  • I/Os per second (IOPS): Represents the storage system’s supply of I/O.

The LSI Logic driver increases coalescing as OIOs and IOPS increase. No coalescing is used with few OIOs or low throughput. This produces efficient I/O at large throughput and low-latency I/O when throughput is small.

In ESX 4.0, the PVSCSI driver coalesces based on OIOs only, and not throughput. This means that when the virtual machine is requesting a lot of I/O but the storage is not delivering, the PVSCSI driver is coalescing interrupts. But without the storage supplying a steady stream of I/Os, there are no interrupts to coalesce. The result is a slightly increased latency with little or no efficiency gain for PVSCSI in low throughput environments.
The CPU utilization difference between LSI and PVSCSI at hundreds of IOPS is insignificant. But at larger numbers of IOPS, PVSCSI can save a lot of CPU cycles

The test results show that PVSCSI is better than LSI Logic, except under one condition–the virtual machine is performing less than 2,000 IOPS and issuing greater than 4 outstanding I/Os. This issue is fixed in vSphere 4.1, so that the PVSCSI virtual adapter can be used with good performance, even under this condition.

Changing queue depths

http://kb.vmware.com

http://pubs.vmware.com/vsphere-50

Useful Article by Scott Lowe

http://www.virtualizationadmin.com/articles-tutorials/general-virtualization-articles/vmwares-paravirtual-scsi-adapter-benefits-watch-outs-usage.html

Creating new VMDKs – What Mode should you use?

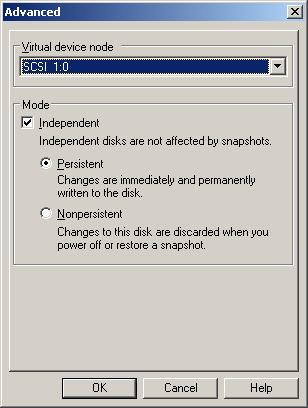
There are 3 Disk Modes within the hard disk options.

  • Independent – Persistent

Disks in persistent mode behave like conventional disks on your physical computer. All data written to a disk in persistent mode are written permanently to the disk. You can set a virtual disk to independent mode to exclude the disk from any snapshots taken of its virtual machine. Changes are immediately and permanently written to the disk, so they have high performance

  • Independent – Non-Persistent

Changes to disks in non-persistent mode are discarded when you power off or reset the virtual machine. With non-persistent mode, you can restart the virtual machine with a virtual disk in the same state every time. Changes to the disk are written to and read from a redo log file that is deleted when you power off or reset. You can set a virtual disk to independent mode to exclude the disk from any snapshots taken of its virtual machine.

  • Normal

In normal mode, disks are included in snapshots that you take of the virtual machine. If you do not want data on the disk to be recorded when you take a snapshot of the virtual machine, configure the disk to be independent.

How to shrink VMware VMDKs

Shrinking a Virtual Disk

Shrinking a virtual disk reclaims unused space in the virtual disk and reduces the amount of space the virtual disk occupies on the host.
Shrinking a disk is a two-step process. In the preparation step, VMware Tools reclaims all unused portions of disk partitions (such as deleted files) and prepares them for shrinking. This step takes place in the guest operating system.
In the shrink step, the VMware application reduces the size of the disk based on the disk space reclaimed during the preparation step. If the disk has empty space, this process reduces the amount of space the virtual disk occupies on the host drive. The shrink step takes place outside the virtual machine.

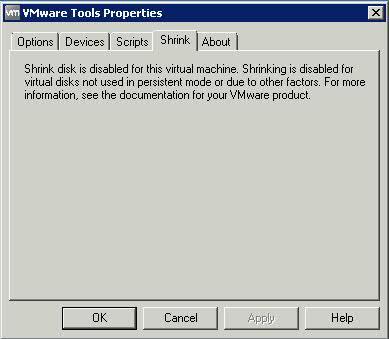
When can you not shrink a disk?

Shrinking disks is not allowed under the following circumstances:

  • The virtual machine is hosted on an ESX/ESXi server. ESX/ESXi Server can shrink the size of a virtual disk only when a virtual machine is exported. The space occupied by the virtual disk on the ESX/ESXi server, however, does not change.
  • You pre-allocated all the disk space to the virtual disk when you created it. Must be Thick provisioned drive for Shrinking
  • The virtual machine contains a snapshot.
  • The virtual machine is a linked clone or the parent of a linked clone.
  • The virtual disk is an independent disk in non-persistent mode.
  • The file system is a journaling file system, such as an ext4, xfs, or jfs file system.

Prerequisites

■  On Linux, Solaris, and FreeBSD guests, run VMware Tools as the root user to shrink virtual disks. If you shrink the virtual disk as a nonroot user, you cannot prepare to shrink the parts of the virtual disk that require root-level permissions.

■  On Windows guests, you must be logged in as a user with Administrator privileges to shrink virtual disks.

■  Verify that the host has free disk space equal to the size of the virtual disk you plan to shrink.

■  Verify that all your hard disks are thick or this will produce an error when you click Shrink

Procedure

  • Click the Shrink tab in the VMware Tools control panel.
 

  • If the disk cannot be shrunk, the tab shows a description of the reason.
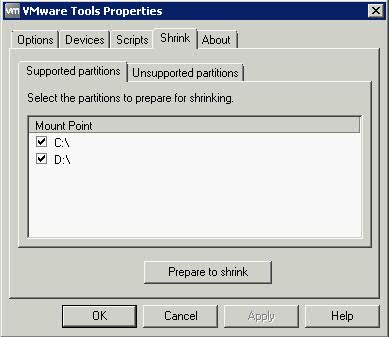
  • Select the partitions to shrink and click Prepare to Shrink.

If you deselect some partitions, the whole disk still shrinks. The deselected partitions, however, are not wiped for shrinking, and the shrink process does not reduce the size of the virtual disk as much as it would with all partitions selected.
VMware Tools reclaims all unused portions of disk partitions (such as deleted files) and prepares them for shrinking. During this phase, you can still interact with the virtual machine

  • When a prompt to shrink disks appears, click Yes.

The virtual machine freezes while VMware Tools shrinks the disks. The shrinking process takes considerable time, depending on the size of the disk.

  • When a message box appears that confirms the process is complete, click OK

The Newer Compact Command

Some newer versions of VMware products include a Compact button or menu command, which performs the same function as the Shrink command. You can use the Compact command when the virtual machine is powered off. The shrinking process is much quicker when you use the Compact command.

Method 1 – Using VMware Converter to shrink or extend a disk

  • Install VMware Converter on the machine you want to convert
  • Start the VMware Converter Application
  • Select File > New > Convert Machine > Select Powered on Machine
  • Specify the Powered On Machine as Local Machine
  • Note, you can also select File > New > Convert Machine > VMware Infrastructure Virtual Machine if you want to shrink a VM which is powered off but you will need VMware Converter installed on another machine
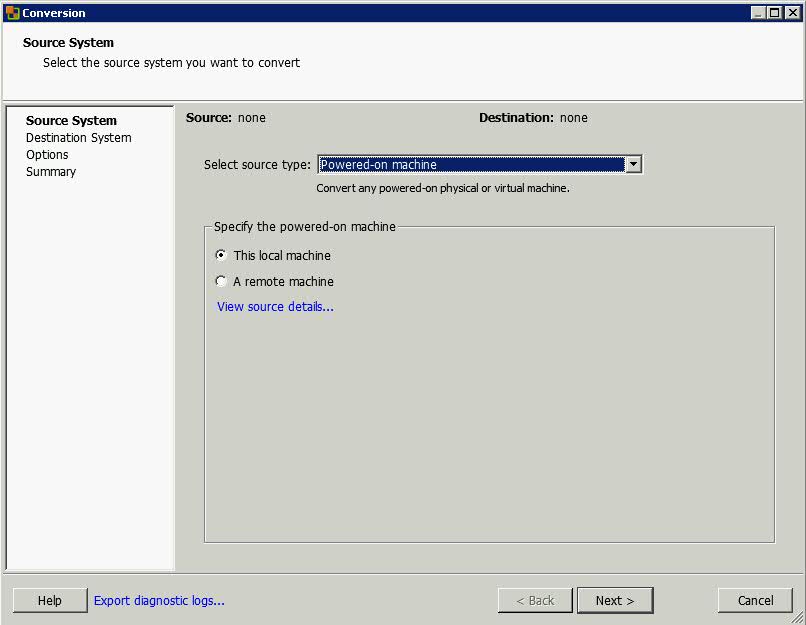
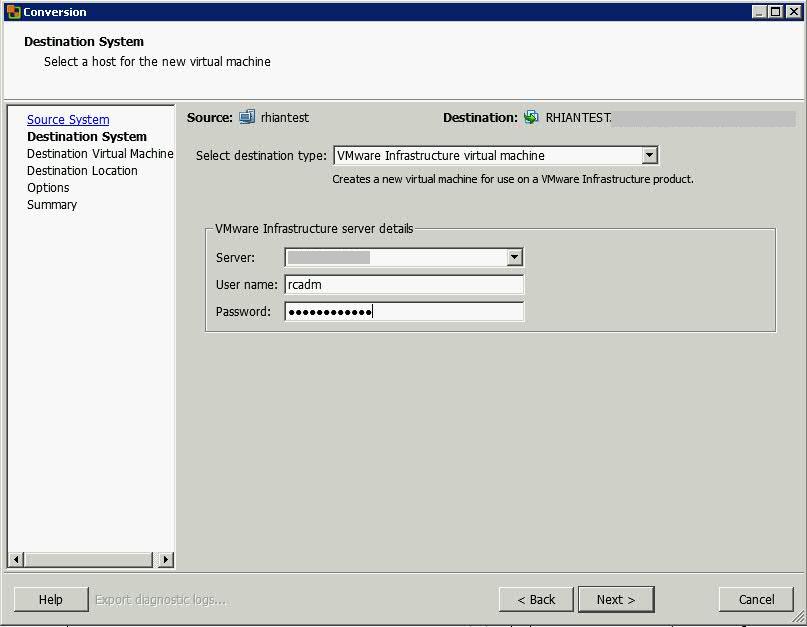
  • Click Next

  • In Destination Type, select VMware Infrastructure Virtual Machine
  • Put in vCenter Server Name
  • Put in User Account
  • Put in Password
  • Click Next

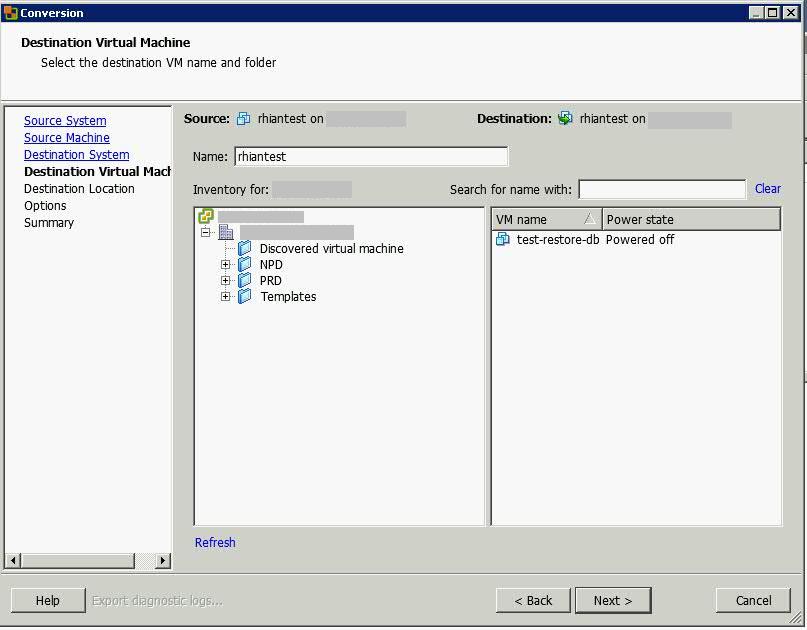
  • Type a different name for your VM. You cannot use the same name
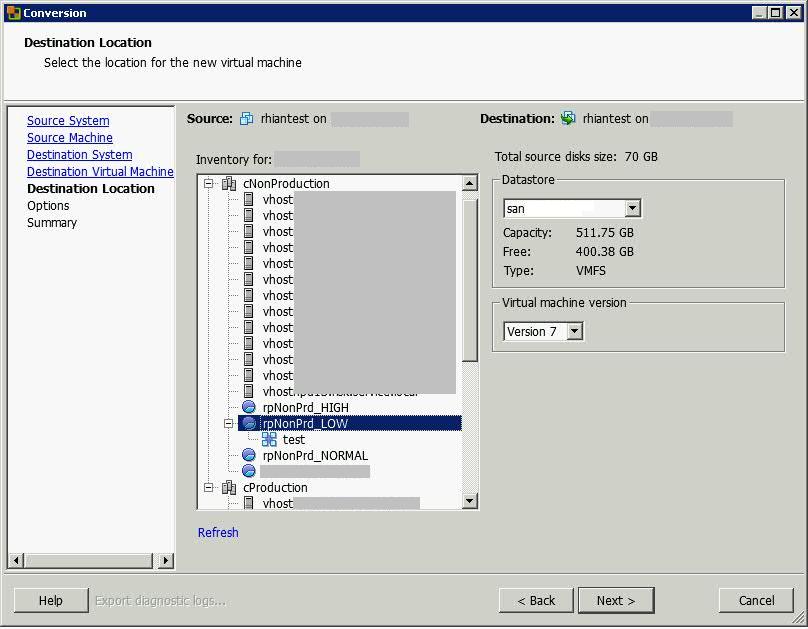
  • Select the same Resource Pool you use for the machine you want to convert
  • Click Next

  • Choose a destination Resource Pool or host
  • Click Next

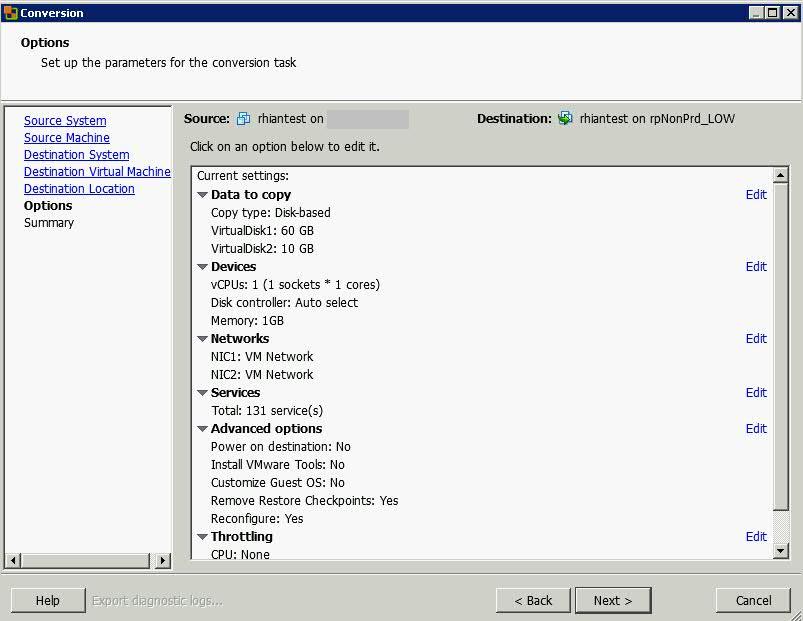
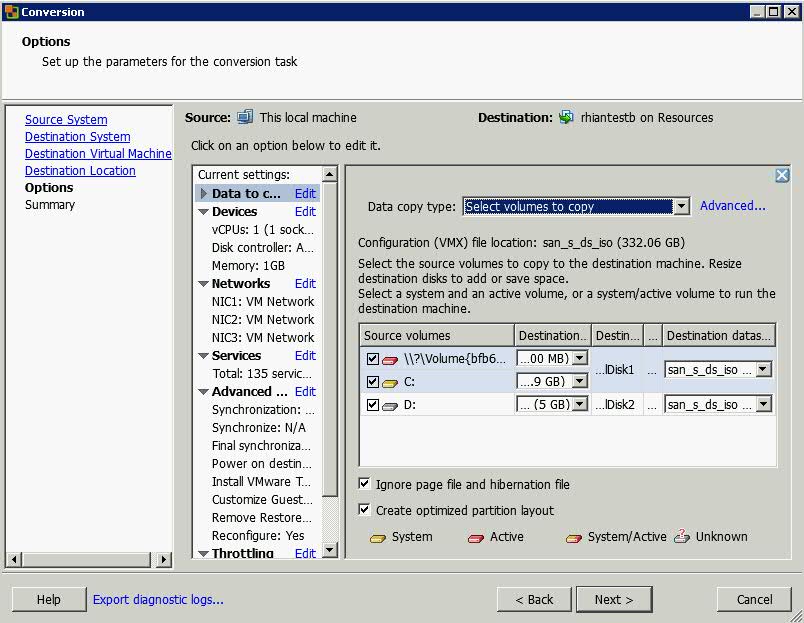
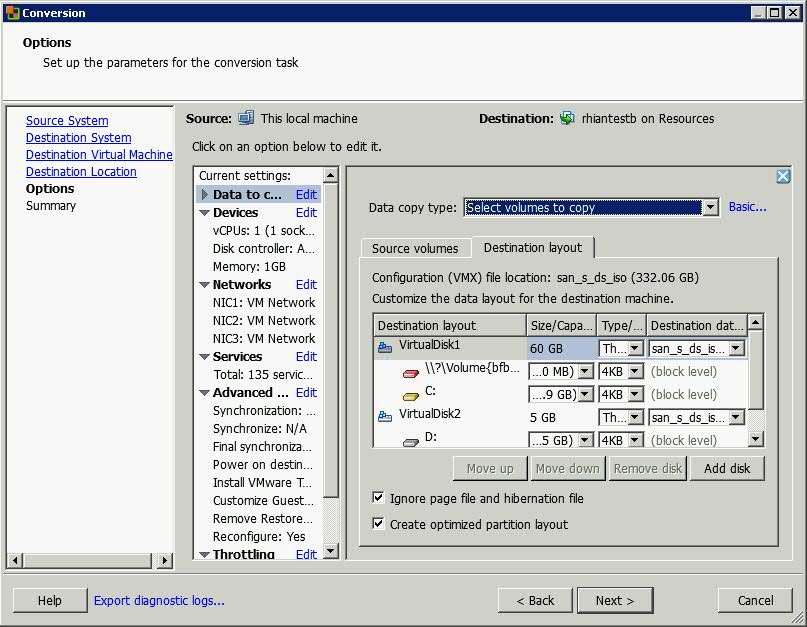
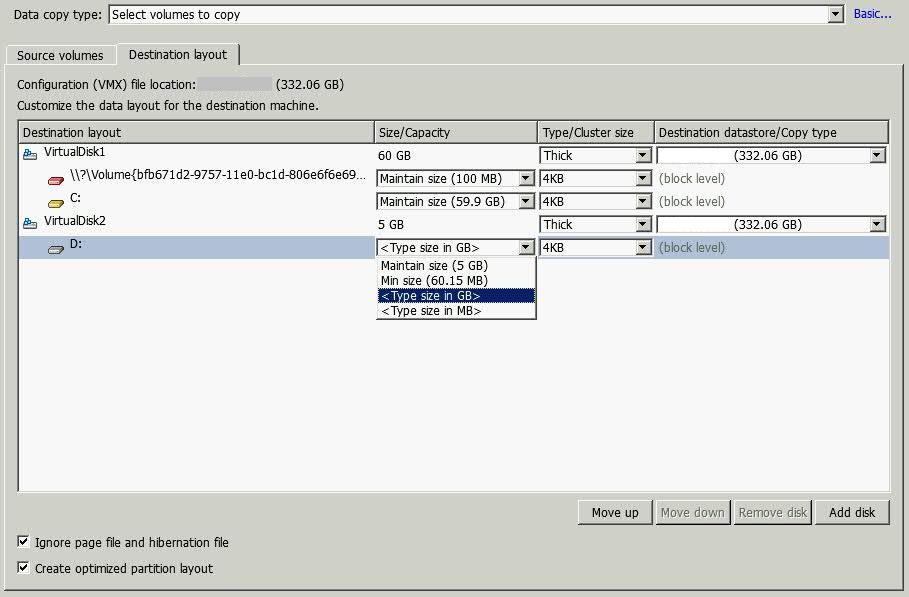
  • Click Edit on Data to Copy

  • Select Advanced

  • Select Destination Layout
  • Select the disk you want to change the size of by clicking the drop down button and select Change Size
  • Click Next
  • You will reach the Summary Page
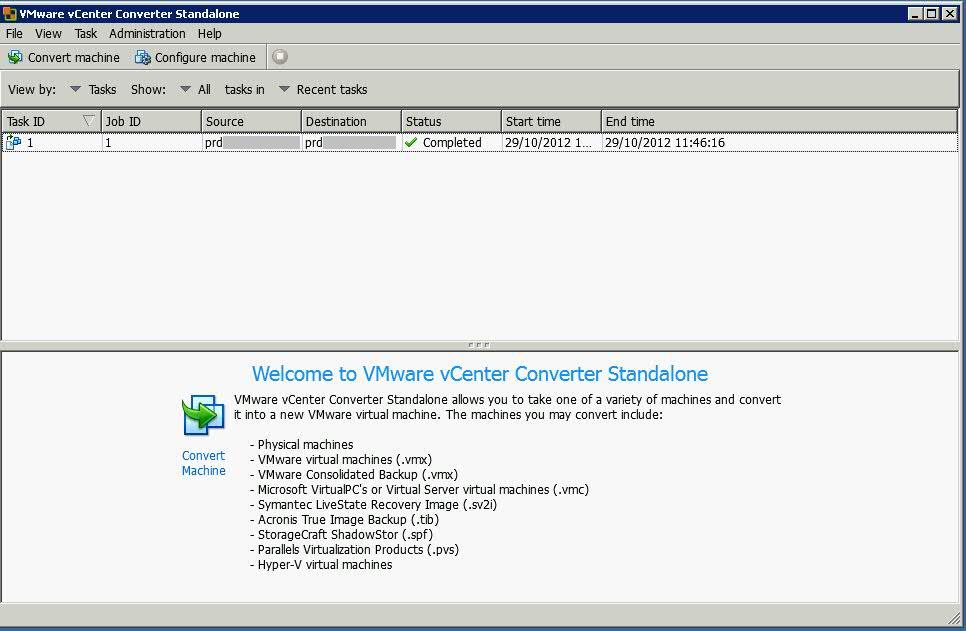
  • Click Finish and the following window will open and show you the running task
  • Power off the original VM
  • Power up the new cloned VM and check everything works ok
  • Delete the original VM

Best Practices for using VMware Converter

http://kb.vmware.com/selfservice/microsites/search.do?language=en_US&cmd=displayKC&externalId=1004588

What happens to VMware Hosts in the event of a complete loss of SAN/Storage?

The Situation

Although IT infrastructure generally always adheres to N+1 technology, there may always be a situation where the “Worst Case Scenario” presents itself. I was asked the question today regarding the possibility and outcome of our SAN rebooting on the VMware Hosts. This was due to a Change Request entered on the system for a SAN firmware upgrade which stated the SAN would need to be rebooted if the change failed. Admittedly there wasn’t too much of a risk due to the fact they upgrade one node at a time and everything still runs on the other node. However what would happen if we lost all nodes?

The Consequences

This is indeed worse case scenario however if the SAN did crash and reboot, you would get an All-Paths-Down (APD) situation to your VMware hosts.

In vSphere 4.x, an All-Paths-Down (APD) situation occurs when all paths to a device are down. As there is no indication whether this is a permanent or temporary device loss, the ESXi host keeps reattempting to establish connectivity. APD-style situations commonly occur when the LUN is incorrectly unpresented from the ESXi/ESX host (which would be this case). The ESXi/ESX host, still believing the device is available, retries all SCSI commands indefinitely. This has an impact on the management agents, as their commands are not responded to until the device is again accessible.
This causes the ESXi/ESX host to become inaccessible/not-responding in vCenter Server.
It is difficult to say whether you would be able to recover all your devices and if there any corruption on the SAN side until everything is restored.

When the storage is back and running, I would recommend:

  • Completing a rescan of all the VM HBAs from the ssh console to try bring the paths back online.

esxcfg-rescan vmhba#

Where <vmkernel SCSI adapter name> is the vmhba# to be rescanned.

  • Restart management agents on the host
  • If you still cannot see the SAN you will need to complete a reboot of the hosts.

Changing the Blocksize a Datastore uses in VMware vSphere 4

To recreate a datastore with a different block size

The block size on a datastore cannot be automatically changed as it is a file system property that can only be specified when the datastore is initially created.

The only way to increase the block size is to move all data off the datastore and recreate it with the larger block size. The preferred method of recreating the datastore is from a console or SSH session, as you can simply recreate the file system without having to make any changes to the disk partition.

Note: All data on a VMFS volume is lost when the datastore is recreated. Migrate or move all virtual machines and other data to another datastore. Back up all data before proceeding.

Block Sizes

The below table lists the size of file/VMDK that can be placed on Datastores formatted with the different Block Size

From the ESX/ESXi console:

Note: This procedure should not be performed on a local datastore on an ESX host where the operating system is located, as it may remove the Service Console privileged virtual machine which is located there.

  • Storage vMotion, move, or delete the virtual machines located on the datastore you would like to recreate with a different block size.
  • Log into the Local Tech Support Mode console of the ESX/ESXi host
  • Use the esxcfg-scsidevs -m command to obtain the disk identifier (mpx, naa, or eui) for the datastore you want to recreate.See below
  • esxcfg-scsidevs -m
  • Use vmkfstools to create a new VMFS datastore file system with a different block size over the existing one: See below
  • vmkfstools -C VMFS-type -b Block-Size -S Datastore-Name/vmfs/devices/disks/Disk-Identifier:Partition-Number
  • E.g. vmkfstools -C vmfs3 -b 8m -S DatastoreXYZ /vmfs/devices/disks/naa.600605b0032807b0155c9e990e4d1a83:1
  • It should then come up with the following Confirmation when complete

  •  Rescan from all other ESX hosts with the vmkfstools -V command.

From the VI / vSphere Client

Note: This procedure should not be performed on a LUN containing the ESX/ESXi operating system, as it may require additional effort to recreate the partition table.

  • Storage vMotion, move, or delete the virtual machines located on the datastore you would like to recreate with a different block size.
  • Select the ESX/ESXi host in the inventory and click the Configuration tab.
  • Select the Storage under hardware, right-click the datastore and choose Delete.

Note: Do not do this on a datastore located on the same disk/LUN as the ESX/ESXi operating system.

  • Rescan for VMFS volumes from the other hosts that can see the datastore.
  • Create the new datastore with the desired block size on one of the hosts using the Add Storage Wizard.
  • Rescan for VMFS volumes from all other hosts that can see the datastore