Installing ESXi 5.1 as VM on an ESXi 5.1 Host
This article explains how to install VMware ESXi in a virtual machine. Installing ESXi in a virtual machine provides a way to try the product without dedicating hardware to it. A virtual ESXi machine may be useful if you are studying to become a VCP (VMware Certified Professional)
Nested Virtualisation Check
A quick way to verify whether your CPU truly supports both Intel-VT+EPT or AMD-V+RVI, you can paste the following into a browser:
https://[your-esxi-host-ip-address]/mob/?moid=ha-host&doPath=capability
You will need to login with your root credentials and then look for the “nestedHVSupported” property and if it states false, it means you maybe able to install nested ESXi or other hypervisor, but you will not be able to run nested 64-bit VMs, only 32-bit VMs, assuming you have either Intel-VT or AMD-V support on your CPUs.
![]()
- Intel VT-x or AMD-V is required for running “Nested Virtualization” which supports nested 32-bit VMs
- Intel EPT or AMD RVI is required for running nested 64-bit VMs
Instructions
- Download the ESXi 5.1 ISO image from the VMware Download site
- Log into your physical host with the vClient
- Click on your Physical Host
- Select Create Virtual Machine
- Select Custom
- Type a name for your Virtual ESXI 5.1 Host
- Choose a Datastore
- Select Virtual Machine Version 8
- Choose Linux > Red Hat Enterprise Linux 6 (64bit)
- Choose 2 Virtual Sockets and 1 core per virtual socket
- Choose 2 or 4GB RAM
- Choose your network
- Choose your SCSI Controller. LSI Logic SAS is probably the best one to choose
- Select a Create a new Virtual Disk
- Select Disk size.
- Choose your Disk Provisioning Method. Thick Provisioned Lazy Zero is ok
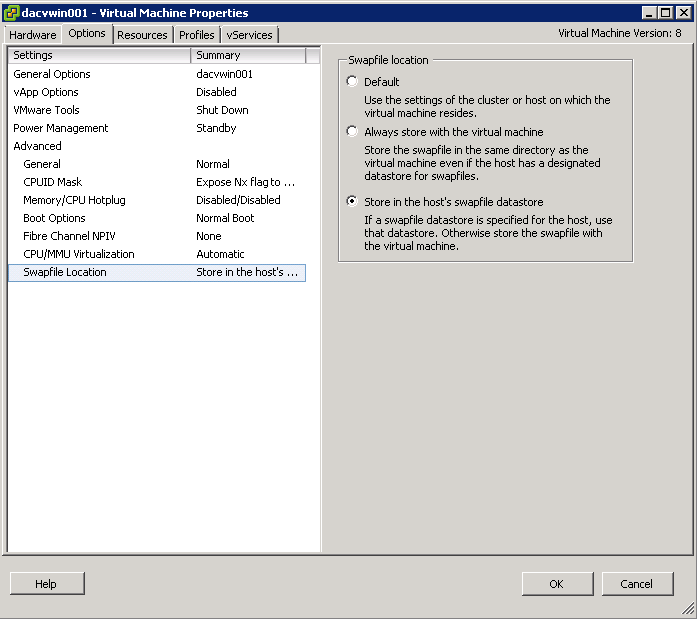
- Select Store with the Virtual Machine
- Choose Advanced Options. These can probably be left as they are
- Next > Finish
- When the VM is built, click Edit Settings
- Attach your VMware ESXi 5.1 ISO to the VMs CD Drive and select to Connect at Power On
- This next option is critical to allow a virtual machine to power on within the virtualized ESXi system. The advanced option “monitor_control.restrict_backdoor” with a value of “True” must be added to the virtual machine’s general options. The configuration parameters section is empty on the virtual machine at this point because it has not been created yet. If you have ever been in this section of the virtual machine configuration for a virtual machine that already exists, there are a number of options that are populated.
- If you are using an i3 or later processor (that is, you do not have a Core 2 Duo), you can enable nested VT. This allows you to run 64bit virtual machines within ESXi. To enable nested VT, add this line – vhv.enable = “TRUE” to the .vmx file of the ESXi virtual machine:
- Start the VM
- Press Enter to start the boot process
- Press fn+F11 to accept the EULA and continue
- Select the virtual drive where you want to install. Press Enter to continue
- Select a keyboard layout. Press Enter to continue.
- Enter a root password. Press the down arrow key, then enter the password again to confirm. Press Enter to continue
- This warning appears: <HARDWARE_VIRTUALIZATION WARNING: Hardware Virtualization is not a feature of the CPU, or is not enabled in the BIOS> This is generally expected. Press Enter to carry on
- Confirm that the info on the screen is correct then press F11 to install
- Reboot when required and remove the attached ISO
- If virtual machines on the virtual ESXi server are going to be powered on, the Enable Promiscuous Mode option will need to be enabled on the vSwitch on which the virtual ESXi server resides.
- The ESXi guest starts with an IP address assigned from DHCP. To set a static IP address: Press fn+F2.
- Enter your password, then press Enter.
- Select Configure Management Network, then press Enter.
- Select IP Configuration, then press Enter.
- Select Set static IP addresses and network configuration, then press the space bar.
- Press the down arrow key to select IP Address field, then enter the correct information.
- If you need to set the Subnet or Default Gateway, press the down arrow key to select those fields.
- After you have finished adjusting the settings, press Enter to exit.
- Press ESC to exit the configuration screen.
- When you are prompted to restart the management network for the changes to take effect, press Y.
- Press ESC again to go back to the main screen.
Running Hyper V
- Edit your Virtual Switch and enable Promiscuous Mode
- Upgrade your Hyper V VM to Hardware Version 9
- Use WinSCP to tweak the hyperv.vmx file
- guestOS = “winhyperV”
- featMask.vm.hv.capable = “Min:1” followed by a carriage return
- Save Changes