Archive for SQL Server

Using SQL Server Copy Database Wizard

SQLMigration

The Task

Move our SCOM DB from a Windows 2003 server running SQL 2005 to a Windows 2008 R2 server running SQL 2008.

The Plan

SQL Server has a copy Database functionality. The Copy Database Wizard provides a convenient way to transfer, move or copy, one or more databases and their objects from an SQL Server 2000 or SQL Server 2005 instance to an instance of SQL Server 2005 or higher.

SCOMDBUpgrade1

You can use the Copy Database Wizard to perform the following tasks:

  • Transfer a database when the database is still available to users by using the SQL Server Management Objects (SMO) method.
  • Transfer a database by the faster detach-and-attach method with the database unavailable during the transfer.
  • Transfer databases between different instances of SQL Server 2005.
  • Upgrade databases from SQL Server 2000 to SQL Server 2005.

Requirements

  • The destination server must be running SQL Server 2005 Service Pack 2 or a later version. The computer on which the Copy Database Wizard runs may be the source or destination server, or a separate computer. This computer must also be running SQL Server 2005 Service Pack 2 or a later version to use all the features of the wizard.
  • To use the Copy Database Wizard, you must be a member of the sysadmin fixed server role on the source and destination servers. To transfer databases by using the detach-and-attach method, you must have file system access to the file-system share that contains the source database files

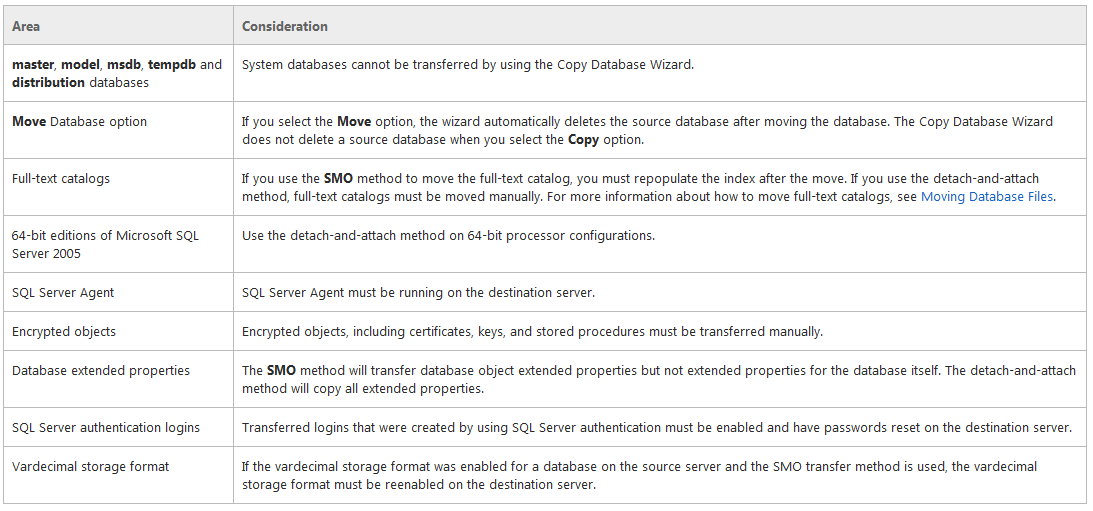
Considerations

SCOMDBUpgrade2

Instructions

  • Open SQL Server Management Studio.
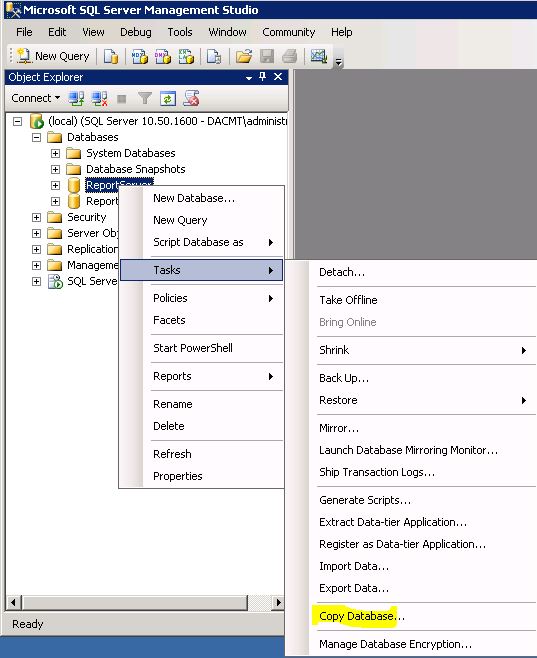
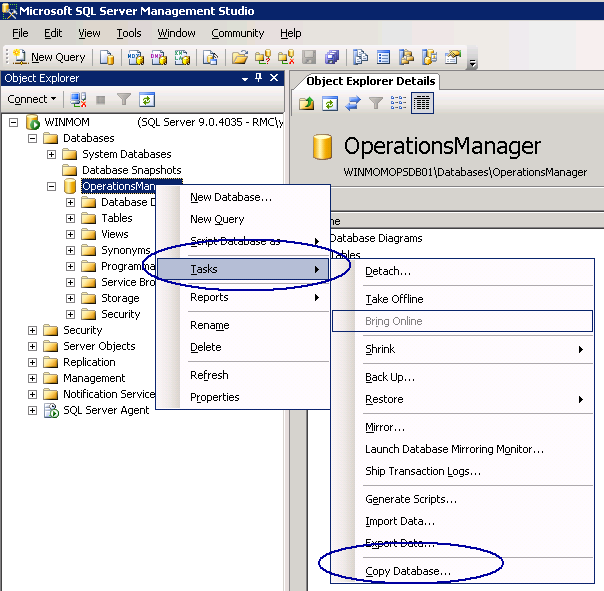
  • In Object Explorer, expand Databases, right-click a database, point to Tasks, and then click Copy Database.

Copydb01

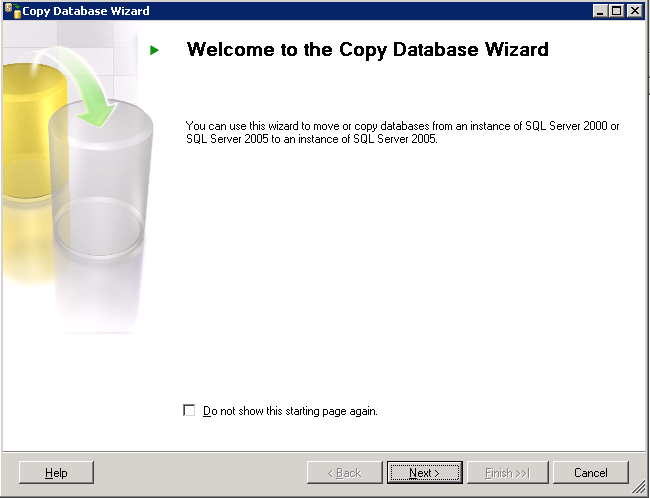
  • Click Next

SCOMDBUpgrade3

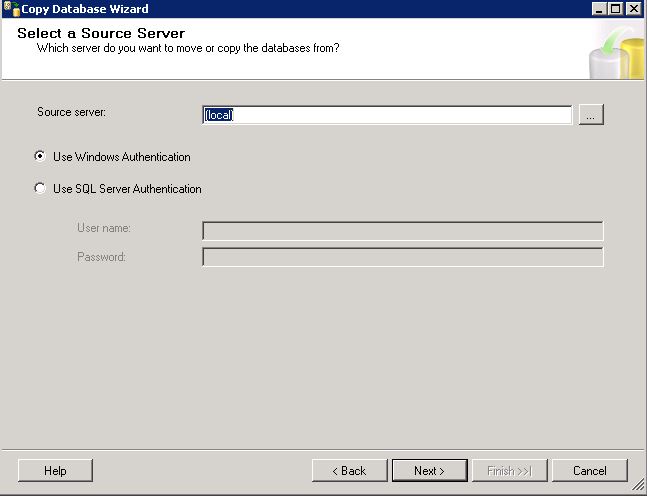
  • Select the Database you want and choose the authentication

Copydb02

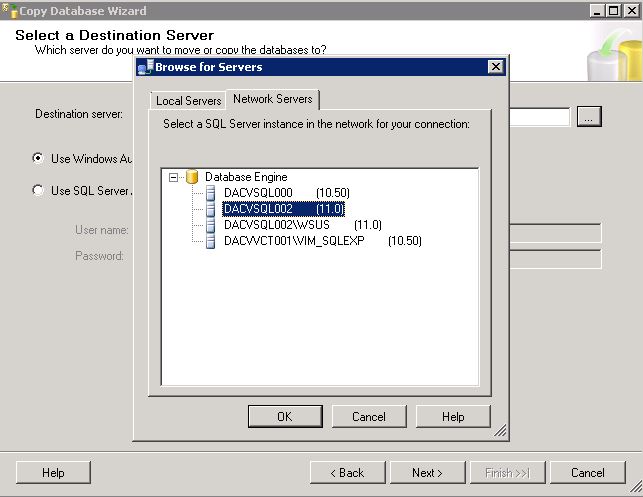
  • Select a destination server. You may need to browse for other servers. E.g I want to copy a database from my server dacvsq001 to dacvsql002

Copydb03

  • If you get an error saying “Index was outside the bounds of the array” you may need to install a higher version of SQL Management Studio on the source server
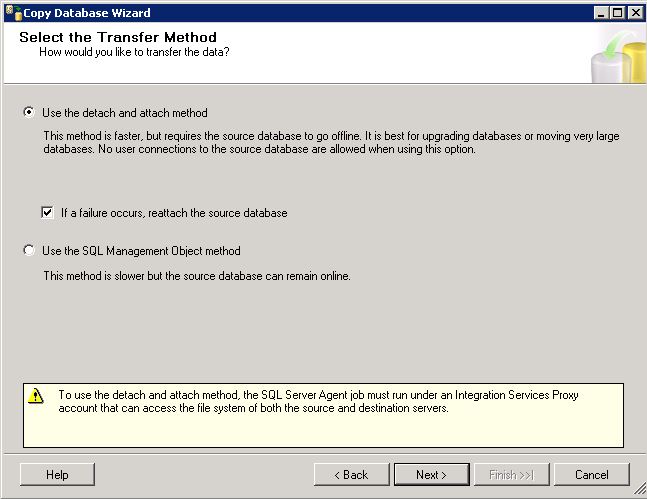
  • You can select to transfer while the DB is offline or online

Copydb04

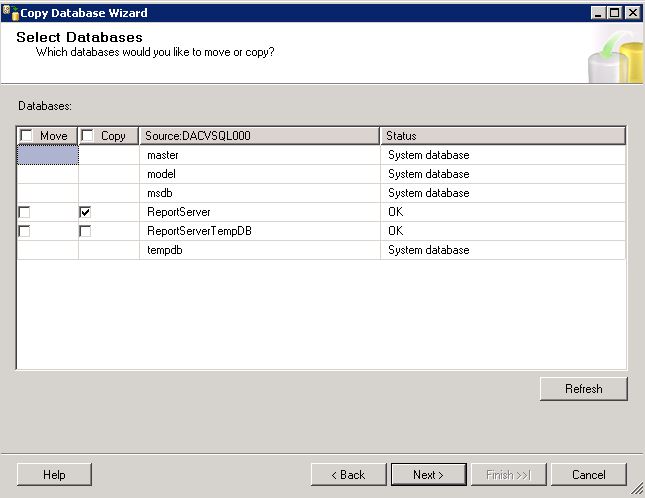
  • Next select the database you want to copy or move

Copydb05

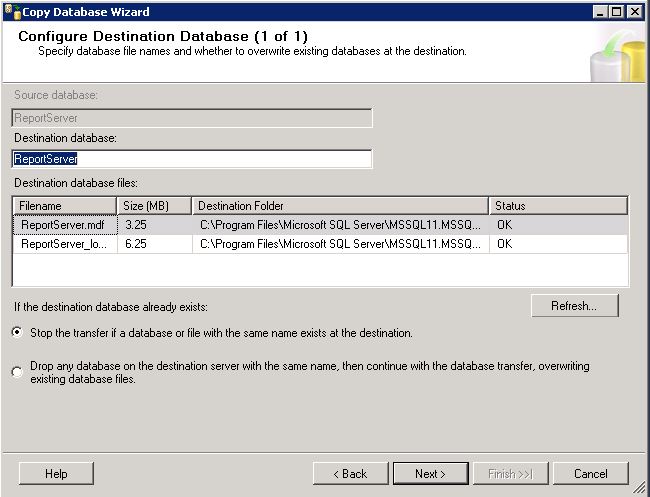
  • Here you can change the name of the database and also select the location of the database and logs to copy or move

Copydb06

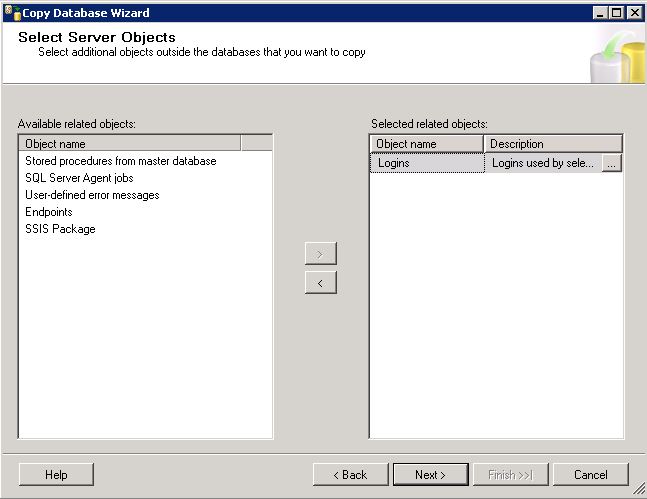
  • Next you can select additional objects to copy

Copydb07

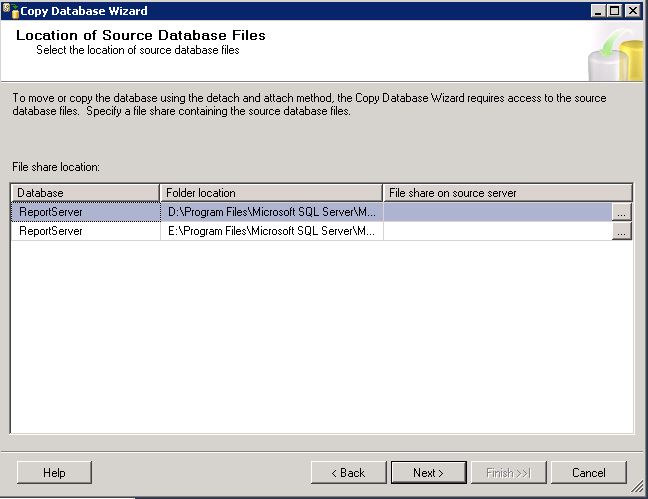
  • Specify a file share containing the source database files

Copydb08

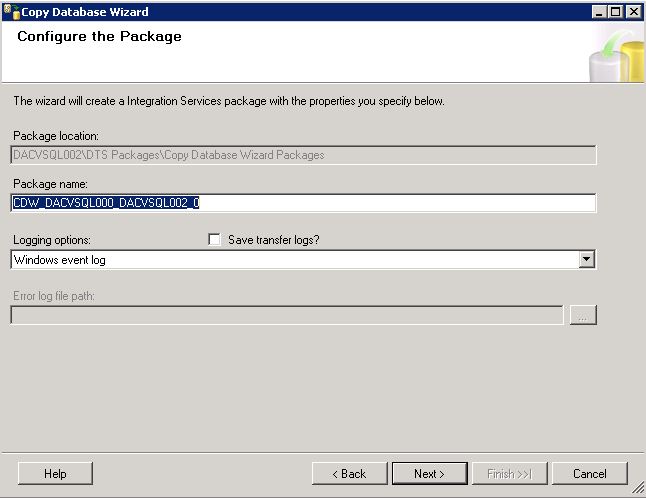
  •  Configure the package

Copydb09

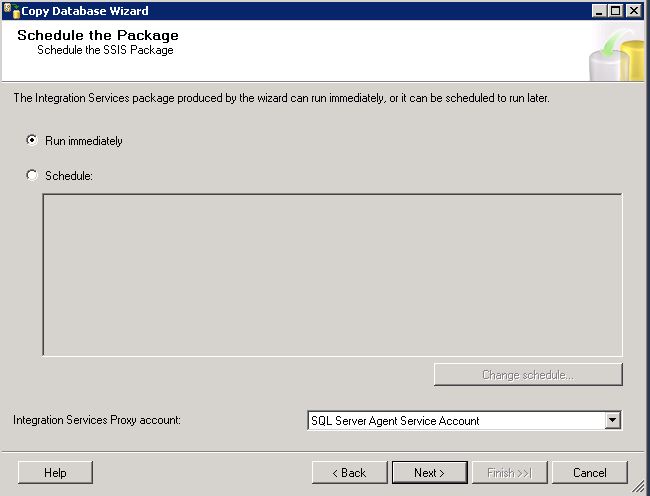
  • Run immediately or schedule the job

Copydb10

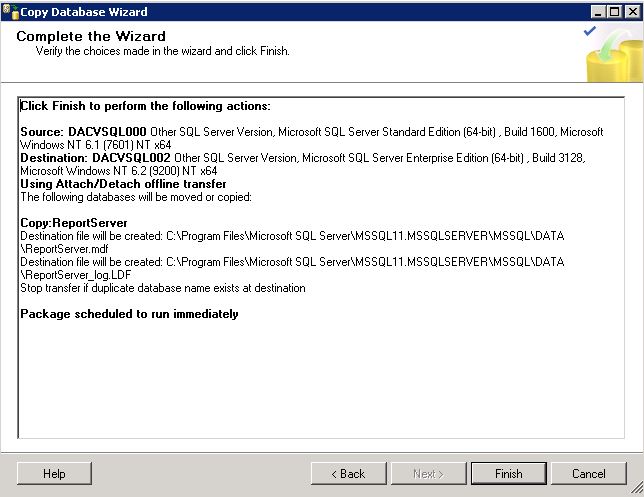
  • Check the details you have configured and click Finish

Copydb11

SQL Server 2012 Installable Features

images

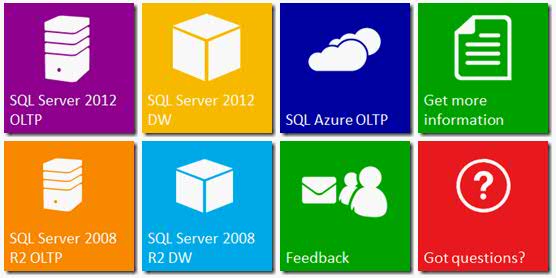
It’s often good to have a brief explanation of the features that are installable through the SQL 2012 Wizard so here they are below for reference

Database Engine

Includes the Database Engine, the core service for storing, processing and securing data. The Database Engine provides controlled access and rapid transaction processing and also provides rich support for sustaining high availability. The Database Engine also provides support for the utility control point in the SQL Server Utility. Only Database Engine Services and Analysis Services can be clustered.

SQL Server Replication

Includes a set of technologies for copying and distributing data and database objects from one database to another and synchronizing between the databases for consistency. You can use replication to distribute data to different locations and to remote and mobile users over local and wide area networks, dial-up connections, wireless connections and the Internet.

Full Text Search

Includes the Search engine that supports Full-Text Extraction for fast text search as well as Semantic Extraction for key phrases (likely tags) and similarity search on content stored in SQL Server.   Data Quality Service: -Includes Data quality database objects.

Analysis Services

Includes Analysis Services and tools used to support online analytical processing (OLAP) and data mining. Only Database Engine Services and Analysis Services can be clustered.

Reporting Services – Native

Includes Reporting Services, a server-based application for creating, managing, and delivering reports to email, multiple file formats, and interactive Web-based formats. The Native mode server provides all processing and management functionality through Reporting Services components. Reporting Services cannot be clustered.

Shared Feature

Each shared feature is installed once within a defined scope and operates within that scope. The defined scope can span all SQL Server versions on a computer (e.g., SQL Server Browser), can be isolated to one major version of SQL Server (e.g., SQL Server Management Tools), or can be isolated to one or more minor versions.

Reporting Service – Shared

Includes Reporting Services, a server-based application for creating, managing, and delivering reports to email, multiple file formats, and interactive Web-based formats. SharePoint integrated mode integrates the report server with SharePoint products. The report viewing and report management experience are integrated with SharePoint sites and libraries. Reporting Services cannot be clustered.

Reporting Services Add in

Includes management and user interface components to integrate a SharePoint product with an SSRS report server in SharePoint integrated mode. The add-in only needs to be installed on server running a SharePoint product.

Data Quality

Includes Data quality client objects.

SQL Server Data Tools

Installs the SQL server development environment, including the tool formerly named Business Intelligence Development Studio. Also installs the business intelligence tools and references to the web installers for database development tools.

Client Tools Connectivity

Includes components for communication between clients and servers.

Integration Services

Includes the designer, runtime, and utilities that enable Integration Services to move, integrate, and transform data between data stores.

Client Tools SDK

Includes the software development kit containing resources for programmers.

Documentation Component

Installs only the components that you use to view and manage the documentation for SQL Server 2012. By default, the Help Viewer component uses the online library. After installing SQL Server, you can use the Help Library Manager component to download documentation to your local computer.

Management Tool – Basic

Includes Management Studio support for the Database Engine and SQL Server Express, SQL Server command-line utility (SQLCMD), SQL Server PowerShell provider, and Distributed Replay Administration Tool.

Management Tool – Complete

Adds the following components to the basic management tools installation: Management Studio support for Reporting Services, Analysis Services, and Integration Services technologies, SQL Server Profiler, Database Tuning Advisor, and SQL Server Utility management.

Distributed Replay Controller

Includes the Distributed Replay Controller which orchestrates the actions of the distributed replay clients.

Distributed Replay Client

Includes the Distributed Replay Client. Multiple Distributed Replay Clients work together to simulate a workload against an instance of SQL Server.

SQL Client Connectivity SDK

Includes SQL Server Native Client (ODBC / OLE DB) SDK for database application development.

Master Data Services

Includes Master Data Services, the platform for integrating data from disparate systems across an organization into a single source of master data for accuracy and auditing purposes. Installs the Master Data Services Configuration Manager, assemblies, PowerShell snap-in, and folders and files for Web applications and services.

Redistributable Features

SQL Server redistributable and shared features are installed when needed: Error and Usage Reporting, SQL Server Native Client, MSXML version 6.0, Sync Services for ADO.NET, and SQL Server Browser.

Optimising SQL Server for VMware vCenter

images

SQL Modifications

I am using Microsoft SQL Server 2008 R2 running on Microsoft Windows Server 2008 R2. It is always worth having some knowledge about your Database software whether it be Oracle, SQL or DB2 etc and worth knowing how to optimise this software to work correctly for VMware vCenter whilst maintaining backups and maintenance plans for further minimization of issues and/or performance problems

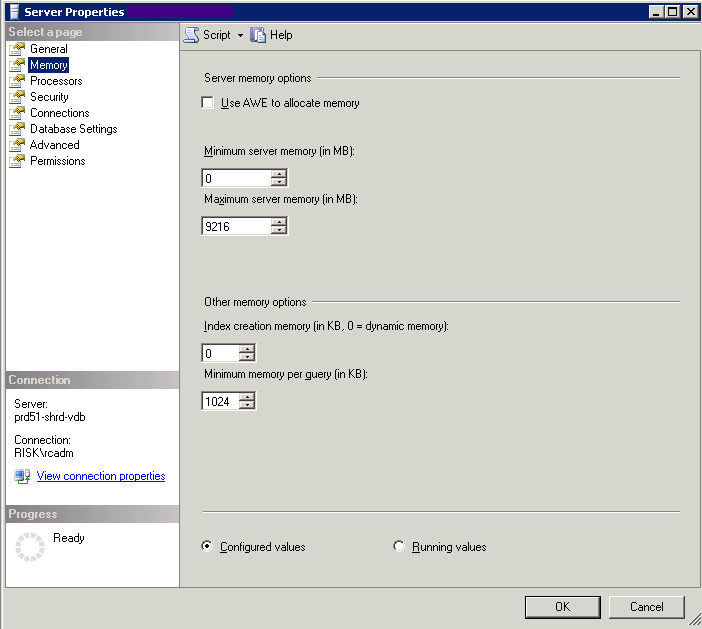
Memory

  • Right-click the topmost SQL Server object, usually named with the machine name or local.
  • Choose Properties.
  • Choose the Memory page.
  • Set “Maximum Server Memory (in MB)” to something useful for the server. Probably something like 25%-50% of the RAM on the host.
  • The more memory you can give it the better, as the database will cache data in RAM, but you also want to leave room in RAM for the OS (2 GB) and some file cache.

sql1a

Recovery Model

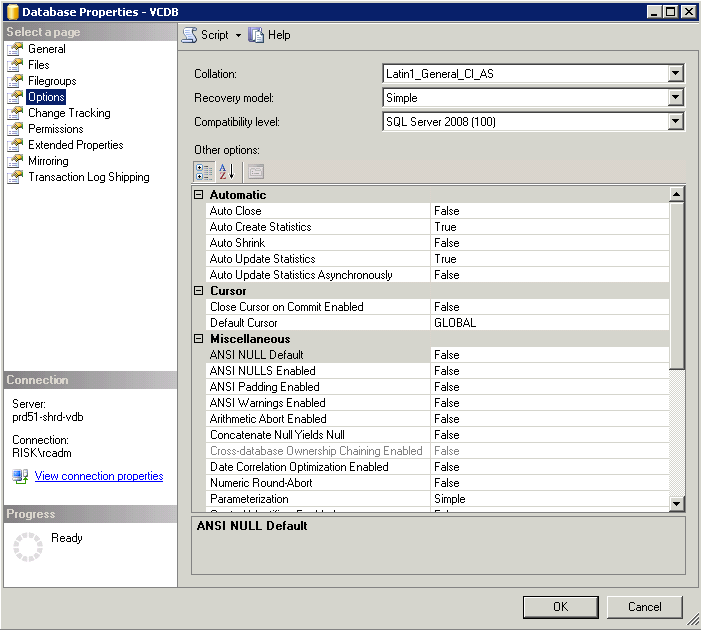
  • Right-click the relevant Database in SQl Management Studio
  • Click Properties
  • Select Options
  • Set the Recovery Model to “Simple.” Click OK.

sql2

Configure Microsoft SQL Server TCP/IP for JDBC

If the Microsoft SQL Server database has TCP/IP disabled and the dynamic ports are not set, the JDBC connection remains closed. The closed connection causes the vCenter Server statistics to malfunction. You can configure the server TCP/IP for JDBC.

This task applies to remote Microsoft SQL Server database servers. You can skip this task if your database is local.

  • Select Start > All Programs > Microsoft SQL Server > Configuration Tool > SQL Server Configuration Manager
  • Select SQL Server Network Configuration
  • Protocols for Instance name
  • Enable TCP/IP
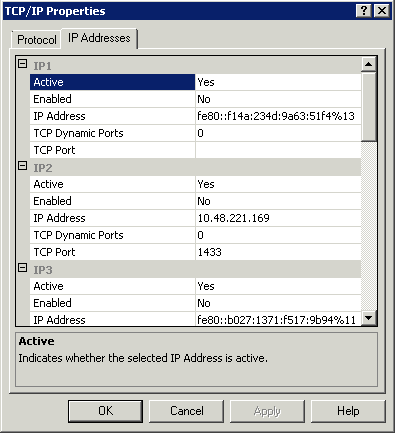
  • Open TCP/IP Properties and set the entries as per the below screen print
  • Click on the IP Addresses tab

sql3

  • Restart the SQL Server service from SQL Server Configuration Manager > SQL Server Services.
  • Start the SQL Server Browser service from SQL Server Configuration Manager > SQL Server Services.

Maintenance of your SQL Server Databases

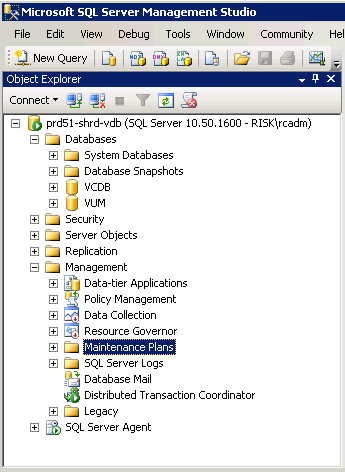
  • Start the Microsoft SQL Server Management Studio again and log in as the sa user. Open the Management folder.

sql4

  • Right-click Maintenance Plans. Select Maintenance Plan Wizard.

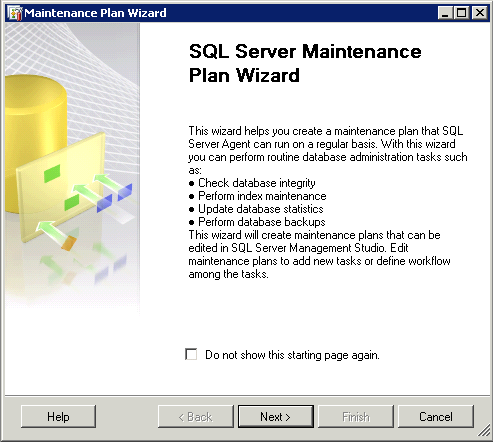
sql5

  • Click Next
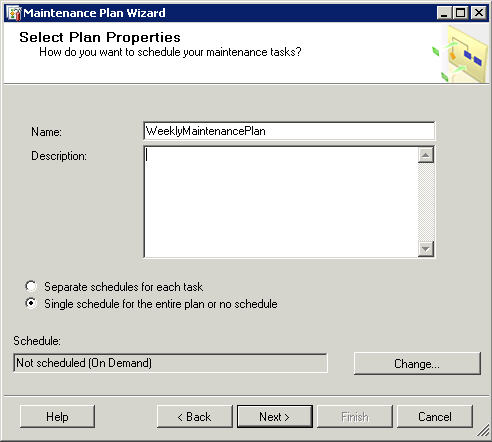
  • On the Select Plan Properties page give it the name WeeklyMaintenancePlan. Select Single schedule for the entire plan or no schedule

sql6

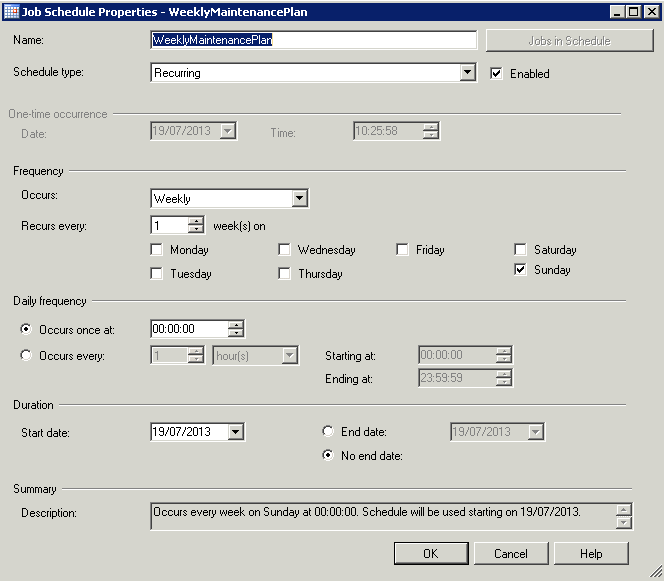
  • Click the Change button to pick when you want it to run.

sql7

  •  Schedule the job to occur when there is little occurring on the system. E.g No backups or antivirus scanning
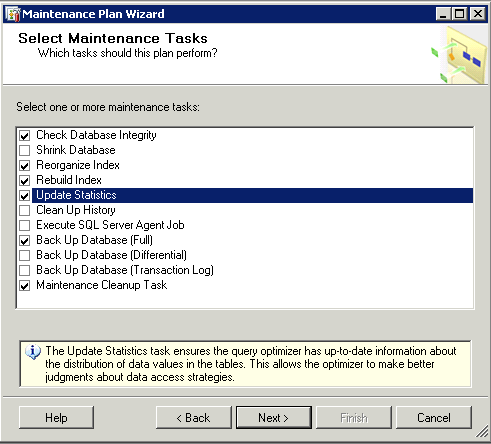
  • Click Next and choose your Maintenance Tasks

sql8

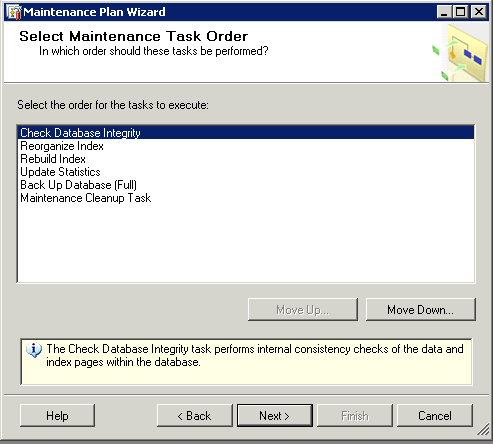
  • Select the order for the Maintenance Tasks to run in

sql9

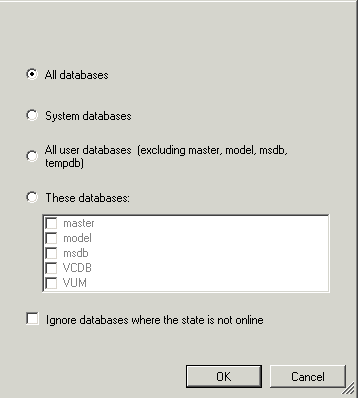
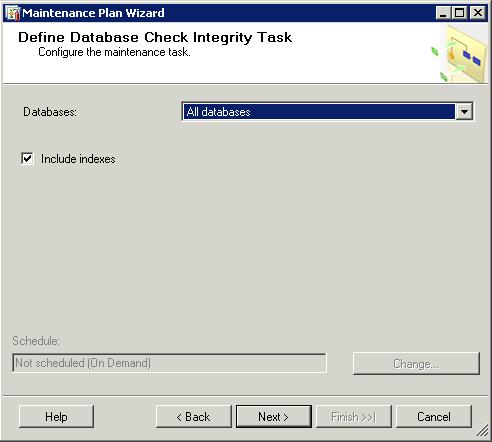
  • For Define Database Integrity Check Select All databases, including indexes.
  • You have the choices below

sql11

  • Click OK and it will bring you back to the Define Database Integrity Check

sql10

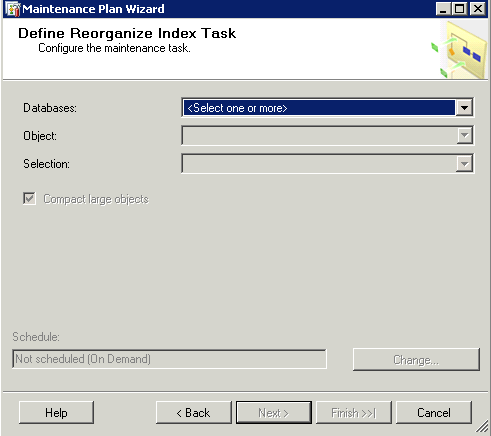
  •  For Define Reorganize Index select All databases, compact large objects.

sql12

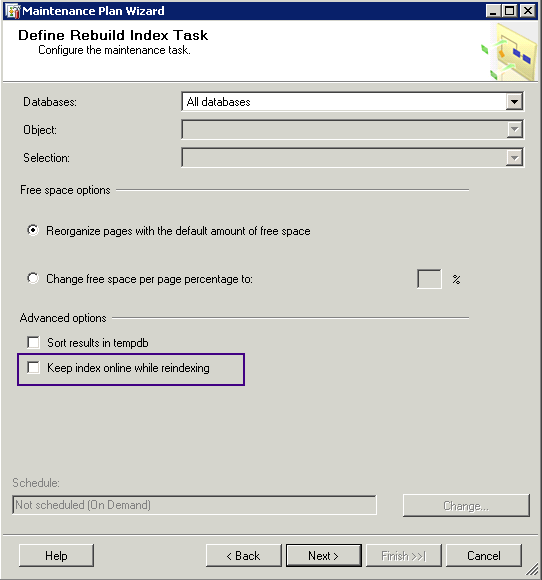
  • For Define Rebuild Index select All Databases, reorganize pages with the default amount of free space. Also check Keep index online while reindexing. Note: The Keep index online option appears to be an Enterprise version feature, and you may see failures with it enabled on other SQL Server versions.

sql13

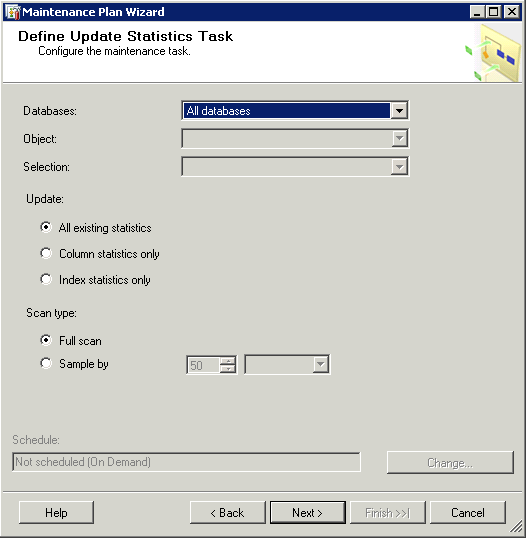
  • For Define Update Statistics select All Databases, all existing statistics, full scan

sql14

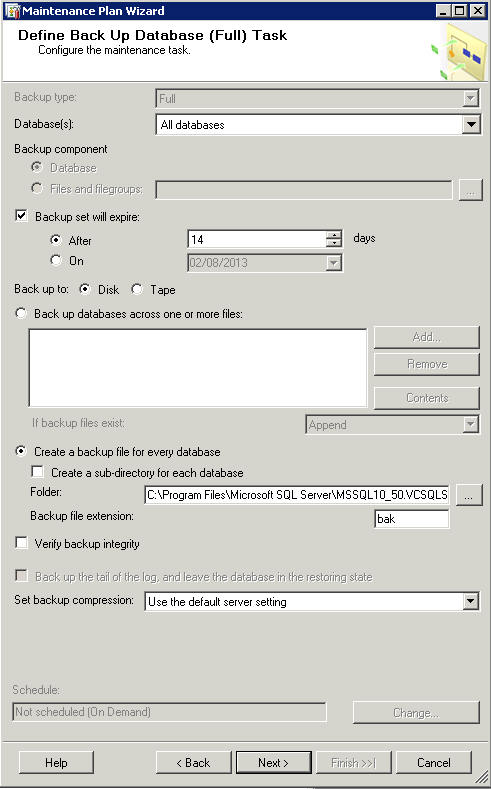
  •  Next on the Define Backup Database (Full) Task, enter the following

sql15

  • Backup Type = Full
  • Databases = All Databases
  • Backup Set will expire after = 14 Days
  • Backup to Disk = Selected
  • Create a backup file for every Database = Selected
  • Choose a folder according to where you want to back up
  • Backup File Extension = bak
  • Set backup compression = Use the default server settings. The Compress Backup option seems like a good one but it isn’t supported on 64-bit SQL Server. It’ll let you set it, then fail on execution
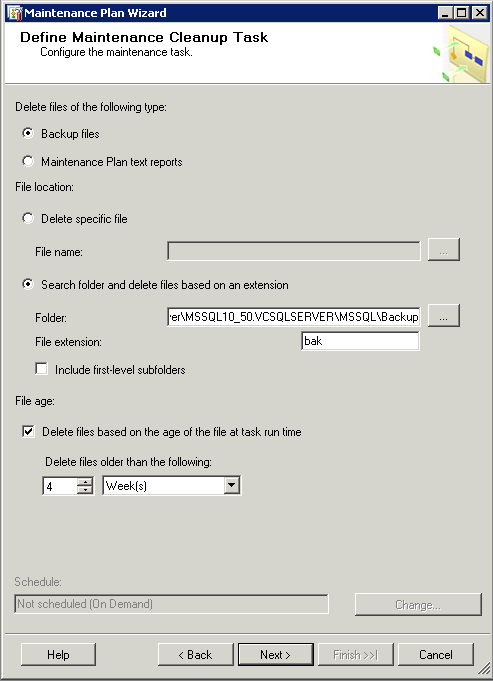
  • Next Define Maintenance Cleanup Task

sql16

  •  Delete files of the following type = Backup Files
  • Search Folder and delete files based on an extension = Choose your backup folder
  • File extension = bak
  • File age = 4 weeks or your choice
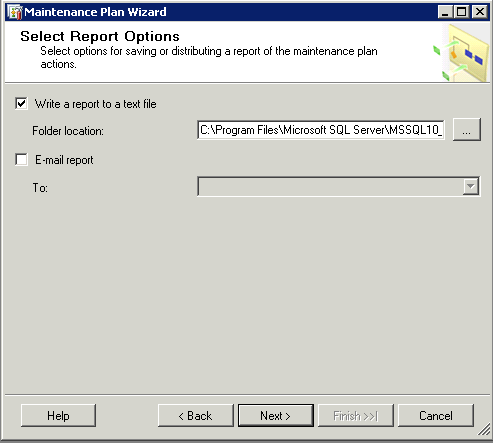
  • Next you are on to the Report Options Page

sql17

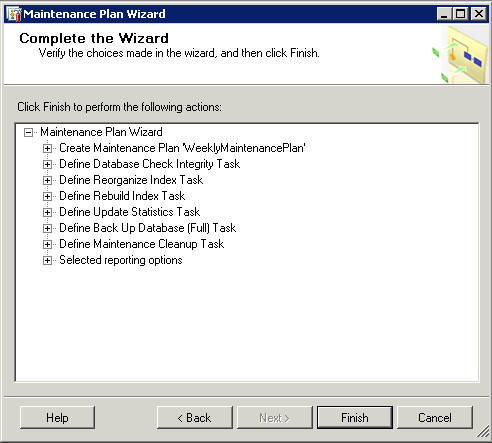
  •  Check the Summaries and Click Finish

sql18

  • Go into the Maintenance Plans folder now, right click on this job, and choose Execute to see if it runs. Check the logs if it doesn’t.
  • Your location may be different but as a rough guide, the log location is c:\Program Files\Microsoft SQL Server\MSSQL10.MSSQLSERVER\MSSQL\Log

Defragmenting VirtualCenter performance data indexes on a Microsoft SQL database

For troubleshooting or maintenance purposes it may be necessary to defragment the indexes on your Microsoft SQL database server.
Fragmentation of indexes occurs when the logical order of pages is different from the physical order on the disk. In VirtualCenter fragmentation occurs most noticeably due to the statistics collection and consolidation.

When the indexes are excessively fragmented, performance of queries to the VirtualCenter database is slow.

http://kb.vmware.com/selfservice/microsites/search.do?language=en_US&cmd=displayKC&externalId=1003990

Warning: If you do not have experienced DB administrators, shutdown the VMware VirtualCenter Server service and do a backup prior to performing any kind of database maintenance. If you have experienced DB administrators you can do the tasks online

Regular Reorganize Database Task

One of the performance suggestions buried in the VMware KB is to regularly reorganize the indexes, since the historical statistics tables get unwieldy. You can do this manually or schedule a job to do it by running the Maintenance Plan Wizard. Choose only Reorganize Indexes and set the schedule to recur every six hours, every day (or however often you want.This keeps the logical fragmentation of the indices down.

Click through the pages of the wizard until you get to “Define Reorganize Index Task.” Have it only reindex VCDB, choose “Tables and views” in the Object selection, and check “Compact large objects.” Click through until you’re done.

Installing a new version of vCenter 5 on SQL Server 2008

Pre Requisites

  • This blog will target an existing Microsoft SQL 2008 R2 Server
  • Make sure you are able to log into SQL Management Studio
  • vCenter 5 installer for obtaining the script which will set this all up automatically
  • vSphere Installation and Setup Guide. Page 176 onwards

Instructions

  • Log into your SQL Server and run SQL Management Studio as a System Admin
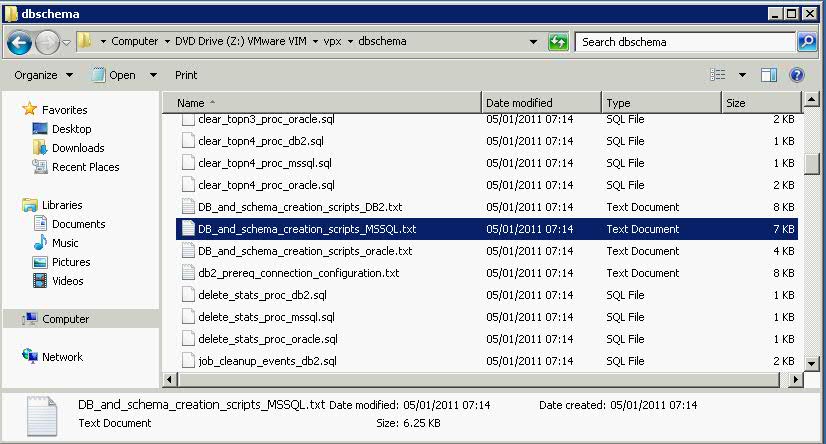
  • Attach your vCenter Installer ISO to your SQL DB VM and navigate to DVDdrive/vpx/dbschema or DVDrive/vCenter Server/dbschema
  • Copy the DB_and_schema_creation_scripts_MSSQL.txt to your desktop

sql2

  • You now need to run through this script and customize the location of the data and log files and the user account and password if you wish
  • The vpxuser that is created by this script is not subject to any security policy. Change the passwords as appropriate. The vpxuser will have DBO Privileges on both the VCDB and the MSDB databases.
  • Logon to a Query Analyzer session with the sysadmin (SA) or a user account with sysadmin privileges and run the following script once amended. Note that I haven’t changed the locations, everything is stored on C:\ as I am only testing and change the vpxuser password
  • A more detailed breakdown is detailed below the script

use [master]
go
CREATE DATABASE [VCDB] ON PRIMARY
(NAME = N’vcdb’, FILENAME = N’C:\VCDB.mdf’ , SIZE = 20000KB , FILEGROWTH = 10% )
LOG ON
(NAME = N’vcdb_log’, FILENAME = N’C:\VCDB.ldf’ , SIZE = 10000KB , FILEGROWTH = 10%)
COLLATE SQL_Latin1_General_CP1_CI_AS
go
use VCDB
go
sp_addlogin @loginame=[vpxuser], @passwd=N’UseaStrongPassword!’, @defdb=’VCDB’, @deflanguage=’us_english’
go
ALTER LOGIN [vpxuser] WITH CHECK_POLICY = OFF
go
CREATE USER [vpxuser] for LOGIN [vpxuser]
go
CREATE SCHEMA [VMW]
go
ALTER USER [vpxuser] WITH DEFAULT_SCHEMA =[VMW]
go
–User should have DBO Privileges or VC_ADMIN_ROLE and VC_USER_ROLE database roles
sp_addrolemember @rolename = ‘db_owner’, @membername = ‘vpxuser’
go
if not exists (SELECT name FROM sysusers WHERE issqlrole=1 AND name = ‘VC_ADMIN_ROLE’)
CREATE ROLE VC_ADMIN_ROLE;
GRANT ALTER ON SCHEMA :: [VMW] to VC_ADMIN_ROLE;
GRANT REFERENCES ON SCHEMA :: [VMW] to VC_ADMIN_ROLE;
GRANT INSERT ON SCHEMA ::  [VMW] to VC_ADMIN_ROLE;
GRANT CREATE TABLE to VC_ADMIN_ROLE;
GRANT CREATE VIEW to VC_ADMIN_ROLE;
GRANT CREATE Procedure to VC_ADMIN_ROLE;
if not exists (SELECT name FROM sysusers WHERE issqlrole=1 AND name = ‘VC_USER_ROLE’)
CREATE ROLE VC_USER_ROLE
go
GRANT SELECT ON SCHEMA ::  [VMW] to VC_USER_ROLE
go
GRANT INSERT ON SCHEMA ::  [VMW] to VC_USER_ROLE
go
GRANT DELETE ON SCHEMA ::  [VMW] to VC_USER_ROLE
go
GRANT UPDATE ON SCHEMA ::  [VMW] to VC_USER_ROLE
go
GRANT EXECUTE ON SCHEMA :: [VMW] to VC_USER_ROLE
go
sp_addrolemember VC_ADMIN_ROLE , [vpxuser]
go
sp_addrolemember VC_USER_ROLE , [vpxuser]
go
use MSDB
go
CREATE USER [vpxuser] for LOGIN [vpxuser]
go
–User should have DBO Privileges or VC_ADMIN_ROLE
sp_addrolemember @rolename = ‘db_owner’, @membername = ‘vpxuser’
go
if not exists (SELECT name FROM sysusers WHERE issqlrole=1 AND name = ‘VC_ADMIN_ROLE’)
CREATE ROLE VC_ADMIN_ROLE;
go
grant select on msdb.dbo.syscategories to VC_ADMIN_ROLE
go
grant select on msdb.dbo.sysjobsteps to VC_ADMIN_ROLE
go
GRANT SELECT ON msdb.dbo.sysjobs to VC_ADMIN_ROLE
GO
GRANT EXECUTE ON msdb.dbo.sp_add_job TO VC_ADMIN_ROLE
go
GRANT EXECUTE ON msdb.dbo.sp_delete_job TO VC_ADMIN_ROLE
go
GRANT EXECUTE ON msdb.dbo.sp_add_jobstep TO VC_ADMIN_ROLE
go
GRANT EXECUTE ON msdb.dbo.sp_update_job TO VC_ADMIN_ROLE
go
GRANT EXECUTE ON msdb.dbo.sp_add_jobserver TO VC_ADMIN_ROLE
go
GRANT EXECUTE ON msdb.dbo.sp_add_jobschedule TO VC_ADMIN_ROLE
go
GRANT EXECUTE ON msdb.dbo.sp_add_category TO VC_ADMIN_ROLE
go
sp_addrolemember VC_ADMIN_ROLE , [vpxuser]
go

A breakdown of the script

This DB_and_schema_creation_scripts_MSSQL.txt file describes how to use optional scripts to create a Microsoft SQL database for vCenter Server and to create the database schema. If you do not use these scripts, you can create the database manually and allow the vCenter Server installer to create the database schema.

To prepare a SQL Server database to work with vCenter Server, you generally need to create a SQL Server database user with database operator (DBO) rights. When you do this, you must make sure that the database user login has the db_owner fixed database role on the vCenter Server database and on the MSDB database. (The db_owner role on the MSDB database is required for installation and upgrade only. You can revoke this role after the installation or upgrade process is complete.) The purpose of granting DBO permissions to the vCenter Server database user is to enable the vCenter Server installer to create the vCenter Server database schema.

For environments in which the user cannot have DBO permissions on the vCenter Server database, you can instead run scripts that create the vCenter Server database schema before you run the vCenter Server installer.

You can use the DB_and_schema_creation_scripts_MSSQL.txt script to create a database, user, and permissions for successful installation of vCenter Server.

  • The first part of this script as listed below. (Highlights in blue where changes can be made)
  • You must change the Password or you may get an error that the Password does not conform to the Password Complexity rules.(Highlighted in red on screenprint)
  • Also I had to make the SIZE=20000KB and 10000KB respectively as SQL would not let me create a DB with the original values in the script
  • Paste the following into a SQL Management Studio Query Window and click Execute. (Highlighted in red on screenprint) See screenprint below script

use [master]
go
CREATE DATABASE [VCDB] ON PRIMARY
(NAME = N’vcdb‘, FILENAME = N’C:\VCDB.mdf’ , SIZE = 20000KB , FILEGROWTH = 10% )
LOG ON
(NAME = N’vcdb_log’, FILENAME = N’C:\VCDB.ldf’ , SIZE = 10000KB , FILEGROWTH = 10%)
COLLATE SQL_Latin1_General_CP1_CI_AS
go
use VCDB
go
sp_addlogin @loginame=[vpxuser], @passwd=N’UseaStrongPassword!‘, @defdb=’VCDB’, @deflanguage=’us_english’
go
ALTER LOGIN [vpxuser] WITH CHECK_POLICY = OFF
go
CREATE USER [vpxuser] for LOGIN [vpxuser]
go

sql3

  • You will see that this part of the script creates the VCDB Database and the user vpxuser under Security Logins and Databases > VCDB > Security > Users

sql2

  • Next copy and paste the following script into a new SQL Query Windows

use VCDB
go
CREATE SCHEMA [VMW]
go
ALTER USER [vpxuser] WITH DEFAULT_SCHEMA =[VMW]
go

  • Navigate to Databases > VCDB > Security > Users > vpxuser > Properties
  • Check that VMW is the Default Schema for the vpxuser

sql4

  • Next the vpxuser should have DBO Privileges or VC_ADMIN_ROLE and VC_USER_ROLE database roles
  • Copy the script below into a new SQL Query Window and click Execute

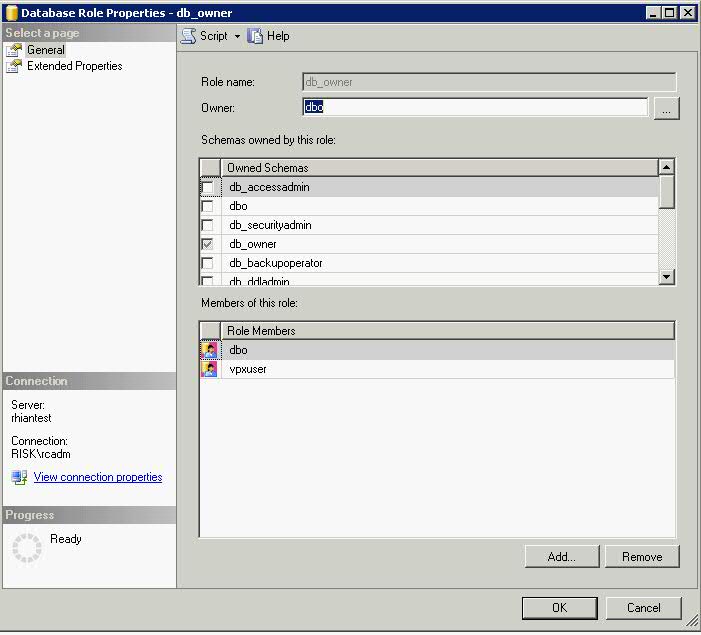
sp_addrolemember @rolename = ‘db_owner’, @membername = ‘vpxuser
go

  • It gives the vpxuser the db_owner role

sql5

  • The rest of the script follows on as below

if not exists (SELECT name FROM sysusers WHERE issqlrole=1 AND name = ‘VC_ADMIN_ROLE’)
CREATE ROLE VC_ADMIN_ROLE;
GRANT ALTER ON SCHEMA :: [VMW] to VC_ADMIN_ROLE;
GRANT REFERENCES ON SCHEMA :: [VMW] to VC_ADMIN_ROLE;
GRANT INSERT ON SCHEMA ::  [VMW] to VC_ADMIN_ROLE;
GRANT CREATE TABLE to VC_ADMIN_ROLE;
GRANT CREATE VIEW to VC_ADMIN_ROLE;
GRANT CREATE Procedure to VC_ADMIN_ROLE;
if not exists (SELECT name FROM sysusers WHERE issqlrole=1 AND name = ‘VC_USER_ROLE’)
CREATE ROLE VC_USER_ROLE
go
GRANT SELECT ON SCHEMA ::  [VMW] to VC_USER_ROLE
go
GRANT INSERT ON SCHEMA ::  [VMW] to VC_USER_ROLE
go
GRANT DELETE ON SCHEMA ::  [VMW] to VC_USER_ROLE
go
GRANT UPDATE ON SCHEMA ::  [VMW] to VC_USER_ROLE
go
GRANT EXECUTE ON SCHEMA :: [VMW] to VC_USER_ROLE
go
sp_addrolemember VC_ADMIN_ROLE , [vpxuser]
go
sp_addrolemember VC_USER_ROLE , [vpxuser]
go
use MSDB
go
CREATE USER [vpxuser] for LOGIN [vpxuser]
go
sp_addrolemember @rolename = ‘db_owner’, @membername = ‘vpxuser
go
if not exists (SELECT name FROM sysusers WHERE issqlrole=1 AND name = ‘VC_ADMIN_ROLE’)
CREATE ROLE VC_ADMIN_ROLE;
go
grant select on msdb.dbo.syscategories to VC_ADMIN_ROLE
go
grant select on msdb.dbo.sysjobsteps to VC_ADMIN_ROLE
go
GRANT SELECT ON msdb.dbo.sysjobs to VC_ADMIN_ROLE
GO
GRANT EXECUTE ON msdb.dbo.sp_add_job TO VC_ADMIN_ROLE
go
GRANT EXECUTE ON msdb.dbo.sp_delete_job TO VC_ADMIN_ROLE
go
GRANT EXECUTE ON msdb.dbo.sp_add_jobstep TO VC_ADMIN_ROLE
go
GRANT EXECUTE ON msdb.dbo.sp_update_job TO VC_ADMIN_ROLE
go
GRANT EXECUTE ON msdb.dbo.sp_add_jobserver TO VC_ADMIN_ROLE
go
GRANT EXECUTE ON msdb.dbo.sp_add_jobschedule TO VC_ADMIN_ROLE
go
GRANT EXECUTE ON msdb.dbo.sp_add_category TO VC_ADMIN_ROLE
go
sp_addrolemember VC_ADMIN_ROLE , [vpxuser]
go

  • Run the scripts in sequence on the VCDB database.The objects created by these scripts need to be owned by the “dbo” user.
  • Right click on VCDB in SQL Management Studio and select New Query
  • Open the scripts one at a time in the query analyzer window and press F5 to execute each script in the order shown here.
  • You can navigate to the vCenter installer folder from the SQL Server and literally just drag and drop the following files into a SQL Query window
  • Important: Do this in order
  • VCDB_mssql.SQL
  • load_stats_proc_mssql.sql
  • purge_stat1_proc_mssql.sql
  • purge_stat2_proc_mssql.sql
  • purge_stat3_proc_mssql.sql
  • purge_usage_stats_proc_mssql.sql
  • stats_rollup1_proc_mssql.sql
  • stats_rollup2_proc_mssql.sql
  • stats_rollup3_proc_mssql.sql
  • cleanup_events_mssql.sql
  • delete_stats_proc_mssql.sql
  • upsert_last_event_proc_mssql.sql
  • load_usage_stats_proc_mssql.sql
  • TopN_DB_mssql.sql
  • calc_topn1_proc_mssql.sql
  • calc_topn2_proc_mssql.sql
  • calc_topn3_proc_mssql.sql
  • calc_topn4_proc_mssql.sql
  • clear_topn1_proc_mssql.sql
  • clear_topn2_proc_mssql.sql
  • clear_topn3_proc_mssql.sql
  • clear_topn4_proc_mssql.sql
  • rule_topn1_proc_mssql.sql
  • rule_topn2_proc_mssql.sql
  • rule_topn3_proc_mssql.sql
  • rule_topn4_proc_mssql.sql
  • process_license_snapshot_mssql.sql
  • process_temptable0_proc_mssql.sql
  • process_temptable1_proc_mssql.sql
  • process_temptable2_proc_mssql.sql

You can also run the following scripts to enable database health monitoring.

  • job_dbm_performance_data_mssql.sql
  • process_performance_data_mssql.sql

Capture

  • Grant the execute privilege for all the store procedures you created to the vCenter Server database user you created (vpxuser)
  • grant execute on purge_stat1_proc to vpxuser
  • grant execute on purge_stat2_proc to vpxuser
  • grant execute on purge_stat3_proc to vpxuser
  • grant execute on purge_usage_stat_proc to vpxuser
  • grant execute on stats_rollup1_proc to vpxuser
  • grant execute on stats_rollup2_proc to vpxuser
  • grant execute on stats_rollup3_proc to vpxuser
  • grant execute on cleanup_events_tasks_proc to vpxuser
  • grant execute on delete_stats_proc to vpxuser
  • grant execute on upsert_last_event_proc to vpxuser
  • grant execute on load_usage_stats_proc to vpxuser
  • grant execute on load_stats_proc to vpxuser
  • grant execute on calc_topn1_proc to vpxuser
  • grant execute on calc_topn2_proc to vpxuser
  • grant execute on calc_topn3_proc to vpxuser
  • grant execute on calc_topn4_proc to vpxuser
  • grant execute on clear_topn1_proc to vpxuser
  • grant execute on clear_topn2_proc to vpxuser
  • grant execute on clear_topn3_proc to vpxuser
  • grant execute on clear_topn4_proc to vpxuser
  • grant execute on rule_topn1_proc to vpxuser
  • grant execute on rule_topn2_proc to vpxuser
  • grant execute on rule_topn3_proc to vpxuser
  • grant execute on rule_topn4_proc to vpxuser
  • grant execute on process_license_snapshot_proc to vpxuser
  • grant execute on process_temptable0_proc tovpxuser
  • grant execute on process_temptable1_proc tovpxuser
  • grant execute on process_temptable2_proc tovpxuser
  • grant execute on process_performance_data_proc to vpxuser
  • grant execute on process_performance_data_mssql.sql to vpxuser
  • For all supported editions of Microsoft SQL Server (except Microsoft SQL Server 2005 Express), ensure that the SQL Agent is running. Run these additional scripts to set up scheduled jobs on the database.
  • Right click the VCDB DB and drag the below scripts into the query window and execute. These scripts ensure that the SQL Server Agent service is running.
  • job_schedule1_mssql.sql
  • job_schedule2_mssql.sql
  • job_schedule3_mssql.sql
  • job_cleanup_events_mssql.sql
  • job_topn_past_day_mssql.sql
  • job_topn_past_week_mssql.sql
  • job_topn_past_month_mssql.sql
  • job_topn_past_year_mssql.sql
  • job_property_bulletin_mssql.sql

Create an ODBC Connection

  • On your vCenter Server system, select Settings > Control Panel > Administrative Tools > Data Sources (ODBC).
  • Click the System DSN tab and do one of the following.

To modify an existing SQL Server ODBC connection, select the connection from the System Data
Source list and click Configure.
To create a new SQL Server ODBC connection, click Add, select SQL Native Client, and click
Finish.

  • Type an ODBC datastore name (DSN) in the Name text box. “VMware vCenter Server”
  • (Optional) Type an ODBC DSN description in the Description text box.
  • Select the server name from the Server drop-down menu. Type the SQL Server host name in the text box if it is not in the drop-down menu.
  • Select one of the authentication methods.
  • Integrate Windows authentication. Optionally, enter the Service Principal Name (SPN).
  • SQL Server authentication. Type your SQL Server login name and password.
  • Select the database created for the vCenter Server system from the Change the default database to menu.
  • Click Finish.
    For SQL Server 2005 and SQL Server 2008 editions, test the data source by selecting Test Data Source and clicking OK from the ODBC Microsoft SQL Server Setup menu.
  • Verify that the SQL Agent is running on your database server.

Run the vCenter Installer in the vCenter Server

  • Run the vCenter Server installer and, when prompted, provide the database user login.

Youtube Video

Courtesy of Wee Kiong Tan

SQL Server 2008 Clustering

This post follows on from the previous post regarding the setup of Microsoft Windows Clusters which will be required before you can set up Microsoft SQL Clustering

Pre Requisites

  • You must have installed Microsoft .NET Framework on both nodes in the cluster – On the Windows Server, you can go to Add Features and select Microsoft .NET 3.5 SP1
  • Create all necessary SQL Server Active Directory Groups for the relevant SQL Server Services (SQL Agent, DB Agent, Analysis Services) Note that Reporting Services/Integration Services are not cluster aware but you can install it to be used with just this server
  • Make sure all patching and software updates are current
  • You must be running Microsoft Enterprise/Datacenter edition
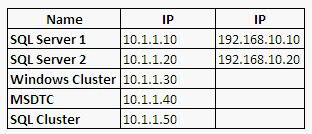
  • Please see the table below for an example of the amount of NICs and different subnets required for a 2 Node Windows/SQL Cluster

Number of Nodes supported by SQL Server versions

Instructions for Node 1

  • On Node 1, connect the SQL Server 2005/2008 ISO or installer
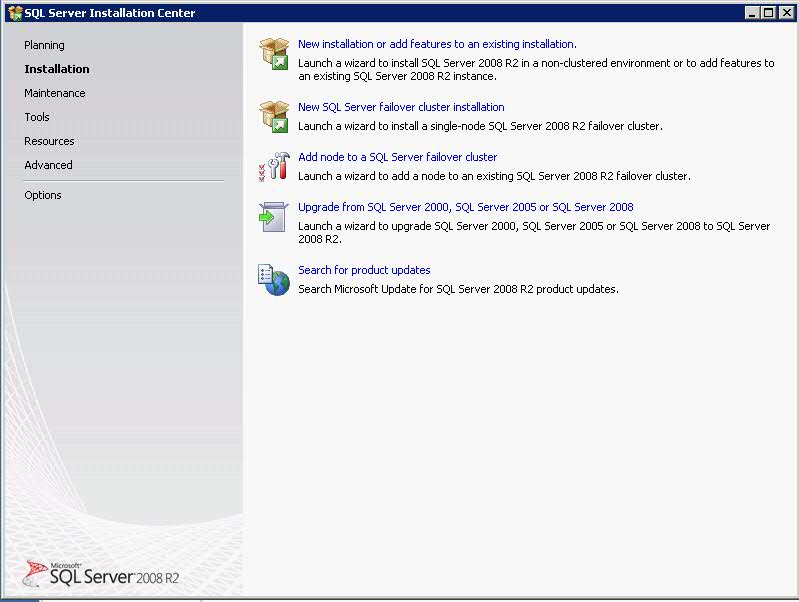
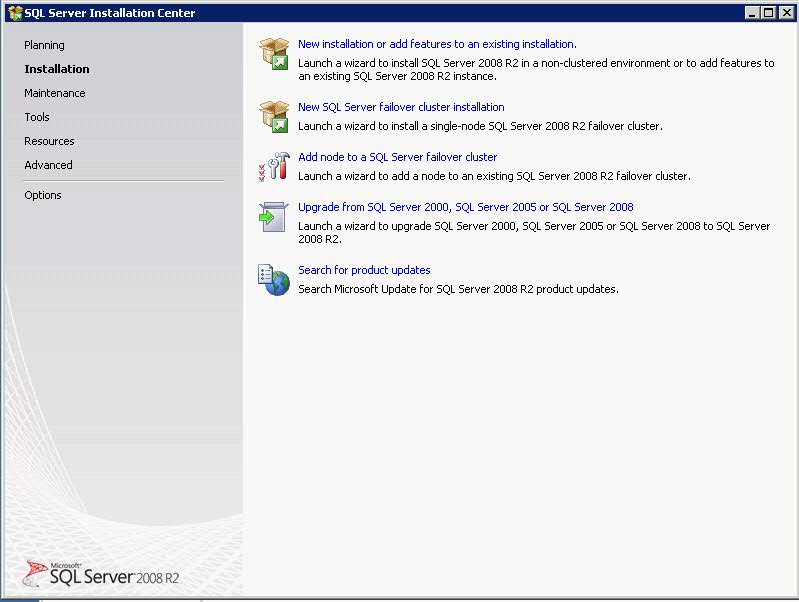
  • Click Setup and choose New SQL Server Failover Cluster Installation

  • Select to Install Setup Support Rules

  • If you get a Network Binding error and your bindings all look correct with the LAN NIC at the top correctly then please try modifying the registry. It looks like sometimes the system takes the Virtual Cluster adapter to be the top binding but this is not visible from Network Connections Window when you go into Advanced settings
  • Drill down to HKEY_LOCAL_MACHINE\SYSTEM\CurrentControlSet\services\Tcpip\Linkage and open up the Bind value and move the LAN ID to the top

  • Setup Support Files
  • Select Product Key
  • On Feature, Select Database Engine Services, Replication Services and Analysis Services
  • Note that Reporting Services/Integration Services are not cluster aware but you can install it to be used with just this server
  • On Instance Configuration, you need to enter a SQL Server Network Name like SQLCLUSTER
  • Keep the default instance or choose a new instance
  • You can change the Instance Root Directory if you wish also *NEED TO CHECK THIS
  • Click Next
  • On the Cluster Resource Group, you can keep the settings
  • In the Cluster Disk Selection, Select the disks you want to use for SQL DB and SQL Logs (Make sure both are ticked!!!)
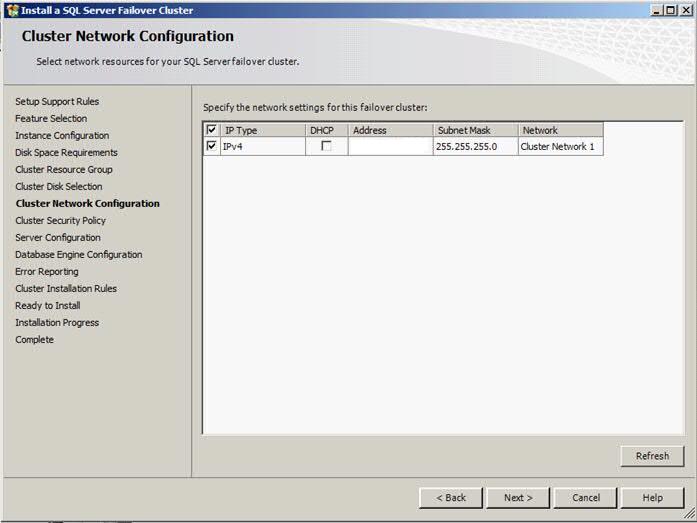
  • Next the Cluster Network Configuration

  • Untick DHCP and provide a new IP Address and Subnet
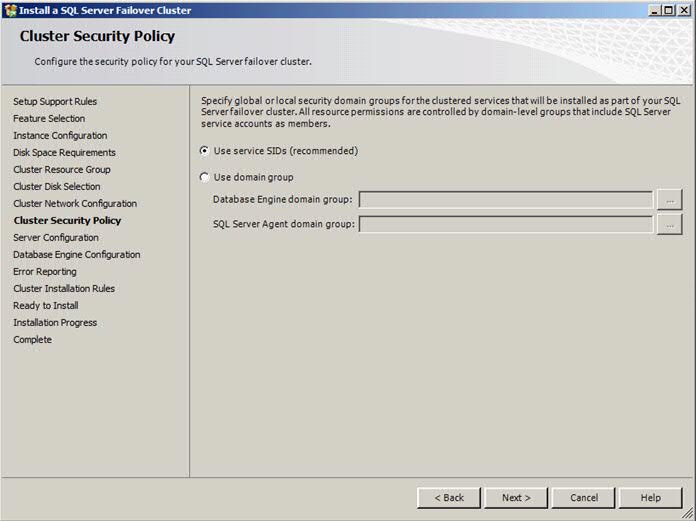
  • On Cluster Security Policy, keep Use Service SSIDs

  • On Service Accounts, please fill in the AD accounts you previously created for SQL Server Agent and SQL Server DB Engine
  • Check Collation is as you want it – Usually Latin1_General_C1_AS
  • In Database Engine Configuration, select Mixed mode and add a password for sa and add the current user
  • Click the Data Directories Tab and configure these paths as appropriate

  • Enable Filestream if you want
  • On Error and Usage Configuration
  • Next
  • Next
  • Install

Instructions for Node 2

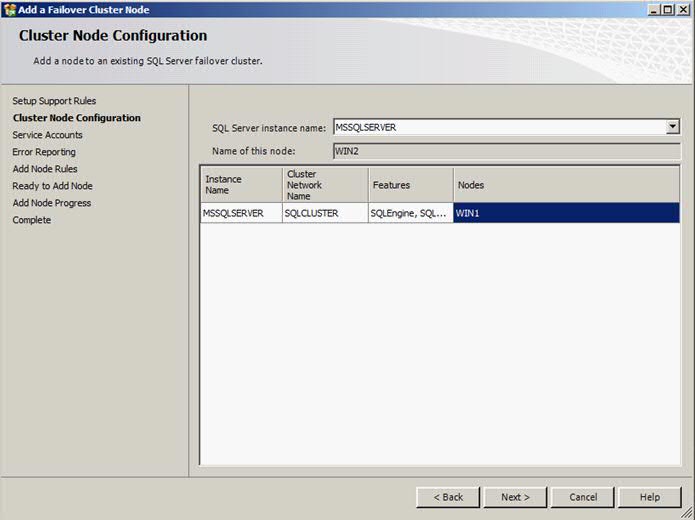
  • Choose Add Node to a SQL Server Failover Cluster

  • Next
  • Put in Product Key
  • Accept Licensing
  • Install Setup Support Files
  • Check Setup Support Rules
  • On the Cluster Node Configuration, check this is all correct

  • Enter password for SQL Server Engine and SQL Server Agent account
  • Click Next on Error Reporting
  • Click Next on Add Node Rules
  • Click Install
  • Complete and Close

Testing Failover

  • Log into the SQL Server and open SQL Management Studio. Test a query against your DB
  • Open Failover Cluster Manager
  • Go to Services and Applications
  • Click on SQL Server (Cluster Name)

  • Select Move this Application or Service to another node.
  • Once this has transferred, do the same query test on the second server and make sure everything works as expected.
  • If so then Failover is working correctly
  • Go to vCenter and create a new HA rule keeping these DB Servers running on separate hosts for the ultimate in failover 🙂

Note: If you find you want to clear the Event Logs post Installation and have a fresh start, then you will need to clear the logs from both servers then close Failover Cluster Manager and restart it.

Useful Articles

capture


SQL Server Database Samples for Testing

Whilst trying to get qualified in various sections of IT infrastructure and realising I had some SQL Server knowledge gaps, I started reading the book; Microsoft (Exam 70-432): Microsoft SQL Server 2008 Implementation And Maintenance. A little way into this book, it points you to a website where you can download a variety of Sample/Test SQL Server Databases in different versions and with different features.

Links

http://msftdbprodsamples.codeplex.com/

http://msftdbprodsamples.codeplex.com/releases/view/93587

Information

The 2 databases it recommends for the novice SQL Server user are below. For each release of the product on the webpages above, there is a light-weight and full version of the AdventureWorks sample database. The light-weight version is denoted by the LT abbreviation in the filename.

  1. AdventureWorks2008 Data File.zip
  2. AdventureWorks2008R2 Data File.zip

Each zip file contains an mdf database file and ldf log file.

An AdventureWorks database can be installed by attaching the database, or using the CREATE DATABASE statement.

To attach an AdventureWorks database

  1. Download a database for your SQL Server version.
  2. Unzip the database (mdf) file and log (ldf) file.
  3. From Microsoft SQL Server Management Studio, connect to a SQL Server instance.
  4. Right click Databases.
  5. Click Attach.
  6. Click the Add button.
  7. Locate the AdventureWorks database mdf file. For instance, AdventureWorks2012_Data.mdf.
  8. Click the OK button on the Locate Database Files dialog window.
  9. Click the OK button on the Attach Databases dialog window to attach the database.

CREATE DATABASE statement

From SQL Server Management Studio, execute the following code:

  • Replace {Database Name} with the name of the database. The name of the database is the first part of the mdf file name before the underscore. For example, AdventureWorks2012 in AdventureWorks2012_Data.mdf.
  • Replace {Database File Name} with the name of the database file. For example, AdventureWorks2012_Data.

Example

Thanks

Thanks to the creators of Codeplex who are providing this free and useful service for anyone wanting to test out new and existing technology