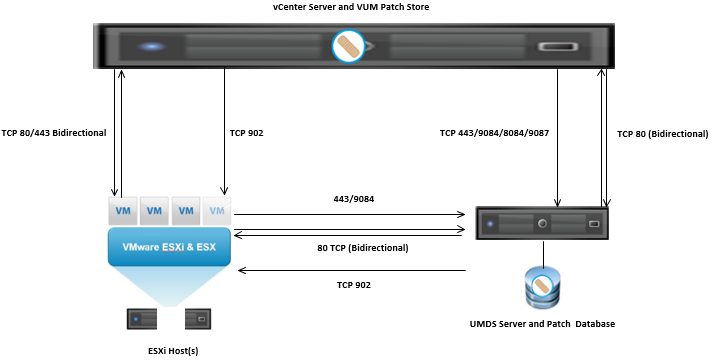
In vSphere 6.7 releases and older, the UMDS 6.7 is bundled with the vCenter Server Appliance installer. You can use the UMDS bundle from the vCenter Server Appliance to install UMDS 6.7 on a separate Linux-based system.
UMDS is a 64-bit application and requires a 64-bit Linux-based system.
You cannot upgrade UMDS that runs on a Linux-based operating system. You can uninstall the current version of UMDS, perform a fresh installation of UMDS according to all system requirements, and use the existing patch store from the UMDS that you uninstalled.
Supported Operating Systems
The Update Manager Download Service (UMDS) can run on a limited number of Linux-based operating systems.
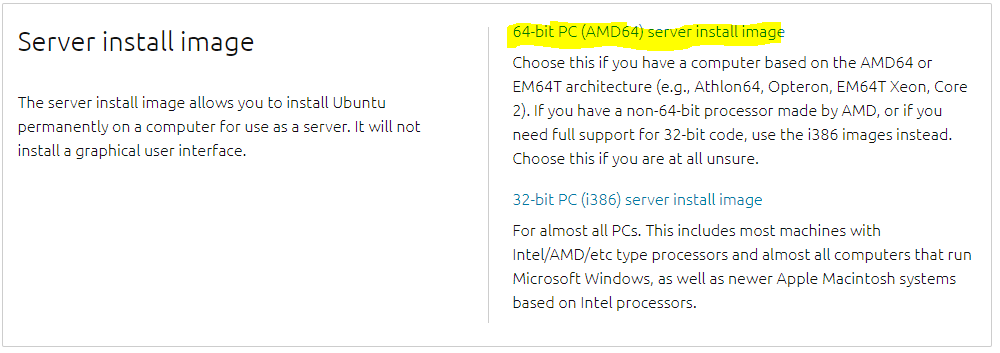
- Ubuntu 14.0.4
- Ubuntu 18.04
- Red Hat Enterprise Linux 7.4
- Red Hat Enterprise Linux 7.5
Download from
http://releases.ubuntu.com/14.04/
Pre-requisites
- UMDS Software found on the vCenter Server Appliance 6.7U3 iso.
- Ubuntu 14.04.x
Procedure
- Download the Ubuntu 14.04.06 iso from http://releases.ubuntu.com/14.04/
- Upload the Ubuntu ISO to your datastore
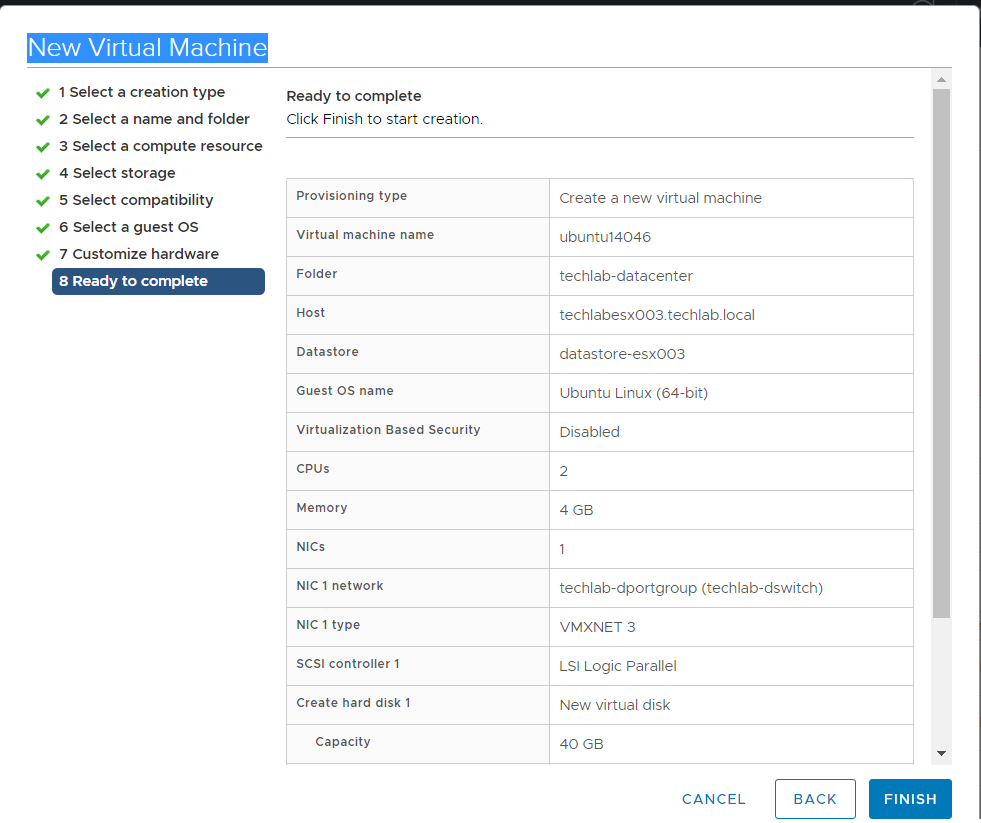
- In vCenter, create a new Ubuntu VM
- Once this is built, edit the settings and attach the iso to the Ubuntu CD drive via the datastore
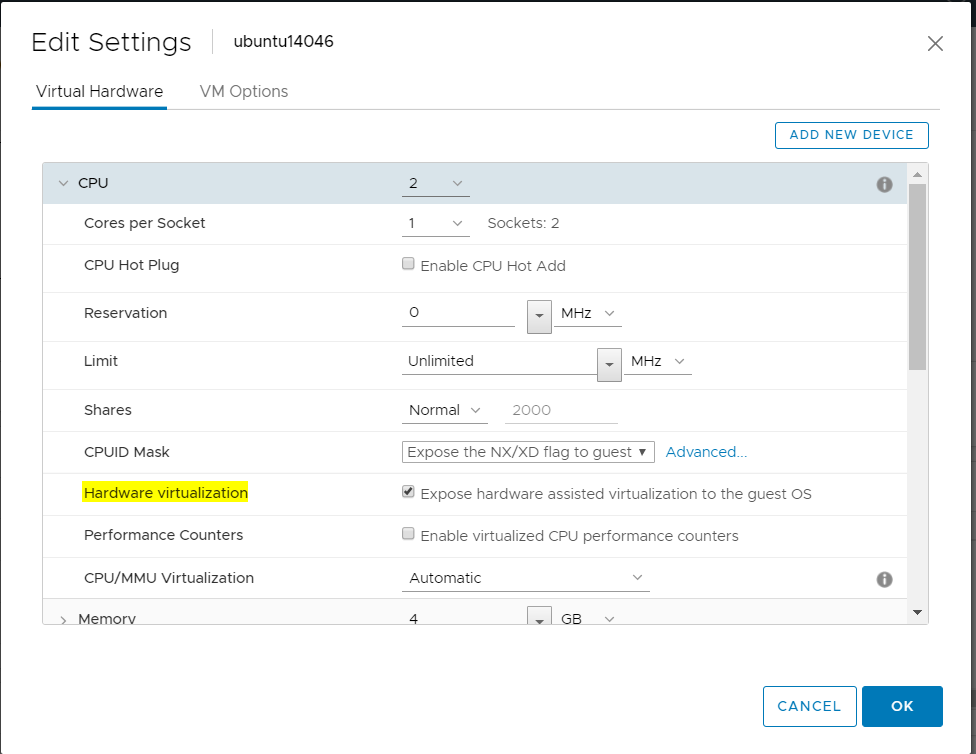
- On the “Virtual Hardware” tab, expand “CPU,” and select “Expose hardware assisted virtualization to guest OS.”
- Right-click your newly created VM and select “Power On.”
- Right-click the VM again and select “Open Console.”
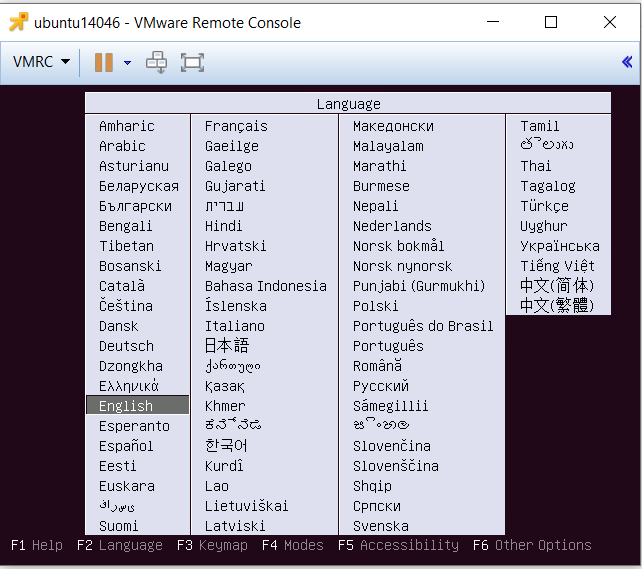
- The Ubuntu installation process should begin automatically and the first prompt is to choose a language. Select English and press Enter
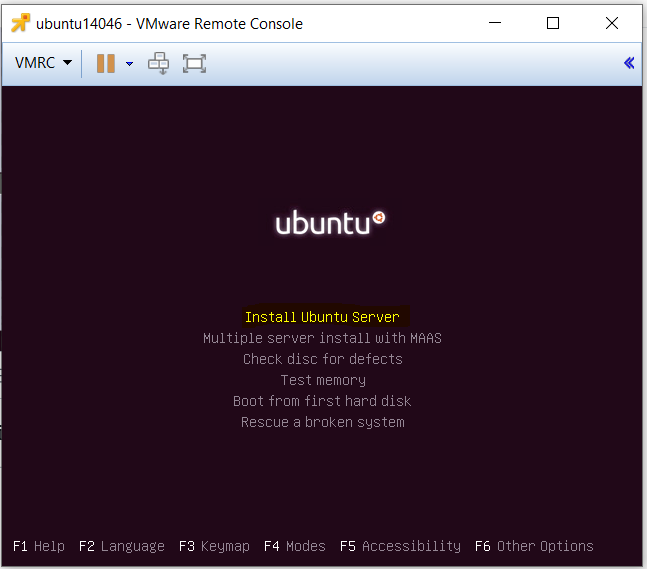
- Highlight “Install Ubuntu Server” and press Enter
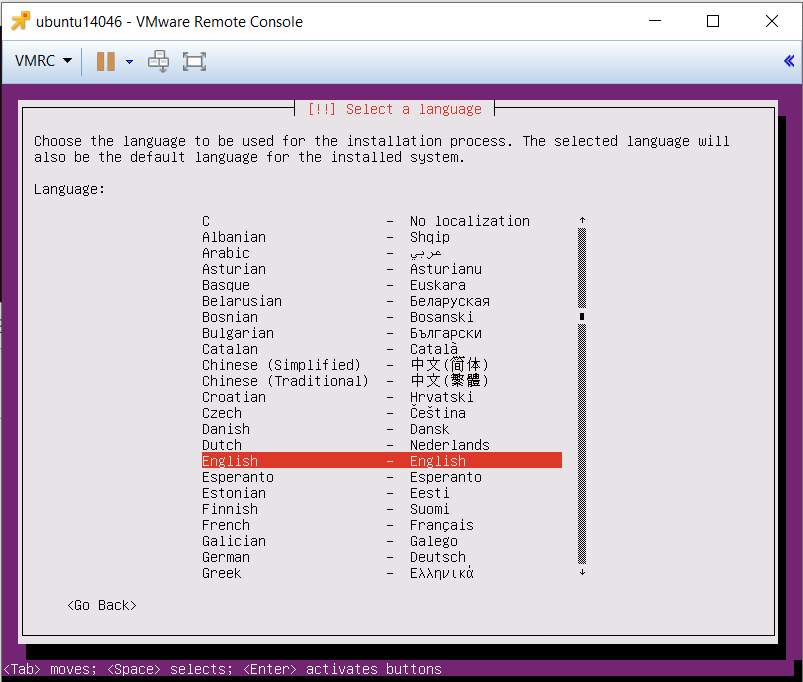
- Select English
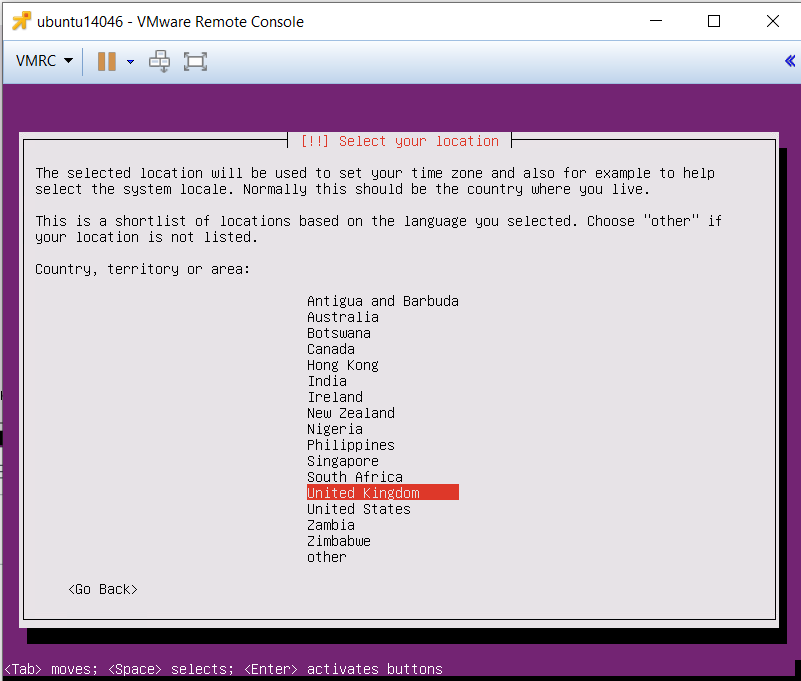
- Select your location – In my case the United Kingdom
- On the “Configure the keyboard” screen select “Yes” and press Enter. Once it has taken you through the configuration, you will see the page below

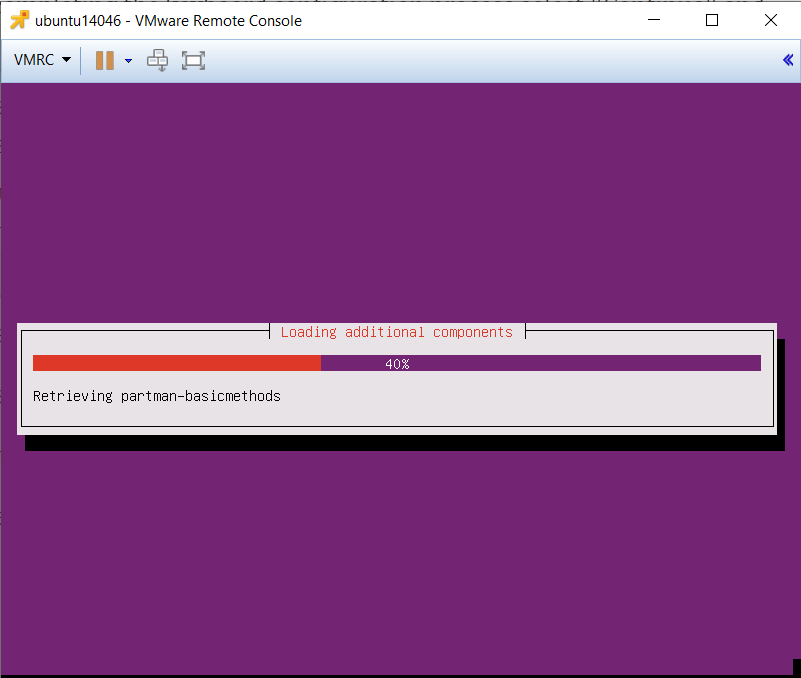
- It will run through the below screen
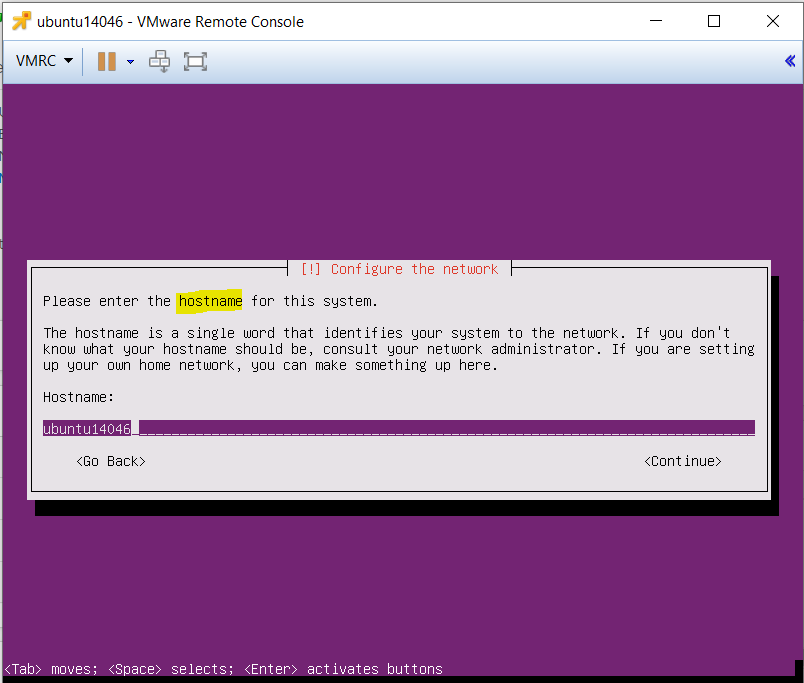
- Enter a hostname
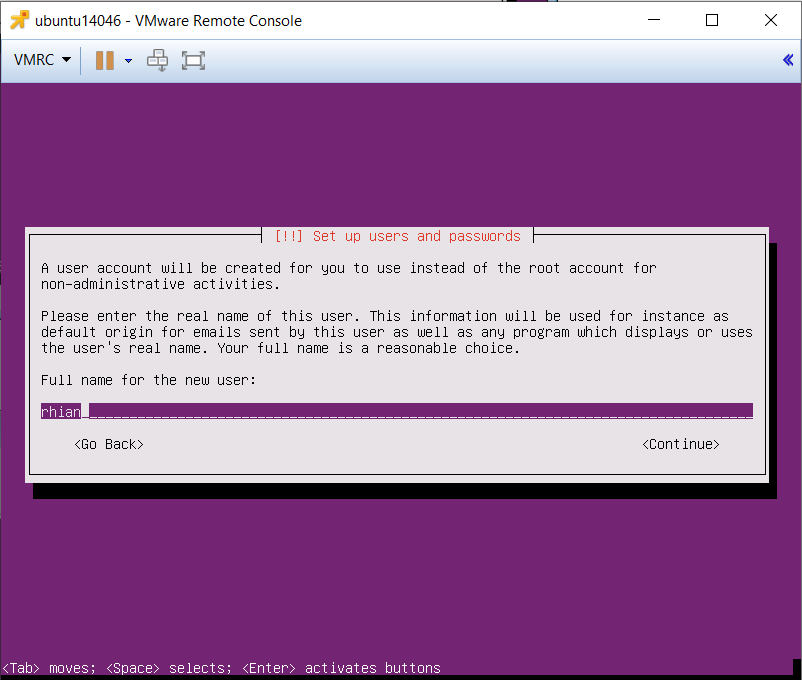
- Ubuntu prompts you to create a user account to be used instead of a root account. Start by entering the full name (first and last) of the user and Press Enter
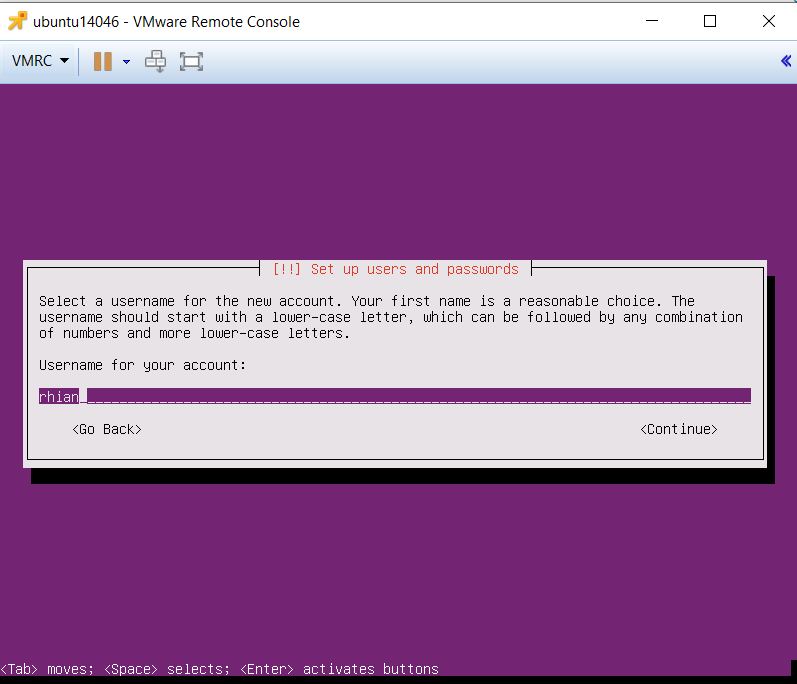
- Enter a username for the account
- Choose a password
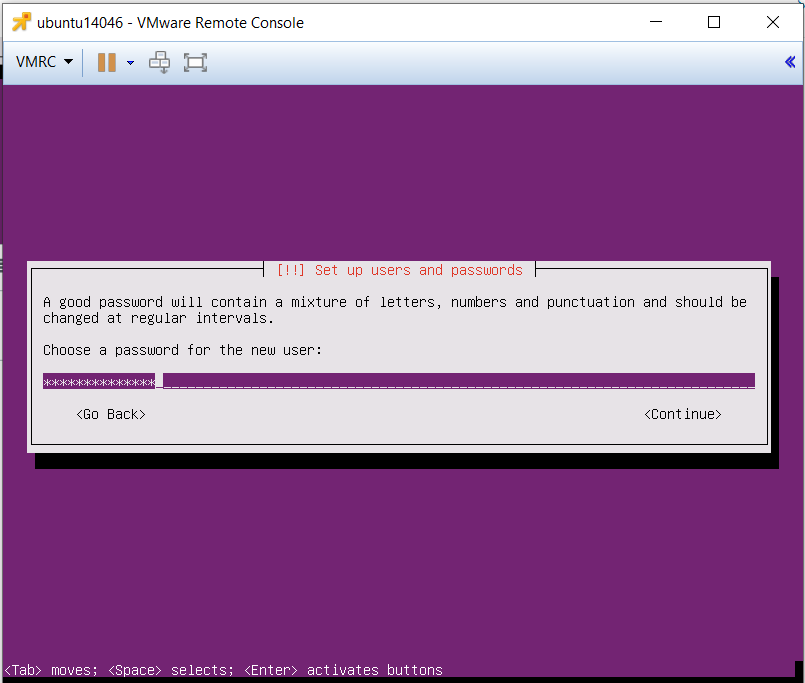
- Enter the password again
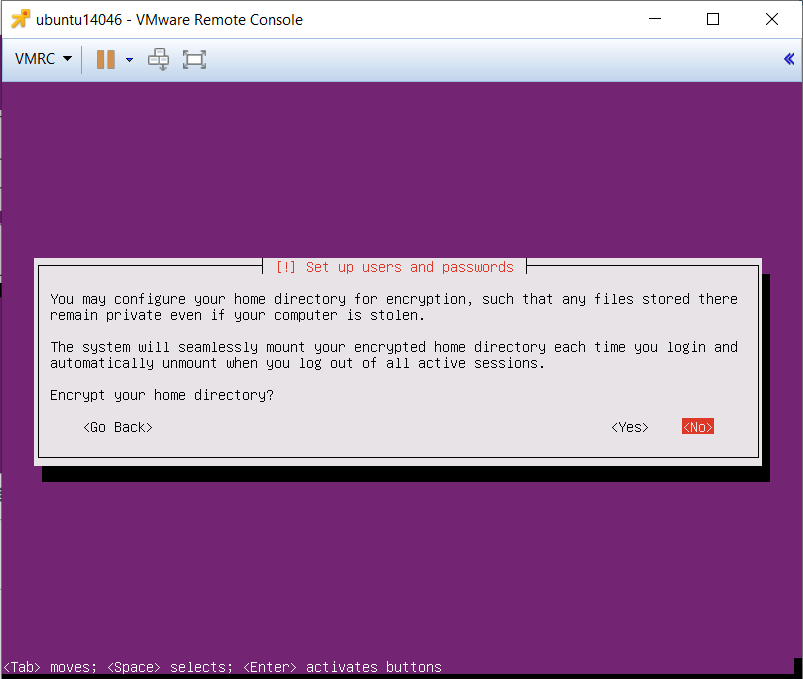
- I chose not to encrypt my home directory, so select “No” and press Enter
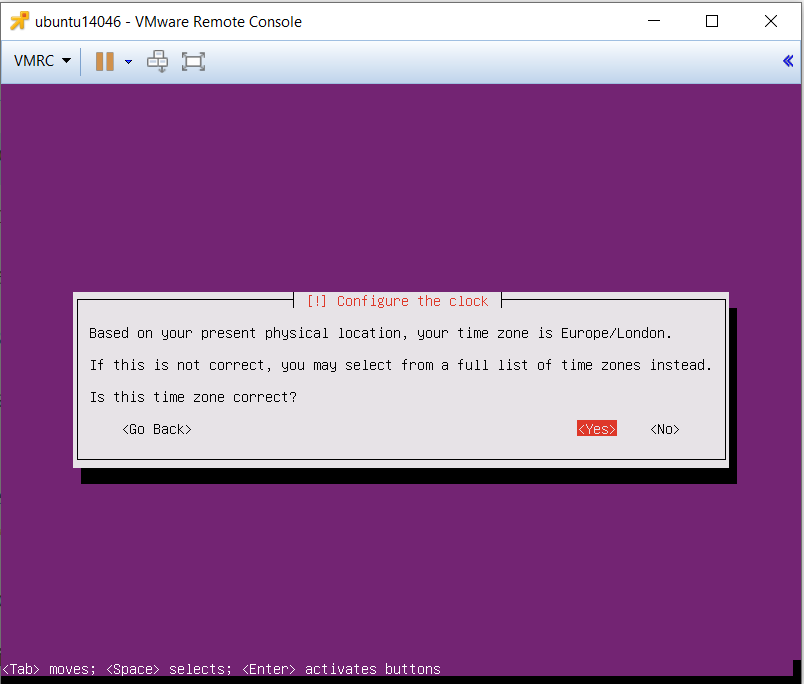
- Configure the clock
- Select “Guided – use entire disk and set up LVM” and press Enter
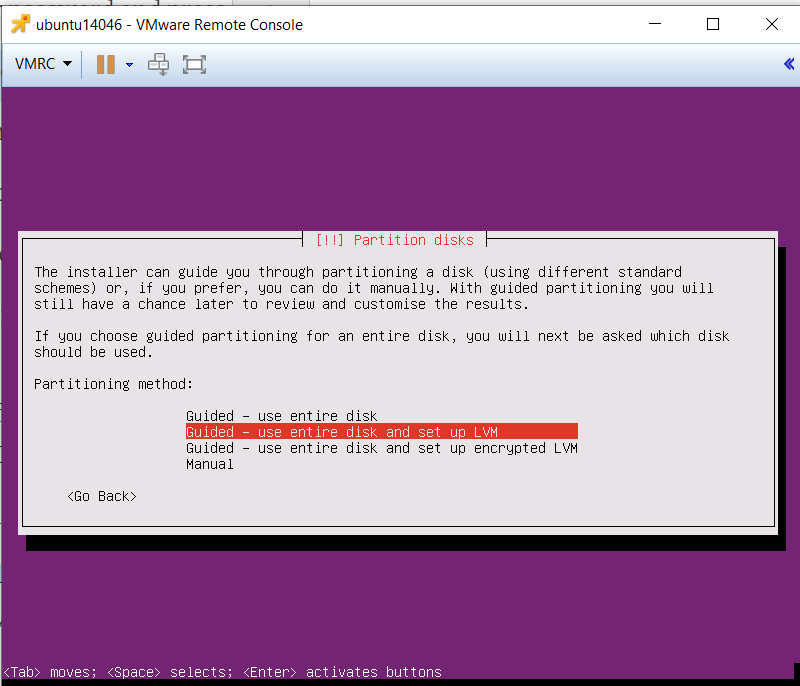
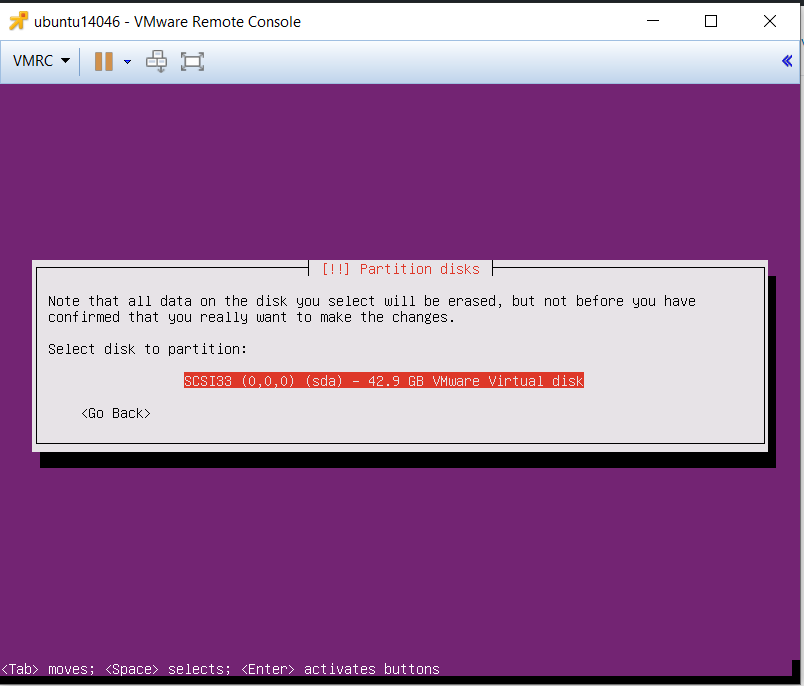
- Choose the disk to partition. I only have one
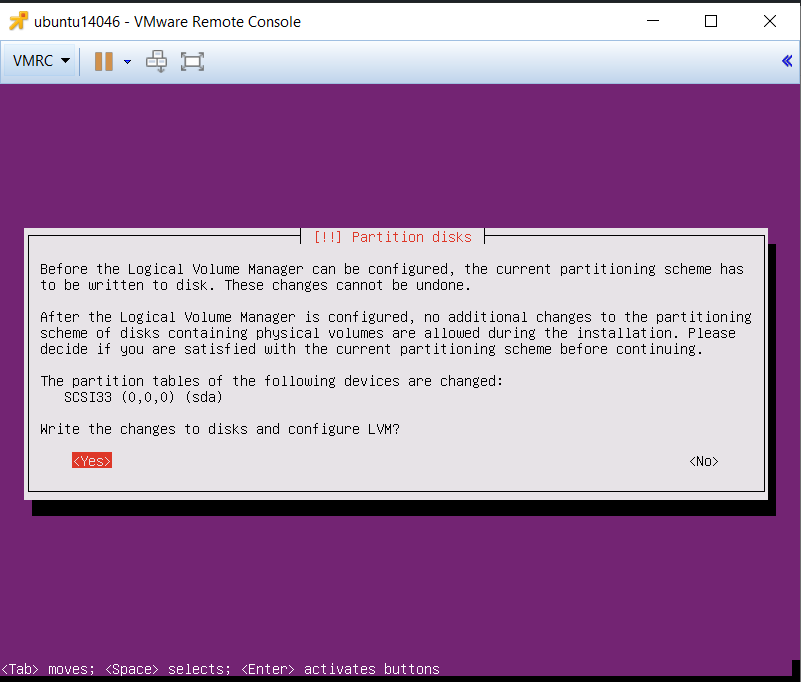
- Select “Yes” and press enter to write the changes to disk and configure LVM.
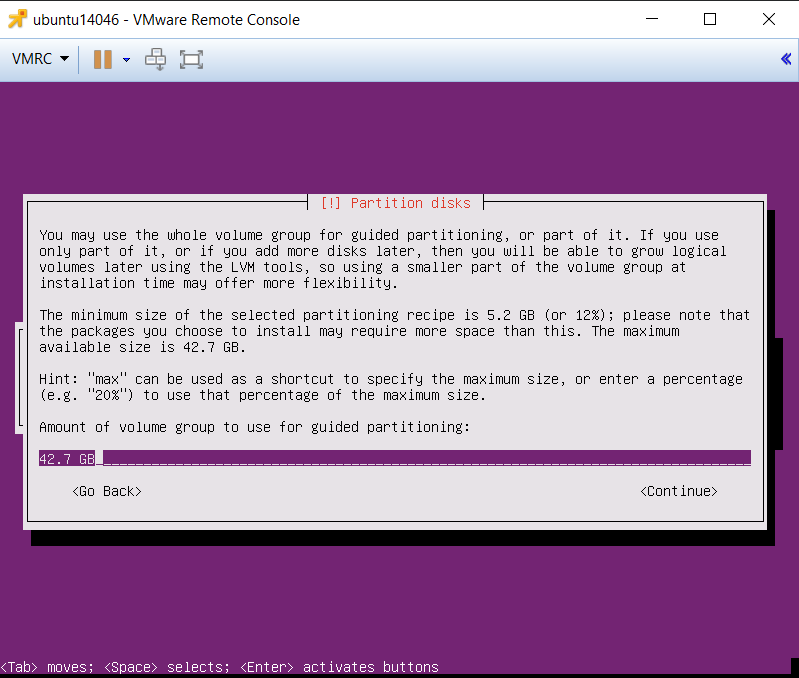
- Accept the default amount of the volume group that will be used for guided partitioning. This tells the installer to use the full disk and press Enter
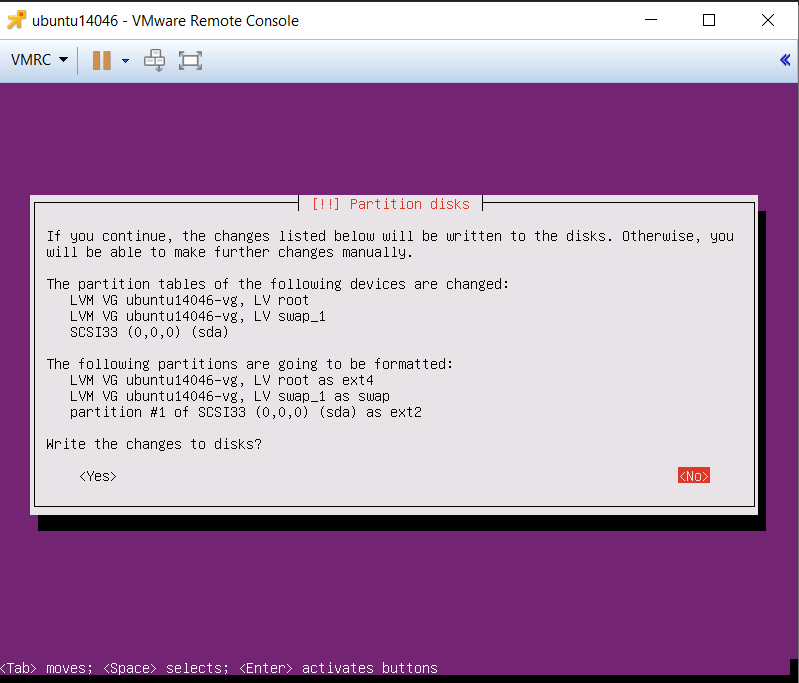
- Select Yes and press enter to write the changes to disk
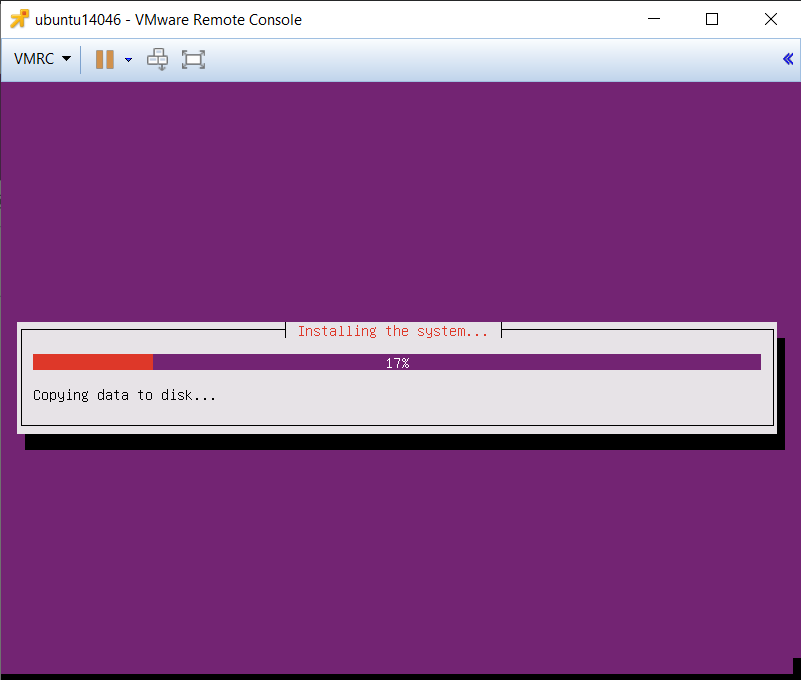
- It will proceed to install the system
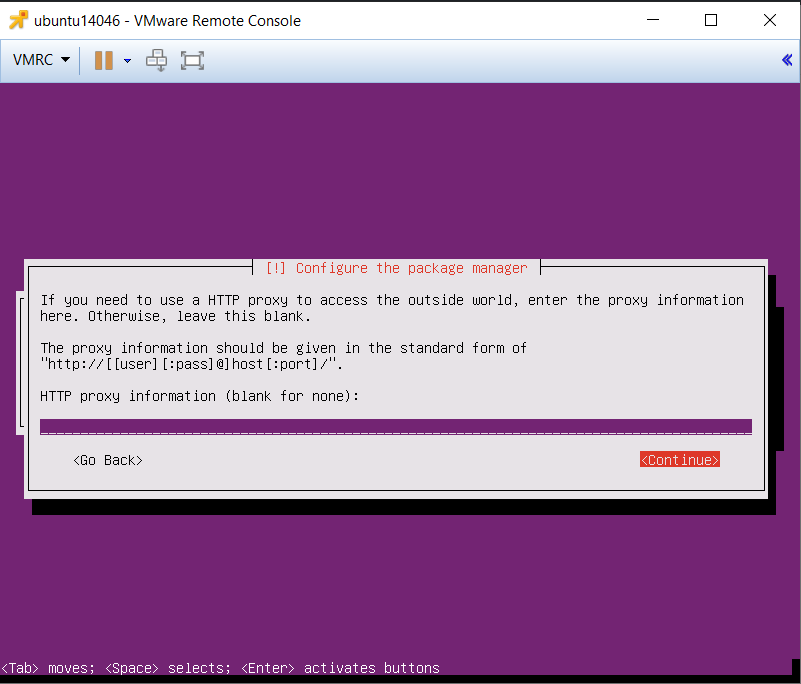
- The install will begin and at some point it will prompt you to enter your Internet proxy. I don’t use one, so I left it blank and pressed Enter
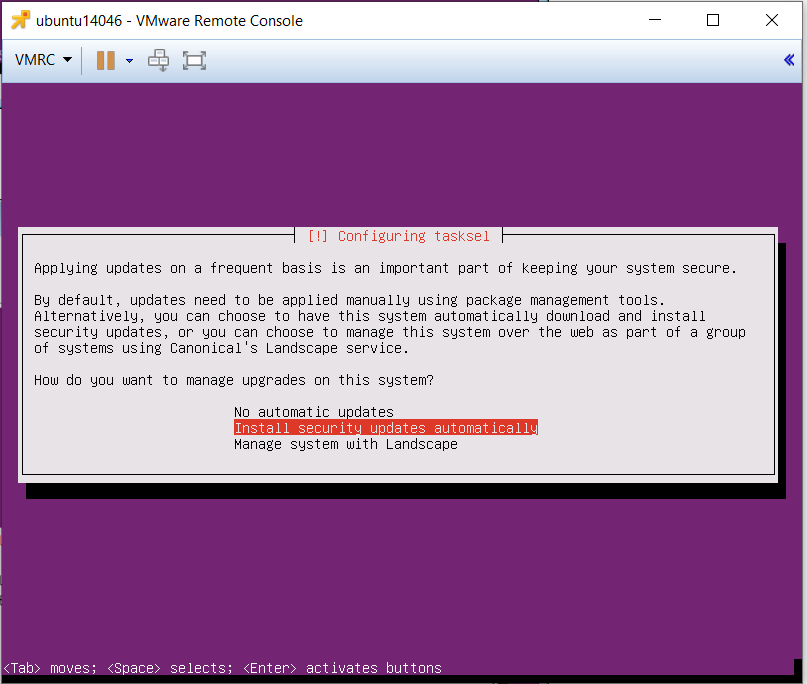
- A dialog will be presented asking you how you want to manage system upgrades. In this case I’ll manually apply updates, so I selected “No automatic updates” and pressed Enter
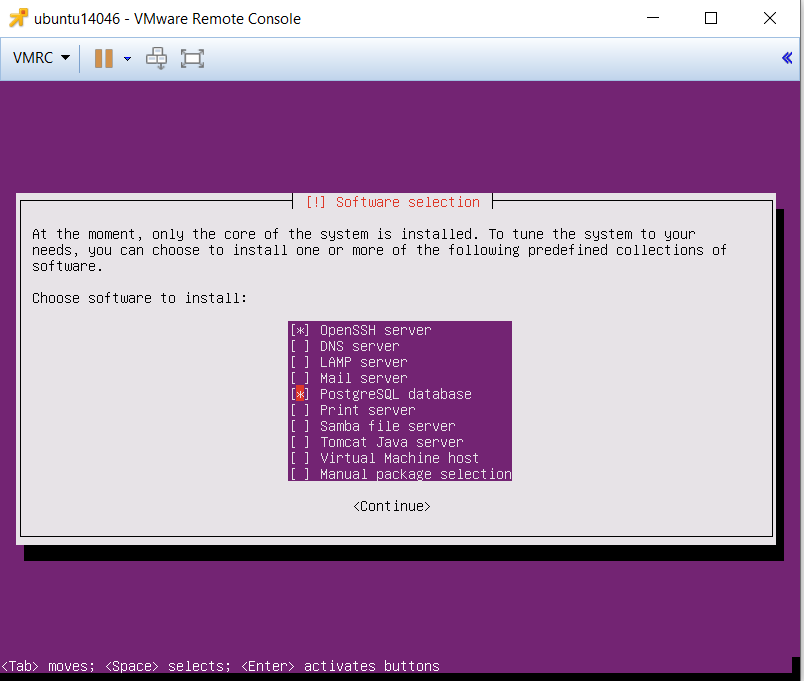
- On the Software selection I have just chosen OpenSSH and PostGres as I am installing a VMware UMDS server
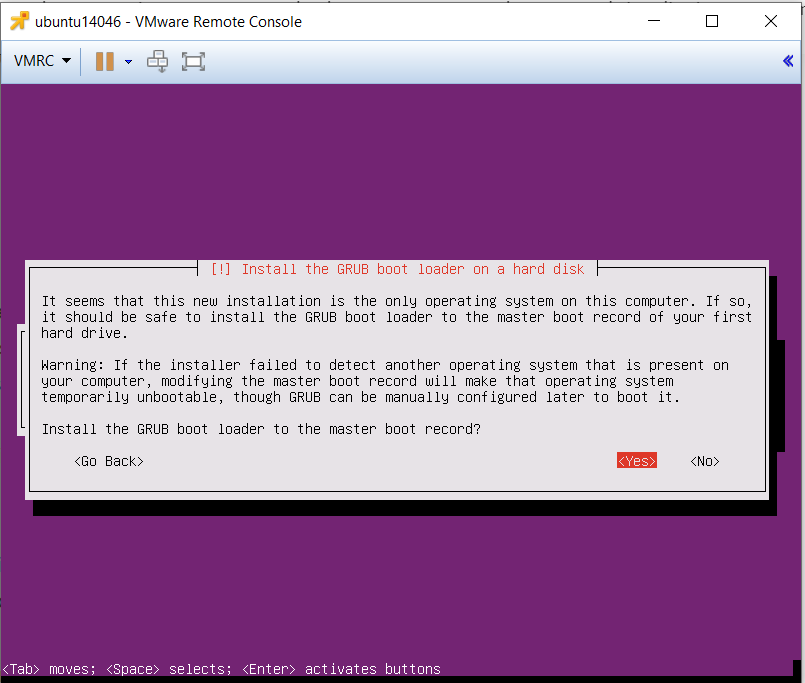
- I clicked Yes to the Grub boot loader message
- Finish the Installation
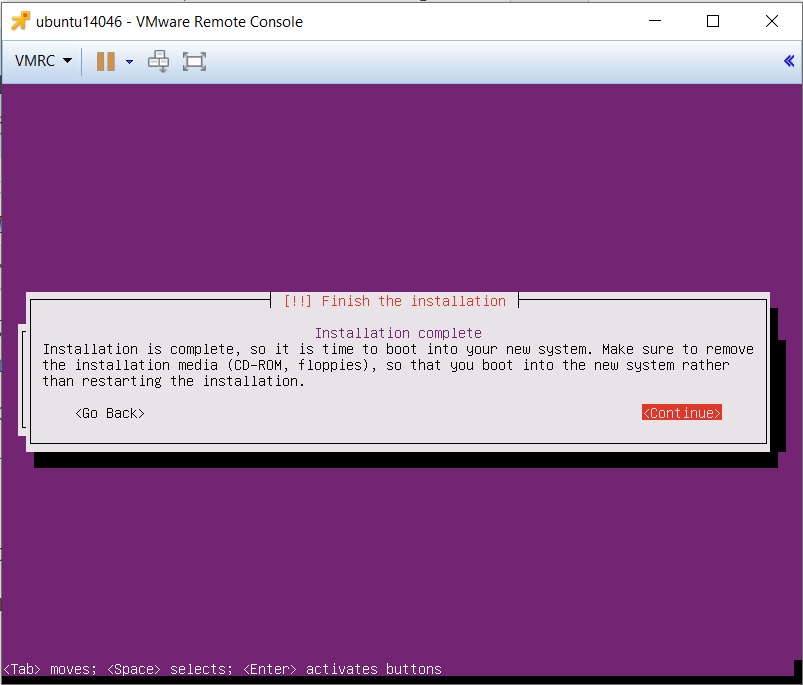
- You are now ready to use the Ubuntu VM
Update VMware Tools
VMware Tools is a group of utilities and drivers that enhance the performance of the virtual machine’s guest operating system when running on an ESXi host. The steps below walk you through installing VMware Tools on our Ubuntu Server 14.04.06 virtual machine using the command line. Note that whenever you update the Linux kernel you will have to reinstall VMware Tools.
- Launch a Web browser and login to the vSphere Web Client.
- From the vCenter Home page click on “VMs and Templates.”
- Right-click the VM and navigate to “All vCenter Actions” > “Guest OS” > “Install VMware Tools.”
- When prompted click “Mount” to mount the VMware Tools installation disk image on the virtual CD/DVD drive of the Ubuntu Server virtual machine.
- Right-click the VM again and select “Open Console.”
- Login with the credentials used during the server installation process

- Mount the VMware Tools CD image to /media/cdrom:
$ sudo mount /dev/cdrom /media/cdrom mount/dev/sr0 is write-protected, mounting read-only- Extract the VMware Tools installer archive file to /tmp
$ tar xzvf /media/cdrom/VMwareTools-*.tar.gz -C /tmp/- Install VMware Tools by running the command below. Note that the
-dswitch assumes that you want to accept the defaults. If you don’t use-dswitch you can opt to choose the default or a custom setting for each question. $ cd /tmp/vmware-tools-distrib/$ sudo ./vmware-install.pl -d ... The configuration of VMware Tools 9.4.5 build-1598834 for Linux for this running kernel completed successfully. ...

- Reboot the virtual machine after the installation completes:
$ sudo reboot
Preparing the VM for UMDS
The next step is to prepare the VM for UMDS and then install it.
The following pre-requisite components for Linux are required but read on..
- perl
- tar
- sed
- psmisc
- unixodbc
- postgresql
- postgresql-contrib
- odbc-postgresql
William Lam has a really great script that automates this: http://www.virtuallyghetto.com/2016/11/automating-the-installation-of-vum-update-manager-download-service-umds-for-linux-in-vsphere-6-5.html
When you install UMDS manually, you are prompted for several responses and the script currently just uses those defaults. If you wish to change them, you simply just need to edit the “answer” file that the script generates to provide to the UMDS installer itself.
Here is what the script is doing at a high level:
- Extract the UMDS installer into /tmp
- Install all OS package dependencies
- Create UMDS installer answer file /tmp/answer
- Create the /etc/odbc.ini and /etc/odbcinst.ini configuration file
- Updating pg_hba.conf to allow UMDS user to access the DB
- Start Postgres DB
- Create UMDSDB user and setting the assigned password
- Install UMDS
Procedure
- Upload both the UMDS install script (install_umds65.sh) as well as the UMDS install package found in the VCSA 6.5 ISO to an already deployed Ubuntu system
- The script needs to run as root and it requires the following 5 command-line options:
- UMDS package installer
- Name of the UMDS Database
- Name of the UMDS DSN Entry
- Username for running the UMDS service
- Password for the UMDS username
Running the script
I found I had to adjust the permissions on the script which I did via WinSCP first
sudo ./install_umds65.sh VMware-UMDS-6.7.0-14203538.tar.gz UMDSDB UMDS_DSN umdsuser VMware1!

It will start to install and this is what you will see
Extracting VMware-UMDS-6.7.0-14203538.tar.gz to /tmp …
vmware-umds-distrib/
vmware-umds-distrib/bin/
vmware-umds-distrib/bin/7z
vmware-umds-distrib/bin/vciInstallUtils
vmware-umds-distrib/bin/vmware-umds
vmware-umds-distrib/bin/downloadConfig.xml
vmware-umds-distrib/bin/vciInstallUtils_config.xml
vmware-umds-distrib/bin/unzip
vmware-umds-distrib/bin/zip
vmware-umds-distrib/bin/umds
vmware-umds-distrib/bin/vmware-updatemgr-wrapper
vmware-umds-distrib/bin/vmware-vciInstallUtils
vmware-umds-distrib/EULA
vmware-umds-distrib/share/
vmware-umds-distrib/share/VCI_proc_postgresql-100-110.sql
vmware-umds-distrib/share/VCI_proc_postgresql-110-120.sql
vmware-umds-distrib/share/VCI_data_postgresql-100-110.sql
vmware-umds-distrib/share/VCI_table_postgresql-110-120.sql
vmware-umds-distrib/share/VCI_base_postgresql.sql
vmware-umds-distrib/share/VCI_undo_postgresql.sql
vmware-umds-distrib/share/VCI_initialsetup_postgresql.sql
vmware-umds-distrib/share/VCI_table_postgresql-100-110.sql
vmware-umds-distrib/share/VCI_data_postgresql-110-120.sql
vmware-umds-distrib/share/VCI_proc_postgresql.sql
vmware-umds-distrib/lib/
vmware-umds-distrib/lib/libvim-types.so
vmware-umds-distrib/lib/libboost_program_options-gcc48-mt-1_61.so.1.61.0
vmware-umds-distrib/lib/libboost_serialization-gcc48-mt-1_61.so.1.61.0
vmware-umds-distrib/lib/libvci-types.so
vmware-umds-distrib/lib/libssl.so.1.0.2
vmware-umds-distrib/lib/libvmacore.so
vmware-umds-distrib/lib/libvci-registrar.so
vmware-umds-distrib/lib/libboost_thread-gcc48-mt-1_61.so.1.61.0
vmware-umds-distrib/lib/libvci-vcIntegrity.so
vmware-umds-distrib/lib/libufa-types.so
vmware-umds-distrib/lib/libssoclient.so
vmware-umds-distrib/lib/libvsanmgmt-types.so
vmware-umds-distrib/lib/liblog4cpp.so.4
vmware-umds-distrib/lib/libstdc++.so.6
vmware-umds-distrib/lib/libboost_filesystem-gcc48-mt-1_61.so.1.61.0
vmware-umds-distrib/lib/libcares.so.2
vmware-umds-distrib/lib/libodbc.so.2
vmware-umds-distrib/lib/libufa-common.so
vmware-umds-distrib/lib/libcurl.so.4
vmware-umds-distrib/lib/libvmomi.so
vmware-umds-distrib/lib/libexpat.so
vmware-umds-distrib/lib/libboost_system-gcc48-mt-1_61.so.1.61.0
vmware-umds-distrib/lib/libnfclib.so
vmware-umds-distrib/lib/libcrypto.so.1.0.2
vmware-umds-distrib/lib/libz.so.1
vmware-umds-distrib/vmware-install.pl
Installing UMDS package dependencies …
Hit http://security.ubuntu.com trusty-security InRelease
Ign http://gb.archive.ubuntu.com trusty InRelease
Hit http://gb.archive.ubuntu.com trusty-updates InRelease
Hit http://gb.archive.ubuntu.com trusty-backports InRelease
Hit http://gb.archive.ubuntu.com trusty Release.gpg
Hit http://gb.archive.ubuntu.com trusty Release
Hit http://security.ubuntu.com trusty-security/main Sources
Hit http://gb.archive.ubuntu.com trusty-updates/main Sources
Hit http://security.ubuntu.com trusty-security/restricted Sources
Hit http://gb.archive.ubuntu.com trusty-updates/restricted Sources
Hit http://security.ubuntu.com trusty-security/universe Sources
Hit http://gb.archive.ubuntu.com trusty-updates/universe Sources
Hit http://security.ubuntu.com trusty-security/multiverse Sources
Hit http://gb.archive.ubuntu.com trusty-updates/multiverse Sources
Hit http://security.ubuntu.com trusty-security/main amd64 Packages
Hit http://gb.archive.ubuntu.com trusty-updates/main amd64 Packages
Hit http://gb.archive.ubuntu.com trusty-updates/restricted amd64 Packages
Hit http://security.ubuntu.com trusty-security/restricted amd64 Packages
Hit http://security.ubuntu.com trusty-security/universe amd64 Packages
Hit http://gb.archive.ubuntu.com trusty-updates/universe amd64 Packages
Hit http://security.ubuntu.com trusty-security/multiverse amd64 Packages
Hit http://gb.archive.ubuntu.com trusty-updates/multiverse amd64 Packages
Hit http://security.ubuntu.com trusty-security/main i386 Packages
Hit http://gb.archive.ubuntu.com trusty-updates/main i386 Packages
Hit http://gb.archive.ubuntu.com trusty-updates/restricted i386 Packages
Hit http://security.ubuntu.com trusty-security/restricted i386 Packages
Hit http://gb.archive.ubuntu.com trusty-updates/universe i386 Packages
Hit http://security.ubuntu.com trusty-security/universe i386 Packages
Hit http://gb.archive.ubuntu.com trusty-updates/multiverse i386 Packages
Hit http://security.ubuntu.com trusty-security/multiverse i386 Packages
Hit http://gb.archive.ubuntu.com trusty-updates/main Translation-en
Hit http://security.ubuntu.com trusty-security/main Translation-en
Hit http://security.ubuntu.com trusty-security/multiverse Translation-en
Hit http://security.ubuntu.com trusty-security/restricted Translation-en
Hit http://security.ubuntu.com trusty-security/universe Translation-en
Hit http://gb.archive.ubuntu.com trusty-updates/multiverse Translation-en
Hit http://gb.archive.ubuntu.com trusty-updates/restricted Translation-en
Hit http://gb.archive.ubuntu.com trusty-updates/universe Translation-en
Hit http://gb.archive.ubuntu.com trusty-backports/main Sources
Hit http://gb.archive.ubuntu.com trusty-backports/restricted Sources
Hit http://gb.archive.ubuntu.com trusty-backports/universe Sources
Hit http://gb.archive.ubuntu.com trusty-backports/multiverse Sources
Hit http://gb.archive.ubuntu.com trusty-backports/main amd64 Packages
Hit http://gb.archive.ubuntu.com trusty-backports/restricted amd64 Packages
Hit http://gb.archive.ubuntu.com trusty-backports/universe amd64 Packages
Hit http://gb.archive.ubuntu.com trusty-backports/multiverse amd64 Packages
Hit http://gb.archive.ubuntu.com trusty-backports/main i386 Packages
Hit http://gb.archive.ubuntu.com trusty-backports/restricted i386 Packages
Hit http://gb.archive.ubuntu.com trusty-backports/universe i386 Packages
Hit http://gb.archive.ubuntu.com trusty-backports/multiverse i386 Packages
Hit http://gb.archive.ubuntu.com trusty-backports/main Translation-en
Hit http://gb.archive.ubuntu.com trusty-backports/multiverse Translation-en
Hit http://gb.archive.ubuntu.com trusty-backports/restricted Translation-en
Hit http://gb.archive.ubuntu.com trusty-backports/universe Translation-en
Hit http://gb.archive.ubuntu.com trusty/main Sources
Hit http://gb.archive.ubuntu.com trusty/restricted Sources
Hit http://gb.archive.ubuntu.com trusty/universe Sources
Hit http://gb.archive.ubuntu.com trusty/multiverse Sources
Hit http://gb.archive.ubuntu.com trusty/main amd64 Packages
Hit http://gb.archive.ubuntu.com trusty/restricted amd64 Packages
Hit http://gb.archive.ubuntu.com trusty/universe amd64 Packages
Hit http://gb.archive.ubuntu.com trusty/multiverse amd64 Packages
Hit http://gb.archive.ubuntu.com trusty/main i386 Packages
Hit http://gb.archive.ubuntu.com trusty/restricted i386 Packages
Hit http://gb.archive.ubuntu.com trusty/universe i386 Packages
Hit http://gb.archive.ubuntu.com trusty/multiverse i386 Packages
Hit http://gb.archive.ubuntu.com trusty/main Translation-en_GB
Hit http://gb.archive.ubuntu.com trusty/main Translation-en
Hit http://gb.archive.ubuntu.com trusty/multiverse Translation-en_GB
Hit http://gb.archive.ubuntu.com trusty/multiverse Translation-en
Hit http://gb.archive.ubuntu.com trusty/restricted Translation-en_GB
Hit http://gb.archive.ubuntu.com trusty/restricted Translation-en
Hit http://gb.archive.ubuntu.com trusty/universe Translation-en_GB
Hit http://gb.archive.ubuntu.com trusty/universe Translation-en
Reading package lists… Done
Reading package lists… Done
Building dependency tree
Reading state information… Done
psmisc is already the newest version.
sed is already the newest version.
perl is already the newest version.
postgresql is already the newest version.
postgresql-contrib is already the newest version.
tar is already the newest version.
vim is already the newest version.
The following extra packages will be installed:
libltdl7 libodbc1 odbcinst odbcinst1debian2
Suggested packages:
libmyodbc tdsodbc unixodbc-bin
The following NEW packages will be installed
libltdl7 libodbc1 odbc-postgresql odbcinst odbcinst1debian2 unixodbc
0 to upgrade, 6 to newly install, 0 to remove and 32 not to upgrade.
Need to get 791 kB of archives.
After this operation, 2,607 kB of additional disk space will be used.
Get:1 http://gb.archive.ubuntu.com/ubuntu/ trusty/main libltdl7 amd64 2.4.2-1.7ubuntu1 [35.0 kB]
Get:2 http://gb.archive.ubuntu.com/ubuntu/ trusty/main libodbc1 amd64 2.2.14p2-5ubuntu5 [175 kB]
Get:3 http://gb.archive.ubuntu.com/ubuntu/ trusty/main odbcinst amd64 2.2.14p2-5ubuntu5 [12.6 kB]
Get:4 http://gb.archive.ubuntu.com/ubuntu/ trusty/main odbcinst1debian2 amd64 2.2.14p2-5ubuntu5 [40.6 kB]
Get:5 http://gb.archive.ubuntu.com/ubuntu/ trusty/universe odbc-postgresql amd64 1:09.02.0100-2ubuntu1 [507 kB]
Get:6 http://gb.archive.ubuntu.com/ubuntu/ trusty/main unixodbc amd64 2.2.14p2-5ubuntu5 [19.8 kB]
Fetched 791 kB in 0s (3,669 kB/s)
Selecting previously unselected package libltdl7:amd64.
(Reading database … 61291 files and directories currently installed.)
Preparing to unpack …/libltdl7_2.4.2-1.7ubuntu1_amd64.deb …
Unpacking libltdl7:amd64 (2.4.2-1.7ubuntu1) …
Selecting previously unselected package libodbc1:amd64.
Preparing to unpack …/libodbc1_2.2.14p2-5ubuntu5_amd64.deb …
Unpacking libodbc1:amd64 (2.2.14p2-5ubuntu5) …
Selecting previously unselected package odbcinst.
Preparing to unpack …/odbcinst_2.2.14p2-5ubuntu5_amd64.deb …
Unpacking odbcinst (2.2.14p2-5ubuntu5) …
Selecting previously unselected package odbcinst1debian2:amd64.
Preparing to unpack …/odbcinst1debian2_2.2.14p2-5ubuntu5_amd64.deb …
Unpacking odbcinst1debian2:amd64 (2.2.14p2-5ubuntu5) …
Selecting previously unselected package odbc-postgresql:amd64.
Preparing to unpack …/odbc-postgresql_1%3a09.02.0100-2ubuntu1_amd64.deb …
Unpacking odbc-postgresql:amd64 (1:09.02.0100-2ubuntu1) …
Selecting previously unselected package unixodbc.
Preparing to unpack …/unixodbc_2.2.14p2-5ubuntu5_amd64.deb …
Unpacking unixodbc (2.2.14p2-5ubuntu5) …
Processing triggers for man-db (2.6.7.1-1ubuntu1) …
Setting up libltdl7:amd64 (2.4.2-1.7ubuntu1) …
Setting up libodbc1:amd64 (2.2.14p2-5ubuntu5) …
Setting up odbcinst (2.2.14p2-5ubuntu5) …
Setting up odbcinst1debian2:amd64 (2.2.14p2-5ubuntu5) …
Setting up odbc-postgresql:amd64 (1:09.02.0100-2ubuntu1) …
odbcinst: Driver installed. Usage count increased to 1.
Target directory is /etc
odbcinst: Driver installed. Usage count increased to 1.
Target directory is /etc
Setting up unixodbc (2.2.14p2-5ubuntu5) …
Processing triggers for libc-bin (2.19-0ubuntu6.14) …
Creating UMDS Installer answer file …
Creating /etc/odbc.ini …
Updating /etc/odbcinst.ini …
Updating pg_hba.conf …
Symlink /var/run/postgresql/.s.PGSQL.5432 /tmp/.s.PGSQL.5432 …
Starting Postgres …
- Starting PostgreSQL 9.3 database server [ OK ]
Sleeping for 60 seconds for Postgres DB to be ready …
Creating UMDS DB + User …
SELECT pg_catalog.set_config(‘search_path’, ”, false)
CREATE ROLE umdsuser NOSUPERUSER CREATEDB CREATEROLE INHERIT LOGIN;
ALTER ROLE
Install VUM UMDS …
Installing VMware Update Manager Download Service.
Logs would be store at /var/log/vmware/vmware-updatemgr/umds
Creating the log directory if required….
In which directory do you want to install Download service?
[/usr/local/vmware-umds]
The path “/usr/local/vmware-umds” does not exist currently. This program is
going to create it, including needed parent directories. Is this what you want?
Let us setup some things for you…
Do you need proxy to connect to internet? [no]
One more thing…we need a storage location to store patches. Make sure you
have enough space in that location
Where do you want download service to store patches
[/var/lib/vmware-umds]
The path “/var/lib/vmware-umds” does not exist currently. This program is going
to create it, including needed parent directories. Is this what you want?
The installation of VMware Update Manager Download Service 6.7.0 build-14203538
completed successfully. You can decide to remove this software from your system
at any time by invoking the following command:
“/usr/local/vmware-umds/vmware-uninstall-umds.pl”.
Enjoy,
–the VMware team
Post script install
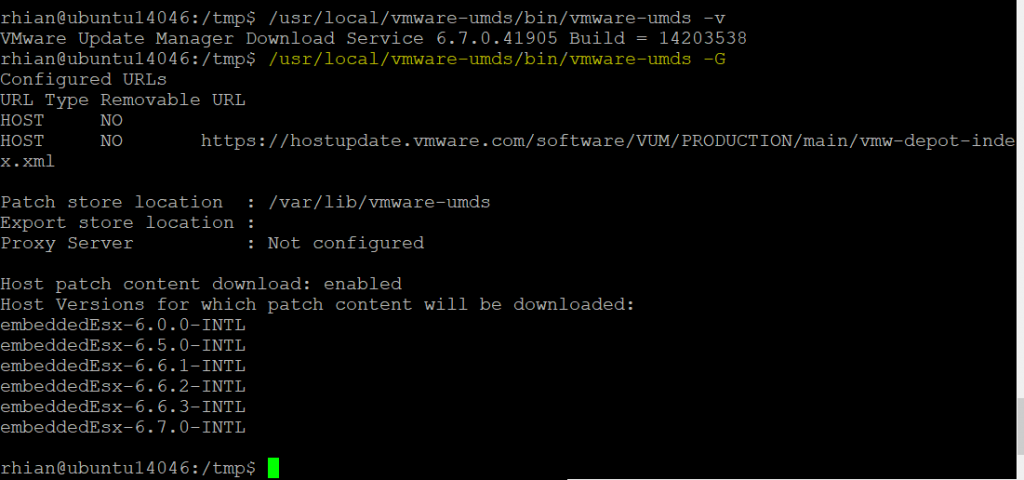
Once the UMDS installer script completes, you can verify by running the following two commands which provides you with the version of UMDS as well as the current configurations:
/usr/local/vmware-umds/bin/vmware-umds -v

/usr/local/vmware-umds/bin/vmware-umds -G
More setup Commands
Log in to the machine where UMDS is installed, and open a Command Prompt window.
The default location in 64-bit Linux is /usr/local/vmware-umds.
Enabling ESXi Updated and VA Updates
To set up a download of all ESXi host updates and all virtual appliance upgrades, run the following command:
vmware-umds -S –enable-host –enable-va

To set up a download of all ESXi host updates and disable the download of virtual appliance upgrades, run the following command:
vmware-umds -S –enable-host –disable-va
To set up a download of all virtual appliance upgrades and disable the download of host updates, run the following command:
vmware-umds -S –disable-host –enable-va
Changing the Patch Store folder
The default folder to which UMDS downloads patch binaries and patch metadata on a Linux machine is /var/lib/vmware-umds
vmware-umds -S –patch-store your_new_patchstore_folder
Adding a new URL
To add a new URL address for downloading patches and notifications for ESXi 5.5, ESXi 6.0, or ESXi 6.5 hosts, run the following command:
vmware-umds -S –add-url https://host_URL/index.xml –url-type HOST
And to remove a URL
vmware-umds.exe -S –remove-url https://URL_to_remove/index.xml
Download selected updates
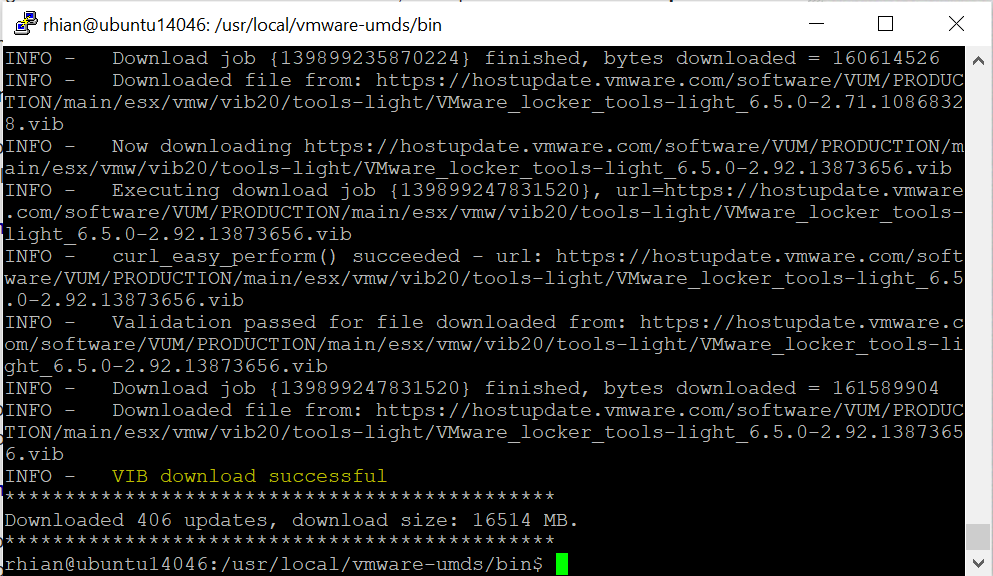
This command downloads all the upgrades, patches and notifications from the configured sources for the first time. Subsequently, it downloads all new patches and notifications released after the previous UMDS download.
vmware-umds -D
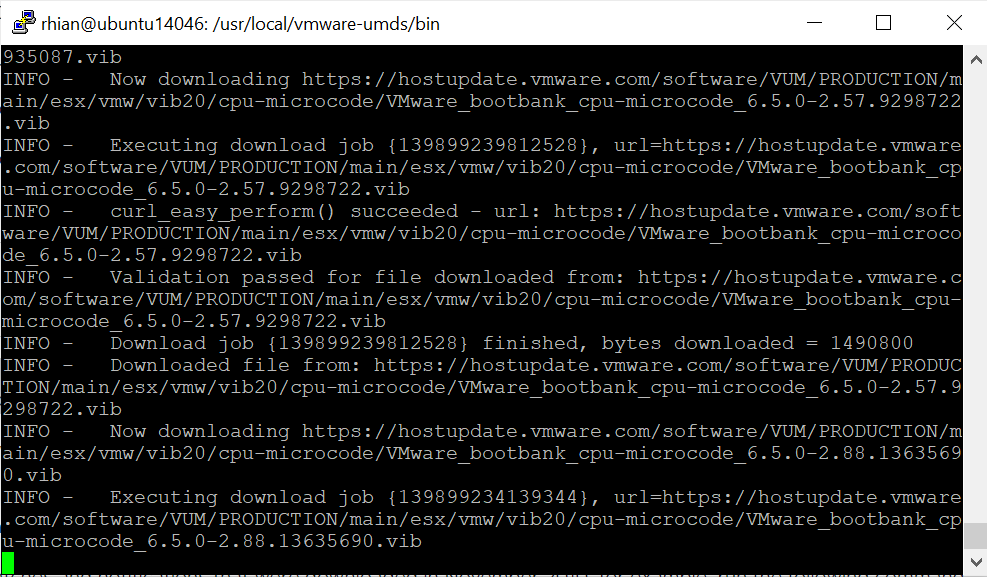
You should now see the below when it finishes
Making the Content available via a Web Server
You have now successfully installed UMDS. Once you have download all of your content, you will need to setup an HTTP server to make it available to VUM instance in the vCenter Server Appliance. You can configure any popular HTTP Server such as Nginx or Apache. For my lab, I used the tiny HTTP server that Python provides.
To make the content under /var/lib/vmware-umds available, just change into that directory and run the following command:
python -m SimpleHTTPServer

Then if you navigate to a browser and type and http://192.168.1.69:8000, you should see your files
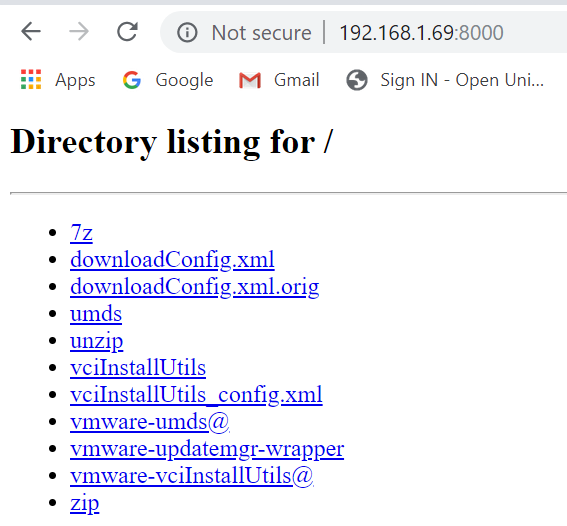
You can now add this URL into your vCenter Update Manager download settings
Thanks
Thanks to William Lam who’s blog I followed to set this up.