Archive for Command Line

Force Windows Recycle Bins to Empty for Every User on a System

11971239281768335436docRUBBISH

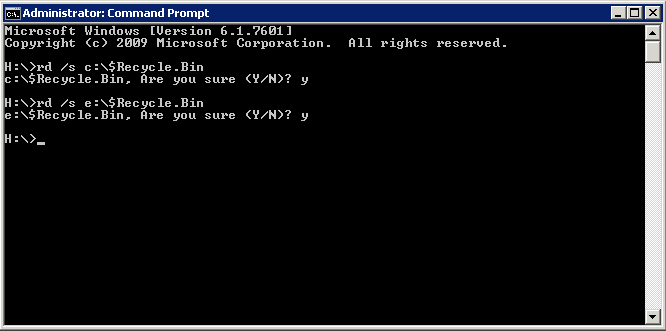
If you have multiple user accounts logging into a Windows computer or server and are running low on space, you can easily empty the recycling bin for all users with a single command line, assuming your user account has administrator privileges.

The Command for Windows 7 and Server 2008

rd /s (Drive):\$Recycle.Bin

cmd

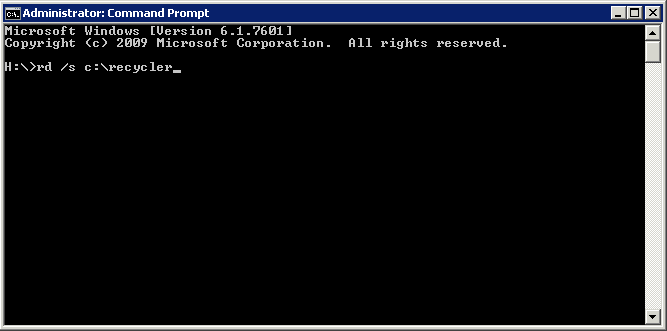
The Command for XP, Vista and 2003

rd /s (Drive):\Recycler

cmd2

Change the Recycle Bin settings

You can change the settings of the Recycle Bin to suit the way you work. For example, if you rarely empty the Recycle Bin because you want to avoid discarding files you might someday want to recover, you can increase the maximum storage size of the Recycle Bin. You can also turn off the delete confirmation dialog box that appears every time you send files to the Recycle Bin, or even choose not to move files to the Recycle Bin and instead immediately remove them from your computer when you delete them.

  1. On the desktop, right-click Recycle Bin, and then click Properties.
  2. Click the General tab, and then do any of the following:
  • To set the maximum storage size of the Recycle Bin, enter a number in the Maximum size box, which sets the Recycle Bin’s maximum size (measured in megabytes) for the selected Recycle Bin under Recycle Bin Location.
  • To turn off the delete confirmation dialog box, clear the Display delete confirmation dialog check box.
  • To immediately remove files from your computer when you delete them, click Do not move files to the Recycle Bin. If you do this, your files will always be permanently removed when deleted.

Microsoft Windows Powershell

What is PowerShell?

Windows PowerShell is Microsoft’s task automation framework, consisting of a command-line shell and associated scripting language built on top of .NET Framework. PowerShell provides full access to COM and WMI, enabling administrators to perform administrative tasks on both local and remote Windows systems.

In PowerShell, administrative tasks are generally performed by cmdlets (pronounced command-lets), specialized .NET classes implementing a particular operation. Sets of cmdlets may be combined together in scripts, executables (which are standalone applications), or by instantiating regular .NET classes (or WMI/COM Objects) These work by accessing data in different data stores, like the filesystem or registry, which are made available to the PowerShell runtime via Windows PowerShell providers.

Windows PowerShell also provides a hosting API with which the Windows PowerShell runtime can be embedded inside other applications. These applications can then use Windows PowerShell functionality to implement certain operations, including those exposed via the graphical interface. This capability has been used by Microsoft Exchange Server 2007  to expose its management functionality as PowerShell cmdlets and providers and implement the graphical management tools as PowerShell hosts which invoke the necessary cmdlets. Other Microsoft applications including Microsoft SQL Server 2008 also expose their management interface via PowerShell cmdlets. With PowerShell, graphical interface-based management applications on Windows are layered on top of Windows PowerShell. A PowerShell scripting interface for Windows products is mandated by the Common Engineering Criteria.

Windows PowerShell includes its own extensive, console-based help, similar to man pages in Unix shells, via the Get-Help cmdlet.

Microsoft Page for PowerShell

http://technet.microsoft.com/en-us/library/bb978526.aspx

5 Introductory Videos

http://technet.microsoft.com/en-us/scriptcenter/dd742419.aspx

Hey Scripting Guy WebPage

http://blogs.technet.com/b/heyscriptingguy/

Technet Virtual Lab – PowerShell

https://msevents.microsoft.com/CUI/EventDetail.aspx?culture=en-US&EventId=1032314395

Script Resources for IT Professionals

http://gallery.technet.microsoft.com/scriptcenter

How To Change Virtual Machine Network Adapter Type Using vSphere PowerCLI

The Task

You want to upgrade your VM NIC from E1000 or VMXNET to VMXNET3. There is a manual way to do this but it is quicker in Powershell

Instructions

  • Power off the VM
  • Log into Powershell – Connect-VIServer – Enter credentials if required
  • Run the following command
  • get-vm vmname | get-networkadapter | set-networkadapter -type “vmxnet3”

  • If you have more than one adapter, it will ask you about all of them. Select Y or N as required
  • Check in the VM Settings that the NIC Type has changed to VMXNET3

  • Power on VM
  • The IP Address settings that were originally set should still be there

The Manual Way (Slower)

  • Power down machine
  • Right click on machine and remove from inventory
  • Go to machine VMX file in the datastore and upload to desktop
  • Edit the vm.vmx file to ethernet0.virtualDev = “vmxnet3”
  • Rename the original vm.vmx file in the datastore to vm.vmx.bak
  • Upload the edited vm.vmx file to the datastore
  • Right click and add vm.vmx file to inventory
  • Power on machine
  • Check IP Address

Qs and As

[Q]
I have run this command while the test vm is powered off and then powered up again and the NIC has changed in the VM settings and within the Wndows 2008 R2 VM however it does not retain the IP Address. Is this standard behaviour or do we need to re-enter the IP Address?

[A]
Yes this is standard behaviour as once the NIC has been changed it is seen as a new device so a new IP will need to be assigned.

[Q]
Can this Powershell command be run while the VM is running and if so will we get the same thing where it will change the NIC type fine but not retain the IP Address?

[A]
No the command will not work while the VM is running. You can “add” a new adapter while the VM is running but to change the adapter type from E1000 to VMXNET3 the VM need to be powered off

Find memory/CPU reservation on all VMs

Find memory/CPU reservation on all VMs

To retrieve the settings for reservation of both memory and CPU run the following PS scripts

## retrieve the values for MemReservationMB for the given VMs
Get-Cluster “myCluster” | Get-VM | Get-VMResourceConfiguration | select VM,MemReservationMB

## retrieve the values for CPUReservationMhz for the given VMs
Get-Cluster “myCluster” | Get-VM | Get-VMResourceConfiguration | select VM,CPUReservationMhz

If you want to go through a set all VM memory/CPU reservations to “0” run the following

## set the MemReservationMB to 0 for given VMs
Get-Cluster “myCluster” | Get-VM | Get-VMResourceConfiguration | Set-VMResourceConfiguration -MemReservationMB 0 -Confirm:$false

## set the CPUReservationMhz to 0 for given VMs
Get-Cluster “myCluster” | Get-VM | Get-VMResourceConfiguration | Set-VMResourceConfiguration -CPUReservationMhz 0 -Confirm:$false

PowerCLI Poster 4.0 and 5.0

Poster of PowerCLI commands for VMware 4.0 +

http://communities.vmware.com/servlet/JiveServlet/download/1597600-42488/PowerCLI-Poster-4.1.pdf;jsessionid=2765C5954C484E4EA249B1702441E330

Poster of PowerCLI commands for VMware 5.0

http://communities.vmware.com/servlet/JiveServlet/download/1821950-70918/VMware%20Management%20with%20PowerCLI%205.0.pdf

The new poster adds to the original vSphere PowerCLI core cmdlets and allow you to quickly reference cmdlets from the following :

  • vSphere
  • Image Builder
  • Auto Deploy
  • Update Manager
  • Licensing
  • View
  • vCloud

Robocopy

robocopy

Robocopy

Robocopy, or “Robust File Copy”, is a command-line directory replication command. It has been available as part of the Windows Resource Kit starting with Windows NT 4.0, and was introduced as a standard feature of Windows Vista, Windows 7 and Windows Server 2008. The command is robocopy.

Capabilities

Robocopy is notable for capabilities above and beyond the built-in Windows copy and xcopy commands, including the following:

  • Ability to tolerate network interruptions and resume copying. (incomplete files are marked with a date stamp of 1980-01-01 and contain a recovery record so Robocopy knows where to continue from)
  • Ability to skip Junction Points which can cause to fail copying in an infinite loop (/XJ)
  • Ability to copy file data and attributes correctly, and to preserve original timestamps, as well as NTFS ACLs, owner information, and audit information using command line switches. /COPYALL or /COPY. Copying folder timestamps is also possible in later versions – /DCOPY:T
  • Ability to assert the Windows NT “backup right”  /B so an administrator may copy an entire directory, including files denied readability to the administrator.
  • Persistence by default, with a programmable number of automatic retries if a file cannot be opened.
  • A “mirror” mode, which keeps trees in sync by optionally deleting files out of the destination that are no longer present in the source.
  • Ability to skip files that already appear in the destination folder with identical size and timestamp.
  • A continuously-updated command-line progress indicator.
  • Ability to copy file and folder names exceeding 256 characters — up to a theoretical limit of 32,000 characters — without errors.
  • Multi-threaded copying. (Windows 7 only)
  • Return code on program termination for batch file usage.

Example Process

  • Decide what is your source folder
  • Decide which is your destination folder
  • The Syntax is then as follows

ROBOCOPY Source_folder Destination_folder [files_to_copy] [options]

Robocopy

Robocopy Source Options

  • /S : Copy Subfolders
  • /E : Copy Subfolders, including Empty Subfolders
  • /COPY:copyflag[s] : What to COPY (default is /COPY:DAT) (copyflags : D=Data, A=Attributes, T=Timestamps S=Security=NTFS ACLs, O=Owner info, U=aUditing info)
  • /SEC : Copy files with Security (equivalent to /COPY:DATS)
  • /DCOPY:T : Copy Directory Timestamps. ##
  • /COPYALL : Copy ALL file info (equivalent to /COPY:DATSOU)
  • /NOCOPY : Copy NO file info (useful with /PURGE)
  • /A : Copy only files with the Archive attribute set
  • /M : like /A, but remove Archive attribute from source files
  • /LEV:n : Only copy the top n LEVels of the source tree
  • /MAXAGE:n : MAXimum file AGE – exclude files older than n days/date
  • /MINAGE:n : MINimum file AGE – exclude files newer than n days/date. (If n < 1900 then n = no of days, else n = YYYYMMDD date)
  • /FFT : Assume FAT File Times (2-second date/time granularity)
  • /256 : Turn off very long path (> 256 characters) support

Copy Options

  • /L : List only – don’t copy, timestamp or delete any files
  • /MOV : MOVe files (delete from source after copying)
  • /MOVE : Move files and dirs (delete from source after copying)
  • /Z : Copy files in restartable mode (survive network glitch)
  • /B : Copy files in Backup mode
  • /ZB : Use restartable mode; if access denied use Backup mode
  • /IPG:n : Inter-Packet Gap (ms), to free bandwidth on slow lines
  • /R:n : Number of Retries on failed copies – default is 1 million
  • /W:n : Wait time between retries – default is 30 seconds
  • /REG : Save /R:n and /W:n in the Registry as default settings
  • /TBD : Wait for sharenames To Be Defined (retry error 67)

Destination options

  • /A+:[RASHCNET] : Set file Attribute(s) on destination files + add
  • /A-:[RASHCNET] : UnSet file Attribute(s) on destination files – remove
  • /FAT : Create destination files using 8.3 FAT file names only
  • /CREATE : CREATE directory tree structure + zero-length files only
  • /DST : Compensate for one-hour DST time differences ##
  • /PURGE : Delete dest files/folders that no longer exist in source
  • /MIR : MIRror a directory tree – equivalent to /PURGE plus all subfolders (/E)

Logging options

  • /L : List only – don’t copy, timestamp or delete any files
  • /NP : No Progress – don’t display % copied
  • /LOG:file : Output status to LOG file (overwrite existing log)
  • /UNILOG:file : Output status to Unicode Log file (overwrite) ##
  • /LOG+:file : Output status to LOG file (append to existing log)
  • /UNILOG+:file : Output status to Unicode Log file (append) ##
  • /TS : Include Source file Time Stamps in the output
  • /FP : Include Full Pathname of files in the output
  • /NS : No Size – don’t log file sizes
  • /NC : No Class – don’t log file classes
  • /NFL : No File List – don’t log file names
  • /NDL : No Directory List – don’t log directory names
  • /TEE : Output to console window, as well as the log file
  • /NJH : No Job Header
  • /NJS : No Job Summary

Repeated Copy Options

/MON:n : MONitor source; run again when more than n changes seen
/MOT:m : MOnitor source; run again in m minutes Time, if changed
/RH:hhmm-hhmm : Run Hours – times when new copies may be started.
/PF : Check run hours on a Per File (not per pass) basis.

Job Options

/JOB:jobname : Take parameters from the named JOB file
/SAVE:jobname : SAVE parameters to the named job file
/QUIT : QUIT after processing command line (to view parameters)
/NOSD : NO Source Directory is specified
/NODD : NO Destination Directory is specified
/IF : Include the following Files

GUI Version (Freeware)

http://tribblesoft.com/easyrobocopy.aspx

VMware vCLI for vSphere 5

VMware vCLI Instructions

The vSphere Command-Line Interface (vSphere CLI) command set allows you to run common system administration commands against ESX/ESXi systems from any machine with network access to those systems. You can also run most vSphere CLI commands against a vCenter Server system and target any ESX/ESXi system that vCenter Server system manages. vSphere CLI includes the ESXCLI command set, vicfg- commands, and some other commands.

  • Download and Install vCLI
  • http://www.vmware.com/support/developer/vcli/
  • Right click on the vCLI icon and select Run as Administrator
  • Navigate to c:\Program Files (x86)\VMware\VMware vSphere CLI\bin
  • You will see the below vCLI commands (Note the .pl extension on the end)

vcli2

  • An example of running a command would be as per below with vifs.pl
  • Type vifs.pl –help to see the associated switches for this command

vifs

  • Try typing vifs.pl –server esxihostserver –listdc

vifs3

  • Another example of this command as per below screenprints shows how you can create a folder on a Datstore
  • vifs.pl –server esxiserver –mkdir “[Datastore] test”

vifs4

Documentation

vSphere Command-Line Interface Documentation

Getting Started with vSphere Command-Line Interfaces

vSphere Command‐Line Interface Concepts and Examples

vSphere Command‐Line Interface Reference

YouTube Video

You Tube Video

Running Commands on Windows.

In order to stop having to put in credentials everytime you run a command you can can the following

save_session.pl –server esxiserver01 –username usera –password passswordxyz –savesessionfile c:\temp\vclisessionfile

The next time you run a command you can type the following

esxcli –server MyESXiHost –sessionfile c:\temp\vclisessionfile storage core filesystem list

vCLI Poster

http://blogs.vmware.com/tp/files/vmware-management-with-vcli-5.0.pdf

Whats the diffference between VMware vCLI and VMware PowerCLI

To automate the management of an ESXi deployment, VMware has created easy-to-use scripting tools for managing day-to-day operations. You can write scripts with the same functionality as the vSphere client to automate manual tasks , allowing you to manage small- to large-scale environments efficiently. These tools work well with both ESXi and ESX hosts, allowing you to easily administer mixed environments.

Both PowerCLI and vCLI are built on the same interface as the vSphere Client. They can be pointed directly at an ESXi host or they can be pointed at vCenter. When pointed at a host, they can execute commands directly on an ESXi host, similar to how a command in the Console OS of ESX operates on only that host. Local authentication is required in this case. Alternatively, when communicating through vCenter, the vCLI and PowerCLI commands benefit from the same authentication (e.g. Active Directory), roles and privileges, and event logging as vSphere Client interactions. This provides for a much more secure and audit-able management framework

VMware vSphere™ PowerCLI

VMware vSphere PowerCLI is a powerful command line tool for automating all aspects of vSphere management, including host, network, storage, VM, guest OS and more. PowerCLI is distributed as a Windows PowerShell snapin, and includes more than 150 PowerShell cmdlets, along with documentation and samples. PowerCLI seamlessly blends the vSphere platform with Windows and .NET, which means you can use PowerCLI by itself or within many different 3rd-party tools

VMware vSphere™ Command Line Interface (vCLI)

VMware vSphere™ Command Line Interface (vCLI) is a set of command-line utilities that help you provision, configure and maintain your ESX and ESXi hosts. The vCLI command set allows you to run common system administration commands against VMware ESXi systems from any machine with network access to those systems. You can run most vCLI commands against a vCenter Server system and target any ESXi system that the vCenter Server system manages. There are commands that can completely automate the initial configuration of an ESXi host and others that provide troubleshooting and diagnostic capabilities. VMware provides vCLI packages for installation on both Windows and Linux systems

VMware vSphere™ Management Assistant (vMA)

The VMware vSphere™ Management Assistant (vMA) is a virtual appliance that brings together all the tools you need to manage vSphere. vMA packages the vSphere Command Line Interface, the vSphere SDK for Perl, as well as logging and authentication modules into one convenient bundle. vMA can also host 3rd-party agents for added management power.