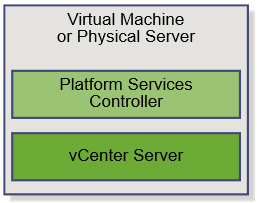
vSphere 6 Platform Services Controller Multimode setup
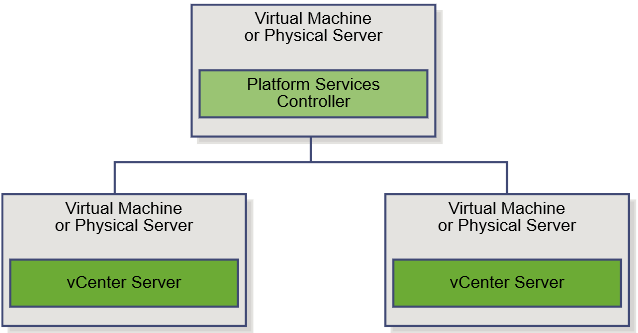
So this is a job I had to do recently which involves quite a few stages but on the whole works very nicely. So I decided to replicate it in my lab using the below 4 servers to show how we can upgrade and migrate from an embedded situation to an external PSC situation. This initial setup has 2 x 5.1 separate vCenter Servers with embedded SSO which will end up being 2 separate 6.0.2 vCenter servers pointing to their own Window 2012 PSCs which will be in Multisite mode.
- 1 x Windows 2012 server with vCenter 5.1 with embedded SSO
- 1 x Windows 2012 server with vCenter 5.1 with embedded SSO
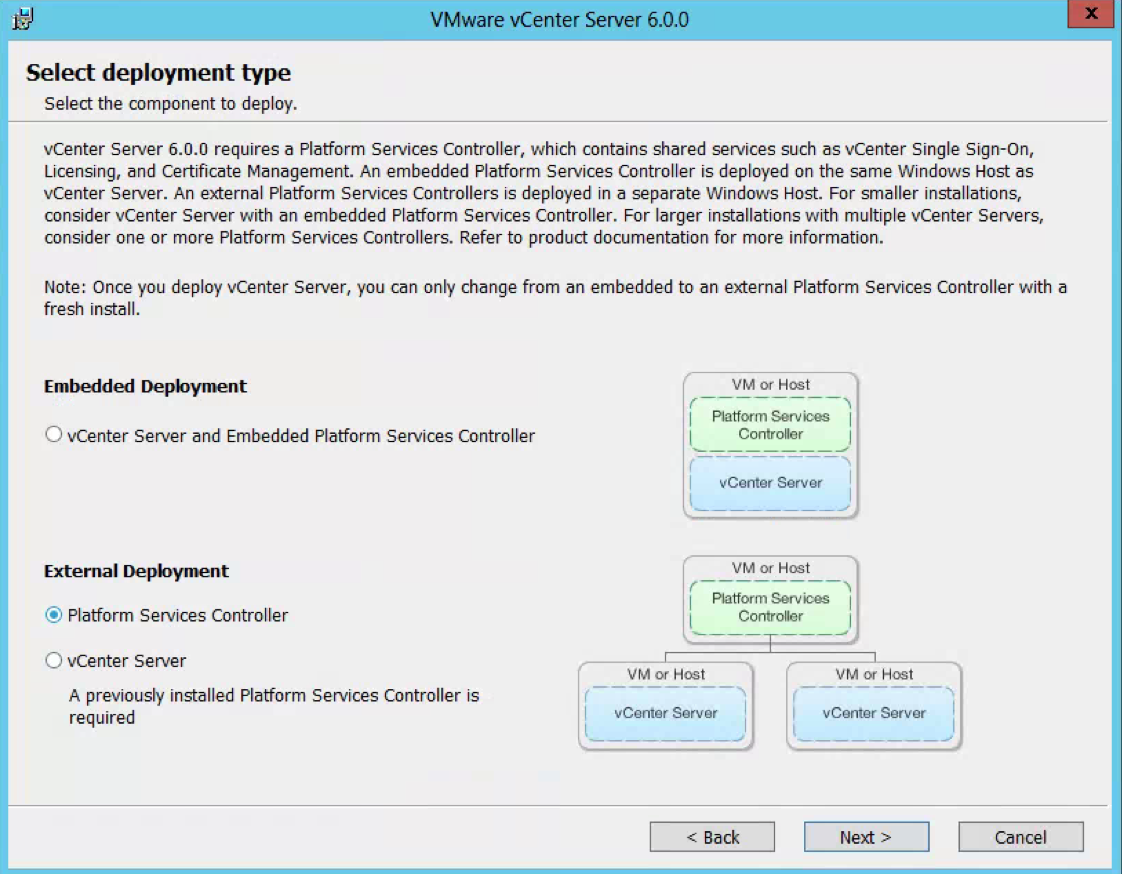
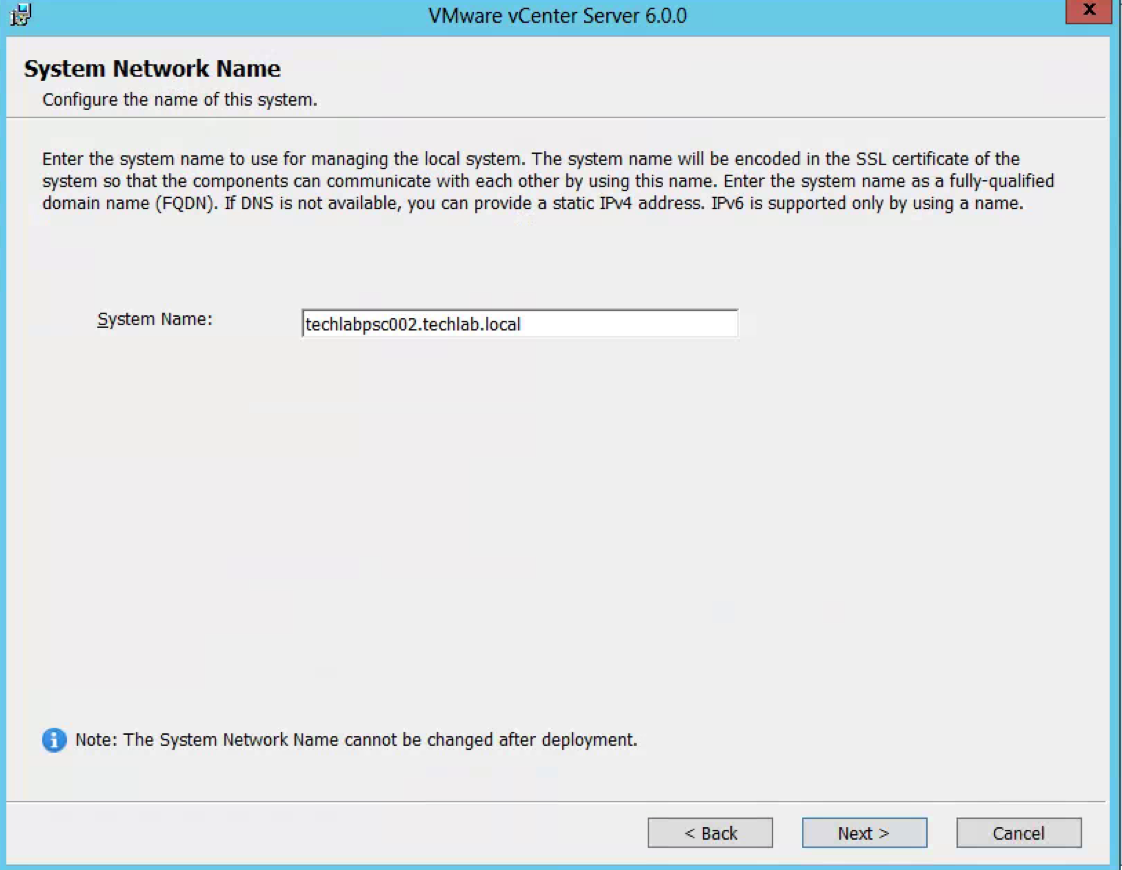
- 1 x Windows 2012 PSC 5.5 U3(New build) (Note we cannot build a v6 PSC at this point due to staged upgrade considerations) (This will be setup as the first PSC)
- 1 x Windows 2012 PSC 5.5 U3 (New build) (Note we cannot build a v6 PSC at this point due to staged upgrade considerations) (This will be set up as the 2nd PSC in a multi-site configuration.
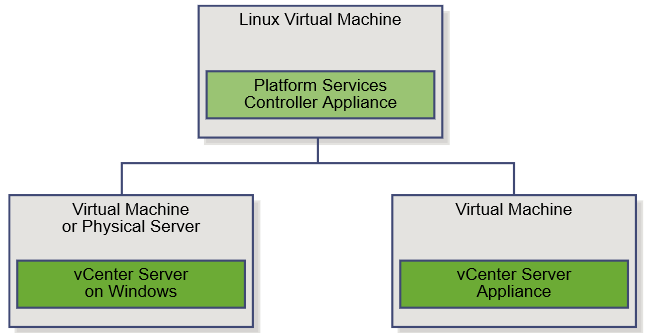
PSC Information
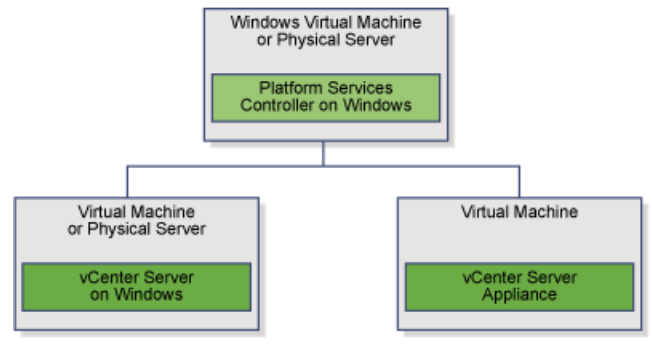
The Platform Services Controller is available on both the Windows vCenter Server ISO or within the vCenter Server Appliance (VCSA) ISO. We will be using the Windows vCenter Server ISO.
Components that are installed with PSC 6.0 include:
- VMware Appliance Management Service (only in Appliance-based PSC)
- VMware License Service
- VMware Component Manager
- VMware Identity Management Service
- VMware HTTP Reverse Proxy
- VMware Service Control Agent
- VMware Security Token Service
- VMware Common Logging Service
- VMware Syslog Health Service
- VMware Authentication Framework
- VMware Certificate Service
- VMware Directory Service
PSC 6.0 is supported with:
- VMware vCenter Server
- VMware vCenter Inventory Services
- VMware vSphere Web Client
- VMware Log Browser
- VMware NSX for vSphere
- VMware Site Recovery Manager
- VMware vCloud Air
- VMware vCloud Director
- VMware vRealize Automation Center
- VMware vRealize Orchestrator
- VMware vSphere Data Protection
- VMware vShield Manager
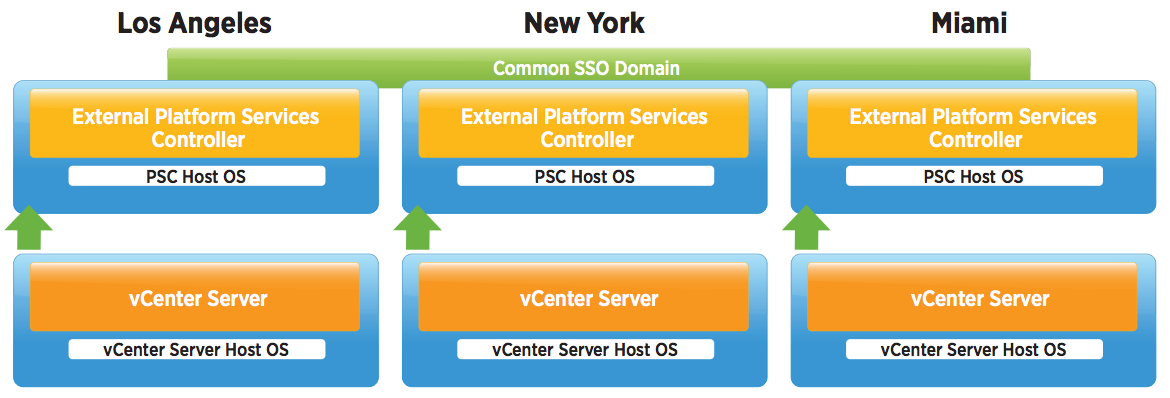
What does Multi-site PSCs give us?
- Customers are able to seamlessly move the vCenter Servers between PSCs when necessary
- This topology allows for Enhanced Linked Mode (ELM) which is facilitated by the PSC. Starting with vSphere 6.0, the implementation of Linked Mode has changed. You no longer need to join vCenter Server instances to Linked Mode groups. You can access the replication functionality provided by Linked Mode in vSphere 6 by registering multiple vCenter Server instances to the same Platform Services Controller or joining Platform Services Controller instances in the same vCenter Single Sign-On domain
- Enhanced Linked Mode provides for a single point of management for all vCenter Servers in the same vSphere domain
- In vSphere 6 the Windows-based and Virtual Appliance-based vCenter Servers have the same operational maximums and can belong to the same linked mode configuration
- The configuration replicates all license, global permissions, tags and roles across all sites
- While it is possible to deploy PSCs over a WAN, the replication between PSCs is very latency sensitive. It is recommended that the latency between PSCs, as with any replicating directory service, to be as low as possible. Additionally, now that Enhanced Linked Mode (ELM) and all features that utilize ELM are facilitated via the PSC, for the best user experience within a vSphere environment, low latency is highly recommended
- Regarding an environment in which multiple PSCs are in the same vSphere Domain and Enhanced Link Mode is being used, if a PSC in which a vCenter Server is connected to fails, access to this vCenter Server through a different vCenter Server’s vSphere Web Client is not possible. This is due to a user’s SAML token from the vSphere Web Client being unable to be passed to the failed PSC, thus to vCenter Server. Unless the PSC is brought back online or vCenter Server is repointed to a different PSC in the same domain, users cannot access it.
Considerations
- It is not supported to re-register vCenter Server 5.1 to a PSC 6.0. you need to repoint vCenter 5.1 to a 5.5U3 SSO server first
- You cannot re-register vCenter Server 6.0 to a PSC 6.0 that does not reside in the existing SSO Domain.
- You cannot install SSO 5.5 and join a PSC 6.0 (and vice versa)
High Level Overview
- Install new Windows Server 2012 R2 SSO 5.5 Server – version 5.5 U3 in the vSphere domain vSphere.local and site configuration Default-First-Site or whatever you want to call your first site for example
- Install new Windows Server 2012 R2 SSO 5.5 Server – version 5.5 U3 in the same vSphere domain vSphere.local and multisite configuration Default-Second-Site or whatever you want to call your first site for example
- Register/Repoint the first 5.1 embedded SSO vCenter to external 5.5 U3 SSO/PSC
- Register/Repoint the second 5.1 embedded SSO vCenter to external 5.5 U3 SSO/PSC
- Uninstall 5.1 Single Sign-On from the two 5.1 vCenters. It is important to do this as the underlying SSO schema changed significantly between major versions
- Upgrade first external SSO 5.5 to PSC 6.0 U2
- Upgrade second external SSO 5.5 to PSC 6.0 U2
- Upgrade vCenters to 6.0.2
- Upgrade Update Manager and vSphere Client
- Check Multisite is working using vcdrepadmin tool in command prompt
- Upgrade hosts and VMs
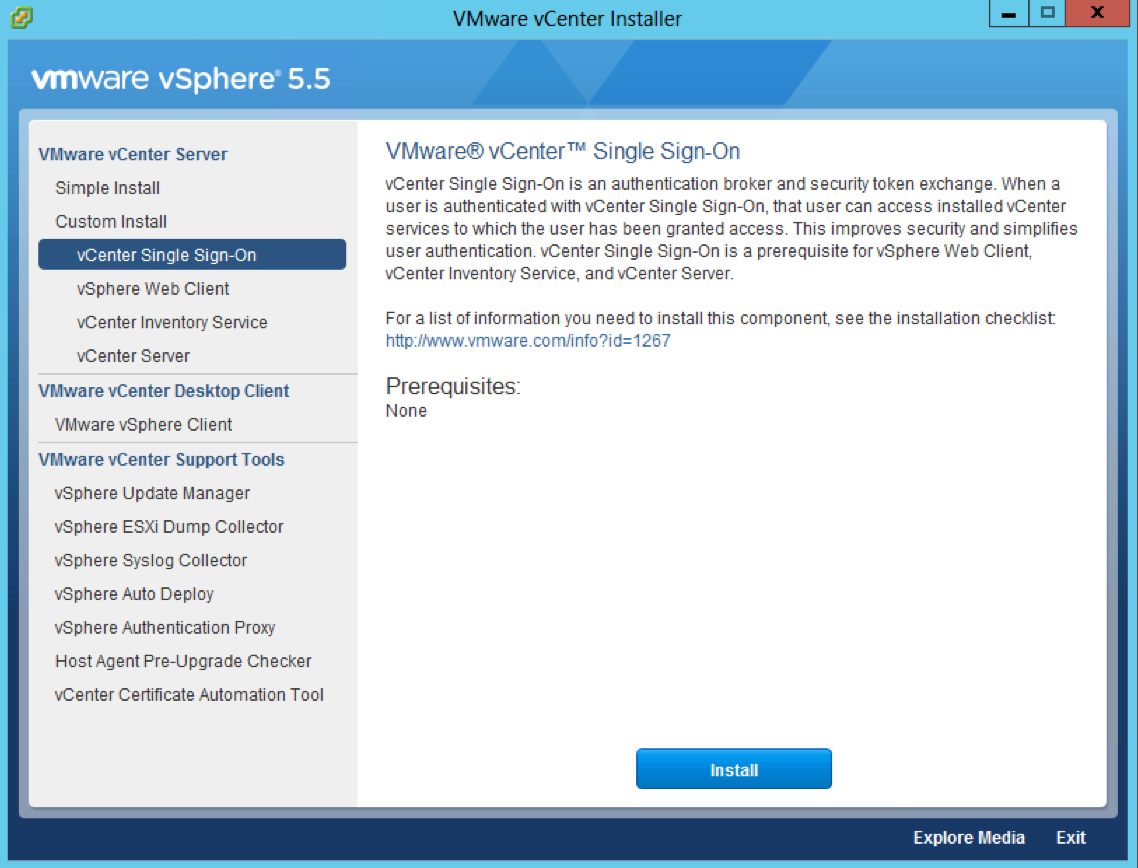
Step 1 and 2 Install 5.5 Single Sign On only on both servers in multisite mode
- Attach the vSphere 5.5 U3 ISO to the first Windows Server 2012 R2 server
- Select Single Sign-On and click Install
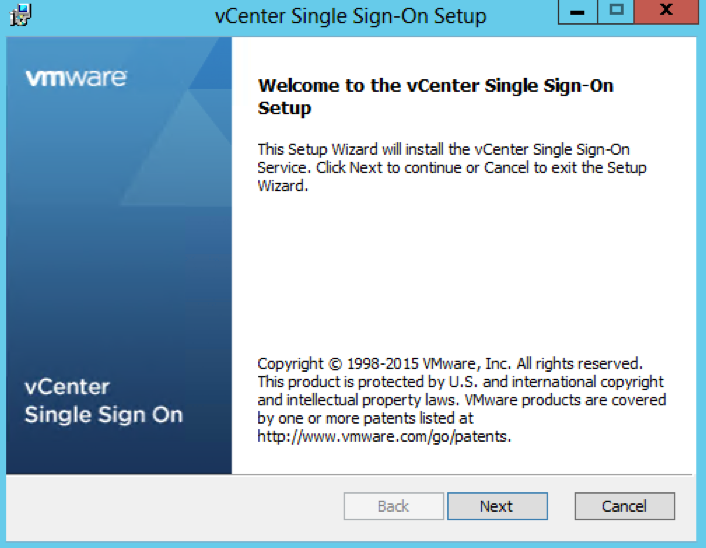
- Accept the License Agreement
- Check the below screens details

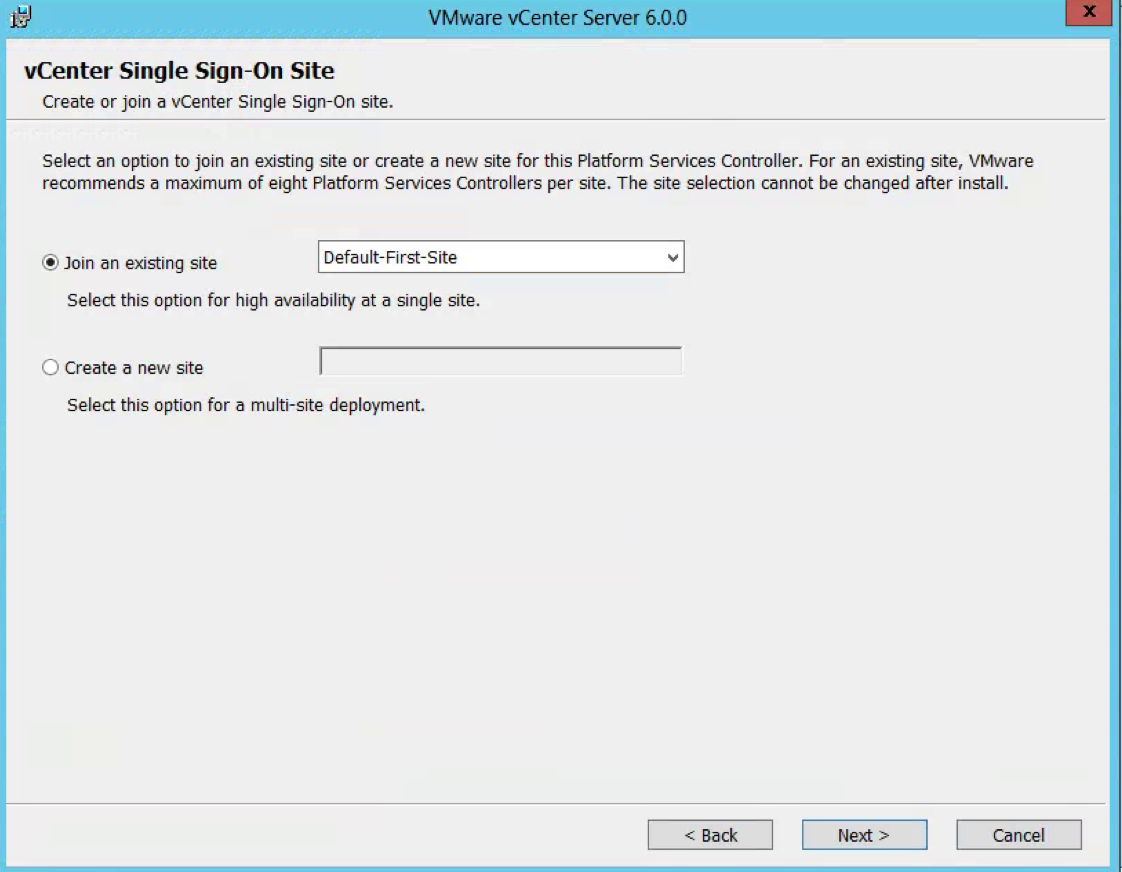
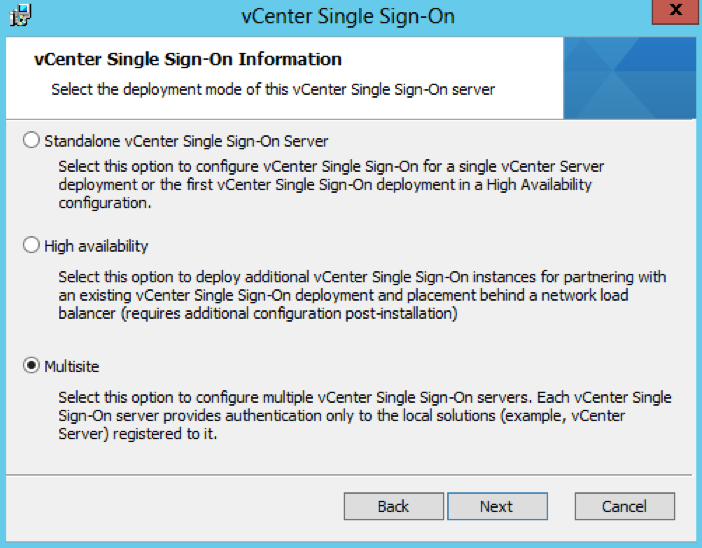
- Choose Standalone vCenter Single Sign-On server as this is the first SSO server before we attach the second in multisite mode
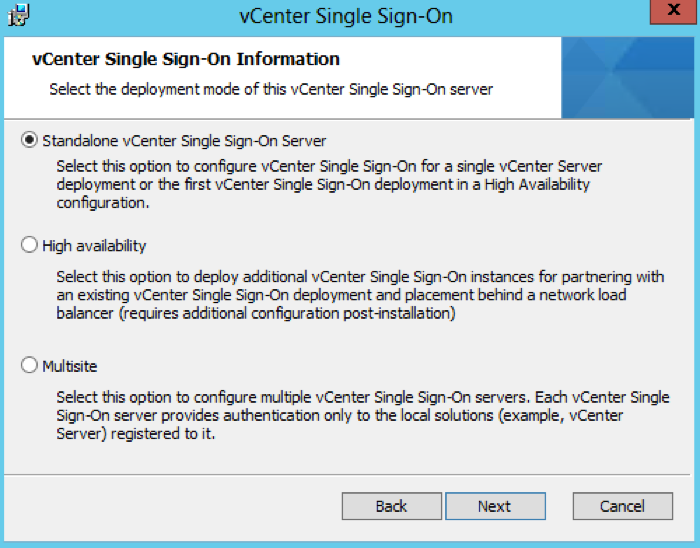
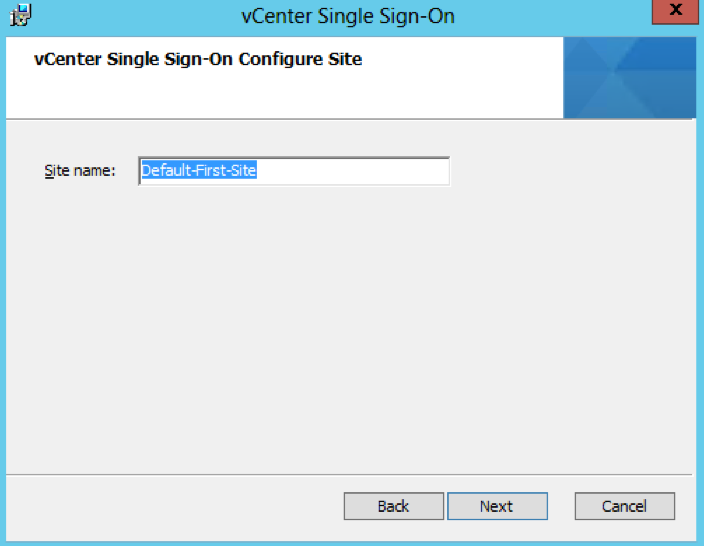
- Leave the Site name as Default-First-Site or you can change it to what you want
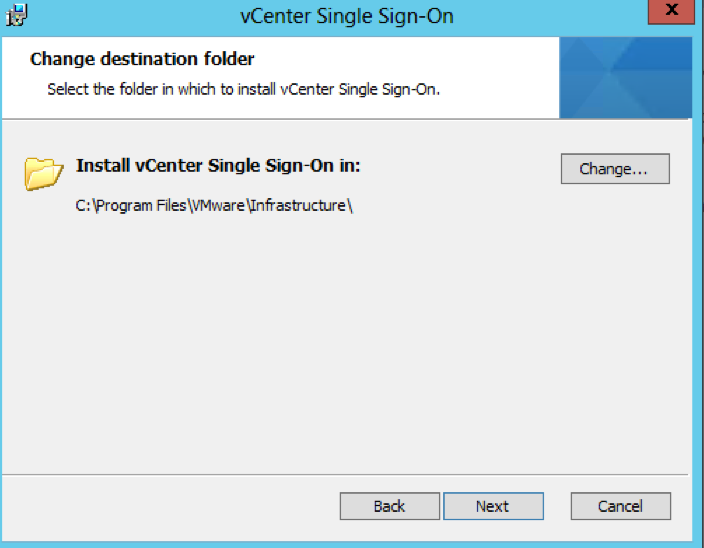
- Check the Directory you are installing in to
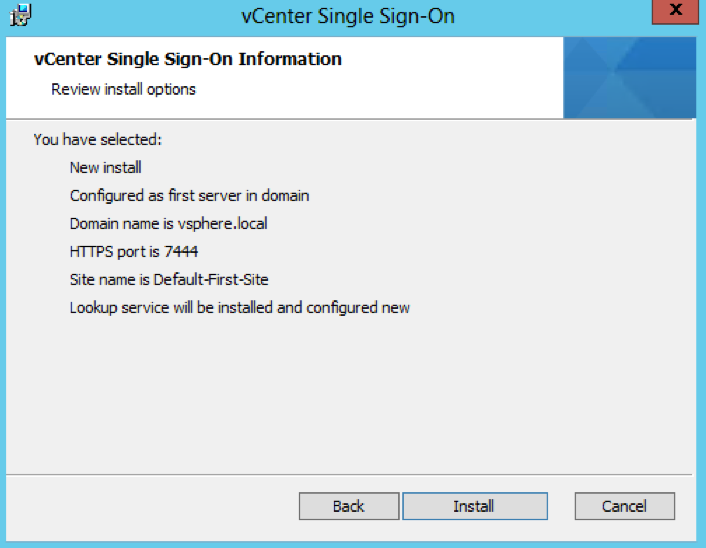
- Check all the final details
- Attach the vSphere 5.5 U3 ISO to the second Windows Server 2012 R2 server

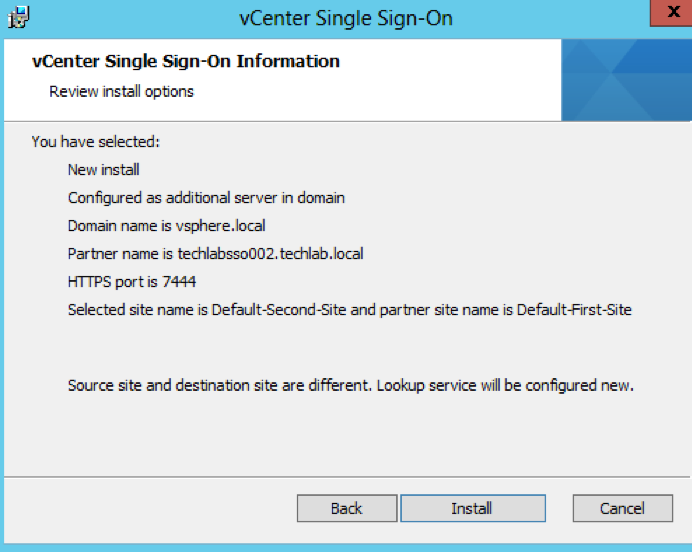
- For this second 5.5 PSC, choose Multisite
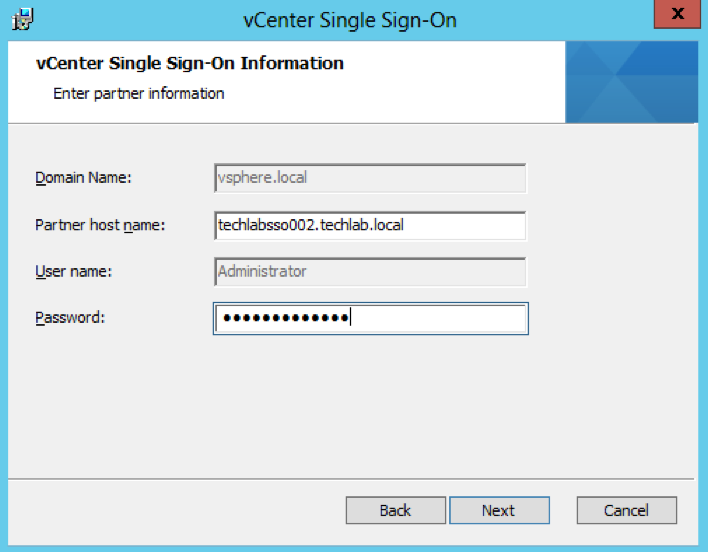
- Put in the Single Sign-On information putting in the partner host name as the first PSC server we set up
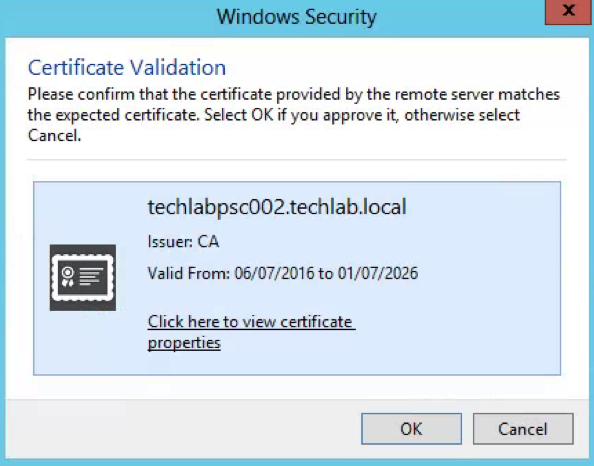
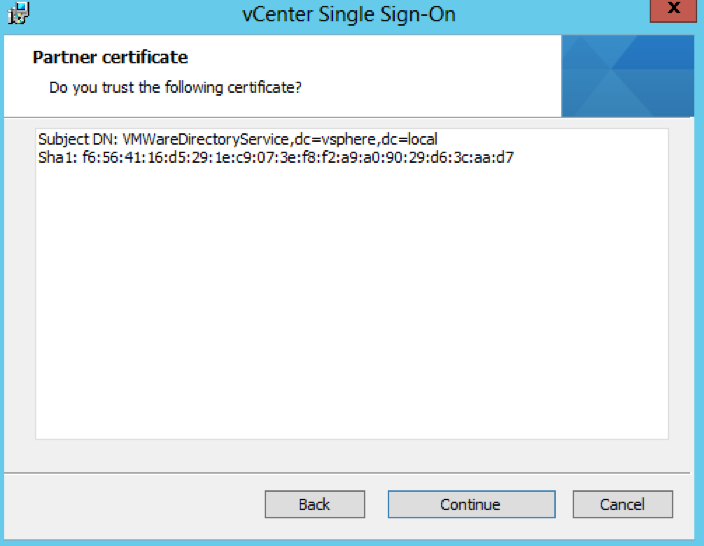
- Check the certificate and click Next
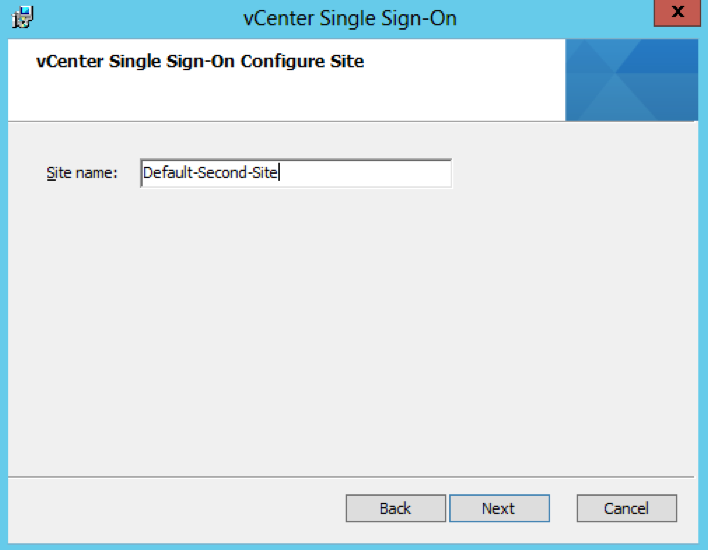
- Put in a name for the second site (Note the first PSC was Default-First-Site and this second one I have named Default-Second-Site)
- Check the Directory you are installing in to
- Check the Final Details and click Install
Step 3 and 4 Repointing and reregistering VMware vCenter 5.1 to the new 5.5 SSO/PSC
After certain changes to your VMware vSphere deployment topography, you might need to re-point or re-register vCenter Server components with the vCenter Inventory Service or vCenter Single Sign-On and the vCenter Lookup Service to ensure that the components can continue to communicate.
https://kb.vmware.com/selfservice/microsites/search.do?language=en_US&cmd=displayKC&externalId=2033620
- On the first vCenter, open a command prompt and change directory to C:\Program Files\VMware\Infrastructure\Inventory Service\scripts
- Run the is-change-sso.bat command to update the stored configuration information of the Inventory Service. Point to the https address of the new 5.5 SSO server
- is-change-sso.bat https://techlabsso002.techlab.local:7444/lookupservice/sdk “administrator@vSphere.local” “SSO_password”
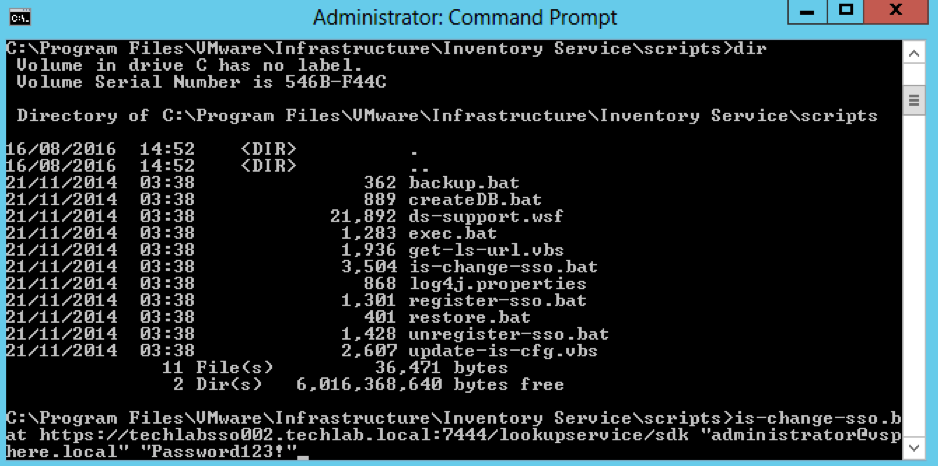
- Type net stop vimqueryservice
- Type net start vimqueryservice
- Next Register vCenter Server with a different Single Sign-On instance
During installation or upgrade, vCenter Server is registered with the Lookup Service for a vCenter Single Sign-On instance. You can change this registration to the Lookup Service for a different Single Sign-On instance. You might register vCenter Server to a different vCenter Single Sign-On instance if the original Single Sign-On instance fails, or if you add a new Single Sign-On node and want to associate vCenter Server with the new node.
Note: When you register vCenter Server to a new Single Sign-On instance, you lose these permissions:
- All permissions created for users from the Single Sign-On system identity source
- All permissions granted to users from identity sources that are not present in the new Single Sign-On instance
- All permissions granted to local operating system users
To register vCenter Server to a different vCenter Single Sign-On instance:
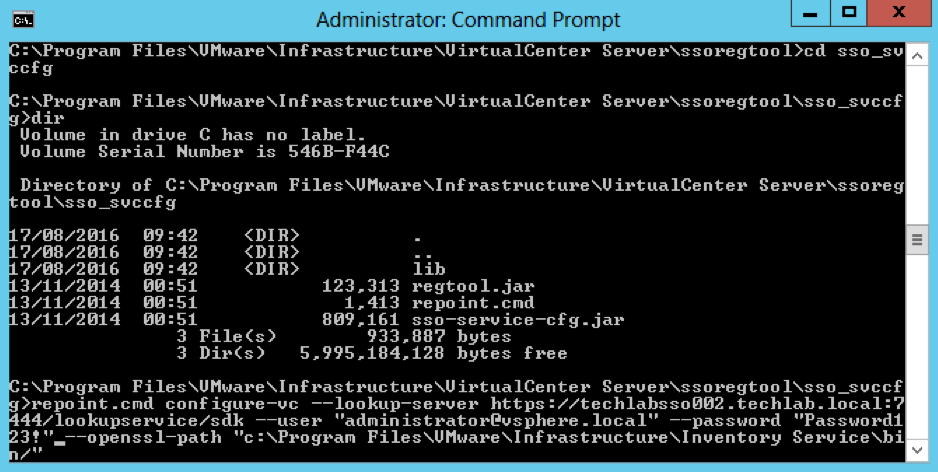
- Open a command prompt and change directory to C:\Program Files\VMware\Infrastructure\VirtualCenter Server\ssoregtool
- Note: If you have installed vCenter Server in a location other than the default C:\Program Files\ folder, adjust the path
- Unzip the sso_svccfg.zip file. Best practice is to unzip these files into a new folder and change directory to the new folder before executing the next step. Unzip to a folder called sso_svccfg
- Run the below command
- repoint.cmd configure-vc –lookup-server https://techlabsso002.techlab.local:7444/lookupservice/sdk –user “administrator@vSphere.local” –password “SSO_password@” –openssl-path “C:\Program Files\VMware\Infrastructure\Inventory Service\bin/”
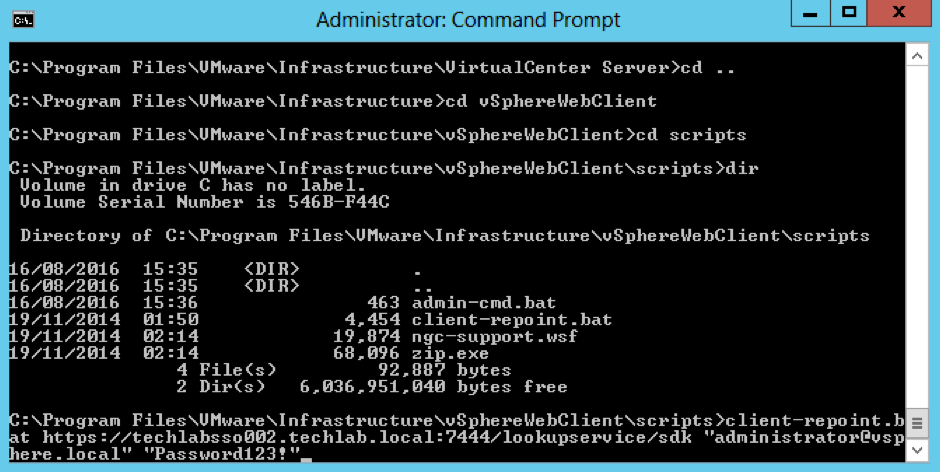
Now interestingly at this point my vSphere Web Client re-registration failed so i had a look at this KB – https://kb.vmware.com/selfservice/search.do?cmd=displayKC&docType=kc&docTypeID=DT_KB_1_1&externalId=2060637 and it said my SSO password is supported with an exclamation mark. However I had to log into the web client on techlabsso002 and change the password and remove the exclamation mark in order for the registration to work!
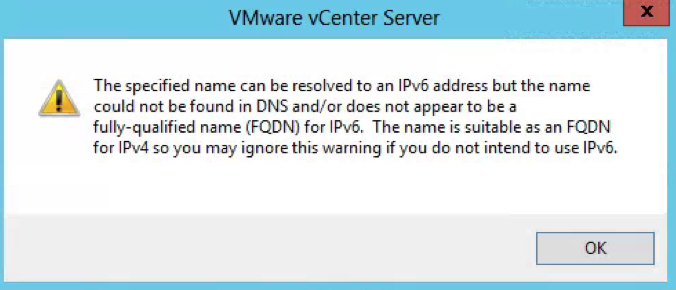
If you have issues, it will look like this
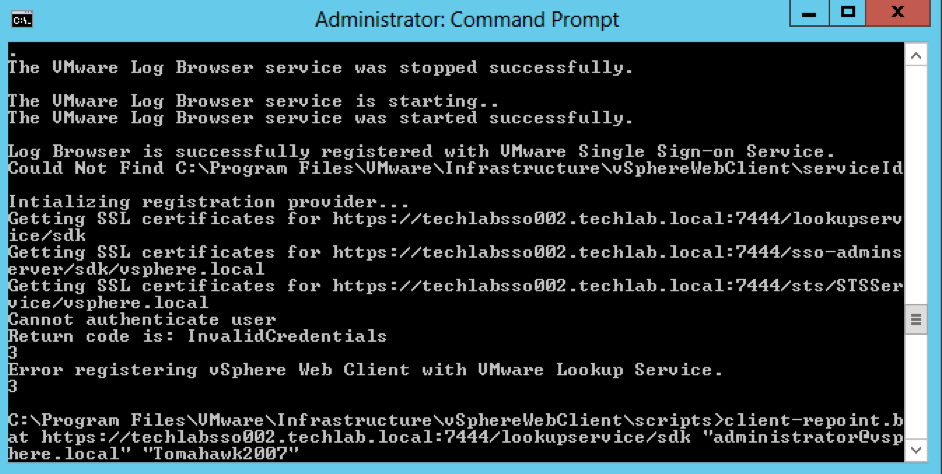
- Next you need to follow exactly the same re-registration steps for the other 5.1 vCenter server and 5.5 SSO server
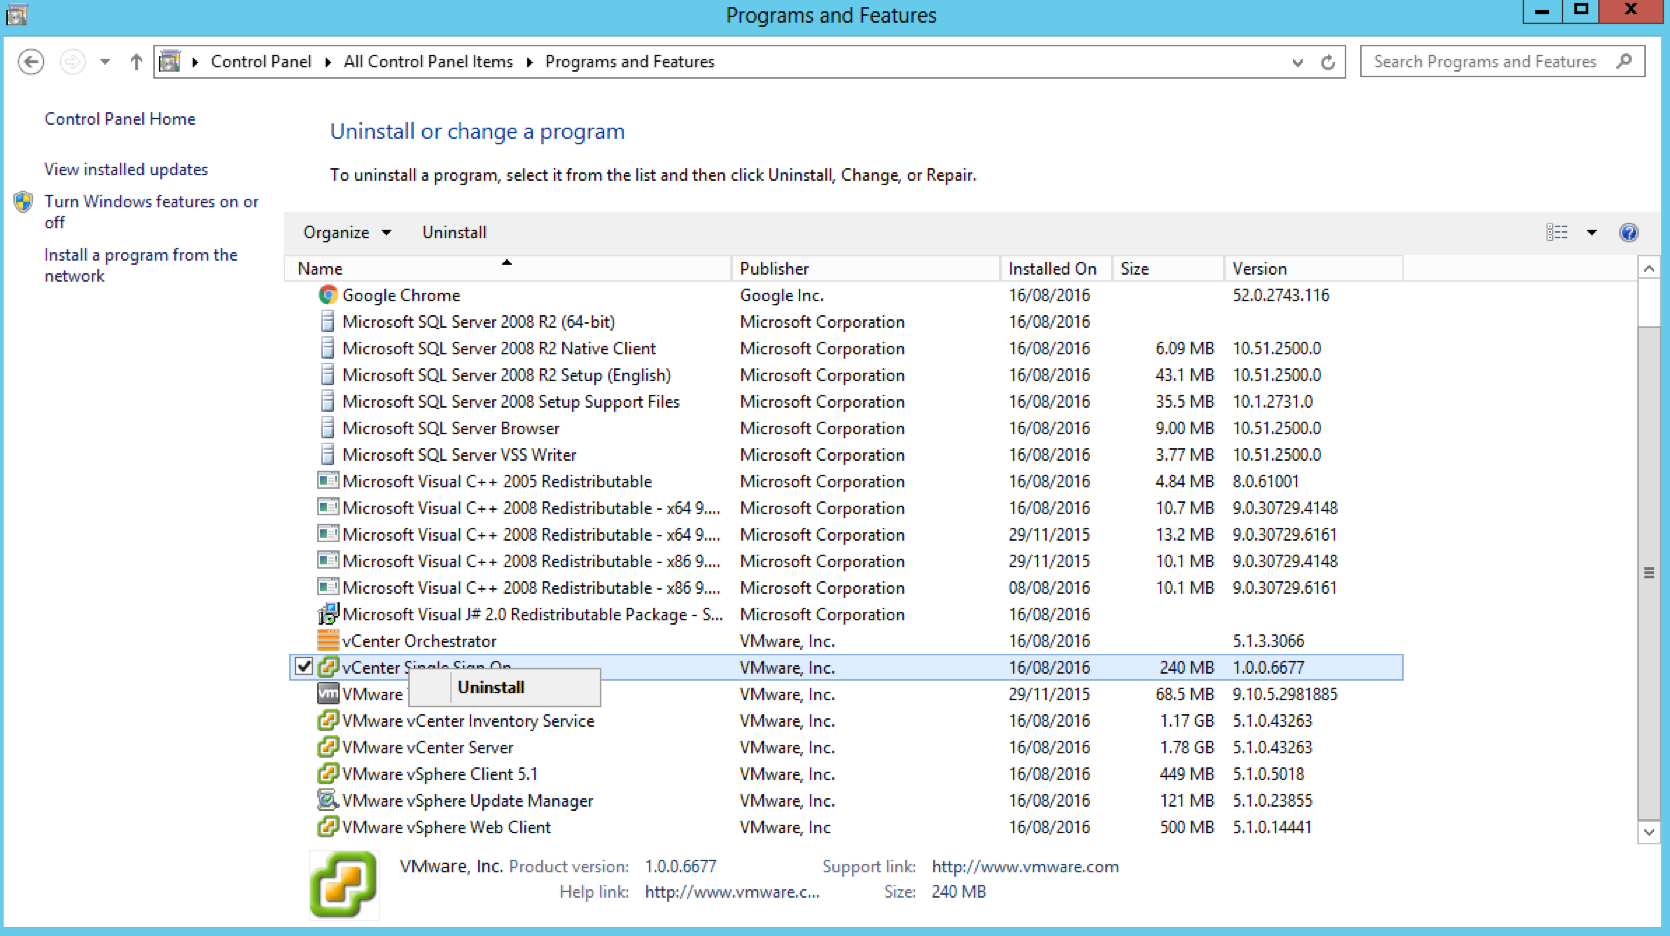
Step 5 – Uninstall 5.1 Single Sign-On from the two 5.1 vCenters (Important!)
- Go to Control Panel and Uninstall
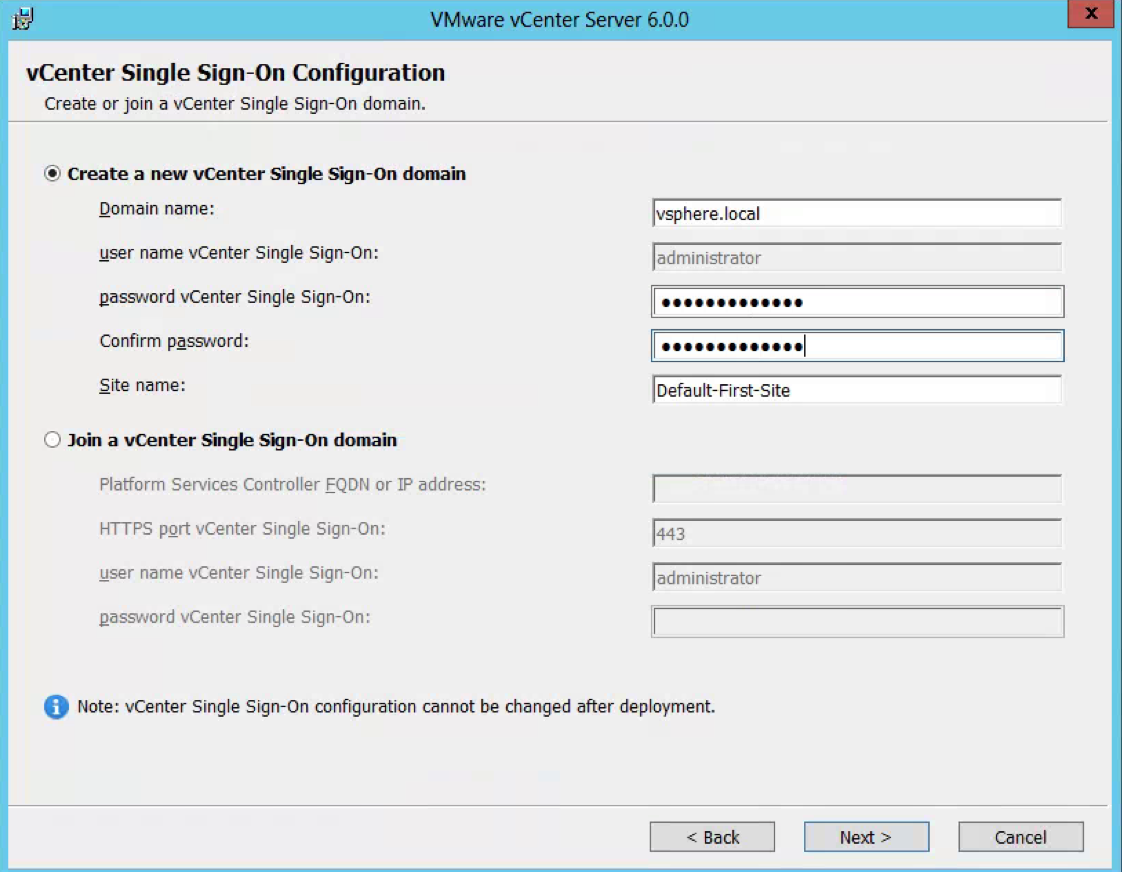
Step 6 and 7 – Upgrade both 5.5 SSO servers to PSC 6 servers
- Attach the vCenter 6 iso to the first PSC server and select vCenter Server for Windows and Install
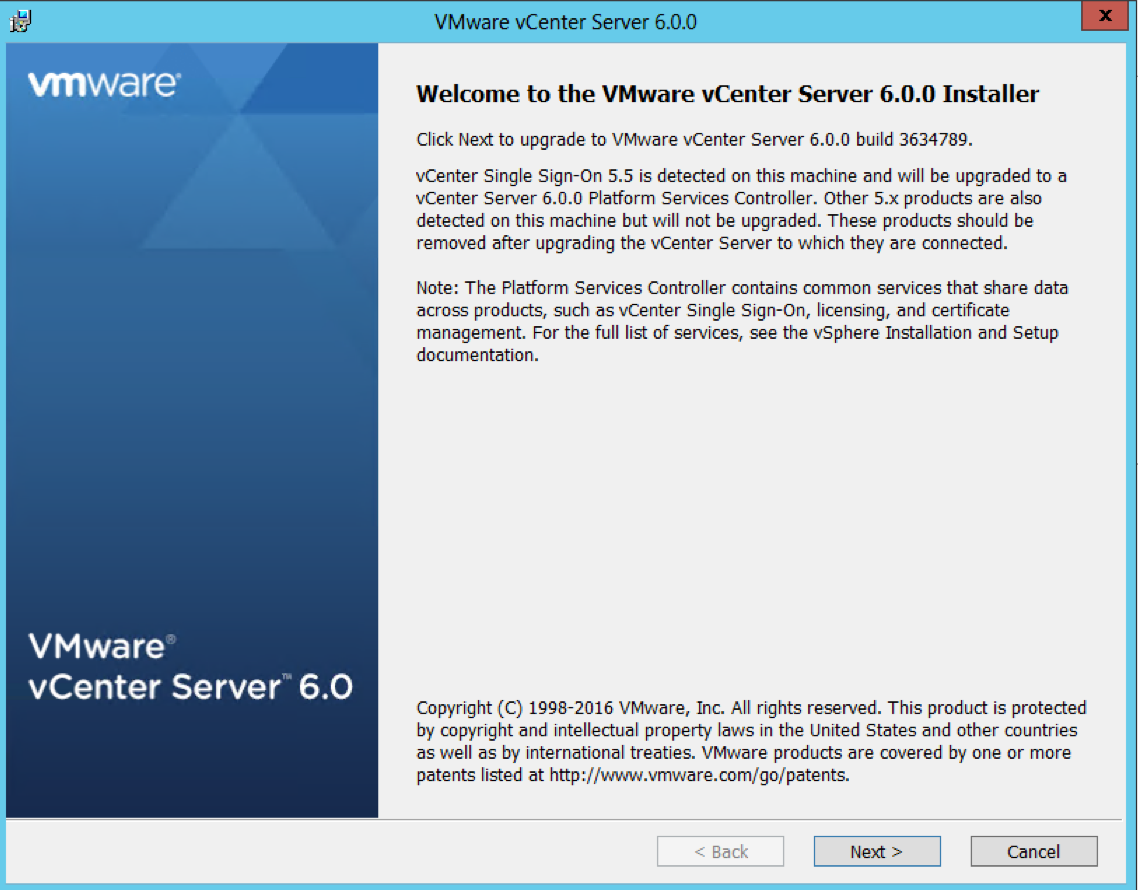
- Accept the License Agreement
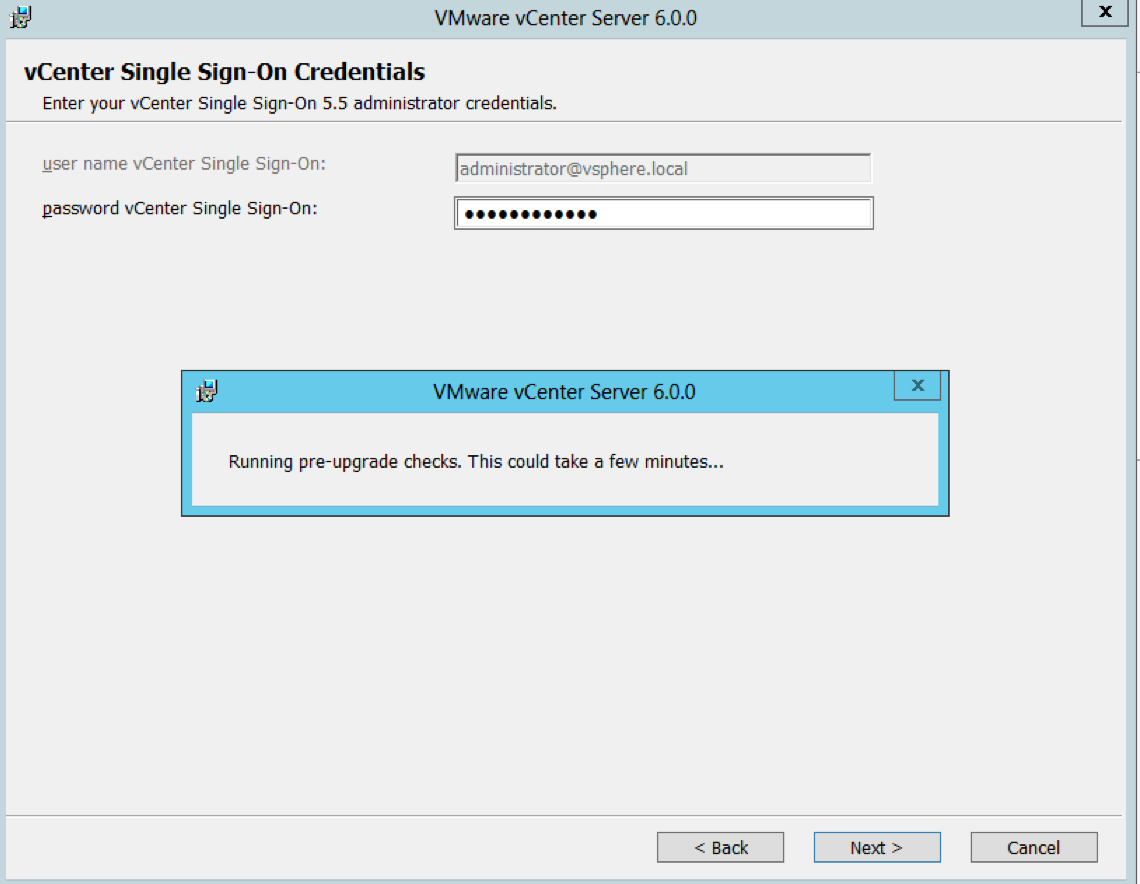
- Put in the Single Sign-On password in and you will see it going through pre-upgrade checks
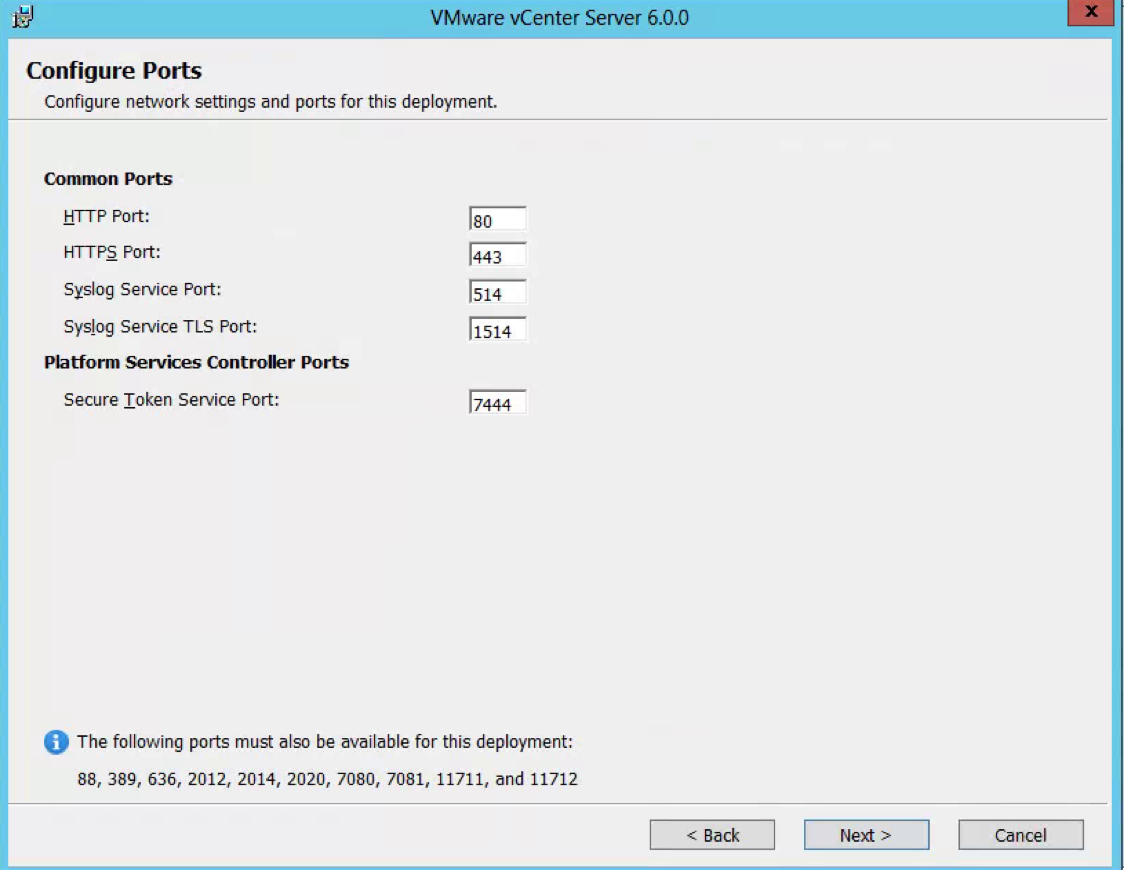
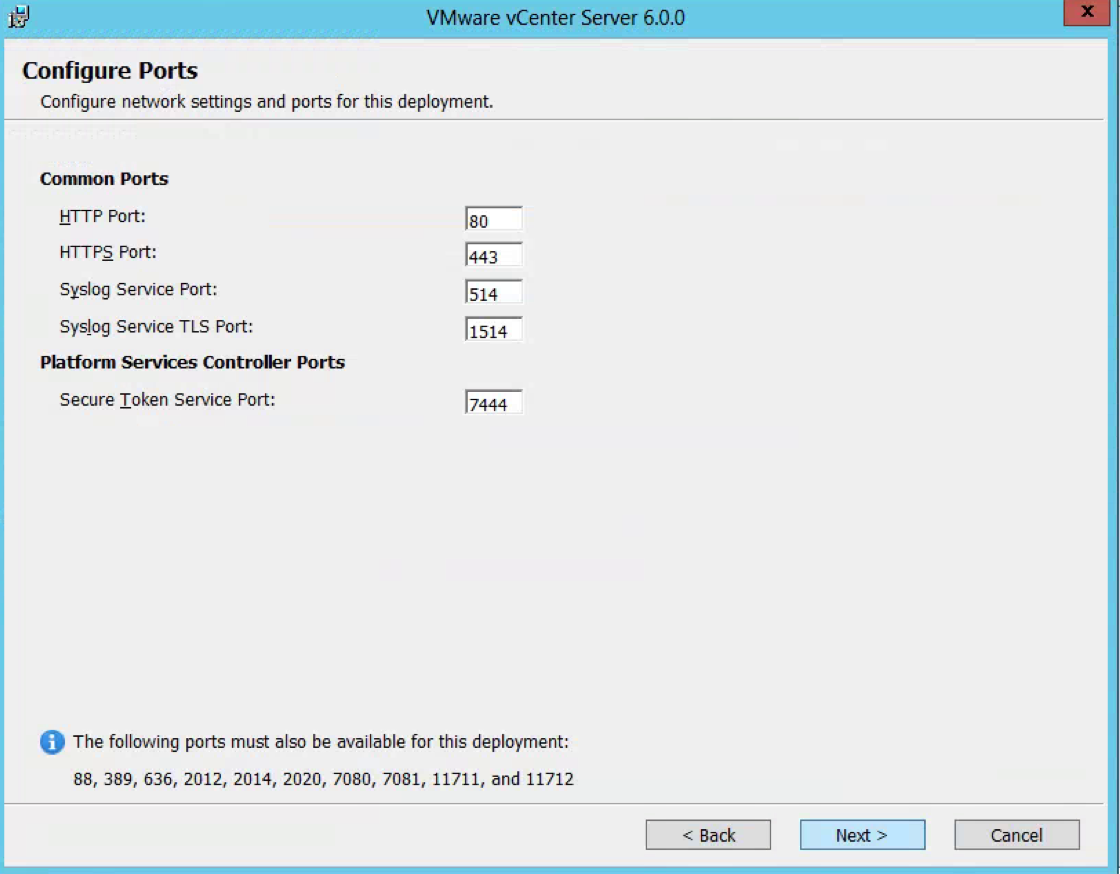
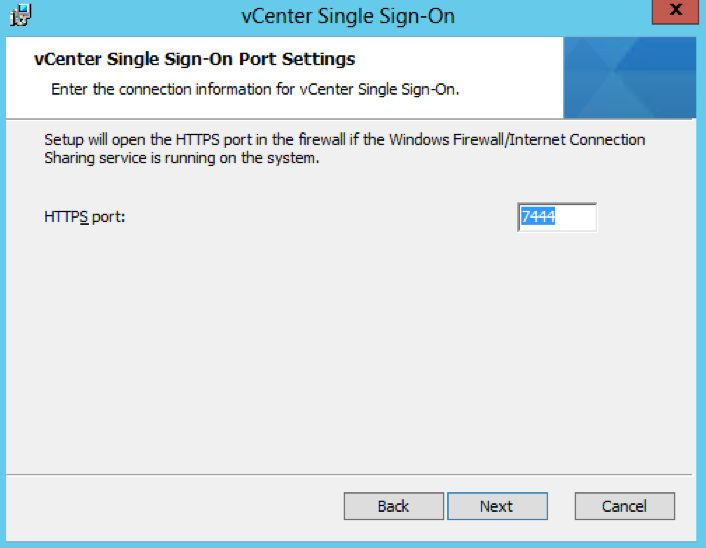
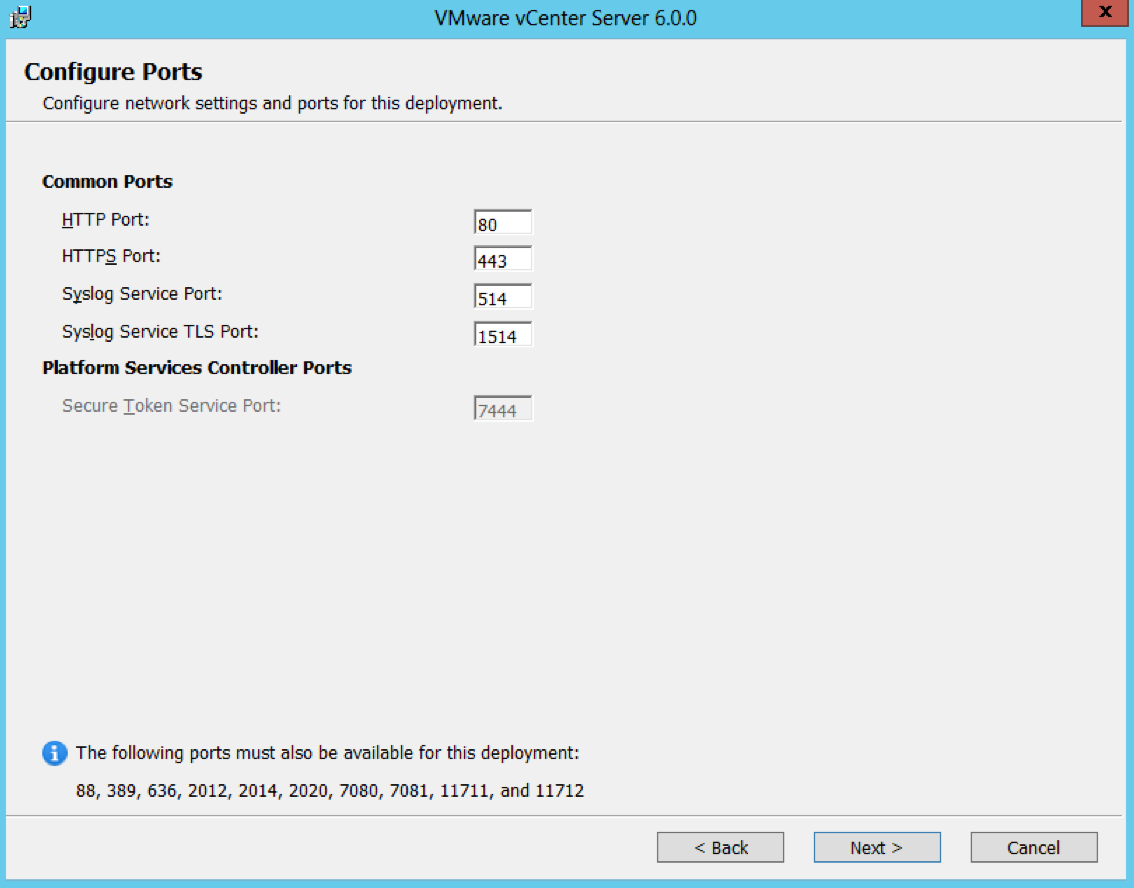
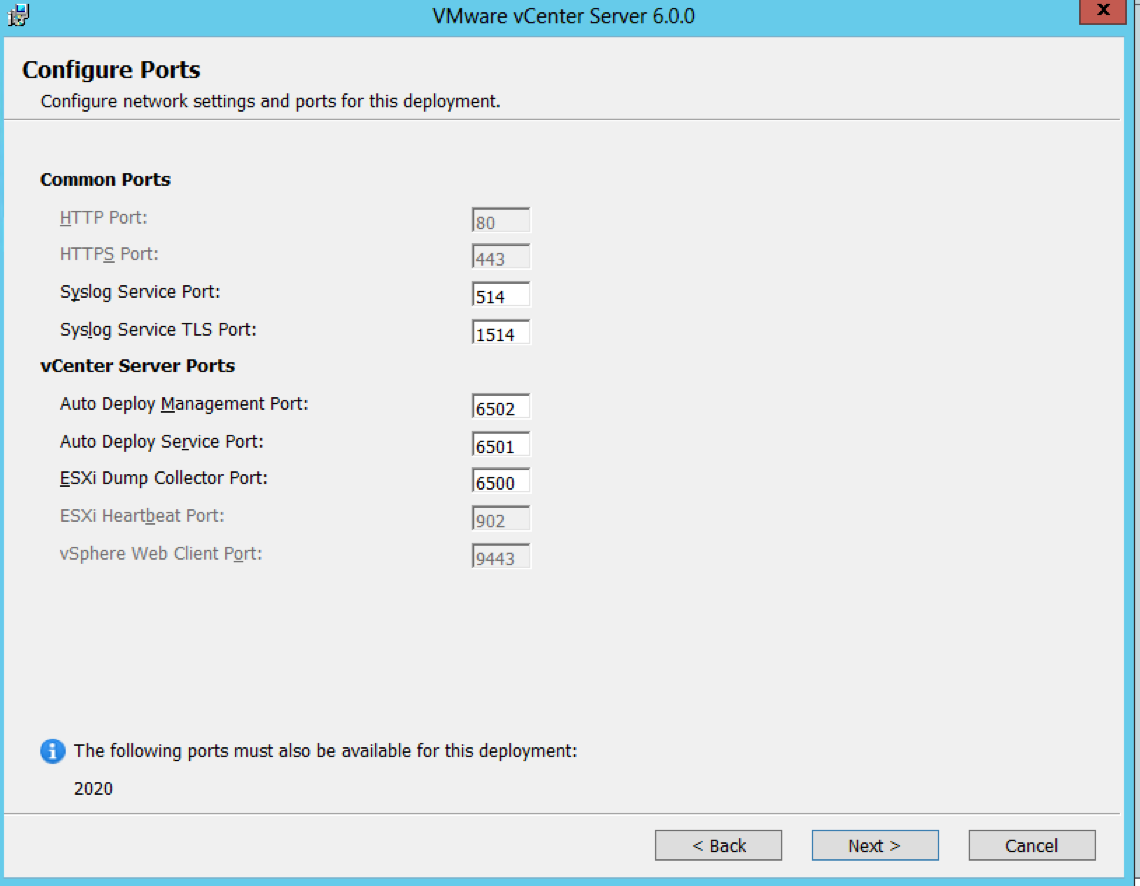
- Check Ports (Important for multi-site communication) (There will be further information at the end of this post about ports required
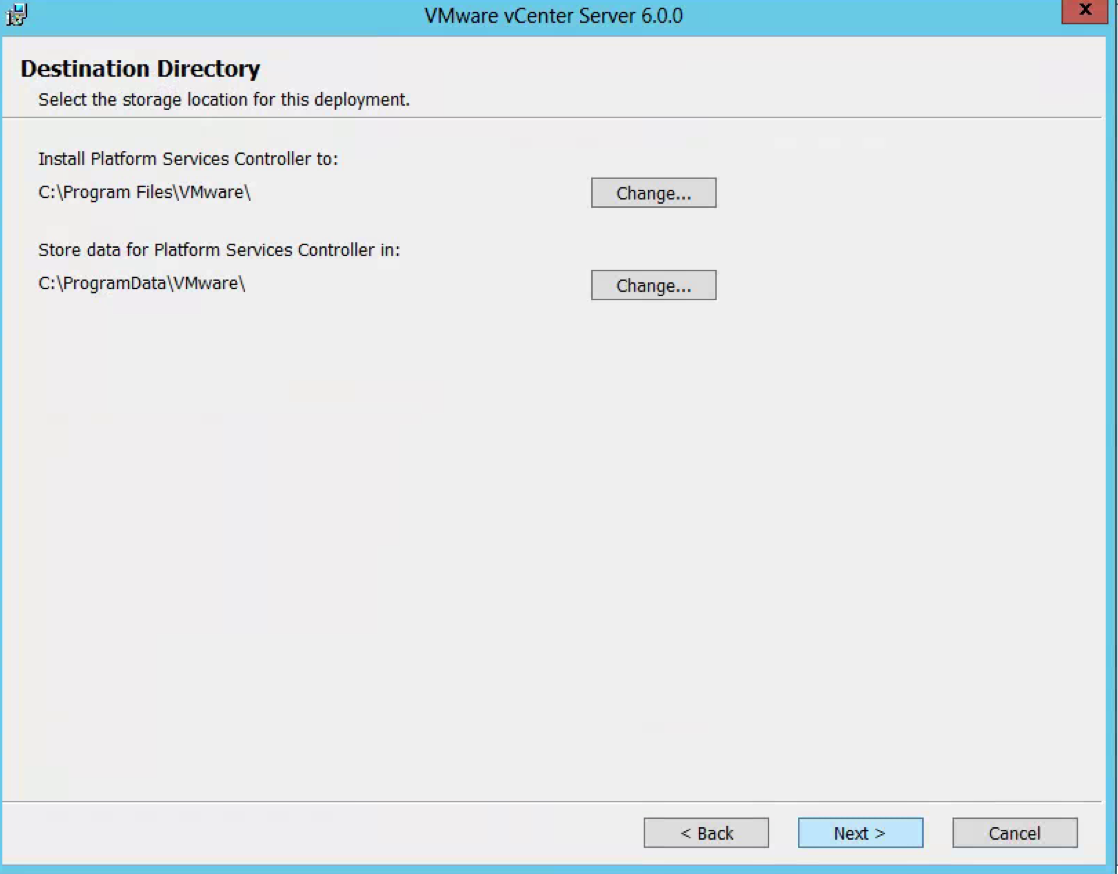
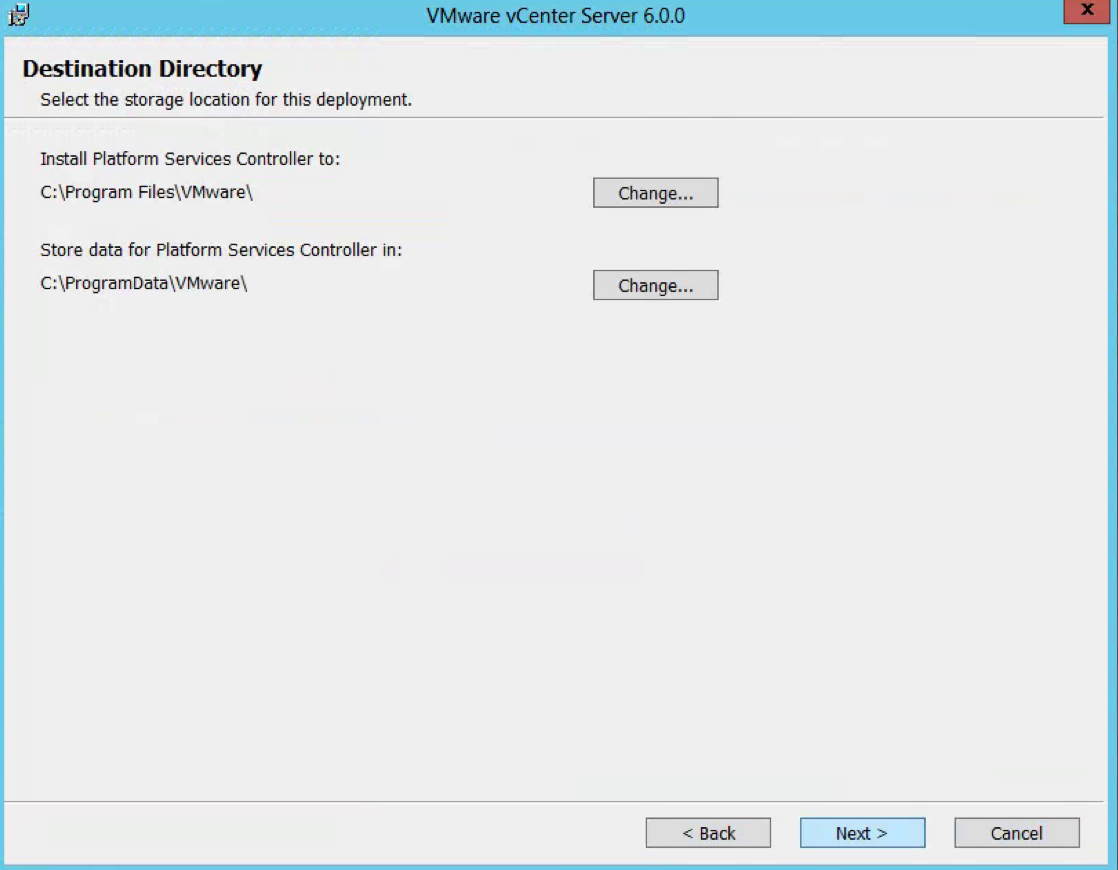
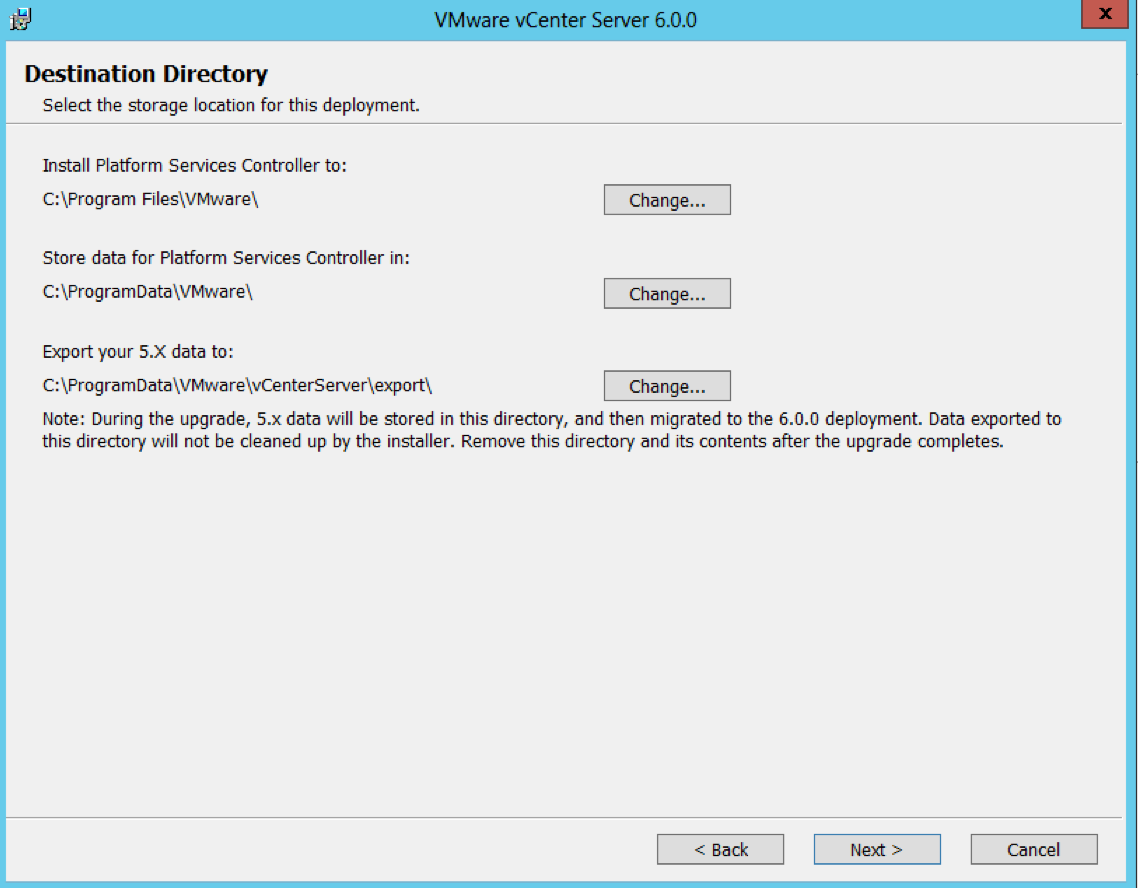
- Check Destination Directories
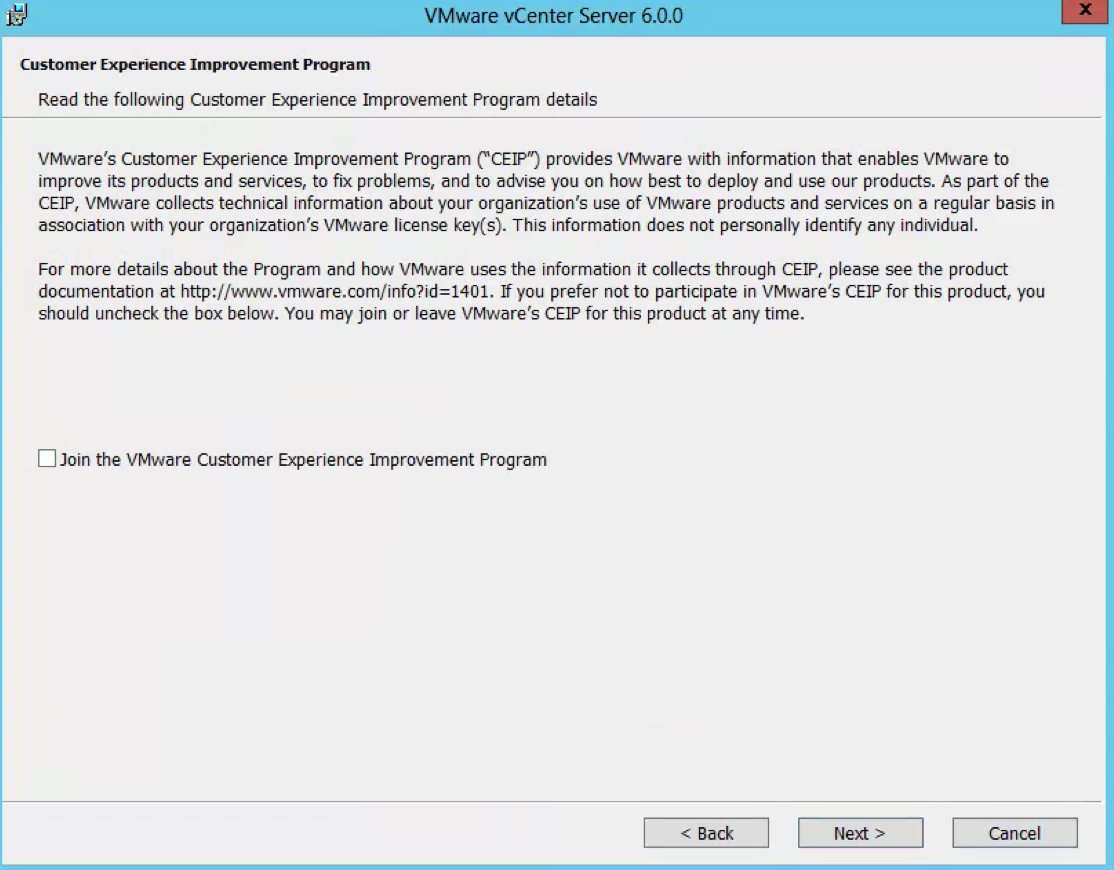
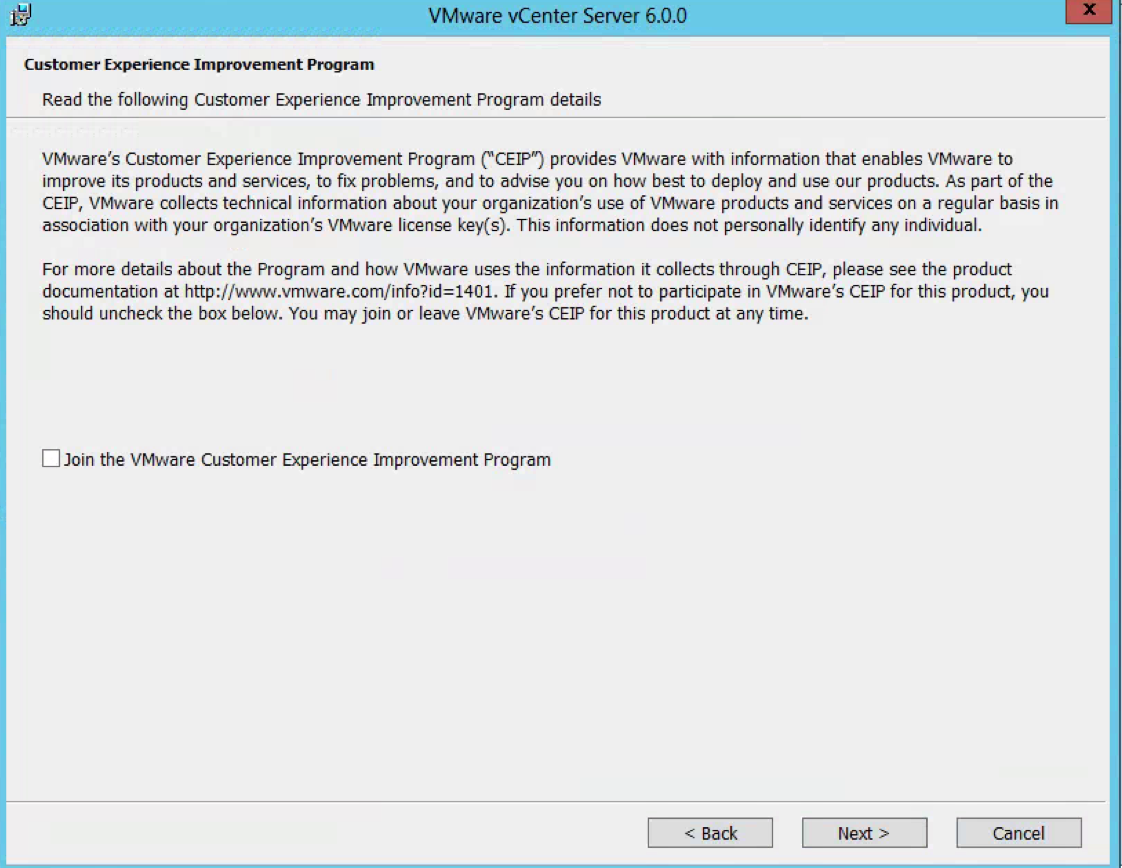
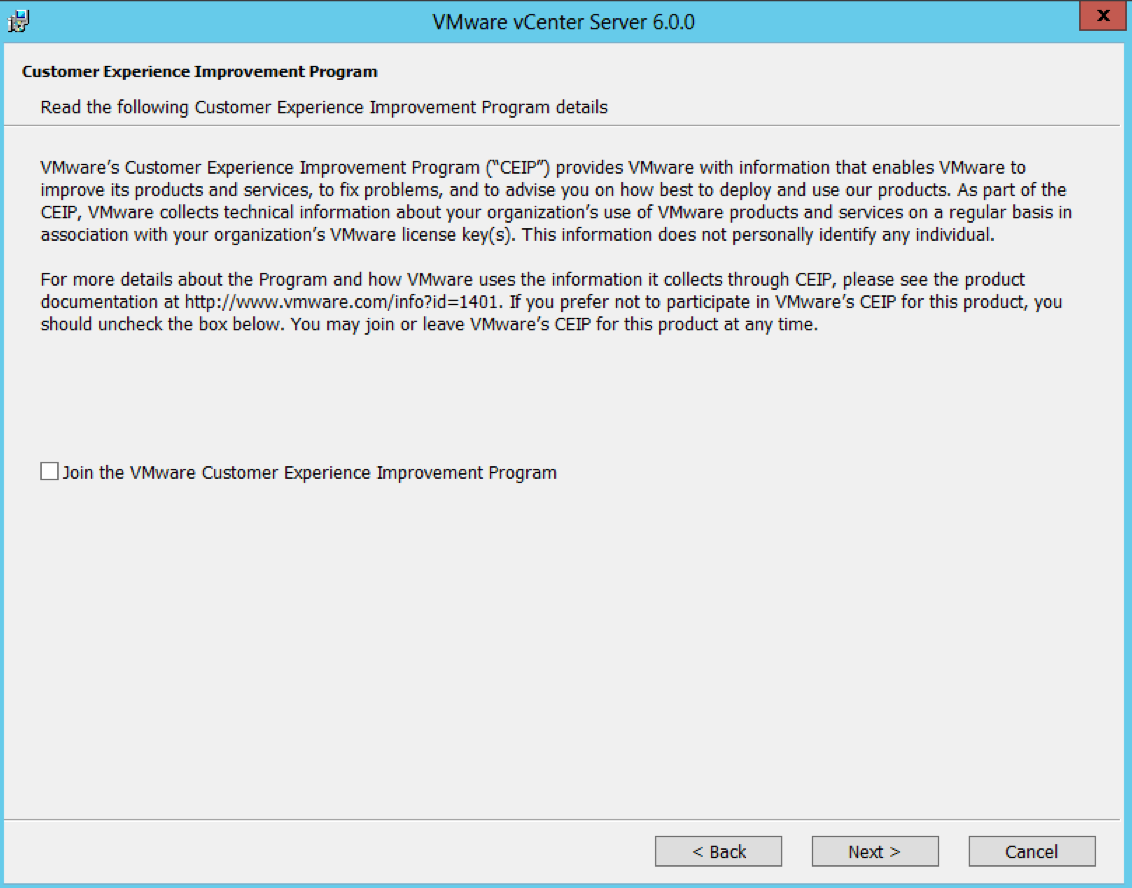
- Choose whether to join the Customer Improvement Program
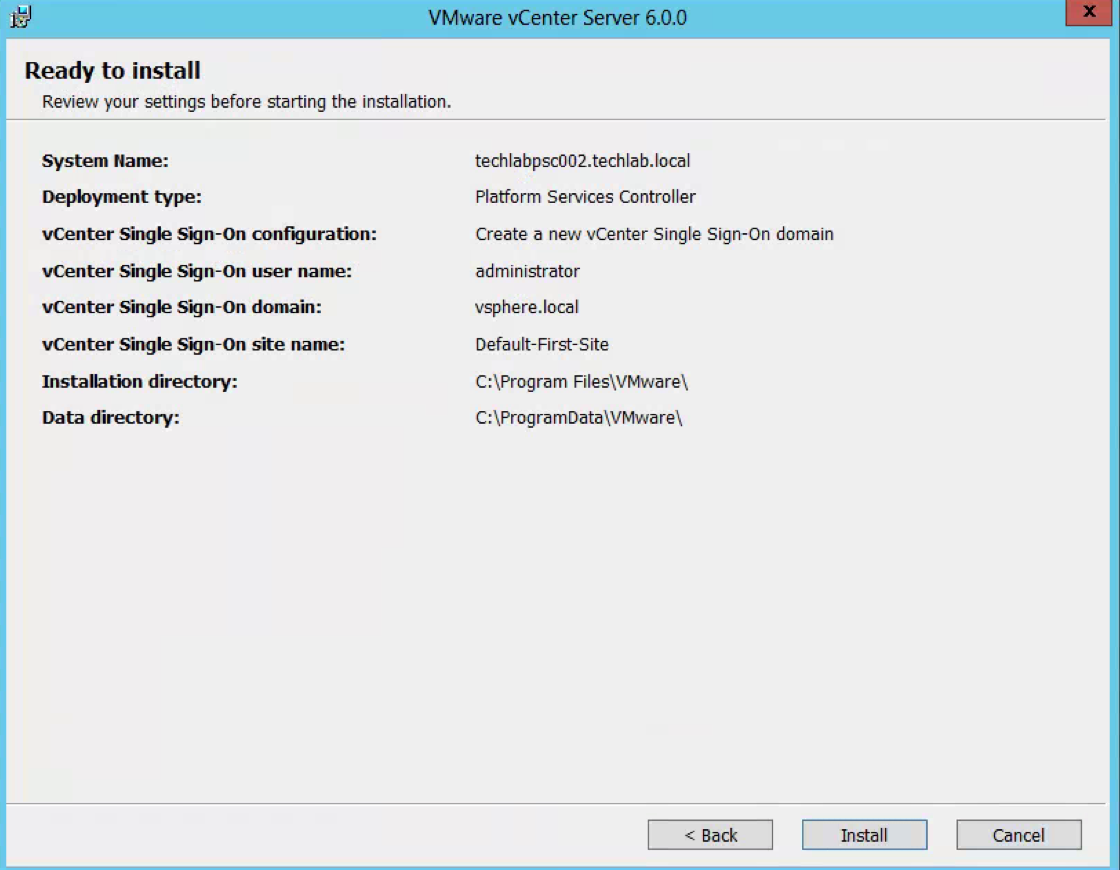
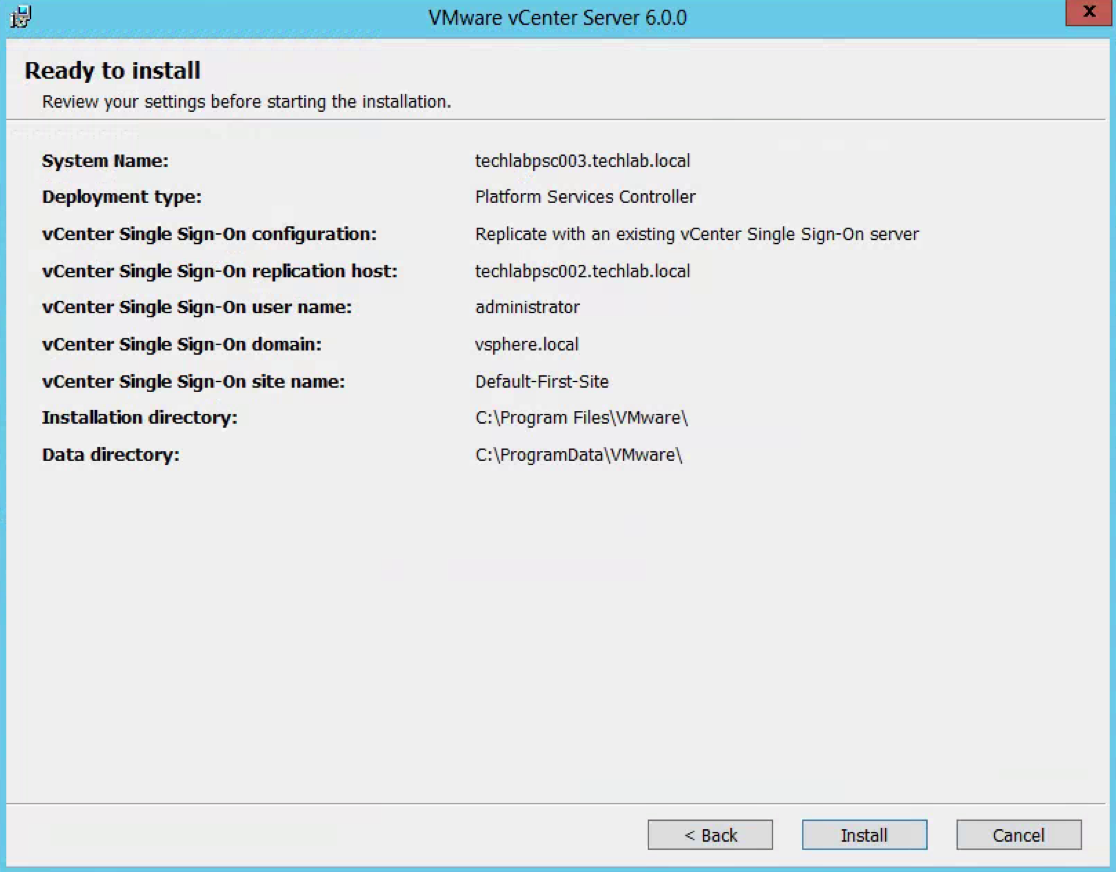
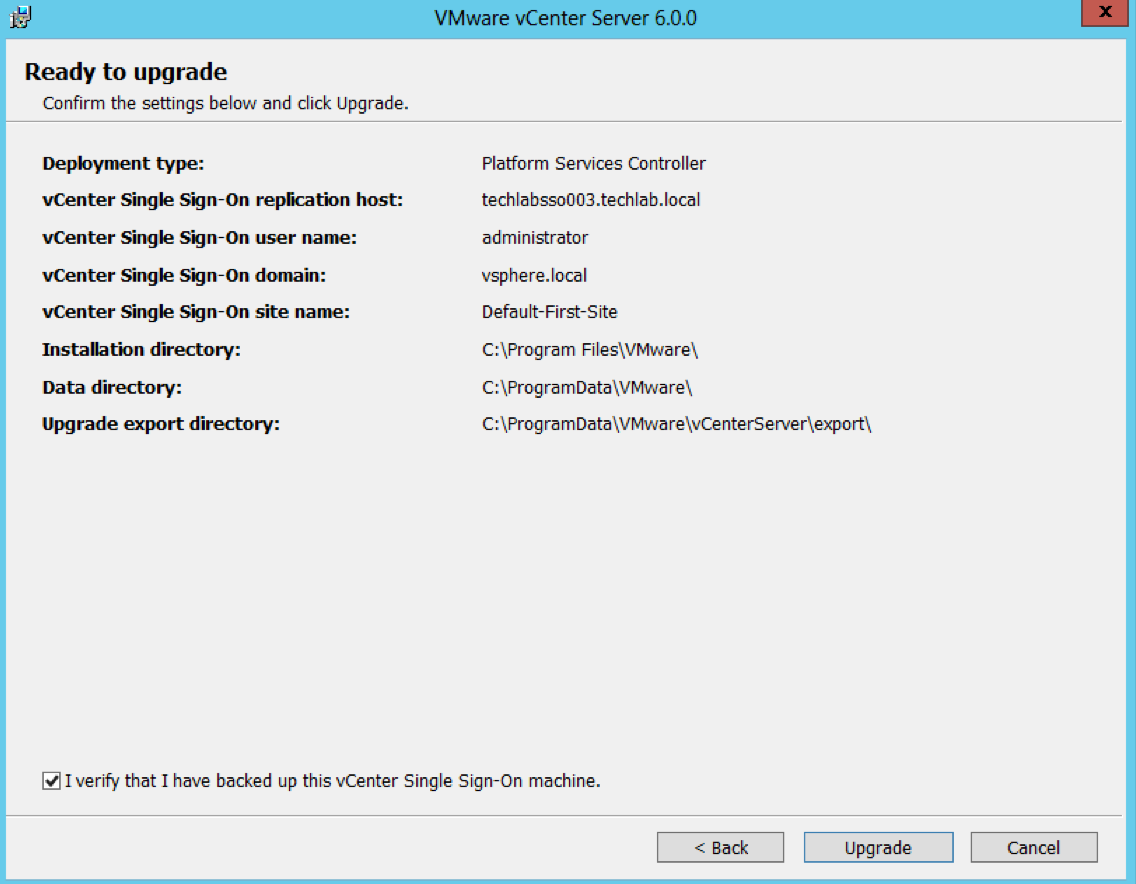
- Check the final details and tick I verify that I have backed up this Single Sign-On machine
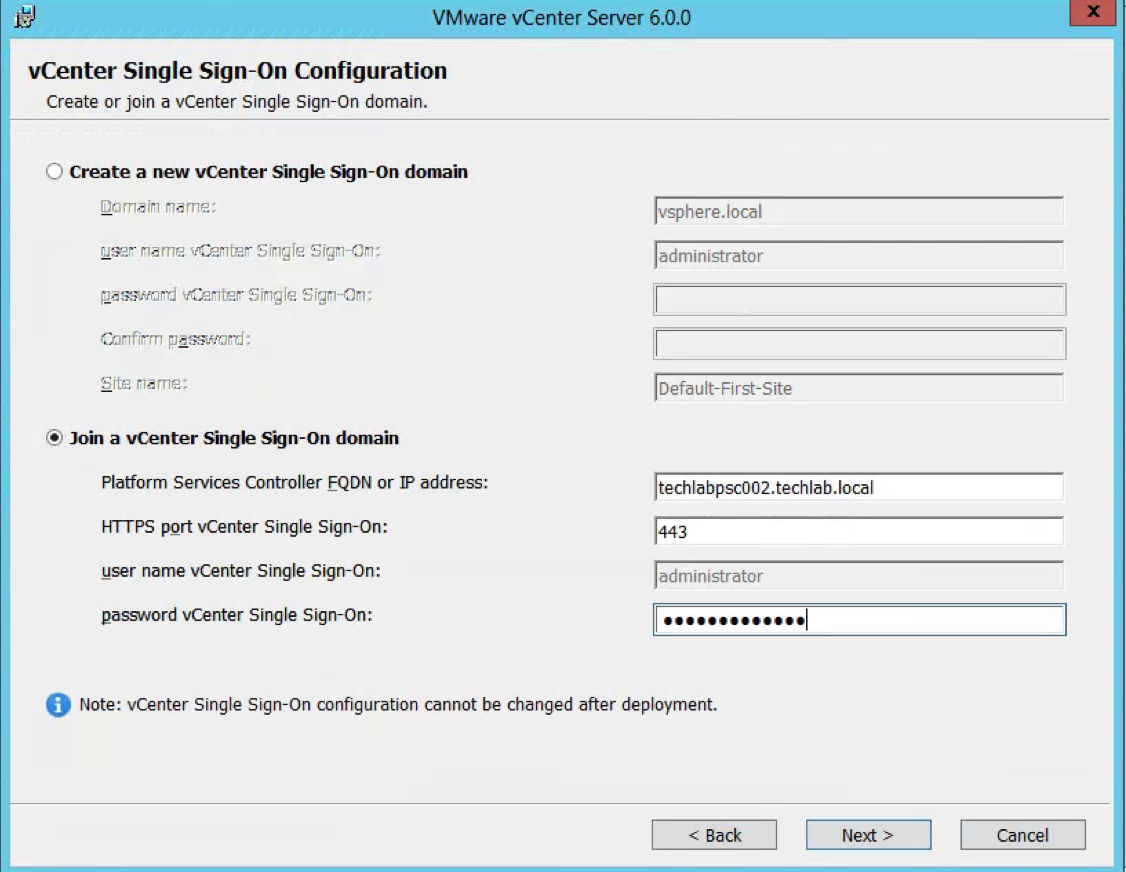
- You can see that this SSO server has a replication partner of the other SSO server techlabsso003 which is in the multi-site setup
- Click Upgrade
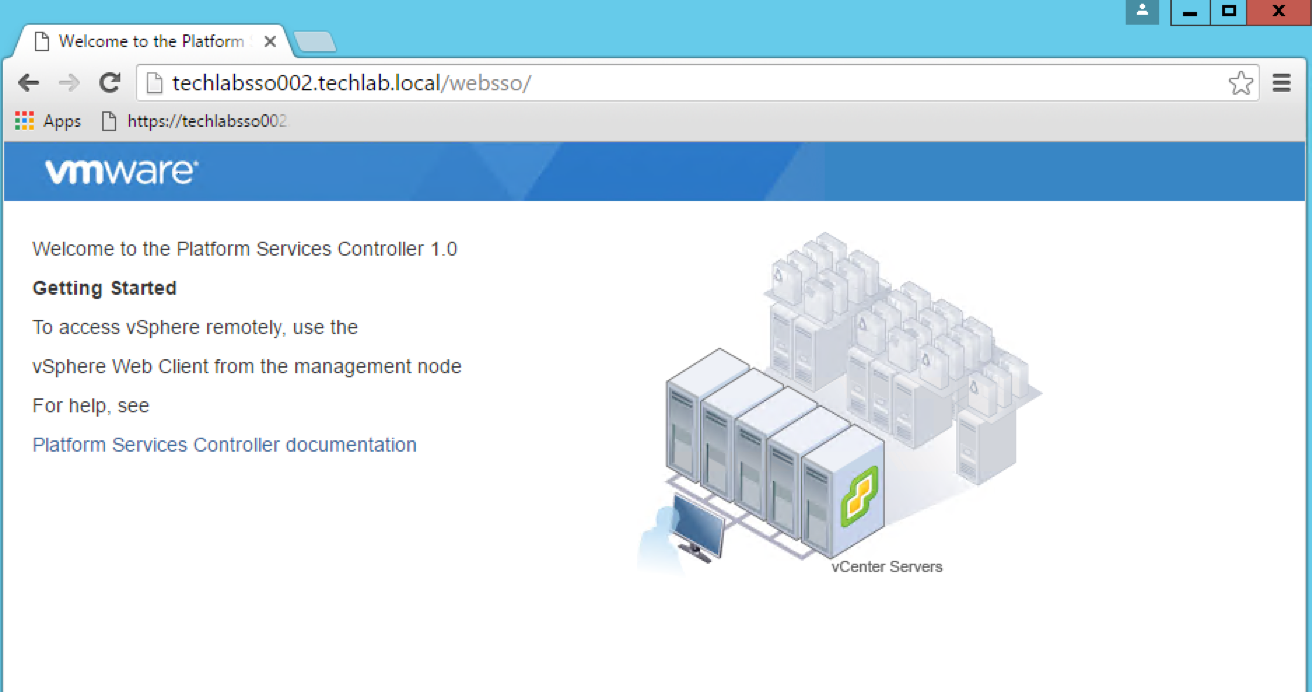
- You can check a couple of links such as https://techlabsso002.techlab.local/websso
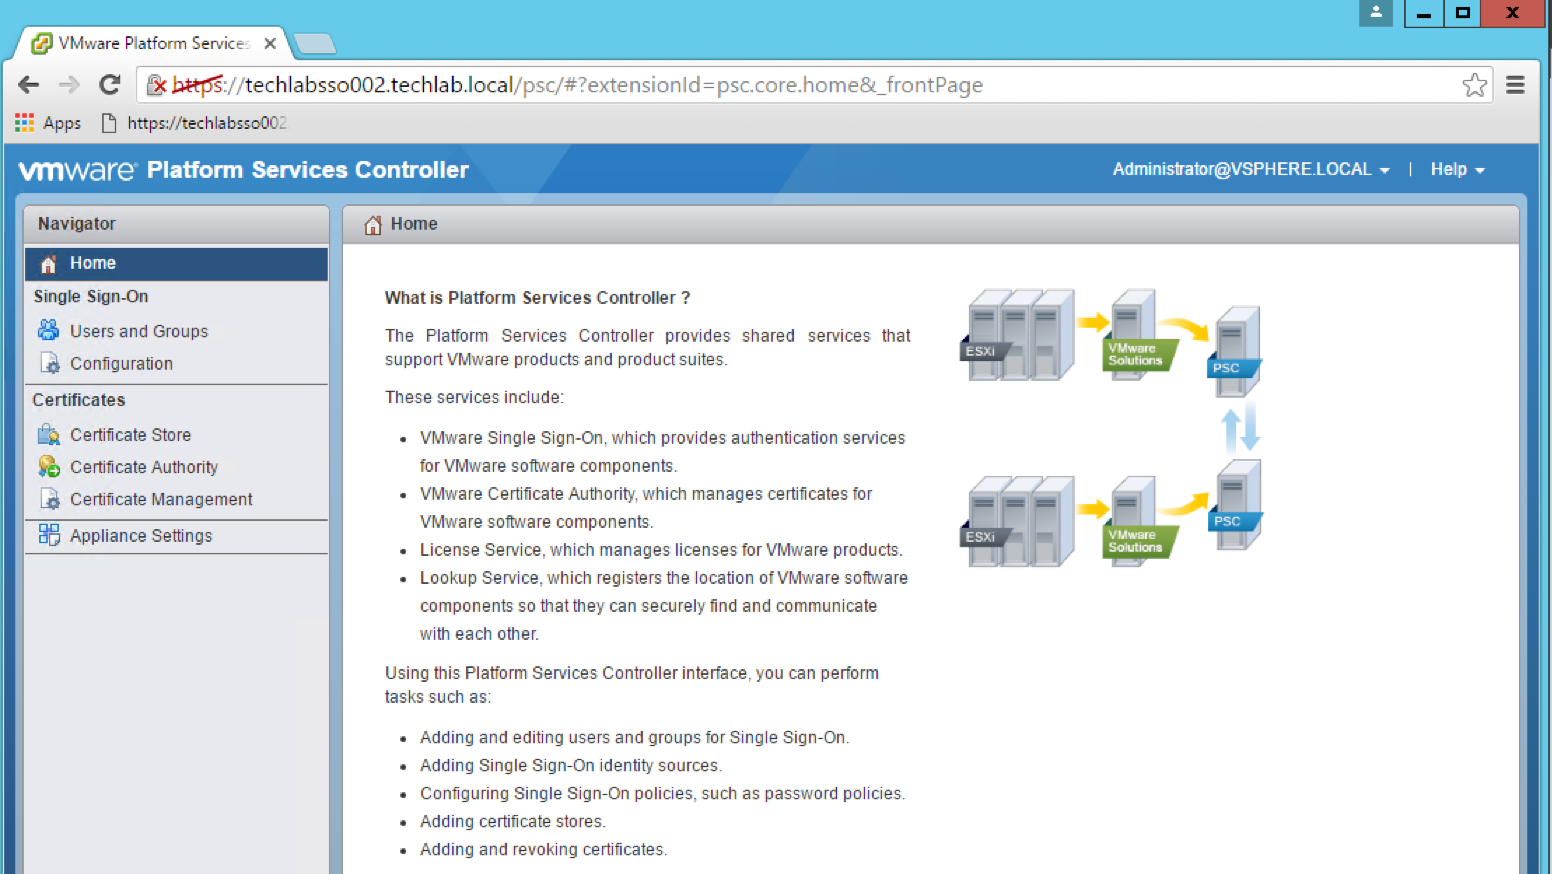
- Check the below link is working also –https://techlabsso002.techlab.local/psc
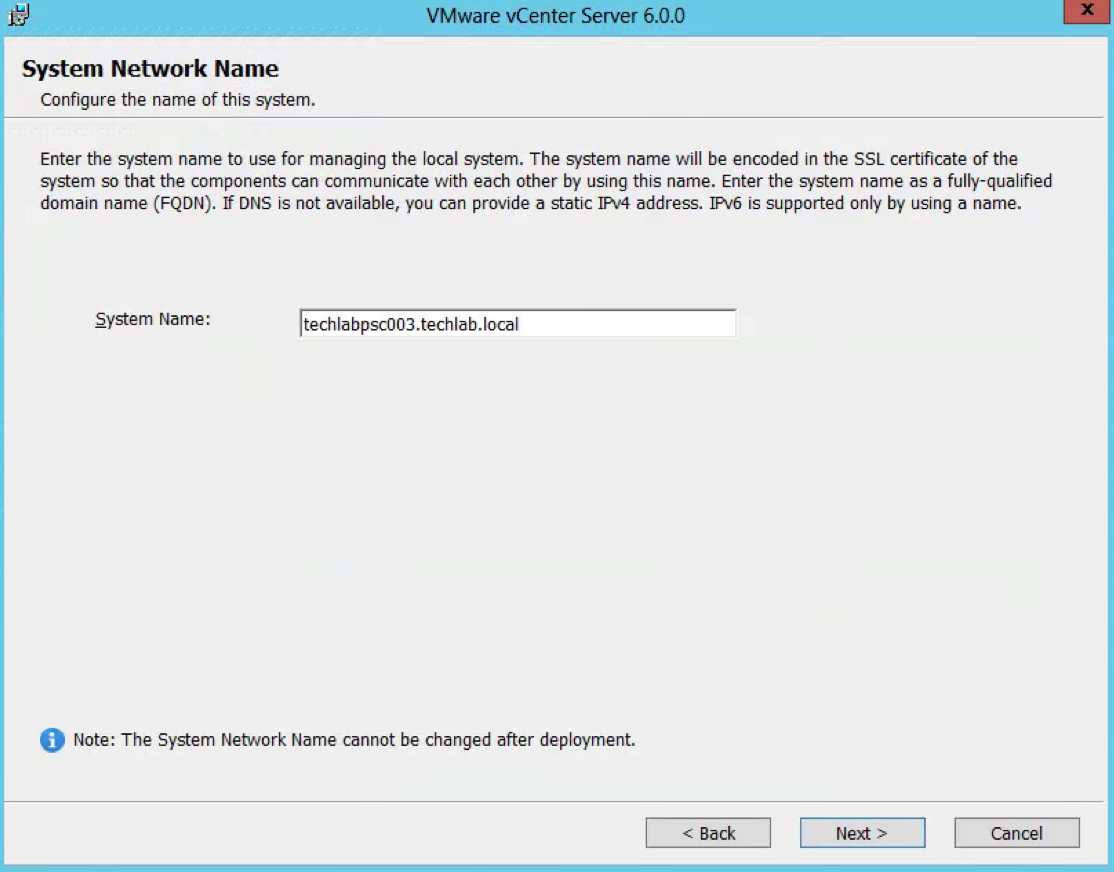
- Next follow the exact same steps to upgrade the second SSO server to a PSC v6 server
- You will see on the final screen in the details that this is the second site (Default-Second-Site)

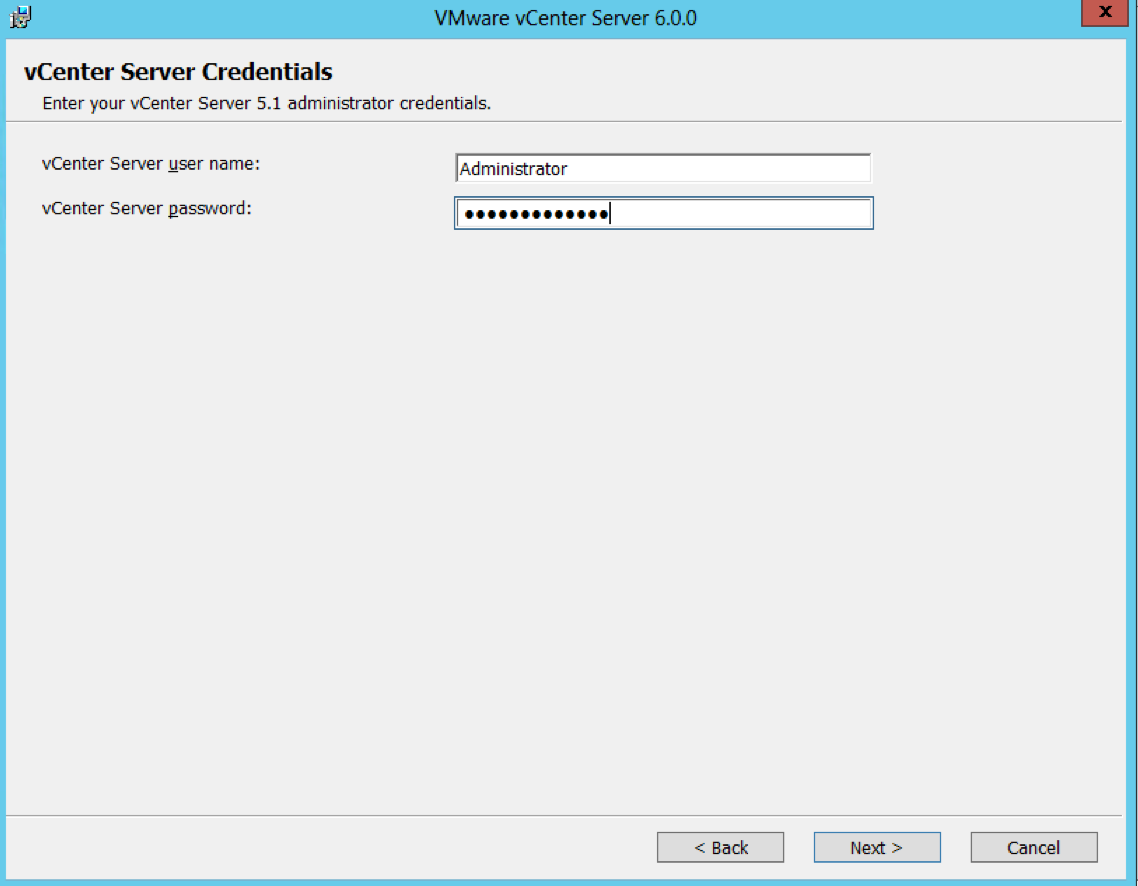
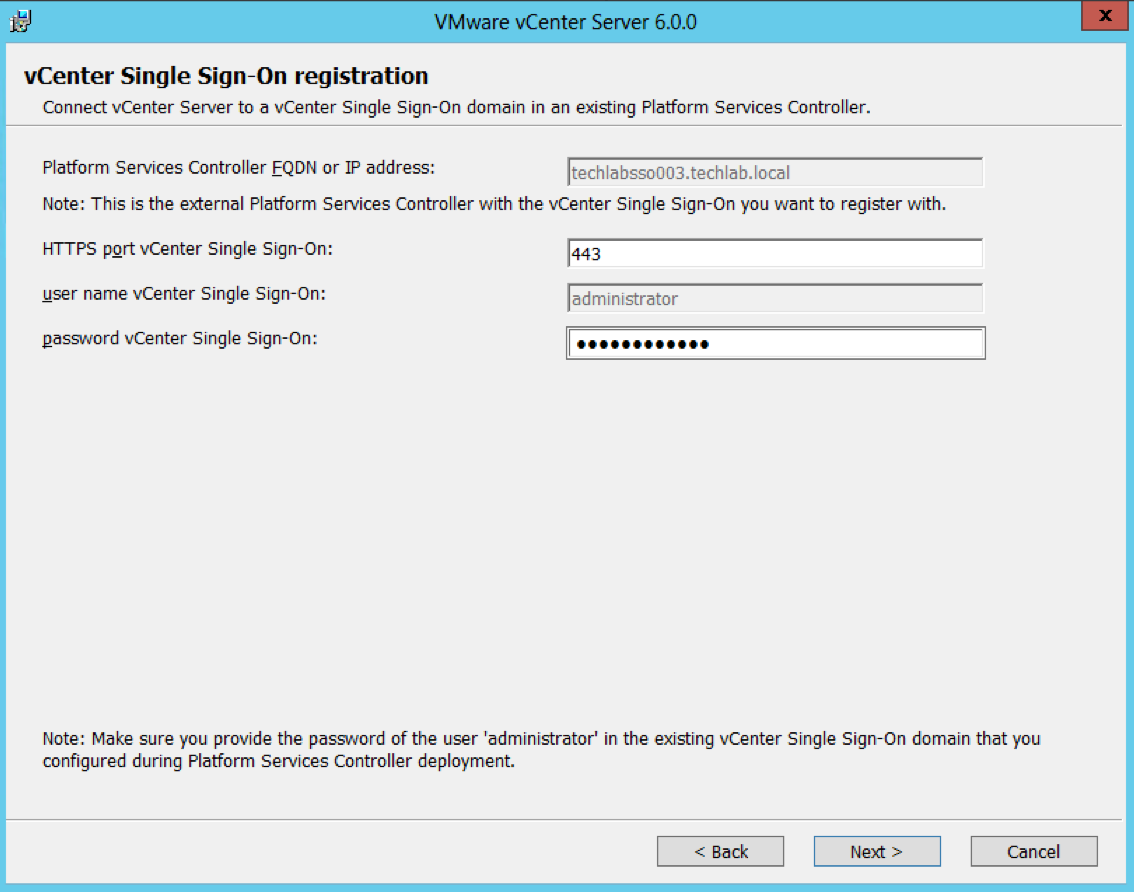
Step 8 – Upgrade both vCenter 5.1 U3 servers to vCenter v6.0 U2
Note: vCenter needs at least 2 vCPUs and 8GB RAM
Note: There is sometimes and error which comes up which says
The user group “NT SERVICE\ALL SERVICES” does not have the “Log on as a service” user right. This precludes the ability to use the virtual accounts feature in Windows permit greater security through increased idolation of services. We recommend that you add this group back to the list of services that have this right. If this right is not added then any installed services that would normally use a virtual account will instead use “Local Service” account
Please see the below KB for further information
https://kb.vmware.com/selfservice/microsites/search.do?language=en_US&cmd=displayKC&externalId=2124709
If this right is not added then any installed services that would normally use a virtual account will instead use the “Local Service” account.
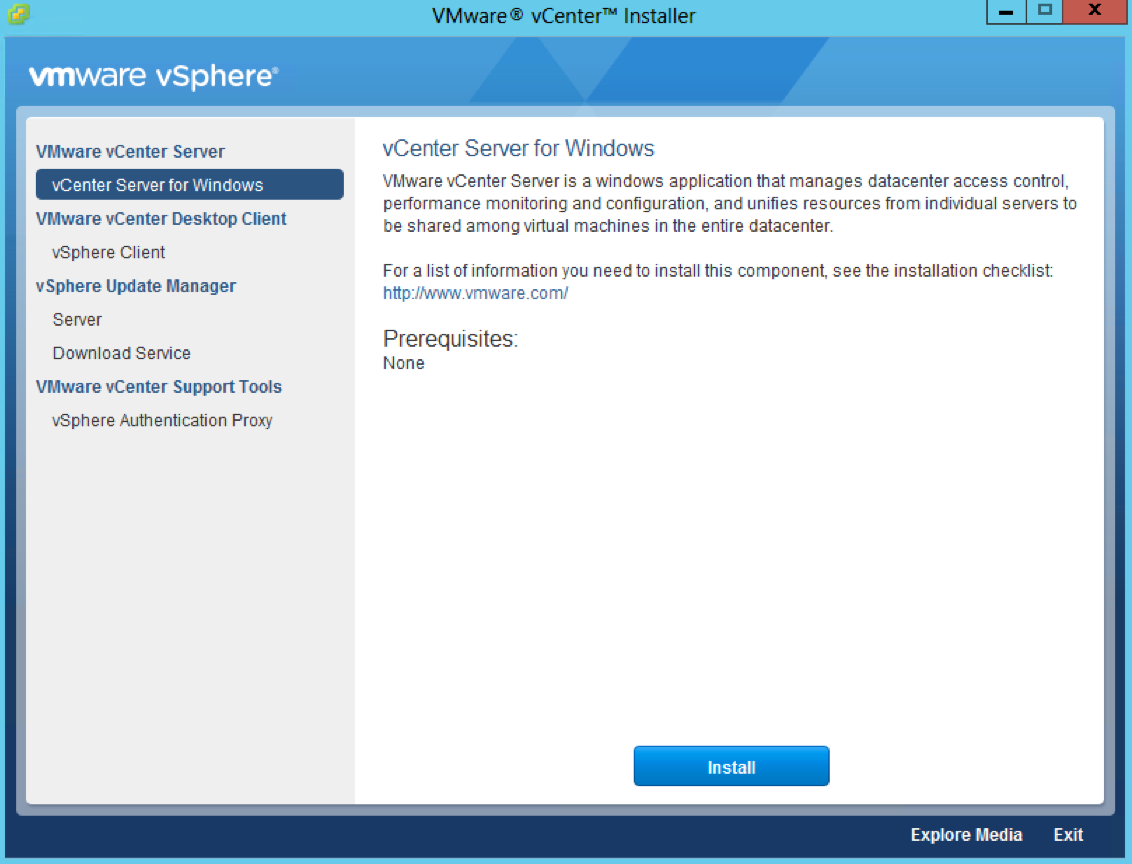
- Attach the vSphere 6 ISO and select vCenter Server for Windows and click Install
- Accept the License Agreement
- Put in the vCenter Server credentials
- It will run the pre-upgrade scripts
- Put in the Single Sign-On password
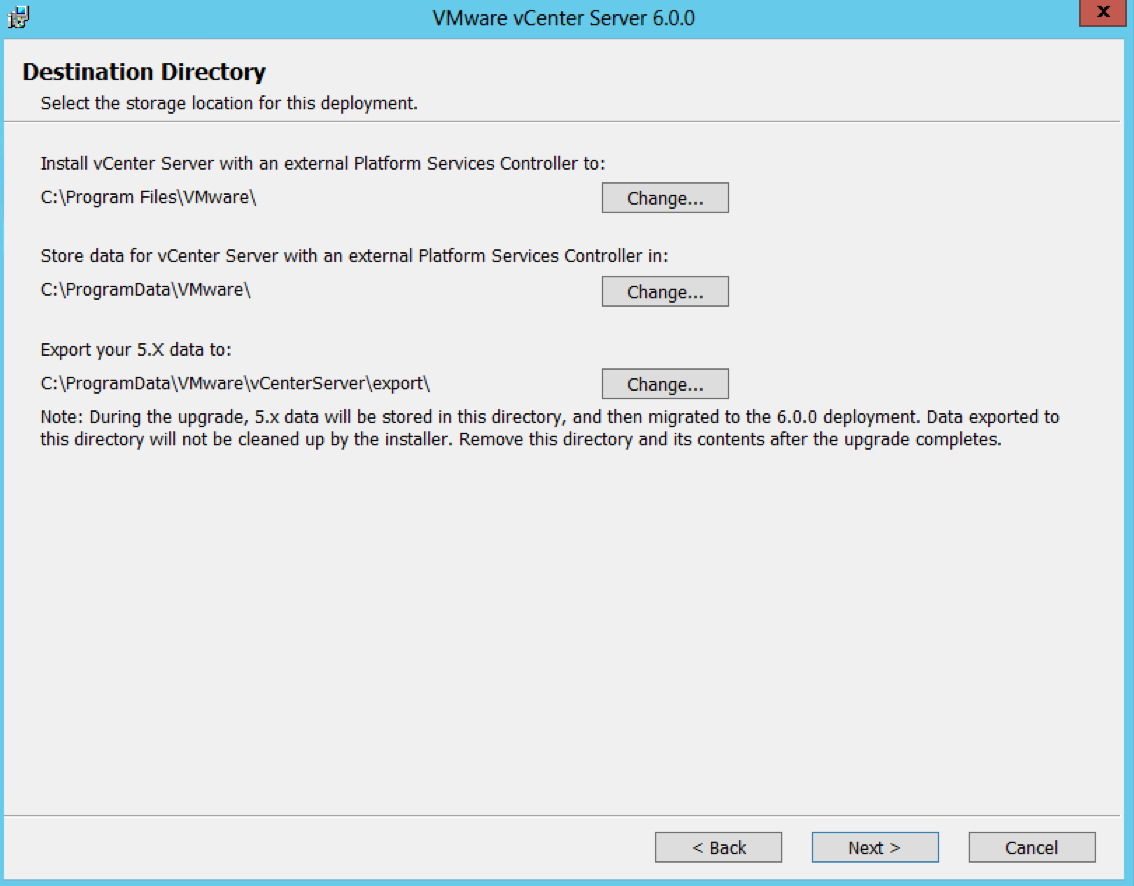
- Select Destination Directories
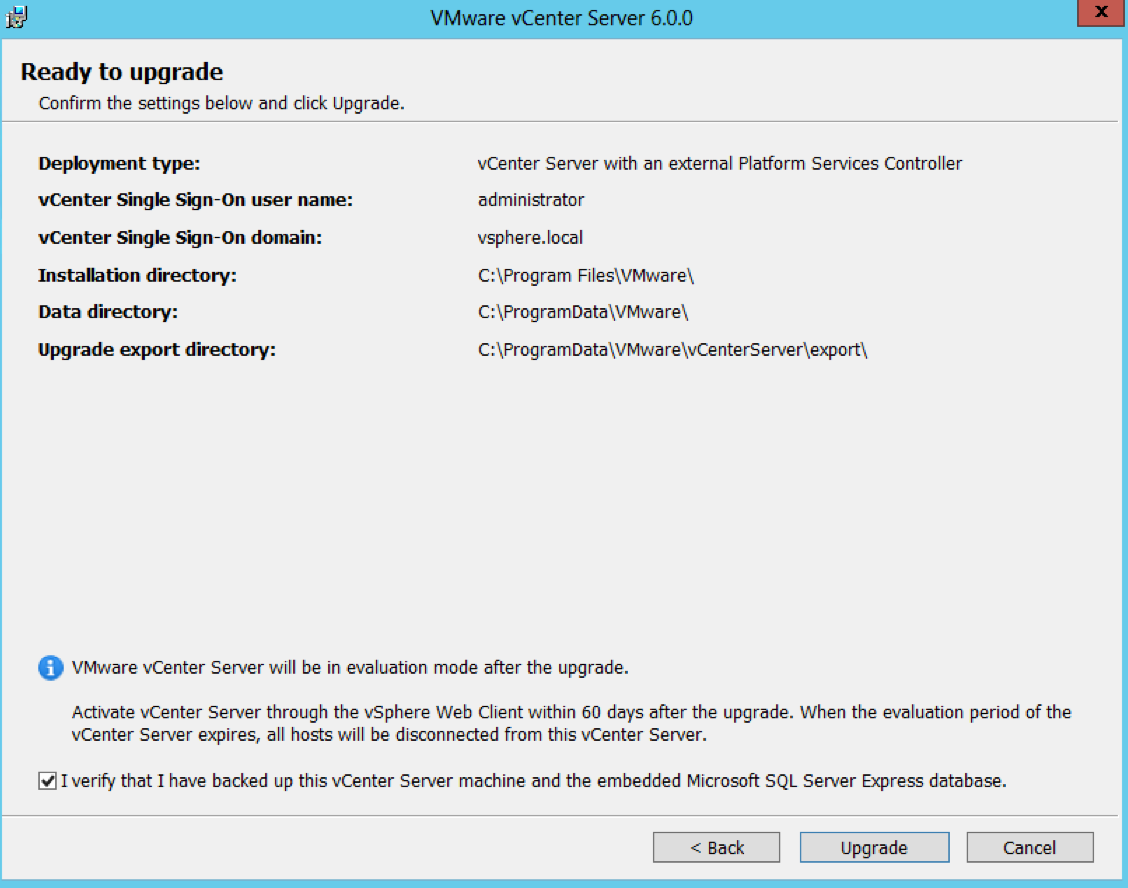
- Check the details on the Ready to Upgrade Page
- Note: When I then kicked off the installer in a client site, they had the Task Scheduler Service turned off on the vCenter server which resulted in this error message during the installation.
An error occurred while invoking external command : ‘Command: schtasks /create /ru SYSTEM /rl highest /f /sc minute /mo 5 /tn “VMwareIIAD” /tr “C:\Program Files\VMware\vCenter Server\python\python.exe\” \”C:\Program Files\VMware\vCenter Server\python-modules\iiad\iiad.py\””
Stderr: ERROR: The network address is invalid
Error occurred while creating scheduled task for IIAD
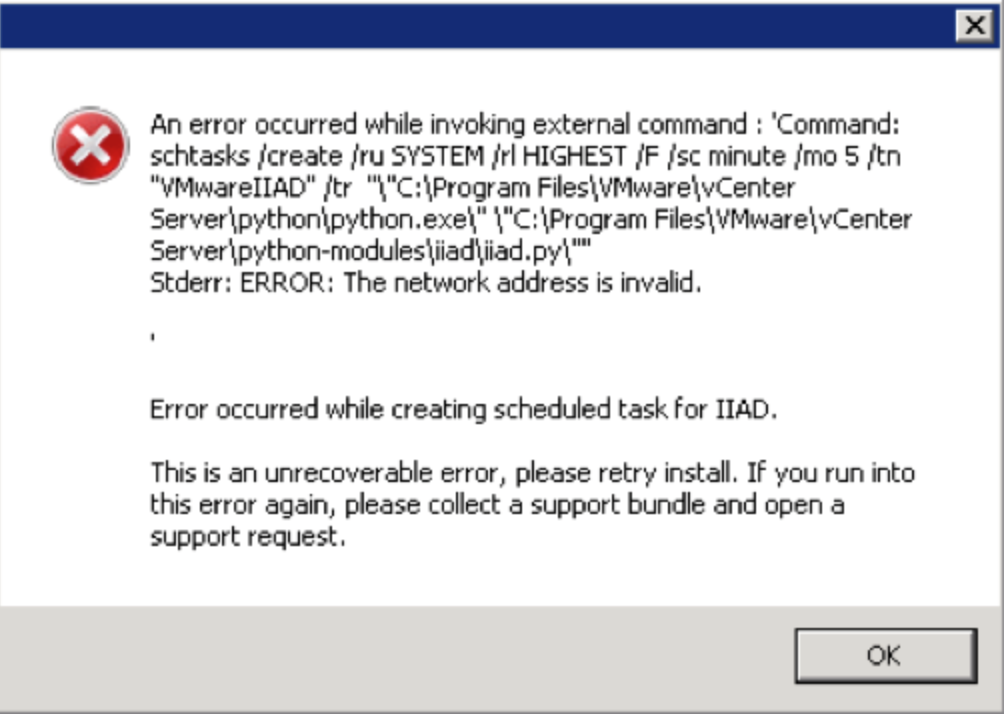
- If this happens, you must makse sure the Task Scheduler is started in the services on the vCenter server
Monitoring the Installation logs
Installation Logs
| · C:\ProgramData\VMware\vCenterServer\logs |
| · %TEMP% directory, usually C:\Users\username\AppData\Local\Temp |
|
Step 9 – upgrade the vSphere Client
Step 10 -Upgrade Update Manager
Step 11 – Determining multi-site replication agreements and status with the Platform Services Controller using vdcrepadmin
Useful VMware KB Link here
Use these parameters using the vdcrepadmin CLI:
- showservers – Displays all of the PSCs in a vSphere domain.
- showpartners – Displays the current partnerships from a single PSC within a vSphere domain.
- showpartnerstatus – Displays the current replication status of a PSC and any of the replication partners of the PSC.
- createagreement and removeagreement – Allows for creation and removal of additional replication agreements between PSCs within a vSphere domain.
Steps for vdcrepadmin showservers
This steps below provide information on using the vdcrepadmin command-line interface (CLI) for reviewing the existing vSphere domain, Platform Services Controllers (PSC) that make up your vSphere domain as well as checking the replication agreements configured and replication status within your environment. Although the utility can be used for other operations, at this time, only what is documented must be executed by technical support staff and customers.
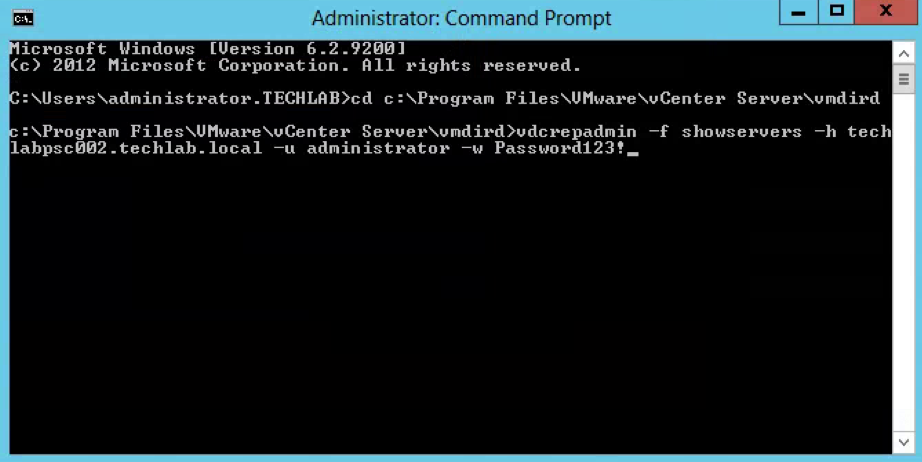
- Log into the PSC and open a Command Prompt as Administrator
- Navigate to cd c:\Program Files\VMware\vCenter Server\vmdird
- Type the below command to show all the PSC Controllers in the vSphere domain
vdcrepadmin -f showservers -h PSC_FQDN -u administrator -w Administrator_Password where administrator is the PSC administrator@vsphere.local user account
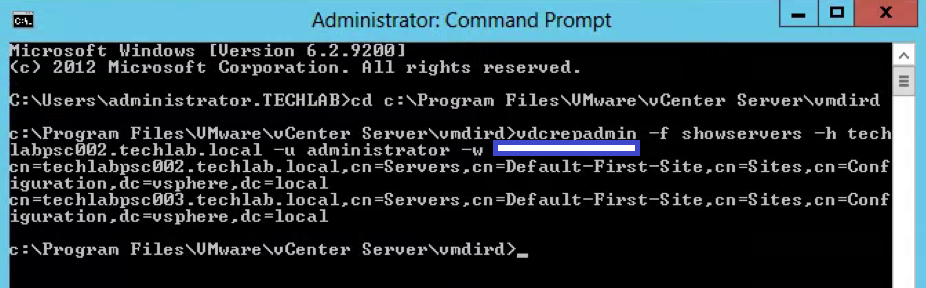
Example
vdcrepadmin -f showservers -h techlabsso002.techlab.local -u administrator -w Password123!
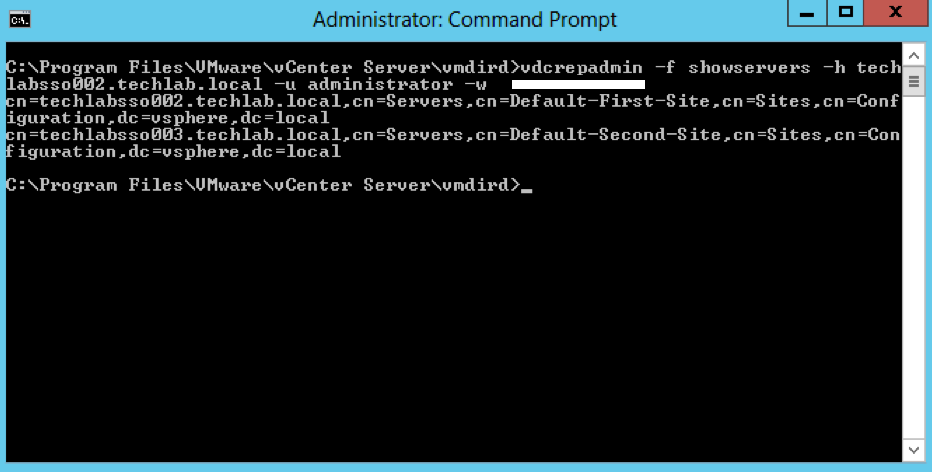
- You should now see the below showing you your 2 PSCs. In my case techlabsso002 and techlabsso003
Steps for vdcrepadmin showpartners
- Next type the following command to show the psc partners
vdcrepadmin -f showpartners -h psc1.vmware.local -u administrator -w VMw@re123
Example
vdcrepadmin -f showpartners -h techlabpsc002.techlab.local -u administrator -w Password123!
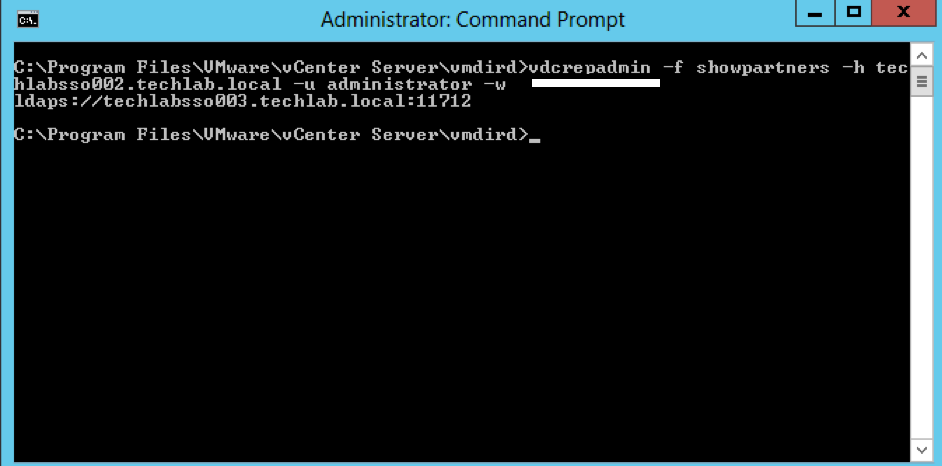
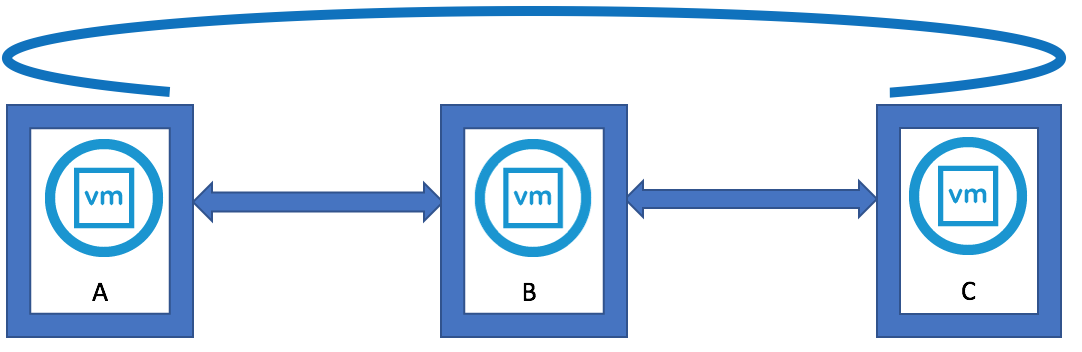
- You could run this showpartners command against all PSCs to map out the topology of the current vSphere domain by re-running this command against each of the PSCs in order to determine all of the partnerships.
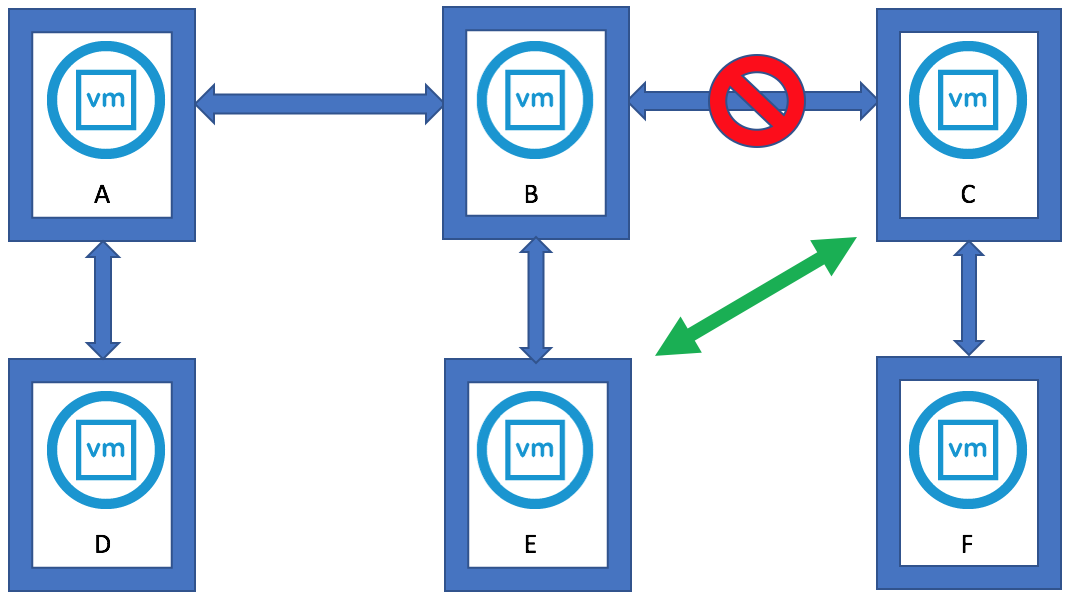
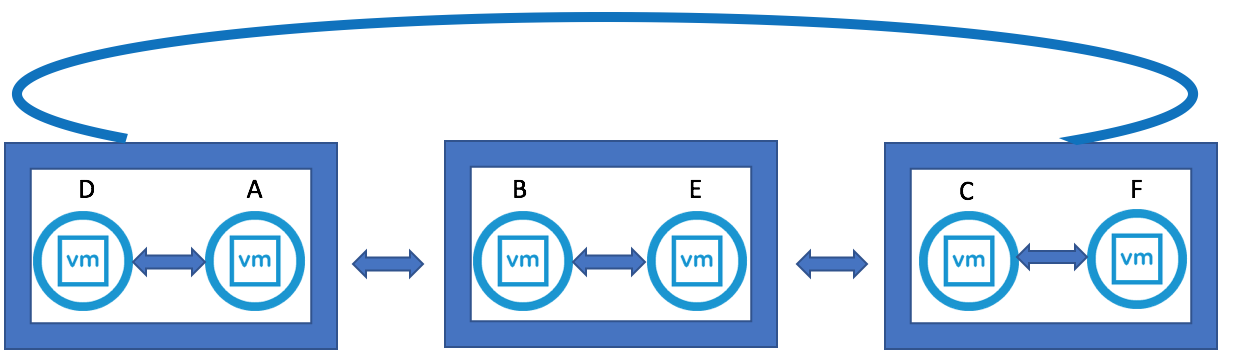
- You can see that some environments will be installed in an in-line fashion, with each PSC installed against the previous PSC, rather than a hub-and-spoke fashion where all of the PSCs would terminate to a central PSC
Interesting Info as per above screenprint courtesy of VMware engineer Sung Ruo.
As you can see above the replication agreement is listed as LDAPS. Any automatic agreement such as when we join PSC servers together is created as LDAPS as per this 5.5 to 6.0U2 upgrade however if we create any manual replication agreements, these will be created as LDAP going forwards.
In 5.5. the only secure LDAP communication between SSO/PSC nodes are via LDAPS. Thus in automatic replication agreements establishment, LDAPS is used.
In 6.0 and after, we introduced LDAP SASL/SRP binding which go through port 389. LDAP SASL/SRP (or KRB) is the simple and safe to manage between LDAP nodes. This binding mechanism is preferable to LDAPS as the SSL port is difficult to manage/deploy correctly as it depends on PKI. Also, LDAP layer sites below certificate. You need an ID before you can get a cert
Regardless, in 6.0 and after, the server will try SASL/SRP first and fall back to LDAPS if necessary regardless of LDAP/LDAPS in the labeledURI in the replication agreement definition. You also cannot force the replication agreements to use LDAPS in 6.0 and after.
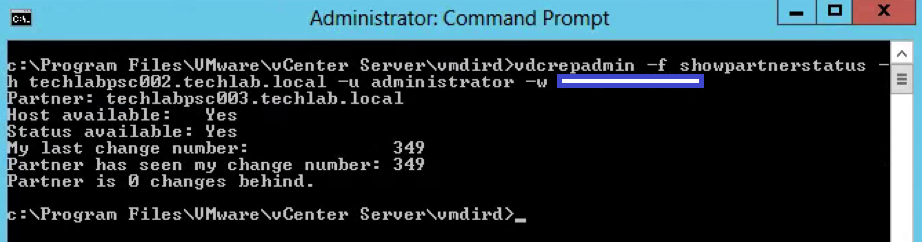
Steps for vdcrepadmin showpartnerstatus
- Next type the following command to show the partner replication status.
- This CLI is limited to execution only against the local PSC. Using the command to query the replication status from one PSC to a different PSC is not yet supported.
vdcrepadmin -f showpartnerstatus -h localhost -u administrator -w Administrator_password
Example
vdcrepadmin -f showpartnerstatus -h techlabpsc002.techlab.local -u administrator -w Password123!
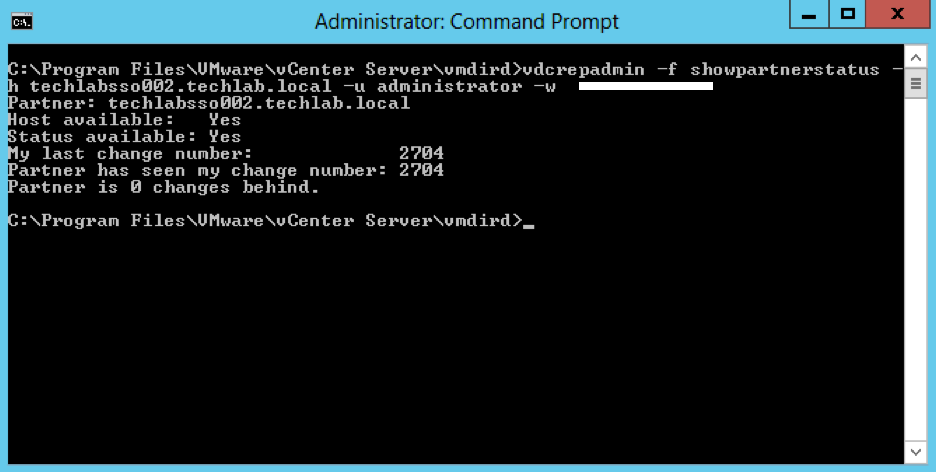
- If you have problems with replication failing, review the /var/log/vmware/vmdird/vmdird-syslog.log or C:\ProgramData\VMware\vCenterServer\logs\vmdird\vmdird-syslog.log file for details. This provides all information related to replication status and the objects that are replicated
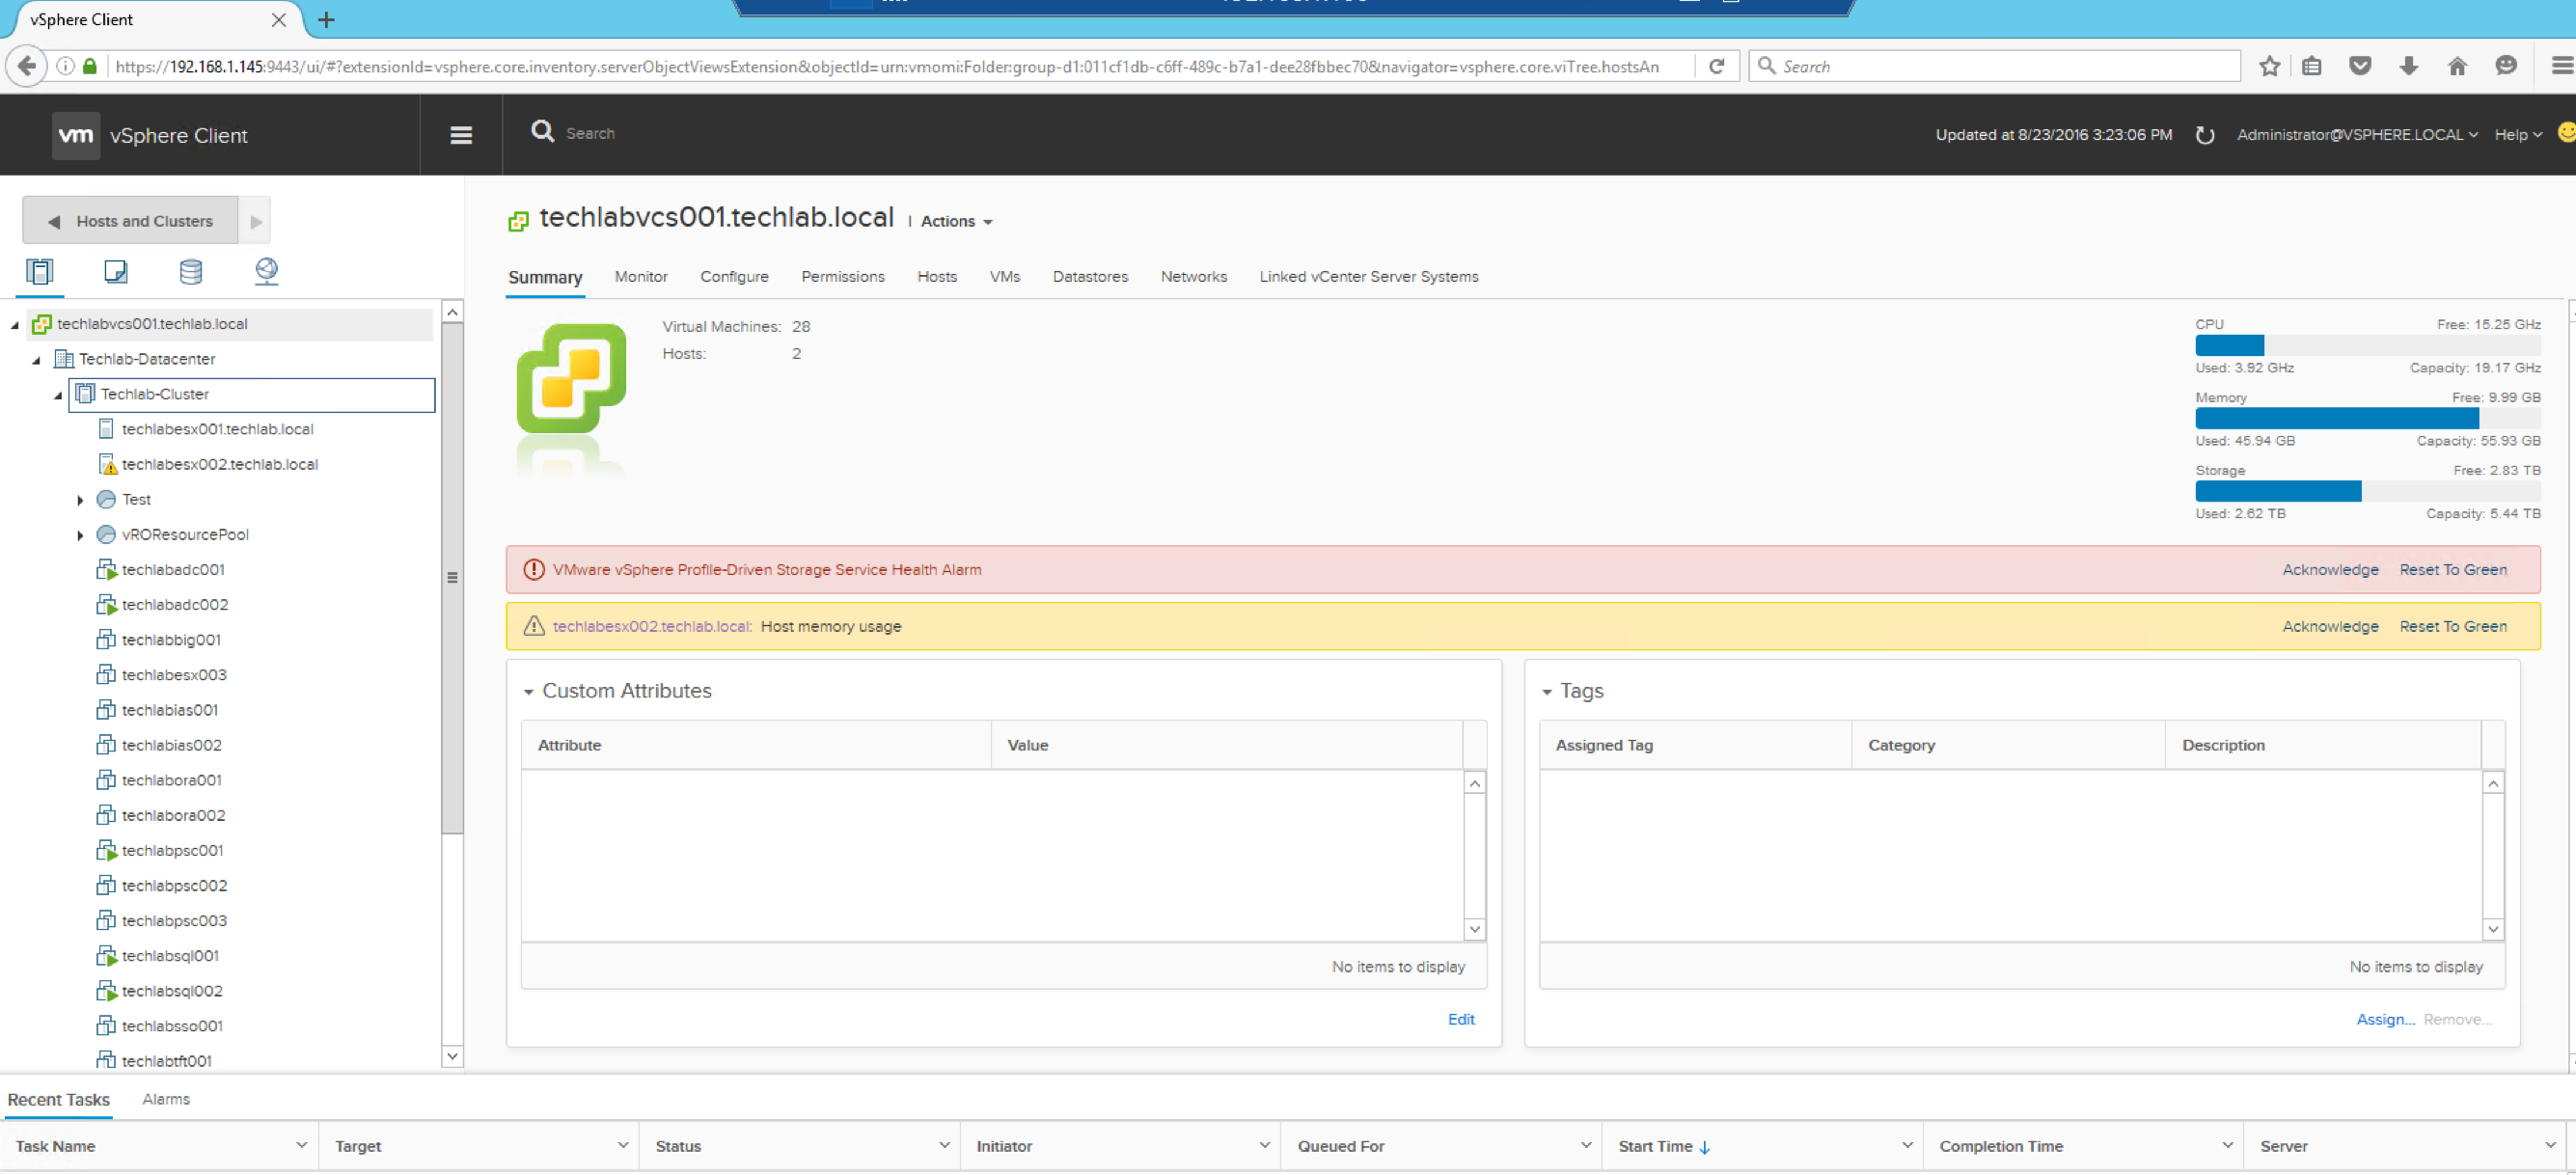
What do you see with multisite?
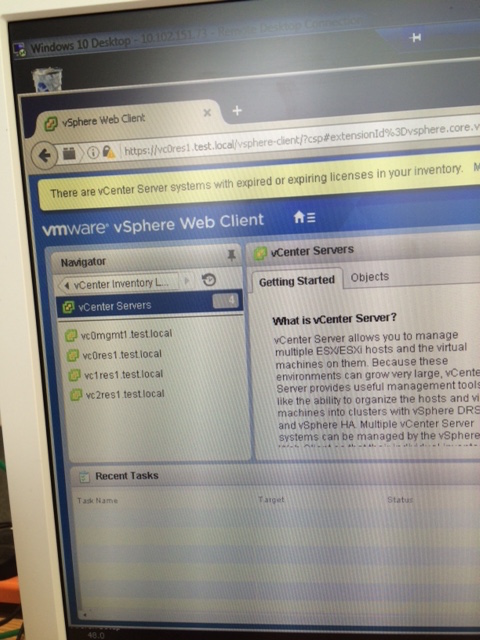
- When multisite is installed, you can then log in to each vCenter and see all other vCenters which are set up and control them
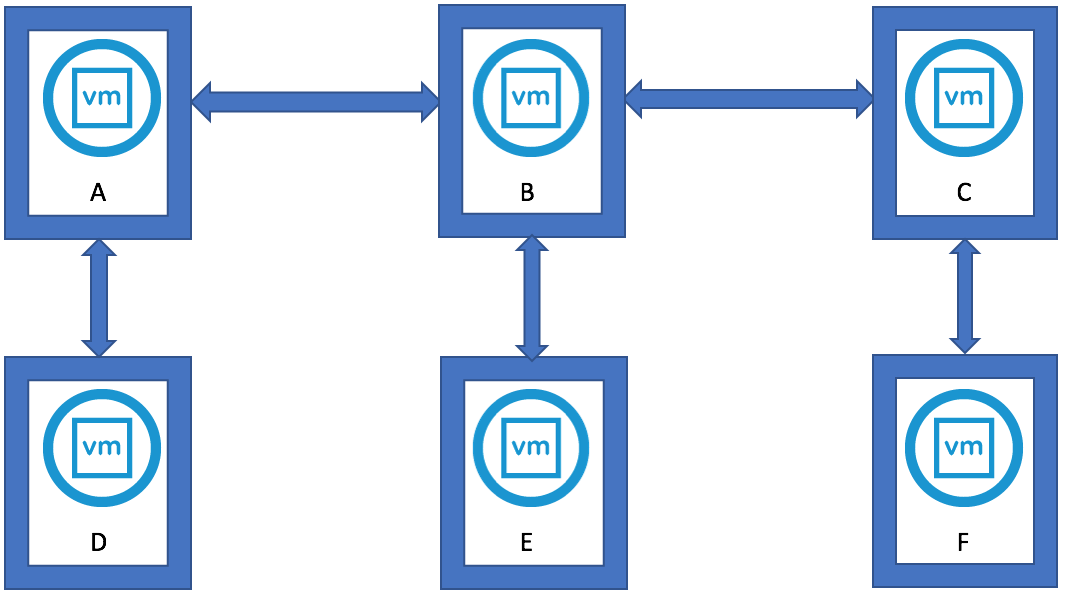
Steps for vdcrepadmin createagreement – Example only with 4 PSCs as I only have 2 PSCs
- Note: This cannot be used to create replication agreements between disparate (separate) vSphere domains
- Map out the topology of the current vSphere domain by re-running the showpartners command against each of the PSCs in order to determine all of the partnerships
For example you have 4 PSCs
You can use the showservers parameter to get a list of all of the PSCs in the domain.
Navigate to C:\Program Files\VMware\vCenter Server\vmdird and run the below commands
vdcrepadmin -f showpartners -h psc1.vmware.local -u administrator -w VMw@re123
ldap://psc2. vmware.local
vdcrepadmin -f showpartners -h psc2.vmware.local -u administrator -w VMw@re123
ldap://psc1. vmware.local
ldaps://psc3. vmware.local
vdcrepadmin -f showpartners -h psc3.vmware.local -u administrator -w VMw@re123
ldap://psc4. vmware.local
ldaps://psc2. vmware.local
vdcrepadmin -f showpartners -h psc4.vmware.local -u administrator -w VMw@re123
ldap://psc3. vmware.local
- With the topology defined, we can now generate new replication agreements. Using the PSCs 1-4 in this section as a model, we need to generate additional replication agreements between:
- PSC1.* and PSC3.*
- PSC1.* and PSC4.*
- PSC2.* and PSC4.*
- Use the following command to create a new replication agreement between PSCs to generate a mesh topology:
vdcrepadmin -f createagreement -2 -h Source_PSC_FQDN -H New_PSC_FQDN_to_Replicate -u administrator -w Administrator_Password
For example:
vdcrepadmin -f createagreement -2 -h psc1.vmware.local -H psc3.vmware.local -u Administrator -w VMw@re123
vdcrepadmin -f createagreement -2 -h psc1.vmware.local -H psc4.vmware.local -u Administrator -w VMw@re123
vdcrepadmin -f createagreement -2 -h psc2.vmware.local -H psc4.vmware.local -u Administrator -w VMw@re123
- Repeat this operation for additional PSCs until you have created an entire mesh topology.
- After completion, repeat Step 5 to confirm that you have generated a mesh topology.
- Note: Due to replication time, it may take a few seconds to minutes for a complete mesh topology to be configured.
Steps for vdcrepadmin removeagreement – Example only with 4 PSCs as I only have 2 PSCs
- Map out the topology of the current vSphere domain by re-running the showpartners command against each of the PSCs in order to determine all of the partnerships
For example you have 4 PSCs
You can use the showservers parameter to get a list of all of the PSCs in the domain.
vdcrepadmin -f showpartners -h psc1.vmware.local -u administrator -w VMw@re123
ldap://psc2. vmware.local
ldap://psc3. vmware.local
ldap://psc4. vmware.local
vdcrepadmin -f showpartners -h psc2.vmware.local -u administrator -w VMw@re123
ldap://psc1. vmware.local
ldap://psc3. vmware.local
ldap://psc4. vmware.local
ldap://psc4. vmware.local
vdcrepadmin -f showpartners -h psc3.vmware.local -u administrator -w VMw@re123
ldap://psc4. vmware.local
ldap://psc2. vmware.local
ldap://psc1. vmware.local
vdcrepadmin -f showpartners -h psc4.vmware.local -u administrator -w VMw@re123
ldap://psc3. vmware.local
ldap://psc1. vmware.local
ldap://psc2. vmware.local
- Use the following command to remove a replication agreement
vdcrepadmin -f removeagreement -2 -h Source_PSC_FQDN -H PSC_FQDN_to_Remove_from_Replication -u administrator -w Administrator_Password
For example:
vdcrepadmin -f removeagreement -2 -h psc1.vmware.local -H psc3.vmware.local -u administrator -w Administrator_Password
Monitoring the PSC Replication Logs
C:\ProgramData\VMware\vCenter Server\Logs\sso\vmware-sts-idmd.log
This is a good log to use as a “one-stop-shop” for SSO authentication issues. Authentication requests/failures as well as problems with an identity source will post here.
C:\ProgramData\VMware\vCenter Server\Logs\vmafdd\vdcpromo.log
Contains installation errors during configuration of vmdir. Especially useful for errors when adding another PSC to the same SSO domain.
C:\ProgramData\VMware\vCenter Server\Logs\vmafdd\vmafdd.log
C:\ProgramData\VMware\vCenter Server\Logs\vmdird\vmdird-syslog.log
Has information concerning the SSO LDAP instance named vmdir. Problems with ldap operations and replication within SSO can be found here.
C:\ProgramData\VMware\vCenter Server\Logs\vmdird\vdcrepadmin.log
C:\ProgramData\VMware\vCenter Server\Logs\vmdird\vmafdvmdirclient.log
C:\Program Data\VMware\CIS\logs\vmdird\vmdir.log
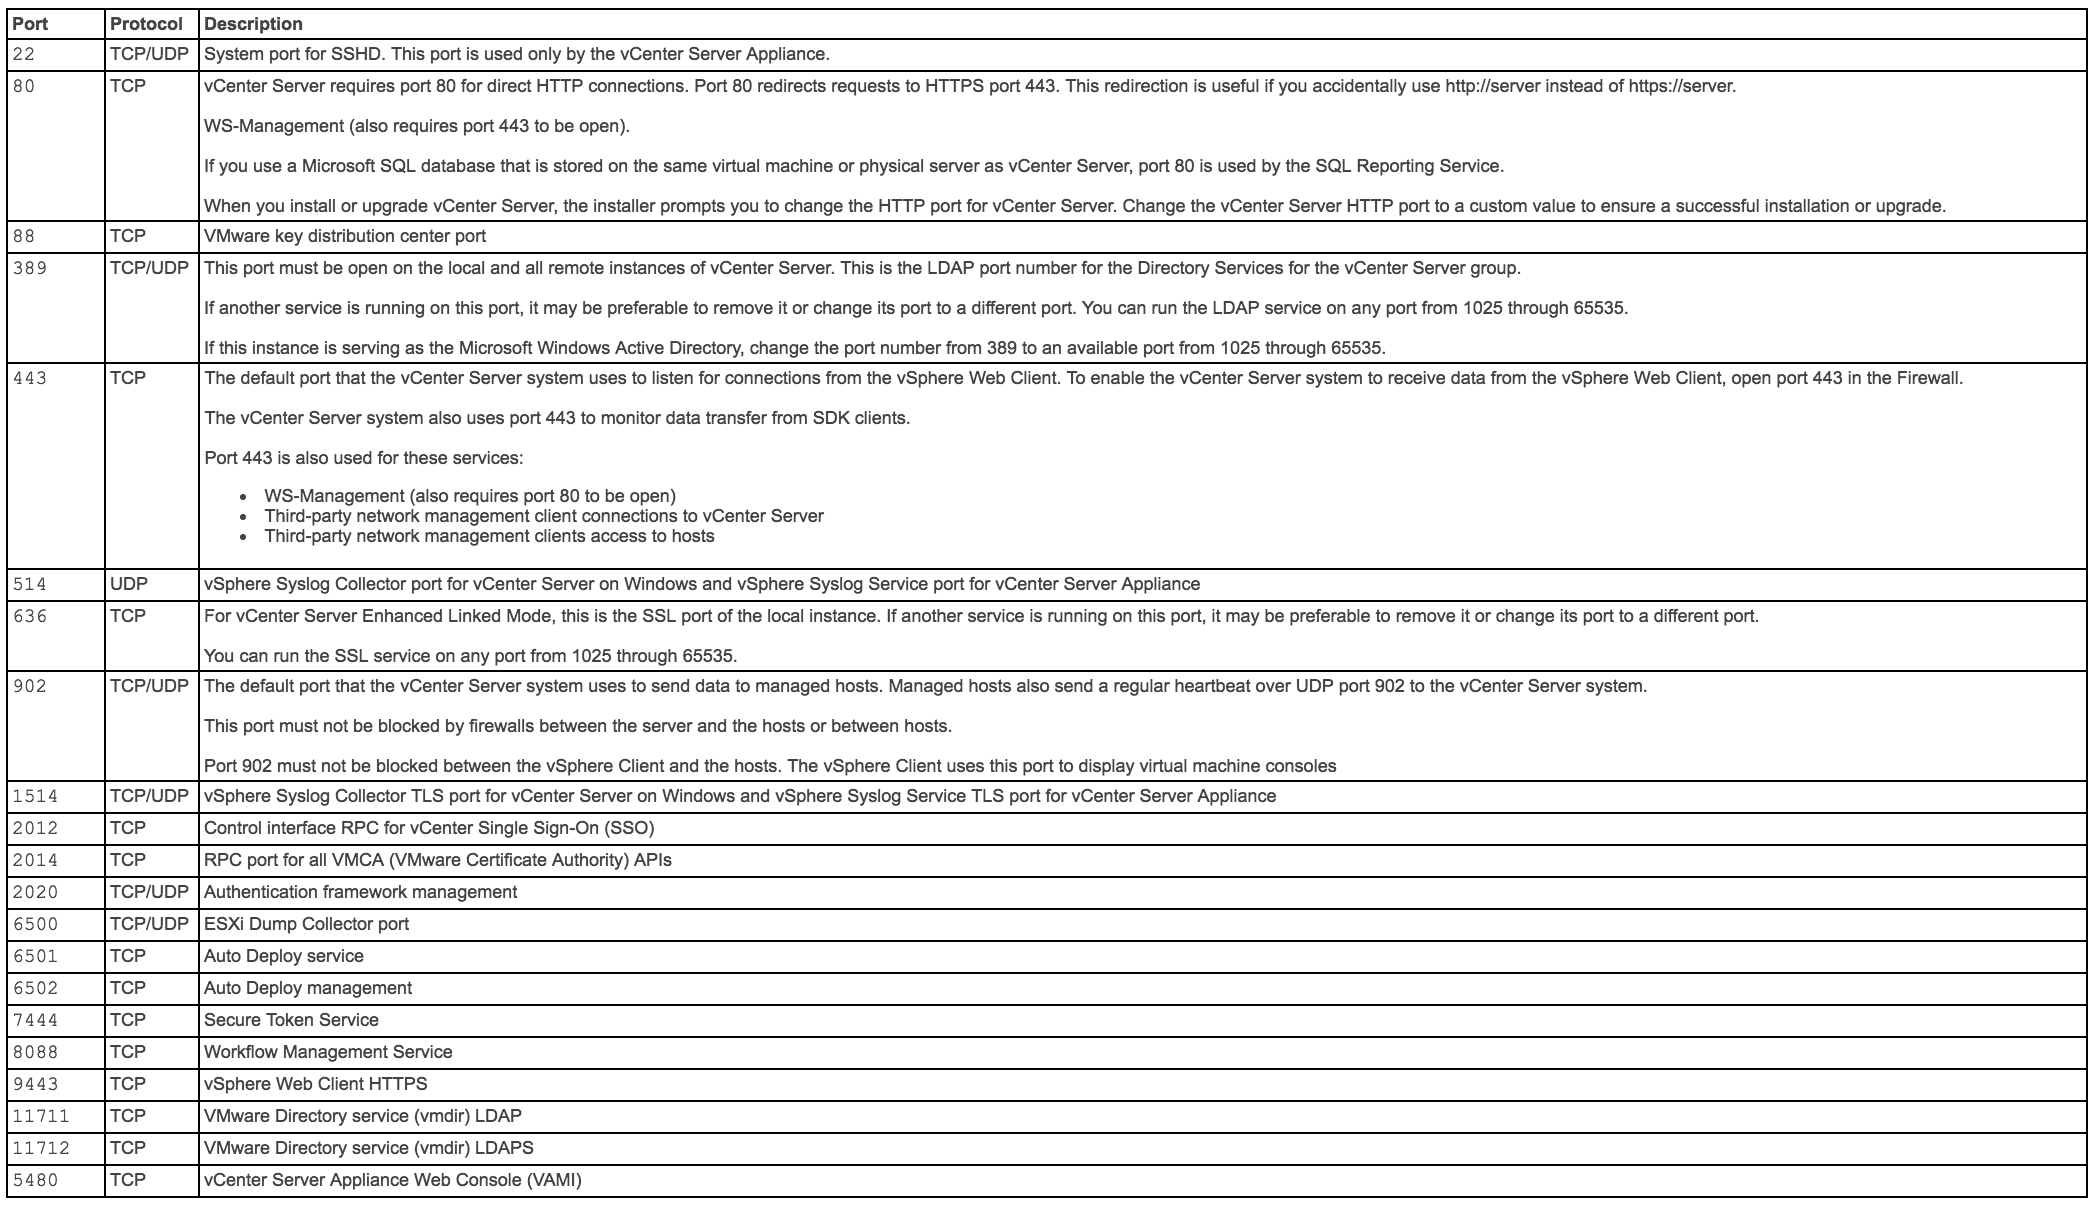
vCenter and PSC Ports
Ports can also be seen here in the vSphere Documentation Center
The table below shows all the ports which vCenter uses but multisite communication only needs a subset of these ports
What ports need to be open between sites for PSC Multisite Mode?
Some situations exist where communication within the same SSO domain can be blocked by external firewalls. The ports which should be open are
PSC to PSC should be 389, 636, 2012, 2014, 2020 and 7444 (Plus 11711 and 11712 if using 5.5)
VC to VC should be 443
PSC to VC should be 443, 389, 636, 11711,11712 and 2012 (11711 and 11712 legacy)
vCenter to vCenter
techlabvcs004 vCenter to techlabvcs005 vCenter – 443
techlabvcs005 vCenter to techlabvcs004 vCenter – 443
PSC to PSC
techlabsso002 PSC to techlabsso003 PSC – 389, 636, 11711, 11712, and 2012 (11711 and 11712 legacy)
techlabsso003 PSC to techlabsso002 PSC – 389, 636, 11711, 11712, and 2012 (11711 and 11712 legacy)
vCenter to PSC
techlabvcs004 vCenter to techlabsso002 PSC – 443, 389, 636, 2012, 2014, 2020, and 7444 (plus 11711 and 11712 if using 5.5)
techlabvcs004 vCenter to techlabsso003 PSC – 443, 389, 636, 2012, 2014, 2020, and 7444 (plus 11711 and 11712 if using 5.5)
techlabvcs005 vCenter to techlabsso002 PSC – 443, 389, 636, 2012, 2014, 2020, and 7444 (plus 11711 and 11712 if using 5.5)
techlabvcs005 vCenter to techlabsso003 PSC – 443, 389, 636, 2012, 2014, 2020, and 7444 (plus 11711 and 11712 if using 5.5)
Checking what sites and domains the PSCs are running on
You can use the following commands from the PSC to discover the SSO topology
SSO Site
- VCSA: /usr/lib/vmware-vmafd/bin/vmafd-cli get-site-name –-server-name localhost
- Windows: C:\Program Files\VMware\vCenter Server\vmafdd\vmafd-cli get-site-name –-server-name localhost
SSO Domain
- VCSA: /usr/lib/vmware-vmafd/bin/vmafd-cli get-domain-name –-server-name localhost
- Windows: C:\Program Files\VMware\vCenter Server\vmafdd\vmafd-cli get-domain-name –-server-name localhost
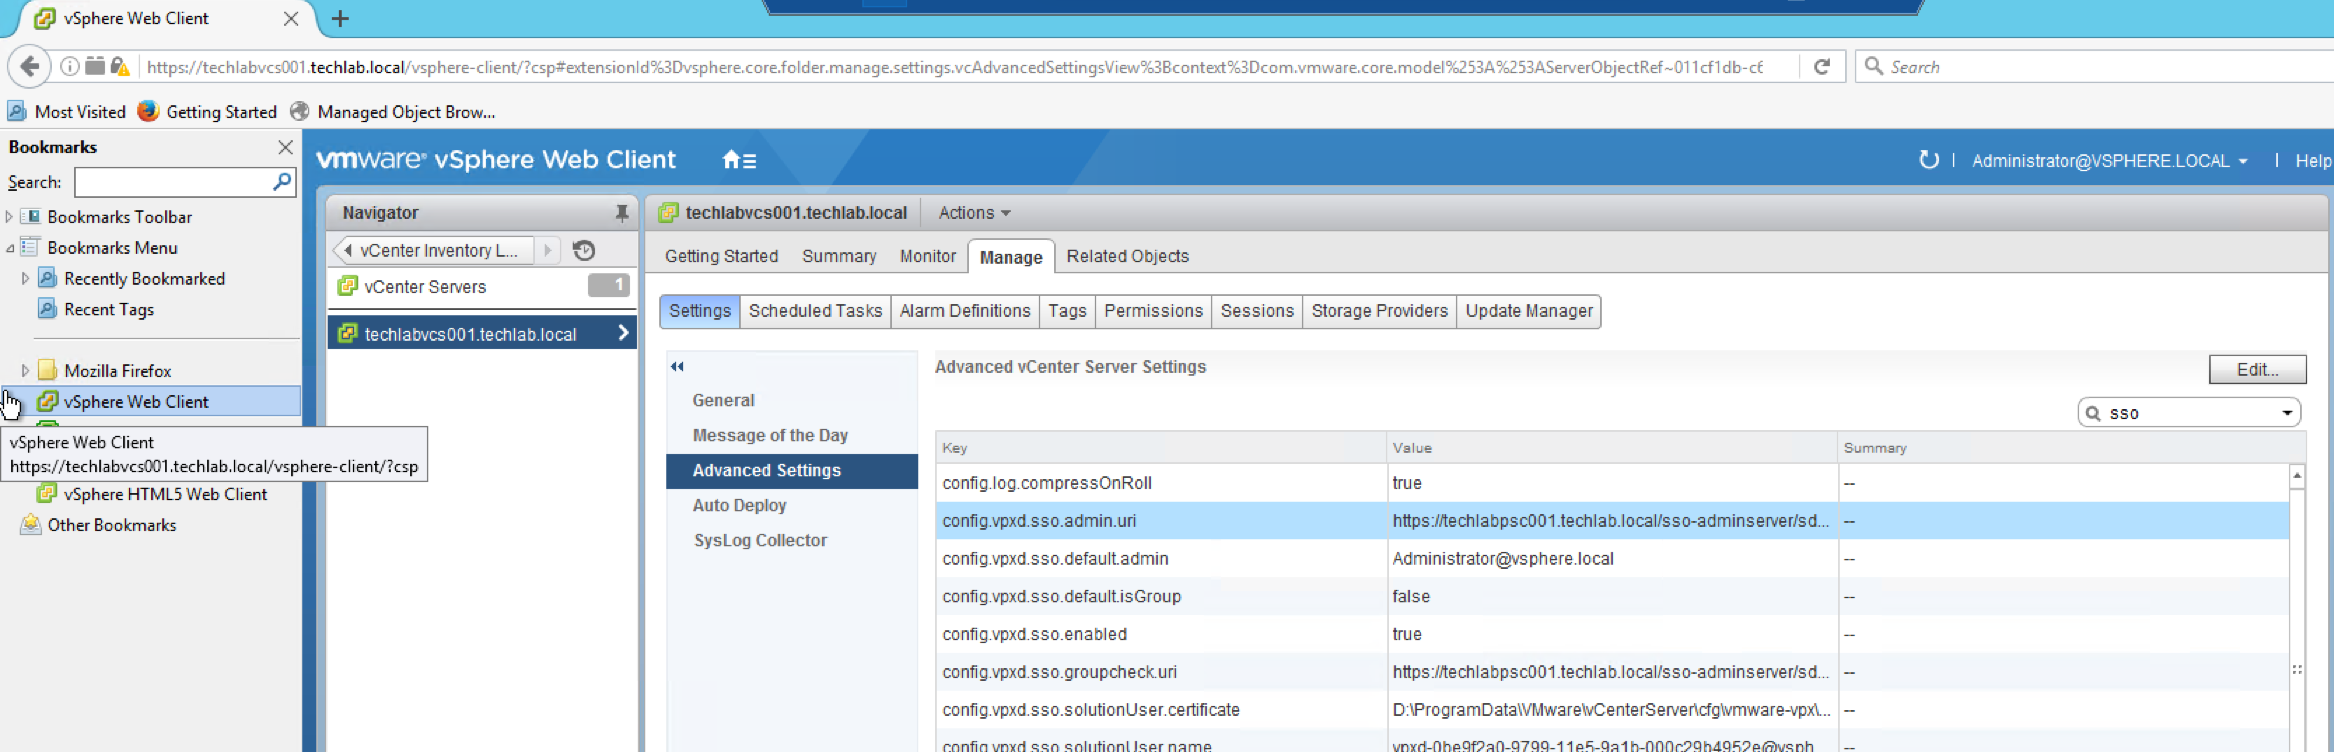
How can I see what PSC I am connected to?
Under the vCenter Server’s Advanced Setting, there is a property called “config.vpxd.sso.admin.uri” which specifies the PSC it is currently linked to
Home > vCenter Inventory Lists > Your vCenter Server > Manage > Advanced Settings > Look for “config.vpxd.sso.admin.uri”
The second option is to use the vmafd-cli utility which is available on the vCenter Server itself. You will need to run the following command depending on your vCenter Server platform (VCSA or Windows)
- /usr/lib/vmware-vmafd/bin/vmafd-cli get-ls-location –server-name localhost
- C:\Program Files\VMware\vCenter Server\vmafdd\vmafd-cli get-ls-location –server-name localhost
SQL Database Password issues during the upgrade
Interestingly we had an error at one site due to special characters
https://kb.vmware.com/selfservice/microsites/search.do?language=en_US&cmd=displayKC&externalId=2125492
Installing vCenter Single Sign-On 5.5 fails if the password for administrator@vsphere.local contains certain special characters
https://kb.vmware.com/selfservice/search.do?cmd=displayKC&docType=kc&docTypeID=DT_KB_1_1&externalId=2060746