Archive for Upgrading

Using VMware’s Host Agent Pre Upgrade Checker and Database Pre Upgrade Checker

tickit

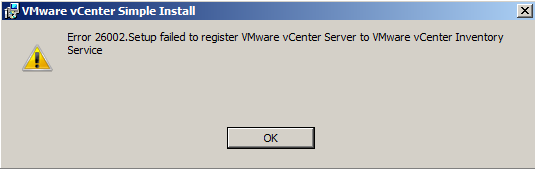
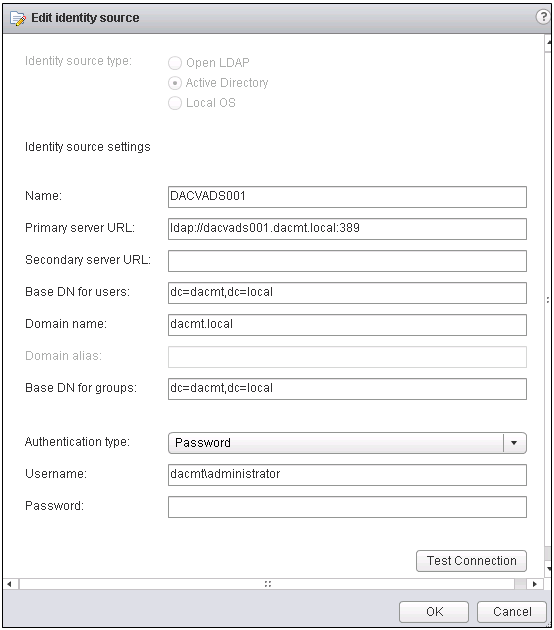
About the vCenter Host Agent Pre-Upgrade Checker

The vCenter Host Agent Pre-Upgrade Checker produces a report showing known issues that might prevent a successful upgrade of the vCenter Host Agent software.

To ensure a successful upgrade to vCenter Server 5, you must diagnose and fix any potential problems on the managed ESX/ESXi hosts. You can run the vCenter Host Agent Pre-Upgrade Checker for in-place upgrades from vCenter Server 4.x to vCenter Server 5.0

checker1

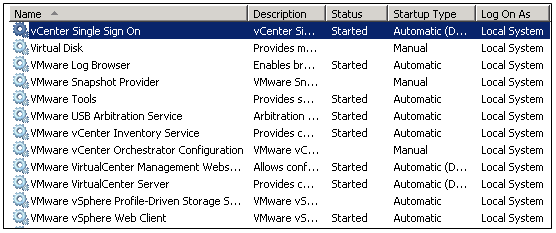
vCenter Host Agent runs on all managed ESX/ESXi hosts. This software coordinates actions received from vCenter Server. When you add a host to vCenter Server, the agent is installed on the physical ESX/ESXi host. When you upgrade to vCenter Server 5, the agent residing on each ESX/ESXi host must be upgraded as well.

During a vCenter Server upgrade, the existing agent software is uninstalled and the updated agent software is installed in its place. If the upgrade fails, the updated agent software might not be installed and the host might become unreachable by VirtualCenter 2.5 Update 6 or later, vCenter Server 4.x, or by vCenter Server 5.0. To avoid this condition, you can run the vCenter Host Agent Pre-Upgrade Checker before you try to upgrade to vCenter Server 5.

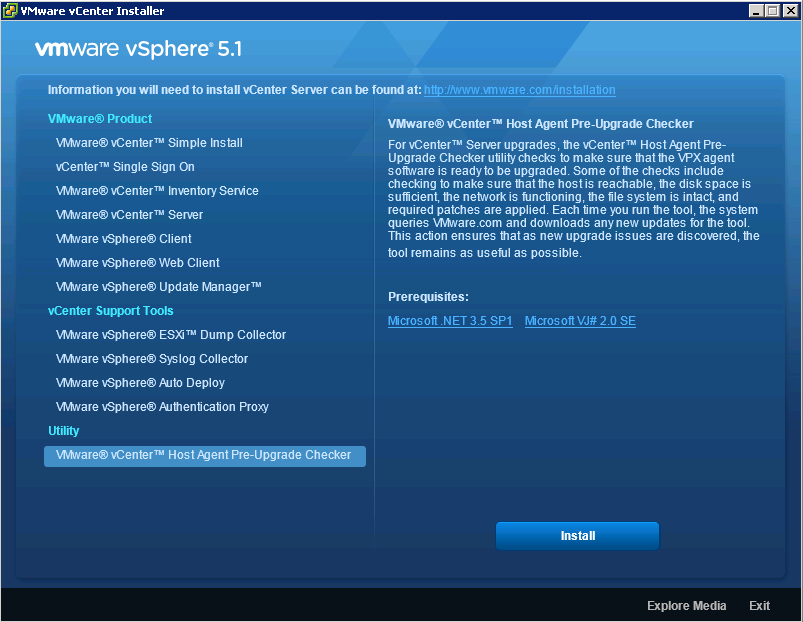
The vCenter Host Agent Pre-Upgrade Checker checks to make sure that the agent software is ready to be upgraded. Some of the checks include checking to make sure that the host is reachable, the disk space is sufficient, the network is functioning, the file system is intact, and required patches are applied. Each time you run the tool, the system queries VMware.com and downloads any new updates for the tool. This action ensures that as new upgrade issues are discovered, the tool remains as useful as possible
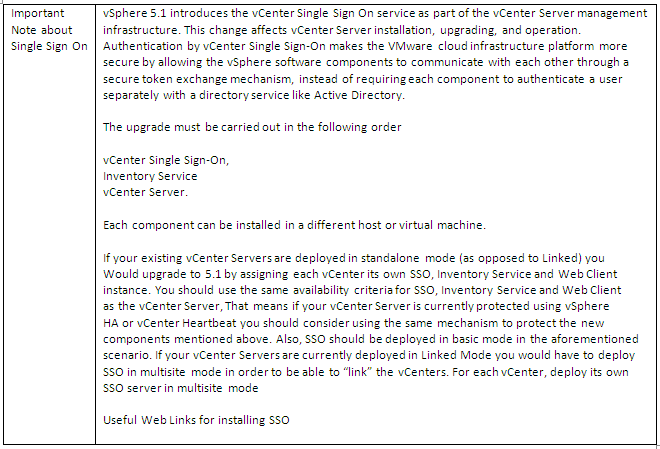
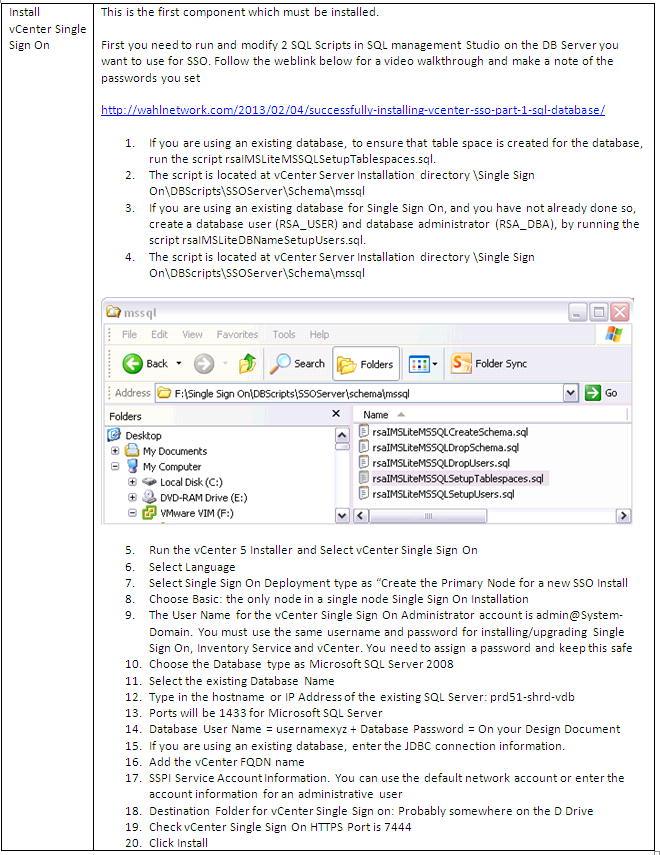
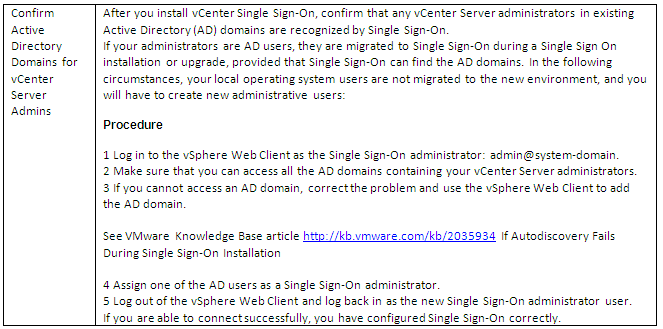
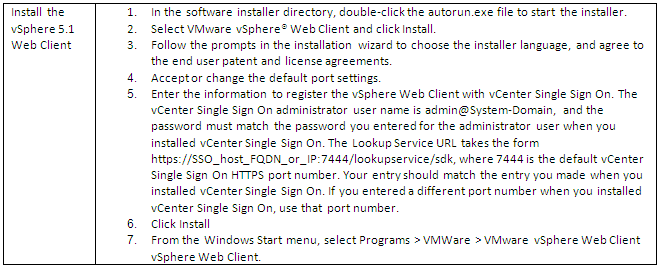
Important

A successful vCenter Host Agent pre-upgrade check does not guarantee a successful upgrade to vCenter Server 5. An upgrade to vCenter Server involves multiple components, and the tool checks only one component: the vCenter Host Agent. Also, the tool checks only known issues. Other issues might be present that the tool does not check.

The vCenter Host Agent Pre-Upgrade Checker does not fix the reported issues. You must resolve the reported issues manually and rerun the tool to verify that the issues are resolved.

Run the vCenter Host Agent Pre-Upgrade Checker

Prerequisites

  • Verify that VirtualCenter 2.5 Update 6 or later or vCenter Server is installed on a Windows machine that is supported by vCenter Server 5.
  • Verify that the VirtualCenter 2.5 Update 6 or vCenter Server machine has a DSN configured that is compatible with vCenter Server 5.
  • Verify that the VirtualCenter 2.5 Update 6 or vCenter Server database is supported by vCenter Server 5. If necessary, upgrade the database to work with vCenter Server 5. The MSDE database was supported in experimental mode in VirtualCenter Server 2.0.x, but is not supported in vCenter Server 5. The vCenter Host Agent Pre-Upgrade Checker will not detect the database. Upgrade to a supported database before using the tool. See Supported Database Upgrades.
  • Verify that the ESX/ESXi hosts are managed by VirtualCenter 2.5 Update 6 or later or by vCenter Server.   Verify that VirtualCenter Agent or vCenter Host Agent software is running on each managed ESX/ESXi host.
  • Verify that Microsoft .NET Framework Version 2.0 is installed on the VirtualCenter 2.5 Update 6 or later system.
  • Verify that you have Internet connectivity from the VirtualCenter 2.5 Update 6 or later or vCenter Server system. This allows new updates to be applied to the tool and allows you to view the reports and the Knowledge Base (KB) articles associated with the reports.

Procedure

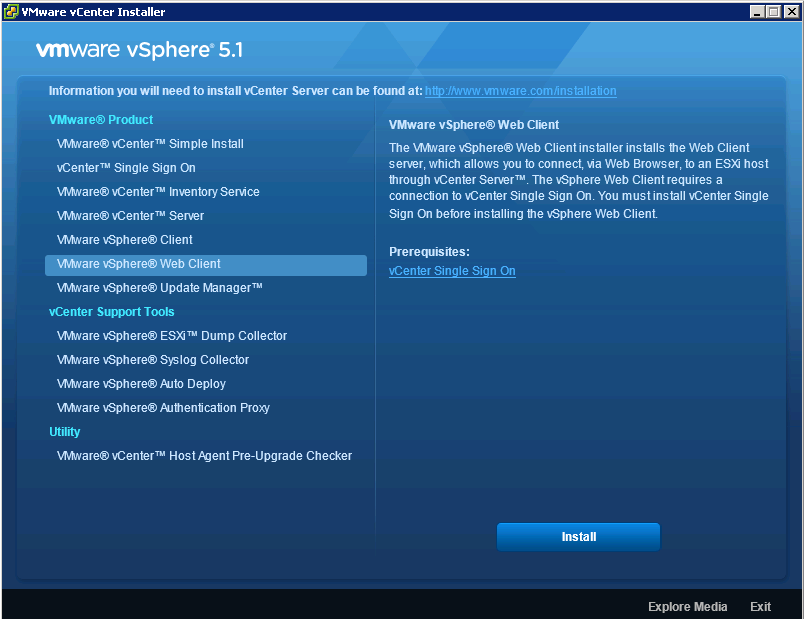
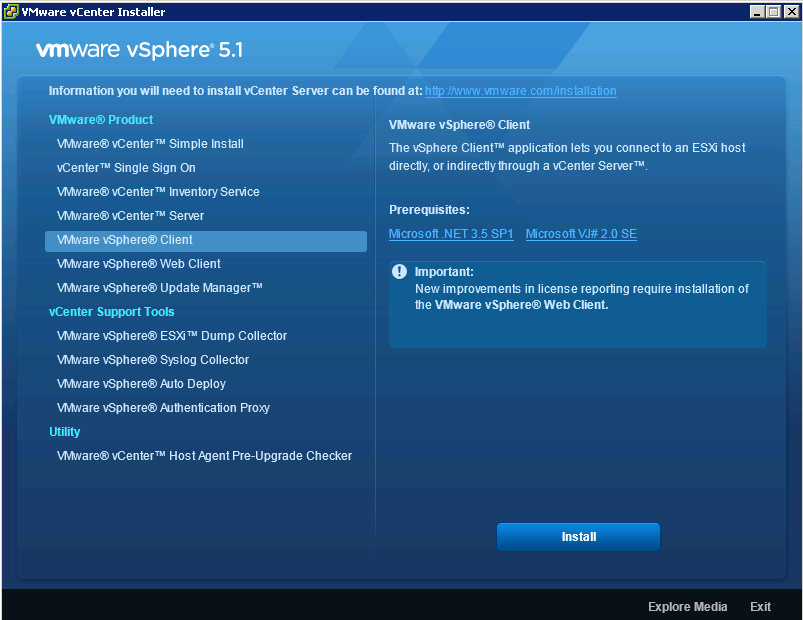
On the VirtualCenter 2.5 Update 6 or later or vCenter Server system you are upgrading from, download the vCenter Server 5 installation package or insert the vCenter Server 5 installation DVD. Take one of the following actions to start the Pre-Upgrade Checker.

  1. In the installation package or on the DVD, navigate to \vpx\agentupgradecheck and run the AgentUpgradeChecker.exe executable file.
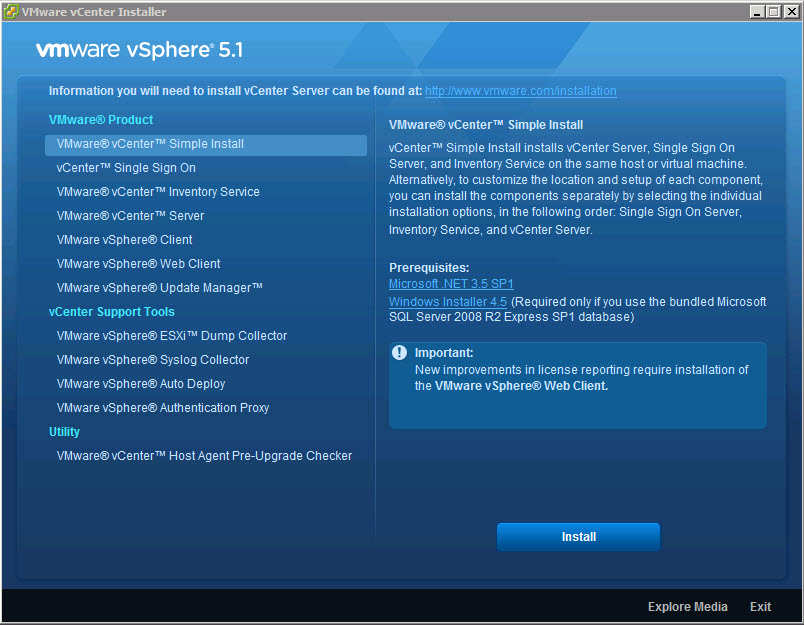
  2. Start the vCenter Server installer autorun.exe and select vCenter Host Agent Pre-Upgrade Checker from the Utility list.

Next

  • Select the DSN for the VirtualCenter or vCenter Server system you are upgrading from and select the login credentials that are appropriate for that DSN.
  • If you are not sure which credential type to select, check which authentication type is configured for the DSN (Control Panel > Administrative Tools > ODBC Data Sources > System DSN).   If the DSN requires a login for the credential type in use, enter a user name and password and click Next.
  • Select an option for scanning all hosts or specific hosts.

checker2

  • Click Run Precheck.The tool takes 30-40 seconds for each host.
  • When the check is complete, click Next.
  • View the pre-upgrade reports.
  • To view the report for an individual host, click the link next to the host name.
  • To view a summary report for all hosts, click View Report.

You have a list of issues to resolve before you upgrade to vCenter Server 5

  • From the report, use the linked KB articles to research and resolve the issues for each host. After you resolve the issues, rerun the vCenter Host Agent Pre-Upgrade Checker. Repeat this process until you resolve all the reported issues, and proceed with your upgrade to vCenter Server 5.

VMware’s Database Pre Upgrade Checker

Before you upgrade vCenter Server, you can run the VMware vCenter Server Database Pre-Upgrade Checker on your current vCenter Server database to reveal problems that could prevent the upgrade or affect the performance of your database after the upgrade. You can use the Pre-Upgrade Checker for these upgrades:

  • On a VirtualCenter 2.5 Update 6 or later database before you upgrade to vCenter Server 4.x.
  • On a vCenter Server 4.0.x database before you upgrade to vCenter Server 4.1.x, 5.0.x, or 5.1.x.
  • On a vCenter Server 4.1.x database before you upgrade to vCenter Server 5.0.x or 5.1.x.
  • On a vCenter Server 5.0.x database before you upgrade to vCenter Server 5.1.x.

Note: You do not need to run the Pre-Upgrade Checker for minor update releases: for example, from version 4.0 to version 4.0 Update 3.

What the Pre-Upgrade Checker Checks

The Pre-Upgrade Checker compares your VCDB database signature profile with a known correct standard for your VCDB database version. A database signature profile is a representation of database structure and dependent objects. The Pre-Upgrade Checker creates a signature profile configuration file for your existing (pre-upgrade) database and compares it with the known correct signature profile for your VCDB database version. If the Pre-Upgrade Checker identifies a difference between your database signature profile and the known VCDB signature profile, the check fails. If your VCDB database signature profile matches the known signature profile, the check verifies that your database can be upgraded.

The Pre-Upgrade Checker also performs these checks.

  • Check for multiple schemas in the customer database.
  • Database user and role check. Checks that the given database user has the correct privilege to upgrade.
  • Table and structure check. No data checks are included in this check.
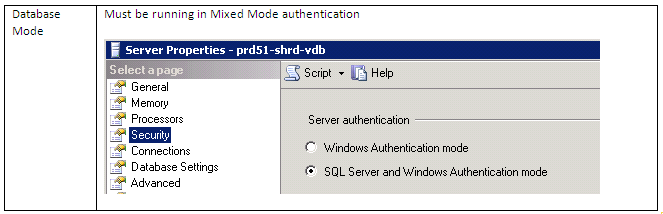
  • SQL compatibility mode check for Microsoft SQL Server. Determines whether the compatibility mode is set to an appropriate and supported level.

The Pre-Upgrade Checker outputs a single .zip file, which contains both the database signature file and the message log from running the Pre-Upgrade Checker.

Note: The Pre-Upgrade Checker works only with vCenter Server installations on Windows. The Pre-Upgrade Checker does not work with the vCenter Server Appliance

VMware Link

Follow this link for install and further information

http://kb.vmware.com/selfservice/microsites/search.do?language=en_US&cmd=displayKC&externalId=2004286

Upgrading vSphere 4.1 to vSphere 5.1

core4

Upgrading is a multistage process in which procedures must be performed in a particular order. Follow the process outlined in this high-level overview to ensure a smooth upgrade with a minimum of system downtime. Make sure that you understand the entire upgrade process before you attempt to upgrade. If you do not follow the safeguards, you might lose data and lose access to your servers. Without planning, you might incur more downtime than is necessary

  • vCenter Single Sign-On
  • Inventory Service
  • vCenter Server

Datacentres continue to evolve. This evolution involves increasingly larger and more complex datacentres. Due to technologies such as cloud computing and distributed applications, administrators must have scalable tools and services to manage these environments in the most efficient manner possible. The longer you do not upgrade the less new beneficial features you will be able to take advantage of to provide an improved and scalable platform

Example Environment

This is an upgrade document targeted at

  • 1 x MS Windows 2008 R2 VMware vCenter VM
  • 1 x MS SQL Server 2008 R2 VM running the VMware vCenter DB + Update Manager DB
  • 25 x VMware ESXi 4.1 U3 Hosts
  • No external Certificates

Planning Tasks

The upgrade to vCenter Server 5.1 includes a database schema upgrade and an upgrade of the vCenter Server Software.

vSphere 5.1 introduces vCenter Single Sign On service as part of the vCenter Server management infrastructure. This change affects vCenter Server installation, upgrading, and operation

You need to check every single point of the VMware Upgrade Guide and make sure you know exactly what you are doing and how to recover from any potential issues

Always use the “Run as Administrator” option. It can cause you to get random error messages because your account even if it is administrator can be denied rights to certain actions

  • Check the Interoperability Matrix

Step0

  • Check Host BIOS Version and Upgrade if necessary

Step0b

  • Make sure hosts reach the minimum hardware configuration

Step2

  • Make sure vCenter meets the minimum hardware requirements

Step3

  •  Make sure Single Sign On meets the minimum hardware requirements

Step4

  • Make sure Inventory Service meets the minimum requirements (if installed separately)

Step5

  • Make sure Inventory Service meets the minimum requirements (if installed on the same server as vCenter)

Step6

  • Make sure the server you install vSphere client on is supported

Step7

  • Make sure the server and web browser is supported for vSphere Web Client

Step8

  • Check JVM Settings (Can be set during vCenter Install)

Step9

  • Check the Database Authentication Mode

Step10

  • Make sure TCP/IP is enabled in SQL Server Configuration Manager

Step21

  • Always check with your vendor. E.g Dell, HP, IBM to see if they offer a customised ISO for VMware vSphere EXi5.X. These can provide extra features and functionality you may not get from the vanilla version via VMware

Step11

  • Make sure Active Directory, DNS and time synchronisation is working correctly

Step37

  • Upgrade your current licensing via your portal

Step12

  • Backup your vCenter and vCenter Update Manager Database via Backup Software and within SQL Management Studio

Step13

  • Backup SSL Certs to a separate location

Step14

  • Run the vCenter Host Agent Pre-Upgrade Checker and resolve any issues

Step15

  • Snapshot the vCenter DB Server and the vCenter VM (If Virtual Servers)

Step16

  • Stop the VMware Virtual Center Service

Step17

  • Important Notes about SSO

Step23

  • Install vCenter Single Sign On

Step38

  • Confirm Active Directory Domains

Step36

  • Install the vCenter Web Client

Step27

  • Upgrade the Inventory Service

Step22

  • Important Notes about the vCenter Install

Step25

  • Install vCenter

Step24

  • Upgrade the vSphere Client to v5.1

Step26

  •  Upgrade Update Manager

Step29

  • Upgrade the Update Manager Client Plugin

Step30

  • Upgrade the Hosts

Step31

  • Upgrade VMware Tools

Step32

  • Upgrade VM Hardware Version

Step33

  • Upgrade Datastores from VMFS3 to VMFS5

Step34

  • Upgrade Virtual Distributed Switches to v5.1

Step35

Installing VMware vCenter Server 5.1 using the Simple Install method

Architectural Changes

The vCenter Server 5.1 release includes significant architectural changes. You must understand these changes before attempting to freshly install or upgrade to vCenter Server 5.1 from older versions of the product. There are four separate services that constitute the vCenter Server 5.1 platform. These are below and must be installed in order

  • vCenter Single Sign On (SSO)
  • vCenter Inventory Service
  • vCenter Server
  • vSphere Web Client

Pre Requisites

Before installing vCenter Server 5.1, vSphere 5.1 requires you to install vCenter Single Sign On and install the Inventory Service. You can install vCenter Single Sign On, Inventory Service, and vCenter Server all on a single host machine using the vCenter Server Simple Install option. This option is appropriate for small deployments.

Alternatively, you can install vCenter Single Sign On, vCenter Inventory Service, and vCenter Server separately to customize the location and configuration of the components. (I found this to be the best way)

You also need Adobe Flash installed for the vSphere Web Client

If you are running vCenter as a Virtual Machine in Workstation then you will need at least 2GB RAM or more!

SSO-MultiSItesso-arch1

This blog will focus on installing vCenter Single Sign On, Inventory Service, and vCenter Server all on a single host machine running Windows Server 2008 R2 Enterprise

Instructions

Note: It may be best to install each component separately. I encountered a few errors when I went through the Simple Install Method. See screenprint below

Error

  • Download the ISO or installer from the VMware website
  • Make sure you have the .NET Framework installed
  • Attach the ISO or run the installer on your designated vCenter Server

vCenterInstaller

  • Select VMware vCenter Server Simple Install and Click Install

vcenter

  • Click Next

vCenter0

  • Click Next

vCenter1

  • Select I accept the terms in the license agreement and click Next

vCenter2

  • Put in a Strong Password and click Next. This is a local account not tied to AD or the Windows host. After SSO is installed, you can configure it for one or more LDAP/AD server and other identity sources.

Capture

  • For this demo, we will just be using the Express Instance

vCenter4

  • Put in the passwords for the RSA_USER and RSA_DBA accounts

vCenter5

  • The FQDN should be in here automatically. If you get an error saying nslookup cannot perform a lookup against this address then check your DNS server

vCenter6

  • Use Network Service Account or put in a Username and Password
  • Click Next

Capture1

  • Choose the location to save into and click Next

Capture3

  • Check HTTP Port

Capture4

  •  Click Install and allow SQL DB to be installed and SSO
  • When this has finished you will get the screen below
  • Put in a license key or just click Next if you are using it in Evaluation Mode

Capture

  • Click Next

Capture1

  • Click Next

Capture2

  • Click Next

Capture4

  • Click Next

Capture3

  • Click Next

Capture5

  • Click Install and then Finish
  • Install the vSphere 5 Web Client (Just follow the prompts)

Capture

  • Next check all the vCenter and Webservices and SSO are running

service

  • Install the vSphere 5 client

client5

  • Make sure you have downloaded and installed Adobe Flash
  • Just a quick point, make sure your vCenter Server has +2GB RAM or things just don’t work very well especially if you are running SSO, Inventory and vCenter on the same box as a test
  • You also may need to adjust your firewall for port 9443
  • If you are running 5.1 rather than 5.0, it is best to log into the vSphere Web Client first before on https://localhost:9443/vsphere-client/ using your SSO Login admin@System-Domain + inital setup password before logging into the vSphere Web Admin Assistant on https://localhost:9443/admin-app or you will get an error such as the below
The vSphere Web Client Administration Tool only supports registration of vCenter
 Server version 5.0.  For newer versions, the vCenter Server system must be regi
stered with the Lookup Service to allow the vSphere Web Client to discover the s
ystem.
  • Log into vSphere web client as admin (admin@System-Domain, this is the default user added during install of vcenter)
  • Go to Administration -> SSO Users and Groups
  • Go to Groups tab and click on __Administrators__
  • Click on the little man icon to Add Principals

Capture

  • Select the local vCenter server as the identity source and search for a local user. See Screenprint) you can add your Admins Group or any other group
  • Then add that user and click OK.
  • Log in as the local user.
  • You should see the vCenter listed after you log in, if not, you may need to reboot.

perms

Useful VMware KB for troubleshooting known certificate error

http://blogs.vmware.com/kb/2012/10/implementing-ca-signed-ssl-certificates-with-vsphere-5-1.html

SSO Issues (Cannot log in using Domain account to vClient etc)

http://blogs.vmware.com/kb/2012/10/vsphere-sso-resources.html

http://longwhiteclouds.com/2012/09/26/vsphere-5-1-gotcha-with-single-sign-on-sso/

  • Go to Administration
  • Single Sign On and Discovery > Configuration
  • Click the + sign to add a new identity source. E.g Active Directory Server.
  • Fill in as per your domain. Note my lab domain is dacmt.local

identity

  • Click Test Connection
  • Wait for it to say Connection successful

connection good

  • Change the order of the domains so AD is at the top

Registering vCenter Server 5 (Not 5.1)

  • Log into the vSphere Web Admin Assistant on https://localhost:9443/admin-app

web

  • Click Register vCenter
  • Enter the vCenter FQDN
  • Enter the Username and Password
  • Enter the vCenter hostname

vcenter

  • Click Register
  • Accept the certificate

cert

Can you run vCenter 5 on Windows Servers 2012?

vCenter isn’t officially supported on Server 2012

What you will find is that the installation fails just before it tries to install the vSphere Profile-Driven Storage Service.

The reason why

To install that service, the vCenter service needs to be running. However, the vCenter service does not start properly in Windows Server 2012. This is due to a missing dependency. In particular, the VirtualCenter Server service relies on the ProtectedStorage service which was removed from Win8/Server 2012. The work around is the following open regedit and go to \System\CurrentControlSet\Services\vpxd and then open the DependOnService key and remove ProtectedStorage from the list. Reboot the machine and the vCenter service should come alive (might take a while). Then restart only the vCenter installation again once everything has come up (you need to wait for vCenter service to come alive which can take a few minutes). The install will continue from where it kicked off and finish

So the short version is, when the vCenter install fails, go to registry and remove ProtectedStorage dependency from the vpxd service, reboot and it should work. Restart the vcenter install and it will finish as per normal.