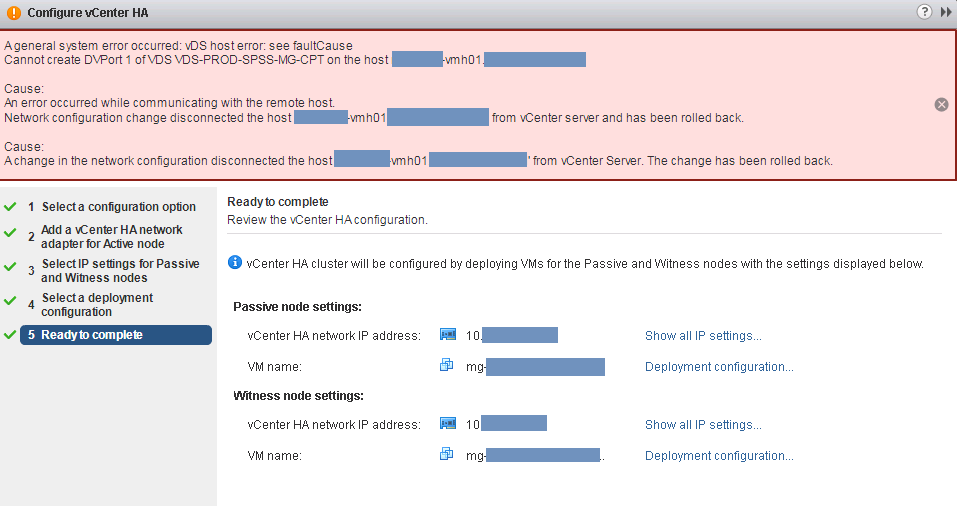
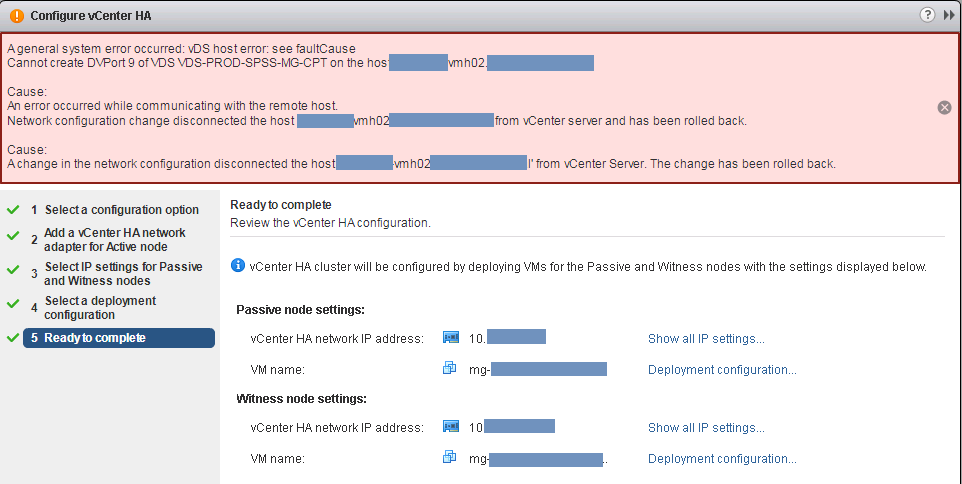
So this is an interesting one because I don’t have a solution but it is now working so I can only explain what happened. The 3 blades hosting the vCenter were HPE Proliant BL460c Gen10 servers. Once I reached the end of configuring a 6.5U2c vCenter for vCenter HA, I received the following error message.
So after going back and double checking typos and distributed switch and port group settings, everything looked fine but this error as you can see specifically mentioned a host vmh01. So i decided to run the VCHA wizard again which produced the same error but listed the second host
As I had 3 hosts in the cluster, I decided to run the wizard a third time which errored on the third host but running it a fourth time meant the VCHA setup ran perfectly and finished without any problems. There was no problem with the vDS or port groups or general networking.
The great thing about VCHA is that in this instance, it rolls everything back so you can simply start again. You might ask why I havent taken a snapshot – well it doesn’t allow you to do this! The rollback works very well, in fact 3 times in this scenario. Obviously not so good if you have hundreds of hosts 😀 A very strange problem where the NICs seemed to need a push before deciding to work however it did work in the end.
I am using Microsoft SQL Server 2008 R2 running on Microsoft Windows Server 2008 R2. It is always worth having some knowledge about your Database software whether it be Oracle, SQL or DB2 etc and worth knowing how to optimise this software to work correctly for VMware vCenter whilst maintaining backups and maintenance plans for further minimization of issues and/or performance problems
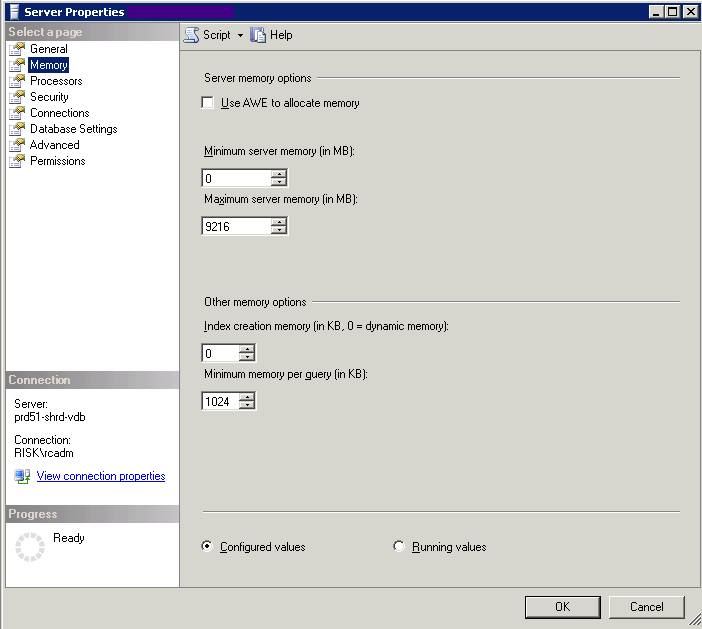
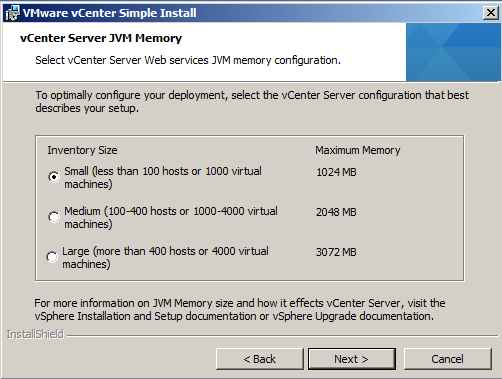
Memory
Right-click the topmost SQL Server object, usually named with the machine name or local.
Choose Properties.
Choose the Memory page.
Set “Maximum Server Memory (in MB)” to something useful for the server. Probably something like 25%-50% of the RAM on the host.
The more memory you can give it the better, as the database will cache data in RAM, but you also want to leave room in RAM for the OS (2 GB) and some file cache.
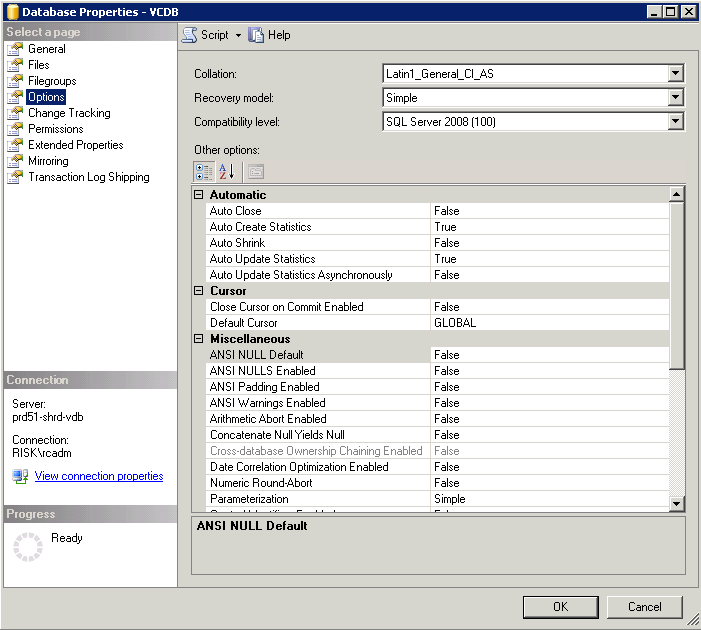
Recovery Model
Right-click the relevant Database in SQl Management Studio
Click Properties
Select Options
Set the Recovery Model to “Simple.” Click OK.
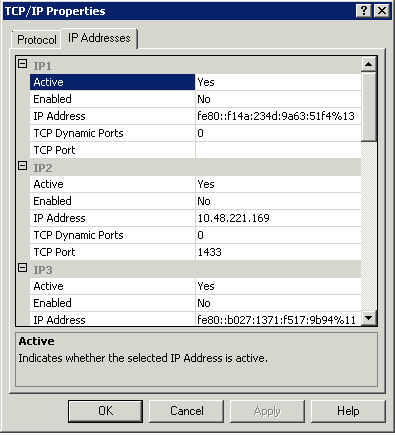
Configure Microsoft SQL Server TCP/IP for JDBC
If the Microsoft SQL Server database has TCP/IP disabled and the dynamic ports are not set, the JDBC connection remains closed. The closed connection causes the vCenter Server statistics to malfunction. You can configure the server TCP/IP for JDBC.
This task applies to remote Microsoft SQL Server database servers. You can skip this task if your database is local.
Select Start > All Programs > Microsoft SQL Server > Configuration Tool > SQL Server Configuration Manager
Select SQL Server Network Configuration
Protocols for Instance name
Enable TCP/IP
Open TCP/IP Properties and set the entries as per the below screen print
Click on the IP Addresses tab
Restart the SQL Server service from SQL Server Configuration Manager > SQL Server Services.
Start the SQL Server Browser service from SQL Server Configuration Manager > SQL Server Services.
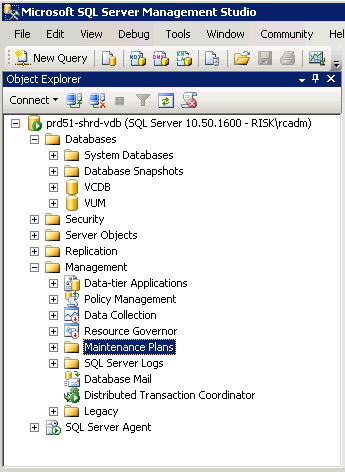
Maintenance of your SQL Server Databases
Start the Microsoft SQL Server Management Studio again and log in as the sa user. Open the Management folder.
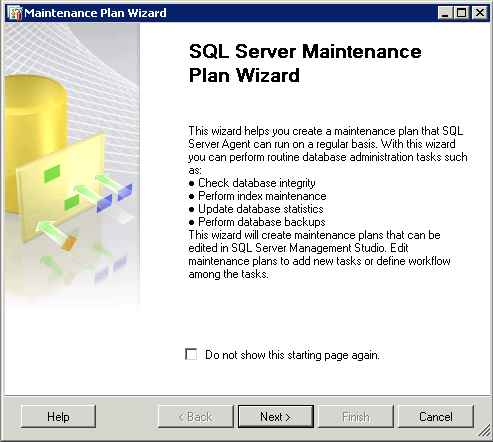
Right-click Maintenance Plans. Select Maintenance Plan Wizard.
Click Next
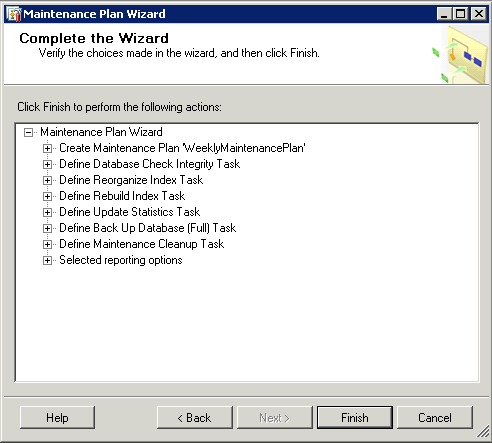
On the Select Plan Properties page give it the name WeeklyMaintenancePlan. Select Single schedule for the entire plan or no schedule
Click the Change button to pick when you want it to run.
Schedule the job to occur when there is little occurring on the system. E.g No backups or antivirus scanning
Click Next and choose your Maintenance Tasks
Select the order for the Maintenance Tasks to run in
For Define Database Integrity Check Select All databases, including indexes.
You have the choices below
Click OK and it will bring you back to the Define Database Integrity Check
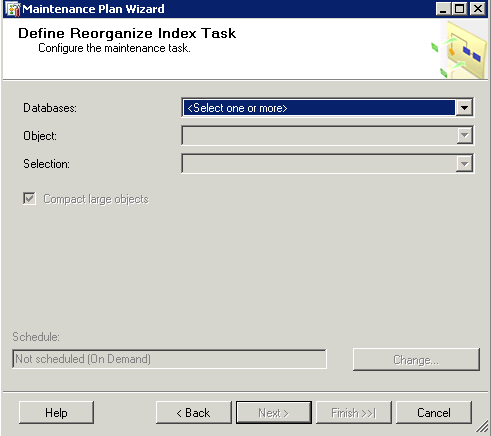
For Define Reorganize Index select All databases, compact large objects.
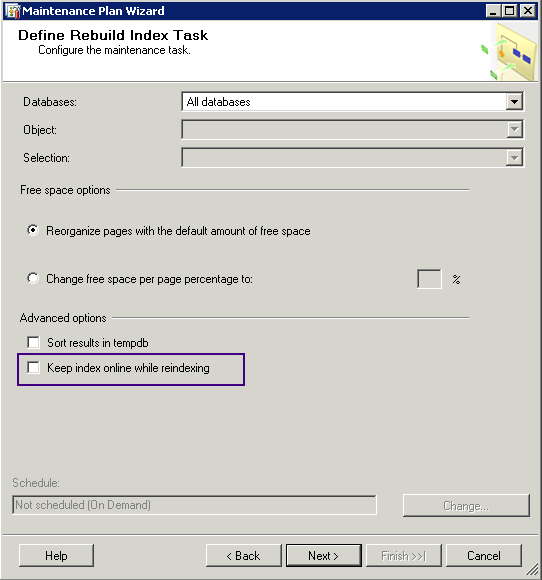
For Define Rebuild Index select All Databases, reorganize pages with the default amount of free space. Also check Keep index online while reindexing. Note: The Keep index online option appears to be an Enterprise version feature, and you may see failures with it enabled on other SQL Server versions.
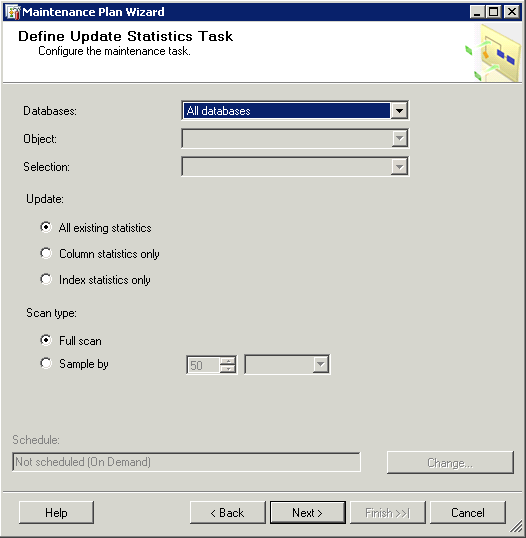
For Define Update Statistics select All Databases, all existing statistics, full scan
Next on the Define Backup Database (Full) Task, enter the following
Backup Type = Full
Databases = All Databases
Backup Set will expire after = 14 Days
Backup to Disk = Selected
Create a backup file for every Database = Selected
Choose a folder according to where you want to back up
Backup File Extension = bak
Set backup compression = Use the default server settings. The Compress Backup option seems like a good one but it isn’t supported on 64-bit SQL Server. It’ll let you set it, then fail on execution
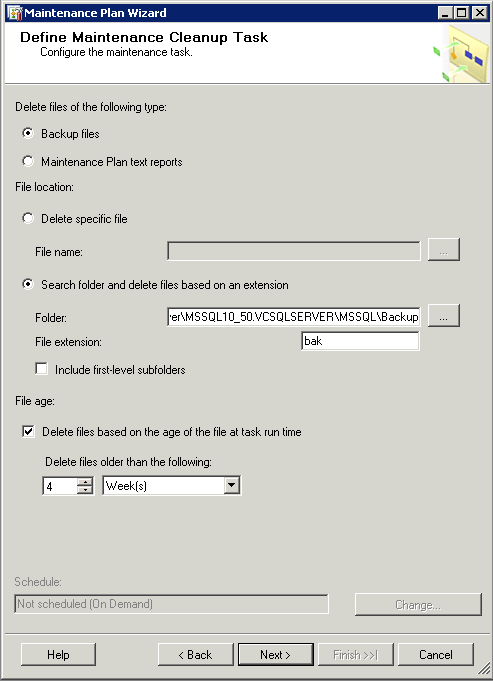
Next Define Maintenance Cleanup Task
Delete files of the following type = Backup Files
Search Folder and delete files based on an extension = Choose your backup folder
File extension = bak
File age = 4 weeks or your choice
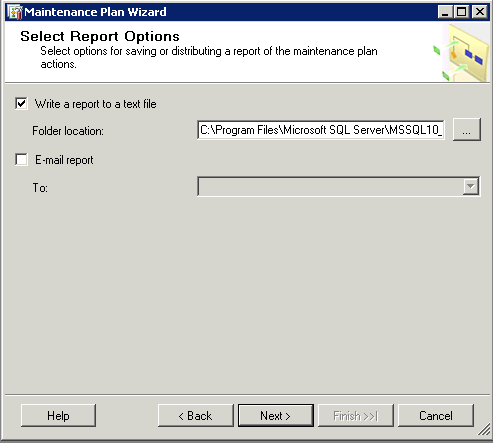
Next you are on to the Report Options Page
Check the Summaries and Click Finish
Go into the Maintenance Plans folder now, right click on this job, and choose Execute to see if it runs. Check the logs if it doesn’t.
Your location may be different but as a rough guide, the log location is c:\Program Files\Microsoft SQL Server\MSSQL10.MSSQLSERVER\MSSQL\Log
Defragmenting VirtualCenter performance data indexes on a Microsoft SQL database
For troubleshooting or maintenance purposes it may be necessary to defragment the indexes on your Microsoft SQL database server.
Fragmentation of indexes occurs when the logical order of pages is different from the physical order on the disk. In VirtualCenter fragmentation occurs most noticeably due to the statistics collection and consolidation.
When the indexes are excessively fragmented, performance of queries to the VirtualCenter database is slow.
Warning: If you do not have experienced DB administrators, shutdown the VMware VirtualCenter Server service and do a backup prior to performing any kind of database maintenance. If you have experienced DB administrators you can do the tasks online
Regular Reorganize Database Task
One of the performance suggestions buried in the VMware KB is to regularly reorganize the indexes, since the historical statistics tables get unwieldy. You can do this manually or schedule a job to do it by running the Maintenance Plan Wizard. Choose only Reorganize Indexes and set the schedule to recur every six hours, every day (or however often you want.This keeps the logical fragmentation of the indices down.
Click through the pages of the wizard until you get to “Define Reorganize Index Task.” Have it only reindex VCDB, choose “Tables and views” in the Object selection, and check “Compact large objects.” Click through until you’re done.
Verify that the VMware VirtualCenter Server service cannot be restarted.
Verify that the configuration of the ODBC Data Source (DSN) used for connection to the database for vCenter Server is correct. For more information, see vCenter Server installation fails with ODBC and DSN errors (1003928).
Verify that ports 902, 80, and 443 are not being used by any other application. If another application, such as Microsoft Internet Information Server (IIS) (also known as Web Server (IIS) on Windows 2008 Enterprise) or the World Wide Web Publishing Services (W3SVC) or the Citrix Licensing Support service is utilizing any of the ports, vCenter Server cannot start. For more information, see Port already in use when installing vCenter Server (4824652).
Verify the health of the database server that is being used for vCenter Server. If the hard drives are out of space, the database transaction logs are full, or if the database is heavily fragmented, vCenter Server may not start. For more information, see Investigating the health of a vCenter Server database (1003979).
Verify the VMware VirtualCenter Service is running with the proper credentials. For more information, see After installing vCenter Server, the VMware VirtualCenter Server service fails to start (1004280).
Verify that critical folders exist on the vCenter Server host. For more information, see Missing folders on a vCenter Server prevent VirtualCenter Server service from starting (1005882).
Verify that no hardware or software changes have been made to the vCenter server that may have caused the failure. If you have recently made any changes to the vCenter server, undo these changes temporarily for testing purposes.
Before launching vCenter Server, ensure that the VMware VCMSDS service is running.
Check the vCenter logs at C:\Documents and Settings\All Users\Application Data\VMware\VMware VirtualCenter\Logs
Verify the relevant database services are running. SQL Services for example
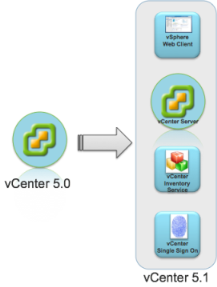
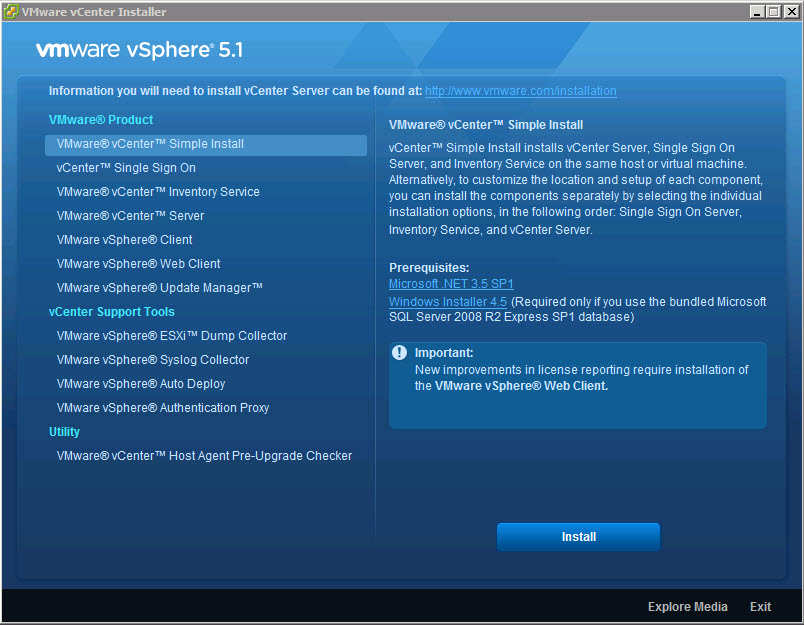
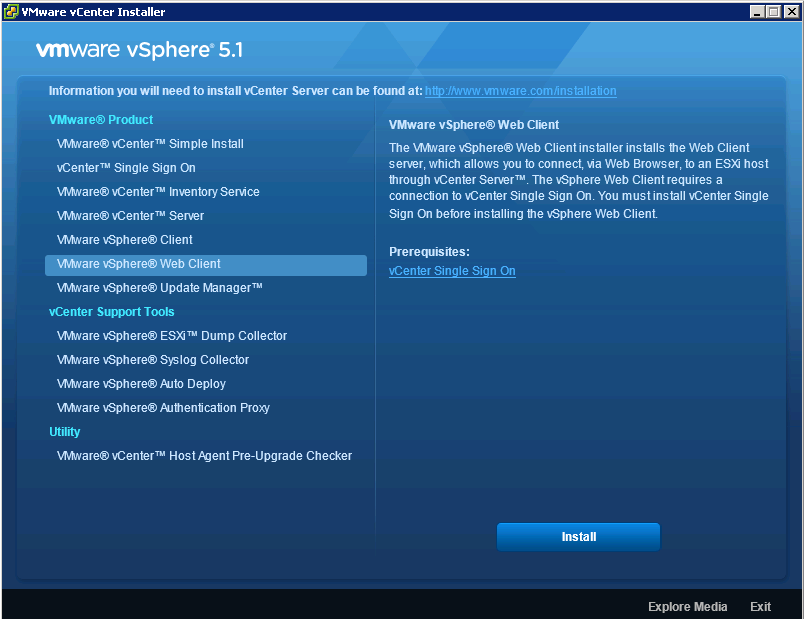
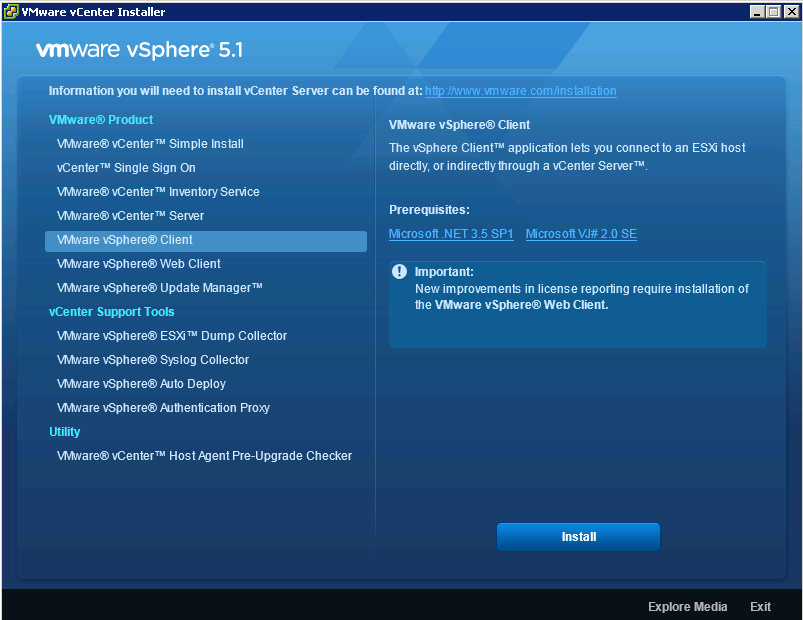
The vCenter Server 5.1 release includes significant architectural changes. You must understand these changes before attempting to freshly install or upgrade to vCenter Server 5.1 from older versions of the product. There are four separate services that constitute the vCenter Server 5.1 platform. These are below and must be installed in order
vCenter Single Sign On (SSO)
vCenter Inventory Service
vCenter Server
vSphere Web Client
Pre Requisites
Before installing vCenter Server 5.1, vSphere 5.1 requires you to install vCenter Single Sign On and install the Inventory Service. You can install vCenter Single Sign On, Inventory Service, and vCenter Server all on a single host machine using the vCenter Server Simple Install option. This option is appropriate for small deployments.
Alternatively, you can install vCenter Single Sign On, vCenter Inventory Service, and vCenter Server separately to customize the location and configuration of the components. (I found this to be the best way)
You also need Adobe Flash installed for the vSphere Web Client
If you are running vCenter as a Virtual Machine in Workstation then you will need at least 2GB RAM or more!
This blog will focus on installing vCenter Single Sign On, Inventory Service, and vCenter Server all on a single host machine running Windows Server 2008 R2 Enterprise
Instructions
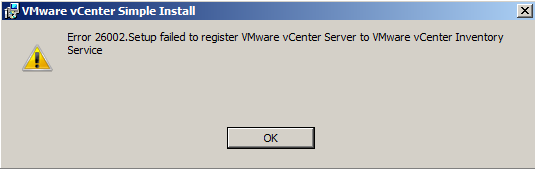
Note: It may be best to install each component separately. I encountered a few errors when I went through the Simple Install Method. See screenprint below
Download the ISO or installer from the VMware website
Make sure you have the .NET Framework installed
Attach the ISO or run the installer on your designated vCenter Server
Select VMware vCenter Server Simple Install and Click Install
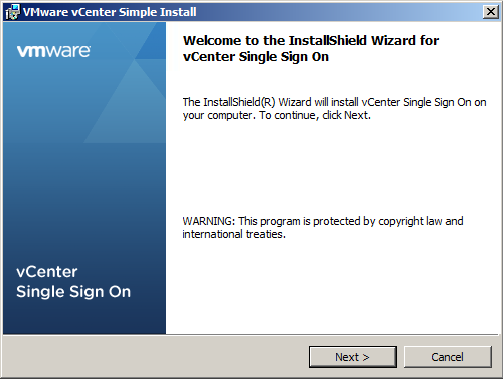
Click Next
Click Next
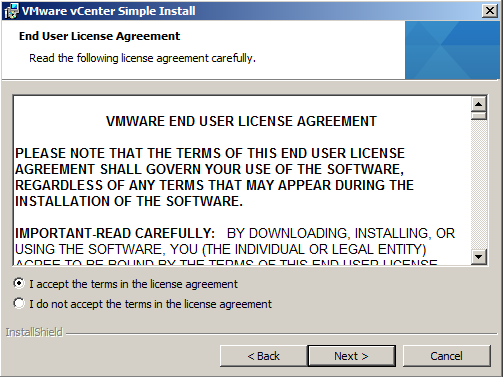
Select I accept the terms in the license agreement and click Next
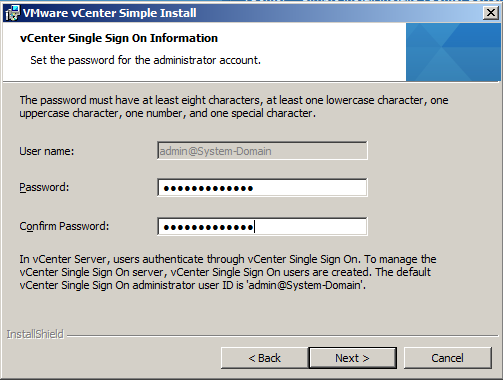
Put in a Strong Password and click Next. This is a local account not tied to AD or the Windows host. After SSO is installed, you can configure it for one or more LDAP/AD server and other identity sources.
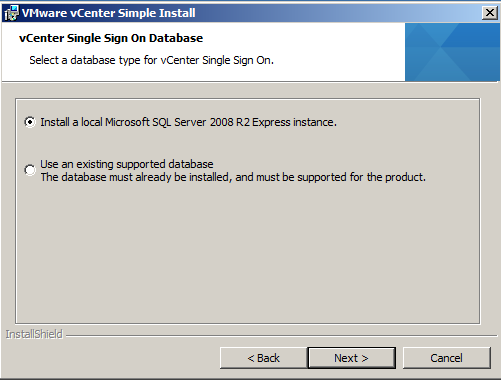
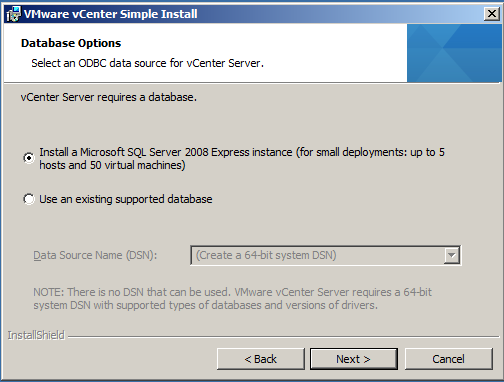
For this demo, we will just be using the Express Instance
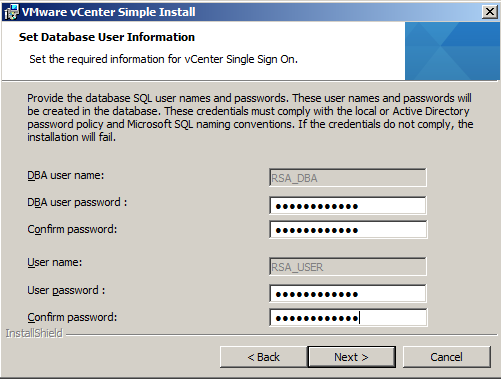
Put in the passwords for the RSA_USER and RSA_DBA accounts
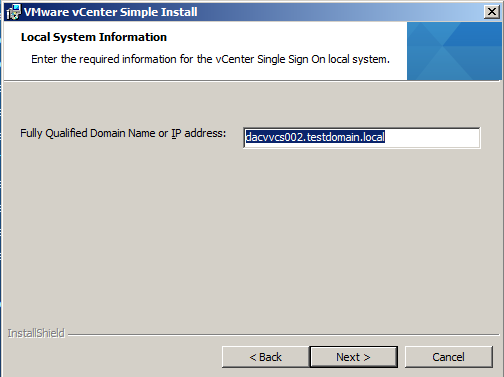
The FQDN should be in here automatically. If you get an error saying nslookup cannot perform a lookup against this address then check your DNS server
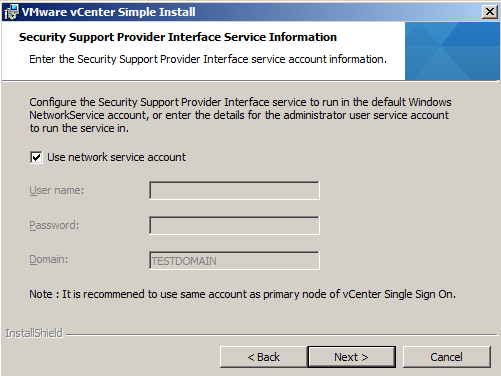
Use Network Service Account or put in a Username and Password
Click Next
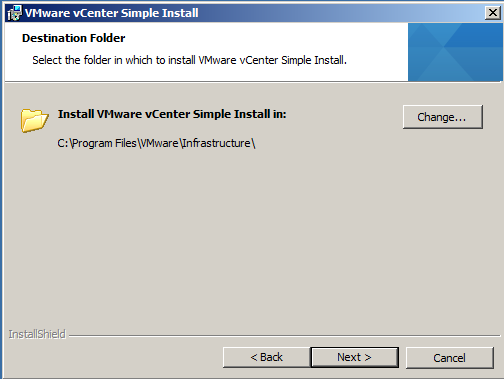
Choose the location to save into and click Next
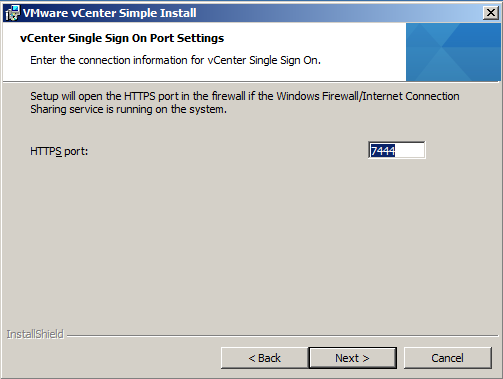
Check HTTP Port
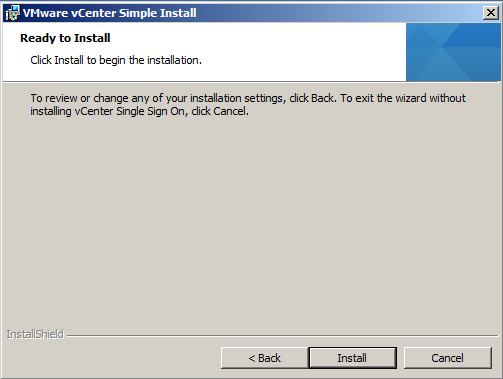
Click Install and allow SQL DB to be installed and SSO
When this has finished you will get the screen below
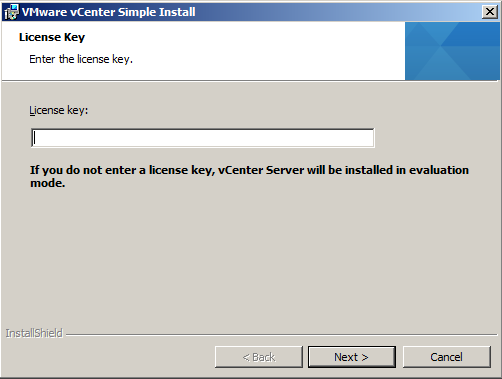
Put in a license key or just click Next if you are using it in Evaluation Mode
Click Next
Click Next
Click Next
Click Next
Click Next
Click Install and then Finish
Install the vSphere 5 Web Client (Just follow the prompts)
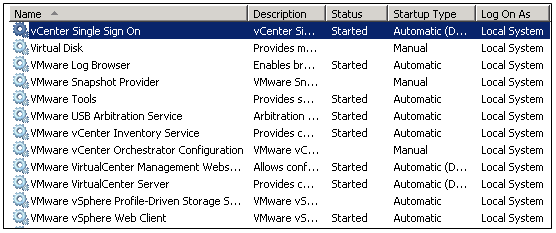
Next check all the vCenter and Webservices and SSO are running
Install the vSphere 5 client
Make sure you have downloaded and installed Adobe Flash
Just a quick point, make sure your vCenter Server has +2GB RAM or things just don’t work very well especially if you are running SSO, Inventory and vCenter on the same box as a test
You also may need to adjust your firewall for port 9443
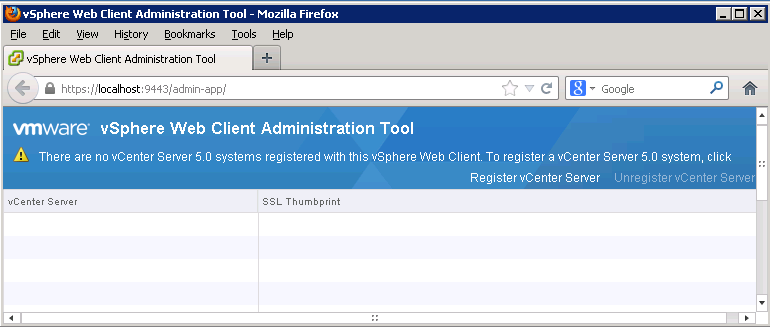
If you are running 5.1 rather than 5.0, it is best to log into the vSphere Web Client first before on https://localhost:9443/vsphere-client/ using your SSO Login admin@System-Domain + inital setup password before logging into the vSphere Web Admin Assistant on https://localhost:9443/admin-app or you will get an error such as the below
The vSphere Web Client Administration Tool only supports registration of vCenter
Server version 5.0. For newer versions, the vCenter Server system must be regi
stered with the Lookup Service to allow the vSphere Web Client to discover the s
ystem.
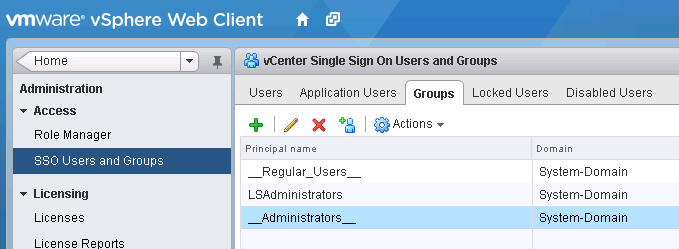
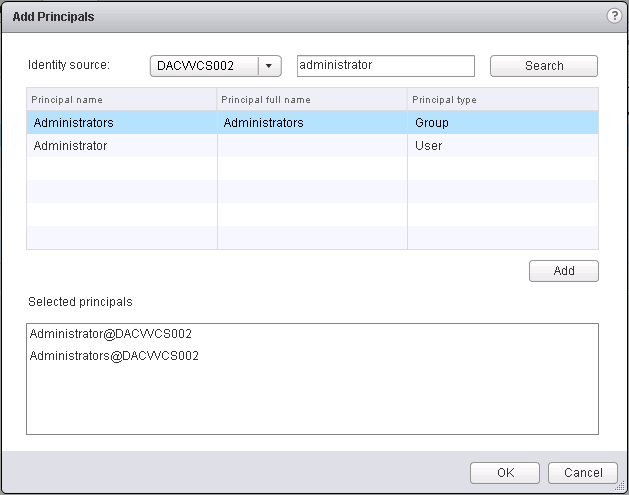
Log into vSphere web client as admin (admin@System-Domain, this is the default user added during install of vcenter)
Go to Administration -> SSO Users and Groups
Go to Groups tab and click on __Administrators__
Click on the little man icon to Add Principals
Select the local vCenter server as the identity source and search for a local user. See Screenprint) you can add your Admins Group or any other group
Then add that user and click OK.
Log in as the local user.
You should see the vCenter listed after you log in, if not, you may need to reboot.
Useful VMware KB for troubleshooting known certificate error
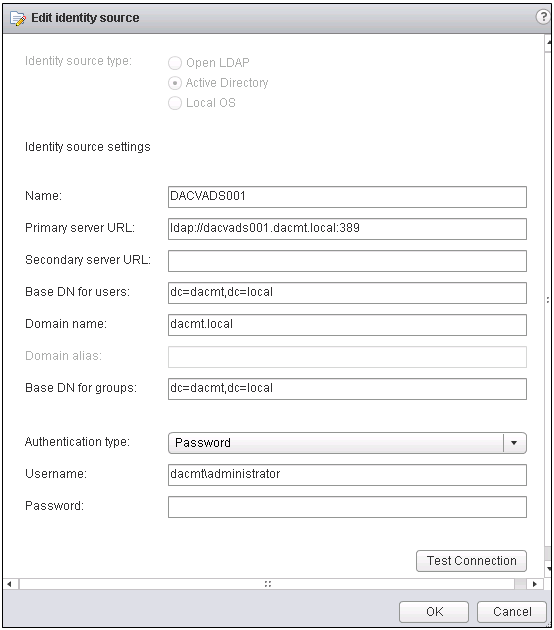
Click the + sign to add a new identity source. E.g Active Directory Server.
Fill in as per your domain. Note my lab domain is dacmt.local
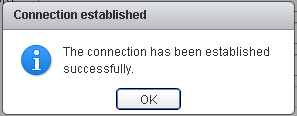
Click Test Connection
Wait for it to say Connection successful
Change the order of the domains so AD is at the top
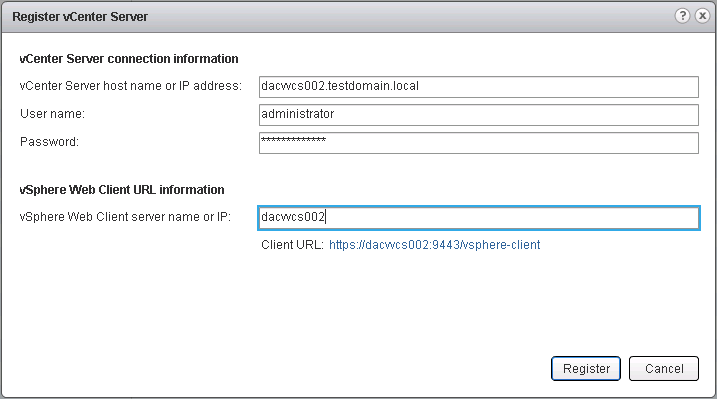
Registering vCenter Server 5 (Not 5.1)
Log into the vSphere Web Admin Assistant on https://localhost:9443/admin-app
Click Register vCenter
Enter the vCenter FQDN
Enter the Username and Password
Enter the vCenter hostname
Click Register
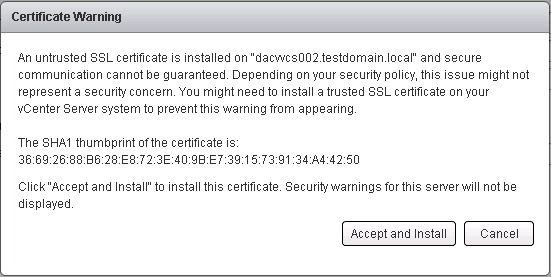
Accept the certificate
Can you run vCenter 5 on Windows Servers 2012?
vCenter isn’t officially supported on Server 2012
What you will find is that the installation fails just before it tries to install the vSphere Profile-Driven Storage Service.
The reason why
To install that service, the vCenter service needs to be running. However, the vCenter service does not start properly in Windows Server 2012. This is due to a missing dependency. In particular, the VirtualCenter Server service relies on the ProtectedStorage service which was removed from Win8/Server 2012. The work around is the following open regedit and go to \System\CurrentControlSet\Services\vpxd and then open the DependOnService key and remove ProtectedStorage from the list. Reboot the machine and the vCenter service should come alive (might take a while). Then restart only the vCenter installation again once everything has come up (you need to wait for vCenter service to come alive which can take a few minutes). The install will continue from where it kicked off and finish
So the short version is, when the vCenter install fails, go to registry and remove ProtectedStorage dependency from the vpxd service, reboot and it should work. Restart the vcenter install and it will finish as per normal.
This blog will target an existing Microsoft SQL 2008 R2 Server
Make sure you are able to log into SQL Management Studio
vCenter 5 installer for obtaining the script which will set this all up automatically
vSphere Installation and Setup Guide. Page 176 onwards
Instructions
Log into your SQL Server and run SQL Management Studio as a System Admin
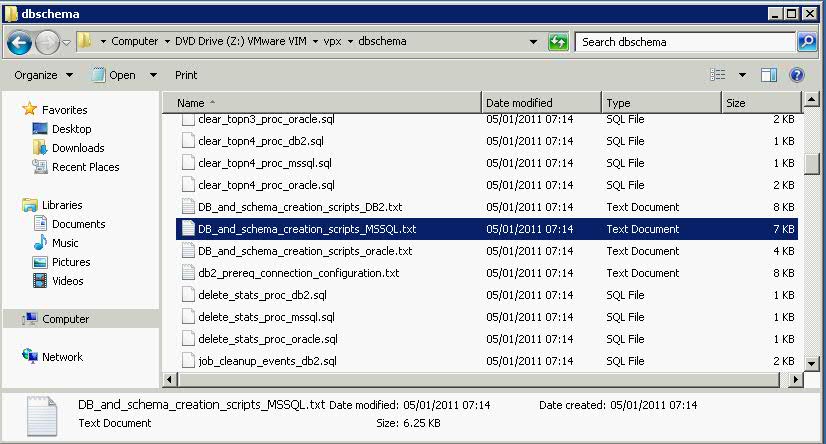
Attach your vCenter Installer ISO to your SQL DB VM and navigate to DVDdrive/vpx/dbschema or DVDrive/vCenter Server/dbschema
Copy the DB_and_schema_creation_scripts_MSSQL.txt to your desktop
You now need to run through this script and customize the location of the data and log files and the user account and password if you wish
The vpxuser that is created by this script is not subject to any security policy. Change the passwords as appropriate. The vpxuser will have DBO Privileges on both the VCDB and the MSDB databases.
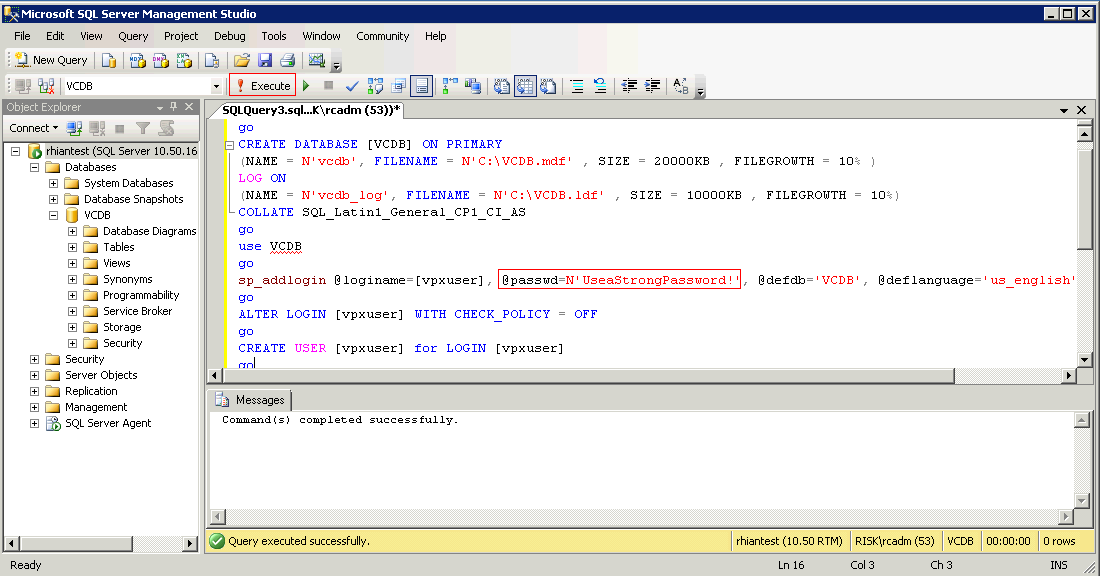
Logon to a Query Analyzer session with the sysadmin (SA) or a user account with sysadmin privileges and run the following script once amended. Note that I haven’t changed the locations, everything is stored on C:\ as I am only testing and change the vpxuser password
A more detailed breakdown is detailed below the script
use [master]
go
CREATE DATABASE [VCDB] ON PRIMARY
(NAME = N’vcdb’, FILENAME = N’C:\VCDB.mdf’ , SIZE = 20000KB , FILEGROWTH = 10% )
LOG ON
(NAME = N’vcdb_log’, FILENAME = N’C:\VCDB.ldf’ , SIZE = 10000KB , FILEGROWTH = 10%)
COLLATE SQL_Latin1_General_CP1_CI_AS
go
use VCDB
go
sp_addlogin @loginame=[vpxuser], @passwd=N’UseaStrongPassword!’, @defdb=’VCDB’, @deflanguage=’us_english’
go
ALTER LOGIN [vpxuser] WITH CHECK_POLICY = OFF
go
CREATE USER [vpxuser] for LOGIN [vpxuser]
go
CREATE SCHEMA [VMW]
go
ALTER USER [vpxuser] WITH DEFAULT_SCHEMA =[VMW]
go
–User should have DBO Privileges or VC_ADMIN_ROLE and VC_USER_ROLE database roles
sp_addrolemember @rolename = ‘db_owner’, @membername = ‘vpxuser’
go
if not exists (SELECT name FROM sysusers WHERE issqlrole=1 AND name = ‘VC_ADMIN_ROLE’)
CREATE ROLE VC_ADMIN_ROLE;
GRANT ALTER ON SCHEMA :: [VMW] to VC_ADMIN_ROLE;
GRANT REFERENCES ON SCHEMA :: [VMW] to VC_ADMIN_ROLE;
GRANT INSERT ON SCHEMA :: [VMW] to VC_ADMIN_ROLE;
GRANT CREATE TABLE to VC_ADMIN_ROLE;
GRANT CREATE VIEW to VC_ADMIN_ROLE;
GRANT CREATE Procedure to VC_ADMIN_ROLE;
if not exists (SELECT name FROM sysusers WHERE issqlrole=1 AND name = ‘VC_USER_ROLE’)
CREATE ROLE VC_USER_ROLE
go
GRANT SELECT ON SCHEMA :: [VMW] to VC_USER_ROLE
go
GRANT INSERT ON SCHEMA :: [VMW] to VC_USER_ROLE
go
GRANT DELETE ON SCHEMA :: [VMW] to VC_USER_ROLE
go
GRANT UPDATE ON SCHEMA :: [VMW] to VC_USER_ROLE
go
GRANT EXECUTE ON SCHEMA :: [VMW] to VC_USER_ROLE
go
sp_addrolemember VC_ADMIN_ROLE , [vpxuser]
go
sp_addrolemember VC_USER_ROLE , [vpxuser]
go
use MSDB
go
CREATE USER [vpxuser] for LOGIN [vpxuser]
go
–User should have DBO Privileges or VC_ADMIN_ROLE
sp_addrolemember @rolename = ‘db_owner’, @membername = ‘vpxuser’
go
if not exists (SELECT name FROM sysusers WHERE issqlrole=1 AND name = ‘VC_ADMIN_ROLE’)
CREATE ROLE VC_ADMIN_ROLE;
go
grant select on msdb.dbo.syscategories to VC_ADMIN_ROLE
go
grant select on msdb.dbo.sysjobsteps to VC_ADMIN_ROLE
go
GRANT SELECT ON msdb.dbo.sysjobs to VC_ADMIN_ROLE
GO
GRANT EXECUTE ON msdb.dbo.sp_add_job TO VC_ADMIN_ROLE
go
GRANT EXECUTE ON msdb.dbo.sp_delete_job TO VC_ADMIN_ROLE
go
GRANT EXECUTE ON msdb.dbo.sp_add_jobstep TO VC_ADMIN_ROLE
go
GRANT EXECUTE ON msdb.dbo.sp_update_job TO VC_ADMIN_ROLE
go
GRANT EXECUTE ON msdb.dbo.sp_add_jobserver TO VC_ADMIN_ROLE
go
GRANT EXECUTE ON msdb.dbo.sp_add_jobschedule TO VC_ADMIN_ROLE
go
GRANT EXECUTE ON msdb.dbo.sp_add_category TO VC_ADMIN_ROLE
go
sp_addrolemember VC_ADMIN_ROLE , [vpxuser]
go
A breakdown of the script
This DB_and_schema_creation_scripts_MSSQL.txt file describes how to use optional scripts to create a Microsoft SQL database for vCenter Server and to create the database schema. If you do not use these scripts, you can create the database manually and allow the vCenter Server installer to create the database schema.
To prepare a SQL Server database to work with vCenter Server, you generally need to create a SQL Server database user with database operator (DBO) rights. When you do this, you must make sure that the database user login has the db_owner fixed database role on the vCenter Server database and on the MSDB database. (The db_owner role on the MSDB database is required for installation and upgrade only. You can revoke this role after the installation or upgrade process is complete.) The purpose of granting DBO permissions to the vCenter Server database user is to enable the vCenter Server installer to create the vCenter Server database schema.
For environments in which the user cannot have DBO permissions on the vCenter Server database, you can instead run scripts that create the vCenter Server database schema before you run the vCenter Server installer.
You can use the DB_and_schema_creation_scripts_MSSQL.txt script to create a database, user, and permissions for successful installation of vCenter Server.
The first part of this script as listed below. (Highlights in blue where changes can be made)
You must change the Password or you may get an error that the Password does not conform to the Password Complexity rules.(Highlighted in red on screenprint)
Also I had to make the SIZE=20000KB and 10000KB respectively as SQL would not let me create a DB with the original values in the script
Paste the following into a SQL Management Studio Query Window and click Execute. (Highlighted in red on screenprint) See screenprint below script
use [master]
go
CREATE DATABASE [VCDB] ON PRIMARY
(NAME = N’vcdb‘, FILENAME = N’C:\VCDB.mdf’ , SIZE = 20000KB , FILEGROWTH = 10% )
LOG ON
(NAME = N’vcdb_log’, FILENAME = N’C:\VCDB.ldf’ , SIZE = 10000KB , FILEGROWTH = 10%)
COLLATE SQL_Latin1_General_CP1_CI_AS
go
use VCDB
go
sp_addlogin @loginame=[vpxuser], @passwd=N’UseaStrongPassword!‘, @defdb=’VCDB’, @deflanguage=’us_english’
go
ALTER LOGIN [vpxuser] WITH CHECK_POLICY = OFF
go
CREATE USER [vpxuser] for LOGIN [vpxuser]
go
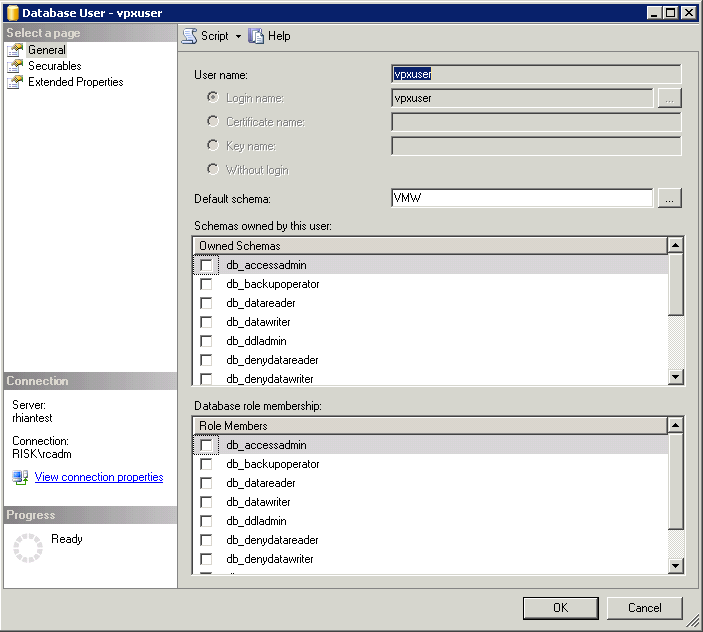
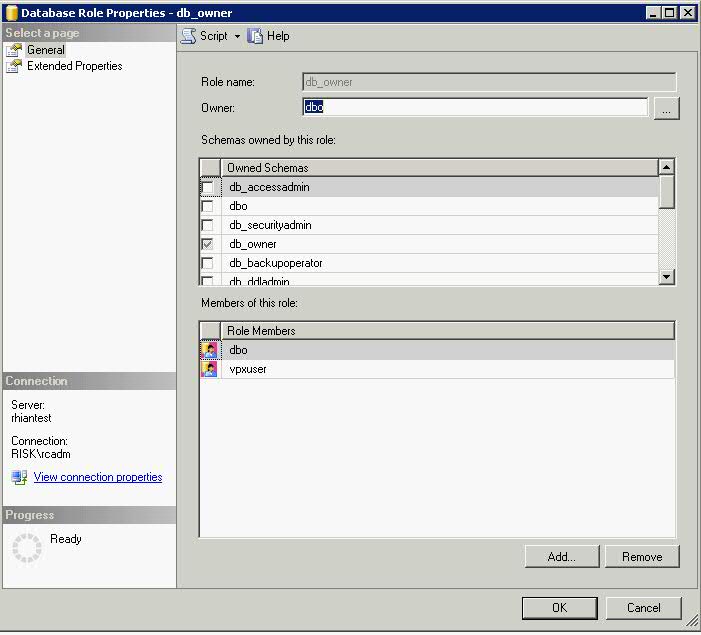
You will see that this part of the script creates the VCDB Database and the user vpxuser under Security Logins and Databases > VCDB > Security > Users
Next copy and paste the following script into a new SQL Query Windows
use VCDB
go
CREATE SCHEMA [VMW]
go
ALTER USER [vpxuser] WITH DEFAULT_SCHEMA =[VMW]
go
Check that VMW is the Default Schema for the vpxuser
Next the vpxuser should have DBO Privileges or VC_ADMIN_ROLE and VC_USER_ROLE database roles
Copy the script below into a new SQL Query Window and click Execute
sp_addrolemember @rolename = ‘db_owner’, @membername = ‘vpxuser‘
go
It gives the vpxuser the db_owner role
The rest of the script follows on as below
if not exists (SELECT name FROM sysusers WHERE issqlrole=1 AND name = ‘VC_ADMIN_ROLE’)
CREATE ROLE VC_ADMIN_ROLE;
GRANT ALTER ON SCHEMA :: [VMW] to VC_ADMIN_ROLE;
GRANT REFERENCES ON SCHEMA :: [VMW] to VC_ADMIN_ROLE;
GRANT INSERT ON SCHEMA :: [VMW] to VC_ADMIN_ROLE;
GRANT CREATE TABLE to VC_ADMIN_ROLE;
GRANT CREATE VIEW to VC_ADMIN_ROLE;
GRANT CREATE Procedure to VC_ADMIN_ROLE;
if not exists (SELECT name FROM sysusers WHERE issqlrole=1 AND name = ‘VC_USER_ROLE’)
CREATE ROLE VC_USER_ROLE
go
GRANT SELECT ON SCHEMA :: [VMW] to VC_USER_ROLE
go
GRANT INSERT ON SCHEMA :: [VMW] to VC_USER_ROLE
go
GRANT DELETE ON SCHEMA :: [VMW] to VC_USER_ROLE
go
GRANT UPDATE ON SCHEMA :: [VMW] to VC_USER_ROLE
go
GRANT EXECUTE ON SCHEMA :: [VMW] to VC_USER_ROLE
go
sp_addrolemember VC_ADMIN_ROLE , [vpxuser]
go
sp_addrolemember VC_USER_ROLE , [vpxuser]
go
use MSDB
go
CREATE USER [vpxuser] for LOGIN [vpxuser]
go
sp_addrolemember @rolename = ‘db_owner’, @membername = ‘vpxuser‘
go
if not exists (SELECT name FROM sysusers WHERE issqlrole=1 AND name = ‘VC_ADMIN_ROLE’)
CREATE ROLE VC_ADMIN_ROLE;
go
grant select on msdb.dbo.syscategories to VC_ADMIN_ROLE
go
grant select on msdb.dbo.sysjobsteps to VC_ADMIN_ROLE
go
GRANT SELECT ON msdb.dbo.sysjobs to VC_ADMIN_ROLE
GO
GRANT EXECUTE ON msdb.dbo.sp_add_job TO VC_ADMIN_ROLE
go
GRANT EXECUTE ON msdb.dbo.sp_delete_job TO VC_ADMIN_ROLE
go
GRANT EXECUTE ON msdb.dbo.sp_add_jobstep TO VC_ADMIN_ROLE
go
GRANT EXECUTE ON msdb.dbo.sp_update_job TO VC_ADMIN_ROLE
go
GRANT EXECUTE ON msdb.dbo.sp_add_jobserver TO VC_ADMIN_ROLE
go
GRANT EXECUTE ON msdb.dbo.sp_add_jobschedule TO VC_ADMIN_ROLE
go
GRANT EXECUTE ON msdb.dbo.sp_add_category TO VC_ADMIN_ROLE
go
sp_addrolemember VC_ADMIN_ROLE , [vpxuser]
go
Run the scripts in sequence on the VCDB database.The objects created by these scripts need to be owned by the “dbo” user.
Right click on VCDB in SQL Management Studio and select New Query
Open the scripts one at a time in the query analyzer window and press F5 to execute each script in the order shown here.
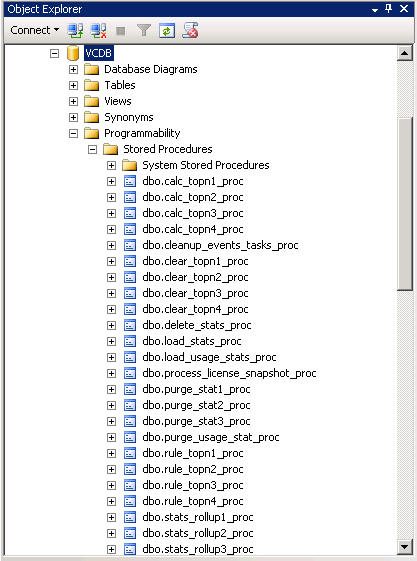
You can navigate to the vCenter installer folder from the SQL Server and literally just drag and drop the following files into a SQL Query window
Important: Do this in order
VCDB_mssql.SQL
load_stats_proc_mssql.sql
purge_stat1_proc_mssql.sql
purge_stat2_proc_mssql.sql
purge_stat3_proc_mssql.sql
purge_usage_stats_proc_mssql.sql
stats_rollup1_proc_mssql.sql
stats_rollup2_proc_mssql.sql
stats_rollup3_proc_mssql.sql
cleanup_events_mssql.sql
delete_stats_proc_mssql.sql
upsert_last_event_proc_mssql.sql
load_usage_stats_proc_mssql.sql
TopN_DB_mssql.sql
calc_topn1_proc_mssql.sql
calc_topn2_proc_mssql.sql
calc_topn3_proc_mssql.sql
calc_topn4_proc_mssql.sql
clear_topn1_proc_mssql.sql
clear_topn2_proc_mssql.sql
clear_topn3_proc_mssql.sql
clear_topn4_proc_mssql.sql
rule_topn1_proc_mssql.sql
rule_topn2_proc_mssql.sql
rule_topn3_proc_mssql.sql
rule_topn4_proc_mssql.sql
process_license_snapshot_mssql.sql
process_temptable0_proc_mssql.sql
process_temptable1_proc_mssql.sql
process_temptable2_proc_mssql.sql
You can also run the following scripts to enable database health monitoring.
job_dbm_performance_data_mssql.sql
process_performance_data_mssql.sql
Grant the execute privilege for all the store procedures you created to the vCenter Server database user you created (vpxuser)
grant execute on purge_stat1_proc to vpxuser
grant execute on purge_stat2_proc to vpxuser
grant execute on purge_stat3_proc to vpxuser
grant execute on purge_usage_stat_proc to vpxuser
grant execute on stats_rollup1_proc to vpxuser
grant execute on stats_rollup2_proc to vpxuser
grant execute on stats_rollup3_proc to vpxuser
grant execute on cleanup_events_tasks_proc to vpxuser
grant execute on delete_stats_proc to vpxuser
grant execute on upsert_last_event_proc to vpxuser
grant execute on load_usage_stats_proc to vpxuser
grant execute on load_stats_proc to vpxuser
grant execute on calc_topn1_proc to vpxuser
grant execute on calc_topn2_proc to vpxuser
grant execute on calc_topn3_proc to vpxuser
grant execute on calc_topn4_proc to vpxuser
grant execute on clear_topn1_proc to vpxuser
grant execute on clear_topn2_proc to vpxuser
grant execute on clear_topn3_proc to vpxuser
grant execute on clear_topn4_proc to vpxuser
grant execute on rule_topn1_proc to vpxuser
grant execute on rule_topn2_proc to vpxuser
grant execute on rule_topn3_proc to vpxuser
grant execute on rule_topn4_proc to vpxuser
grant execute on process_license_snapshot_proc to vpxuser
grant execute on process_temptable0_proc tovpxuser
grant execute on process_temptable1_proc tovpxuser
grant execute on process_temptable2_proc tovpxuser
grant execute on process_performance_data_proc to vpxuser
grant execute on process_performance_data_mssql.sql to vpxuser
For all supported editions of Microsoft SQL Server (except Microsoft SQL Server 2005 Express), ensure that the SQL Agent is running. Run these additional scripts to set up scheduled jobs on the database.
Right click the VCDB DB and drag the below scripts into the query window and execute. These scripts ensure that the SQL Server Agent service is running.
job_schedule1_mssql.sql
job_schedule2_mssql.sql
job_schedule3_mssql.sql
job_cleanup_events_mssql.sql
job_topn_past_day_mssql.sql
job_topn_past_week_mssql.sql
job_topn_past_month_mssql.sql
job_topn_past_year_mssql.sql
job_property_bulletin_mssql.sql
Create an ODBC Connection
On your vCenter Server system, select Settings > Control Panel > Administrative Tools > Data Sources (ODBC).
Click the System DSN tab and do one of the following.
To modify an existing SQL Server ODBC connection, select the connection from the System Data
Source list and click Configure.
To create a new SQL Server ODBC connection, click Add, select SQL Native Client, and click
Finish.
Type an ODBC datastore name (DSN) in the Name text box. “VMware vCenter Server”
(Optional) Type an ODBC DSN description in the Description text box.
Select the server name from the Server drop-down menu. Type the SQL Server host name in the text box if it is not in the drop-down menu.
Select one of the authentication methods.
Integrate Windows authentication. Optionally, enter the Service Principal Name (SPN).
SQL Server authentication. Type your SQL Server login name and password.
Select the database created for the vCenter Server system from the Change the default database to menu.
Click Finish.
For SQL Server 2005 and SQL Server 2008 editions, test the data source by selecting Test Data Source and clicking OK from the ODBC Microsoft SQL Server Setup menu.
Verify that the SQL Agent is running on your database server.
Run the vCenter Installer in the vCenter Server
Run the vCenter Server installer and, when prompted, provide the database user login.
Ensure service levels, optimum resource usage and configuration compliance in dynamic virtual and cloud environments with VMware vCenter Operations Management Suite. Designed for VMware vSphere and built for cloud, vCenter Operations Management Suite sets the industry standard in operational efficiency and allows you to proactively ensure virtual/cloud infrastructure performance of your Microsoft Exchange, Oracle and SAP, provide continuous compliance with operational and regulatory requirements, and optimize resource utilization and cost.
What can it do?
Intelligently Automate Operations Management to Maximize Efficiency and Agility
Automate performance, capacity, and configuration management with patented analytics and an integrated approach to management. Eliminate the finger pointing, improve team collaboration and reduce manual problem solving efforts by as much as 40% with automated root cause analysis.
Proactively Manage Performance across the Entire Infrastructure
Get proactive warning of performance issues and capacity shortfalls before problems affect end users. Real-time performance dashboards let you meet SLAs by pinpointing building performance issues before end users notice. Optimize your infrastructure for efficiency and minimize risk of performance across your entire infrastructure, both virtual and physical.
Gain Comprehensive Visibility and Manage Compliance with Cloud Automation
Gain better visibility into planned and unplanned configuration changes and remediate unwanted changes to ensure operational and regulatory compliance. Manage compliance automatically with out-of-the-box configuration templates. Ensure compliance with policy control and integrated smart alerts across both virtual and physical aspects of your datacenter infrastructure.
Key New Features
Operations Management Dashboard
Provides comprehensive views into health, risk and efficiency scores of your cloud infrastructure. Quickly drill down to see what’s causing current workload conditions, pinpoint potential problems in the future and identify areas with inefficient use of resources.
Correlation of Performance and Change Events
Enables administrators to quickly understand and remediate performance issues arising from configuration changes
Compliance Checking of vSphere Hosts
Allows administrators to maintain a compliant infrastructure and automated the hardening of vSphere hosts with pre-built security and compliance guidelines.
Smart Alerts
Provides pro-active notifications of building health, performance and capacity issues in the environment. Automated root cause analysis identifies the offending metric across all layers of the infrastructure
Capacity Planning, Reporting and Optimization
These views help administrators optimize VM density; identify areas of reclaimable waste and chronic capacity shortfalls. Configurable alerts notify of changing capacity conditions in production and non-production areas.
Integrated Cost Metering and Reporting
These capabilities provide visibility into the financial value of consumed resources and enable administrators to optimize provisioned capacity for lowest cost without sacrificing performance.
Discovery and Visualization of Application and Infrastructure Dependencies
This brings application-level awareness to infrastructure and operations teams to ensure service levels and disaster recovery protection for all critical application services. Application components and version numbers are named automatically and updated continuously
What’s Included in the vCenter Operations Management Suite?
VMware vCenter Operations Manager
VMware vCenter Operations Manager uses patented analytics and an integrated approach to operations management to provide the intelligence and visibility needed to proactively ensure service levels, optimum resource usage and configuration compliance in dynamic virtual and cloud environments.
VMware vCenter Configuration Manager
VMware vCenter Configuration Manager™ automates configuration management across virtual and physical servers and desktops, increasing efficiency by eliminating manual, error-prone and time-consuming work. This enables enterprises to maintain continuous compliance by detecting
changes and comparing them to configuration and security policies.
VMware vCenter Infrastructure Navigator
VMware vCenter Infrastructure Navigator automatically discovers and visualizes application and infrastructure dependencies. It provides visibility into the application services running over the virtual-machine infrastructure and their interrelationships for day-to-day operational management.
VMware vCenter Chargeback Manager
VMware vCenter Chargeback Manager™ enables accurate cost measurement, analysis and reporting of virtual machines, providing visibility into the actual cost of the virtual infrastructure required to support business services.
Currently at my work, our network team have decided they want to create a new VMware Management VLAN (Headache Time) They want us to move vCenter on to this new VLAN and assign a new…
IP Address
Subnet Mask
Gateway
VMware Port Group VLAN ID
So what can possibly go wrong?…. Apparently quite a lot
Once the networking is changed on your vCenter, the ESX(i) hosts disconnect because they store the IP address of the vCenter Server in configuration files on each of the individual servers. This incorrect address continues to be used for heartbeat packets to vCenter Server.
You may also experience connectivity issues with vSphere Update Manager, Autodeploy, Syslog and Dump Collector.
Things to remember
Ensure you have a vCenter database backup.
Once the vCenter IP address has changed all that should be necessary is to reconnect the hosts back into vCenter.
Please ensure that the vCenter DNS entry gets updated with the correct IP address. In addition ensure you have intervlan routing configured correctly.
In the worst case scenario and you have to recreate the vCenter database then all you will lose is historic performance data and resource pools.
You will need to change the Port Group VLAN
Creating a second nic on the vCenter and assigning it the IP address of the new VLAN won’t be of assistance as you will need to select a managed vCenter IP address if you do this
How to resolve this
There are two methods to get the ESX hosts connected again. Try each one in order
Method 1
Log in as root to the ESX host with an SSH client.
Using a text editor, edit the /etc/opt/vmware/vpxa/vpxa.cfg file and change the parameter to the new IP of the vCenter Server.
Or for ESXi 4 and 5, navigate to the folder /etc/vmware/vpxa and with vi open the file: vpxa.cfg. Search for the line that starts with: and then change this parameter to the new IP address of the vCenter Server.
Save your changes and exit.
Restart the management agents on the ESX.
Restart the VirtualCenter Server service with this command: # services.sh
Return to the vCenter Server and restart the “VMware VirtualCenter Server” Service.
Note: This procedure can be performed on an ESXi host through Tech Support mode with the help of a VMware Technical Support Engineer.
Method 2
From vSphere Client, right-click the ESX host and click Disconnect.
From vSphere Client, right-click the ESX host and click Reconnect. If the IP is still not correct, go to step 3.
From vSphere Client, right-click the ESX host and click Remove.
Caution: After removing the host from vCenter Server, all the performance data for the virtual machines and the performance data for the host will be lost
Reinstall the VMware vCenter Server agent.
Select New > Add Host.
Enter the information used for connecting to the host
Firewall/Router Passthrough
If the IP traffic between the vCenter Server and ESX host is passing through a NAT device like a firewall or router and the vCenter Server’s IP is translated to an external or WAN IP, update the Managed IP address:
From vSphere Client connected to the vCenter Server top menu, click Administration and choose VirtualCenter Management Server Configuration.
Click Runtime Settings from the left panel.
Change the vCenter Server Managed IP address.
If the DNS name of the vCenter Server has changed, update the vCenter Server Name field with the new DNS name
How we changed IP Address step by step on vSphere 4.1
First of all Remote Desktop into your vCenter Server and change the IP Address, Subnet Mask and Gateway.
Make sure inter vlan routing is configured between your new subnet and the subnet your DNS servers are on if this is the case
Go to your DNS Server and delete the entry for your current vcenter server
Add the new A Record for your vCenter Server
You may need to run an ipconfig /flushdns on the systems you are working on.
Try reconnecting via Remote Desktop to your vCenter Server to establish connectivity
Click Home and go to vCenter Server Settings and adjust vCenter’s IP address
At this point, all your hosts will have disconnected? (Don’t panic!)
At this point we logged into the host which runs vCenter using the vClient and changed the VLAN on the port group vCenter was on.
Go back to your logon into vCenter
Right click on the first disconnected hosts and click Connect
The below error message will appear
Click Close and then an Add host box will appear as per below screenprint
The host should now connect back in and adjust for HA
If you get any error messages afterwards then the IP Addres will need to be updated in a couple of other places. See link below
Because vSphere is not a single stand-alone server, application, or isolated computing system, the pieces of the puzzle will require some form of communication between them. There are many possible configuration scenarios depending on the environment in which vSphere is being deployed.
A vCenter Server must be able to communicate with each host and each vSphere client. Furthermore, if a remote database server is utilized rather than a local instance of the database, the required TCP/IP ports for that database installation are also required.
If an instance of vCenter Server is installed on Windows Server 2008, you must either disable the Windows Firewall or make an exception to allow communication between all of the required pieces of the environment.
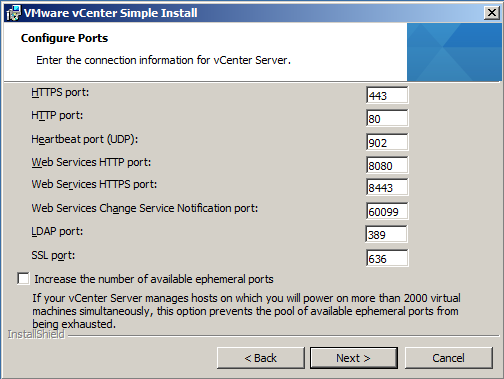
vCenter Server requires several ports to be open when you select a default installation. Each of these ports will be used for a different portion of the overall communications path. To enable proper communication between each of the components, consult a network engineer to ensure the appropriate ports are open for communication.
Web ports that are required to be open include the following:
Port
Description
80
Required for the purpose of redirecting nonsecure requests to vCenter Server on a secure port
443
The default port used to communicate with vSphere Client and to look for data from vSphere Web Access Client and other VMware Software Development Kit (SDK) applications such as the VI Toolkit. You can change this port, but vSphere Client and any SDK applications must use the vCenter Server name, followed by the nondefault port number
8080
The port used by Web Services HTTP.
8443
The port used by Web Services HTTPS
389
The standard port number used for Lightweight Directory Access Protocol (LDAP) services. This port is used for the Directory Services component of vCenter Server. It must be available to vCenter Server, even if vCenter Server is not part of a Linked Mode Group. You can change from port 389 to any available port ranging from 1025 to 65535. This is the normal LDAP port that the vCenter Server Active Directory Application Mode (ADAM) instance listens on.
636
Used when using vCenter in Linked Mode. This is the Secure Sockets Layer (SSL) port of the local vCenter Server ADAM Instance. It is the preferred port number, but it can also be changed to any available port ranging from 1025 to 65535.
902
Used for multiple tasks. It is used to manage ESX and ESXi hosts and send data to them. vCenter Server also receives a heartbeat at regular intervals from hosts on port 902 over User Datagram Protocol (UDP). This port must not be blocked between vCenter Server and hosts, or between hosts. Port 902 is also used for providing remote console access to virtual machines from vSphere Client.
903
Used in the same fashion as 902: it provides remote console access of virtual machines to vSphere Client. These ports must be open for proper communication to occur between vCenter Server and vSphere Client, as well as from vSphere Client and the ESX and ESXi hosts
vCenter and the vCenter Database
If you want or need to have vCenter and the vCenter Database on separate VLAN’s, you only need to be sure you have enough network bandwidth and speed between them so that the VC performance will not be affected
A host interacts with the vCenter Server through two host management agents: hostd and vpxa. Hostd is started on the host during ESX boot up. It is primarily responsible for bookkeeping of the host-level entities like VMs, datastores, networks, and so on. It is also responsible for implementing the host-level functions of the vSphere Infrastructure API. The vCenter Server dispatches host-related operations to a host over the Web using a SOAP interface. On the host, another agent called vpxa listens to these SOAP requests and dispatches them to hostd using the vCenter Server API. When a host is added to a vCenter Server inventory, vpxa is installed and started on the host. The resource consumption of hostd and vpxa can be monitored using esxtop.
Because vCenter Server communicates with an ESX host through the vSphere Infrastructure API using a SOAP interface, one of the key contributors to the operational latencies is the number of network hops between vCenter Server and the ESX host. If the ESX host is located multiple network hops away from the vCenter Server, the operational latencies may increase significantly. It is therefore recommended that the ESX host resides as few network hops away from the vCenter Server and the DB as possible
You do not need a dedicated physical server (a way to reach a greater consolidation)
Server Consolidation: instead of dedicating an entire physical server to VirtualCenter, you can run it in a virtual machine along with others on the same ESX Server host.
Mobility: by encapsulating the VirtualCenter server in a virtual machine, you can transfer it from one host to another, enabling maintenance and other activities.
Each backup solution that works for a VM work also in this case
Snapshots: A snapshot of the VirtualCenter virtual machine can be used for backup,
archiving, and other similar purposes.
Availability: using VMware HA, you can provide high availability for the VirtualCenter server
You can via DRS rules place the vCenter on certain hosts so you know where it is.
Virtual Solution Con’s
It is susceptible to a potential VI outage
No cold migration
No cloning
It must contend for resources along with other VMs
If you wish to modify the hardware properties for the VirtualCenter virtual machine, you will need to schedule downtime for VirtualCenter. Then, you will need to connect to the ESX Server host directly with the VI Client, shut down the VirtualCenter virtual machine, and make the modifications.
Careful consideration and design thinking needs to built into a vSphere environment where a vDS will be used – See below
Virtual vCenter and vDS
VMware specifically state about running vCenter within a distributed switch and they said point blank, “it is not supported”. They said “Because vCenter governs the distributed switch environment, you can’t have vCenter within the distributed switch.”
If you lose your Virtual Center you will have no way in moving virtual machines between different port groups on the vNetwork Distributed Switch. In addition, you will not be able to get a virtual machine from the traditional virtual switch to a port group on the vNetwork Distributed Switch. Extra to that, you can’t move a VM to another VMware vNetwork Distributed Switch. So that means if you are using VMware vSphere vNetwork Distributed Switches & you lose virtual center you are almost disabled on the networking part. If you lose connectivity on the classic virtual switch & your adapter on the distributed switch are OK you still can’t move your virtual machines to that distributed switch till Virtual Center is back.”
Does this mean a virtual infrastructure design should keep a vSS around? I would say “yes!”. Perhaps it’s now more important to dedicate 2 of the ESX host’s pNICs for the ESX Service Console / ESXi Management VMKernel isolated as a vSS. The 2 pNICs are not only for redundancy anymore, but also to support one or more standby VM portgroups in case they’re needed as a recovery network for VMs normally using the vDS. Of course, that means creating the appropriate trunking, and VLANs ahead of time. Have everything ready for a quick and easy change of critical VMs when needed.
Therefore, a hybrid design using both a vSS and a vDS is a smart “safety net” to have. Especially when an admin has to point the vSphere client directly at an ESX/ESXi host. The “safety net” vSS portgroups will be available from each host and the VMs can be easily switched via the vSphere Client GUI.
Don't think about what can happen in a month. Don't think what can happen in a year. Just focus on the 24 hours in front of you and do what you can to get closer to where you want to be :-)