Archive for Objective 7 Secure a vSphere environment

Identify configuration files related to network security

padlock

ESXi Security

By introducing a layer of abstraction between the physical hardware and virtualized systems running IT services, virtualization technology provides a powerful means to deliver cost savings via server consolidation as well as increased operational efficiency and flexibility. However, the added functionality introduces a virtualization layer that itself becomes a potential avenue of attack for the virtual services being hosted. Because a single host system can house multiple virtual machines, the security of that host becomes even more important. Because it is based on a light‐weight kernel optimized for virtualization, VMware ESX and VMware ESXi are less susceptible to viruses and other problems that affect general‐purpose operating systems. However, ESX/ESXi is not impervious to attack, and you should take proper measures to harden it, as well as the VMware VirtualCenter management server, against malicious activity or unintended damage

ESXILog111

The log files provide an important tool for diagnosing breaches of security as well as other system issues. They also provide audit information. In addition to storing information in files on the local host, you can also send this information to a remote syslog server

As with ESX, ESXi maintains its configuration state in a set of configuration files. However, on ESXi these files can be accessed only using the remote file access API, and there are far fewer files involved. These files normally are not modified directly. Instead, their contents normally change indirectly because of some action invoked on the host. However, the file access API does allow for direct modification of these files, and some modifications might be warranted in special circumstances. Therefore, you should monitor all of these files for integrity and unauthorized tampering, either by periodically downloading them and tracking their contents or by using a commercial tool designed to do this.

Configure and Maintain the ESXi Firewall

images

The ESXi Firewall

Supported services and management agents that are required to operate the host are described in a rule set configuration file in the ESXi firewall directory /etc/vmware/firewall/. The file contains firewall rules and lists each rule’s relationship with ports and protocols.

By default, when ESXi is installed, the firewall is enabled. The default configuration is to permit only the required operational traffic and to deny all other

Firewall

Identify esxcli firewall configuration commands

esxclinetwork

Capture

Example Commands of esxcli network firewall

List Firewall Rules

  • esxcli network firewall ruleset list

firewall

Enable and Disable the FTP Client Rulset

  • esxcli network firewall ruleset set –ruleset-id ftpClient –enabled true
  • esxcli network firewall ruleset set –ruleset-id ftpClient –enabled false

Firewall2

Explain the three Firewall Security Levels

Capture

Enable/Disable pre-configured services

Firewall2

Configure service behavior automation

Select a host > Configuration > Software > Security Profile > Services > Properties > Options

  • Start automatically if any ports are open, and stop when all ports are closed: The default setting for these services that VMware recommends. If any port is open, the client attempts to contact the network resources pertinent to the service in question. If some ports are open, but the port for a particular service is closed, the attempt fails, but there is little drawback to such a case. If and when the applicable outgoing port is opened, the service begins completing its tasks.
  • Start and stop with host: The service starts shortly after the host starts and closes shortly before the host shuts down. Much like Start automatically if any ports are open, and stop when all ports are closed, this option means that the service regularly attempts to complete its tasks, such as contacting the specified NTP server. If the port was closed but is subsequently opened, the client begins completing its tasks shortly thereafter.
  • Start and stop manually: The host preserves the user-determined service settings, regardless of whether ports are open or not. When a user starts the NTP service, that service is kept running as long as the host is powered on. If the service is started and the host is powered off, the service is stopped as part of the shutdown process.

Firewall3

Open/Close ports in the firewall
  1. Login to vSphere client
  2. Enter the Hosts and Clusters View
  3. Select a host
  4. Click the Configuration tab
  5. Under the Software view, select Security Profile
  6. Under Security Profile > Firewall, click Properties
  7. Highlight a service
  8. To enable a firewall rule, check the check box next to the traffic label

firewall3

Allowing connections from an IP Address or a network

  1. All connections may be allowed or it can be restricted to a single IPv4 or IPv6 addresses and/or IPv4 or IPv6 networks.

Firewall2

Example esxcli network firewall commands

List the Firewall rules and their ports

  • esxcli network firewall ruleset rule list

firewall4

Disable and Enable the All IPs allowed rule for the ftpClient Rule

  • esxcli network firewall ruleset set –allowed-all false –ruleset-id=ftpClient
  • esxcli network firewall ruleset set –allowed-all true –ruleset-id=ftpClient

firewall5

Specify an allowed network range 10.1.1./24 for the ftpClient Firewall Rule

  • esxcli network firewall ruleset allowedip add –ip-address=10.1.1.0/25 –ruleset-id ftpClient

firewall6

Create a custom service

Rule set configuration files are located in the /etc/vmware/firewall directory and you will see there are 2 files there already

  • fdm.xml
  • service.xml

fw2

Create a custom service file for a service

  • Log into WinSCP and navigate to /etc/vmware/firewall/
  • Copy the service.xml file to your machine
  • I copied the format for an individual service within the service.xml file and created a new Wordpad file initially where I adjusted the service id to a unique ID, the id to my service name – RhianService and chose a new port number 800

XMLFormat

  • I then saved the file as RhianService.xml
  • Next copy this file to the /etc/vmware/firewall directory

Rhianservice2

  • Next Putty into your host and run the following commands as seen in the screenprint below
  • esxcli network firewall refresh
  • esxcli network firewallrulset list and you should see your new service

CustomFirewallRule

  • In vCenter look at Configuration > Software > Security Profile. You should see your custom profile

firewallservice

Adding a Custom Service

To add a service to the host security profile, VMware partners can create a VIB that contains the port rules for the service in a configuration file. VIB authoring tools are available to VMware partners only. Each set of rules for a service in the rule set configuration file contains the following information

  • A numeric identifier for the service, if the configuration file contains more than one service.
  • A unique identifier for the rule set, usually the name of the service.
  • For each rule, the file contains one or more port rules, each with a definition for direction, protocol, port type, and port number or range of port numbers.
  • An indication of whether the service is enabled or disabled when the rule set is applied.
  • An indication of whether the rule set is required and cannot be disabled

Set Firewall Security Level

fw

  • High Security (Default) – Firewall is configured to block all incoming and outgoing traffic, except for ports 22,123,427,443,902,5989, and 5988. These are ports used for basic ESXi communication
  • Medium Security – All incoming traffic is blocked, except on the default ports and any ports you specifically open. Outgoing traffic is not blocked
  • Low Security – There are no ports blocked on either incoming or outgoing traffic. This setting is equivalent to removing the fireall

Set High

  • esxcli network firewall set –default-action false

firewall7

Set Low

  • esxcli network firewall set –default-action true

firewall8

Restart hostd at the command line following Security Level changes by typing service mgmt-vmware restart

Analyse Logs for Security Related Messages

images

What logs are there?

ESXILog11

Identify methods for hardening virtual machines

index

Hardening Machines

  • Installing Antivirus Software

Stagger the schedule for virus scans, particularly in deployments with a large number of virtual machines. Performance of systems in your environment will degrade significantly if you scan all virtual machines simultaneously.
Because software firewalls and antivirus software can be virtualization-intensive, you can balance the need for these two security measures against virtual machine performance, especially if you are confident that your virtual machines are in a fully trusted environment.

  • Limiting Exposure of Sensitive Data Copied to the Clipboard

Go to the VM > Edit Settings > Options > Advanced > General > Configuration Parameters > Add Row > Enter the below values

Capture

  • Removing Unnecessary Hardware Devices

Attackers can use this capability to breach virtual machine security in several ways. For example, an attacker with access to a virtual machine can connect a disconnected CD-ROM drive and access sensitive information on the media left in the drive, or disconnect a network adapter to isolate the virtual machine from its network, resulting in a denial of service.

  • Prevent a Virtual Machine User or Process from Disconnecting Devices

If you do not want to permanently remove a device, you can prevent a virtual machine user or process from connecting or disconnecting the device from within the guest operating system.

  • Limiting Guest Operating System Writes to Host Memory

The guest operating system processes send informational messages to the host through VMware Tools. If the amount of data the host stored as a result of these messages was unlimited, an unrestricted data flow would provide an opportunity for an attacker to stage a denial-of-service (DoS) attack.

  • Modify Guest Operating System Variable Memory Limit

You can increase the guest operating system variable memory limit if large amounts of custom information are being stored in the configuration file.

  • Prevent the Guest Operating System Processes from Sending Configuration Messages to the Host

You can prevent guests from writing any name-value pairs to the configuration file. This is appropriate when guest operating systems must be prevented from modifying configuration settings.

  • Configuring Logging Levels for the Guest Operating System

Normally, a new log file is created each time you reboot a host, so the file can grow to be quite large. You can ensure new log file creation happens more frequently by limiting the maximum size of the log files. VMware recommends saving 10 log files, each one limited to 100KB. These values are large enough to capture sufficient information to debug most problems that might occur.

  • Limit Log File Numbers and Sizes

To prevent virtual machine users and processes from flooding the log file, which can lead to denial of service, you can limit the number and size of the log files ESXi generates.

  • Securing Fault Tolerance Logging Traffic

This logging traffic between the Primary and Secondary VMs is unencrypted and contains guest network and storage I/O data, as well as the memory contents of the guest operating system. This traffic can include sensitive data such as passwords in plaintext. To avoid such data being divulged, ensure that this network is secured, especially to avoid “man-in-the-middle” attacks. For example, use a private network for FT logging traffic.

VMware Hardening Guides

vSphere 5.0 Hardening Guide

vSphere 4.1 Hardening Guide

vSphere 5 Security Guide


Manage Active Directory Integration

active-directory

Add the domain and DNS information for your site to the ESXi host

  1. Connect to the ESXi host using vSphere Client
  2. Select the host and then the configuration tab
  3. Click on DNS and Routing > Software
  4. Click Properties
  5. On the DNS configuration tab, enter the domain name
  6. Specify the DNS server address
  7. Optionally, add additional search domains with the text box Look for hosts in the following domains
  8. Optionally, you may specify the default gateway on the routing tab
  9. Click OK

ad1

Add an ESXi host to the Active Directory Domain

  1. Connect to the ESXi host using vSphere Client
  2. Select the host and then the configuration tab
  3. Click on Authentication Services
  4. Click Properties
  5. Select the Service Type, Active Directory
  6. Within the Domain Settings Frame, enter a Domain Name. Optionally, include a forward slash and a pre-configured OU to join and automatically move the ESXi host into the Organizational Unit upon joining the domain
  7. Do not check Use vSphere Authentication Proxy, see section above for more details.

ad2

  1. Click Join Domain
  2. Enter a Domain Administrator credentials and click OK.

ad3

  • If this errors check your DNS Settings are correct

Removing an ESXi host from an Active Directory Domain

  1. Connect to the ESXi host or vCenter using vSphere Client
  2. Select the host and then the configuration tab
  3. Click on Authentication Services
  4. Click Properties
  5. Click Leave Domain
  6. Click OK, OK
  7. If you are in a hurry, delete the computer from Active Directory associated with your ESXi host

ad4

Enable strong passwords and configure password polices

padlock

ESXi Password Information

By default, ESXi uses the pam_passwdqc.so plug-in to set the rules that users must observe when creating passwords and to check password strength.
The pam_passwdqc.so plug-in lets you determine the basic standards that all passwords must meet. By default, ESXi imposes no restrictions on the root password. However, when nonroot users attempt to change their passwords, the passwords they choose must meet the basic standards that pam_passwdqc.so sets.

Password Requirements

By default, ESXi enforces requirements for user passwords. When you create a password, include a mix of characters from four character classes: lowercase letters, uppercase letters, numbers, and special characters such as an underscore or dash.

Your user password must meet the following length requirements.

  • Passwords containing characters from one or two character classes must be at least eight characters long.
  • Passwords containing characters from three character classes must be at least seven characters long.
  • Passwords containing characters from all four character classes must be at least six characters long.

NOTE: An uppercase character that begins a password does not count toward the number of character classes used. A number that ends a password does not count toward the number of character classes used.

You can also use a passphrase, which is a phrase consisting of at least three words, each of which is 8 to 40 characters long.

Example: Creating Acceptable Passwords

The following password candidates meet the requirements of ESXi.

  • xQaTEhbU: Contains eight characters from two character classes.
  • xQaT3pb: Contains seven characters from three character classes.
  • xQaT3#: Contains six characters from four character classes.

The following password candidates do not meet the requirements of ESXi.

  • Xqat3hb: Begins with an uppercase character, reducing the effective number of character classes to two.

Eight characters are required when you use only two character classes.

  • xQaTEh2: Ends with a number, reducing the effective number of character classes to two.

Eight characters are required when you use only two character classes.

Configuring Password Complexity

To configure password complexity, you can change the default value of the following parameters.

password requisite /lib/security/$ISA/pam_passwdqc.so retry=N min=N0,N1,N2,N3,N4

  • retry is the number of times a user is prompted for a new password if the password candidate is not sufficiently strong.
  • N0 is the number of characters required for a password that uses characters from only one character class. For example, the password contains only lowercase letters.
  • N1 is the number of characters required for a password that uses characters from two character classes.
  • N2 is used for passphrases. ESXi requires three words for a passphrase. Each word in the passphrase must be 8-40 characters long.
  • N3 is the number of characters required for a password that uses characters from three character classes.
  • N4 is the number of characters required for a password that uses characters from all four character classes.
  • match is the number of characters allowed in a string that is reused from the old password. If the pam_passwdqc.so plug-in finds a reused string of this length or longer, it disqualifies the string from the strength test and uses only the remaining characters.

Setting any of these options to -1 directs the pam_passwdqc.so plug-in to ignore the requirement.

Setting any of these options to disabled directs the pam_passwdqc.so plug-in to disqualify passwords with the associated characteristic. The values used must be in descending order except for -1 and disabled.

Change Default Password Complexity for the pam_passwdqc.so Plug-In

Configure the pam_passwdqc.so plug-in to determine the basic standards all passwords must meet.

Procedure

  • Log in to the ESXi Shell and acquire root privileges.
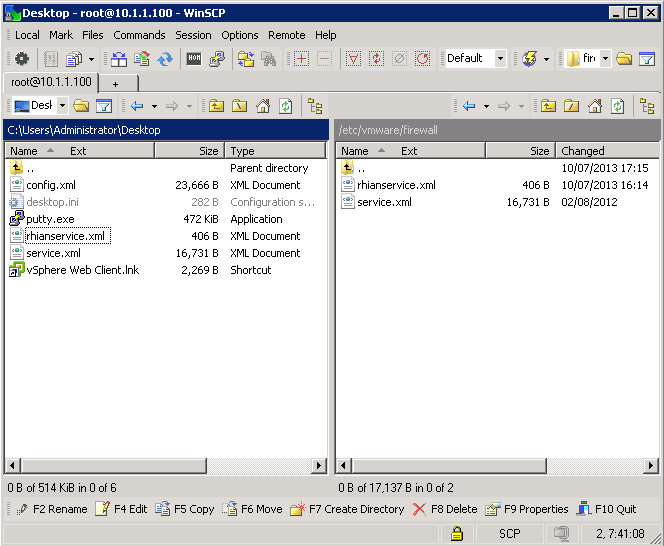
  • Open the passwd file with a text editor or use WinSCP to download, modify and upload the passwd file
  • For example, vi /etc/pam.d/passwd then type i which equals insert mode allowing input on the screen
  • Edit the following line

password requisite /lib/security/$ISA/pam_passwdqc.so retry=N min=N0,N1,N2,N3,N4

  • Type (ESC :wq to exit insert mode)

passwordpolicy

  • Save the file.

Example: Editing /etc/pam.d/passwd

password requisite /lib/security/$ISA/pam_passwdqc.so retry=3 min=12,9,8,7,6

With this setting in effect, the password requirements are:

  • retry=3: A user is allowed 3 attempts to enter a sufficient password.
  • N0=12: Passwords containing characters from one character class must be at least 12 characters long.
  • N1=9: Passwords containing characters from two character classes must be at least nine characters long.
  • N2=8: Passphrases must contain words that are each at least eight characters long.
  • N3=7: Passwords containing characters from three character classes must be at least seven characters long.
  • N4=6: Passwords containing characters from all four character classes must be at least six characters long.

Configure vSphere Authentication Proxy

Hand

What is vSphere Authentication Proxy?

When you use the vSphere Authentication Proxy, you do not need to transmit Active Directory credentials to the host. Users supply the domain name of the Active Directory server and the IP address of the authentication proxy server when they add a host to a domain.

Step 1 – Installing the vSphere Authentication Proxy Service

To use the vSphere Authentication Proxy service (CAM service) for authentication, you must install the service on a host machine.

You can install the vSphere Authentication Proxy on

  • The same machine as the associated vCenter Server
  • Or on a different machine that has a network connection to the vCenter Server.
  • The vSphere Authentication Proxy is not supported with vCenter Server versions earlier than version 5.0.

The vSphere Authentication Proxy service binds to an IPv4 address for communication with vCenter Server, and does not support IPv6. vCenter Server can be on an IPv4-only, IPv4/IPv6 mixed-mode, or IPv6-only host machine, but the machine that connects to vCenter Server through the vSphere Client must have an IPv4 address for the vSphere Authentication Proxy service to work.

Be Aware

At the start of the install, you will get this message if you want to install this on the same server as vCenter Server

proxy

Read this weblink

http://pubs.vmware.com/vsphere-51/index.jsp?topic=%2Fcom.vmware.vsphere.upgrade.doc%2FGUID-C6CCC905-24B7-4C2B-A179-5A7D7866EE33.html

Prerequisites

  • Verify that you have administrator privileges on the host machine where you install the vSphere Authentication Proxy service.
  • Verify that the host machine has Windows Installer 3.0 or later.
  • Verify that the host machine has a supported processor and operating system. The vSphere Authentication Proxy supports the same processors and operating systems as vCenter Server.
  • Verify that the host machine has a valid IPv4 address. You can install vSphere Authentication Proxy on an IPv4-only or IPv4/IPv6 mixed-mode host machine, but you cannot install vSphere Authentication Proxy on an IPv6-only host machine.
  • If you are installing vSphere Authentication Proxy on a Windows Server 2008 R2 host machine, download and install the Windows hotfix described in Windows KB Article 981506 on the support.microsoft.com Web site. If this hotfix is not installed, the Authentication Proxy Adapter fails to initialize. This problem is accompanied by error messages in camadapter.log similar to Failed to bind CAM website with CTL and Failed to initialize CAMAdapter.

Procedure

  • On the host machine where you will install the vSphere Authentication Proxy service, install the .NET Framework 3.5.
  • Install IIS
  • Install vSphere Auto Deploy.
  • You do not have to install Auto Deploy on the same host machine as the vSphere Authentication Proxy service.
  • Add the host machine where you will install the authentication proxy service to the domain.
  • Use the Domain Administrator account to log in to the host machine.
  • In the software installer directory, double-click the autorun.exe file to start the installer.
  • Select VMware vSphere Authentication Proxy and click Install.
  • Follow the wizard prompts to complete the installation.

proxy1

  • Click Next

proxy2

  • Be careful on the next screen. There seems to be a bug where if you select the FQDN over the IP Address, it causes problems later on where something seems to truncate the FQDN which can be seen in the camadapter.log (as seen in the screenprint below so choose IP Address for now. This is what the hotfix is meant to fix but if you are up to date with Updates etc, it will say the update is not applicable. If you select the FQDN, you will find at the end of the procedure where you finally join a host to the domain that you will get this error message
  • “The specified vSphere Authentication Proxy server is not reachable, or has
    denied access to the service.”

proxy3

proxy5

  • Finish the Installation

proxy4

  • During installation, the authentication service registers with the vCenter Server instance where Auto Deploy is registered.
  • The authentication proxy service is installed on the host machine.
  • NOTE When you install the vSphere Authentication Proxy service, the installer creates a domain account with appropriate privileges to run the authentication proxy service. The account name begins with the prefix CAM and has a 32-character, randomly generated password associated with it. The password is set to never expire.
  • Do not change the account settings.

Step 2 – Configure a Host to use the vSphere Authentication Proxy for Authentication

After you install the vSphere Authentication Proxy service (CAM service), you must configure the host to use the authentication proxy server to authenticate users.

Procedure for IIS6

  • Use the IIS manager on the host to set up the DHCP range.
  • Setting the range allows hosts that are using DHCP in the management network to use the authentication proxy service.
  • Browse to Computer Account Management Website.
  • Right-click the virtual directory CAM ISAPI.
  • Select Properties > Directory Security > Edit IP Address and Domain
    Name Restrictions > Add Group of Computers.
  • If a host is not provisioned by Auto Deploy, change the default SSL certificate to a self-signed certificate or to a certificate signed by a commercial certificate authority (CA).

Capture

Procedure for IIS7

  • Use the IIS manager on the host to set up the DHCP range.
  • Setting the range allows hosts that are using DHCP in the management network to use the authentication proxy service.
  • Browse to Computer Account Management Website.
  • Click the CAM ISAPI virtual directory in the left pane and open IPv4
    Address and Domain Restrictions.
  • Select Add Allow Entry > IPv4 Address Range.

IIS

  • If a host is not provisioned by Auto Deploy, change the default SSL certificate to a self-signed certificate or to a certificate signed by a commercial certificate authority (CA).

Capture

  • Also set the following settings

SSL

Step 3 – Authenticating vSphere Authentication Proxy to ESXi

Before you use the vSphere Authentication Proxy to connect ESXi to a domain, you must authenticate the vSphere Authentication Proxy server to ESXi. If you use Host Profiles to connect a domain with the vSphere Authentication Proxy server, you do not need to authenticate the server. The host profile authenticates the proxy server to ESXi.
To authenticate ESXi to use the vSphere Authentication Proxy, export the server certificate from the vSphere Authentication Proxy system and import it to ESXi. You need only authenticate the server once.

NOTE By default, ESXi must authenticate the vSphere Authentication Proxy server when using it to join a domain. Make sure that this authentication functionality is enabled at all times. If you must disable authentication, you can use the Advanced Settings dialog box to set the
UserVars.ActiveDirectoryVerifyCAMCertifcate attribute to 0.

Procedure for IIS6

  • On the authentication proxy server system, use the IIS Manager to export the certificate.
  • Right-click Computer Account Management Website.
  • Select Properties > Directory Security > View Certificate.
  • Select Details > Copy to File.
  • Select the options Do Not Export the Private Key and Base-64 encoded X.509 (CER).

Procedure for IIS7

  • On the authentication proxy server system, use the IIS Manager to export the certificate.
  • Click Computer Account Management Web Site in the left pane.
  • Select Bindings to open the Site Bindings dialog box.
  • Select https binding.

BINDINGS

  • Select Edit > View SSL Certificate.

CERT

  • Select Details > Copy to File.

CERT2

  • Select the options Do Not Export the Private Key and Base-64 encoded X.509 (CER)

CERT3

  • Choose a name for the exported cert and a location to save it

CERT5

  • Finish

Step 4 – Import a vSphere Authentication Proxy Server Certificate to ESXi

To authenticate the vSphere Authentication Proxy server to ESXi, upload the proxy server certificate to ESXi.
You use the vSphere Client user interface to upload the vSphere Authentication Proxy server certificate to ESXi.

Procedure

  • Select a host in the vSphere Client inventory and click the Summary tab.
  • Upload the certificate for the authentication proxy server to a temporary location on ESXi.
  • Under Resources, right-click a Datastore and select Browse Datastore.
  • Select a location for the certificate and select the Upload File button.
  • Browse to the certificate and select Open.
  • Select the Configuration tab and click Authentication Services.
  • Click Import Certificate.

import

  • Enter the full path to the authentication proxy server certificate file on the host and the IP address of the authentication proxy server.
  • Use the form [Datastore name] file path to enter the path to the proxy server.

Capture12

  • Click Import.

Step 5 – Use vSphere Authentication Proxy to Add a Host to a Domain

When you join a host to a directory service domain, you can use the vSphere Authentication Proxy server for authentication instead of transmitting user-supplied Active Directory credentials. You can enter the domain name in one of two ways:

  • n name.tld (for example, domain.com): The account is created under the default container.
  • n name.tld/container/path (for example, domain.com/OU1/OU2): The account is created under a particular organizational unit (OU).

Prerequisites

  • Verify that the vSphere Client is connected to a vCenter Server system or to the host.
  • If ESXi is configured with a static IP address, verify that its associated profile is configured to use the vSphere Authentication Proxy service to join a domain so that the authentication proxy server can trust the ESXi IP address.
  • If ESXi is using a self-signed certificate, verify that the host has been added to vCenter Server. This allows the authentication proxy server to trust ESXi.
  • If ESXi is using a CA-signed certificate and is not provisioned by Auto Deploy, verify that the CA certificate has been added to the local trust certificate store of the authentication proxy server as described in “Configure a Host to Use the vSphere Authentication Proxy for Authentication,” on page 64 of the vSphere 5 Security Guide
  • Authenticate the vSphere Authentication Proxy server to the host as described in “Authenticating vSphere Authentication Proxy to ESXi,” on page 65 of the vSphere 5 Security Guide

Procedure

  • In the vSphere Client inventory, select the host.
  • Select the Configuration tab and click Authentication Services.
  • Click Properties.
  • In the Directory Services Configuration dialog box, select the directory server from the drop-down menu.
  • Enter a domain.
  • Use the form name.tld or name.tld/container/path.
  • Select the Use vSphere Authentication Proxy check box.
  • Enter the IP address of the authentication proxy server.
  • Click Join Domain.
  • Click OK.

ad5

View vSphere Authentication Proxy Settings

You can verify the IP address and the port where the proxy server listens.
After you set up a vSphere Authentication Proxy service on a host machine, you can view the host machine address and port information in the vSphere Client.

Procedure

  • In the vSphere Client, select Inventory > Administration > vSphere Authentication Proxy.
  • The VMware vSphere Authentication Proxy page is displayed.

Log Location

C:\ProgramData\VMware\vSphere Authentication Proxy\logs

Configure SSL Timeouts

images

Configure SSL Timeouts

In situations where high latency may be in problem, you may need to configure a timeout for your SSL handshake.

You can configure SSL timeouts for ESXi and timeout periods can be set for two types of idle connections:

  • The Read Timeout setting applies to connections that have completed the SSL handshake process with port 443 of ESXi.
  • The Handshake Timeout setting applies to connections that have not completed the SSL handshake process with port 443 of ESXi.

Both connection timeouts are set in milliseconds and Idle connections are disconnected after the timeout period. By default, fully established SSL connections have a timeout of infinity.

Read Timeout Procedure

  • Log in to the ESXi Shell and acquire root privileges.
  • Change to the directory /etc/vmware/hostd/
  • Use a text editor to open the config.xml file.
  • Within the /etc/vmware/hostd/config.xml file, locate the subsection enclosed by the http tags located within the vmacore tags

SSLxml

  • Set the Read Timeout to 20 seconds, enter the following command.
    <readTimeoutMs>20000</readTimeoutMs>
  • Save your changes and close the file.
  • Restart the hostd process: /etc/init.d/hostd restart

Handshake Timeout Procedure

  • Log in to the ESXi Shell and acquire root privileges.
  • Change to the directory /etc/vmware/hostd/
  • Use a text editor to open the config.xml file.
  • Within the /etc/vmware/hostd/config.xml file, locate the subsection enclosed by the ssl tags located within the vmacore tags

SSLxml 2

  • Set the Handshake Timeout to 20 seconds, enter the following command.
    <handshakeTimeoutMs>20000</handshakeTimeoutMs>
  • Save your changes and close the file.
  • Restart the hostd process: /etc/init.d/hostd restart

Replace default certificate with a CA certificate

padlock

How default certificates work

The ESXi host uses automatically generated certificates that are created as part of the installation process. These certificates are unique and make it possible to begin using the server, but they are not verifiable and they are not signed by a trusted, well-known certificate authority (CA).
Using default certificates might not comply with the security policy of your organization. If you require a certificate from a trusted certificate authority, you can replace the default certificate.

Things to consider

  • If the host has Verify Certificates enabled, replacing the default certificate might cause vCenter Server to stop managing the host. If the new certificate is not verifiable by vCenter Server, you must reconnect the host using the vSphere Client.
  • ESXi supports only X.509 certificates to encrypt session information sent over SSL connections between server and client components.
  • For information about replacing default certificates on a vCenter Server system, see the vSphere Examples and Scenarios documentation.
  • All file transfers and other communications occur over a secure HTTPS session. The user used to authenticate the session must have the privilege Host.Config.AdvancedConfig on the host

Procedure

  • Log in to the ESXi Shell and acquire root privileges.
  • In the directory /etc/vmware/ssl, rename the existing certificates using the following commands.

mv rui.crt orig.rui.crt
mv rui.key orig.rui.key

  • Copy the new certificate and key to /etc/vmware/ssl.
  • Rename the new certificate and key to rui.crt and rui.key.
  • Restart the host after you install the new certificate.
  • Alternatively, you can put the host into maintenance mode, install the new certificate, and then use the Direct Console User Interface (DCUI) to restart the management agents.

See Pages

71-73 of the vSphere 5 Security Guide

32-36 VMware vSphere Examples and Scenarios

Enable ESXi Lockdown Mode

padlock

What is ESXi Lockdown Mode?

To increase the security of your ESXi hosts, you can put them in lockdown mode. When you enable lockdown mode, no users other than vpxuser have authentication permissions, nor can they perform operations against the host directly. Lockdown mode forces all operations to be performed through vCenter Server.

What happens?

  • When a host is in lockdown mode, you cannot run vSphere CLI commands from an administration server, from a script, or from vMA against the host. External software or management tools might not be able to retrieve or modify information from the ESXi host.
  • The root user is still authorized to log in to the direct console user interface when lockdown mode is enabled
  • If you enable or disable lockdown mode using the Direct Console User Interface (DCUI), permissions for users and groups on the host are discarded. To preserve these permissions, you must enable and disable lockdown mode using the vSphere Client connected to vCenter Server.
  • Enabling or disabling lockdown mode affects which types of users are authorized to access host services, but it does not affect the availability of those services. In other words, if the ESXi Shell, SSH, or Direct Console User Interface (DCUI) services are enabled, they will continue to run whether or not the host is in lockdown mode.
  • Lockdown mode is only available on ESXi hosts that have been added to vCenter Server.
  • Users who were logged in to the ESXi Shell before lockdown mode was enabled remain logged in and can run commands. However, these users cannot disable lockdown mode. No other users, including the root user and users with the Administrator role on the host, can use the ESXi Shell to log in to a host that is in lockdown mode.

Lockdown mode behaviour

Lockdown2

Enabling Lockdown Mode

  • Through the Security Profile
  • Through DCUI
  • Through adding a new host to a cluster

Through the security profile

  • Select the host in the inventory panel.
  • Click the Configuration tab and click Security Profile.
  • Click the Edit link next to lockdown mode.
  • The Lockdown Mode dialog box appears.
  • Select Enable Lockdown Mode.
  • Click OK.

Lockdown3

Through the DCUI

  • Log into an SSH Session or directly into the Host console screen
  • Press F2 and login
  • Scroll to the Configure Lockdown Mode setting and press Yes and Enter

lockdown