
What is vCloud Foundation in general?
VMware Cloud Foundation provides a software-defined stack including VMware vSphere with Kubernetes, VMware vSAN, VMware NSX-T Data Center, and VMware vRealize Suite, VMware Cloud Foundation provides a complete set of software-defined services for compute, storage, network security, Kubernetes management, and cloud management.
What is vCloud Foundation Lab Constructor?
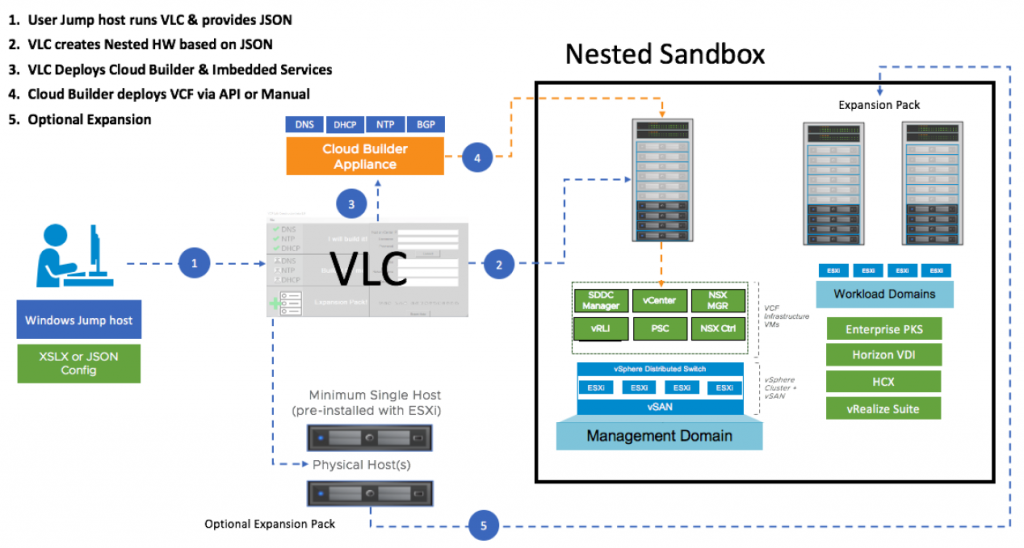
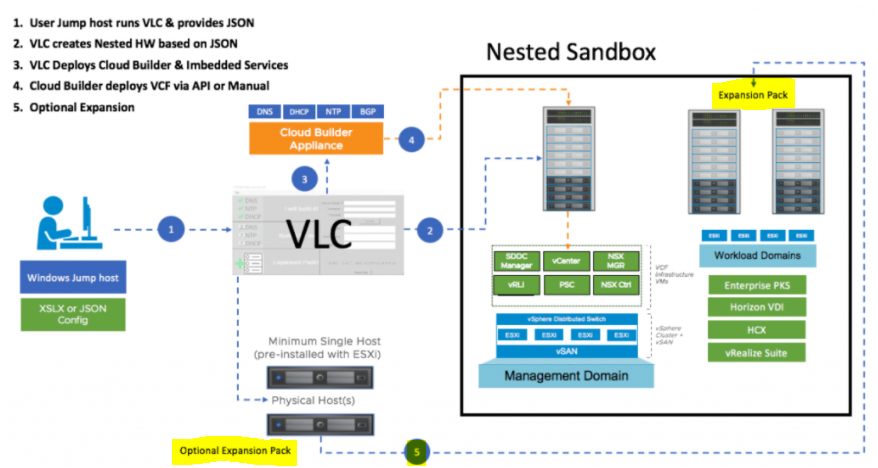
VLC is an automated tool built by Ben Sier and Heath Johnson that deploys an entire nested Cloud Foundation environment onto a single physical host or vSphere Cluster. It is an unsupported tool, this will allow you to learn about VCF with a greatly reduced set of resource requirements. VLC deploys the Core SDDC components in the smallest possible form factor. Specifically, components like the vCenter and vRealize Log Insight nodes are deployed in the tiny, and xsmall format as specified in a JSON config file. With these two stages, the reduction of physical resources needed to deploy the VLC nested lab components becomes possible on a single physical host with 12 CPU Cores, 128 GB RAM, and 2 TB of SSD Disk.
An overall view of what VLC looks like
Download VLC
You will need to register at http://tiny.cc/getVLC and then you will be provided with a zip file.
Support channel
Support for VLC on Slack vlc-support.slack.com
Useful links
Sofware involved
The below software is used in VLC
- VMware Cloud Builder OVA (Contains the S/W below)
- VCF-SDDC-Manager-Appliance OVA
- VMware NSX Manager OVA
- VMware vCenter appliance
- VMware ESXi (Gets extracted from CloudBuilder)
- VMware vRealize Log Insight OVA
Where to get the software?
VMware Cloud Foundation software is only available a few ways today. Here are a few methods to get started with
- VMUG Advantage Eval Experience – VCF is available for VMUG Advantage Subscribers
- vExpert Program – If you are a vExpert you can log in and download the software for free however there is not an NSX-T license available here, only in VMUG I believe.
- VCF customers – Can download what you need from the My VMware Portal
Pre-requisites
Step 1
You need a single physical host running ESXi 6.7+ with 12 cores, 128 GB RAM and 800 GB SSD. This is the minimum requirement for using VLC and you will need to configure the host in 1 of 4 configurations below.
- Standalone ESXi (No vCenter) using a vSS
- ESXi host with vCenter using vSS
- Single ESXi host in a cluster using vDS
- Multiple ESXi hosts in a cluster using vDS
If you are running multiple hosts in a vSAN cluster then run the following command on all hosts because you will be in effect nesting a vSAN within a vSAN
esxcli system settings advanced set -o /VSAN/FakeSCSIReservations -i 1
If you are deploying to a single physical host don’t worry about physical VLANs as all the traffic will reside on that single physical host. If you are deploying to a vSphere cluster you’ll need at least 1 VLAN (10 is the default) physically configured and plumbed up on your physical switch to all hosts in that cluster. If you intend to do anything with NSX (AVN’s are the common thread) you’ll also need 3 additional VLANs (11-13 are default)
- If in a cluster configuration, disable all HA and DRS and vMotion on the physical host(s).
- You will need a virtual switch (VSS or vDS) with the MTU set to 9000
- On the vSwitch, create a portgroup for VCF with VLAN Trunking (0-4094) enabled. On the portgroup (not the switch) set the following security settings:
Promiscuous Mode = Accept
Allow Forged Transmits = Accept
Allow MAC Address Changes = Accept
I chose to deploy my lab on one host with a vDS switch.
Step 2
Build a Windows-based jump host on this ESXi host as a VM and install the following software.
- Windows 10/2012/2016 (Older versions are not supported)
- Powershell 5.1+
- PowerCLI 11.3+
- OVFTool 4.3+ (64bit)
- Net Framework
- VMXNET3 NICs – 1500 MTU
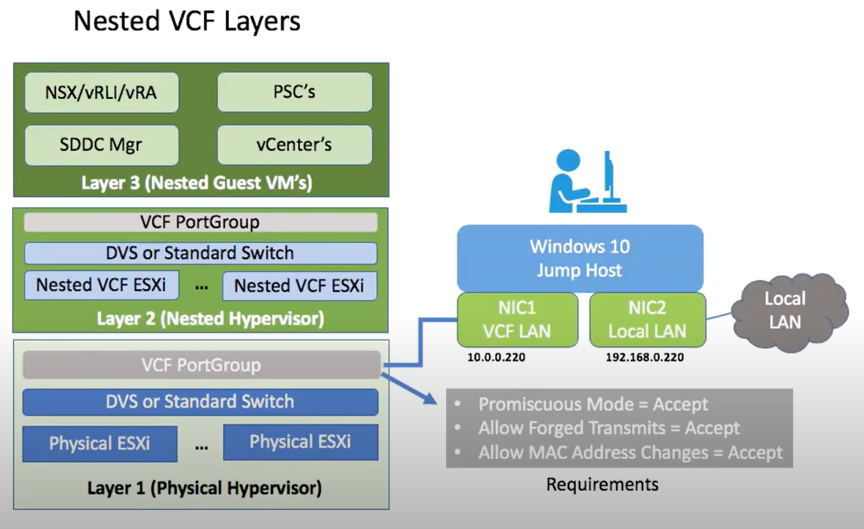
On this jump host, attach two virtual NICs.
- Attached one NIC to your local LAN Network so you can RDP to it.
- Attach the second NIC to the VCF PortGroup created in Step 1 and configure it with the IP 10.0.0.220. Set the DNS on the second NIC to 10.0.0.221. The 10.0.0.221 address will be the address assigned to the Cloud Builder appliance, by default. VLC will modify the Cloud Builder appliance so that it provides specific services, like DNS, for the nested environment. Thus, this using this IP for DNS will allow you to access the nested VCF environment when using the default configuration file in Automated mode.
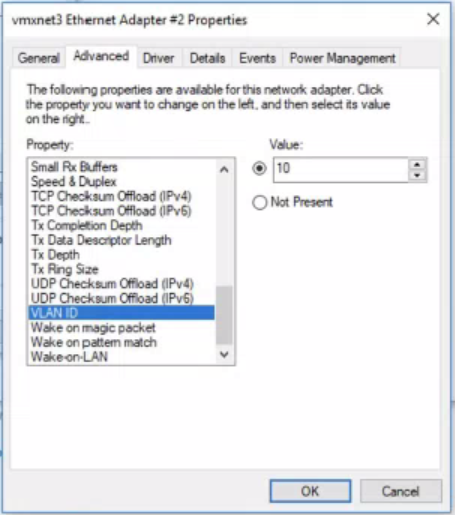
- This second NIC will also need to be configured in the NIC properties to use the VLAN of your management network. In the default Automated VLC configuration this is VLAN 10.
The jump host should look like the below
On the jump host, do the following
- Disable Windows Firewall.
- Turn off Windows Defender Real-time Scanning. Note: this has a habit of resetting after reboots of the Windows VM.
Step 3
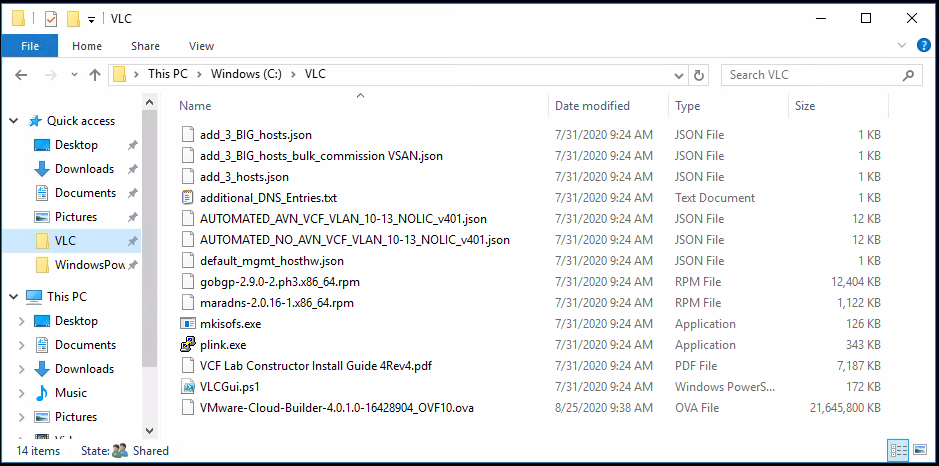
- On the Windows jump host, create a local disk folder for VLC. This must be a local attached disk (i.e. “C:\VLC\ ”) as mapped Network drives will fail.
- Download the VCF Software (Cloud Builder OVA) into this folder.
- You used to have to download the vSphere ESXi ISO that matches the version required for VCF. The easiest method to do this was to simply copy the .iso file located on the Cloud Builder appliance but to make this even easier, VLC now provides an option in the setup GUI where it will download this file directly from the Cloud Builder appliance that it deploys.
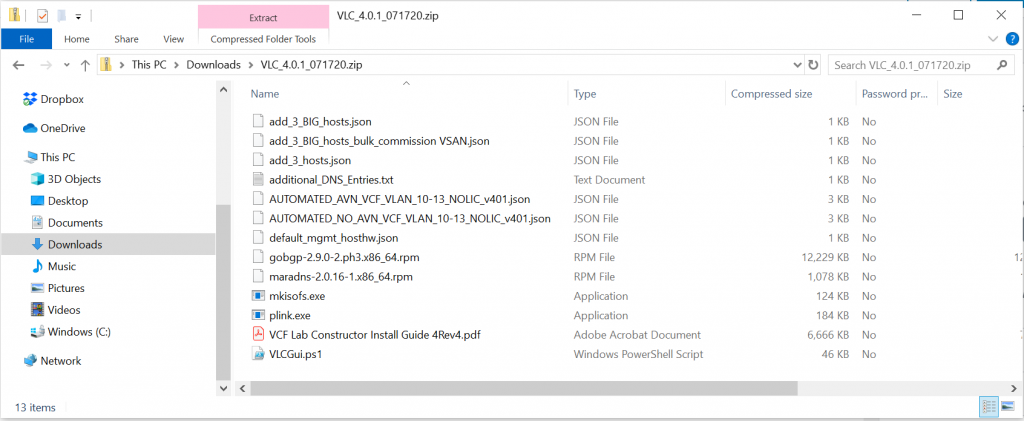
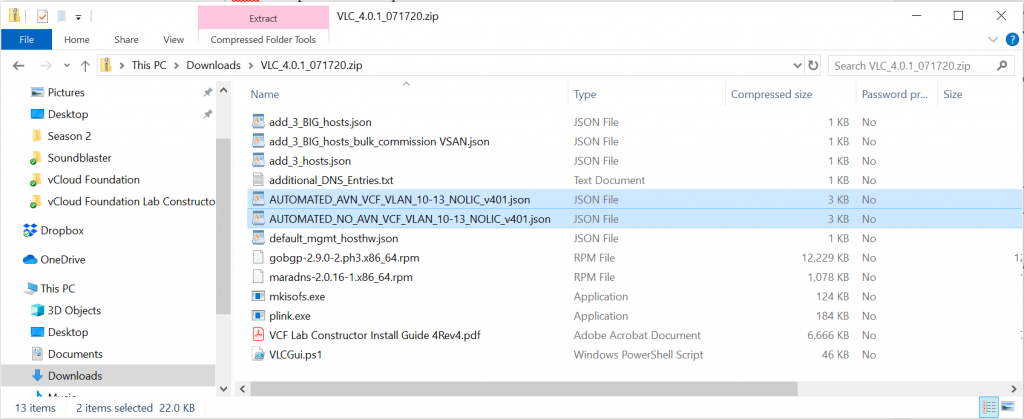
- Download and extract the VLC package to this folder as well
- Install anything extra you need like Putty, WinSCP and Notepad++
Step 4
We now need to edit one of two files. You have a choice of Automated_AVN or Automated_No_AVN when deploying VLC.
For more information on AVN, check this blog
https://blogs.vmware.com/cloud-foundation/2020/01/14/application-virtual-networks-with-vcf/
Multiple sample bringup JSON formatted files are provided with VLC. The selection of the bringup JSON file will dictate if AVN will be implemented at bringup or not. Regardless of which bringup file is to be used, you will need to edit the file to be used in order to define the license keys to be used. The default configuration files do not include any license keys. Using a text editor, edit the appropriate file, as desired with an ESXi license, vCenter license, NSX-T license and vSAN license.
Step 5
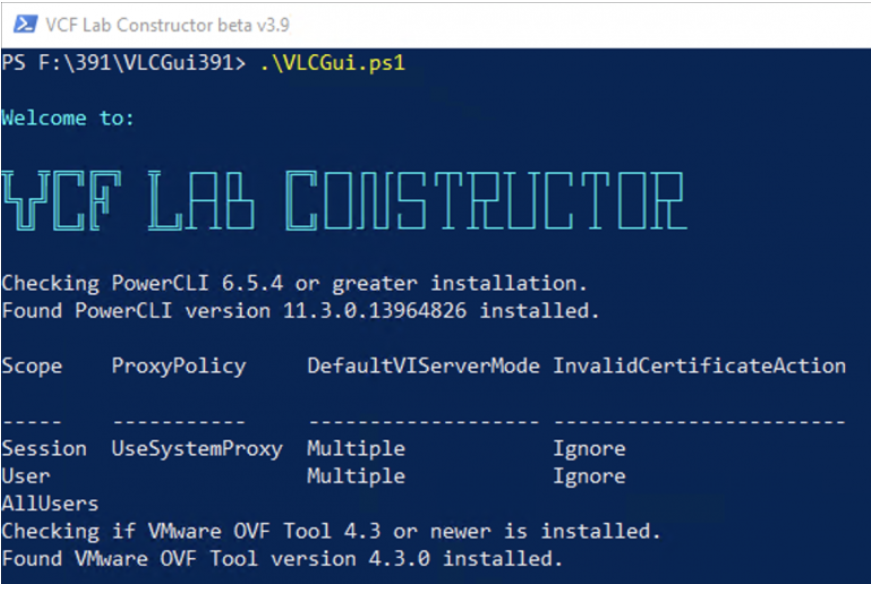
- Either open a Powershell window (as Administrator) and execute the VLC PowerShell Script “C:\VLC\VLCGUi.ps1” or right click on the VLCGUI.ps1 and select ‘Run with PowerShell’.
- VLC UI will Launch
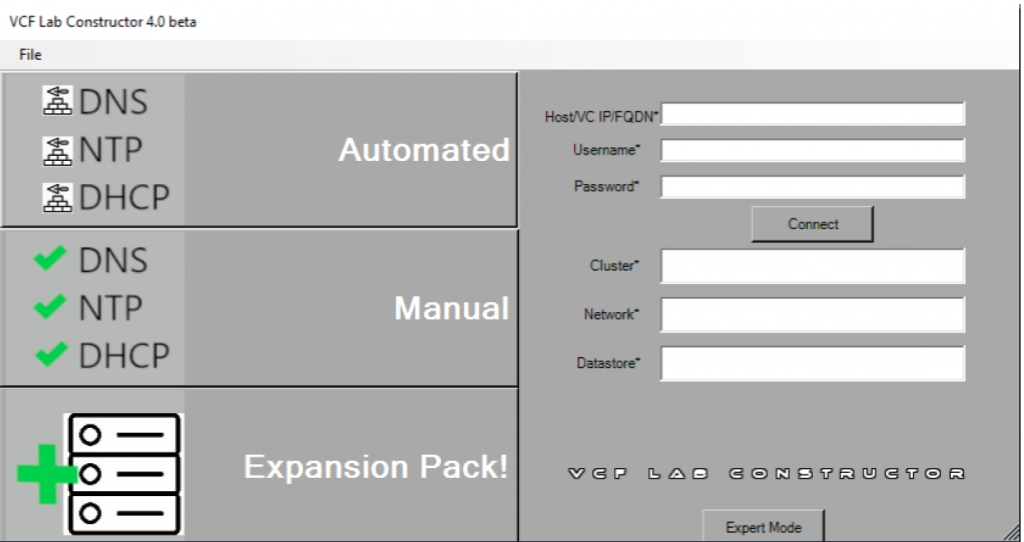
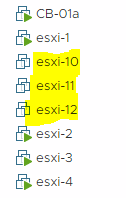
- Once the above screen completes, you will see the below screen. Select the “Automated” Button. This will build your first four hosts for the Management Domain. This is done by creating four virtual nested ESXi hosts. These nested hosts are automatically sized and created for you. You are able to configure the hostnames and IP addresses to be used within the configuration file that you provide the VCF Lab Constructor
- Click on the field titled ’VCF EMS JSON’ and select the JSON file that you just entered the license keys for.
- Click on the CB OVA Location field to select the location of the CB OVA.
- (Optional) Enter the External GW for the Cloud Builder Appliance to use. This allows you to point to a gateway that will allow internet access.

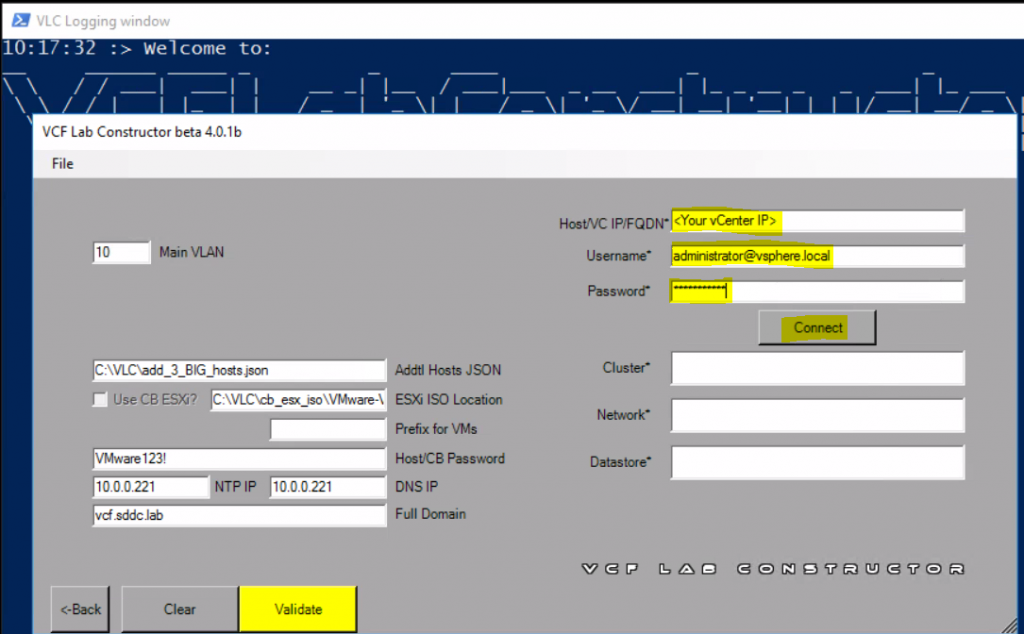
- Click the Connect Button
- VLC will connect to the host or vCenter you specified and will validate all necessary settings. It will then populate the Cluster, Network, and Datastore fields with information gathered from your environment.
- Select the cluster, network (port group) and datastore that you desire VLC to install the nested lab to. The Cluster field will not display any value if you are deploying directly to a single ESXi host.
- ** If your port group does not show up, you need to check to see if the previous security settings have been set explicitly on the port group and not just the switch.
- Click the yellow Validate button
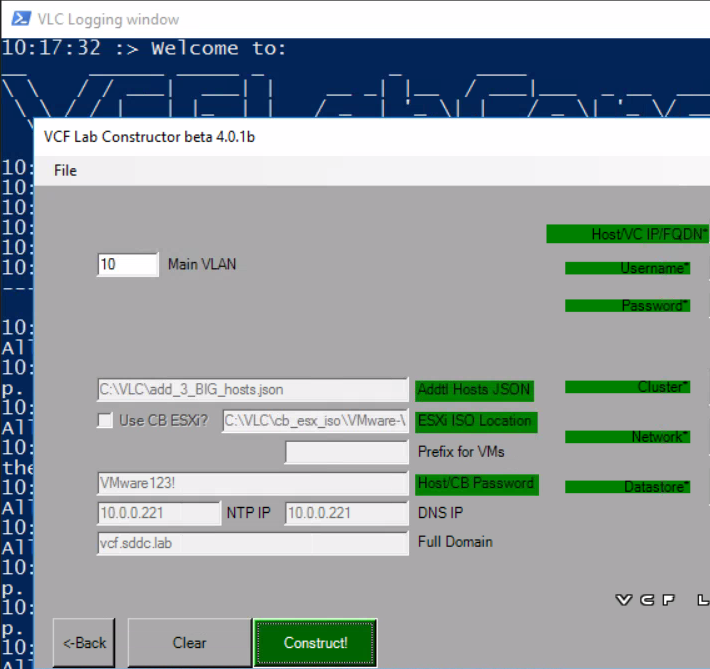
- As VLC validates the information, it will mark the fields in green. When everything has been validated, the Validate button will change to a green button that says ‘Construct’.
- Note the Bring up box. his is a fully documented process in the installation of VCF. Using the VCF Lab Constructor will allow you to manually do this so you can follow the steps of the official VMware Documentation, or if you check the box in the GUI the VCF Lab Constructor will complete Bring-up for you automatically.
- Click Construct to begin the deployment of VMware Cloud Foundation.
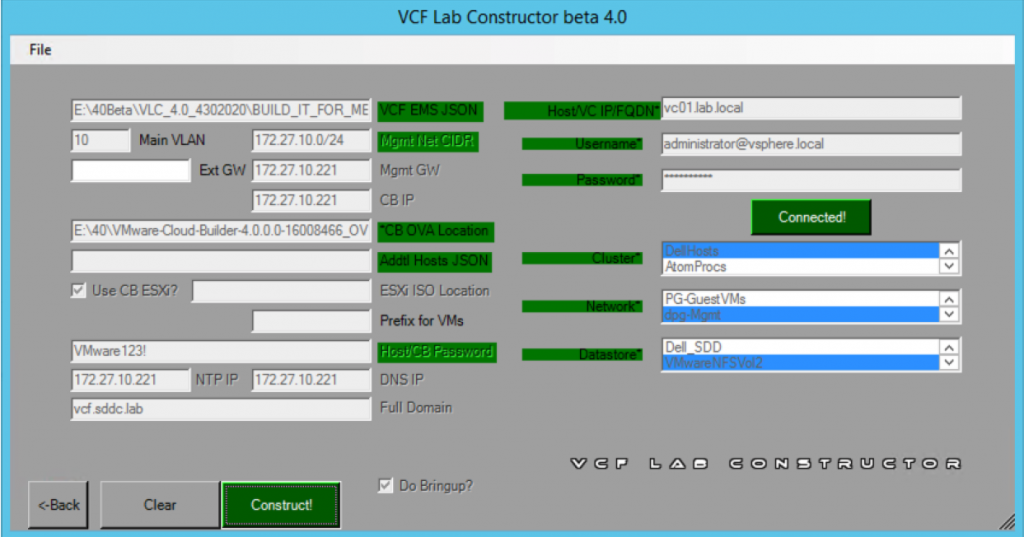
- The process will take some time to complete. On average, expect to wait three and a half hours for the deployment process to complete.
Logging
- During bringup logs can be found in the Cloudbuilder appliance in the /var/log/vmware/vcf/bringup directory – Check vcf-bringup-debug.log in that directory.
- For problems deploying VC and PSC on bringup look in /var/log/vmware/vcf/bringup/ci-installer-xxxx/workflow_xxxx/vcsa-cli-installer.log
- After bringup you can look at the SDDC Manager for logs. The are all rooted in the /var/log/vmware/vcf folder. Depending on what operation you are performing you can look into one of the other folders.
- Domain Manager – Used when creating/deleting/expanding/shrinking new workload domains:/var/log/vmware/vcf/domainmanager/domainmanager.log
- Operations Manager – Used when commissioning/decommissioning hosts and resource utilization collection:/var/log/vmware/vcf/operations/operationsmanager.log
- LCM – Used for Life cycle management activities like downloading bundles, applying updates: /var/log/vmware/vcf/lcm/lcm.log
Accessing the VCF UI
To gain network access when the VCF components are installed on layer 3, your jump host will need a NIC with multiple IP addresses or you will need multiple NICs. Be aware that because everything is nested inside Layer 2 all network traffic is being broadcast back up to Layer 1 port groups. Simply having your jump host on this subnet or port group and listening on the default VCF subnet i.e. (192.168.0.0) will allow you to access everything in layer 3. The jump host can also be nested at layer 1 or a physical desktop that has access to the same subnet. Nesting it at Layer 1 has the best performance.
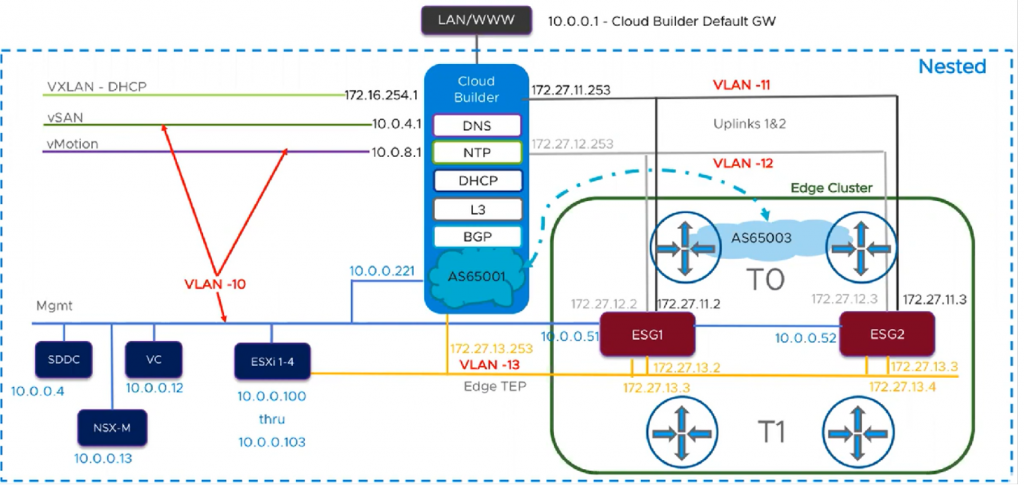
The below diagram courtesy of VMware shows the networks which are created
Further tasks – Expanding the number of hosts
Using the Expansion pack option will now allow you to scale out hosts
When clicking on the Expansion pack option, you get the below screen
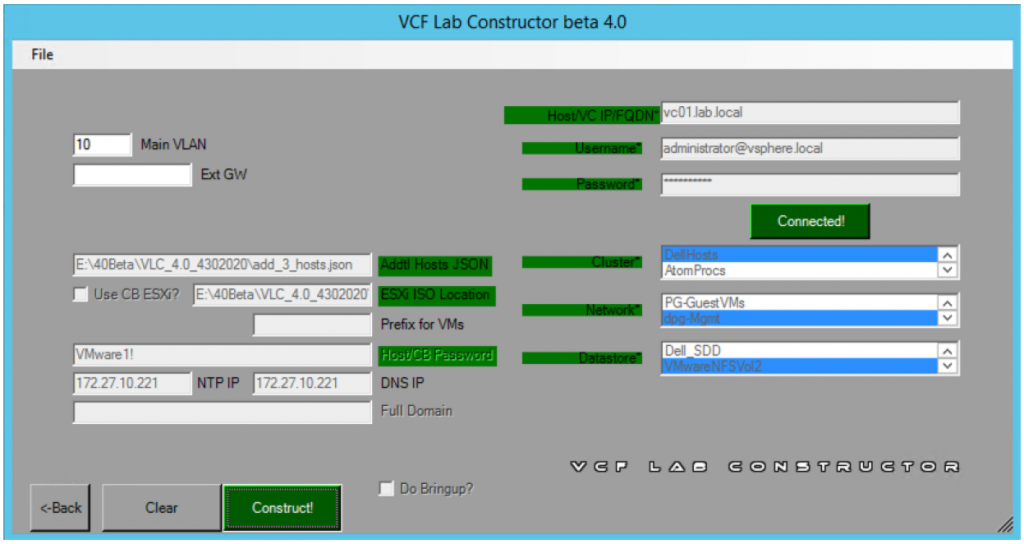
When you have used the Automated method to deploy your environment. VLC has configured the Cloud Builder appliance to provide essential infrastructure services for the managment domain. Before adding additional hosts, you will need to add the appropriate DNS entries to the Cloud Builder configuration. You can use the information below or further down the post, I go through using the expansion pack option when running the VLCGui.ps1 script again and modifying some VLC files.
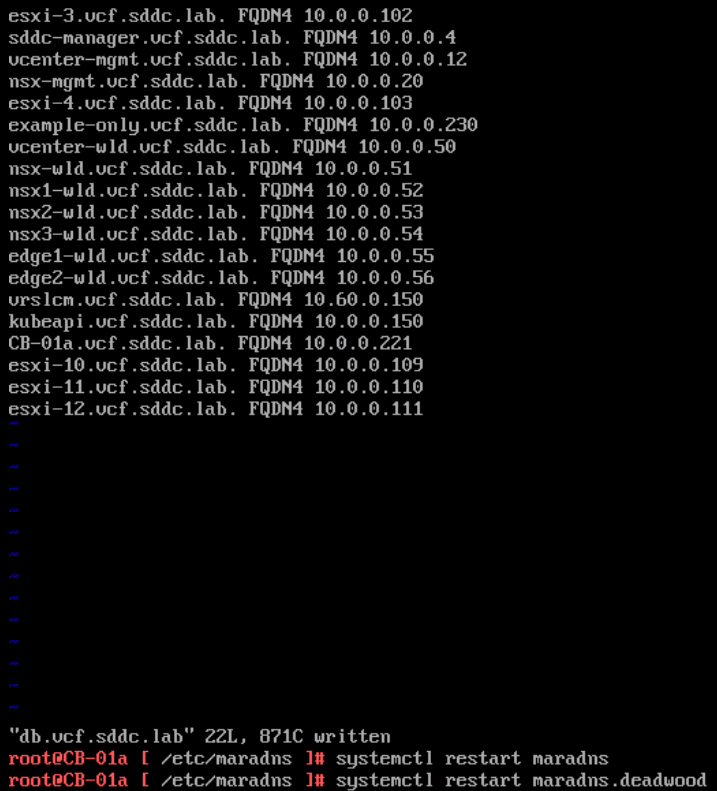
Adding DNS entries for extra hosts
- Use SSH to connect to your Cloud Builder VM and log in using the username (admin) and the password that you specified in the VLC GUI when you deployed the environment.
- You will need to edit the DNS “db” file for the zone specified. As an example, assume that the domain ‘vcf.sddc.lab’ was used during the creation of the nested environment. This would mean the zone file would be located here: /etc/maradns/db.vcf.sddc.lab
- After making your changes and saving the file you will need to reload maradns and the maradns.deadwood services. MaraDNS takes care of forward lookups and Deadwood takes care of Reverse DNS.

- You would follow this same procedure for adding DNS entries for vRSLCM, vROps, vRA, Horzion, or any other component. Note: Certain software (like vROps, vRA, and Horizon) are not automated in VCF 4.0 via SDDC Manager. You may need to follow the manual guidance presented in the VCF documentation to deploy these software packages.
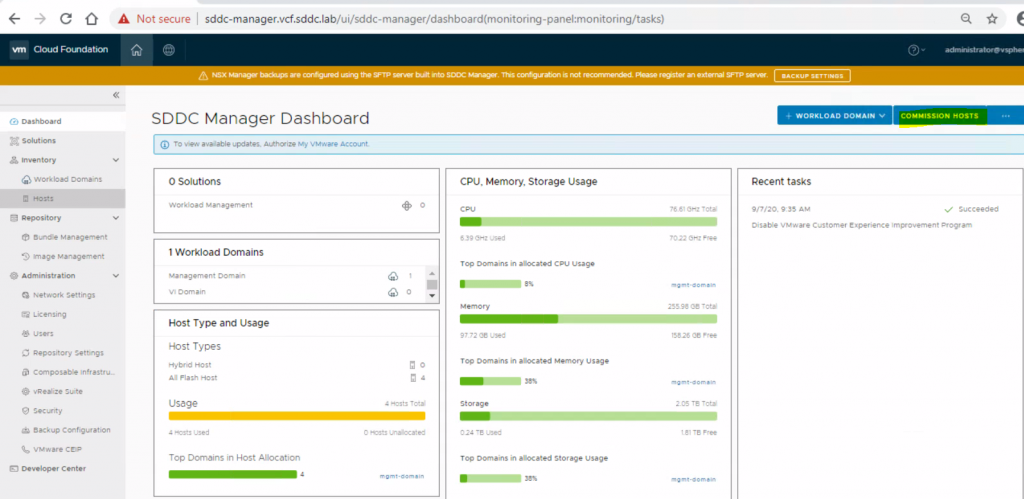
Logging into the SDDC
From the jump host you can log into the following
Hosts = 10.0.0.100-103
vCenter IP = 10.0.0.12 (https://vcenter-mgmt.sddc.lab)
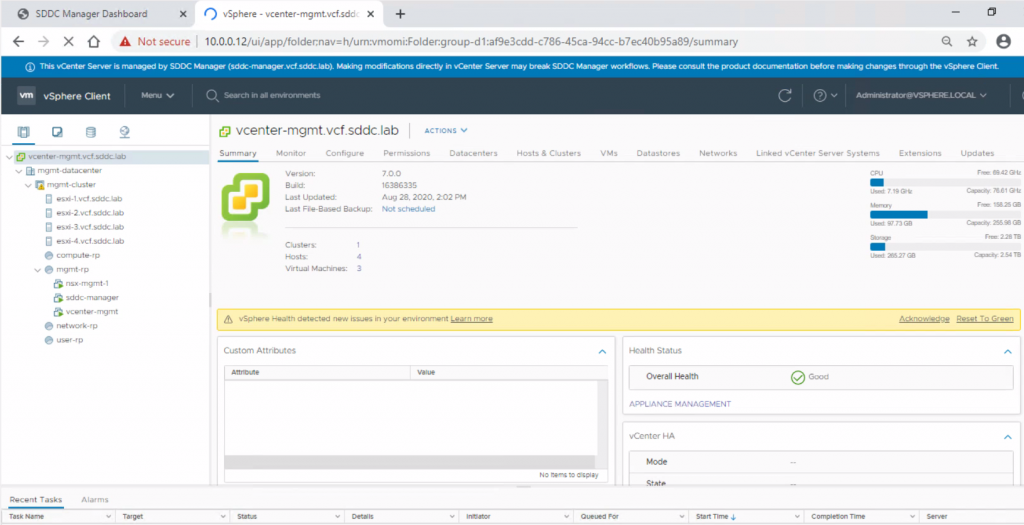
SDDC = 10.0.0.4 (https://sddc-manager.vcf.sddc.lab)
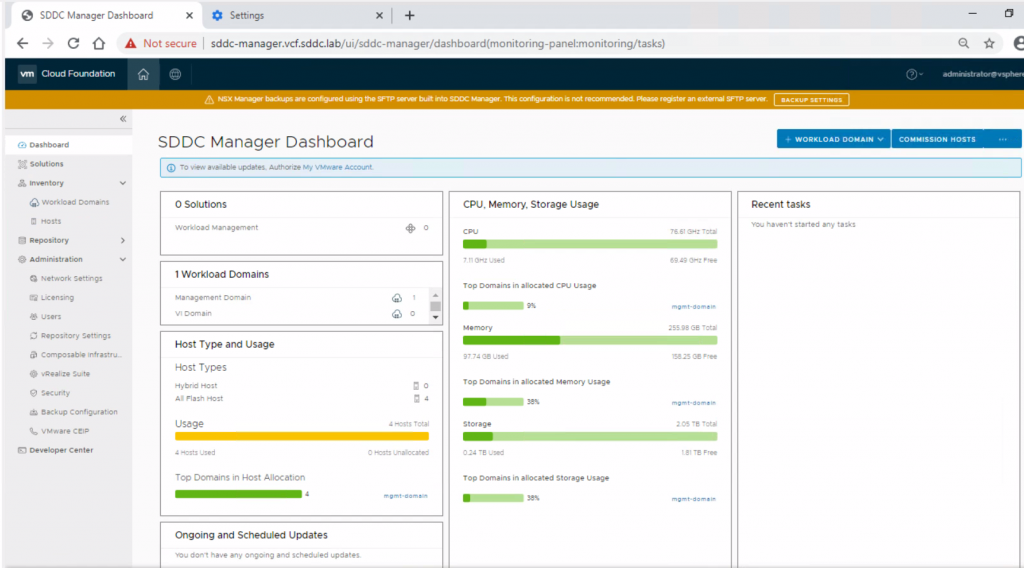
Have a click around and get familiar with the user interface
What if we want to create a workload domain?
The initial part of this script deploys the 4 node ESXi management domain so what if we want to create some more hosts for a workload domain for the products below?
- K8s
- Horizon
- HCX
- vRealize suite
Step 1
First of all we are going to use the below 3 files and add DNS entries
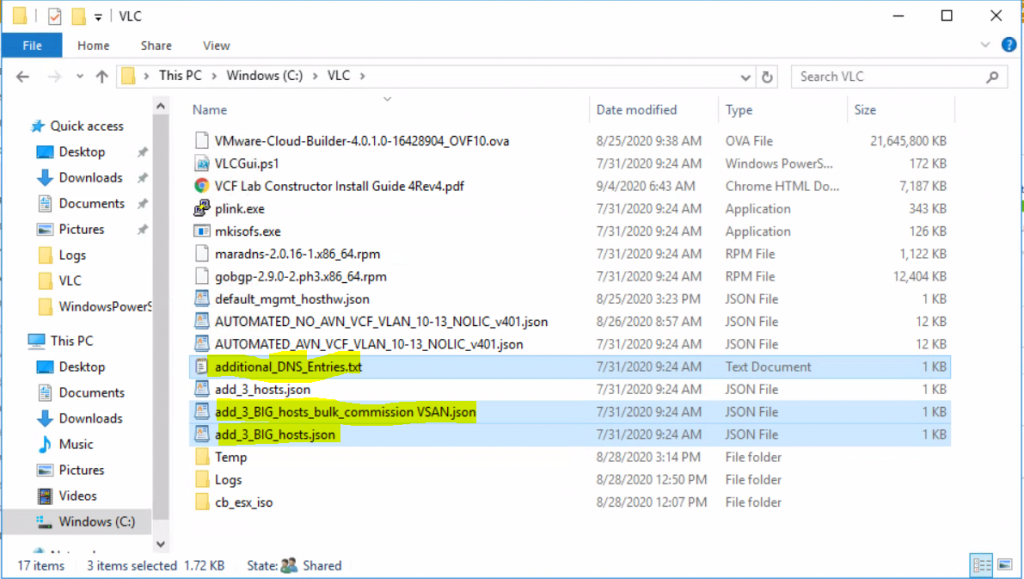
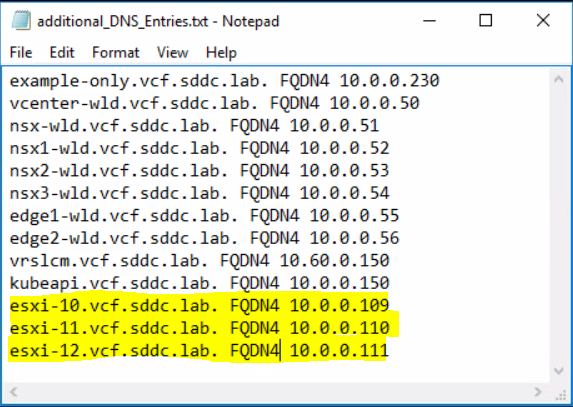
Open the additional_DNS_Entries.txt file and add in the new 3 hosts. In my case it looks like this.
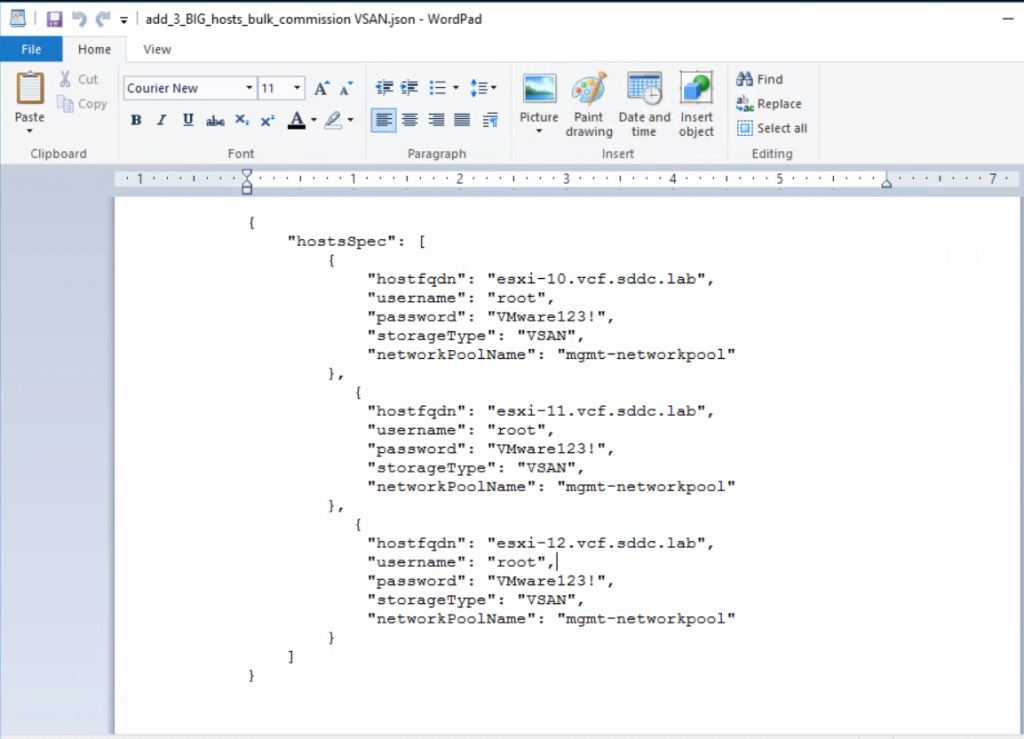
The next file to look at is the add_3_BIG_hosts_bulk_commission VSAN.json
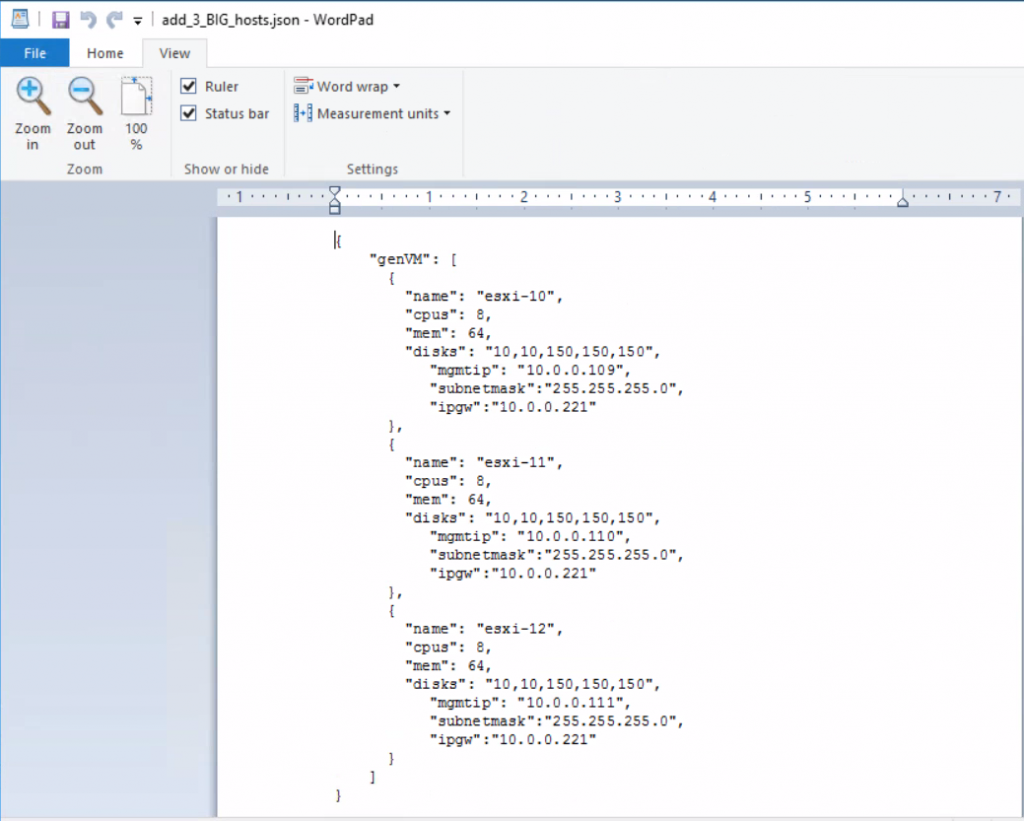
Next we will have a look at the add_3_BIG_hosts_bulk_commission VSAN.jso file. This is used by the vCloud Foundation software itself.
So now we need to run the VLCGui.ps1 script again located in c:\VLC to get to the point where we see the expansion pack option below.
Run Powershell and run .\VLCGui.ps1
Click on Expansion pack
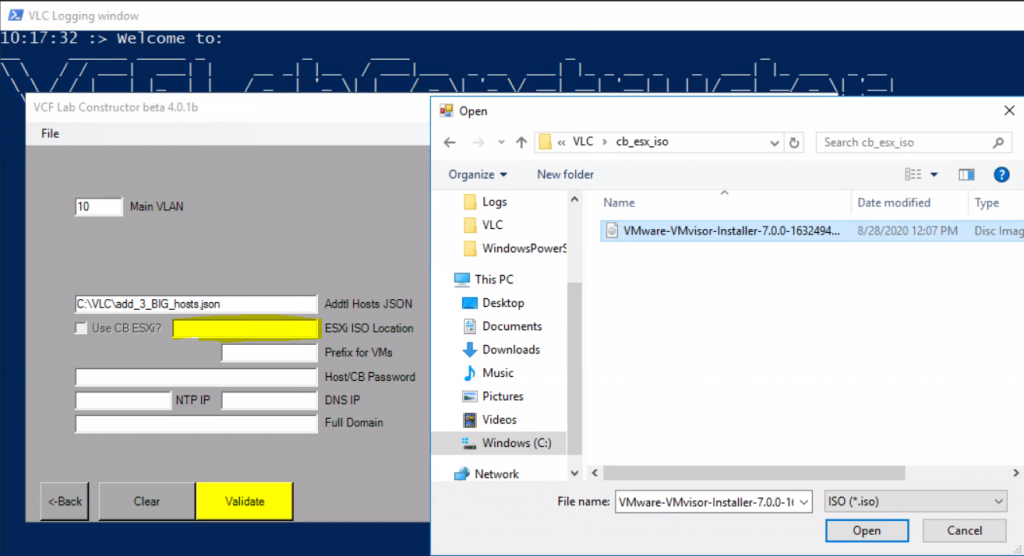
Add in 10 for the main VLAN
In the Addtl Hosts JSON file box, select your add_3_BIG_hosts.json

In the ESXi ISO Location, navigate to c:\VLC\cb_ESX_iso and select the ESXi image
Next add in the host password which is VMware123
Add in the NTP IP which points to the CloudBuilder appliance on 10.0.0.221
Add in the DNS IP which points to the CloudBuilder appliance on 10.0.0.221
Add in the domain name for the lab which is vcf.sddc.lab
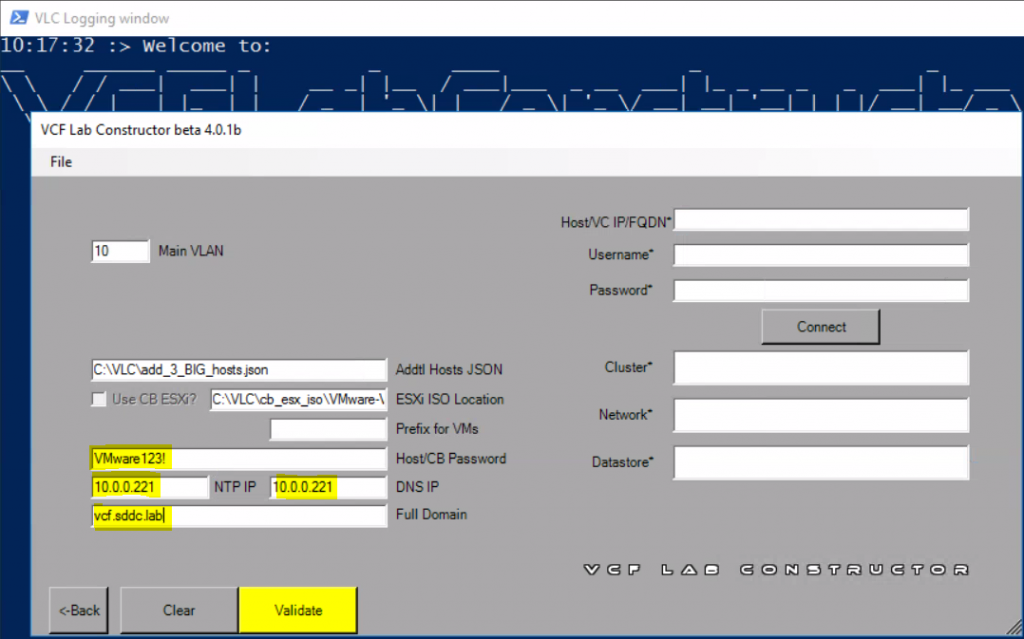
Next put in your vCenter IP, username and password and click Connect
When connected, choose your cluster, network and datastore like you did when configuring this for the inital management host deployment and then click Validate and everything should be green
Click Construct
You will now see in your vCenter the extra hosts being created
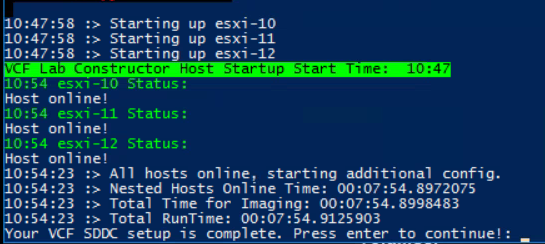
Once finished, you should see the below message in PowerShell. You can see it took a total of around 8 minutes.
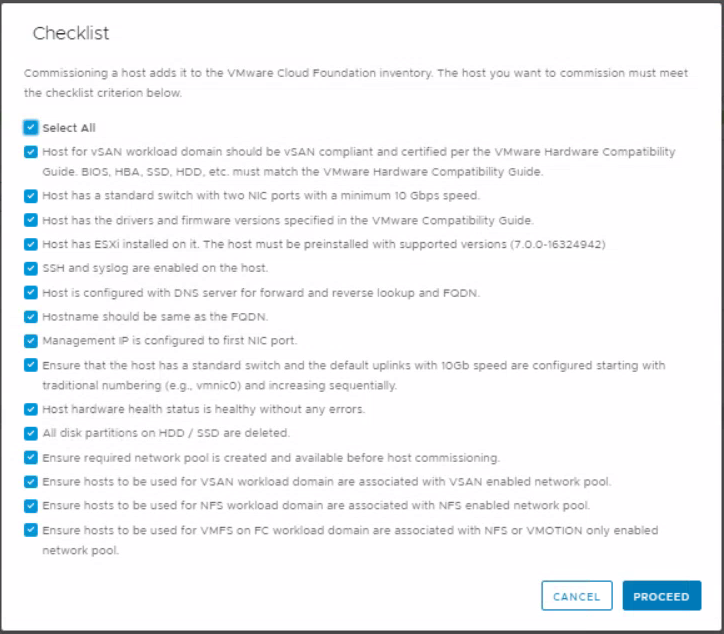
The hosts are now ready to be commissioned into SDDC Manager so we go back to sddc-manager.vcf.sddc.lab and click on Commission hosts in the top right hand corner.
Say Yes to the entire checklist and click Proceed
Next we will use the Import button to add the additional hosts.
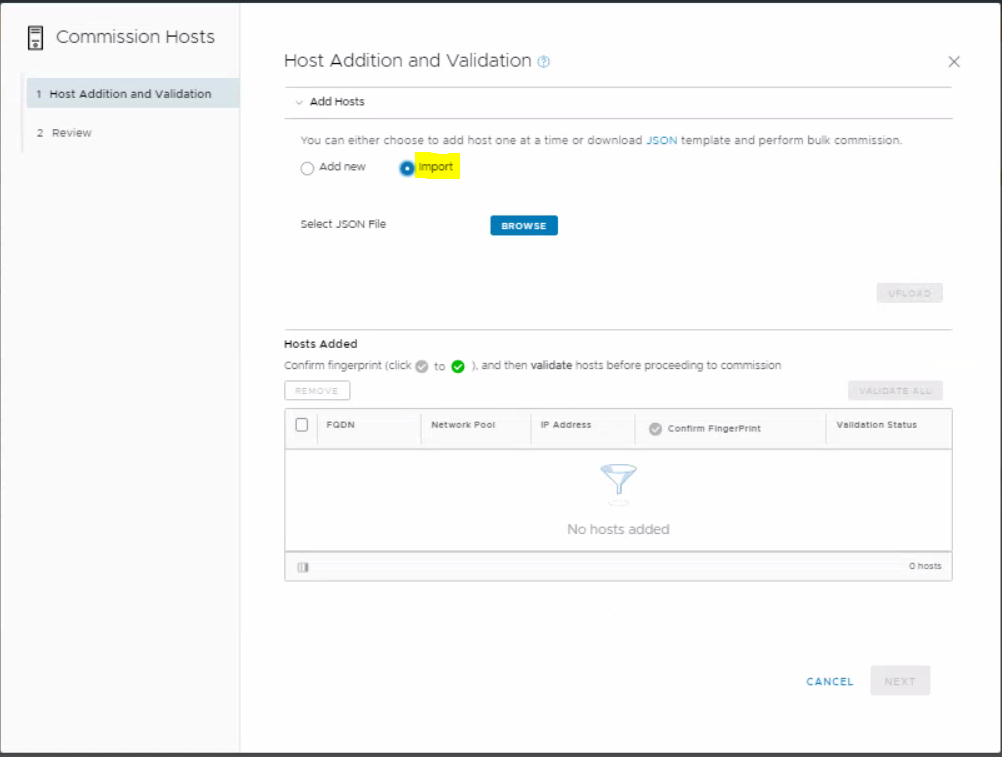
Choose the add_3_BIG_hosts_bulk_commission VSAN.json file
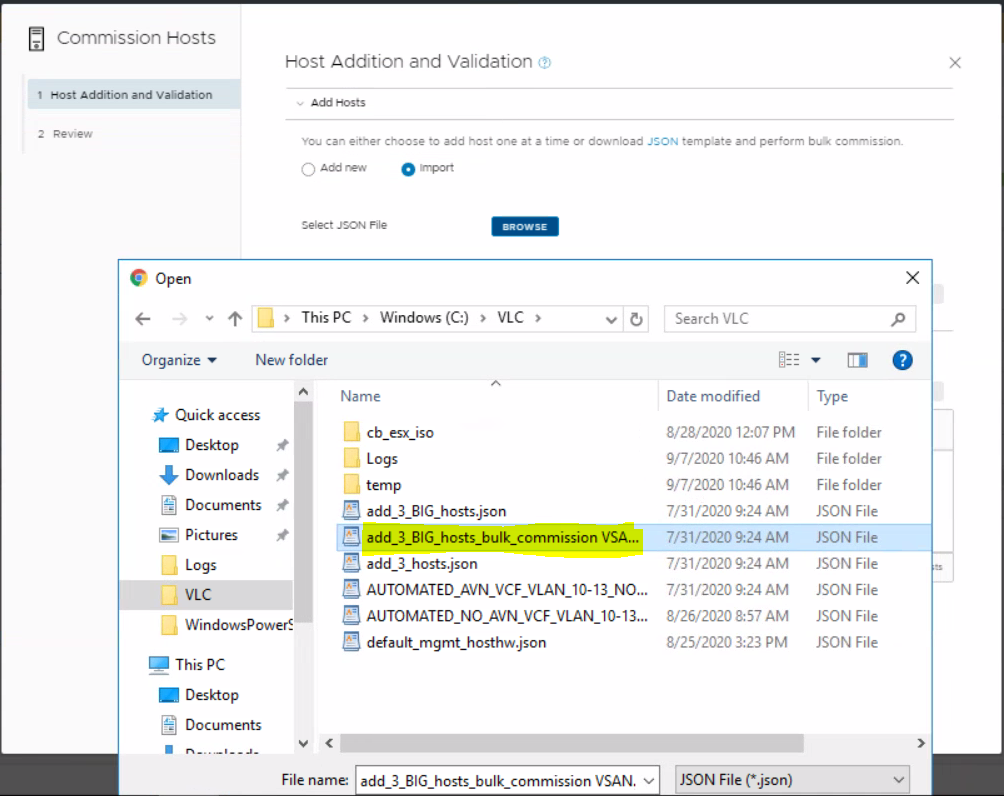
Click upload
If you have a problem where you get the below message then follow the steps below
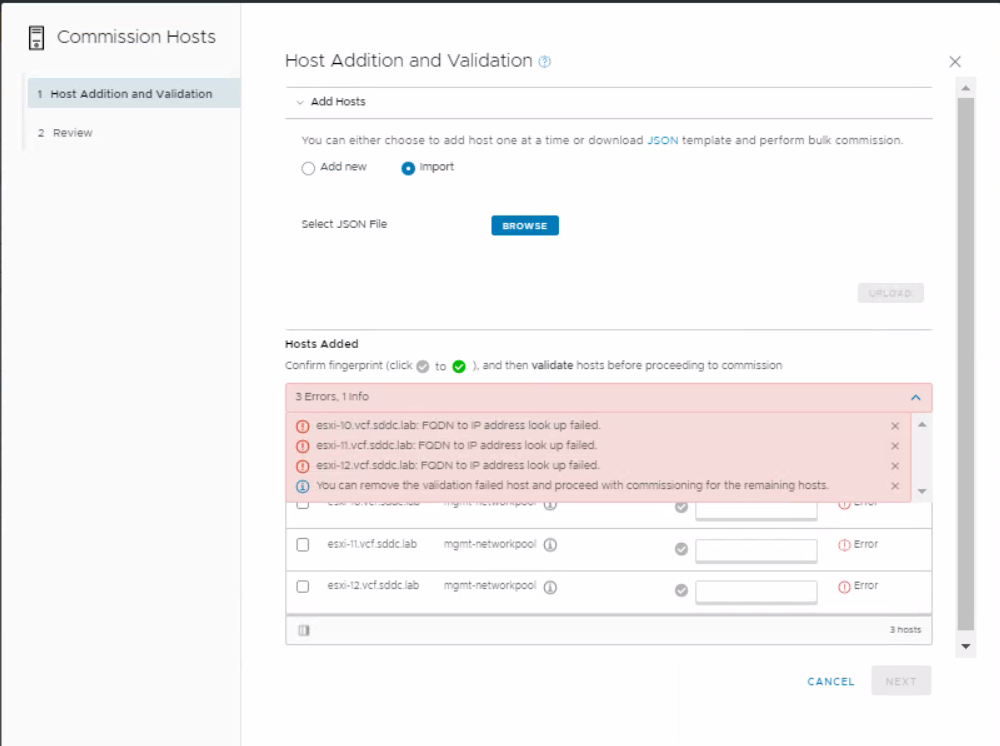
Log into the Cloudbuilder appliance using root and VMware123! and run the below command

Press i to insert new data and add in your new hosts in the same format as the other entries
Go back to SDDC manager and try an upload again and everything should be fine.
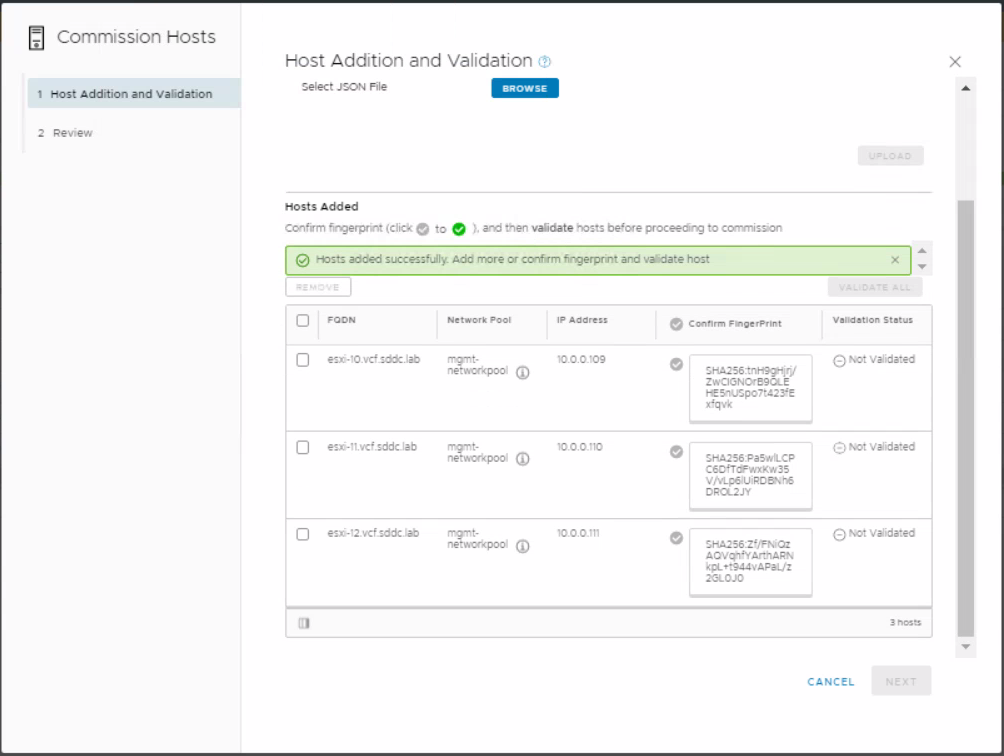
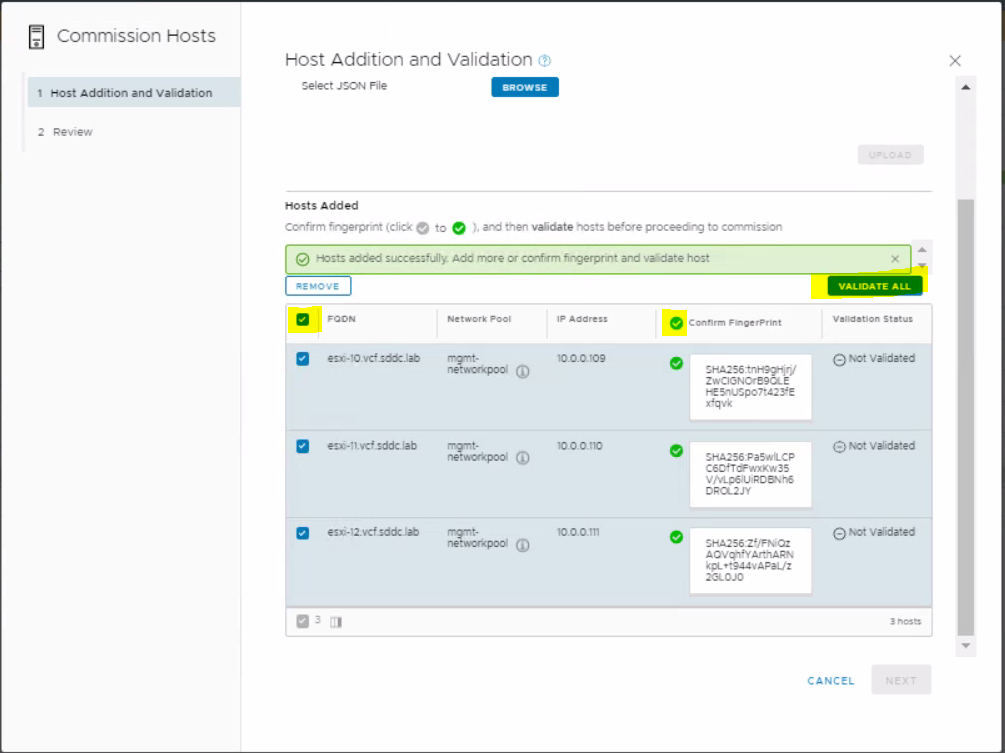
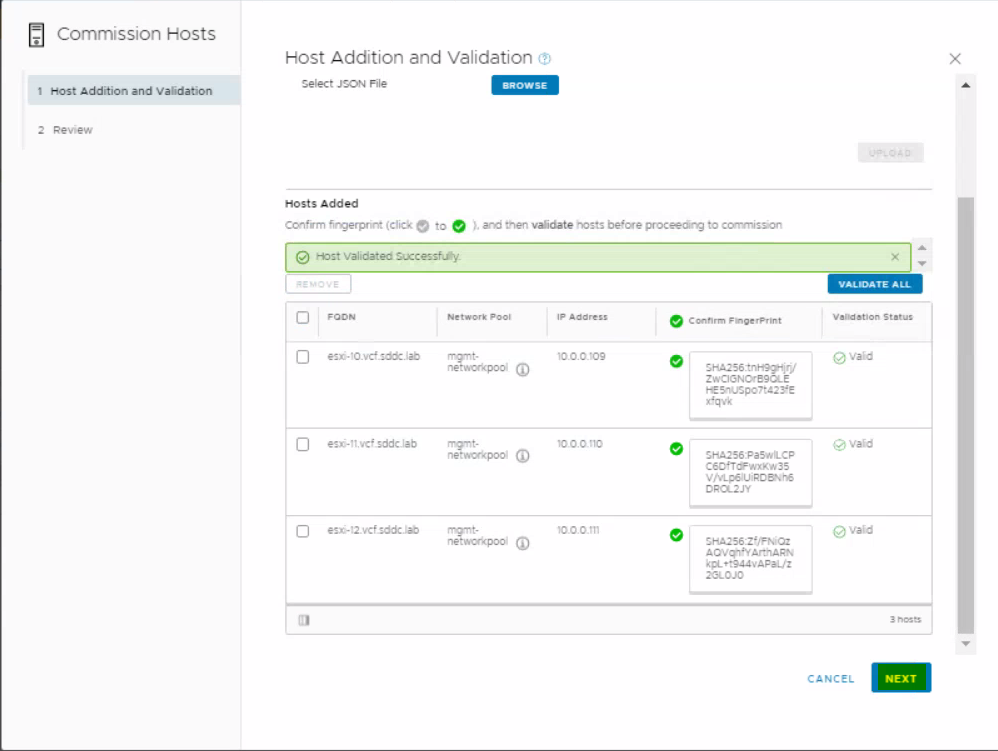
Select all hosts, click on the tickbox on the column saying Confirm FingerPrint and click Validate
Click Next
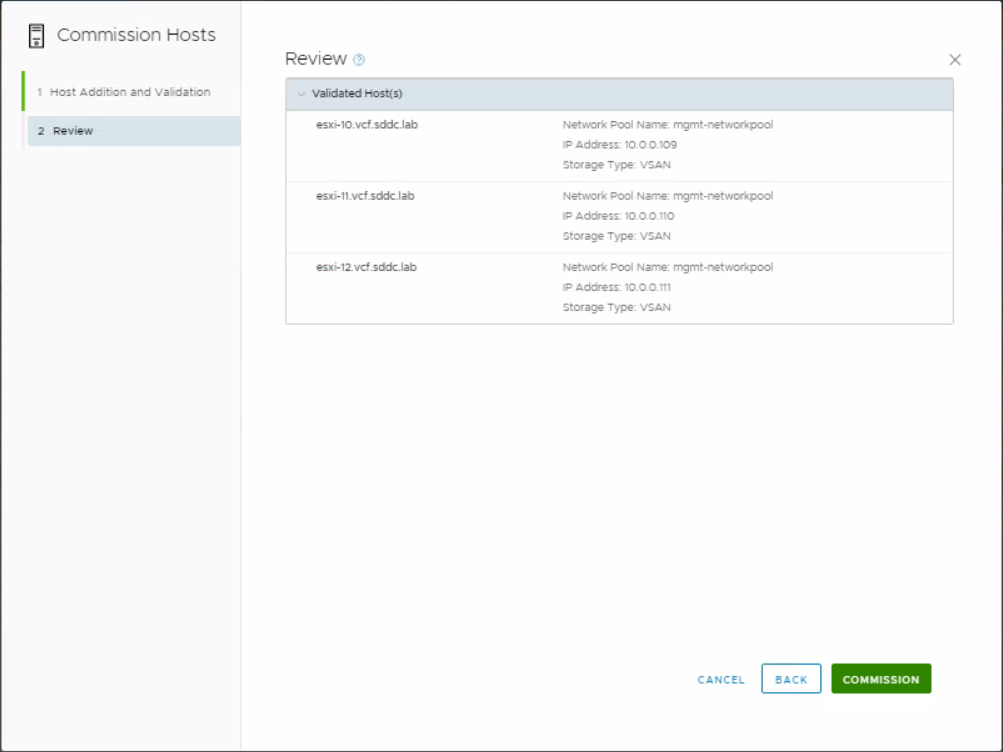
Review
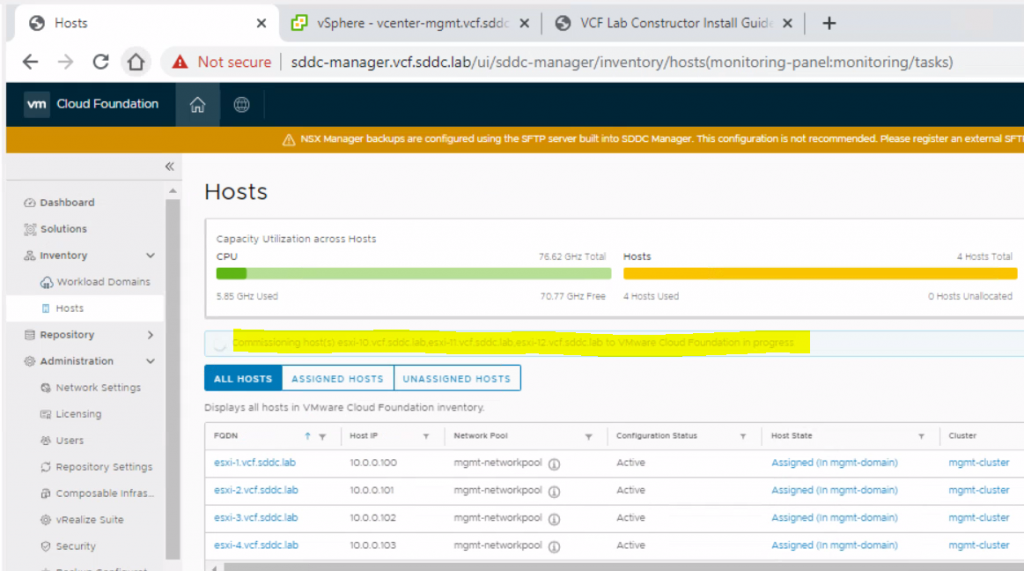
You will see a message in SDDC Manager saying the hosts are being commissioned
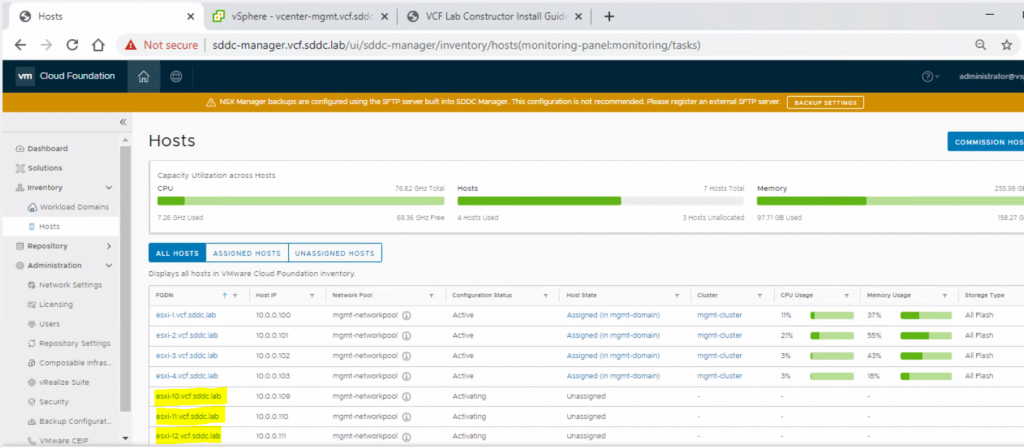
Once commissioned, you will see them as unassigned hosts
Following on from this, I will be following the VLC manual to enable vSphere with Kubernetes on VLC
Enabling Kubernetes on VLC
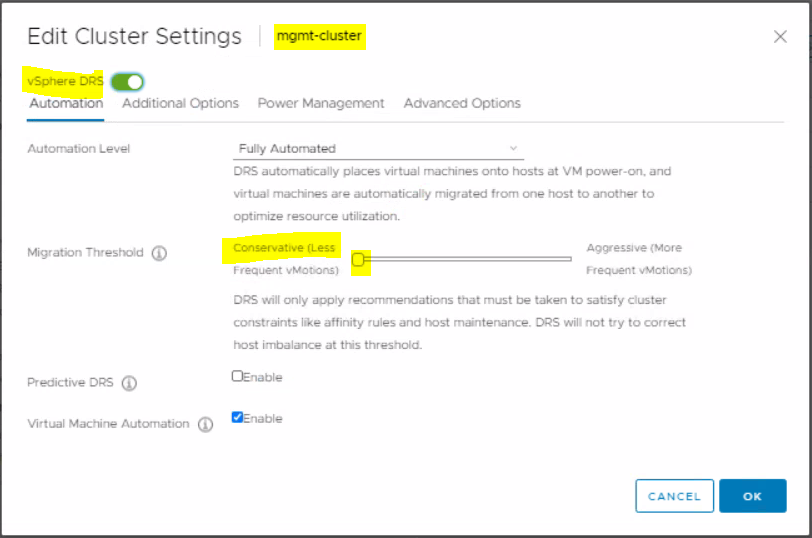
In vcenter-mgmt.vcf.sddc.lab, set DRS to Conservative on mgmt-cluster
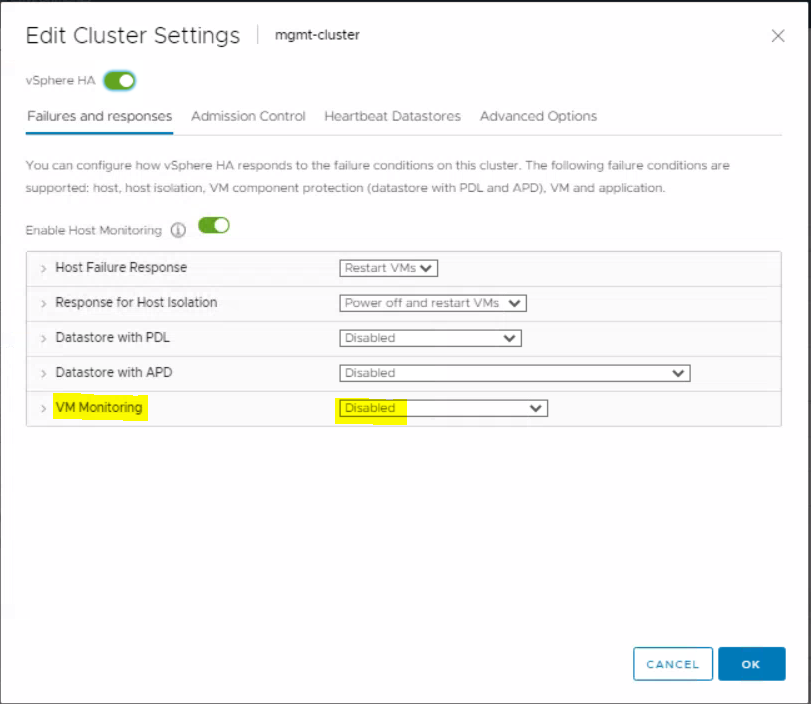
In vcenter-mgmt.vcf.sddc.lab, set VM Monitoring to Disabled
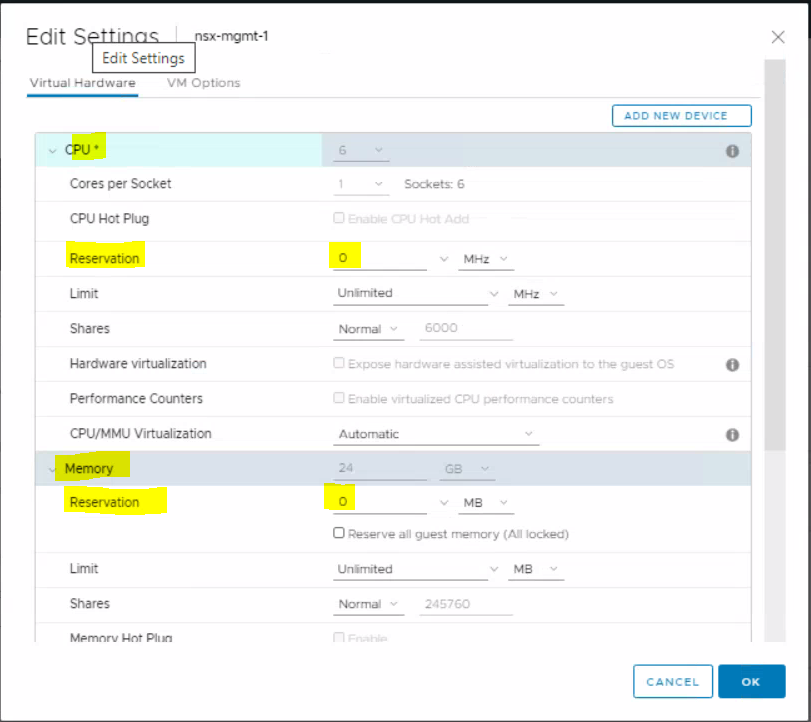
In vcenter-mgmt.vcf.sddc.lab, remove the CPU and memory reservation on nsx-mgmt-1
Make sure you have enough licensing available and add additional licenses if required.
We can now create a VI workload domain with the 3 extra hosts we added before. In sddc-manager.vcf.sddc.lab, click on the menu and select Inventory > Workload domains and click the blue + Workload Domain button. Then select the dropdown VI – Virtual Infrastructure
Select vSAN on Storage Selection and click begin

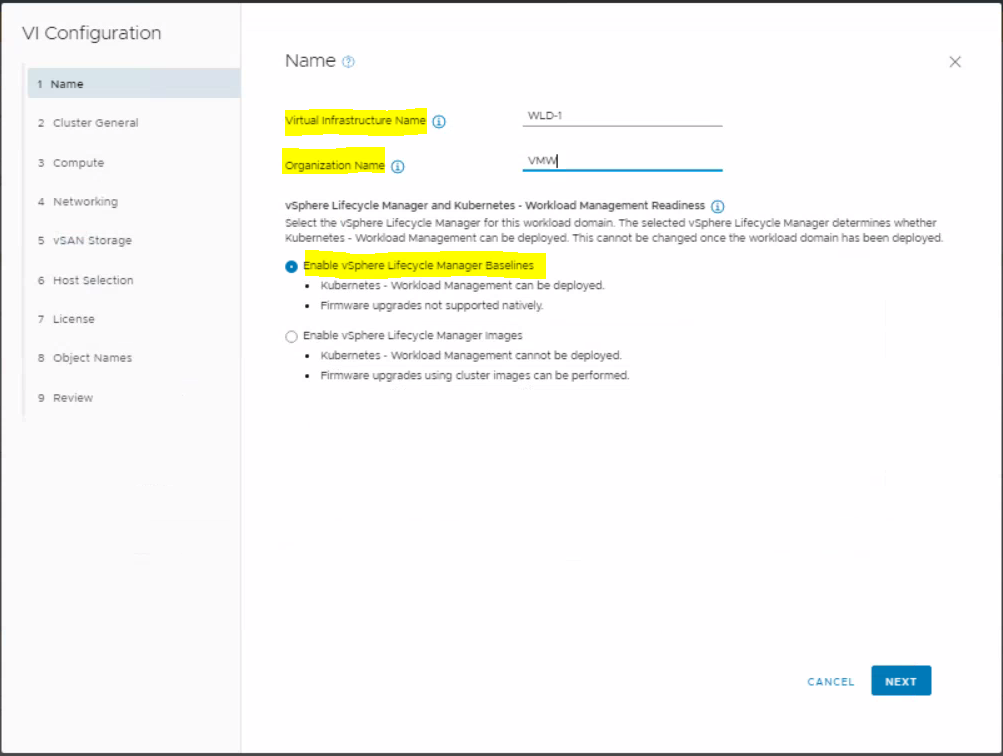
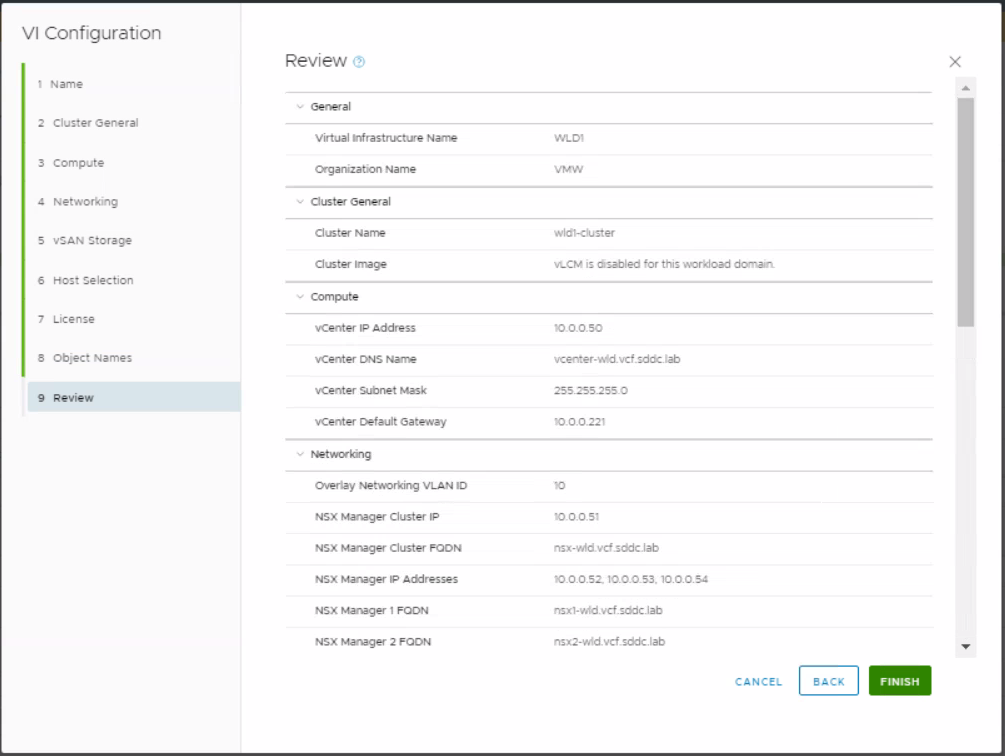
Enter a Virtual Infrastructure Name and Organisation name
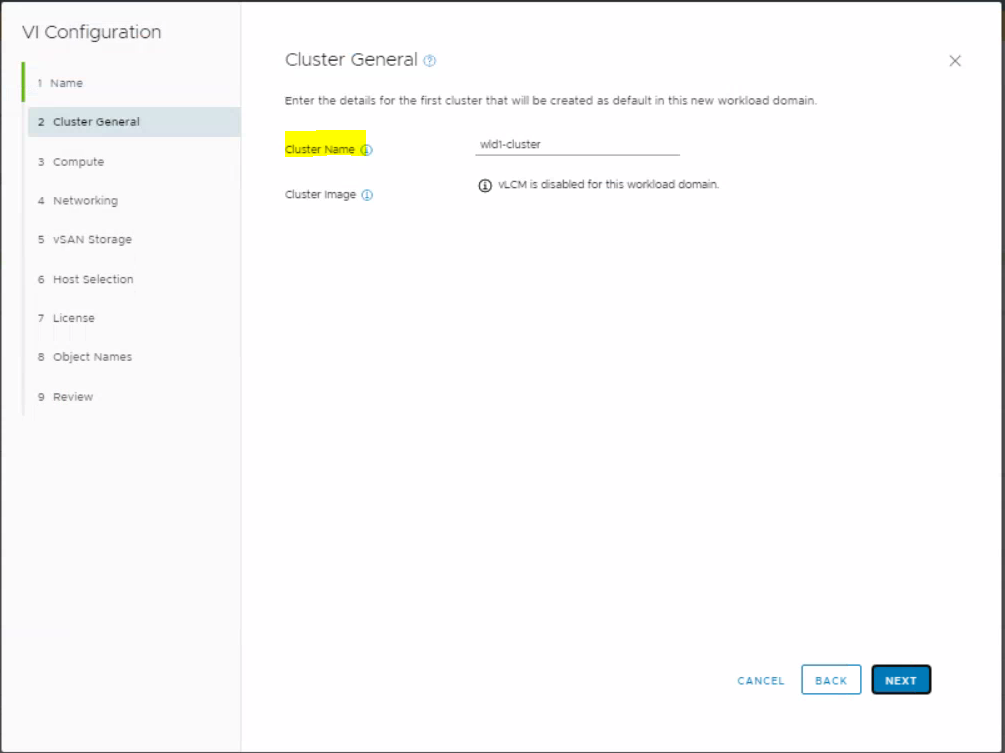
Enter a cluster name and click Next
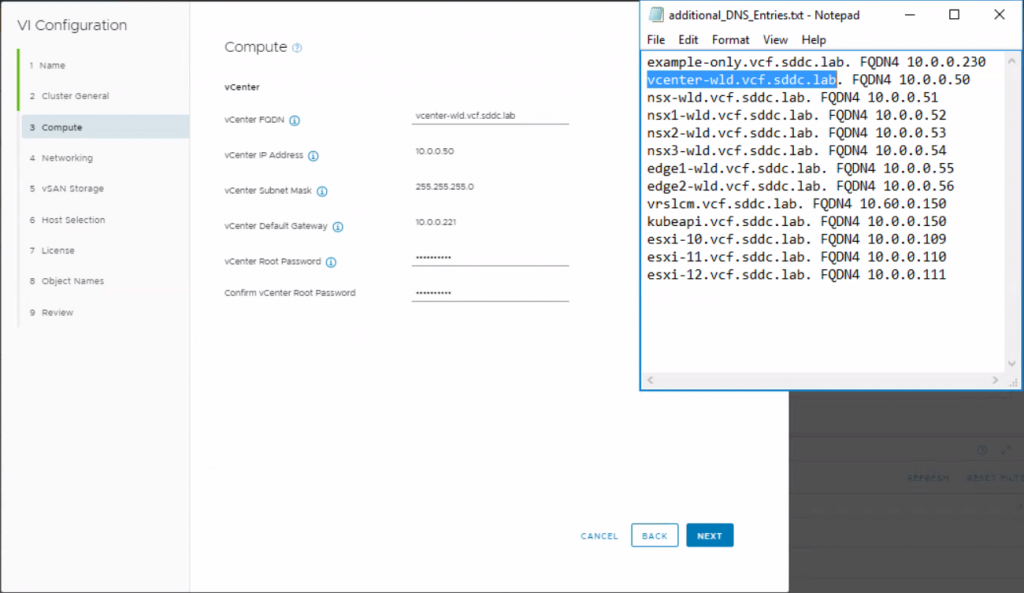
Fill in the details of the workload domain vCenter. I have screenshotted the file additional_DNS_Entries.txt from the c:\VLC folder next to this for reference. I used the password used throughout this lab which is VMware123! to keep everything easy.
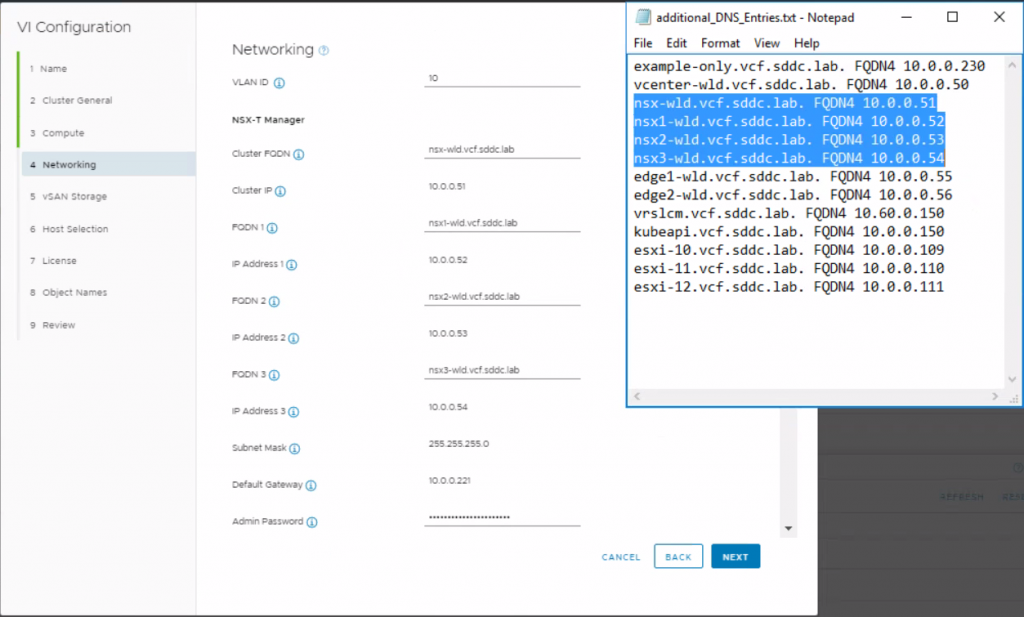
Next we need to fill in the NSX information. Again the information has come from the additional_DNS_Entries.txt from the c:\VLC folder and the password needs to be stronger so I have used VMware123!VMware123!
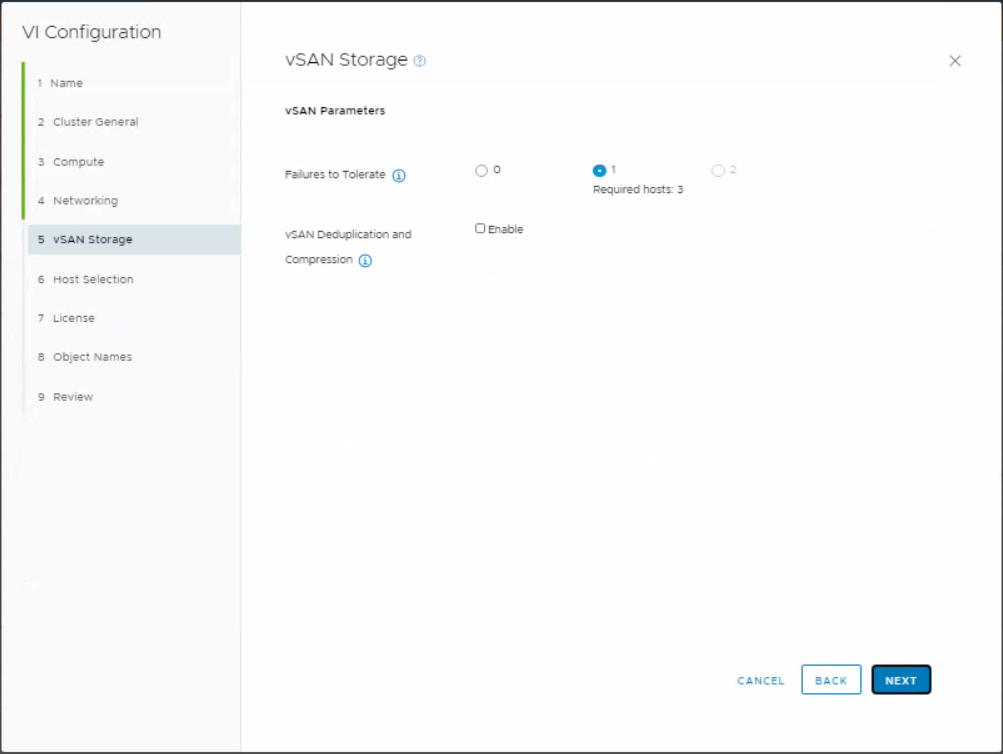
Leave the vSAN storage parameters as they are
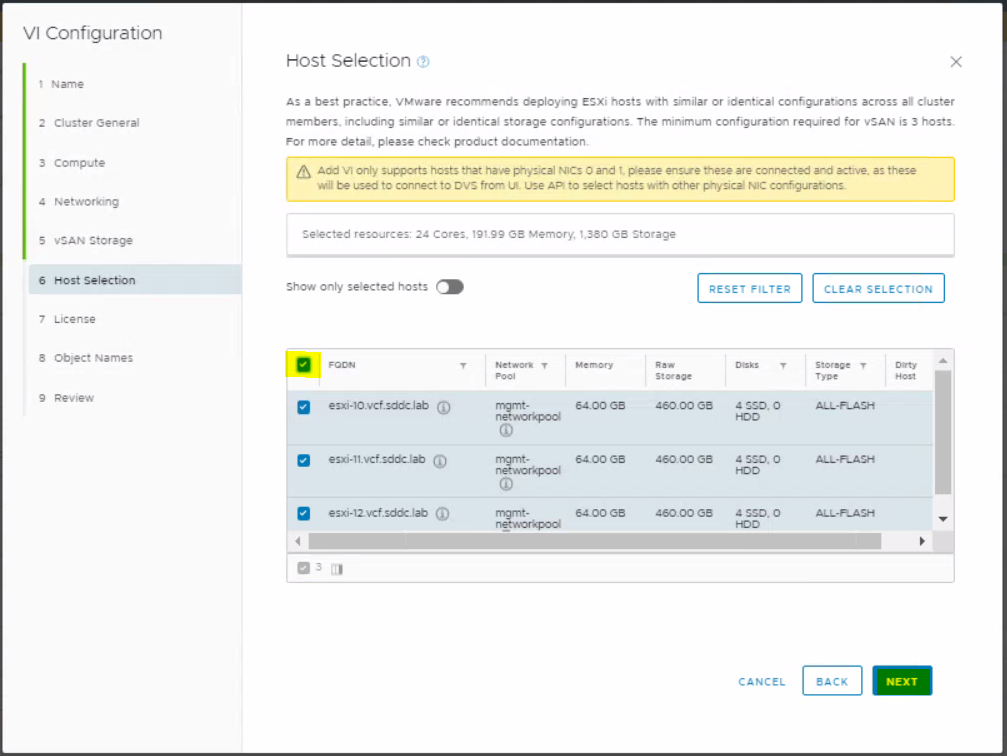
On the Host selection page, select your 3 new unassigned hosts
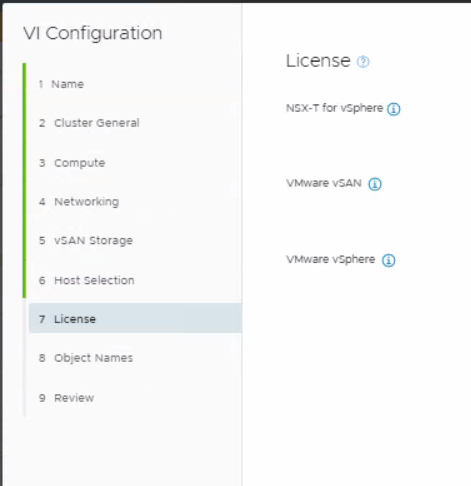
Put in your license keys
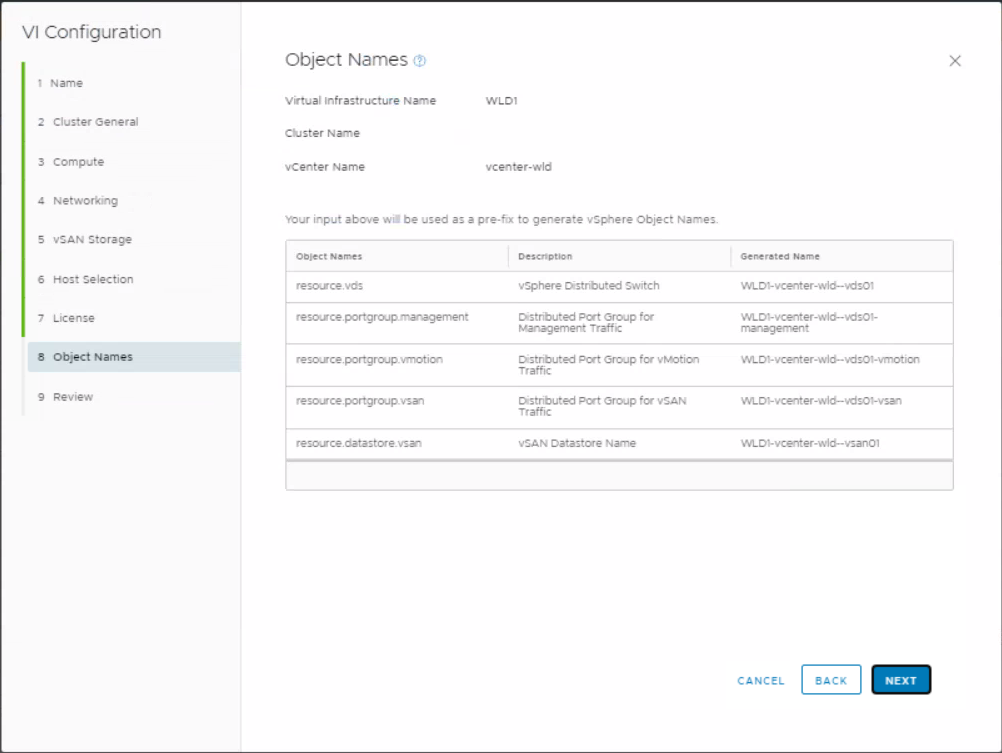
Check the object names
Review the final configuration
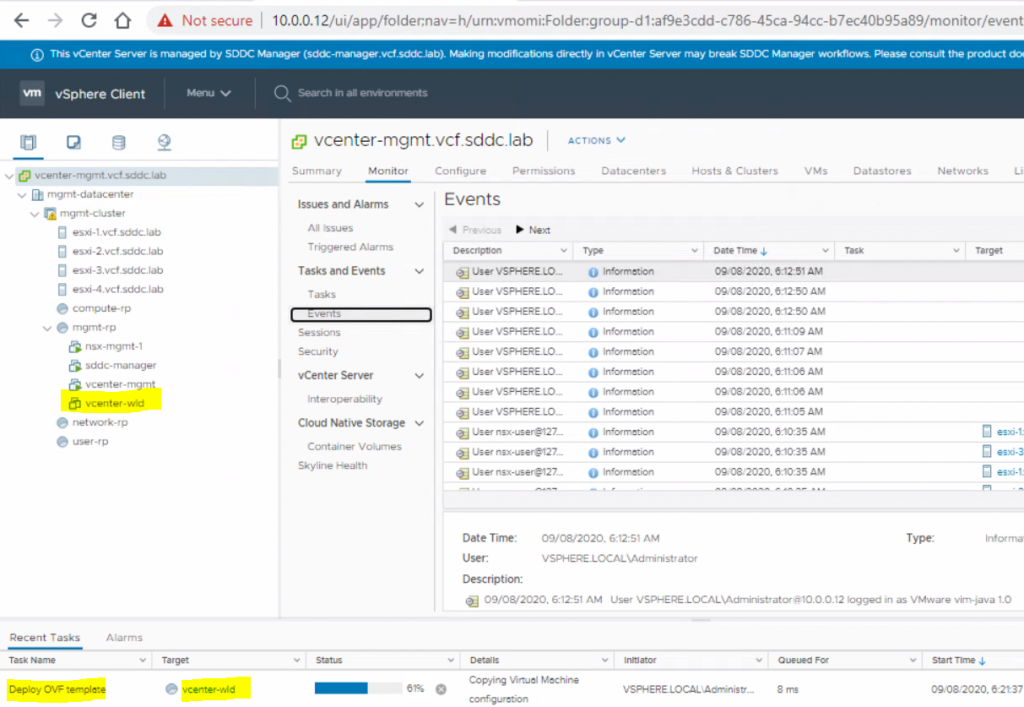
You will start to see the vcenter-wld appliance being deployed
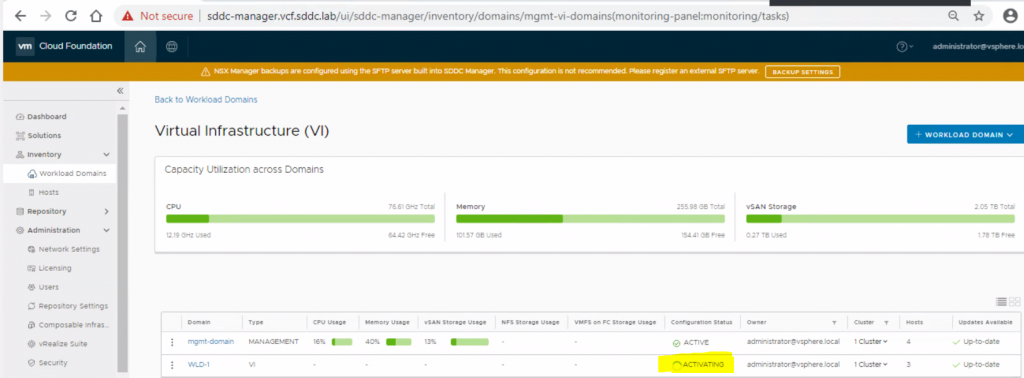
You will see the workload domain activating
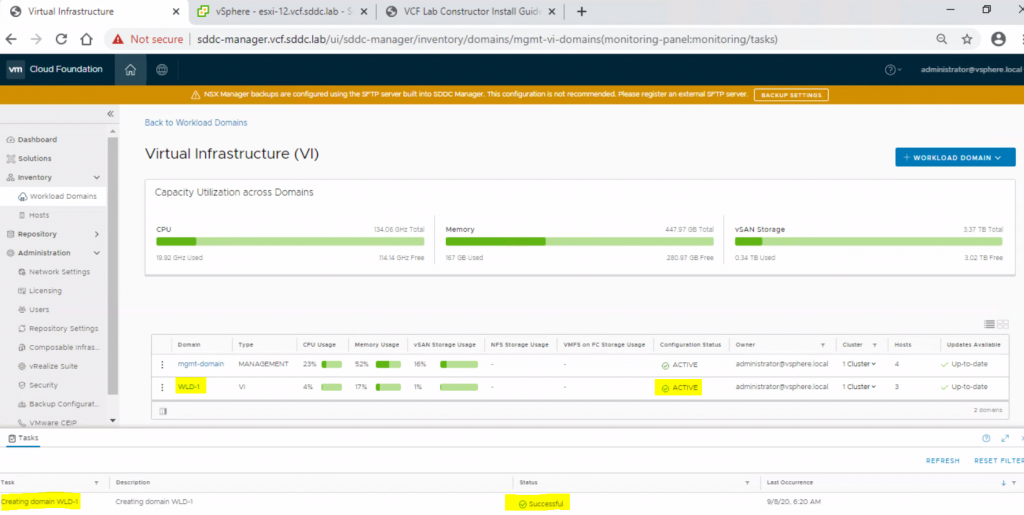
When it is finally done, we should see the following
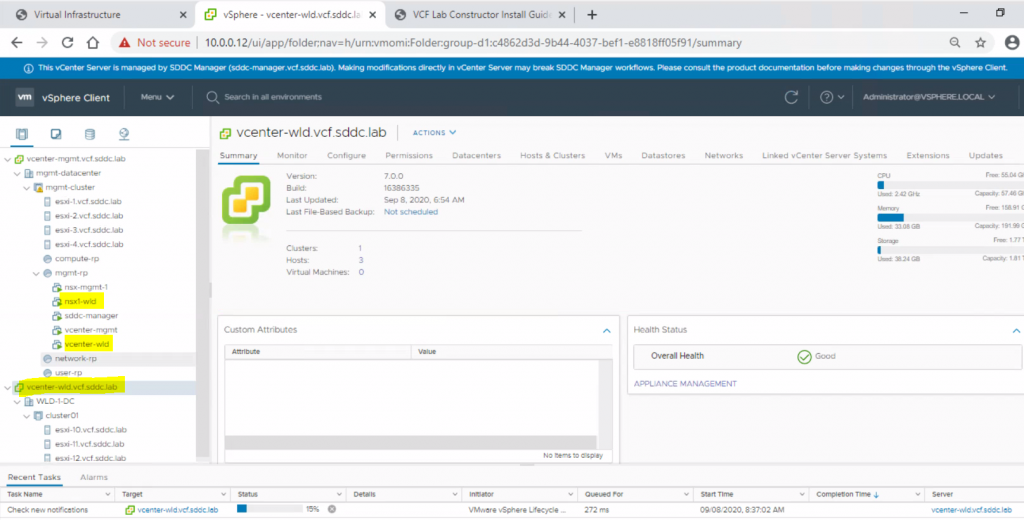
If we log out of the vCenter and back in then we will see the linked mgmt and workload vCenters under one page
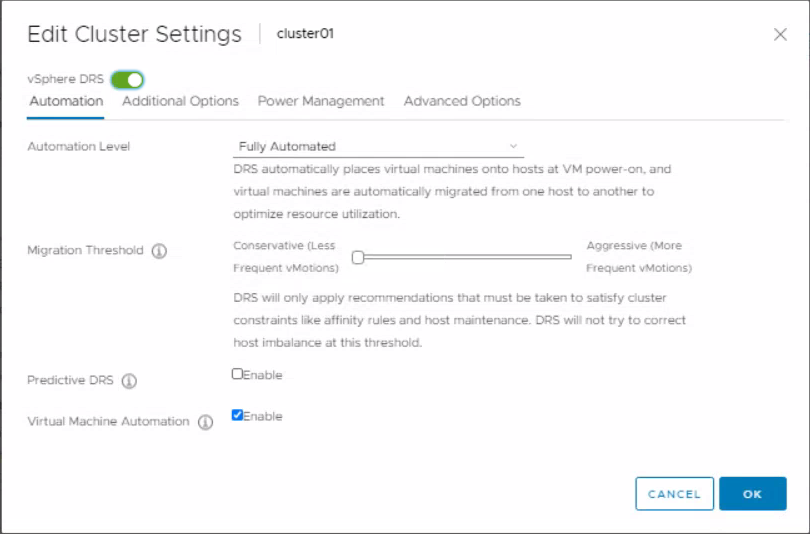
Edit the cluster settings and change the migration threshold to Conservative
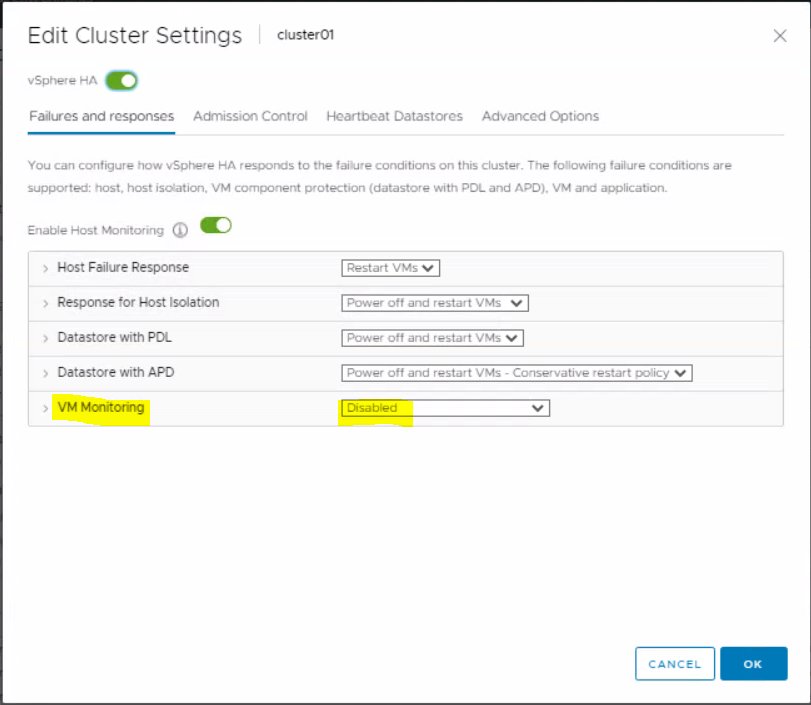
In the HA settings, set the VM monitoring to disabled.
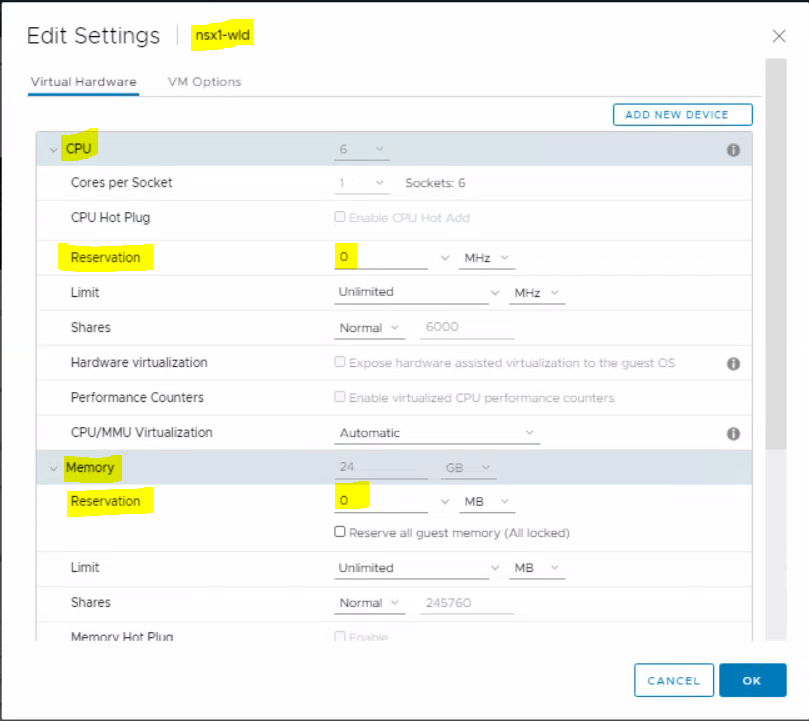
Edit the settings on the nsx1-wld to change the CPU and memory reservation to 0
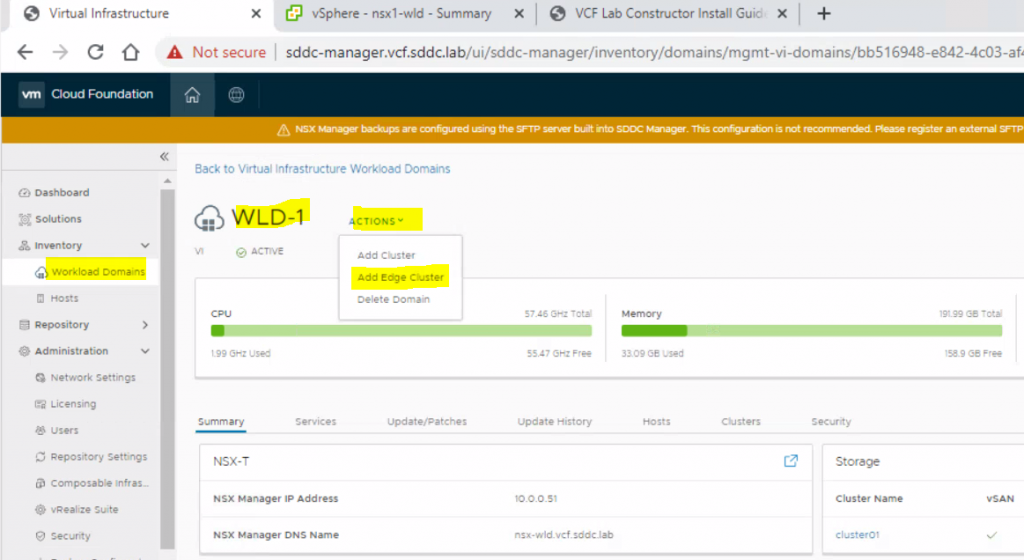
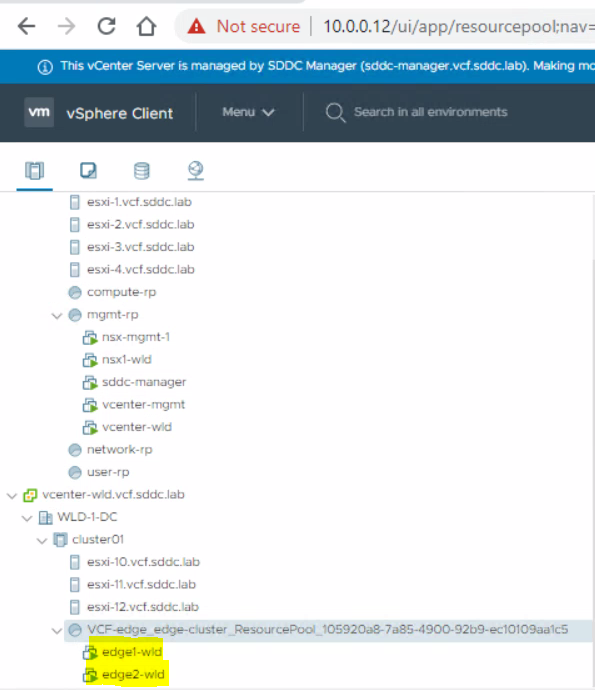
In the sddc-manager.vcf.sddc.lab > Workload Domains > WLD-1 – Actions – Add Edge Cluster
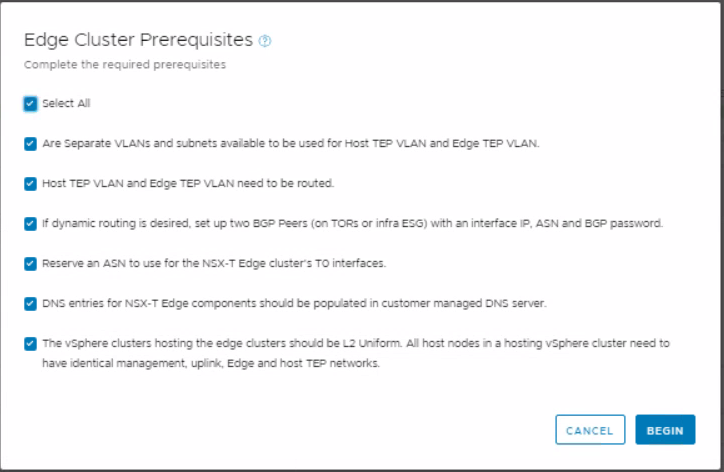
Select All on the Edge Cluster Prerequisites page
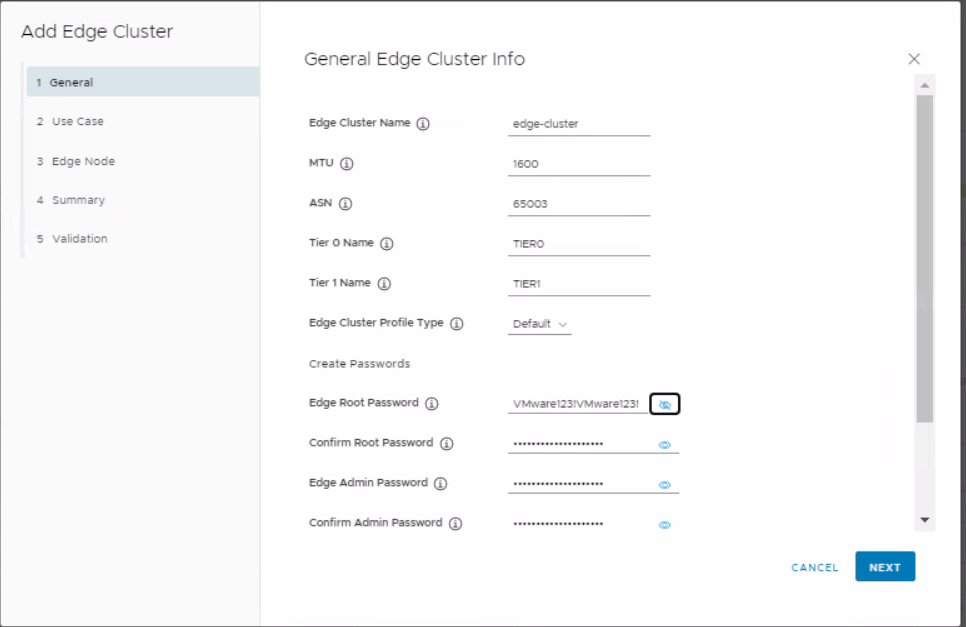
Put in the Edge Cluster details (I followed this from the lab guide
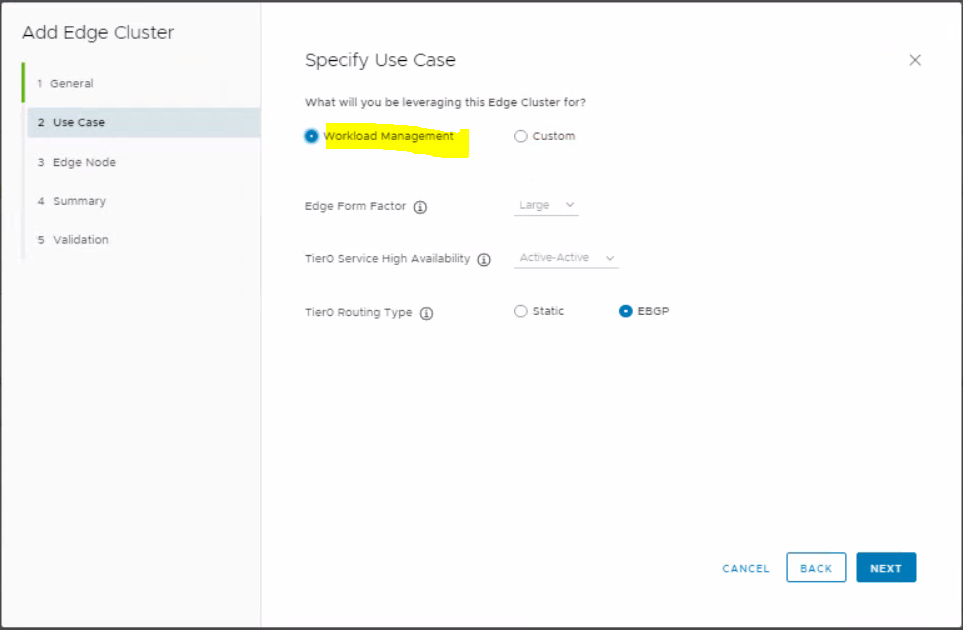
Select Workload domain on the specify use case
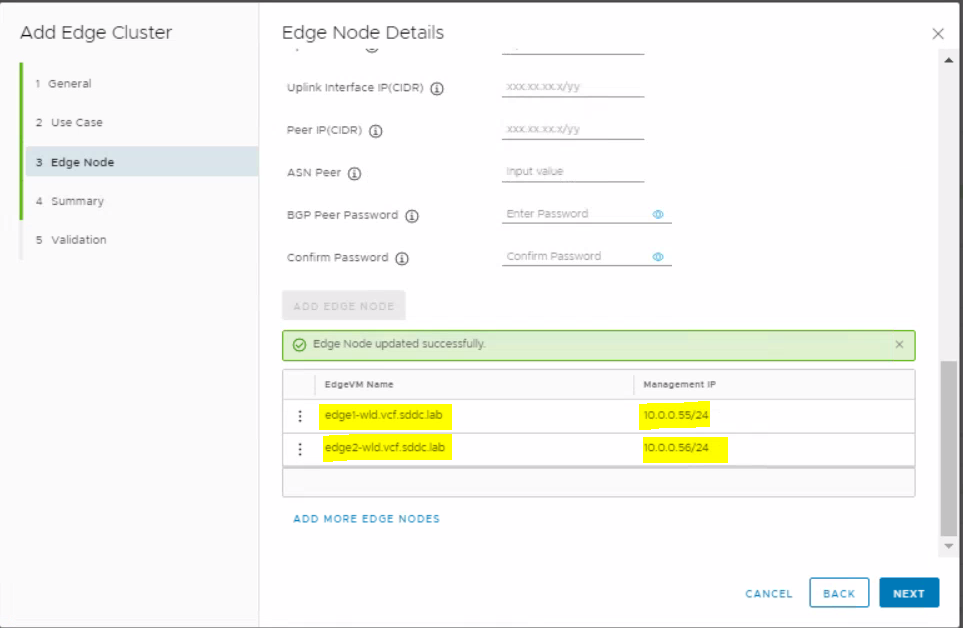
Next, add the first Edge node, once you have filled everything in, select the button to add the second edge node
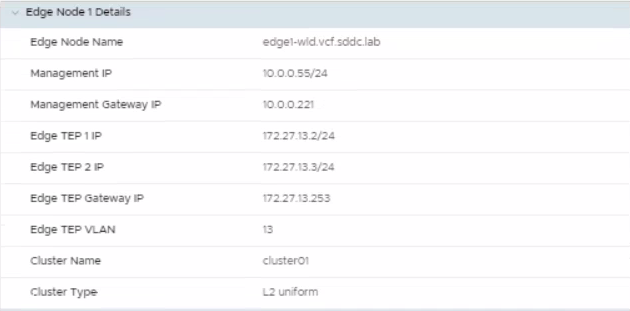
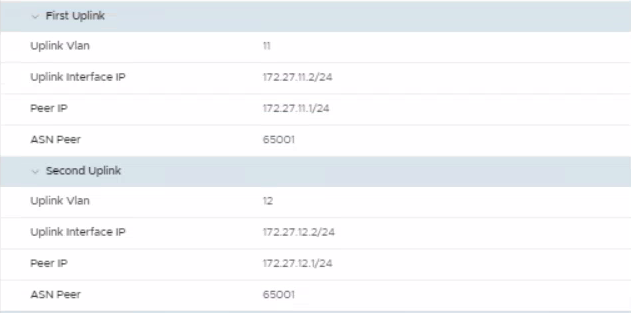
Add the second Edge node and click Add Edge node
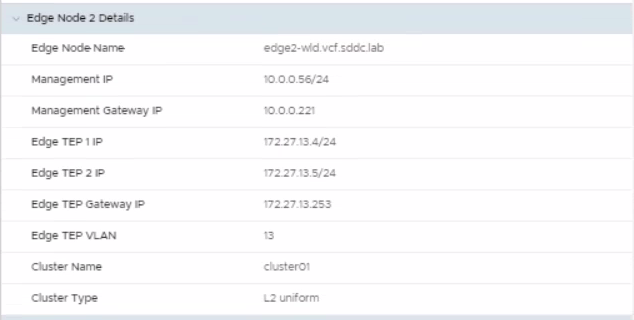
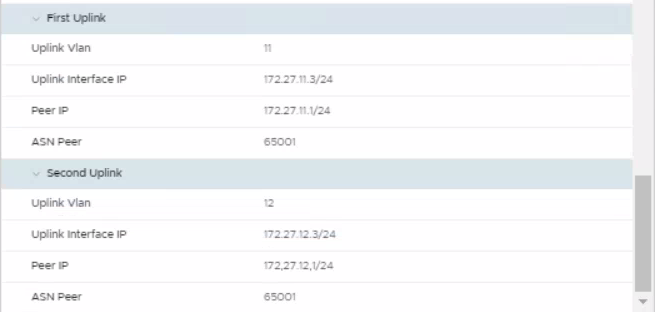
Once complete, you should see that both Edge nodes are added successfully
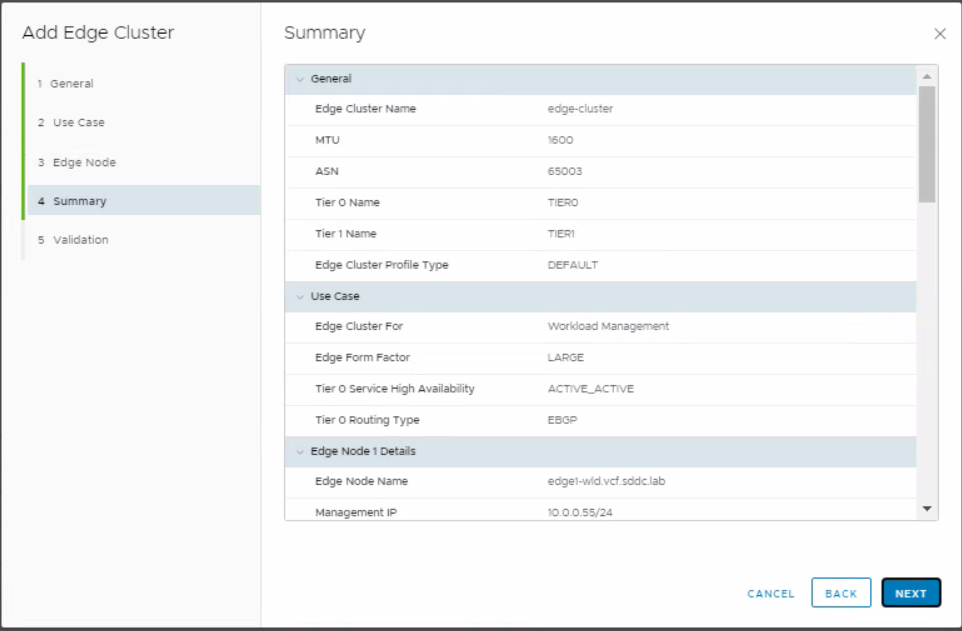
On the Summary page, double check all your details are correct and click Next
Validation will run
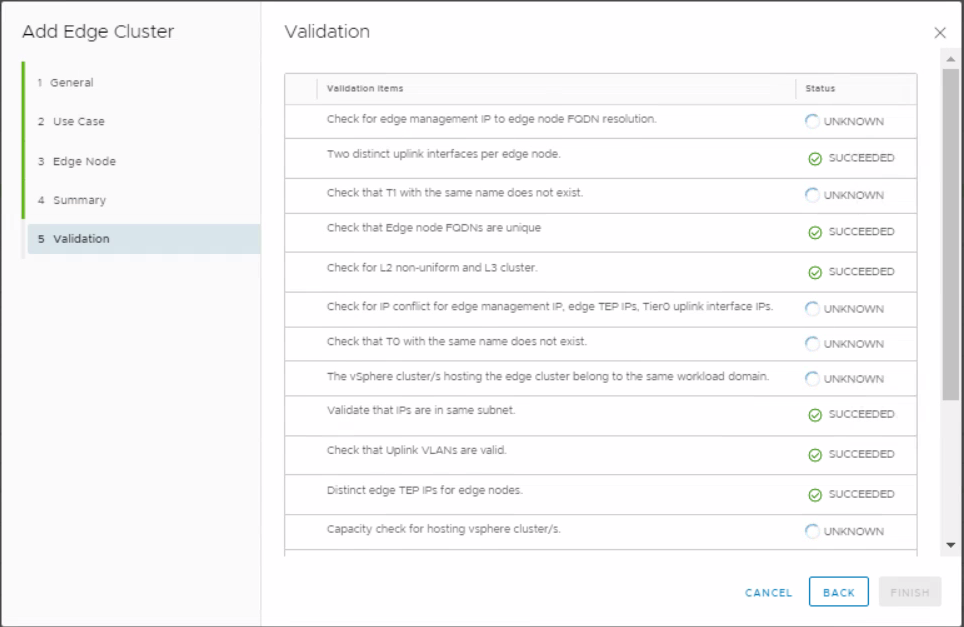
Validation should succeed
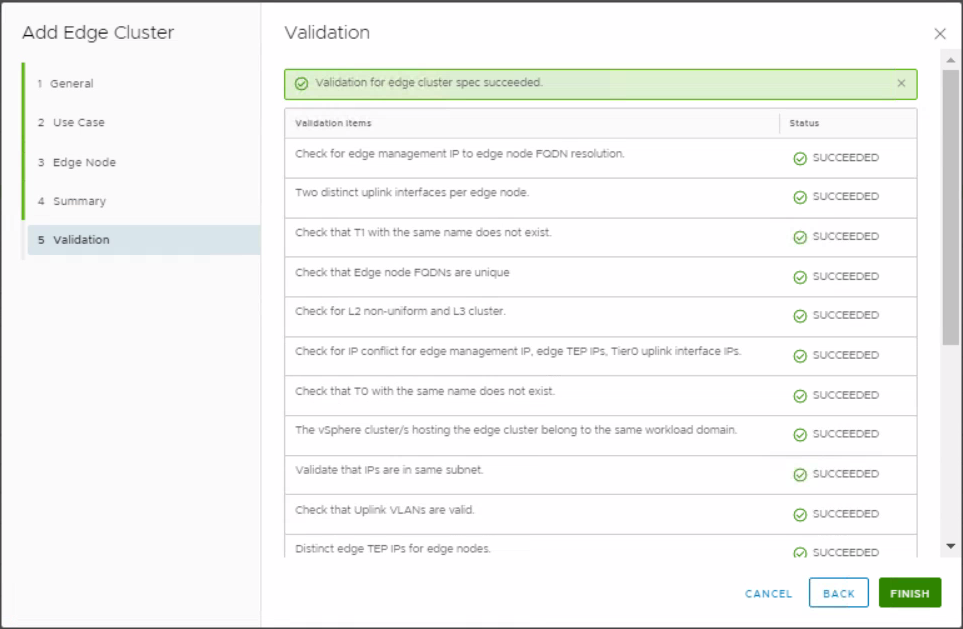
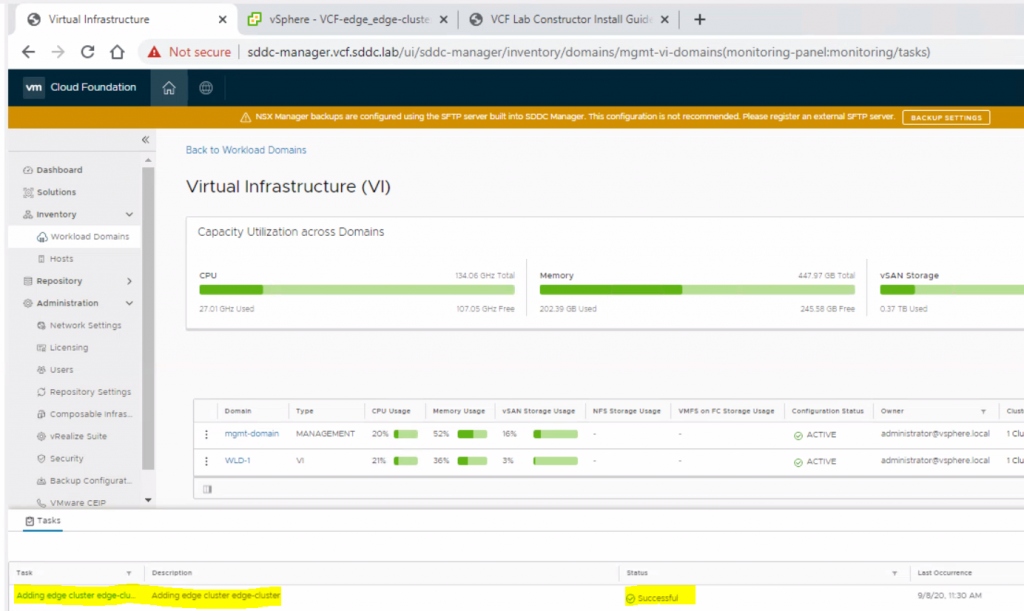
Click Finish and check out SDDC Manager where you should see a task saying Adding edge cluster

You will see the Edge servers deploying in vCenter if you check
When complete it should say succcesful
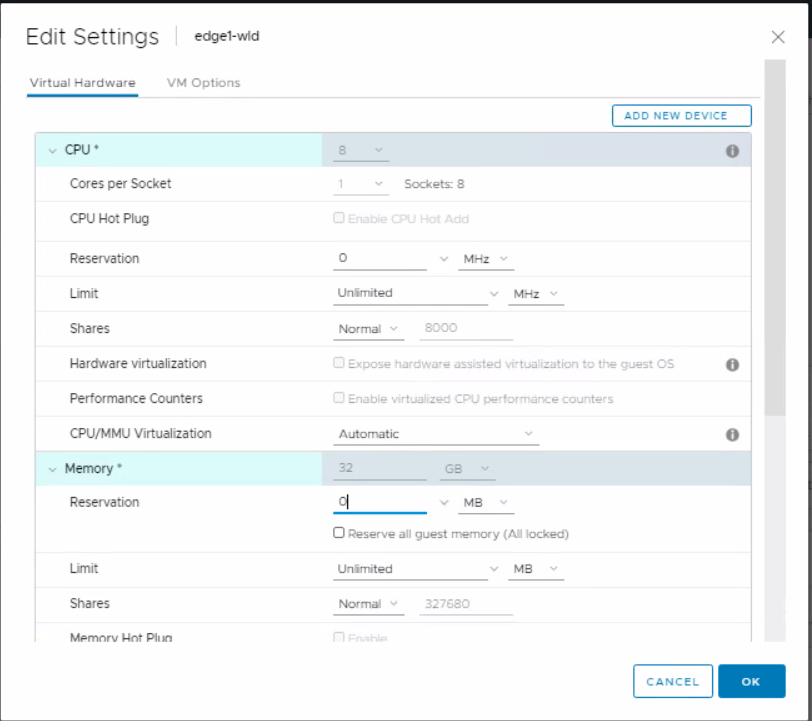
In the vCenter, edit the settings for both edge1-wld and edge2-wld to change the CPU shares to normal and the memory reservation to 0
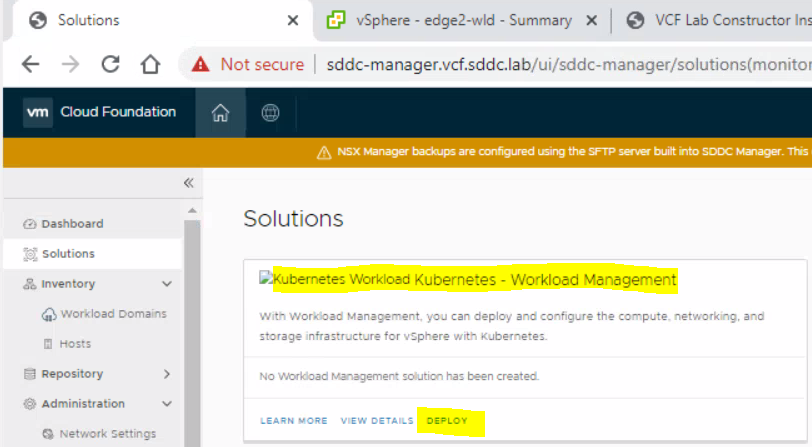
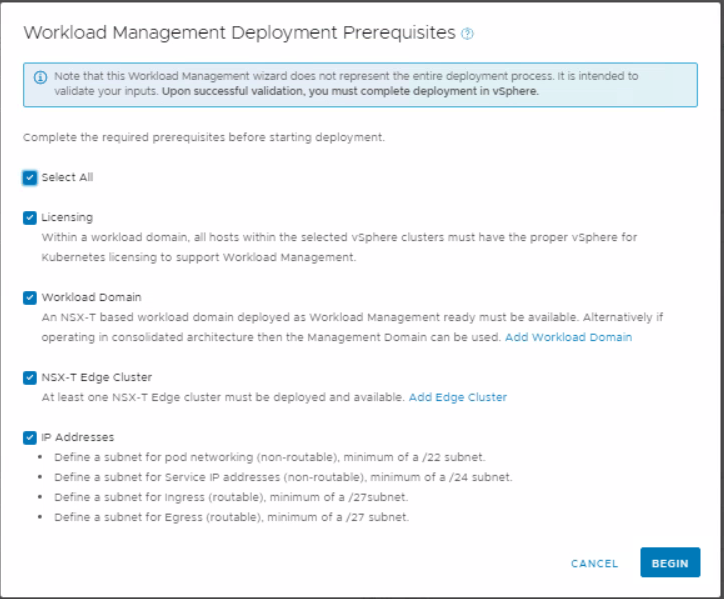
Go to the SDDC Dashboard and select Solutions and Deploy Kubernetes Workload Kubernetes – Workload Management.
Read the Pre-requisites and select all.
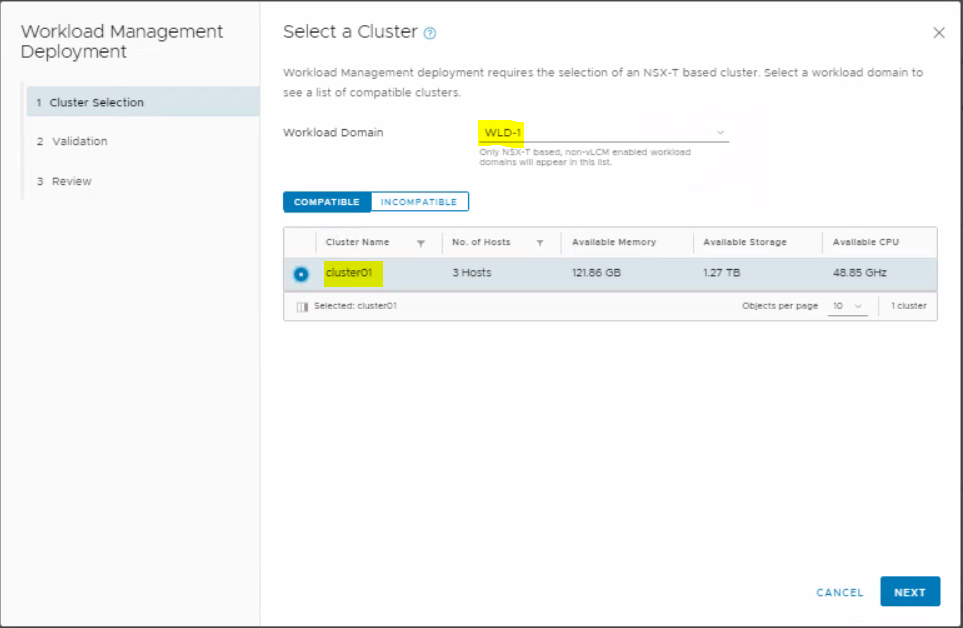
Select Workload domain, then cluster01 and next
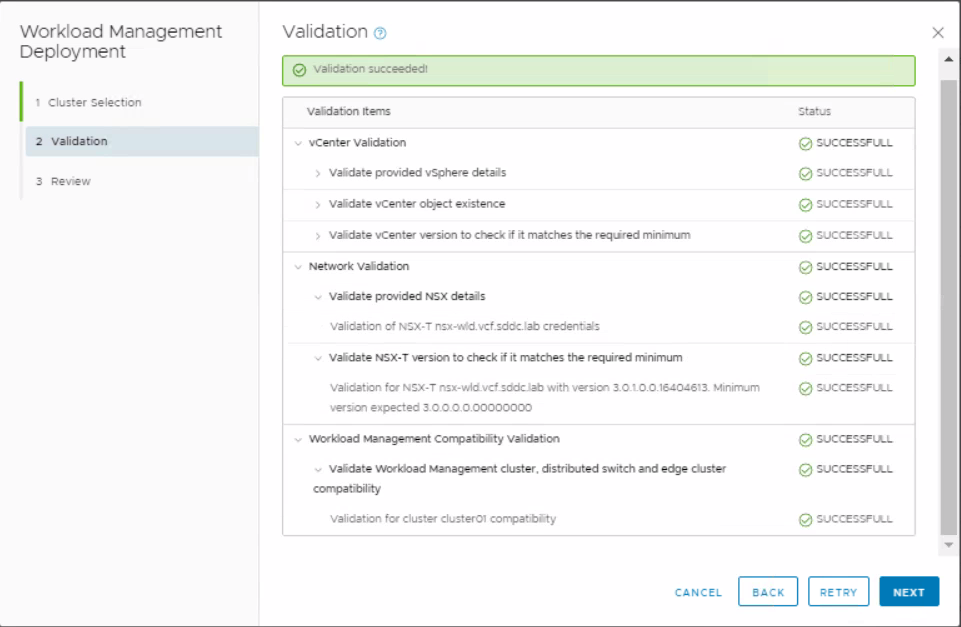
It will then go through a process of validation
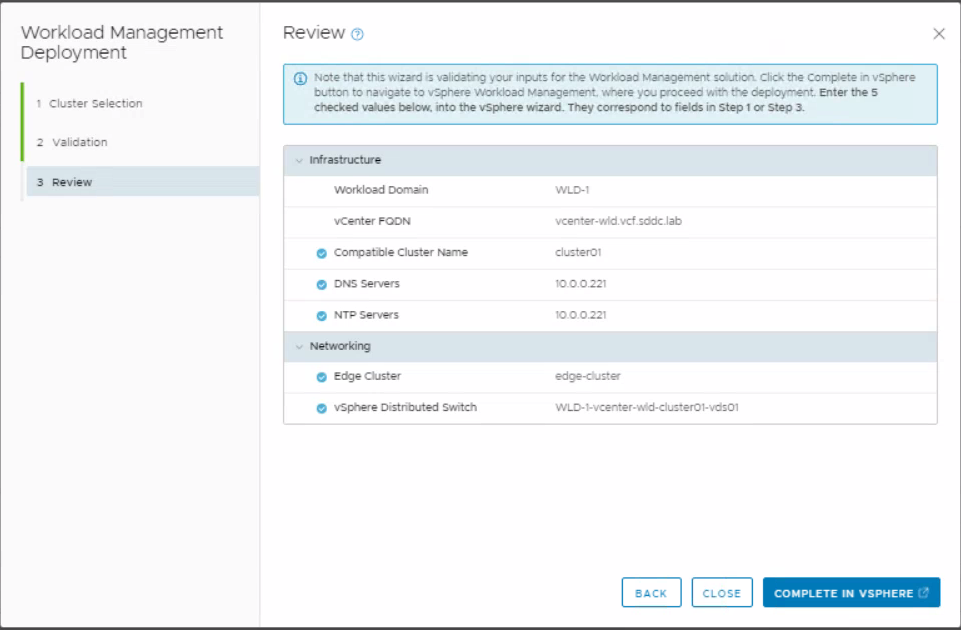
Read the Review page and click Complete in vSphere
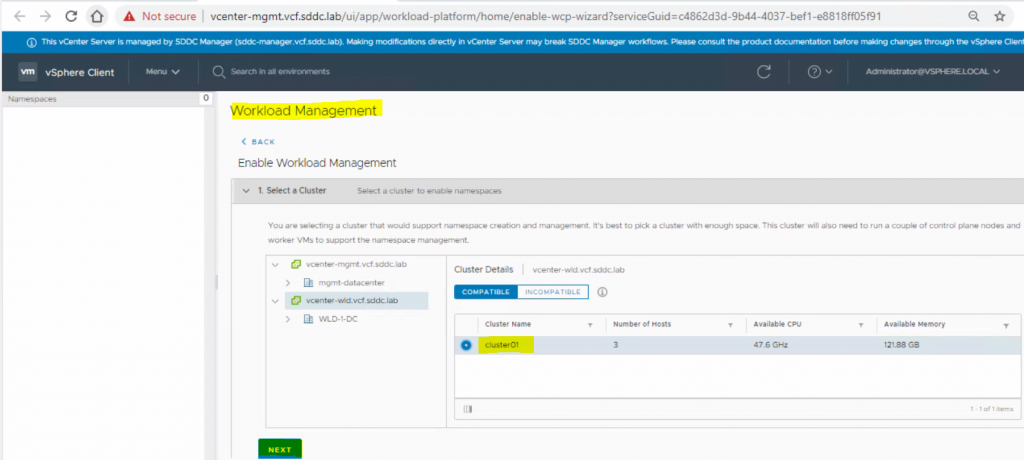
In vcenter-wld.vcf.sddc.lab > Workload Management > Select cluster01 and click Next
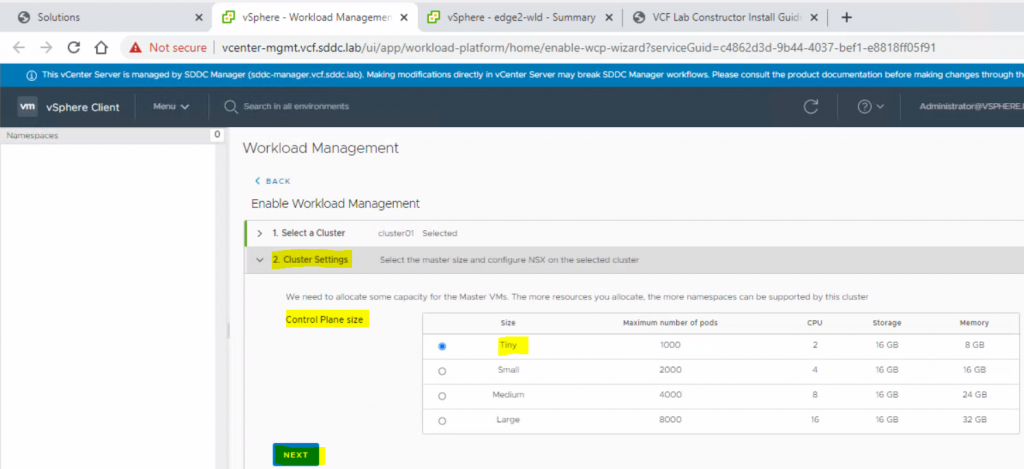
Select Tiny and click Next
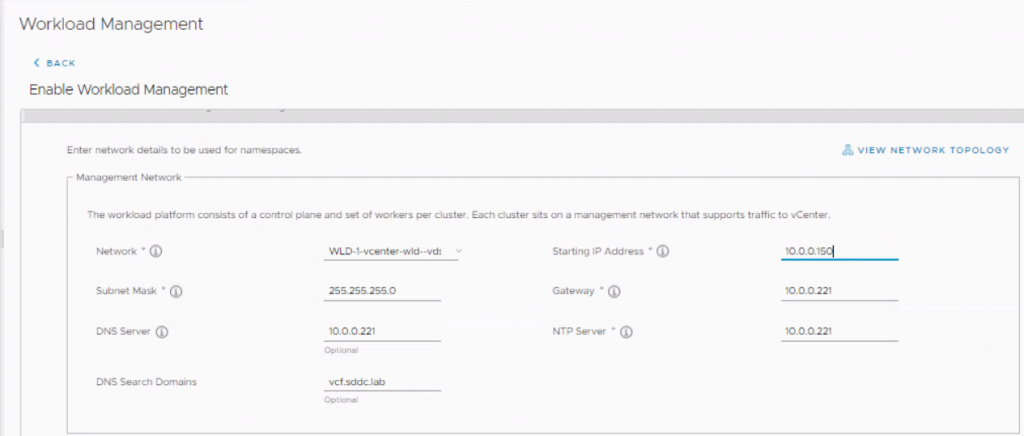
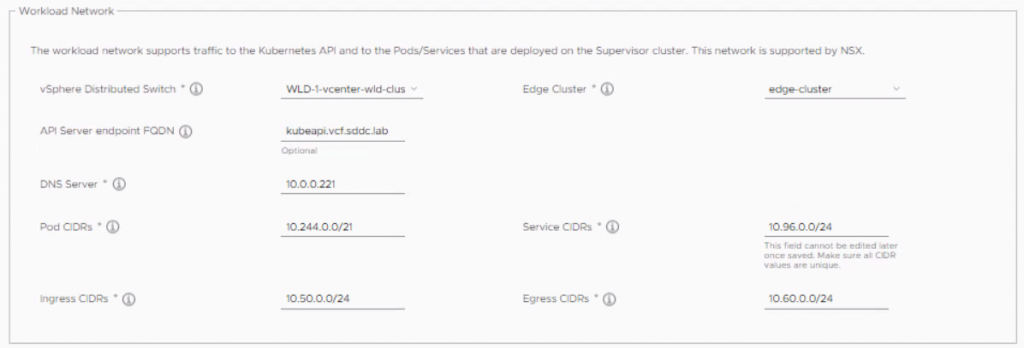
Enter network info and click next
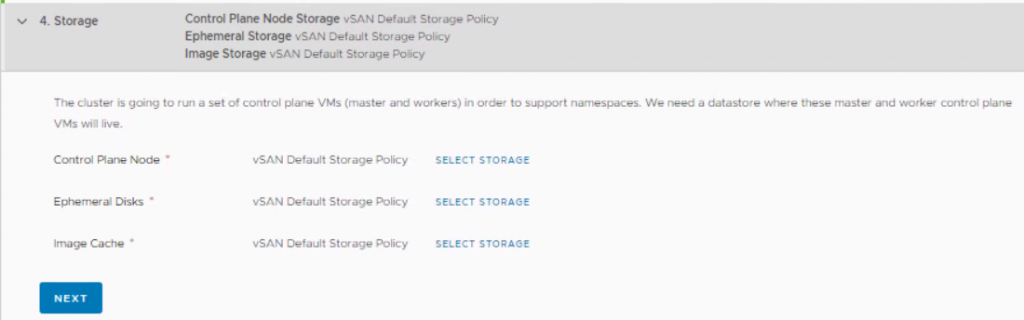
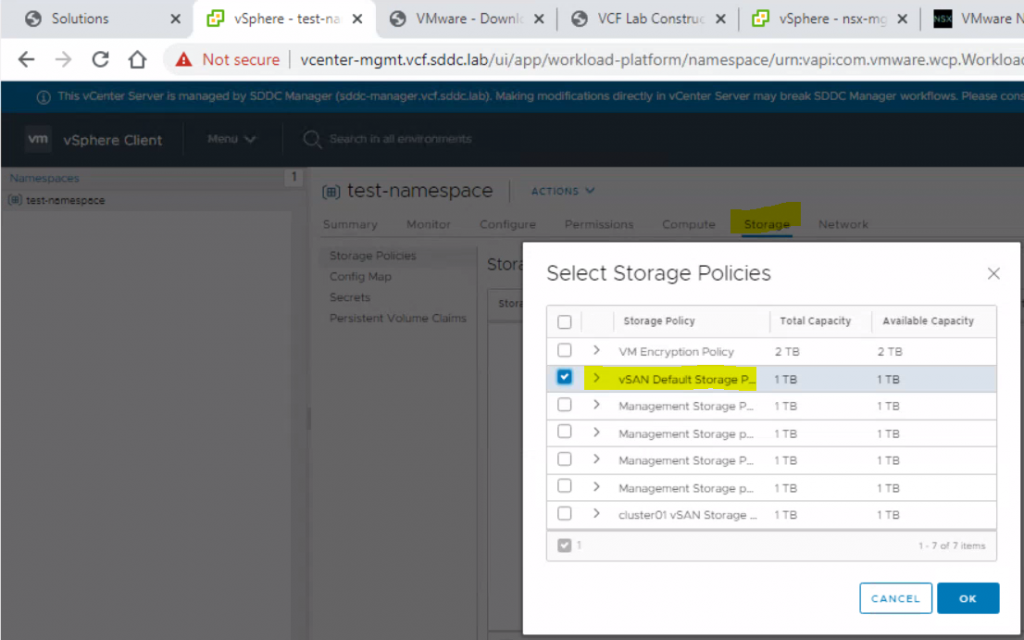
Select storage policy for each component
Review and Confirm

In vcenter-wld.vcf.sddc.lab, you can monitor the tasks
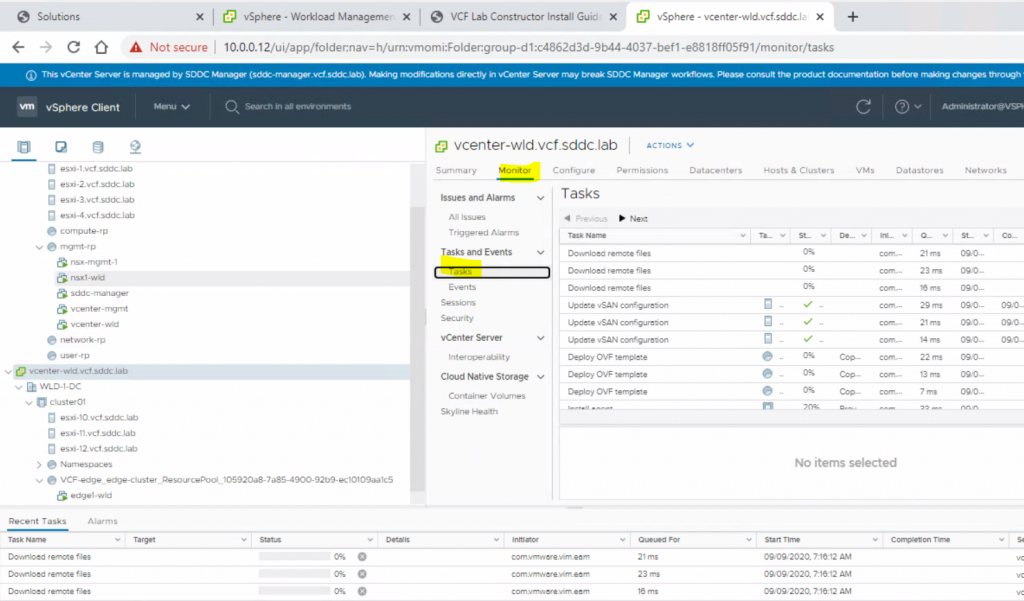
The below actions then take place
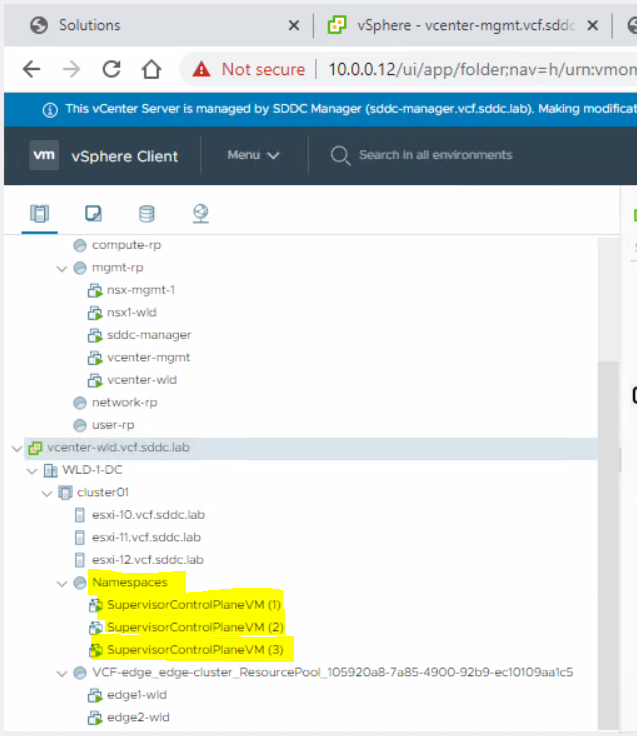
- The deployment of 3 x Supervisor Control Plane VMs
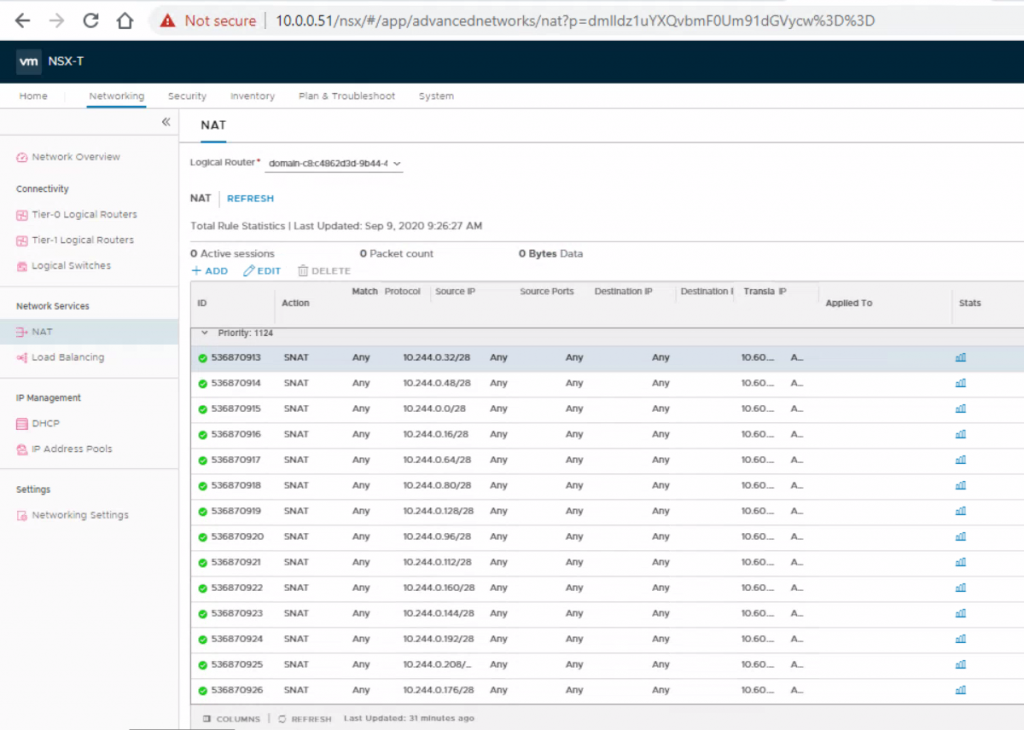
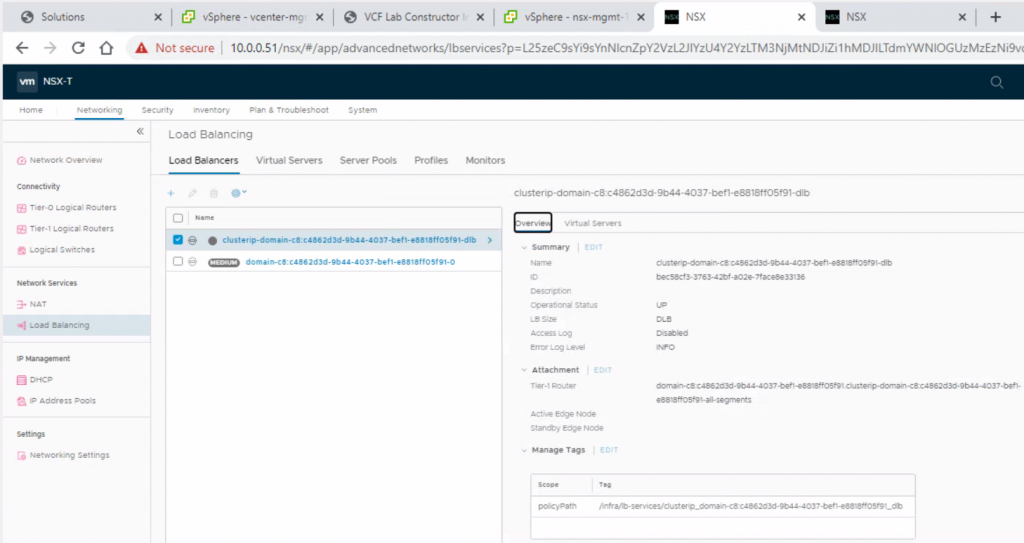
- The creation of a set of SNAT rules (Egress) in NSX-T for a whole array of K8s services
- The creation of a Load Balancer (Ingress) in NSX-T for the K8s control plane
- The installation of the Spherelet on the ESXi hosts so that they behave as Kubernetes worker nodes
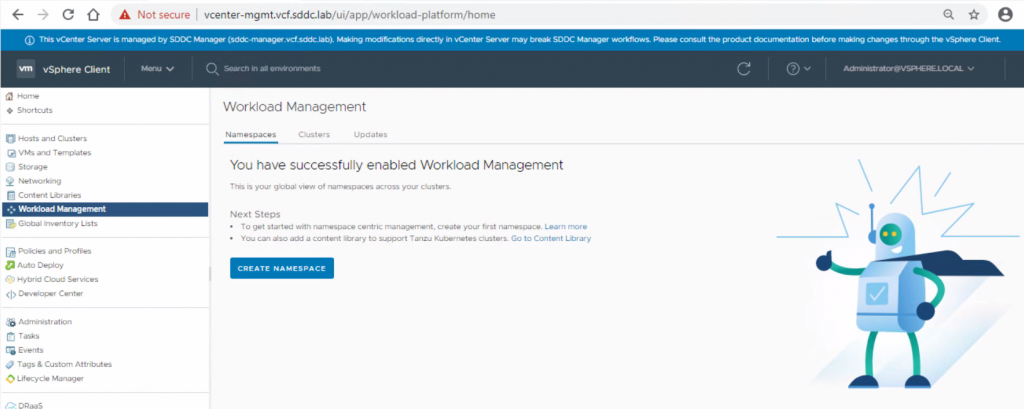
In vCenter, we can see that Workload Management has been succesfully created
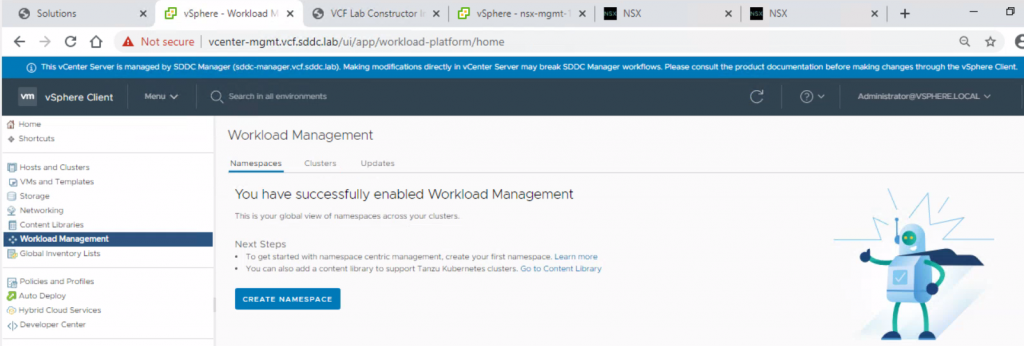
Add 2 routes to the jump host

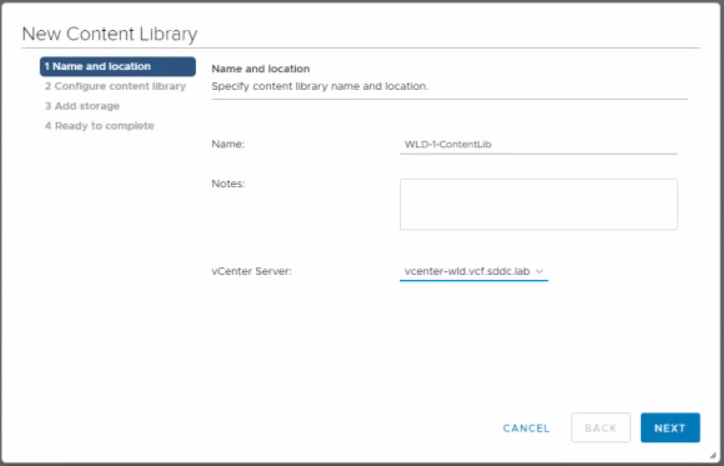
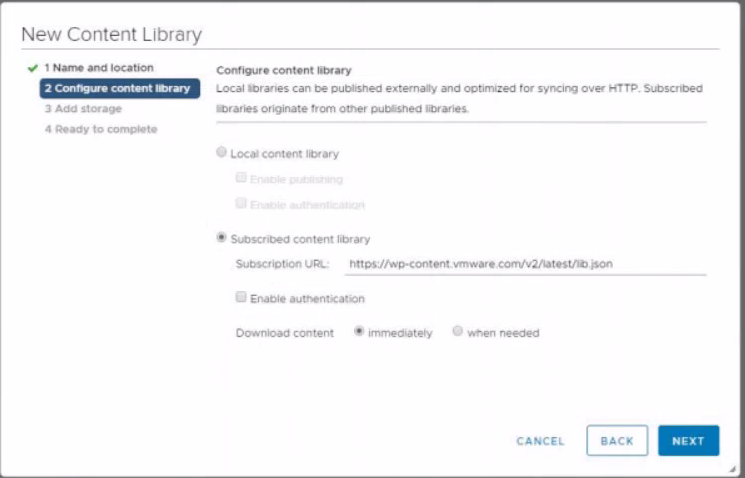
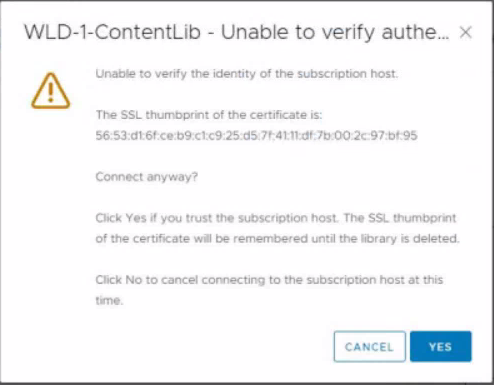
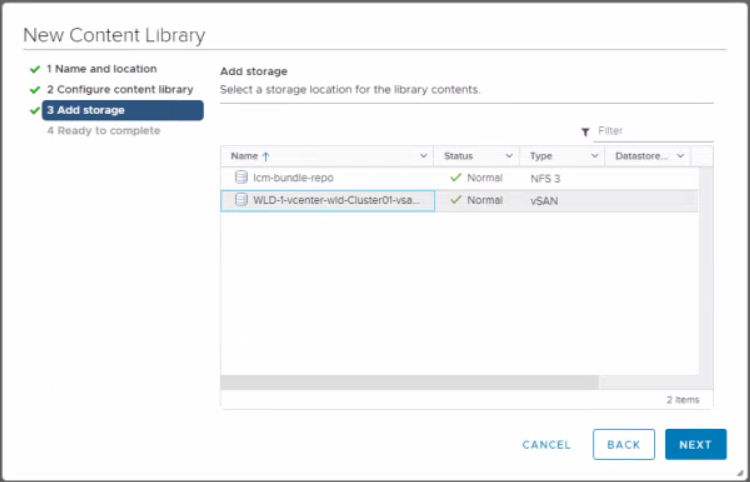
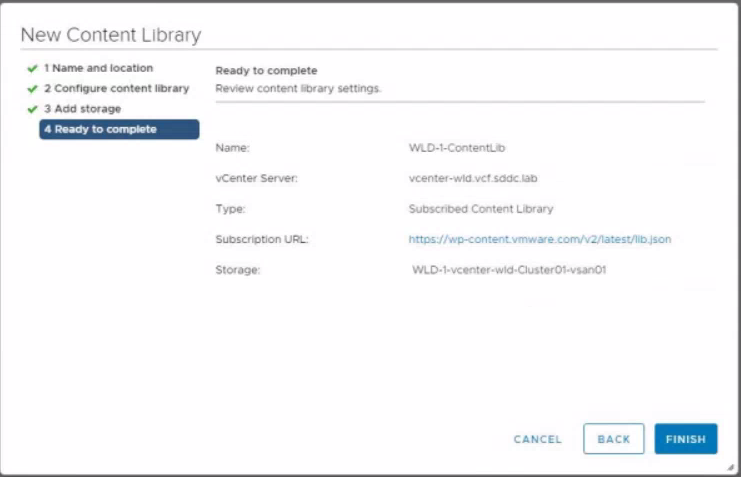
We now need to create a content library
Select subscribed content library and click Next
Accept the certificate
Select vSAN datastore and click Next
Click Finish
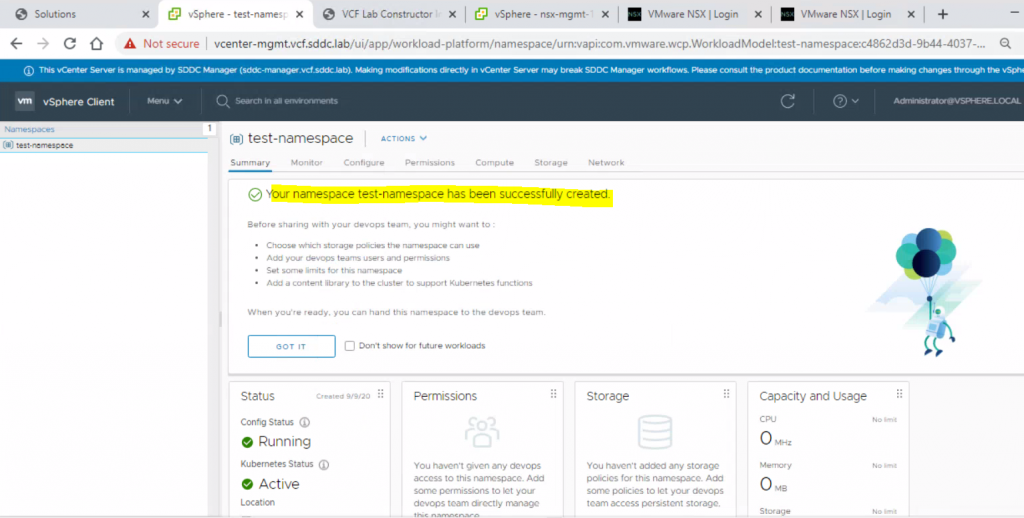
Go to vCenter > Home > Workload management > Create Namespace
I created a namespace called test-namespace
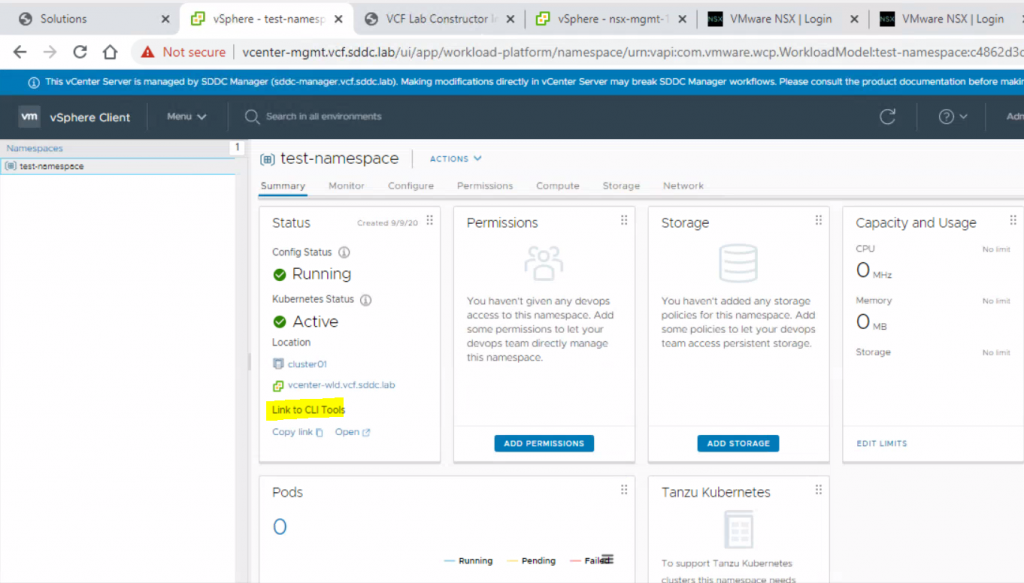
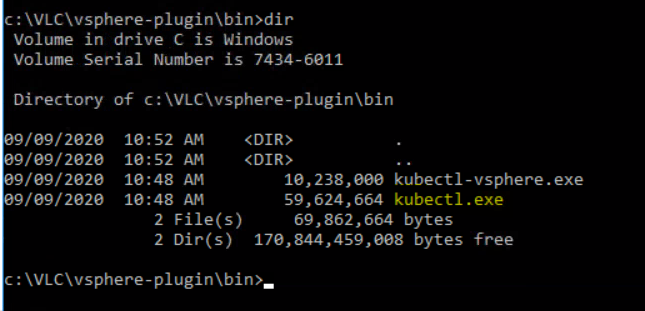
Download the kubectl plugin from the CLI Tools link. If you click on Open
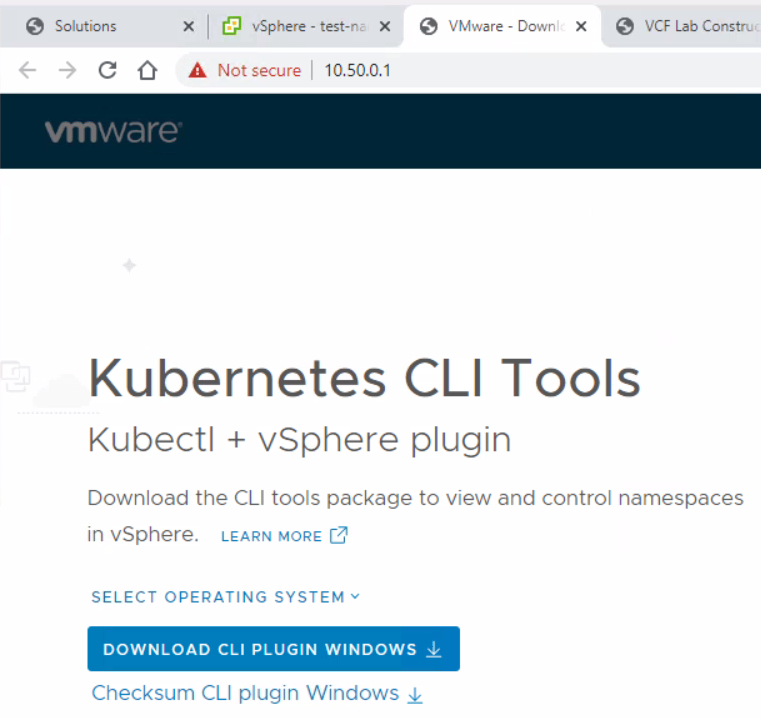
You will get this page. Click Download CLI plugin and unzip it. I unzipped mine to c:\VLC\vsphere-plugin
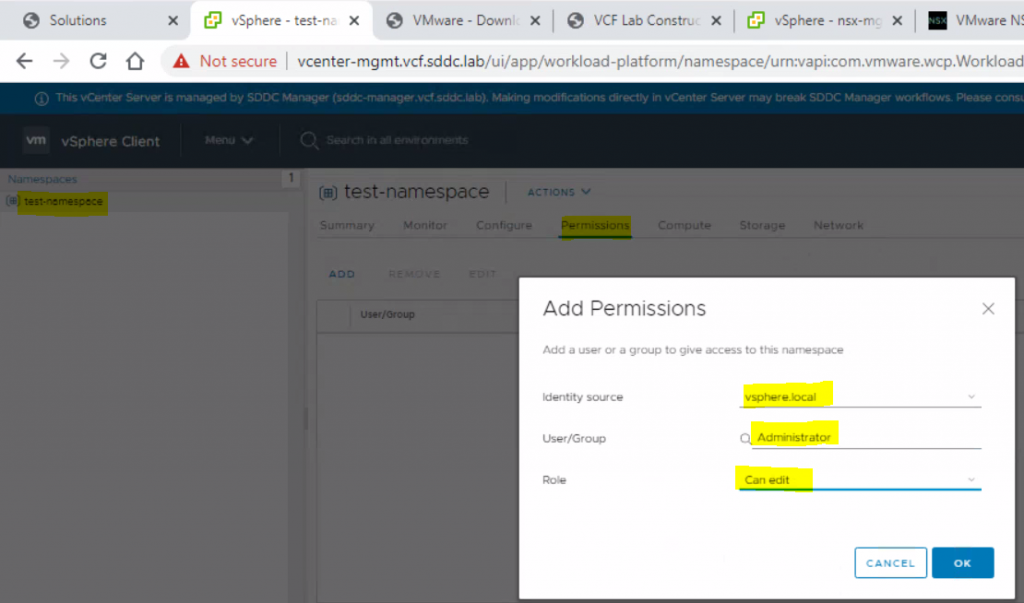
Create permissions on the name space
Set Storage Policies
Open Command prompt, Navigate to c:\VLC\vsphere-plugin\bin
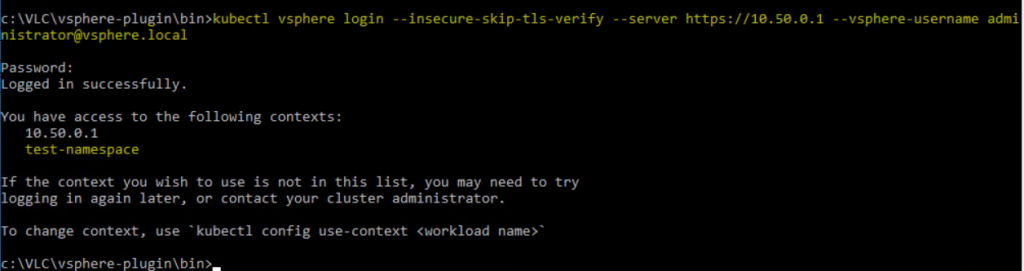
Login as administrator@vsphere.local to 10.50.0.1 which is just the first IP address of the ingress CIDR block you provided which is assigned to the load balancer in NSX that then points to the supervisor cluster
This is where I need to read up more on Kubernetes and vCloud in general to do anything else! 😀

