What is NAP?
Network Access Protection (NAP) is a new technology introduced in Windows Vista® and Windows Server® 2008. (NAP can also be deployed on computers running Windows Server 2008 R2 and Windows 7). NAP includes client and server components that allow you to create and enforce health requirement policies that define the required software and system configurations for computers that connect to your network. NAP enforces health requirements by inspecting and assessing the health of client computers, limiting network access when client computers are deemed noncompliant, and remediating noncompliant client computers for unrestricted network access. NAP enforces health requirements on client computers that are attempting to connect to a network. NAP also provides ongoing health compliance enforcement while a compliant client computer is connected to a network.
In addition, NAP provides an application programming interface (API) set that allows non-Microsoft software vendors to integrate their solutions into the NAP framework.
NAP enforcement occurs at the moment when client computers attempt to access the network through network access servers, such as a VPN server running Routing and Remote Access, or when clients attempt to communicate with other network resources. The way that NAP is enforced depends on the enforcement method you choose.
NAP enforces health requirements for the following:
- Internet Protocol security (IPsec)-protected communications
- Institute of Electrical and Electronics Engineers (IEEE) 802.1X-authenticated connections
- Virtual private network (VPN) connections
- Dynamic Host Configuration Protocol (DHCP) configuration
- Terminal Services Gateway (TS Gateway)
Installing NAP
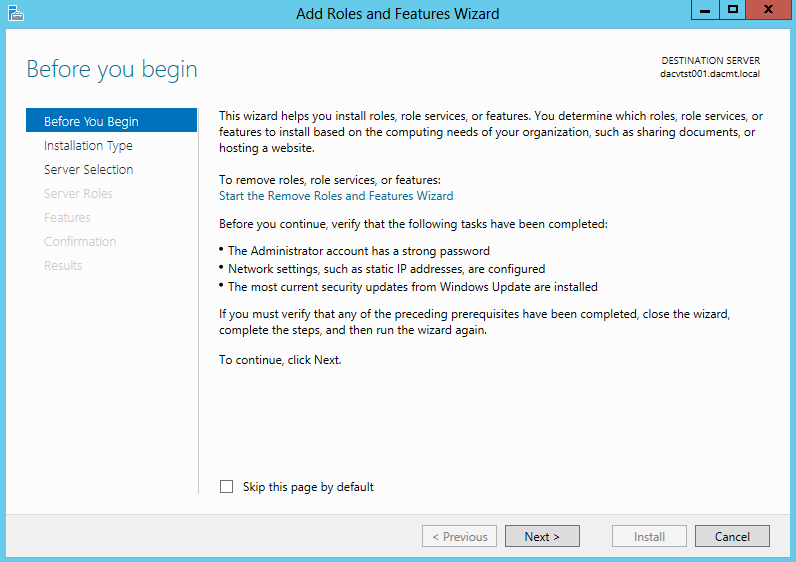
- Select Add Roles and Features and when the screen below comes up, Click Next
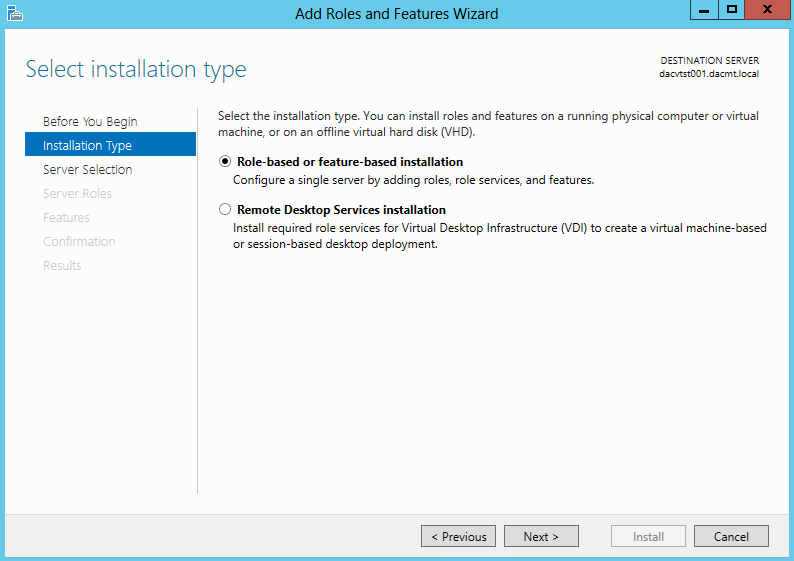
- Select Role-based or feature based installation
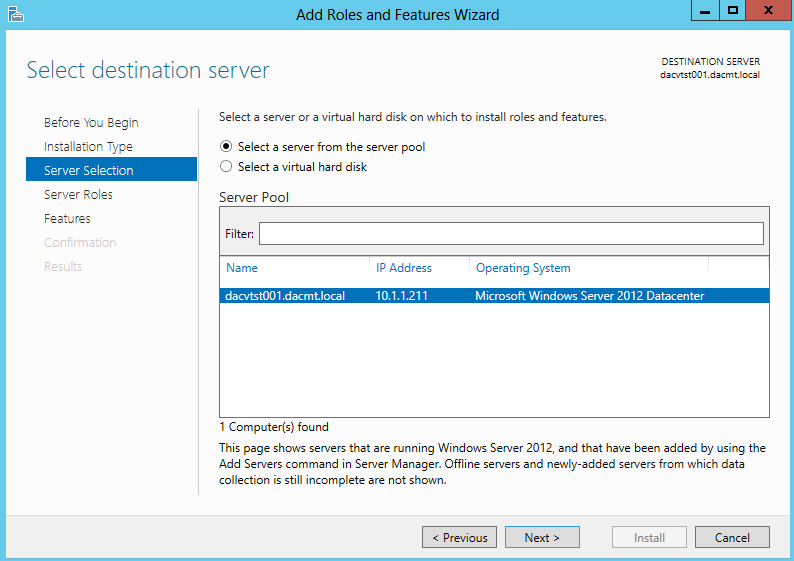
- Choose your server. I have a test Windows 2012 box called dacvtst001
- Select Network Policy and Access Services

- Click to Add Features when you select Network Policy and Access Services

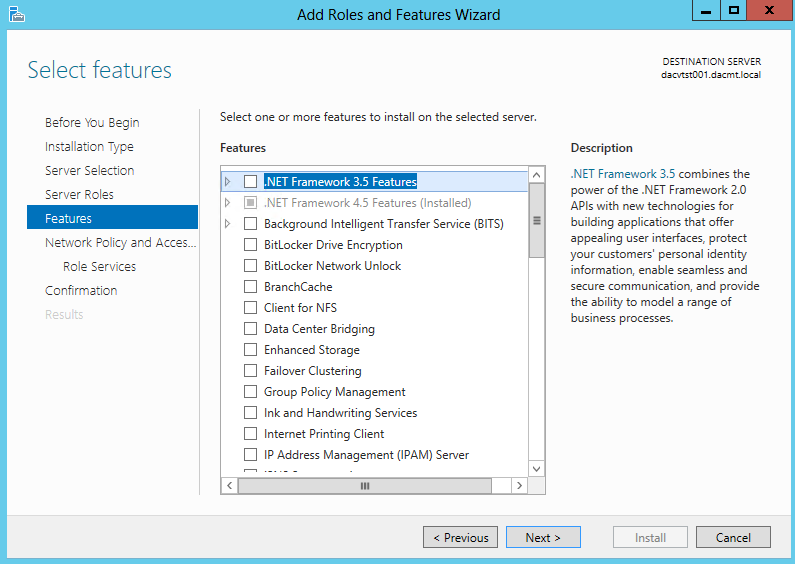
- Click Next on Select Features
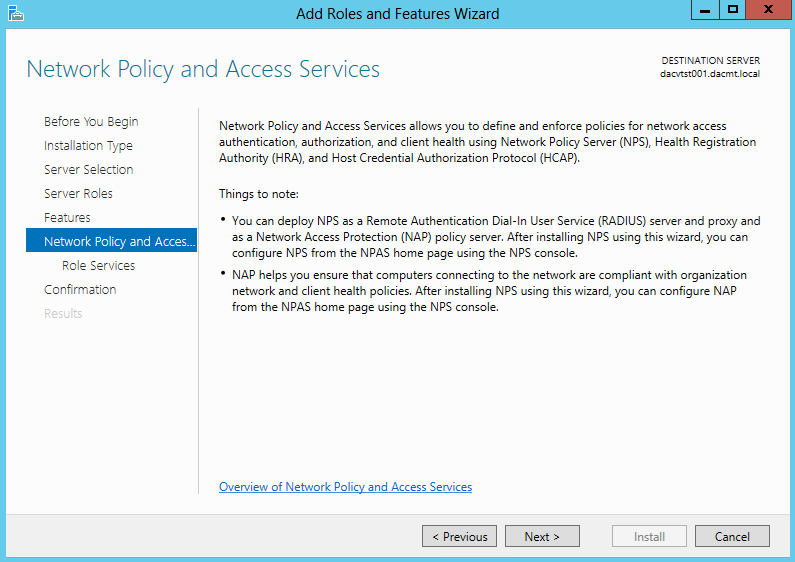
- Read the Network Policy and Access Services screen
- The following screenprints show the different descriptions of each Role Service. The first one being the Network Policy Server
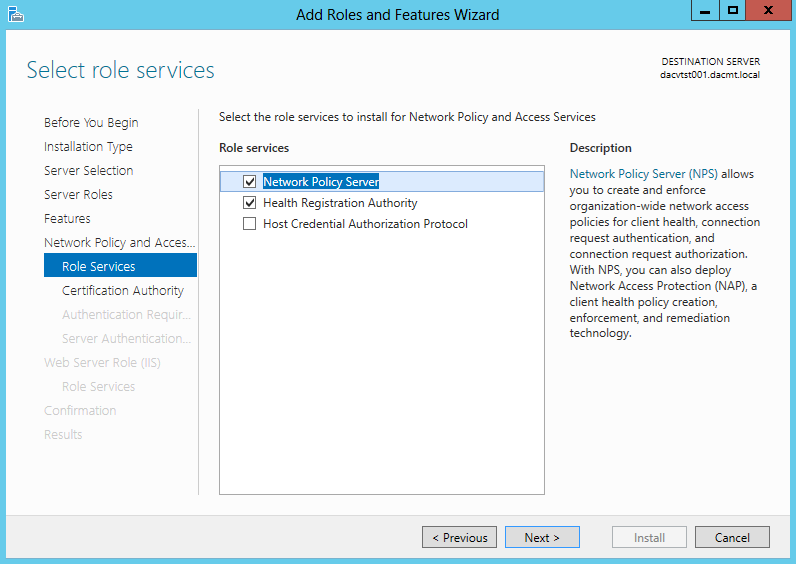
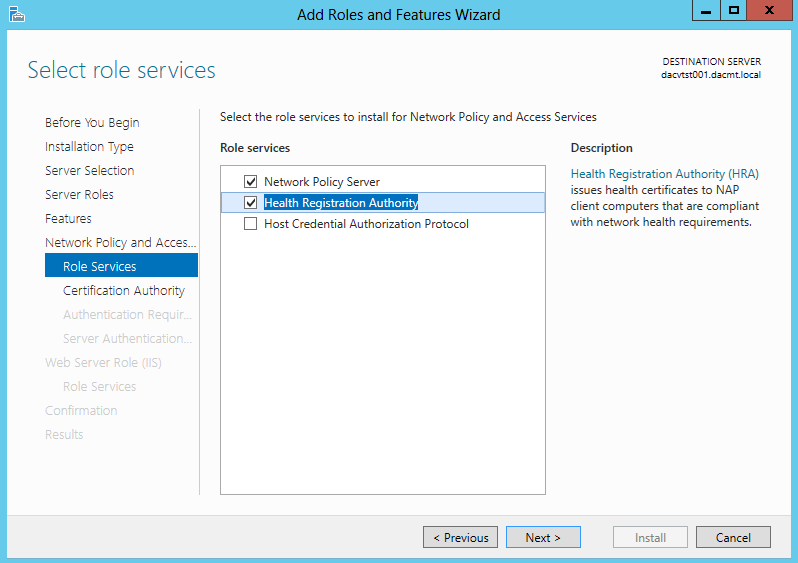
- The second one being the Health Registration Authority
- The third one being the Host Credential Authorization Protocol
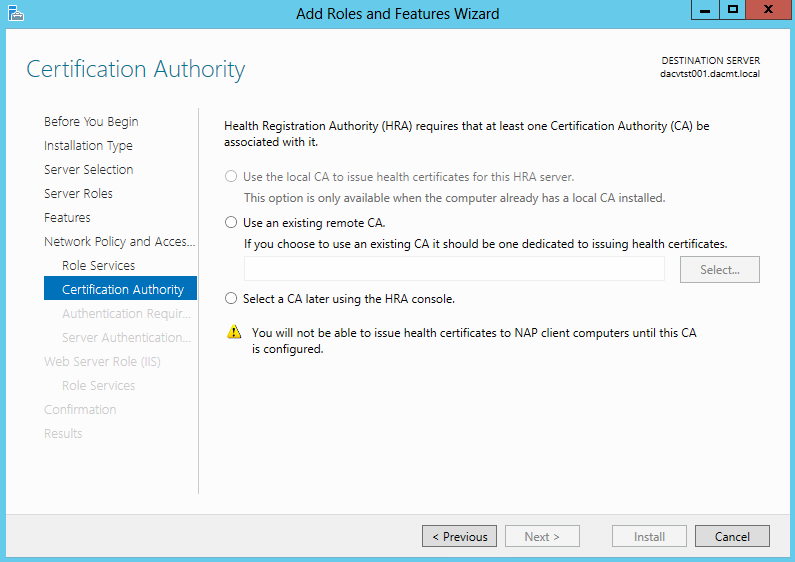
- Choose your Certificate settings. I chose Select a CA later using the HRA Console as this is just a test system but choose whatever is relevant to your setup
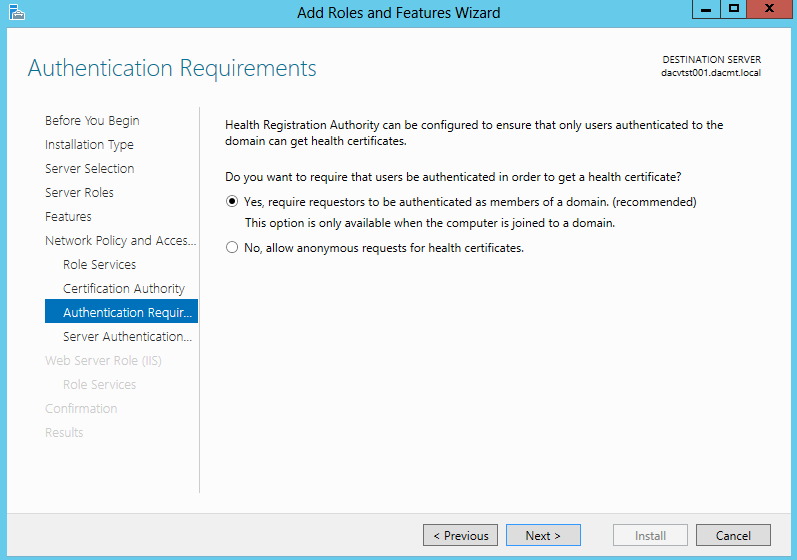
- Choose Authentication Requirements
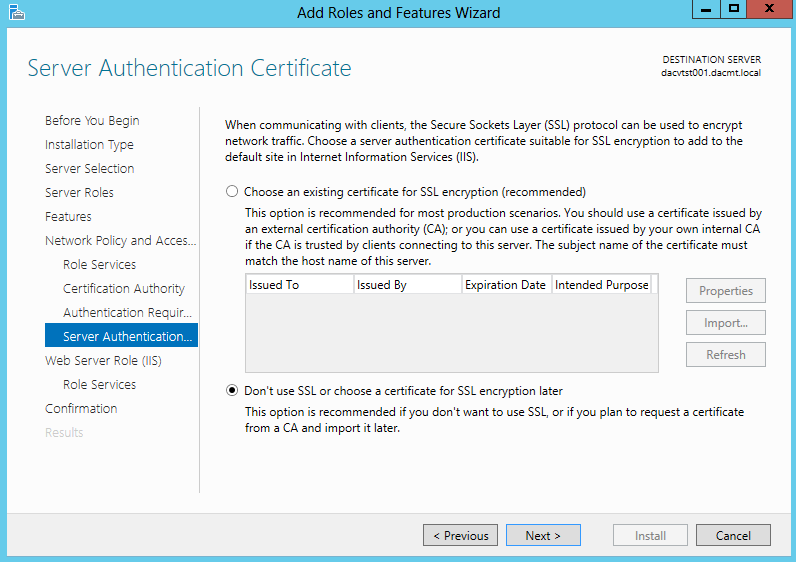
- Choose your Server Authentication Certificate for encryption
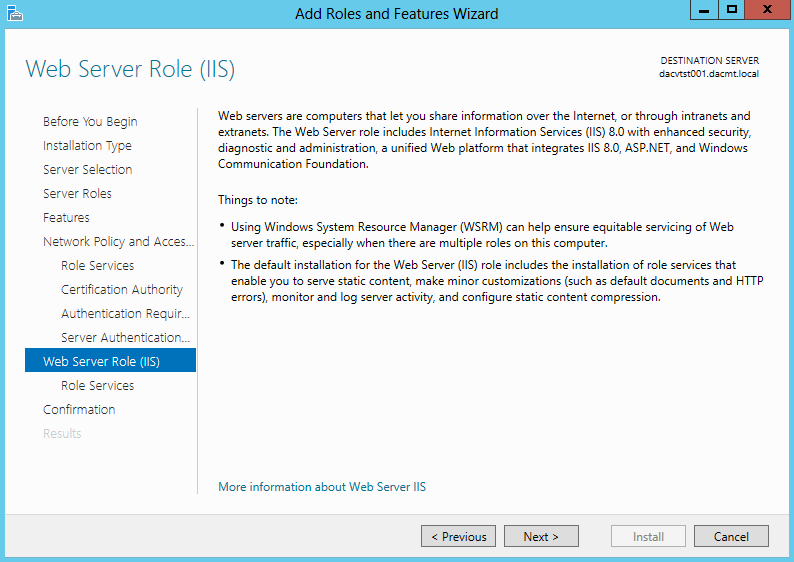
- Read the Web Server Role (IIS)
- Select Web Server Role Services Features

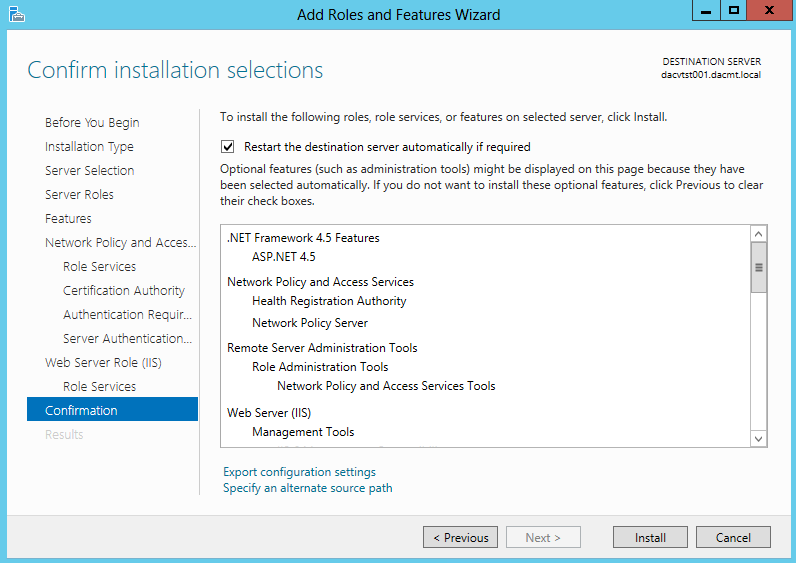
- Confirm Installation Selections
- You will also need to install the Group Policy Management Feature
- In Server Manager, under Features Summary, click Add Features.
- Select the Group Policy Management check box, click Next, and then click Install.
- Verify the installation was successful, and then click Close to close the Add Features Wizard dialog box.
- Close Server Manager.
- Next once everything is installed and rebooted, hit the Windows Key and Q to see the Aero view of all Applications
- Select Network Policy Server and you should see the below screen
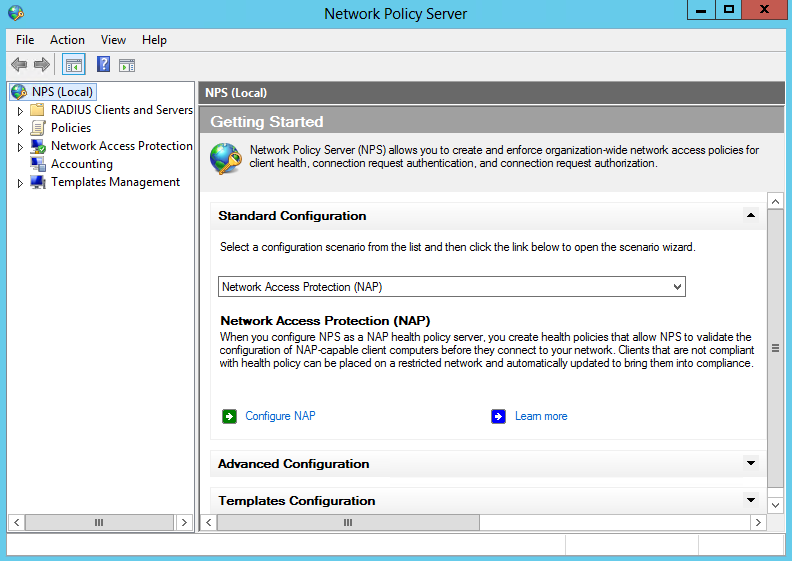
- And here is what it looks like with the menus expanded
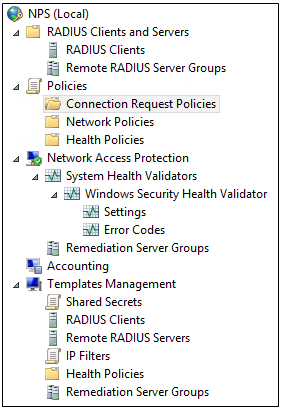
The NAP wizard helps you configure each NAP component to work with the NAP enforcement method you choose. These components are displayed in the NPS console tree, and include:
- System Health Validators. System health validators (SHVs) define configuration requirements for computers that attempt to connect to your network. E.g. Configured to require only that Windows Firewall is enabled.
- Health Policies. Health policies define which SHVs are evaluated, and how they are used in the validation of the configuration of computers that attempt to connect to your network. Based on the results of SHV checks, health policies classify client health status.
- Network Policies. Network policies use conditions, settings, and constraints to determine who can connect to the network. There must be a network policy that will be applied to computers that are compliant with the health requirements, and a network policy that will be applied to computers that are noncompliant.
- Connection Request Policies. Connection request policies are conditions and settings that validate requests for network access and govern where this validation is performed.
- RADIUS Clients and Servers. RADIUS clients are network access servers. If you specify a RADIUS client, then a corresponding RADIUS server entry is required on the RADIUS client device. Remote DHCP servers are configured as RADIUS clients on NPS.
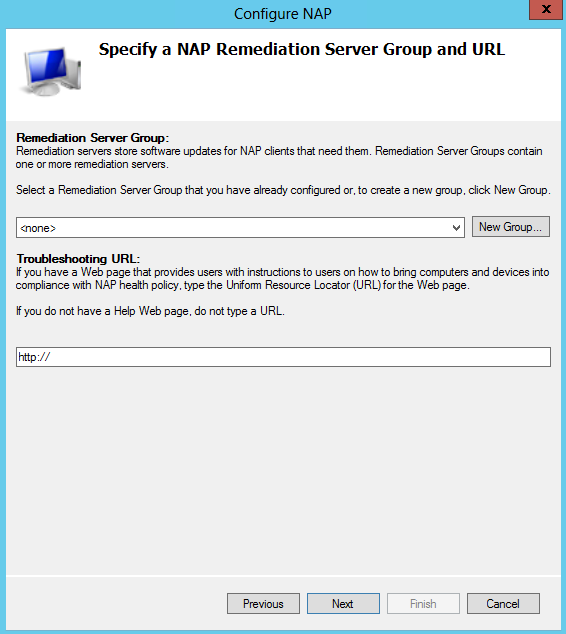
- Remediation Server Groups. Remediation server groups allow you to specify servers that are made available to noncompliant NAP clients so that they can remediate their health state and become compliant with health requirements. If these servers are required, they are automatically available to computers on the restricted access subnet when you add them to remediation server groups.
Configuring NAP
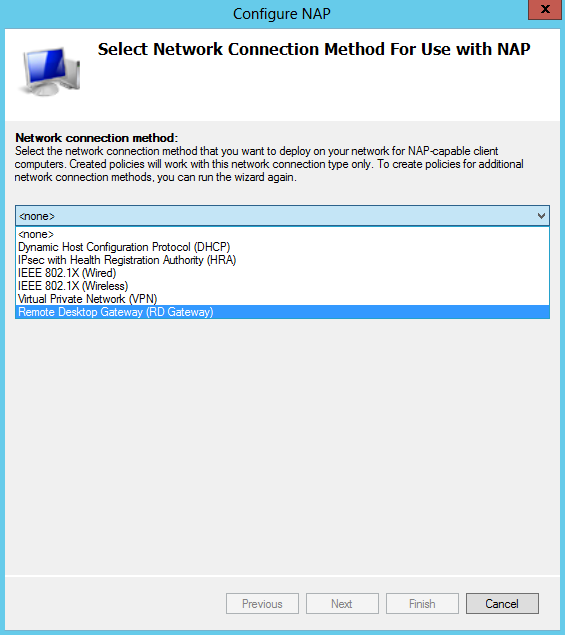
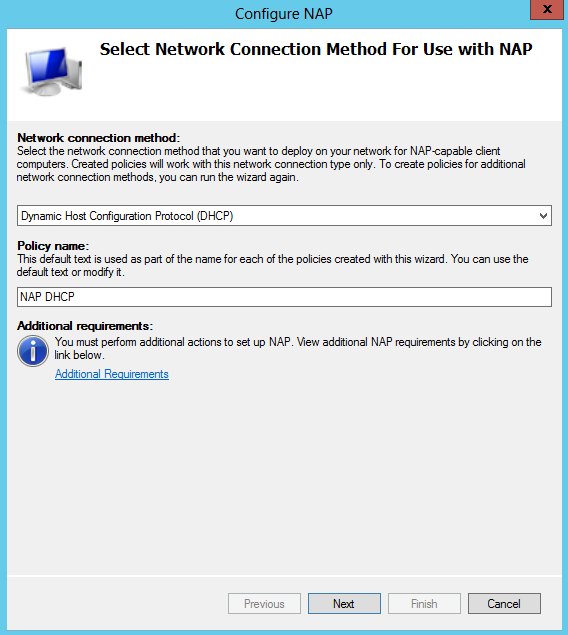
- In the details pane, under Standard Configuration, click Configure NAP. The NAP configuration wizard will start
- Choose Dynamic Host Configuration Protocol (DHCP) Note I already have DHCP installed on this test VM
- You should then see the below
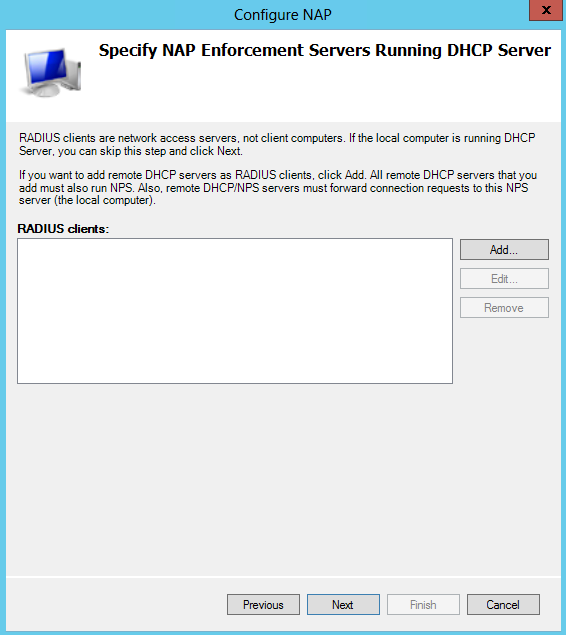
- Choose the Radius clients. Note I already have DHCP installed so I just click Next
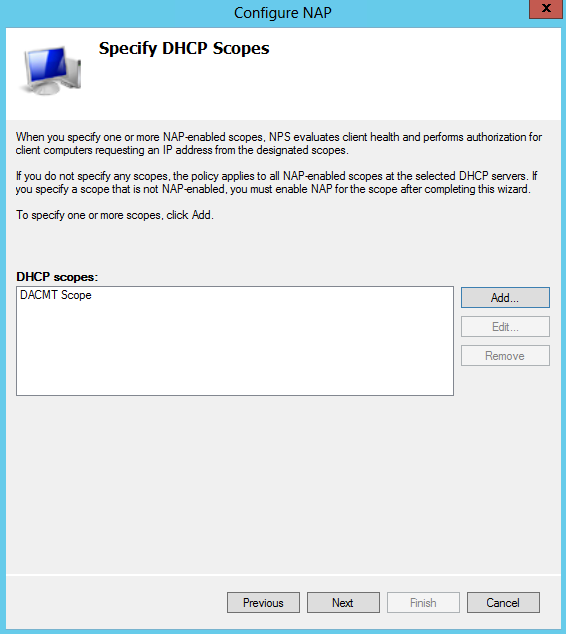
- Click Add and type a name for your DHCP Scope. Mine is called DACMT scope
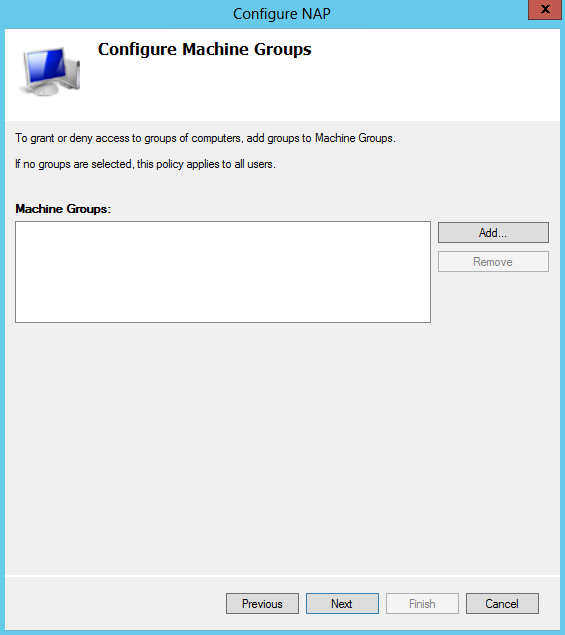
- Configure Machine Groups. Just click Next
- Choose Remediation Server Groups. Just click Next here
- Define NAP Health Policy. Verify that Windows Security Health Validator and Enable
auto-remediation of client computers check boxes are selected, and then click Next

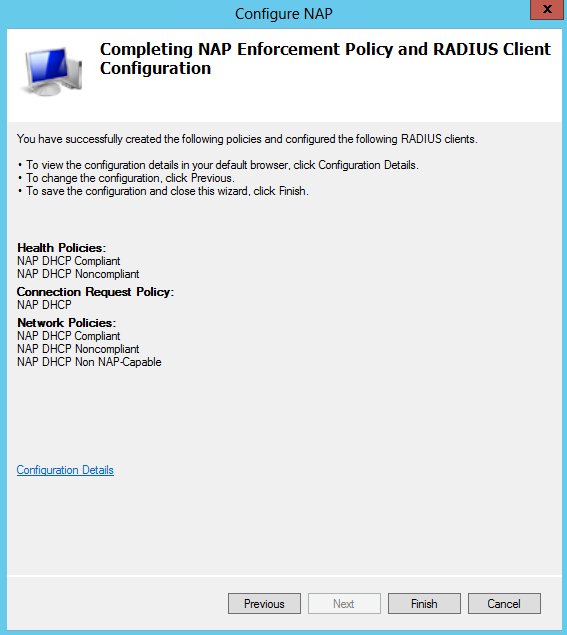
- On the Completing NAP Enforcement Policy and Radius Client Configuration screen, check the details and click Finish
Configure SHVs
SHVs define configuration requirements for computers that attempt to connect to your network.
- In the Network Policy Server console tree, double-click Network Access Protection, and then click System Health Validators >
- In the details pane, click Windows Security Health Validator.
- In the Windows Security Health Validator Properties dialog box, click Settings.
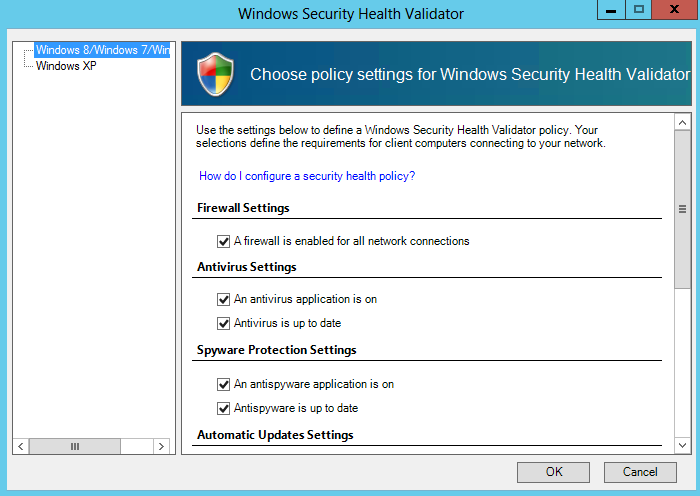
- Tick whichever Security Health Validations you want to enforce on your network
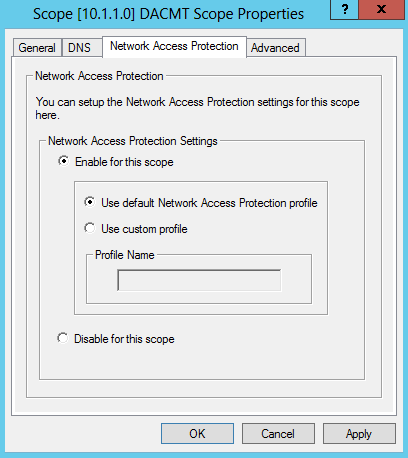
Enable NAP settings for the scope
- In the DHCP console, double-click dacvtst001.dacmt.local, and then double-click IPv4
- Right-click Scope [10.1.1.0] DACMT Scope, and then click Properties.
On the Network Access Protection tab, under Network Access Protection Settings, choose Enable for this scope, verify that Use default Network Access Protection profile is chosen, and then click OK
Configure the default user class
Next, configure scope options for the default user class. These server options are used when a compliant client computer attempts to access the network and obtain an IP address from the DHCP server.
- In the DHCP console tree, under Scope [10.1.1.0] DACMT Scope, right-click Scope Options, and then click Configure Options.
- On the Advanced tab, verify that Default User Class is chosen next to User class.
- Select the 006 DNS Servers check box, in IP Address, under Data entry, type 10.1.1.160, and then click Add.

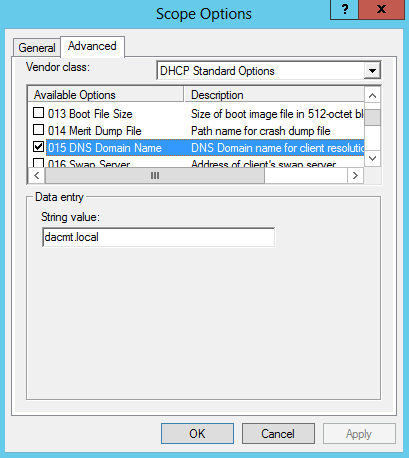
- Select the 015 DNS Domain Name check box, in String value, under Data entry, type dacmt.local, and then click OK.
- The dacmt.local domain is a full-access network assigned to compliant NAP clients.
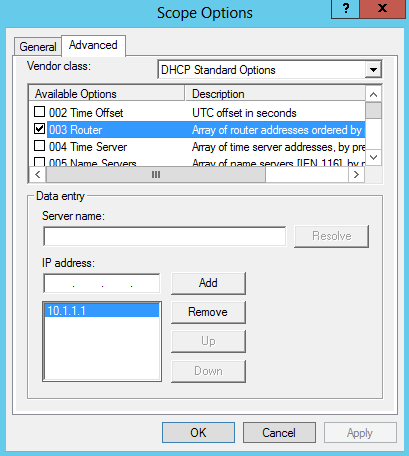
- Note The 003 Router option is configured in the default user class if a default gateway is required for client computers. Because all computers in the test lab are located on the same subnet, this option is not required.
Configure the default NAP class
Next, configure scope options for the default network access protection class. These server options are used when a noncompliant client computer attempts to access the network and obtain an IP address from the DHCP server. To configure default NAP class scope options
- In the DHCP console tree, under Scope [10.1.1.0] DACMT Scope, right-click Scope Options, and then click Configure Options.
- On the Advanced tab, next to User class, choose Default Network Access Protection Class.
- Select the 006 DNS Servers check box, in IP Address, under Data entry, type 10.1.1.60, and then click Add.
- Select the 015 DNS Domain Name check box, in String value, under Data entry, type restricted.dacmt.local, and then click OK. access network assigned to noncompliant NAP clients.
- Note The 003 Router option is configured in the default NAP class if a default gateway is required for client computers to reach the DHCP server or remediation servers on a different subnet. Because all computers in the test lab are located on the same subnet, this option is not required.
Configure NAP client settings in Group Policy
The following NAP client settings will be configured in a new Group Policy object (GPO) using the Group Policy Management feature on NPS1:
- NAP enforcement clients
- NAP Agent service
- Security Center user interface
After these settings are configured in the GPO, security filters will be added to enforce the settings on computers you specify. The following section describes these steps in detail
- On dacvtst001, click Start, click Run, type gpme.msc, and then press ENTER.
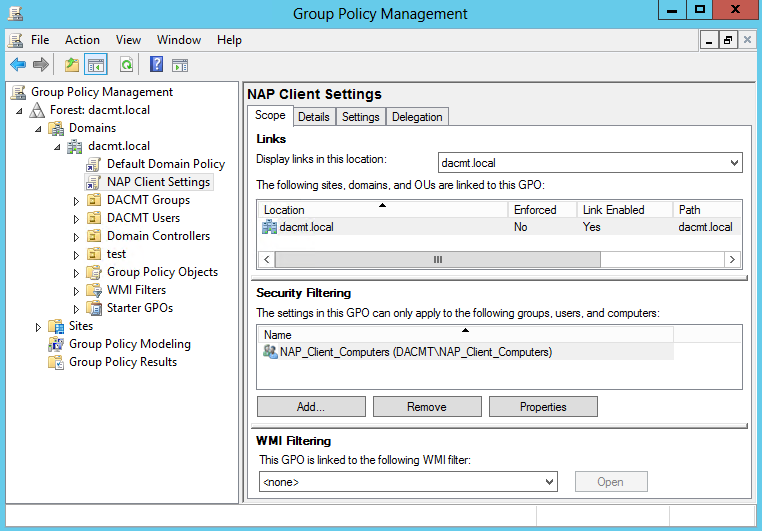
- In the Browse for a Group Policy Object dialog box, next to dacmt.local, click the icon to create a new GPO, type NAP Client Settings for the name of the new GPO, and then click OK.
- The Group Policy Management Editor window will open. Navigate to Computer Configuration/Policies/Windows Settings/Security Settings/System Services.
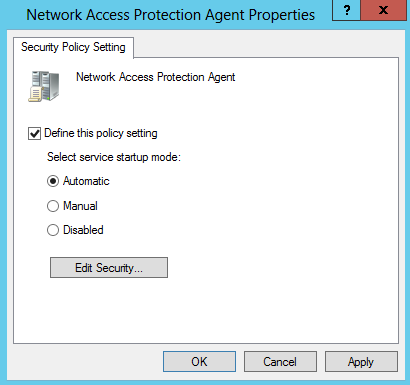
- In the details pane, double-click Network Access Protection Agent.
- In the Network Access Protection Agent Properties dialog box, select the Define this policy setting check box, choose Automatic, and then click OK.
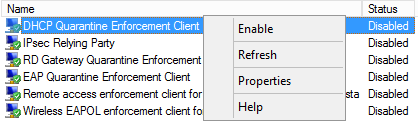
- In the console tree, open Network Access Protection\NAP Client Configuration\Enforcement Clients.
- In the details pane, right-click DHCP Quarantine Enforcement Client, and then click Enable.
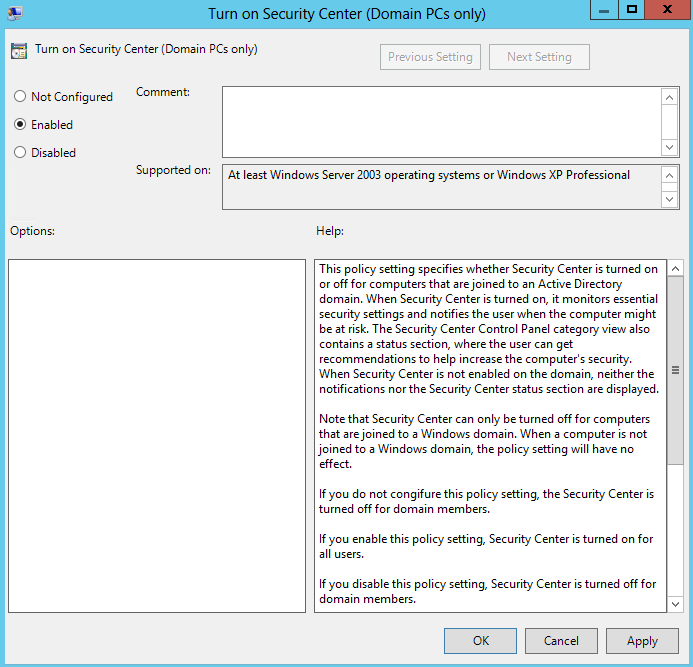
- In the console tree, navigate to Computer Configuration\Policies\Administrative Templates\Windows Components\Security Center.
- In the details pane, double-click Turn on Security Center (Domain PCs only), choose Enabled, and then click OK.
- Close the Group Policy Management Editor window.
- If you are prompted to apply settings, click Yes
Configure security filters for the NAP client settings GPO
Next, configure security filters for the NAP client settings GPO. This prevents NAP client settings from being applied to server computers in the domain.
- On dacvtst001, click Start, click Run, type gpmc.msc, and then press ENTER.
- In the Group Policy Management Console (GPMC) tree, navigate to Forest: dacmt.local\Domains\Contoso.com\Group Policy Objects\NAP client settings.
- In the details pane, under Security Filtering, click Authenticated Users, and then click Remove.
- When you are prompted to confirm the removal of delegation privilege, click OK. In the details pane, under Security Filtering, click Add.
- In the Select User, Computer, or Group dialog box, under Enter the object name to select (examples), type NAP client computers group, and then click OK.
- Close the GPMC.

