![]()
What’s new in vSphere 5.5
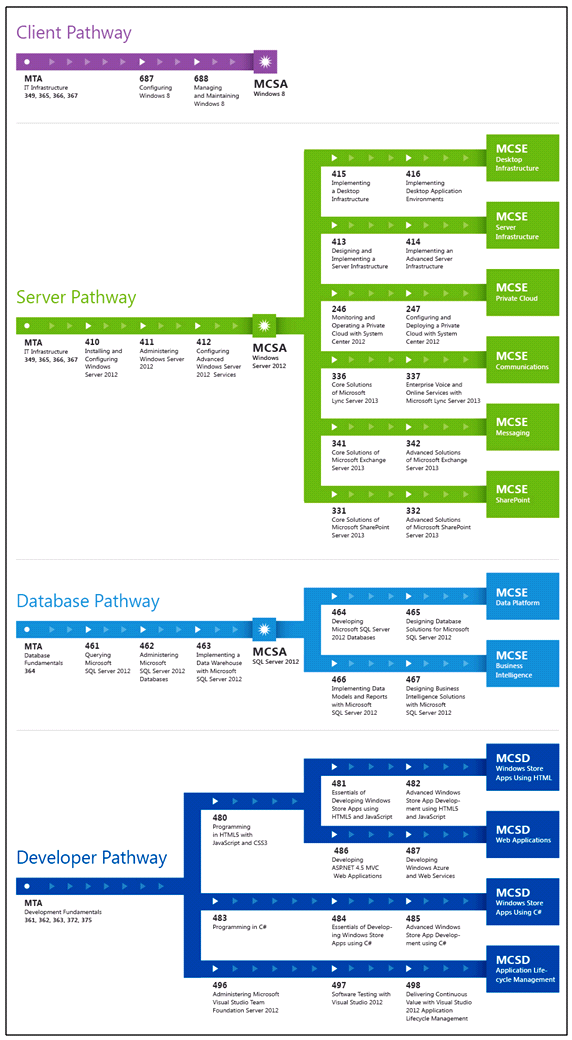
I needed to go through these after realising my certifications were due to expire. I was able to take the VCP5-DCV Delta Exam (VCP550D) exam with Pearson Vue which is a little cheaper for those of you with existing qualifications. See the VMware site and log into your myvmware account to check the status of your existing qualifications.
A brief summary with key points on all features
- Hot-Pluggable PCIe SSD Devices
PCIe stands for Peripheral Component Interconnect Express. These high performance Solid State Drives can be used for local storage in ESXi. The ability to hot add has always been there with SAS and SATA and is now expanded to support SSDs. Being able to provide this functionality is of great benefit to Administrators in reducing downtime to a host system in the event of a disk failure or even to be able to add an SSD drive. PCIe is a serial based technology which means information can be sent over the bus in 2 directions at once. Each lane in PCIe can transmit in both directions at the same time. Standard PCI is parallel based technology which means all data goes in one directions around a loop. Bandwidth is not shared the same way in PCIe opposed to PCI so there is less bus congestion.
Reliable Memory Technology
This is a CPU Hardware feature that ESXi can use to place the VMkernel on a region of memory which is reported as being more reliable. ESXi runs directly in memory therefore protecting it and reducing the risk of memory errors whilst increasing resiliency will provide this protection. Hostd, Initial Thread and Watchdog are also protected. The vmware-hostd management service is the main communication channel between ESX/ESXi hosts and VMkernel. The vmware-watchdog process watches over hostd and restarts it if it detects that hostd is no longer running.
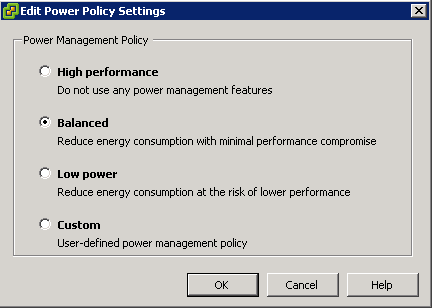
Enhancements to CPU C-States
In vSphere 5.1 and earlier, the balanced policy for host power management leveraged only the performance state (P-state), which kept the processor running at a lower frequency and voltage. In vSphere 5.5, the deep processor power state (C-state) also is used, providing additional power savings. Another potential benefit of reduced power consumption is with inherent increased performance, because turbo mode frequencies on Intel chipsets can be reached more quickly while other CPU cores in the physical package are in deep C-states.
Virtual Machine Compatibility with VMware ESXi 5.5
- LSI SAS support for Oracle Solaris 11 OS
- Enablement for new CPU architectures
- New advanced host controller interface (AHCI) This new virtual-SATA controller supports both virtual disks and CD-ROM devices that can
connect up to 30 devices per controller, with a total of four controllers - Hardware-accelerated 3D graphics – (vSGA) Virtual shared graphics acceleration (vSGA) support inside of a virtual machine. The existing support was limited to only NVIDIA-based GPUs. With vSphere 5.5, vSGA support has been expanded to include both NVIDIA- and AMD-based GPUs
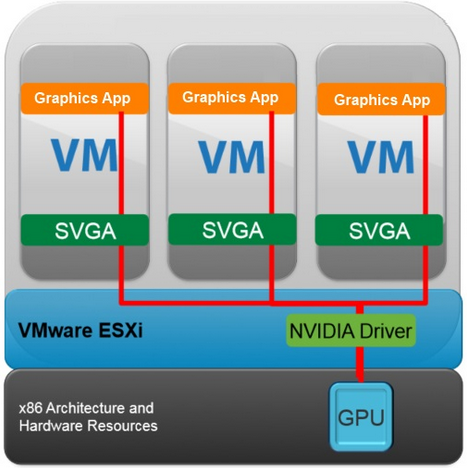
- There are three supported rendering modes for a virtual machine configured with a vSGA: automatic, hardware and software accessed by editing the settings of a VM
Graphics Acceleration for Linux Guests
VMware is the first to develop a new guest driver that accelerates the entire Linux graphics stack for modern Linux distributions. This means that any modern GNU/Linux distribution can package the VMware guest driver and provide out-of-the-box support for accelerated graphics without any additional tools or package installation
vCenter Single Sign-On
The following vCenter Single Sign-On enhancements have been made.
- Simplified deployment – A single installation model for customers of all sizes is now offered.
- Enhanced Microsoft Active Directory integration – The addition of native Active Directory support enables cross-domain authentication with one and two-way trusts common in multidomain environments.
- Built from the ground up, this architecture removes the requirement of a database and now delivers a multimaster authentication solution with built-in replication and support for multiple tenants.
vSphere Web Client
- Full client support for Mac OS X is now available in the
vSphere Web Client. - Administrators now can drag and drop objects from the center panel onto the vSphere inventory, enabling them to quickly perform bulk actions
- Administrators can now select properties on a list of displayed objects and selected filters to meet specific search criteria
- Recent Items. Similar to what you find on Windows desktops , this feature allows you to go back to recently accessed objects
vCenter Server Appliance
The previous embedded database had certain limitations which caused it’s adoption to be less widely taken up. The vCenter Server Appliance addresses this with a re-engineered, embedded vPostgres database that can now support as many as 100 vSphere hosts or 3,000 virtual machines (with appropriate sizing)
vSphere App HA
In earlier versions App HA used virtual machine monitoring, which checks for
the presence of “heartbeats” from VMware Tools as well as I/O activity from the virtual machine. In vSphere 5.5, VMware has introduced vSphere App HA. This new feature works in conjunction with vSphere HA host monitoring and virtual
machine monitoring to further improve application uptime. vSphere App HA can be configured to restart an application service when an issue is detected. It is possible to protect several commonly used, off-the-shelf applications. vSphere HA can also reset the virtual machine if the application fails to restart.
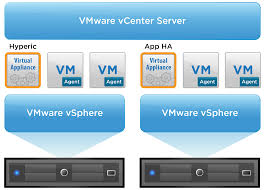
vSphere App HA
vSphere App HA uses VMware vFabric Hyperic to monitor applications. VMware vFabric Hyperic is an agent-based monitoring system that automatically collects metrics on the performance and availability of hardware resources, operating systems, middleware and applications in physical, virtualized and cloud environments. It requires the provisioning of 2 appliances
- vSphere App HA virtual appliance stores and manages vSphere App HA policies.
- vFabric Hyperic monitors applications and enforces vSphere App HA policies
- Hyperic agents then need to be installed in the virtual machines containing applications that will be protected by vSphere App HA
- Includes policies to manage timings and resetting options
vSphere HA Compatibility with DRS Anti-Affinity Rules
vSphere HA will now obey DRS anti-affinity rules when restarting virtual machines. If you have anti-affinity rules defined in DRS that keep selected virtual machines on separate hosts, VMware HA will now keep to those rules when restarting virtual machines following a host failure
vSphere Data Protection
- Direct-to-host emergency restore: vSphere Data Protection can be used to restore a virtual machine directly to a vSphere host without the need for vCenter Server and vSphere Web Client. This is especially helpful when using vSphere Data Protection to protect vCenter Server.
- Backup and restore of individual virtual machine hard disks (.vmdk files): Individual .vmdk files can be selected for backup and restore operations.
- Replication to EMC Avamar: vSphere Data Protection replicates backup data to EMC Avamar to provide offsite backup data storage for disaster recovery.
- Flexible storage placement: When deploying vSphere Data Protection, separate datastores can be selected for the OS partition and backup data partition of the virtual appliance.
- Mounting of existing backup data storage to new appliance: An existing vSphere Data Protection backup data partition can be mounted to a new vSphere Data Protection virtual appliance during deployment.
- Scheduling granularity: Backup and replication jobs can be scheduled at specific times; for example. Backup Job 1 at 8:45 p.m., Backup Job 2 at 11:30 p.m., and Replication Job 1 at 2:15 a.m.
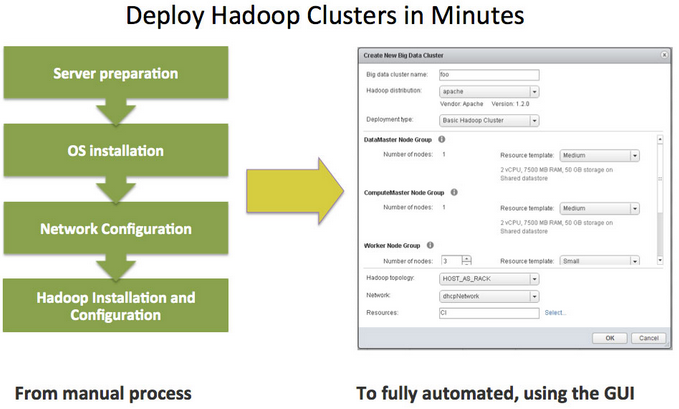
vSphere Big Data Extensions (BDE)
BDE is a new addition in vSphere 5.5 for VMware vSphere Enterprise Edition
and VMware vSphere Enterprise Plus Edition. BDE is a tool that enables administrators to deploy and manage Hadoop clusters on vSphere. BDE is
based on technology from Project Serengeti, the VMware open-source virtual Hadoop management tool.
- Creates, deletes, starts, stops and resizes clusters
- Controls resource usage of Hadoop clusters
- Specifies physical server topology information
- Manages the Hadoop distributions available to BDE users
- Automatically scales clusters based on available resources and in response to other workloads on the vSphere cluster
- Hadoop clusters can be protected easily using vSphere HA and VMware vSphere Fault Tolerance
Support for 62TB VMDK
The previous limit was 2TB—512 bytes. The new limit is 62TB. The maximum size of a virtual Raw Device Mapping (RDM) is also increasing, from 2TB—512 bytes to 62TB. Virtual machine snapshots also support this new size for delta
disks that are created when a snapshot is taken of the virtual machine.
Microsoft Cluster Service (MSCS)
- Microsoft Windows 2012
- Round-robin path policy for shared storage. changes were made concerning the SCSI locking mechanism used by MSCS when a failover of services occurs. New path policy, changes have been implemented that make it irrelevant which path is used to place the SCSI reservation; any path can free the reservation.
- iSCSI protocol for shared storage
- Fibre Channel over Ethernet (FCoE) protocol for shared storage
16GB E2E FC Support
In vSphere 5.5, VMware introduces 16Gb end-to-end FC support. Both the HBAs and array controllers can run at 16Gb as long as the FC switch between the initiator and target supports it.
PDL AutoRemove
Permanent device loss (PDL) is a situation which occurs when a disk device either fails or is removed from the vSphere host in an uncontrolled way. PDL detects if a disk device has been permanently removed that is, the device will not return based on SCSI sense codes. When the device enters this PDL state, the vSphere host can take action to prevent directing any further, unnecessary I/O to this device. This alleviates other conditions that might arise on the host as a result of this unnecessary I/O. The PDL feature automatically removes a device from a host when it enters a PDL state. Because vSphere hosts have a limit of 255 disk devices per host, a device that is in a PDL state can no longer accept I/O but can still occupy one of the available disk device spaces. Therefore, it is better to remove the device from the host.
PDL AutoRemove occurs only if there are no open handles left on the device. The auto-remove takes place when the last handle on the device closes. If the device recovers, or if it is re-added after having been inadvertently removed, it will be treated as a new device.
vSphere Replication
At the primary site, migrations now move the persistent state files that contain pointers to the changed blocks along with the VMDKs in the virtual machine’s home directory, thereby removing the need for a full synchronization. This means that replicated virtual machines can now be moved between datastores, by vSphere Storage vMotion or vSphere Storage DRS, without incurring a penalty on the replication. The retention of the .psf means that the virtual machine can be brought to the new datastore or directory while retaining its current replication data and can continue with the procedure and with the “fast suspend/resume” operation of moving an individual VMDK.
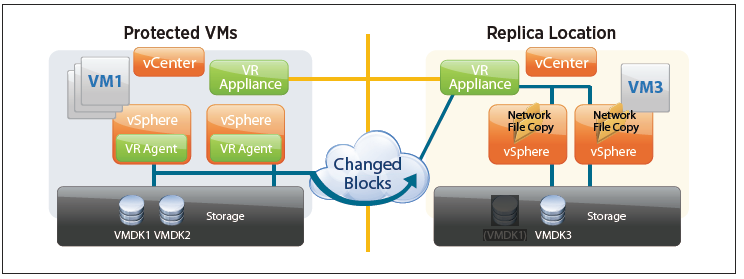
A new feature is introduced in vSphere 5.5 that enables retention of historical points in time. The old redo logs are not discarded; instead, they are retained and cleaned up on a schedule according to the MPIT retention policy.
VAAI UNMAP Improvements
vSphere 5.5 introduces a new and simpler VAAI UNMAP/Reclaim command:
- esxcli storage vmfs unmap
- The ability to specify the reclaim size in blocks rather than as a percentage value; dead space can now be reclaimed in increments rather than all at once
VMFS Heap Improvements
In vSphere 5.5, VMware introduces a much improved heap eviction process, so there is no need for the larger heap size, which consumes memory. vSphere 5.5, with a maximum of 256MB of heap, enables vSphere hosts to access all address space of a 64TB VMFS
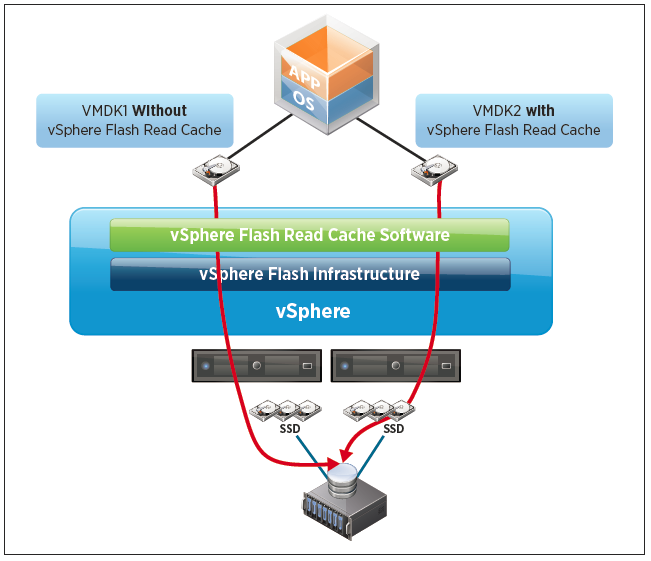
vSphere Flash Read Cache
vSphere Flash Read Cache enables the pooling of multiple Flash-based devices into a single consumable vSphere construct called vSphere Flash Resource, which is consumed and managed in the same way as CPU and memory are done today in vSphere.
The vSphere Flash Read Cache infrastructure is responsible for integrating the vSphere hosts’ locally attached Flash-based devices into the vSphere storage stack. This integration delivers a Flash management platform that enables the pooling of Flash-based devices into a vSphere Flash Resource.
Link Aggregation Protocol Enhancements
- Comprehensive load-balancing algorithm support – 22 new hashing algorithm options are available. For example, source and destination IP address and VLAN field can be used as the input for the hashing algorithm.
- Support for multiple link aggregation groups (LAGs) – 64 LAGs per host and 64 LAGs per VMware vSphere VDS.
- Because LACP configuration is applied per host, this can be very time consuming for large deployments. In this release, new workflows to configure LACP across a large number of hosts are made available through templates.
Traffic Filtering enhancements
The vSphere Distributed Switch now supports packet classification and filtering based on MAC SA and DA qualifiers, traffic type qualifiers (i.e. vMotion, Management, FT), and IP qualifiers (i.e. protocol, IP SA, IP DA, and port number).
Quality of Service Tagging
Two types of Quality of Service (QoS) marking/tagging common in networking are 802.1p Class of Service
- (CoS) Class of Service applied on Ethernet/layer 2 packets
- (DSCP) Differentiated Service Code Point, applied on IP packets. In vSphere 5.5, the DSCP marking support enables users to insert tags in the IP header. IP header–level tagging helps in layer 3 environments, where physical routers function better with an IP header tag than with an Ethernet header tag.
SR-IOV Enhancements
Single-root I/O virtualization (SR-IOV) is a standard that enables one PCI Express (PCIe) adapter to be presented as multiple, separate logical devices to virtual machines.
- A new capability is introduced that enables users to communicate the port group properties defined on the vSphere standard switch (VSS) or VDS to the virtual functions. The new control path through VSS and VDS communicates the port group–specific properties to the virtual functions. For example, if promiscuous mode is enabled in a port group, that configuration is then passed to virtual functions, and the virtual machines connected to the port group will receive traffic from other virtual machines.
Enhanced Host Level Performance
- An enhanced host-level packet capture tool is introduced. The packet capture tool is equivalent to the command-line tcpdump tool available on the Linux platform.
- This tool is part of the vSphere platform and can be accessed through the vSphere host cmd prompt
- Can capture dropped packets
- Can trace the path of a packet with time stamp details
- Can capture traffic on VSS and VDS
- Captures packets at the following levels
––Uplink
––Virtual switch port
––vNIC
40Gb NIC Support
vSphere 5.5 provides support for 40Gb NICs. In 5.5 the functionality is limited to the Mellanox ConnectX-3 VPI adapters configured in Ethernet mode.
Maximums
- 320 physical CPUs
- 4TB Memory
- 16 Numa nodes
- 4906 vCPUs per ESXi host