Tag Archive for RDM

Adding shared RDM’s to multiple VMs in VMware vSphere 5.5

RDM2

The Task

For this task we had 6 x RHEL6 VMs which someone had asked us to attach the same RDM disk to in a non cluster aware scenario. E.g No SQL/Exchange clustering, just the simple sharing of a LUN between the VMs.

About RDM Mapping

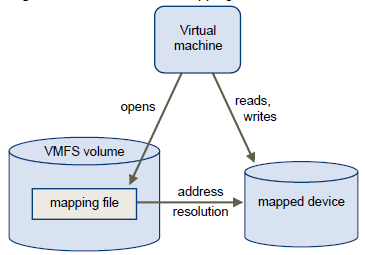
An RDM is a mapping file in a separate VMFS volume that acts as a proxy for a raw physical storage device.
The RDM allows a virtual machine to directly access and use the storage device. The RDM contains metadata for managing and redirecting disk access to the physical device.
The file gives you some of the advantages of direct access to a physical device while keeping some advantages of a virtual disk in VMFS. As a result, it merges VMFS manageability with raw device access. RDMs can be described in terms such as mapping a raw device into a datastore, mapping a system LUN, or mapping a disk file to a physical disk volume. All these terms refer to RDMs.

RDM

Although VMware recommends that you use VMFS datastores for most virtual disk storage, on certain occasions, you might need to use raw LUNs or logical disks located in a SAN.

When you give your virtual machine direct access to a raw SAN LUN, you create an RDM disk that resides on a VMFS datastore and points to the LUN. You can create the RDM as an initial disk for a new virtual machine or add it to an existing virtual machine. When creating the RDM, you specify the LUN to be mapped and the datastore on which to put the RDM.
Although the RDM disk file has the same.vmdk extension as a regular virtual disk file, the RDM contains only mapping information. The actual virtual disk data is stored directly on the LUN.
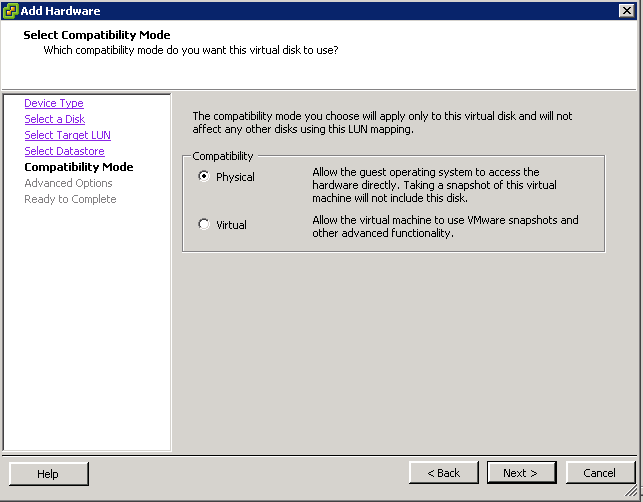
Compatibility Modes

Two compatibility modes are available for RDMs:

  • Virtual compatibility mode allows an RDM to act exactly like a virtual disk file, including the use of snapshots.
  • Physical compatibility mode allows direct access of the SCSI device for those applications that need lower level control.

Instructions

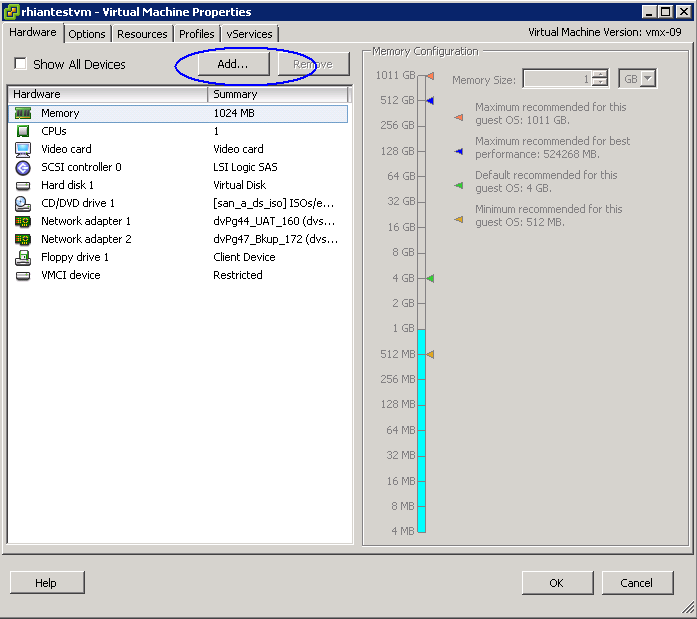
  • Log into vCenter and go to the first VM and click Edit Settings. Note the VM will need to be powered off for you to configure some settings further on in the configuration.

rdm1

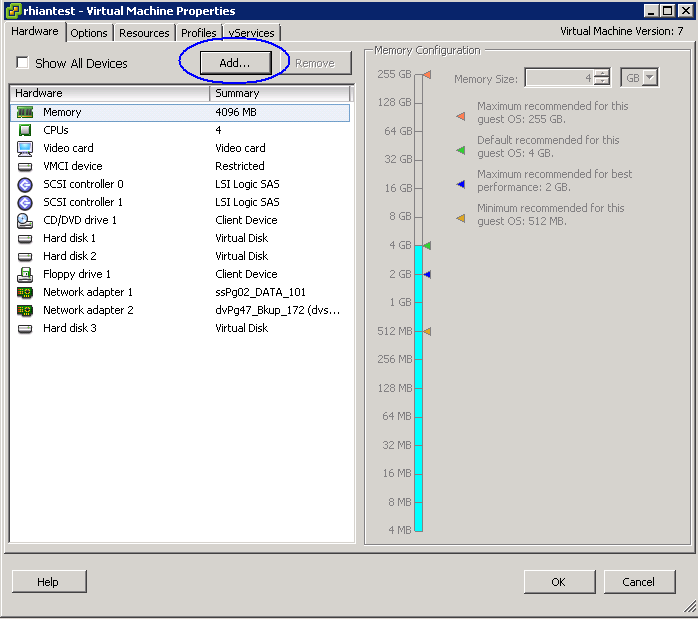
  • Click Add and choose Hard Disk

rdm2

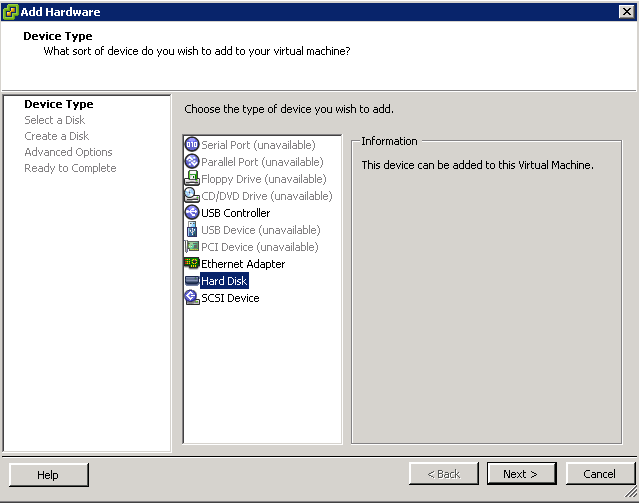
  • Choose Raw Disk Mapping

rdm3

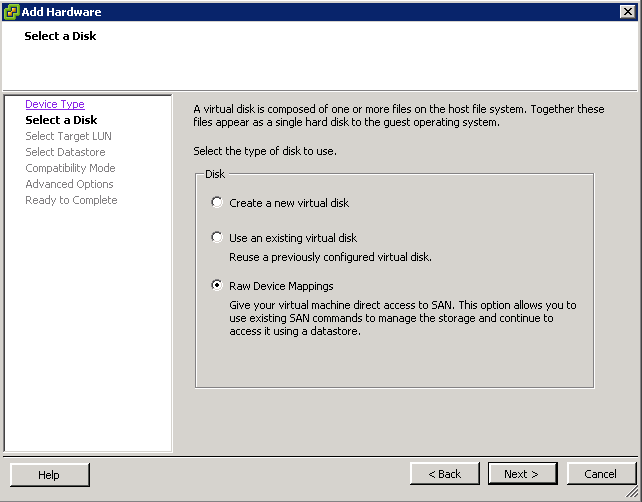
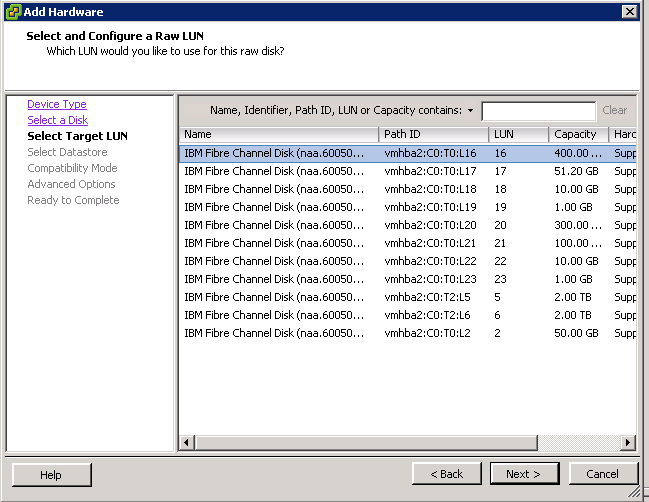
  • Select the Raw Disk you want to use

rdm4

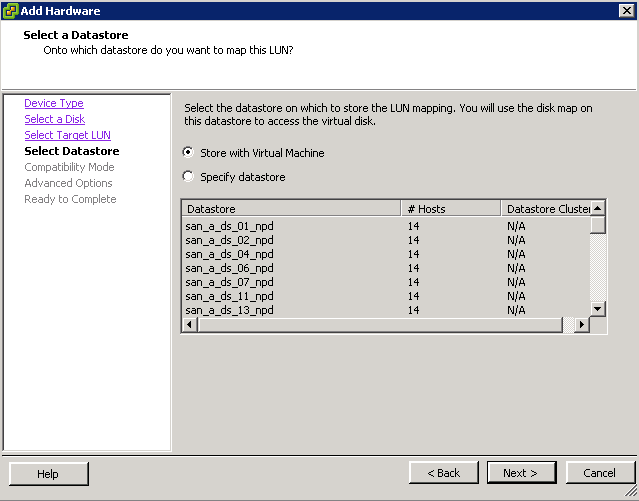
  • Select whether to store it with the VM or on a separate datastore

rdm5

  • Choose a Compatibility Mode – Physical or Virtual. We need to choose Physical

rdm6

  • Choose a SCSI Device Mode. This will also need to be the same on the second machine you are going to add the same RDM to.

rdm7

  • Click Finish
  • Next go the second VM and click Edit Settings and click Add
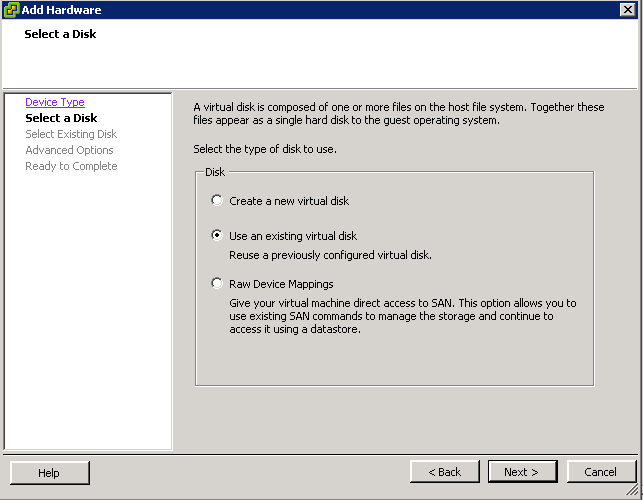
rdm8

  • Click

rdm9

  • Click Choose an Existing Disk

rdm10

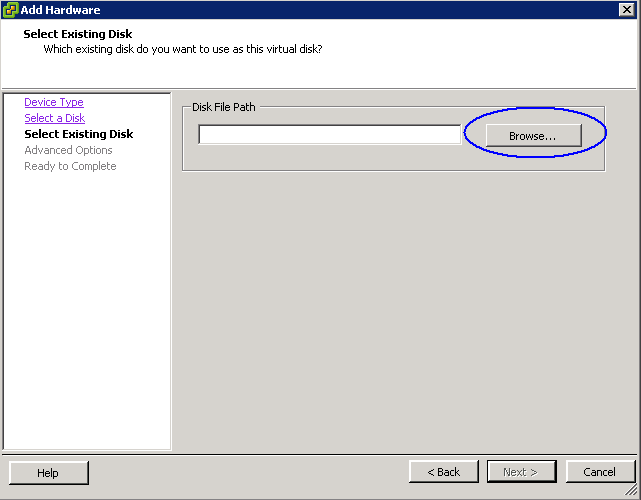
  • You now need to browse to the Datastore that the first VM is one and find the RDM VMDK file and select this

rdm11

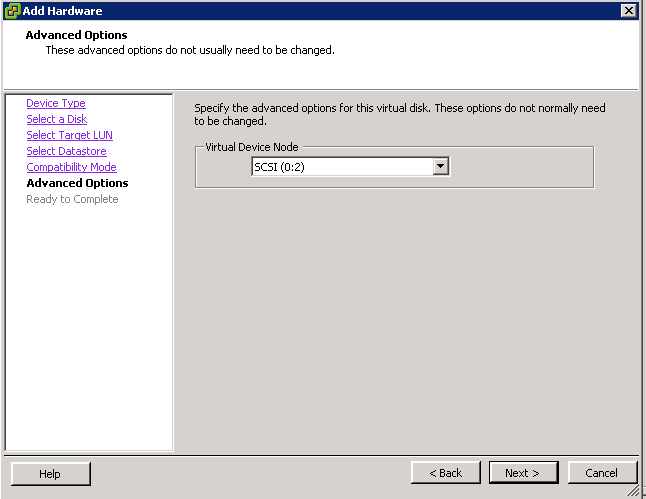
  • In Advanced Options, select the same SCSI ID that the first VM containing the RDM is on
  • Click Finish and the Edit Settings box will come up again
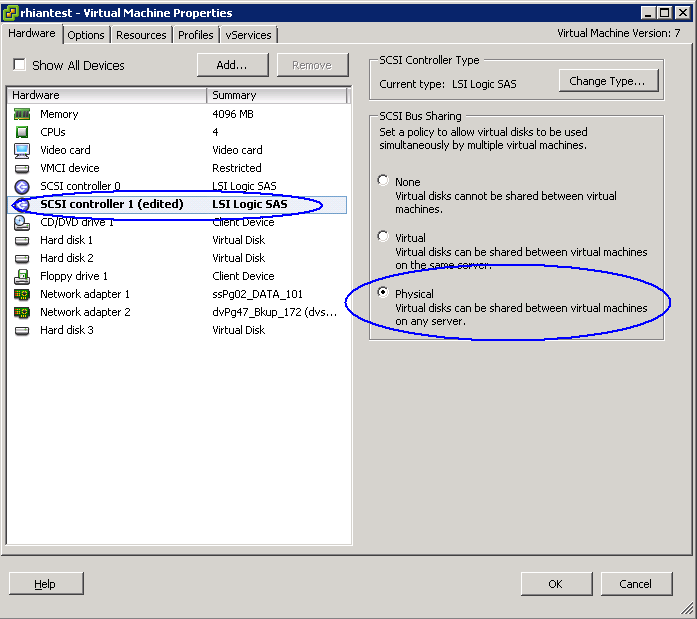
  • You need to change the SCSI Bus Sharing on the Controller to Physical to Allow Sharing

rdm12

  • Click OK
  • You should now have a shared RDM between 2 VMs
  • Power on the VMs

Problems: Incompatible Device backing for device 0

We actually encountered an issue where we tried to accept the settings on the second VM and got the following error message

lun

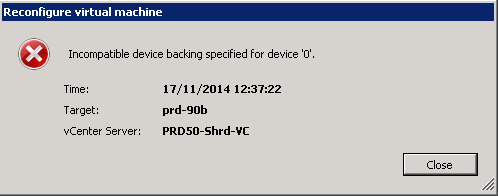
We resolved it by having a member of our storage team recreating the LUNS we needed to add on the SAN. When sharing MSCS RDM LUNs between nodes, ensure that the LUNs are uniformly presented across all ESXi/ESX hosts. Specifically, the LUN ID for each LUN must be the same for all hosts.

In our case with VMware and Windows clusters we use the IBM v7000 GUI to map the LUNs which is easier – It assigns the first available SCSI ID. No issues with these Operating Systems.
But with Red Hat it didn’t work, because it uses SCSI ID together with WWNs. So we had to use v7000 CLI to map the LUNs with one and the same SCSI ID to every host

 If the LUN IDs are not the same across hosts, contact your storage admin, team or storage vendor to change the LUN ID appropriately. It is a better practice to assign the LUN to a new, previously unused ID and present the LUN under the new ID to the cluster.

Deleting a VM with Raw Disk Mappings

How do you delete a VM with Raw Disk Mappings?

To the best of my knowledge, if you delete the VM it will only delete the pointer file and you would have to delete the RDM on the SAN.

Before deleting the VM, you could always click on Edit Settings and select the RDM and Remove Disk – Delete from disk. This should delete both the pointer file and the RDM.

VMware RDMs

What is RAW Device Mapping?

A Raw Device Mapping allows a special file in a VMFS volume to act as a proxy for a raw device. The mapping file contains metadata used to manage and redirect disk accesses to the physical device. The mapping file gives you some of the advantages of a virtual disk in the VMFS file system, while keeping some advantages of direct access to physical device characteristics. In effect it merges VMFS manageability with raw device access

A raw device mapping is effectively a symbolic link from a VMFS to a raw LUN. This makes LUNs appear as files in a VMFS volume. The mapping file, not the raw LUN is referenced in the virtual machine configuration. The mapping file contains a reference to the raw LUN.

Note that raw device mapping requires the mapped device to be a whole LUN; mapping to a partition only is not supported.

Uses for RDM’s

  • Use RDMs when VMFS virtual disk would become too large to effectively manage.

For example, When a VM needs a partition that is greater than the VMFS 2 TB limit is a reason to use an RDM. Large file servers, if you choose to encapsulate them as a VM, are a prime example. Perhaps a data warehouse application would be another. Alongside this, the time it would take to move a vmdk larger than this would be significant.

  • Use RDMs to leverage native SAN tools

SAN snapshots, direct backups, performance monitoring, and SAN management are all possible reasons to consider RDMs. Native SAN tools can snapshot the LUN and move the data about at a much quicker rate.

  • Use RDMs for virtualized MSCS Clusters

Actually, this is not a choice. Microsoft Clustering Services (MSCS) running on VMware VI require RDMs. Clustering VMs across ESX hosts is still commonly used when consolidating hardware to VI. VMware now recommends that cluster data and quorum disks be configured as raw device mappings rather than as files on shared VMFS

Terminology

The following terms are used in this document or related documentation:

  • Raw Disk — A disk volume accessed by a virtual machine as an alternative to a virtual disk file; it may or may not be accessed via a mapping file.
  • Raw Device — Any SCSI device accessed via a mapping file. For ESX Server 2.5, only disk devices are supported.
  • Raw LUN — A logical disk volume located in a SAN.
  • LUN — Acronym for a logical unit number.
  • Mapping File — A VMFS file containing metadata used to map and manage a raw device.
  • Mapping — An abbreviated term for a raw device mapping.
  • Mapped Device — A raw device managed by a mapping file.
  • Metadata File — A mapping file.
  • Compatibility Mode — The virtualization type used for SCSI device access (physical or virtual).
  • SAN — Acronym for a storage area network.
  • VMFS — A high-performance file system used by VMware ESX Server.

Compatibility Modes

Physical Mode RDMs

  • Useful if you are using SAN-aware applications in the virtual machine
  • Useful to run SCSI target based software
  • Physical mode is useful to run SAN management agents or other SCSI target based software in the virtual machine
  • Physical mode for the RDM specifies minimal SCSI virtualization of the mapped device, allowing the greatest flexibility for SAN management software. In physical mode, the VMkernel passes all SCSI commands to the device, with one exception: the REPORT LUNs command is virtualized, so that the VMkernel can isolate the LUN for the owning virtual machine. Otherwise, all physical characteristics of the underlying hardware are exposed.

Virtual Mode RDMs

  • Advanced file locking for data protection
  • VMware Snapshots
  • Allows for cloning
  • Redo logs for streamlining development processes
  • More portable across storage hardware, presenting the same behavior as a virtual disk file

Setting up RDMs

  •  Right click on the Virtual Machine and select Edit Settings
  • Under the Hardware Tab, click Add
  • Select Hard Disk
  • Click Next
  • Click Raw Device Mapping

If the option is greyed out, please check the following.

http://kb.vmware.com/RDM Greyed Out

  • From the list of SAN disks or LUNs, select a raw LUN for your virtual machine to access directly.
  • Select a datastore for the RDM mapping file. You can place the RDM file on the same datastore where your virtual machine configuration file resides,
    or select a different datastore.
  • Select a compatibility mode. Physical or Virtual
  • Select a virtual device node
  • Click Next.
  • In the Ready to Complete New Virtual Machine page, review your selections.
  • Click Finish to complete your virtual machine.

Note: To use vMotion for virtual machines with enabled NPIV, make sure that the RDM files of the virtual machines are located on the same datastore. You cannot perform Storage vMotion or vMotion between datastores when NPIV is enabled.

What machines can you “not” Storage vMotion

VMware Storage VMotion is a component of VMware vSphere™that provides an intuitive interface for live migration of virtual machine disk files within and across storage arrays with no downtime or disruption in service. Storage VMotion relocates virtual machine disk files from one shared storage location to another shared storage location with zero downtime, continuous service availability and complete transaction integrity. StorageVMotion enables organizations to perform proactive storage migrations, simplify array migrations, improve virtual machine storage performance and free up valuable storage capacity.Storage VMotion is fully integrated with VMware vCenter Server to provide easy migration and monitoring.

How does it work

1. Before moving a virtual machines disk file, Storage VMotion moves the “home directory” of the virtual machine to the new location. The home directory contains meta data about the virtual machine (configuration, swap and log files).

2. After relocating the home directory, Storage VMotion copies the contents of the entire virtual machine storage disk file to the destination storage host, leveraging “changed block tracking” to maintain data integrity during the migration process.

3. Next, the software queries the changed block tracking module to determine what regions of the disk were written to during the first iteration, and then performs a second iteration of copy, where those regions that were changed during the first iteration copy (there can be several more iterations).

4. Once the process is complete, the virtual machine is quickly suspended and resumed so that it can begin using the virtual machine home directory and disk file on the destination datastore location.

5. Before VMware ESX allows the virtual machine to start running again, the final changed regions of the source disk are copied over to the destination and the source home and disks are removed.

What machines can you not Storage vMotion?

1. Virtual machines with snapshots cannot be migrated using Storage vMotion

2. Migration of virtual machines during VMware Tools installation is not supported

3. The host on which the virtual machine is running must have a license that includes Storage vMotion.

4. ESX/ESXi 3.5 hosts must be licensed and configured for vMotion. ESX/ESXi 4.0 and later hosts do not require vMotion configuration in order to perform migration with Storage vMotion.

5. The host on which the virtual machine is running must have access to both the source and target datastores

6. Virtual machine disks in non-persistent mode cannot be migrated

7. Clustered applications or clustered virtual machine configurations do not support Storage vMotion.

8. For vSphere 4.0 and higher, Virtual Disks and Virtual RDM pointer files can be relocated to a destination datastore, and can be converted to thick provisioned or thin provisioned disks during migration as long as the detsination is not an NFS Datastore

9. Physical Mode Pointer files can be relocated to the destination datastore but cannot be converted