Archive for June 2015

Installing Windows 2012 RDS Roles (License Server, Connection Broker, RD Session Host and RD Web Access)

terminal

Instructions

  • Log into your server
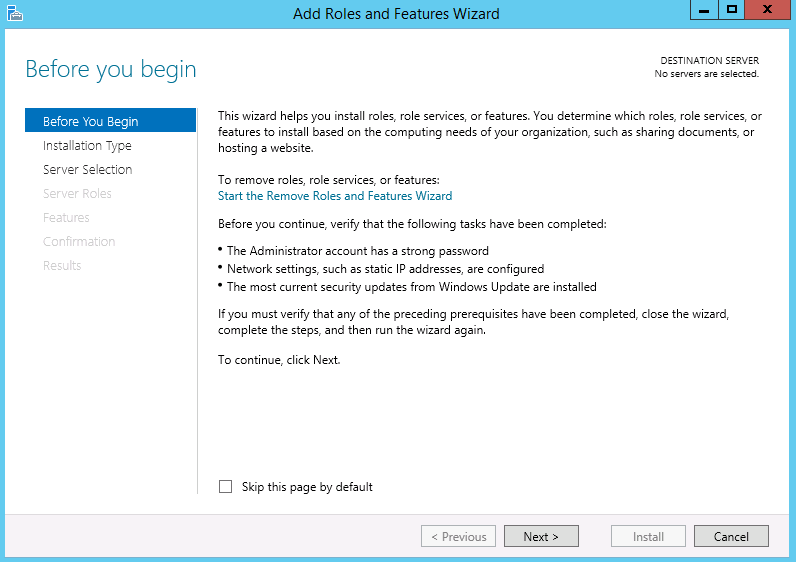
  • Click on Dashboard and under Configure this local server, select Add roles and features

TS1

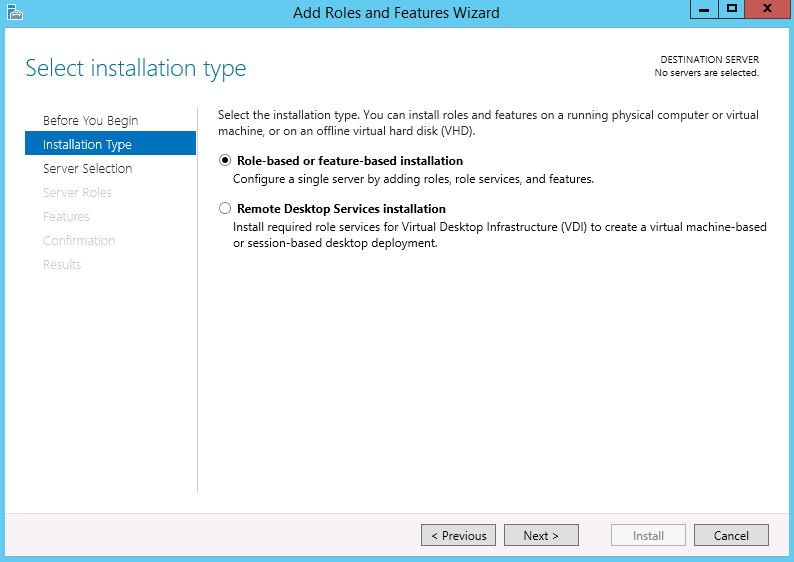
  • Choose Role based or feature-based installation

TS2

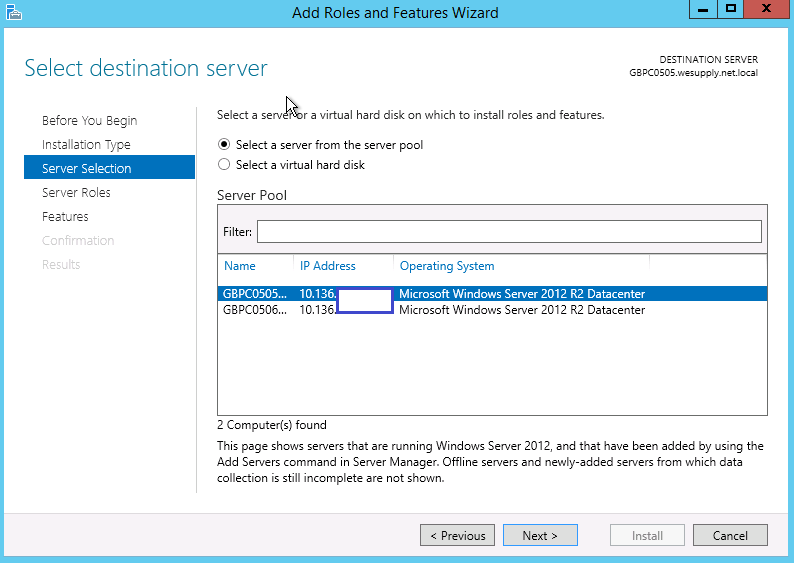
  • Select the destination server for these roles

TS3

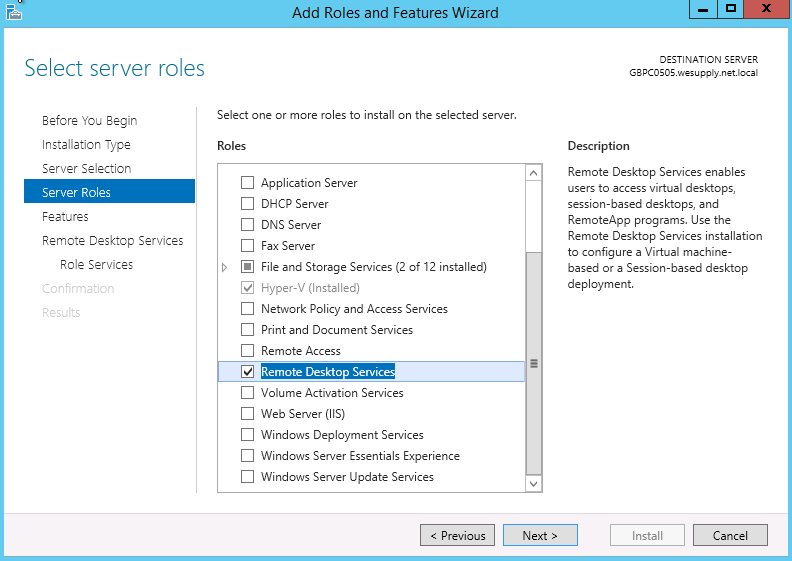
  • Select Remote Desktop Services. Click Next

TS4

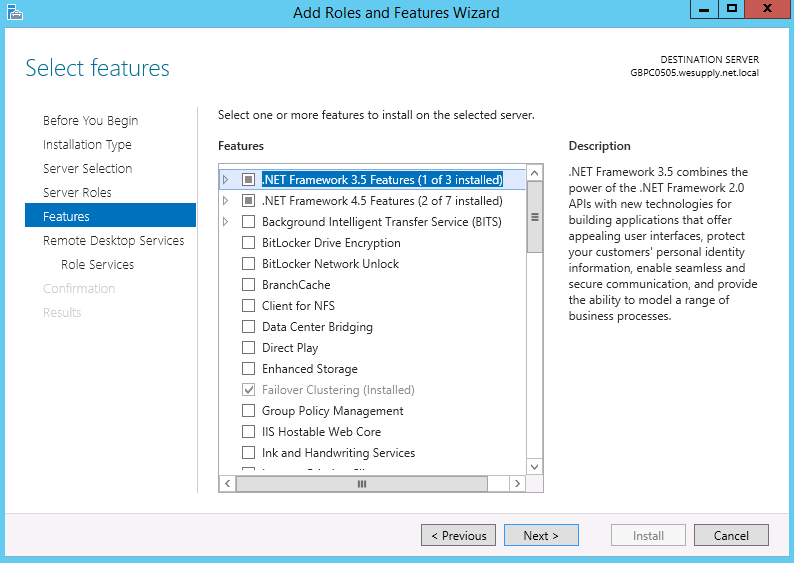
  • Select any features as required

TS5

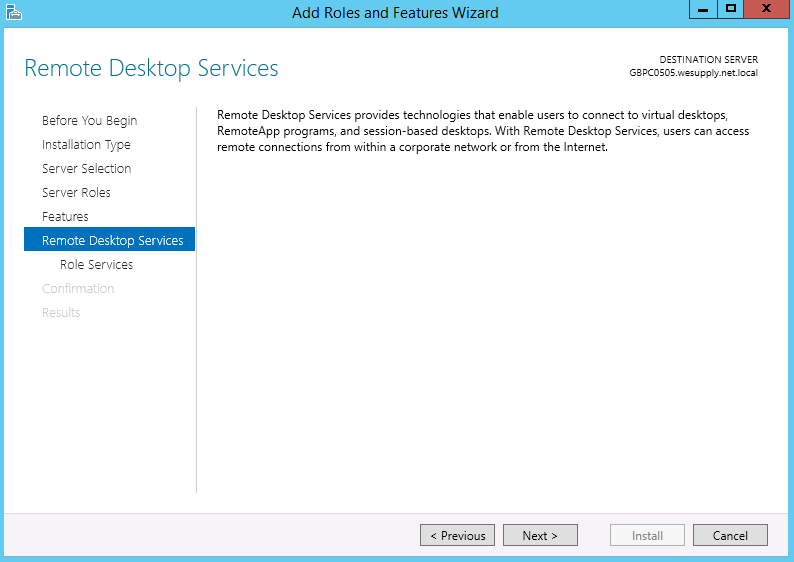
  • Read the description and click Next

TS6

  • Select Role Services
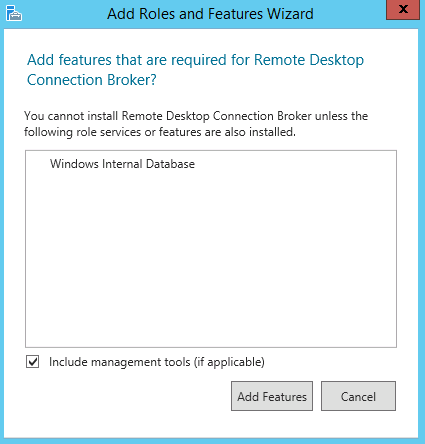
  • If you choose the Connection Broker role, it will prompt you to install Windows Internal Database

TS7

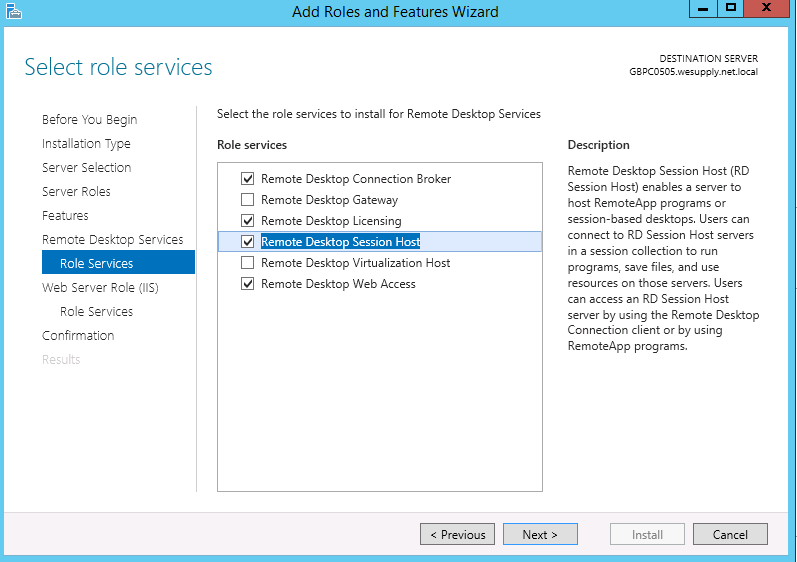
  • Choose the RDS Services you need. Note. I am installing 4 roles today

TS8

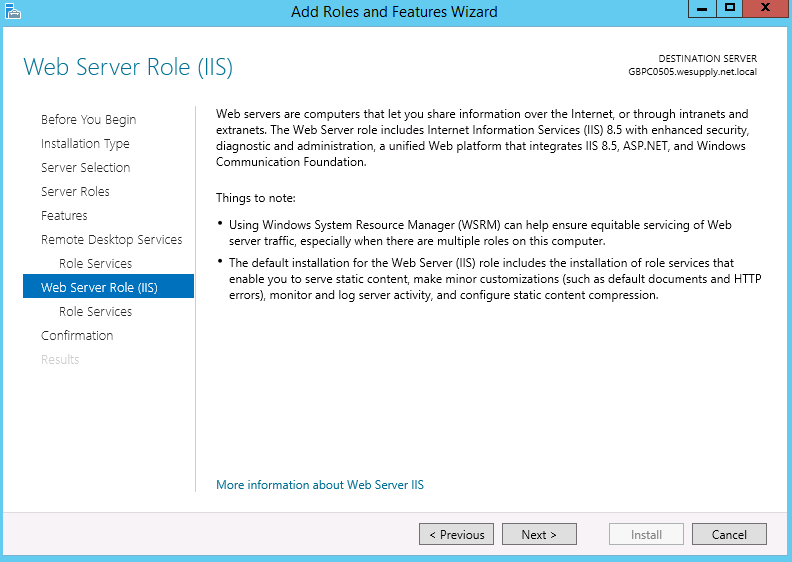
  • You will see a Web Server (IIS) page. Click Next

TS9

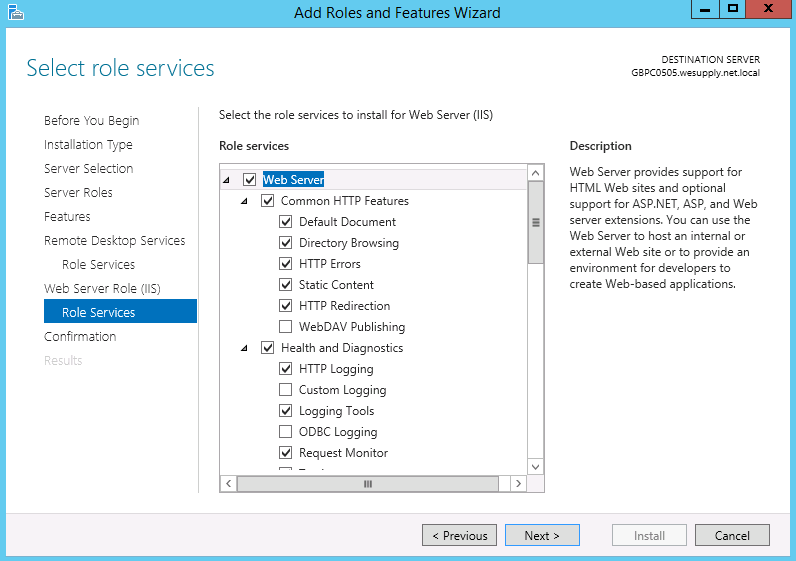
  • Select Role Services. This shows the IIS role services. Leave as they are for now.

TS10

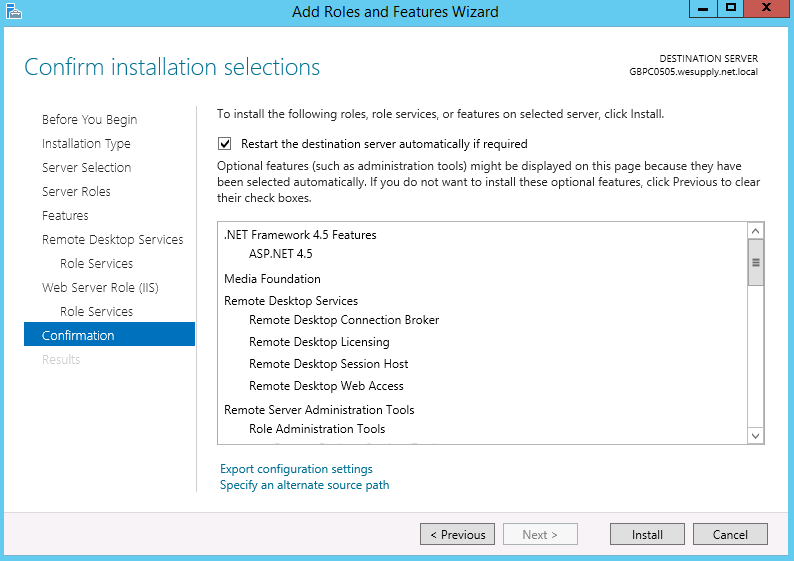
  • Check the Confirm Installation Selections Page. I would tick Restart the destination server automatically if required.

TS11

  • To Activate the Licensing Server, Go to Tools > Terminal Services and Launch Remote Desktop Licensing Manager.
  • You will see it is not activated

TS12

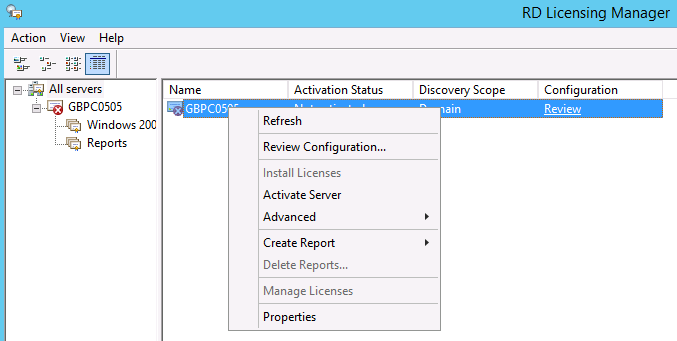
  • Right click on the server and select Activate Server

TS13

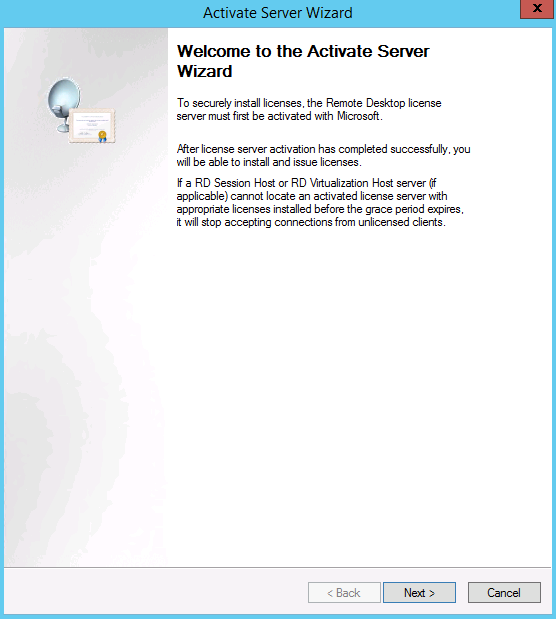
  • This will bring up the Welcome to the Activate Server Wizard

TS14

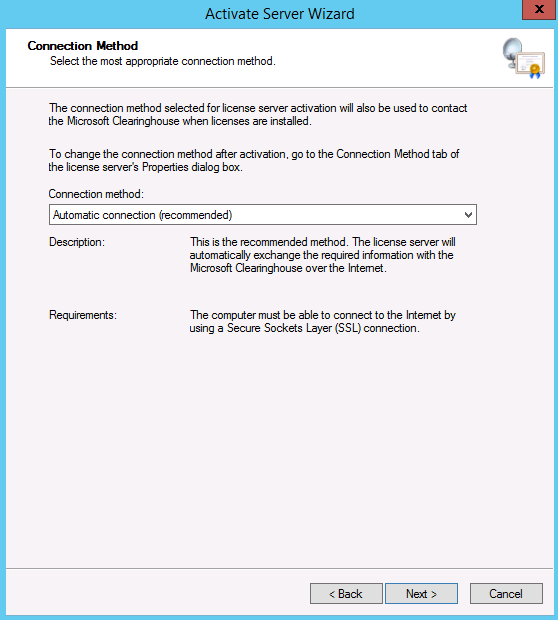
  • You will now see the Connection Method screen

TS15

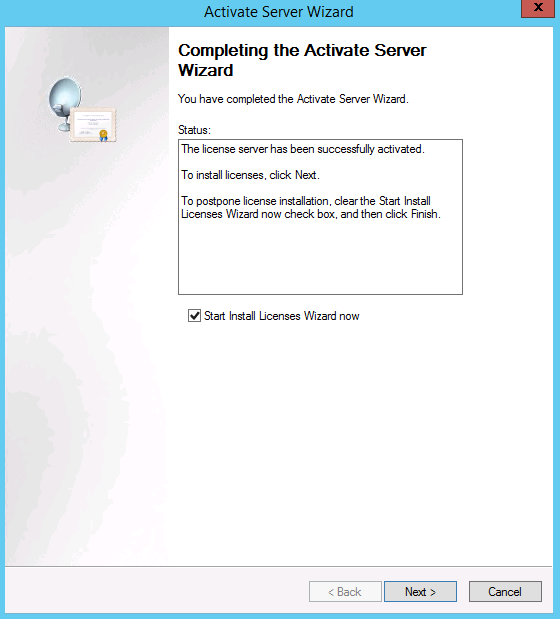
  • You will need to fill in your company information followed by some optional information. When you have done this click Next. It should then activate your server and ask you if you want to install Licenses

TS16

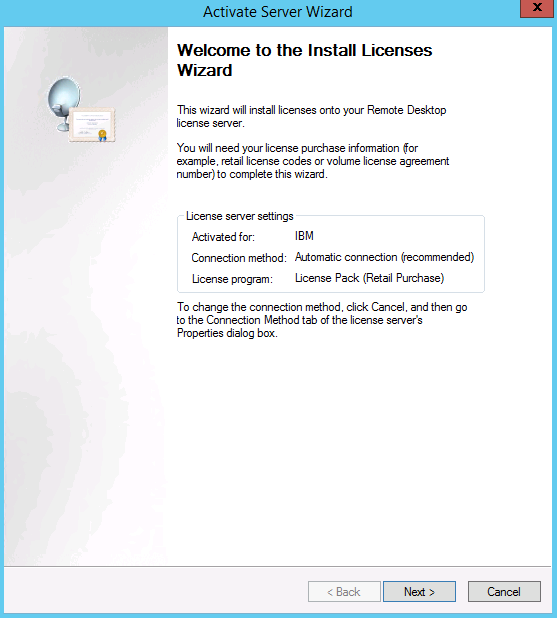
  • You will now see the Welcome to the Install Licenses Wizard
  • Note you can go try to go through this as we did but it didn’t work with web enrolment. It may work with your setup
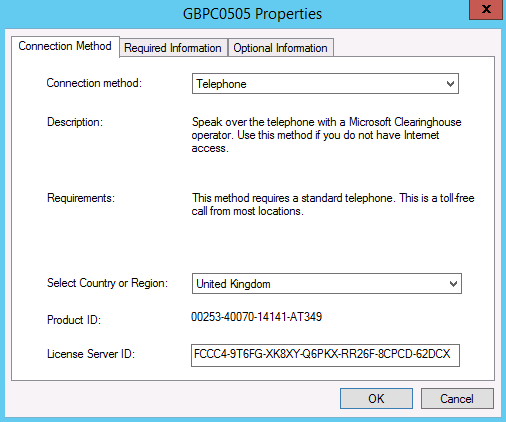
  • We had to go back to the Licensing manager and right click on the server > select properties and then change the connection method to Telephone and activate our TS User CALs this way.
  • We the used the below link to call Microsoft to activate our licenses who then gave us back a product key to put in the Install Licenses wizard.

TS17

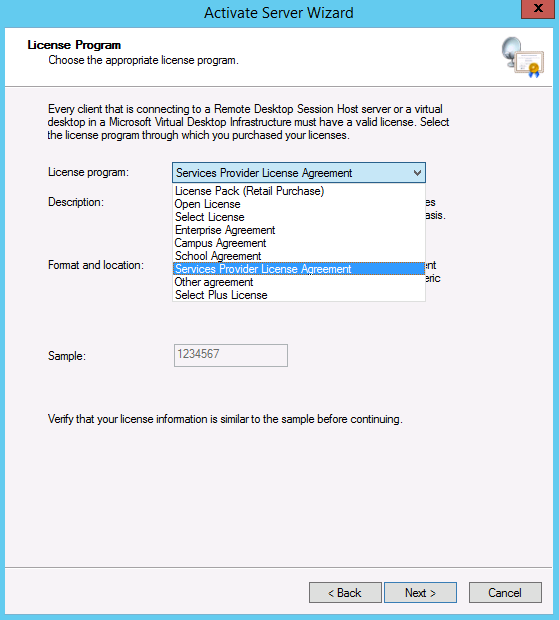
  • You will now see the License Program Page
  • Select your License Program. In our case it is Service Provider License Agreement
  • Depending on what option you select you will require enrollment numbers or agreement numbers etc

TS21

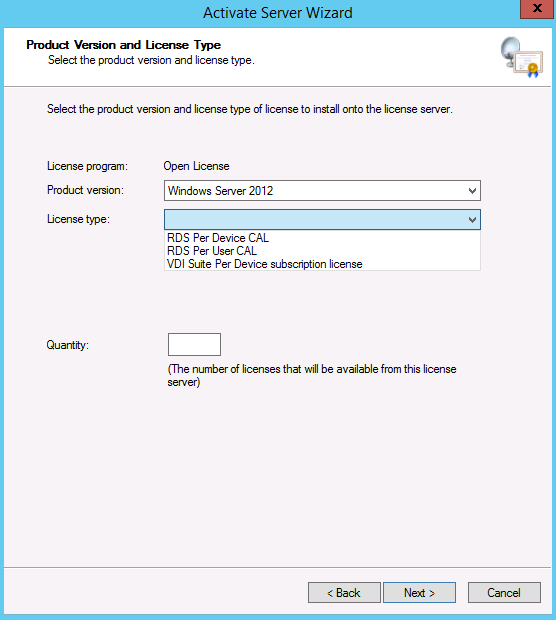
  • Choose your O/S
  • Choose whether it is Per Device/Per User or VDI Suite.
  • In our case it was 20 Per User Licenses

TS20

  • Click Next and you will see
  • Now go back to your RD Licensing Manager screen and click on Review.

TS22

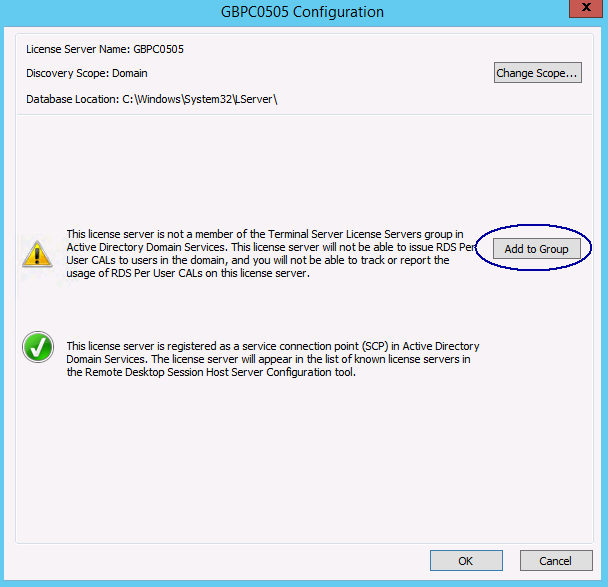
  • You will see this page

TS23

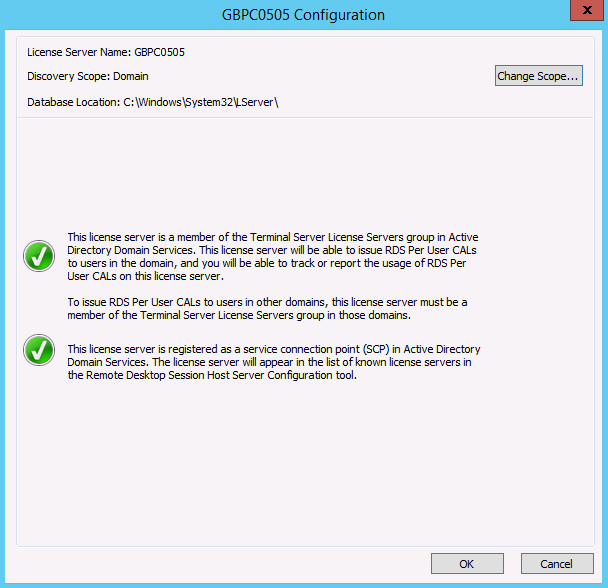
  • You need to be a Domain Admin to add the license server to the Terminal Servers group in AD

TS24

  • Note at this point if you haven’t managed to activate your user CALs then this the point I mentioned earlier about going to the properties of the server and selecting telephone, phoning Microsoft and getting a key from them to put in the Install Licensing Wizard

TS25

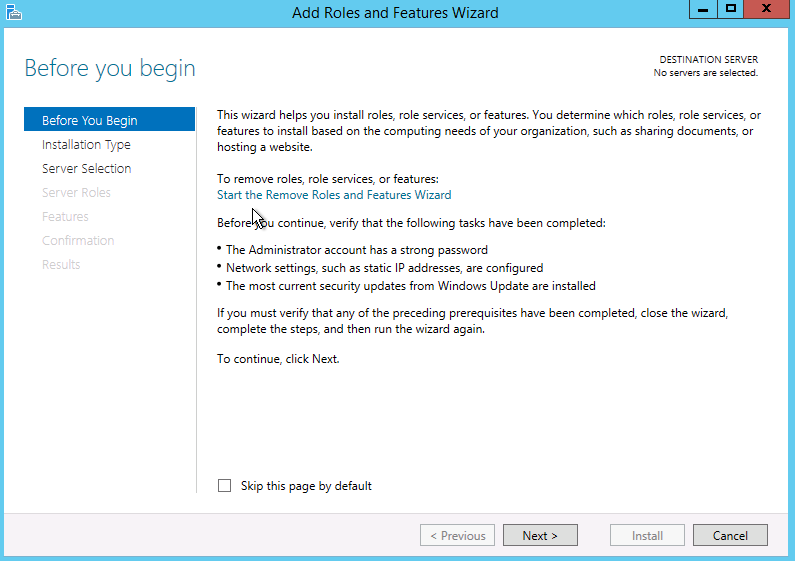
  • Next go back to your 2012 Dashboard and select Add Roles and Features

TS26

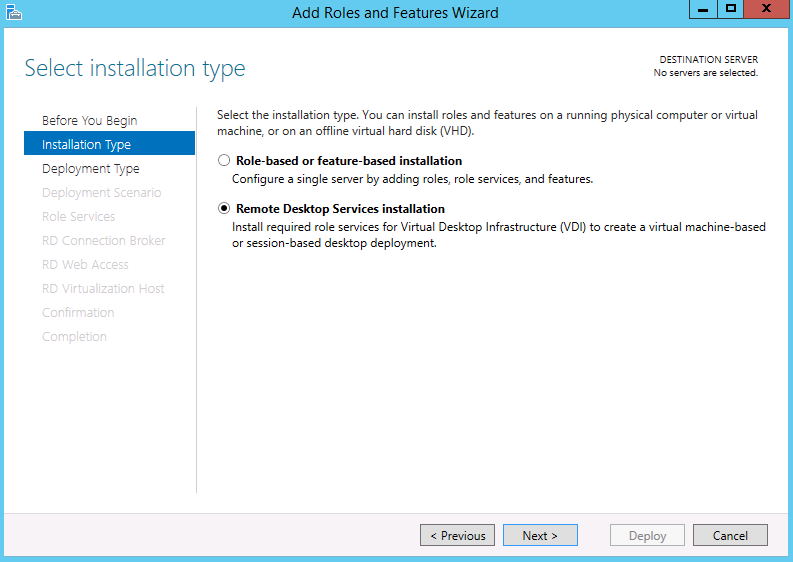
  • Choose Remote Desktop Services Installation

TS28

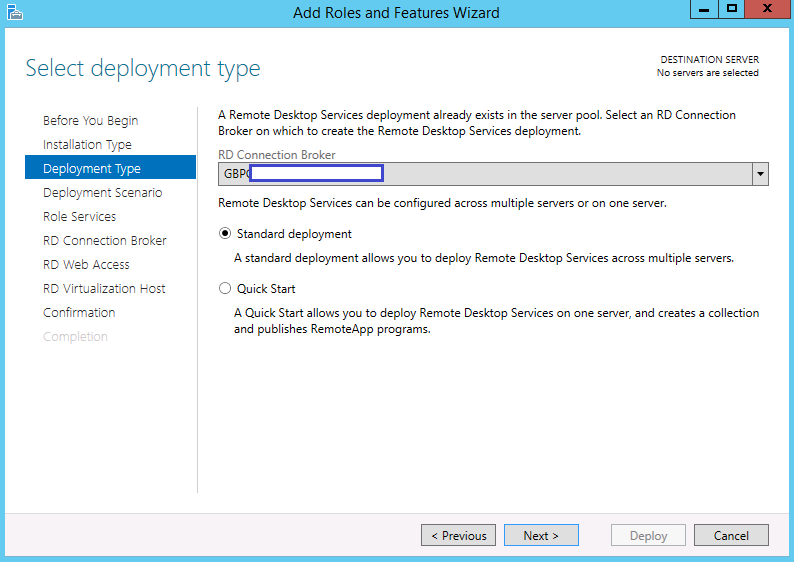
  • You will now be on the Select Deployment Type page. Select your broker server and choose Standard Deployment

TS29b

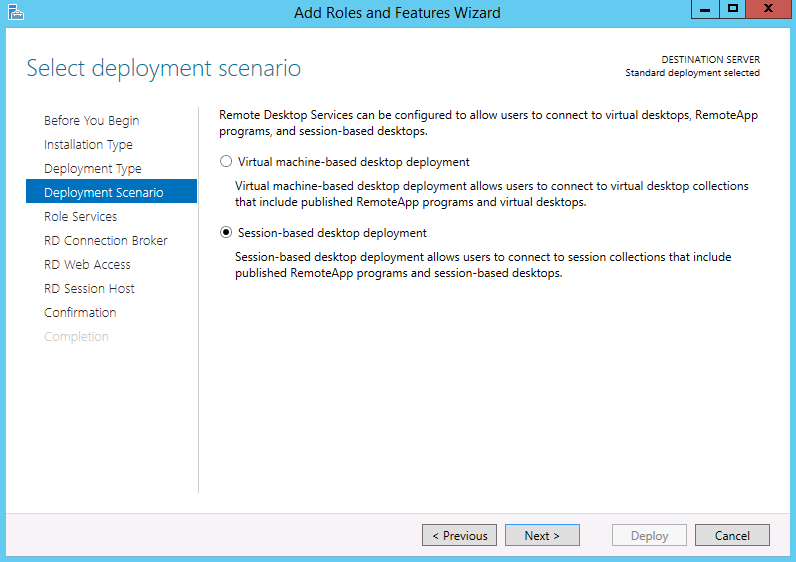
  • On the Select Deployment Scenario choose Session-based desktop deployment

TS30

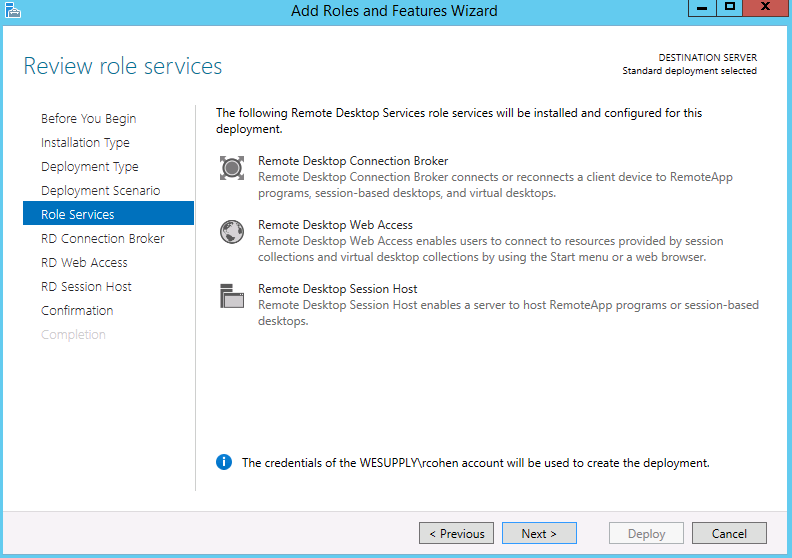
  • You will find that the roles we previously installed will come up here
  • Click Next

TS31

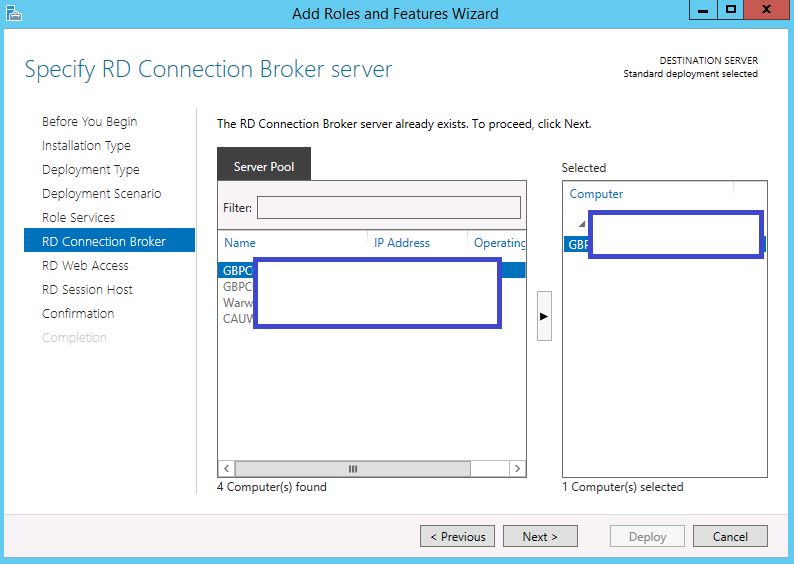
  • It will say the RD Connection Broker Server already exists
  • Click Next

TS32b

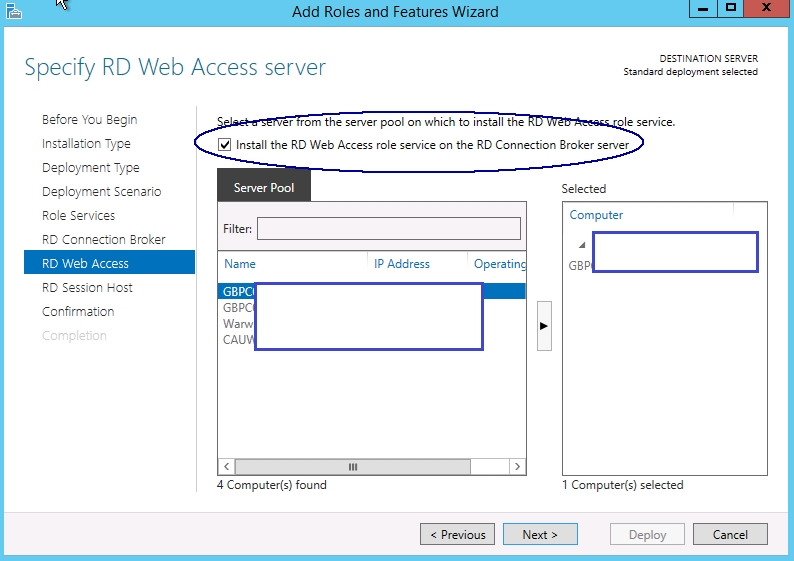
  • On the Specify RD Web Access Server, put a tick in the box which says “Install the RD Web Access role service on the RD Connection Broker server

TS33b

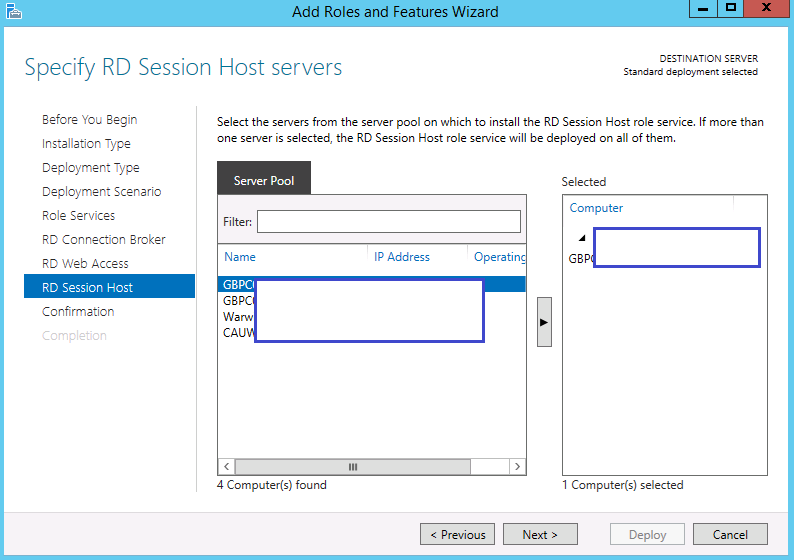
  • On the Specify RD Session Host servers, select the machine you want the RDS Session host role to be on

TS34

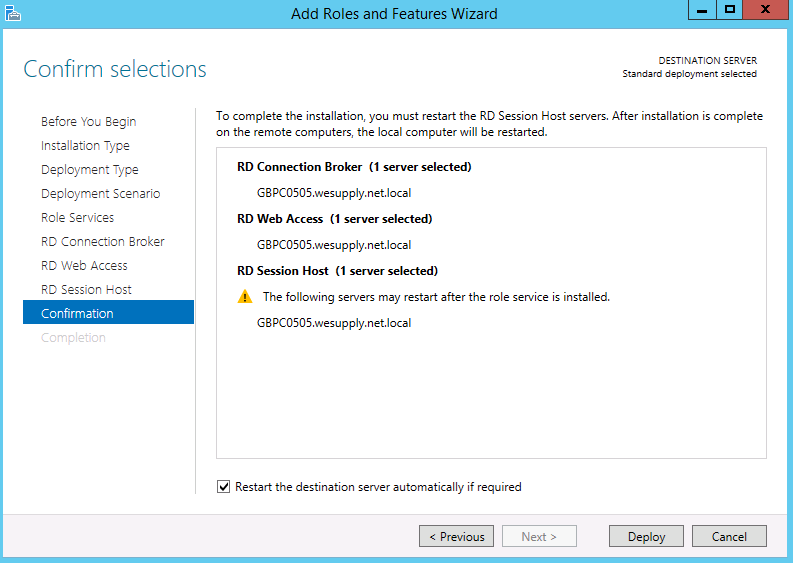
  •  Check the Confirm Selections and tick to Restart the destination server automatically if required followed by clicking on Deploy

TS35

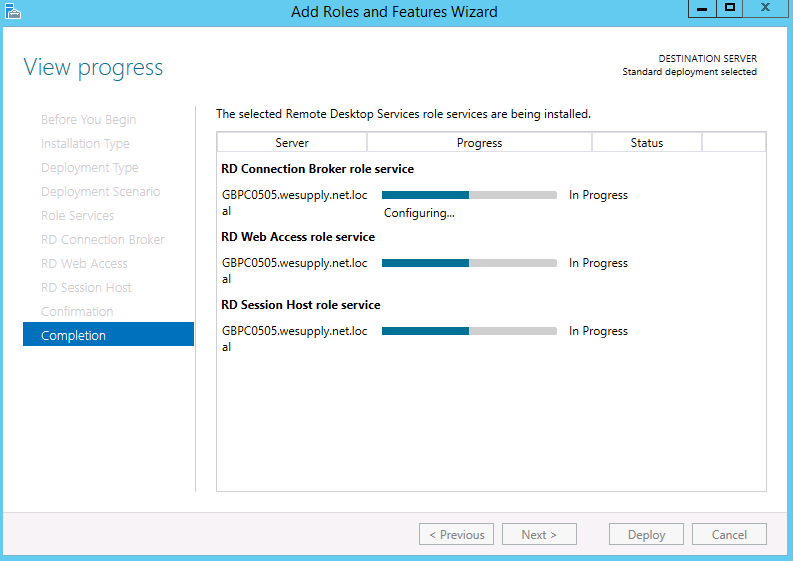
  • It should start to install

TS36

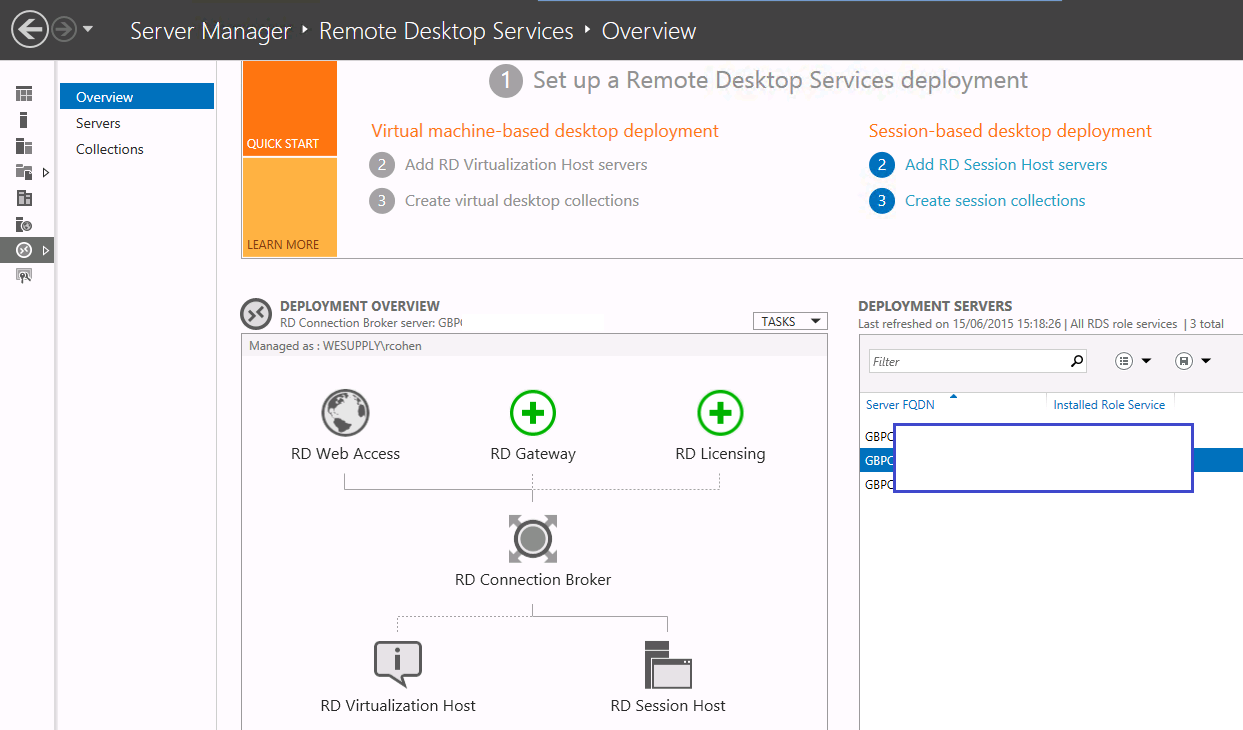
  • Once the RDS Roles are installed, we see the graphical description of our environment, the roles installed on each of the servers and the FQDN names of each server on the Overview page
  • In case you are trying to find the tools that used to be available on a server running the RD Session Host….You can stop looking. The tools Remote Desktop Session Host Configuration and Remote App Manager have been removed from the RD Session Host role in Windows Server 2012. Instead, most of the settings can now be configured using the new Server Manager console, or using the new PowerShell module RemoteDeskop. For other settings, you can still use GPO’s.

TS38

  • Next, we will configure the Session Host
  • Go to Server Manager > Remote Desktop Services > Overview
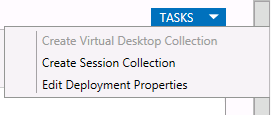
  • Click on RD Session Host > Tasks > Edit Deployment Properties
  • Ignore RD Gateway
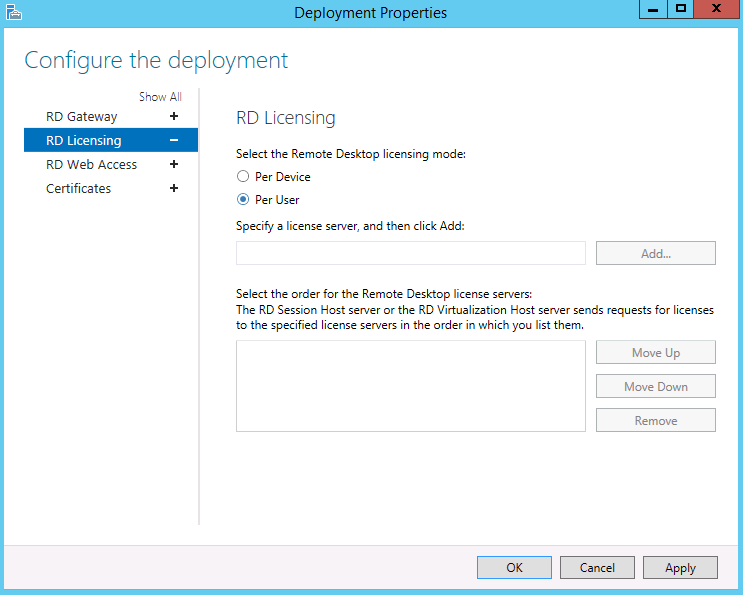
  • On the RD Licensing page select your licensing mode and put in your license server

TS37

  • You can check your RD License Server configuration in Powershell by running the below

TS40

  • You may find that your licensing errors and says “The licensing mode for the remote desktop session host server is not configured”
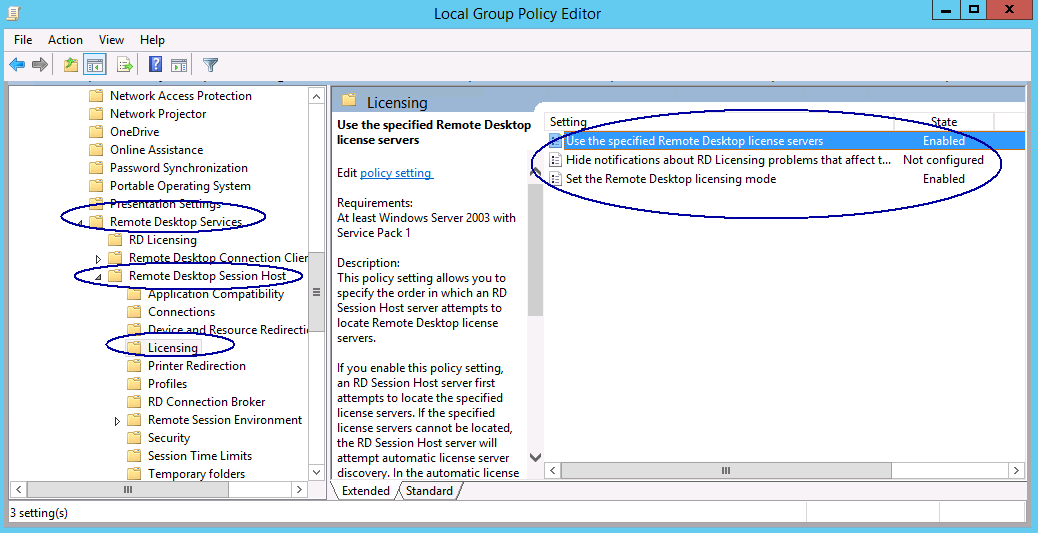
  • If this is the case, you will need to open gpedit.msc and navigate to the 2 locations below
  • Navigate until : Computer Configuration | Administrative Template | Windows Components | Remote Desktop Services | Remote Desktop Session Host | Licensing
  • Modify Use the specified Remote Desktop License Servers and put in the license server
  • Modify the Remote Desktop Licensing mode to Per User or Per Device depending on your agreement
  • Computer Configuration > Administrative Templates > Windows Components > Remote Desktop Services > Remote Desktop Session Host > Licensing

TS51

  • Next On to Session Collections.
  • Go to Server Manager > Remote Desktop Services > Collections
  • Note: The Connection Broker connects and reconnects users to their virtual desktops, RemoteApp-published applications and session-based desktops. It’s a mandatory RDS component in Windows Server 2012, and it’s installed by default when you deploy Remote Desktop Services. The Connection Broker load-balances requests to RD Session Host servers in a session collection or to virtual desktop pools
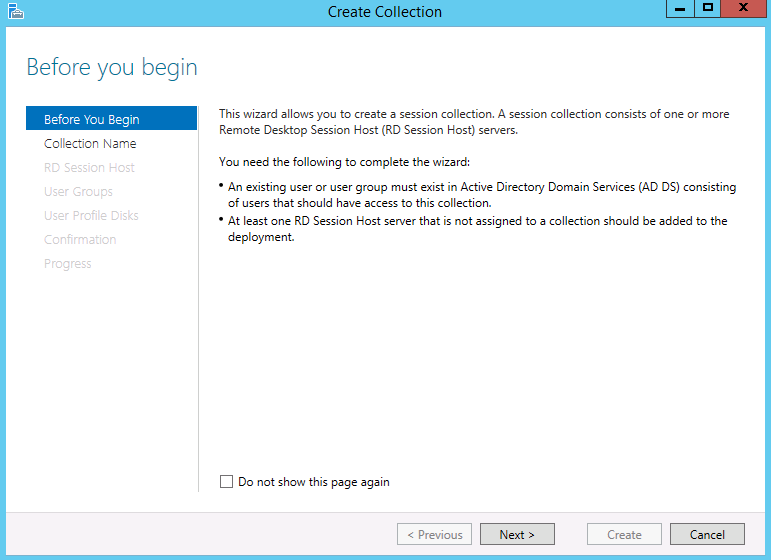
  • Click Tasks > Create Session Collection
  • Collections are a logical grouping of Remote Desktop Servers that provides either session-based or virtual machine-based (VDI) deployments.
  • Each Session host that’s a member of an RDS collection is limited to only participating in one collection.

TS41

  • Click Next

TS42

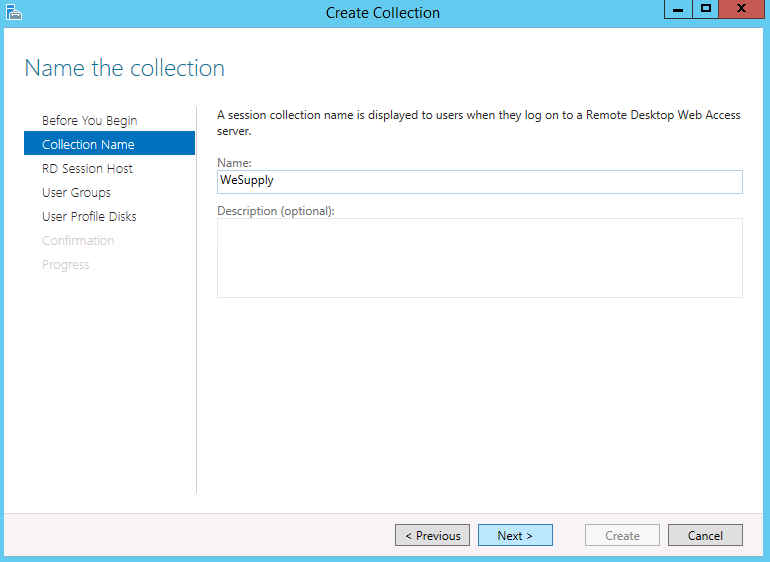
  • Put in a name and description

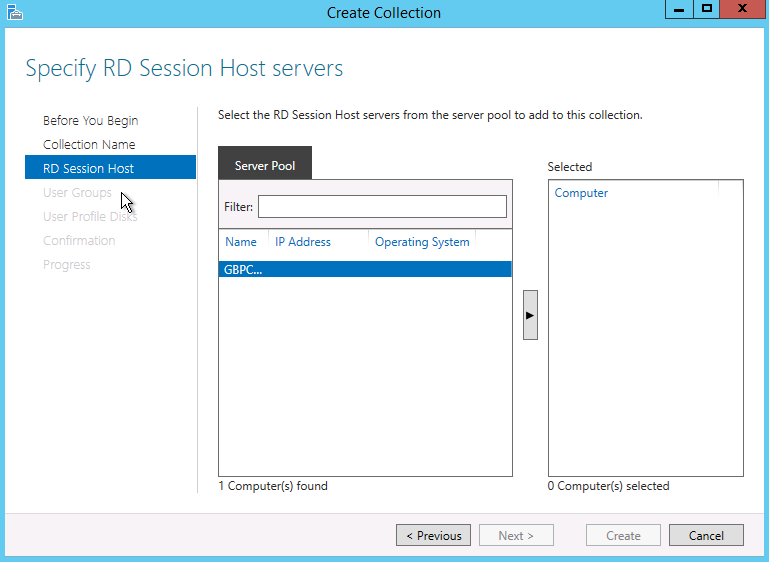
TS43

  • Specify the RD Session Hosts you want to add to this collection

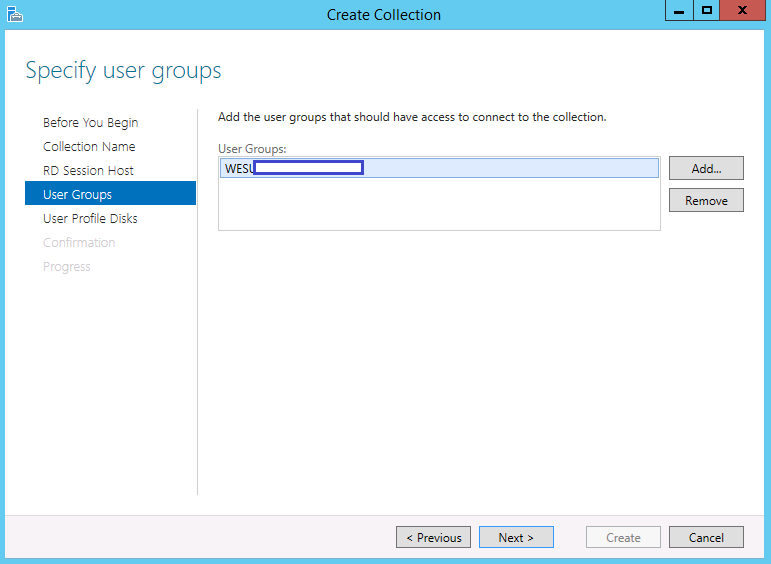
TS44

  • Specify the User Groups

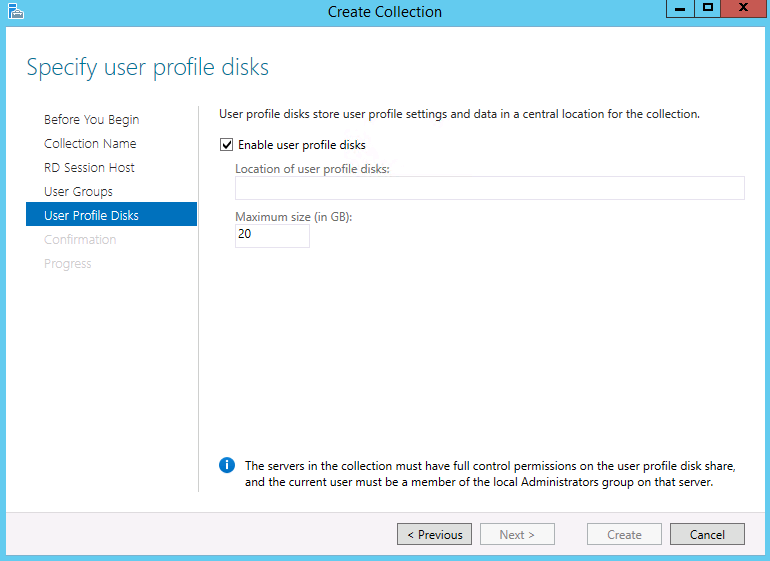
TS45

  • Specify user profile disks – Uncheck the Enable user Profile Disks checkbox and hit next.

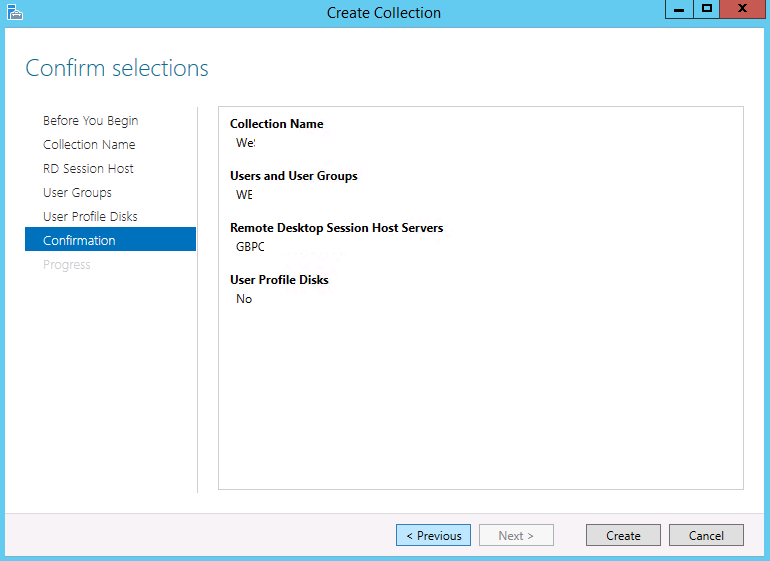
TS46

  • Confirm Selections

TS47

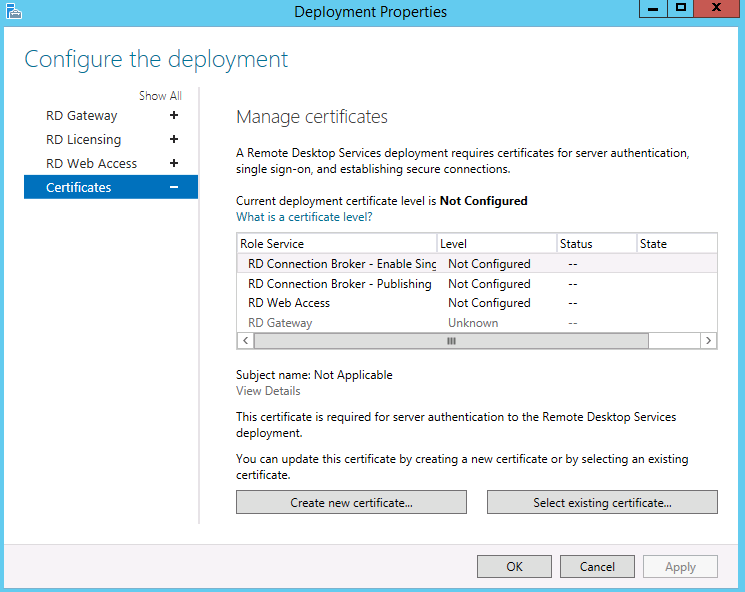
  • You might also want to look into certificates which is accessed from Server Manager > Remote Desktop Services > Overview > Tasks > Edit Deployment Properties

TS48

  • Select Certificates

TS50

  • More information can be found on Microsoft’s webpages 🙂

Some other important information

We also had 2 Terminal servers in this setup which were on a different network. I had to do the following

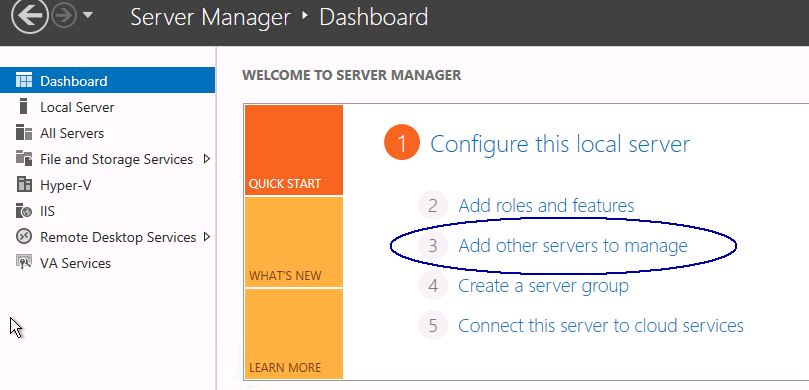
  • Go to Server Overview
  • Go to Add other Servers to manage

TS52

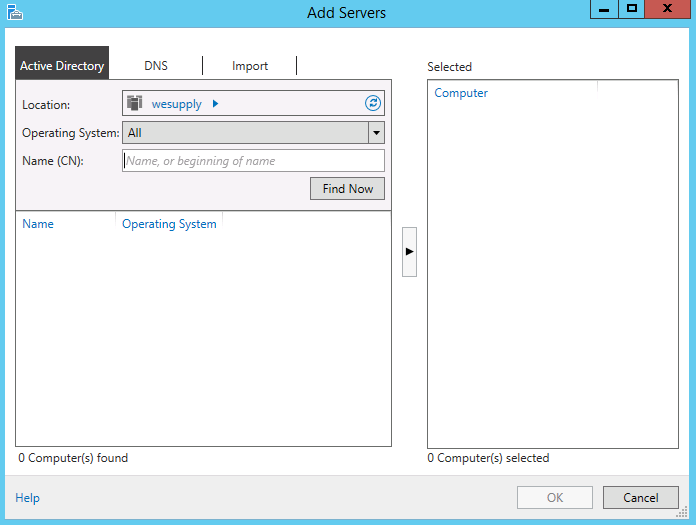
  • Search and add the servers you need

TS53

  • Once these are added, Go to Server Manager > Remote Desktop Services and add these servers which should now appear. Be careful as it will install the RD Session host role and will reboot the servers.

Load Balancing

If you want full load balancing, your users can use RD Web Access. The GUI for the remote desktop client (on any platform) does not have a way to specify the collection. Connecting to the RD Connection Broker will not load balance, nor would connecting to any RD Session Host server directly. You can manually edit an .rdp file to specify the collection and that process works, but is convoluted for end users. RD Web Access has become the preferred method for disseminating .rdp connection info in 2012 to accommodate the change to collections and the RDCB role.

RD LIcensing Manager

You may notice there is an expiry period on issued licenses in RD LIcensing Manager

RD-Licensing-Expiry

The time is based on the minimum transfer rights in the license agreement which is a Service Provider Agreement. (IBM’s licensing agreement from Microsoft) In this case 60 days.

The license agreement is a part of the purchase. It varies by region and by how you purchased it. It is a legally binding document and describes how the purchased product can be used. For example, an OEM server license offend includes the stipulation that it cannot be transferred to a new machine at all. The discounted OEM pricing benefit comes at the cost of reduced mobility.

For CALs, it is common to see restrictions stating that a CAL can only be transferred to a new user every 60/90/120 days. This allows you to reassign a CAL in the event a user had to be dismissed, but prevents abuse by using one user CAL for multiple shift users by claiming “I transfer the CAL every 8 hours.”

SO in theory you buy the amount of licenses for the amount of users you have. So say you have 20 licenses and 20 users log in and take a license. If for some reason a 21st person logs in, the system will allow it because it will assign a temporary CAL however this is a breach of your license agreement until another CAL expires and is released after the 60 days. Note that TS/RDS CALs are *not* legally licensed by concurrent users, but by TOTAL users. So if you have 50 users, but only expect 17 to be logged on at a time. You still need 50 CALs. Not 10, or even 20. The same applies to device licensing and device CALs. You pay for total devices, not concurrent devices. Which in the era of mobility, BYOD, and similar trends, can be an unknown, making user licensing more flexible in most (but not all) circumstances.

Other good links

http://ryanmangansitblog.com/2013/09/27/rds-2012-deployment-and-configuration-guides/

http://pdfs.loadbalancer.or/Microsoft_Remote_Desktop_Services_Deployment_Guide.pdf

 

Reset Integrated Management Module (IMM) or Remote Supervisor Adaptor (RSA)

imm7

What is the IMM/RSA

IBM Integrated Management Module (IMM) comprises the legacy BMC (baseboard management processor) and RSA (Remote Supervisor Adapter) function in IBM uEFI machines. It also consolidates Super I/O controller, Video controller. It also incorporates most of the bugs present in RSA and BMC, as well as providing many of its own, unique problems. This works with System firmware (Unified Extensible Firmware Interface) to provide system management functions. some of its greatly improved features over BMC and RSA are:
  • Advanced Predictive Failure Analysis (PFA)
  • Option to choose dedicated or shared Ethernet connection
  • Virtual light path diagnostic
  • Email alerts
  • Remote firmware updating
  • Remote power control, remote control of hardware and Operating system
  • OS failure screen shot capture
  • Remote disk which enables to use CD/DVD drive, USB flash drives, image and diskette drive

The Issue

What I’ve found is sometimes these IMM addresses become uncontactable. They will ping and they will allow an nslookup but you simply can’t connect to them over a normal web interface. It will just time out.

The Fix

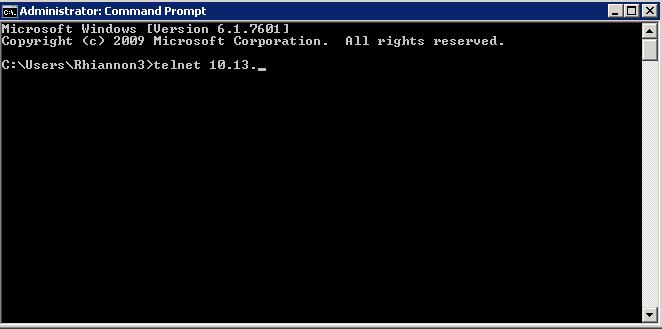
There is a nice easy fix for this which is to telnet into the IMM IP Address and run a command to reset the connection. Note this does not wipe any settings, It is simply a command to reboot the IMM.

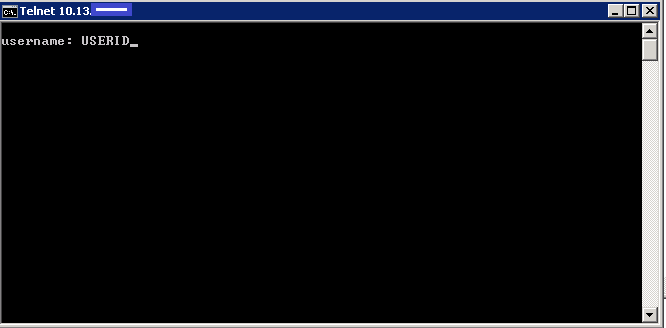
  • Telnet into you IMM

IMM1

  • Put in your Username. I used the default USERID account

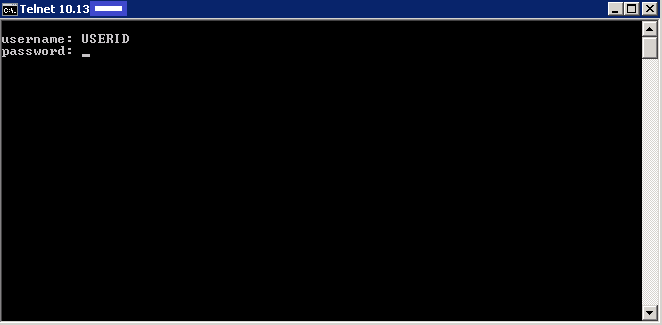
IMM2

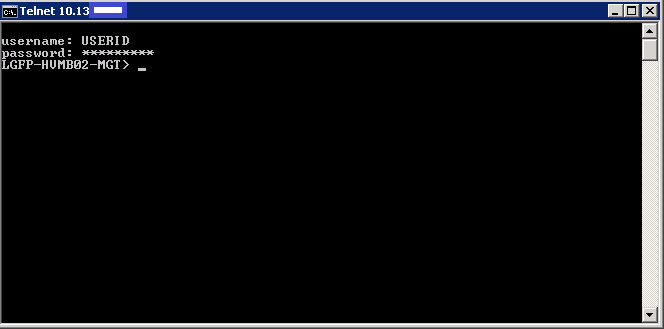
  • Put in the password for the USERID account

IMM3

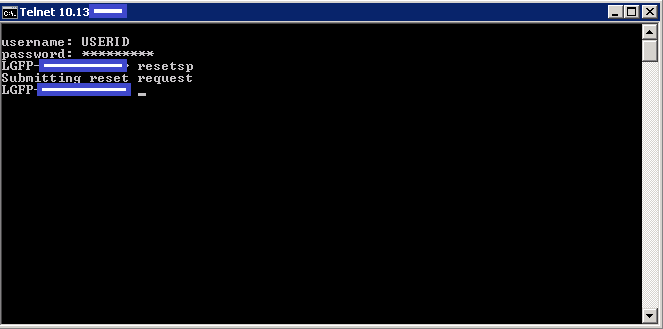
  • Type in resetsp to reset/refresh the IMM Nic

IMM4

  • Leave it a couple of mins and it should say Submitting reset request or say it has been done

IMM5

  • Test out the web connection to your IMM using https://<IP Address> or https://<DNS Name of IMM>

IMM6

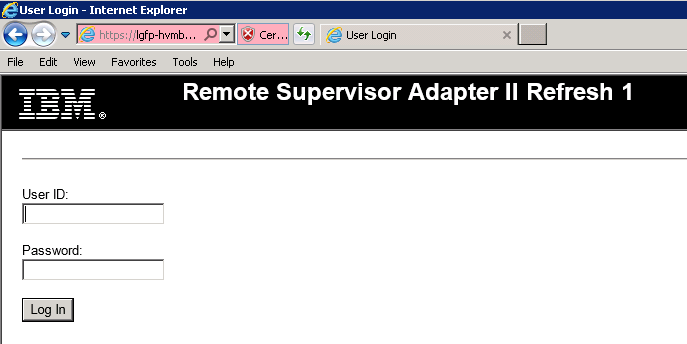
  • Hopefully this is what you should see.
  • We did have 2 that wouldn’t even connect via telnet. In this case I would reboot the whole server to refresh the connections
  • 🙂

An alternative

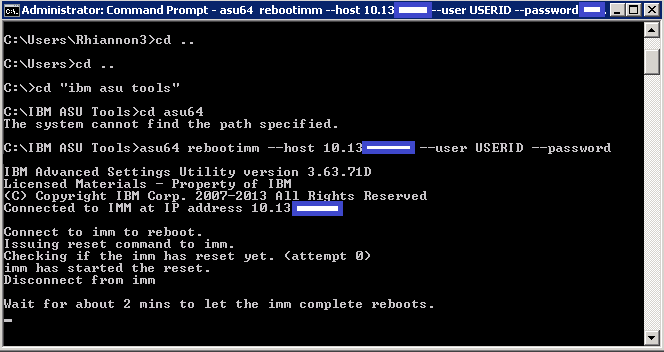
IBM provide a utility called ASU (Advanced Settings Utility) You can download and install this and use the command line. Here is an example below

IMM8


NTFS File/Folder and Path Limits

ntfs

What is a file system?

A file system is a part of the operating system that determines how files are named, stored, and organized on a volume. A file system manages files and folders, and the information needed to locate and access these items by local and remote users. NTFS, short for New Technology File System, is a file system that was introduced by Microsoft in 1993 with Windows NT 3.1.

Benefits of NTFS

  • Increasing reliability

NTFS uses its log file and checkpoint information to restore the consistency of the file system when the computer is restarted in the event of a system failure. In the event of a bad-sector error, NTFS dynamically remaps the cluster containing the bad sector and allocates a new cluster for the data, as well as marking the cluster as bad and no longer using it. For example, by formatting a POP3 mail server with NTFS, the mail store can offer logging and recovery. In the event of a server crash, NTFS can recover data by replaying its log files.

  • Increasing security

NTFS allows you to set permissions on a file or folder, and specify the groups and users whose access you want to restrict or allow, and then select the type of access. NTFS also supports the Encrypting File System (EFS) technology used to store encrypted files on NTFS volumes. Any intruder who tries to access your encrypted files is prevented from doing so, even if that intruder has physical access to the computer. For example, a POP3 mail server, when formatted with an NTFS file system, provides increased security for the mail store, security that would not be available should the server be formatted with the FAT file system.

  • Supporting large volumes

NTFS allows you to create an NTFS volumes as per below

  1. Up to 16 terabytes using the default cluster size (4 KB) for large volumes.
  2. Up to 256 terabytes using the maximum cluster size of 64 KB.
  3. NTFS also supports larger files and more files per volume than FAT File Systems.

Limited space on a volume

If your organization has limited space on a volume, NTFS provides support for increasing storage on a server with limited disk space.

  1. Disk quotas allow you to track and control user disk space usage for NTFS volumes.
  2. NTFS supports compression as well as adding unallocated space from the same disk or from another disk to increase the size of an NTFS volume.
  3. Mounted volumes allow you to mount a volume at any empty folder on a local NTFS volume if you run out of drive letters or need to create additional space that is accessible from an existing folder.

Using features available only in NTFS

NTFS has a number of features that are not available if you are using a FAT file system. These include:

  1. Distributed link tracking. Maintains the integrity of shortcuts and OLE links. You can rename source files, move them to NTFS volumes on different computers within a Windows Server 2003 or Windows 2000 domain, or change the computer name or folder name that stores the target without breaking the shortcut or OLE links.
  2. Sparse files. Large, consecutive areas of zeros. NTFS manages sparse files by tracking the starting and ending point of the sparse file, as well as its useful (non-zero) data. The unused space in a sparse file is made available as free space.
  3. NTFS change journal. Provides a persistent log of changes made to files on a volume. NTFS maintains the change journal by tracking information about added, deleted, and modified files for each volume.
  4. Hard links. NTFS-based links to a file on an NTFS volume. By creating hard links, you can have a single file in multiple folders without duplicating the file. You can also create multiple hard links for a file in a folder if you use different file names for the hard links. Because all of the hard links reference the same file, applications can open any of the hard links and modify the file.
  • Volume Shadow Copy Service

Service that provides an infrastructure for creating highly accurate, point-in-time shadow copies. These copies of a single volume or multiple volumes can be made without affecting the performance of a production server. The Volume Shadow Copy Service can produce accurate shadow copies by coordinating with business applications, backup applications, and storage hardware.

  • Distributed File System (DFS).

Strategic storage management solution in Windows Server 2003 that enables you to group shared folders located on different servers logically by transparently connecting them to one or more hierarchical namespaces.

  • File System Replication (FRS)

Technology that replicates files and folders stored in the SYSVOL shared folder on domain controllers and Distributed File System (DFS) shared folders. When FRS detects that a change has been made to a file or folder within a replicated shared folder, FRS replicates the updated file or folder to other servers

FAT32 and NTFS Limits

FAT32:

  • Maximum disk size: 2 terabytes
  • Maximum file size: 4 gigabytes
  • Maximum number of files on disk: 268,435,437
  • Maximum number of files in a single folder: 65,534

NTFS:

  • Maximum disk size: 256 terabytes
  • Maximum file size: 256 terabytes
  • Maximum number of files on disk: 4,294,967,295
  • Maximum number of files in a single folder: 4,294,967,295

File Path Lengths

In the Windows API, the maximum length for a path is MAX_PATH, which is defined as 260 characters. A local path is structured in the following order: drive letter, colon, backslash, name components separated by backslashes, and a terminating null character. For example, the maximum path on drive D is “D:\some 256-character path string” where “” represents the invisible terminating null character for the current system codepage. (The characters < > are used here for visual clarity and cannot be part of a valid path string.)

The Windows API has many functions that also have Unicode versions to permit an extended-length path for a maximum total path length of 32,767 characters. This type of path is composed of components separated by backslashes, each up to the value returned in the lpMaximumComponentLength parameter of the GetVolumeInformation function (this value is commonly 255 characters). To specify an extended-length path, use the “\\?\” prefix. For example, “\\?\D:\very long path“.

Long Path Tool

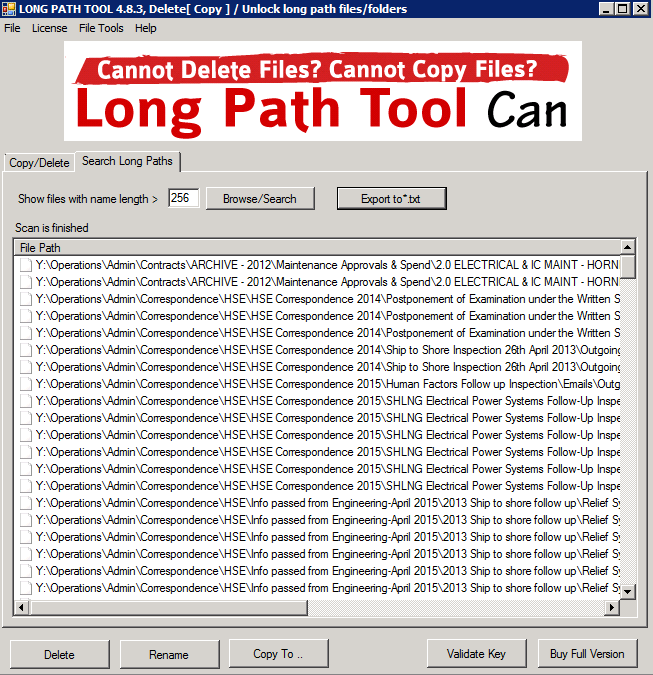
There is a brilliant piece of software called Long Path Tool. This can scan a directory or folder and tell you which paths are over the 256 character limit

http://longpathtool.com/

LongPathTool

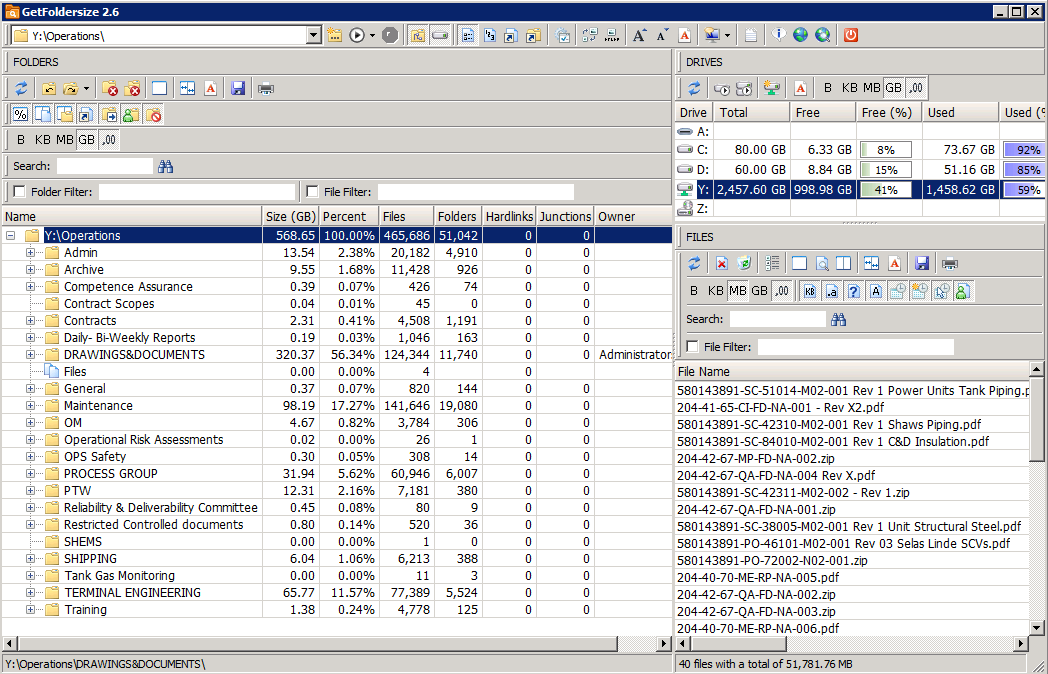
GetFolderSize

This is another piece of free software which can tell you folder and file sizes for a directory and folders

http://www.getfoldersize.com/en_download.htm#info

GetFolderSize

Useful Microsoft Link for detailed NTFS information

https://msdn.microsoft.com/en-us/library/aa365247%28VS.85%29.aspx