Managing vSphere Users
A user is an individual authorized to log in to either ESXi or vCenter Server. ESXi users fall into two categories:
- Authorized vCenter Server users
Authorized users for vCenter Server are those included in the Windows domain list that vCenter Server references or are local Windows users on the vCenter Server host. You cannot use vCenter Server to manually create, remove, or otherwise change users. You must use the tools for managing your Windows domain. Any changes you make are reflected in vCenter Server. However, the user interface does not provide a user list for you to review.
- Direct-access user
Users authorized to work directly on the host are those added to the internal user list by a system administrator. An administrator can perform a variety of management activities for these users, such as changing passwords, group memberships, and permissions as well as adding and removing users.
The user list that ESXi maintains locally is separate from the users known to vCenter Server, which are either local Windows users or users that are part of the Windows domain. If Active Directory authentication has been configured on the host, then the same Windows domain users known to vCenter Server will be available on the ESXi host.
Add a Local User
- Log in to ESXi using the vSphere Client.
- Click the Local Users & Groups tab and click Users.
- Right-click anywhere in the Users table and click Add to open the Add New User dialog box.
- Enter a login, a user name, a numeric user ID (UID), and a password.
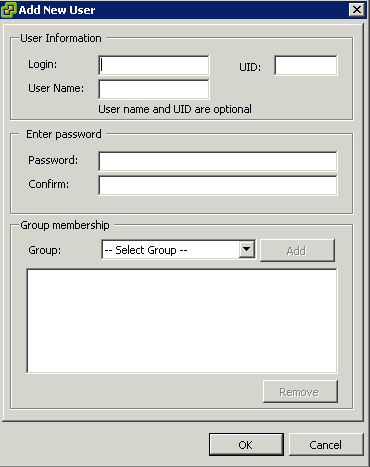
NOTE: Do not create a user named ALL. Privileges associated with the name ALL might not be available to all users in some situations. For example, if a user named ALL has Administrator privileges, a user with ReadOnly privileges might be able to log in to the host remotely. This is not the intended behavior.
- Specifying the user name and UID are optional. If you do not specify the UID, the vSphere Client assigns the next available UID.
- Create a password that meets the length and complexity requirements. The host checks for password compliance using the default authentication plug-in, pam_passwdqc.so. If the password is not compliant, the following error appears: A general system error occurred: passwd: Authentication token manipulation error.
- To change the user’s ability to access ESXi through a command shell, select or deselect Grant shell access to this user.
NOTE: To be granted shell access, users must also have an Administrator role for an inventory object on the host. In general, do not grant shell access unless the user has a justifiable need. Users that access the host only through the vSphere Client do not need shell access.
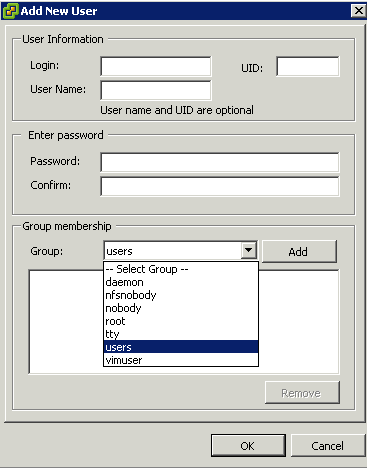
- To add the user to a group, select the group name from the Group drop-down menu and click Add.
- Click OK.
Adding a Group
A group is a set of users that share a common set of rules and permissions. When you assign permissions to a group, all users in the group inherit them, and you do not have to work with the user profiles individually.
The group lists in vCenter Server and the ESXi host are drawn from the same sources as their respective user lists. The group lists in vCenter Server are drawn from the local users or any trusted domain, and the group lists for the host are drawn from the local user list or from any trusted Windows domain.
- Log in to ESXi using the vSphere Client.
- Click the Local Users & Groups tab and click Groups
- Click Add
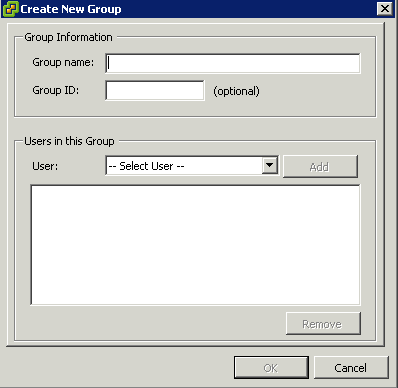
- Enter a Group name
- Specifying the ID is optional. If you do not specify an ID, the vSphere Client assigns the next available group ID.
- Select the Users you want to add to the Group
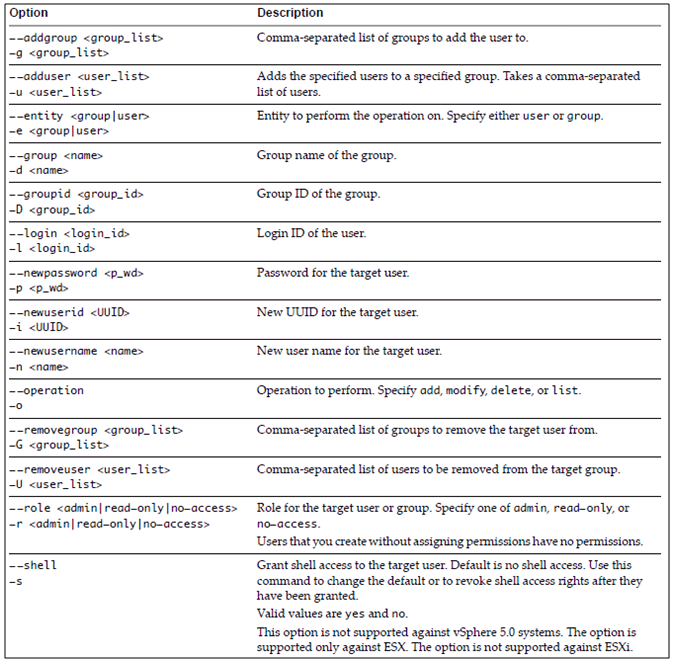
Using Command Line syntax to add/remove users
The vicfg-user command‐specific options manipulate users and groups
Examples
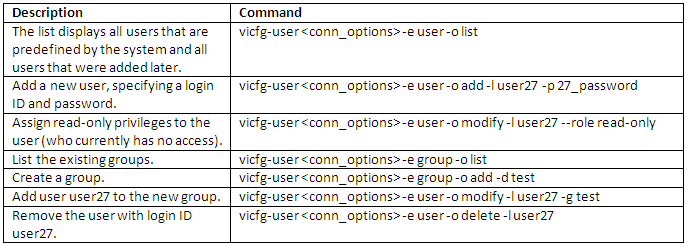
vMA Example