Archive for February 2013

Utilise Update Manager PowerCLI to export baselines for testing

index

Why Export Baselines?

Before you apply patches or extensions to ESX/ESXi hosts, you might want to test the patches and extensions by applying them to hosts in a test environment. You can then use Update Manager PowerCLI to export the tested baselines to another Update Manager server instance and apply the patches and extensions to the other hosts.

Workflow

This workflow describes how to test patches by using one Update Manager instance and how to export the patch baseline containing the tested patches to another Update Manager instance.

Pages are referenced from Installing and Administering VMware vSphere Update Manager

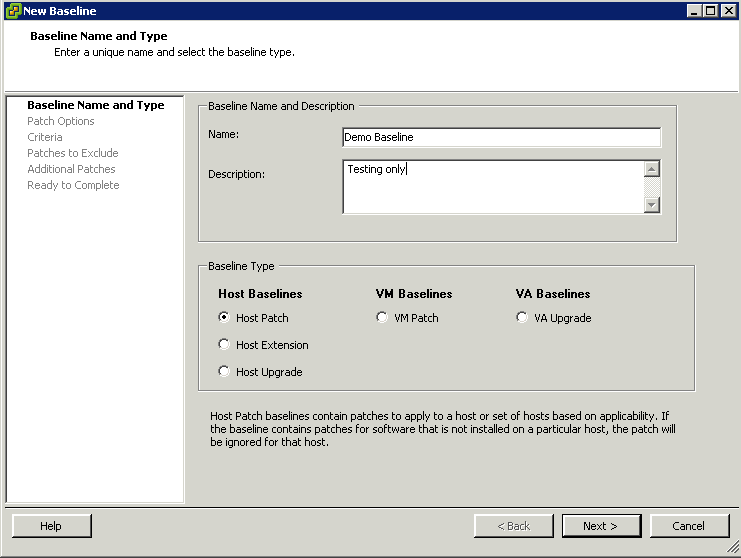
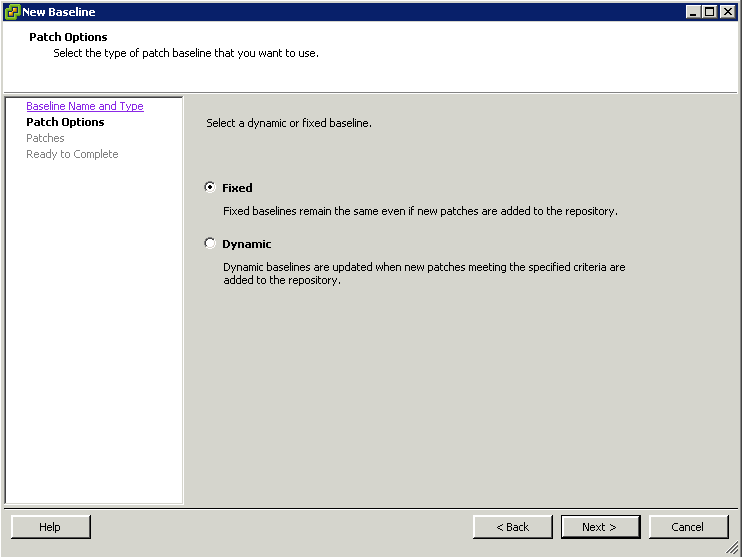
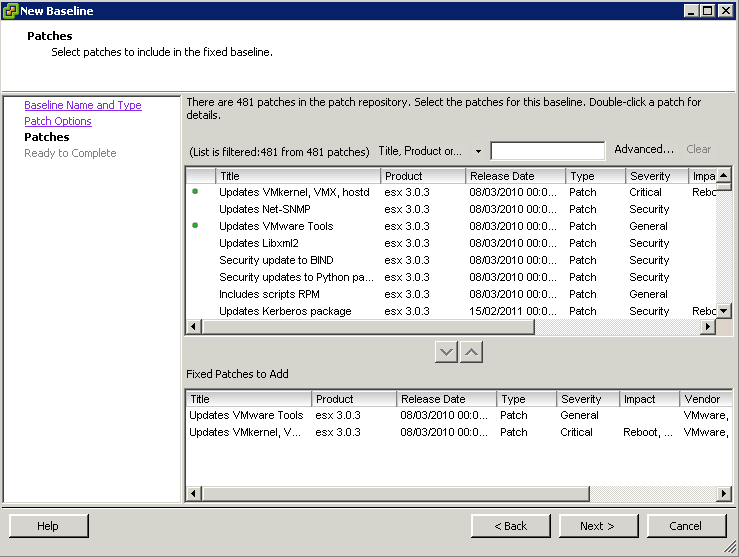
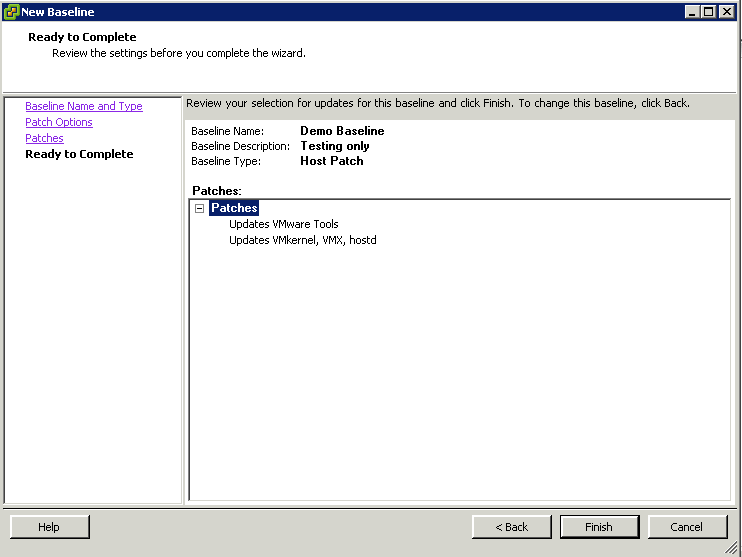
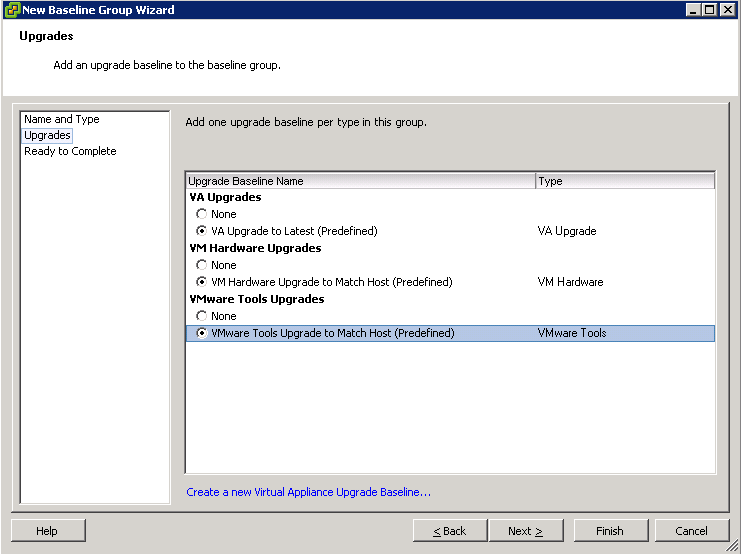
  • Create fixed host patch baselines.

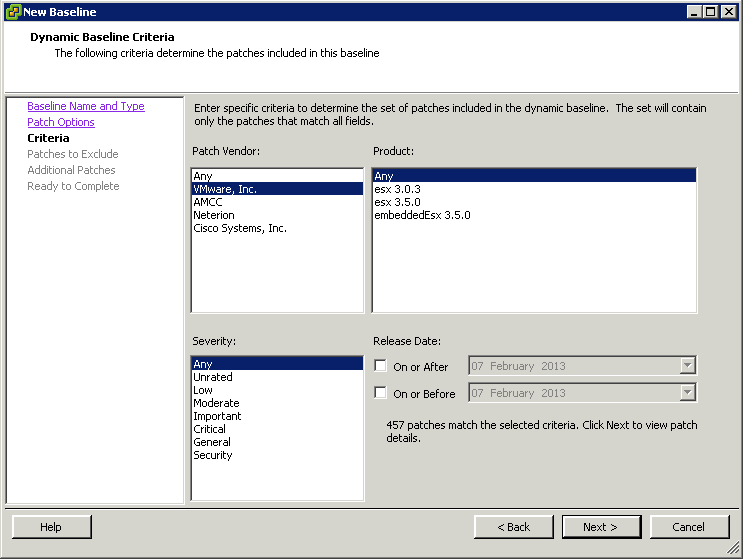
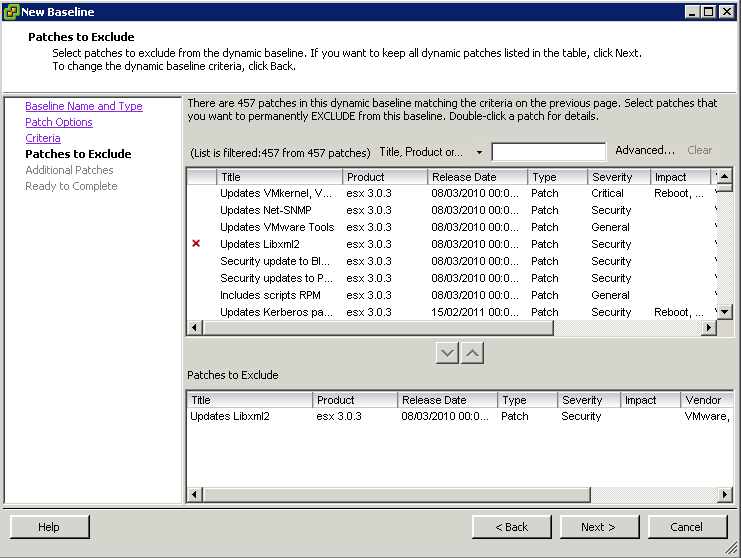
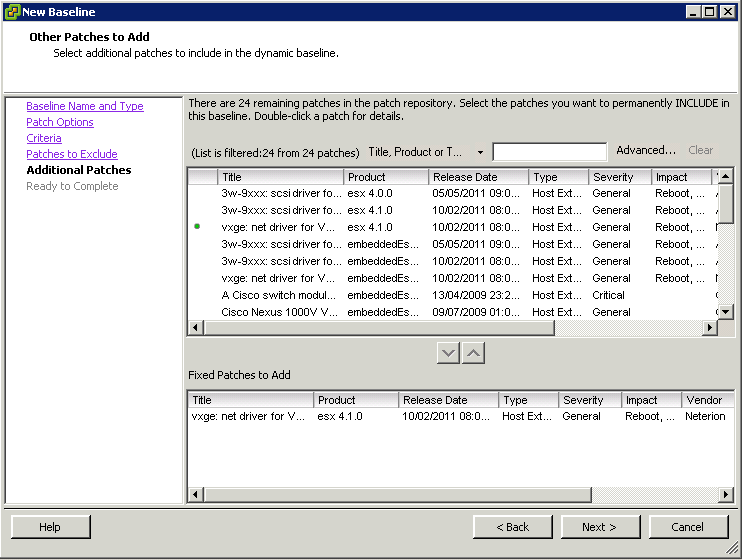
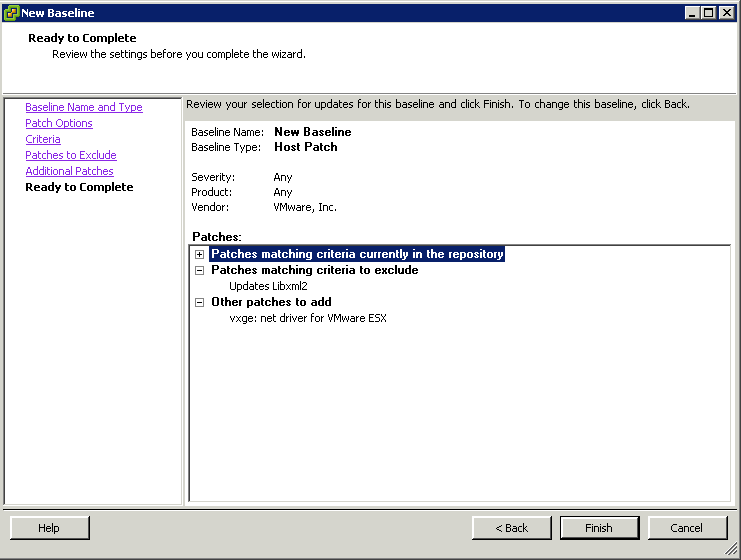
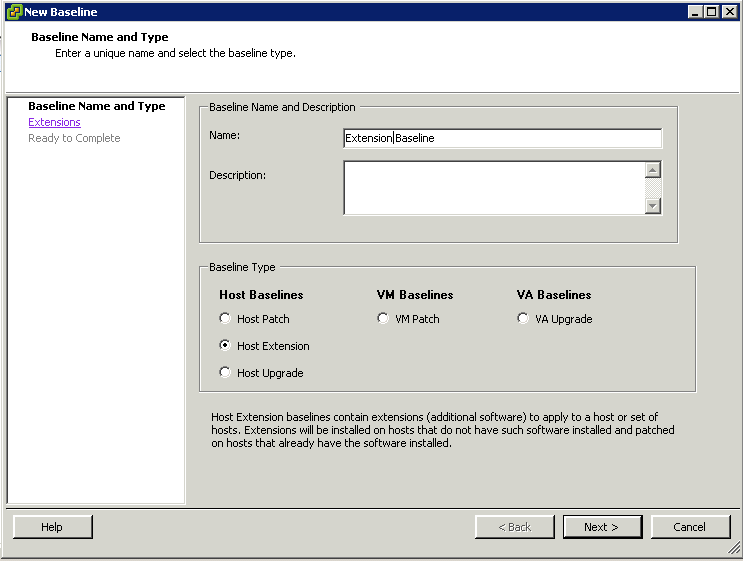
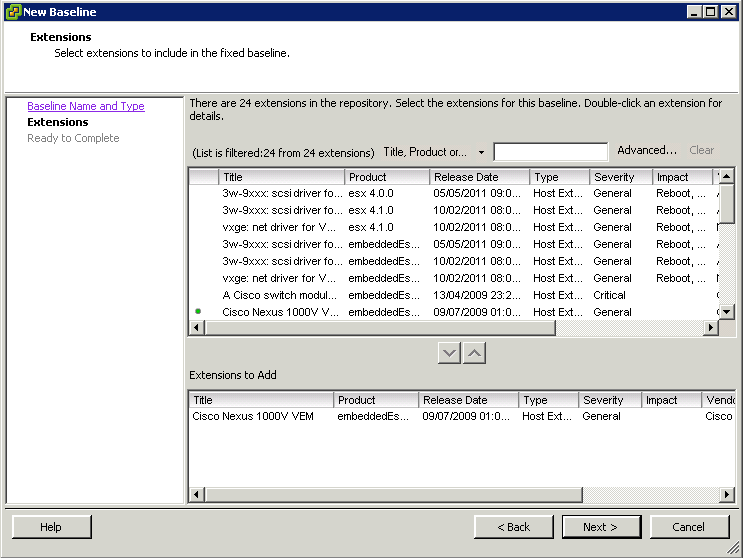
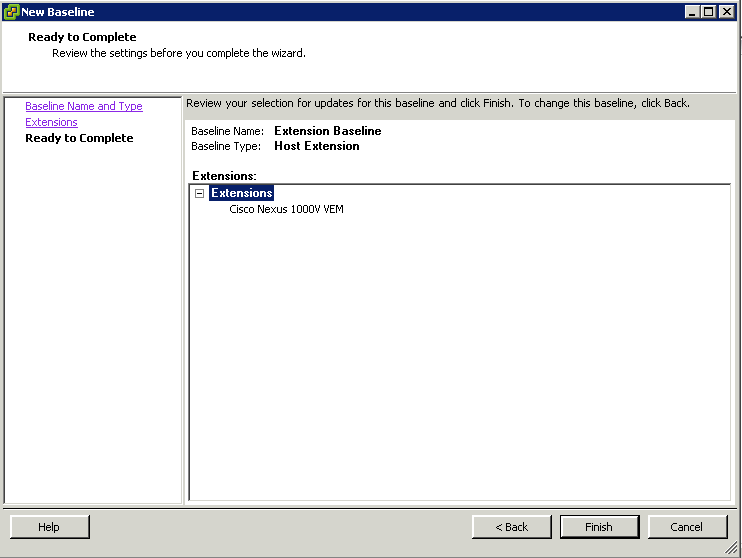
Create fixed patch baselines containing the patches that you want to test. Fixed patch baselines do not change their content when new patches are downloaded into the Update Manager patch repository. You can create a fixed patch baseline from the Baselines and Groups tab of the Update Manager Administration view. For more information and a detailed procedure, see “Create a Fixed Patch Baseline,” on page 85.

  • Attach the patch baselines to a container object containing the hosts that you want to scan or remediate.

The container object can be a folder, cluster, or datacenter. You can attach baselines and baseline groups to objects from the Update Manager Compliance view. For more information about attaching baselines and baseline groups to vSphere objects, see “Attach Baselines and Baseline Groups to Objects,” on page 97.

  • Scan the container object.

After you attach baselines to the selected container object, you must scan it to view the compliance state of the hosts in the container. You can scan selected objects manually to start the scanning immediately. For detailed instructions on how to scan your hosts manually, see “Manually Initiate a Scan of ESX/ESXi Hosts,” on page 101. You can also scan the hosts in the container object at a time convenient for you by scheduling a scan task. For more information and detailed instructions about scheduling a scan, see “Schedule a Scan,” on page 102.

  • Review the scan results displayed in the Update Manager Client Compliance view.

For a detailed procedure about viewing scan results and for more information about compliance states, see “Viewing Scan Results and Compliance States for vSphere Objects,” on page 103.

  • (Optional) Stage the patches in the attached baselines to the hosts that you want to update.

You can stage the patches and copy them from the Update Manager server to the hosts before applying them. Staging patches speeds up the remediation process and helps minimize host downtime during remediation. For a detailed procedure about staging patches and extensions to hosts, see “Stage Patches and Extensions to ESX/ESXi Hosts,” on page 121.

  • Remediate the container object.

Remediate the hosts that are in Non-Compliant state to make them compliant with the attached baselines. For more information about remediating hosts against patch or extension baselines, see “Remediate Hosts

  • Export the patch baselines from the Update Manager server that you used to test the patches, and import them to another Update Manager server.

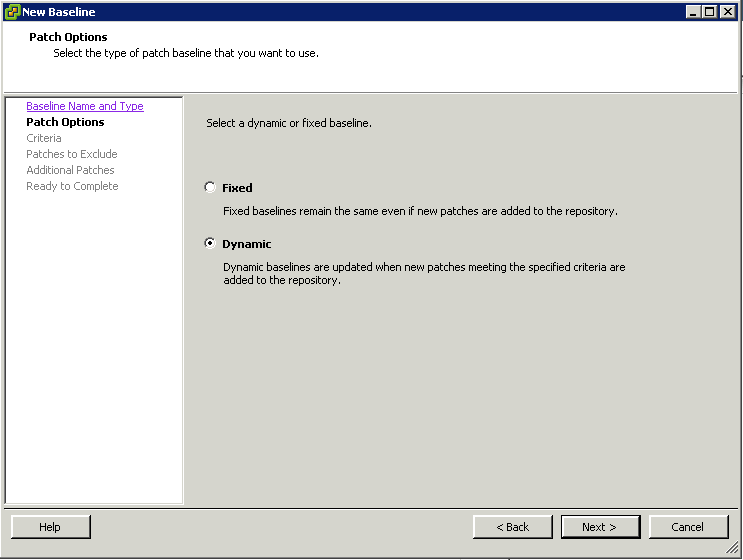
You can export and import patch baselines from one Update Manager server to another by using an Update Manager PowerCLI script. The example script on Page 156 of Installing and Administering VMware vSphere Update Manager creates a duplicate of the baseline MyBaseline on the $destinationServer.

The script works for fixed and dynamic patch baselines as well as for extension baselines.

Generate Database Reports using MS Excel or MS SQL

images

Generating Common Database Reports

Update Manager uses Microsoft SQL Server and Oracle databases to store information. Update Manager does not provide a reporting capability, but you can use a third-party reporting tool to query the database views to generate reports.

IMPORTANT The Update Manager database does not contain information about the objects in the inventory, but contains internal inventory entity IDs. To get the original IDs for virtual machines, virtual appliances, and hosts, you must have access to the vCenter Server system database. From the vCenter Server system database, you can retrieve the ID of the objects that you want to access. To obtain the Update Manager database IDs of the objects, Update Manager adds the prefix vm- (for virtual machines), va- (for virtual appliances), or host- (for hosts)

Generate Common Reports Using Microsoft Office Excel

Using Microsoft Excel, you can connect to the Update Manager database and query the database views to generate a common report.

Prerequisites

You must have an ODBC connection to the Update Manager database.

Procedure for Microsoft SQL Server (Express Procedure below)

Note: I am using Microsoft Office 2010

  • Log in to the computer on which the Update Manager database is set up.
  • From the Windows Start menu, select Programs > Microsoft Office > Microsoft Excel.
  • Click Data > Import External Data > New Database Query.
  • In the Choose Data Source window, select VMware Update Manager and click OK
  • If necessary, in the database query wizard, select the ODBC DSN name and enter the user name and password for the ODBC database connection.
  • In the Query Wizard – Choose Columns window, select the columns of data to include in your query

excel

  • Click Next
  • For example, if you want to get the latest scan results for all objects in the inventory and all patches for an inventory object, select the following database views and their corresponding columns from the Available tables and columns pane:
  • VUMV_UPDATES
  • VUMV_ENTITY_SCAN_RESULTS
  • Click OK in the warning message that the query wizard cannot join the tables in your query.
  • In the Microsoft Query window, drag a column name from the first view to the other column to join the columns in the tables manually.
  • For example, join the META_UID column from the VUMV_UPDATES database view with the UPDATE_METAUID column from the VUMV_ENTITY_SCAN_RESULTS database view.
  • A line between the columns selected indicates that these columns are joined.
  • The data is automatically queried for all inventory objects in the Microsoft Query window.

Procedure for Microsoft SQL Server Express

Note: I am using Microsoft Office 2010

  • Log in to the computer on which the Update Manager database is set up.
  • From the Windows Start menu, select Programs > Microsoft Office > Microsoft Excel.
  • Click Data > From Other Sources > From Microsoft Query

data

  •  Click VMware vSphere Update Manager

excel

  • Choose relevant colums etc
  • For example, if you want to get the latest scan results for all objects in the inventory and all patches for an inventory object, select the following database views and their corresponding columns from the Available tables and columns pane:
  • VUMV_UPDATES
  • VUMV_ENTITY_SCAN_RESULTS

VUM

  • Click OK to the message that they cannot be joined

VUM2

  • In the Microsoft Query window, drag a column name from the first view to the other column to join the columns in the tables manually.
  • For example, join the META_UID column from the VUMV_UPDATES database view with the UPDATE_METAUID column from the VUMV_ENTITY_SCAN_RESULTS database view.
  • A line between the columns selected indicates that these columns are joined.
  • The data is automatically queried for all inventory objects in the Microsoft Query window

join

  • And this is what you will see

metadata

Generate Common Reports Using Microsoft SQL Server Query

Using a Microsoft SQL Server query, you can generate a common report from the Update Manager database.

Procedure

To generate a report containing the latest scan results for all objects in the inventory and for all patches for an inventory object, run the query in Microsoft SQL Client.

excel3

  • The query displays all patches that are applicable to the scanned objects in the inventory.

Troubleshoot Update Manager problem areas or issues

index

Troubleshooting

Problems you may get. Please click on the links to go to the troubleshooting page

Gather Update Manager Log Bundles

You can gather information about recent events on the Update Manager server for diagnostic purposes. When Update Manager and vCenter Server are installed on the same machine, you can also gather the vCenter Server log bundle together with the Update Manager log bundle.

Procedure

  • Log in to the machine on which Update Manager is installed.
  • To obtain the complete set of the logs, you should log in with the user name and password used for
  • installing Update Manager.
  • Select Start > All Programs > VMware > Generate Update Manager log bundle
  • Log files are generated as a ZIP package, which is stored on the current user’s desktop.

Create and Modify Baseline Groups

images

Patch and Extension Baselines

You can remediate hosts against baselines that contain patches or extensions. Depending on the patch criteria you select, patch baselines can be either dynamic or fixed.

  • Dynamic patch baselines contain a set of patches, which updates automatically according to patch availability and the criteria that you specify.
  • Fixed baselines contain only patches that you select, regardless of new patch downloads.
  • Extension baselines contain additional software modules for ESX/ESXi hosts. This additional software might be VMware software or third-party software. You can install additional modules by using extension baselines, and update the installed modules by using patch baselines.

If your vCenter Server system is part of a connected group in vCenter Linked Mode, and you have more than one Update Manager instance, patch and extension baselines that you create are not applicable to all inventory objects managed by other vCenter Server systems in the group. Baselines are specific for the Update Manager instance you select.

Create a Fixed Patch Baseline

Fixed baselines consist of a specific set of patches that do not change as patch availability changes.

Prerequisites

Connect the vSphere Client to a vCenter Server system with which Update Manager is registered, and on the Home page, click Update Manager under Solutions and Applications. If your vCenter Server system is part of a connected group in vCenter Linked Mode, you must specify the Update Manager instance to use, by selecting the name of the corresponding vCenter Server system in the navigation bar.

Procedure

  • On the Baselines and Groups tab, click Create above the Baselines pane.
  • Type a name, and optionally, a description of the baseline.
  • Under Baseline Type, select Host Patch, and click Next.

Baseline1

  • Select Fixed for the type of baseline and click Next.

Baseline2

  • Select individual patches to include and click the down arrow to add them to the Fixed Patches to Add list.

Baseline3

  • (Optional) Click Advanced to find specific patches to include in the baseline.
  • Click Next

Baseline4

  • On the Ready to Complete page, click Finish.
  • The new baseline is displayed in the Baselines pane of the Baselines and Groups tab.

Create a Dynamic Patch Baseline

Dynamic baselines consist of a set of patches that meet certain criteria. The contents of a dynamic baseline varies as the available patches change. You can also exclude or add specific patches. Patches you select to add or exclude do not change with new patch downloads.

Prerequisites

Connect the vSphere Client to a vCenter Server system with which Update Manager is registered, and on the Home page, click Update Manager under Solutions and Applications. If your vCenter Server system is part of a connected group in vCenter Linked Mode, you must specify the Update Manager instance to use, by selecting the name of the corresponding vCenter Server system in the navigation bar.

Procedure

  • On the Baselines and Groups tab, click Create above the Baselines pane.
  • Type a name, and optionally, a description of the baseline.
  • Under Baseline Type select Host Patch, and click Next.

Baseline1

  • Select Dynamic as the type of baseline, and click Next.

Baseline5

  • On the Dynamic Baseline Criteria page, specify criteria to define the patches to include, and then click Next.

Baseline6

  • For example, when you select a product and severity option, the patches are restricted to the ones that are applicable for the selected product and are of the specified severity level
  • (Optional) On the Patches to Exclude page, select one or more patches in the list and click the down arrow to permanently exclude them from the baseline.
  • (Optional) Click Advanced to search for specific patches to exclude from the baseline.

Baseline7

  • Click Next.
  • (Optional) On the Other Patches to Add page, select individual patches to include in the baseline and click the down arrow to move them into the Fixed Patches to Add list.

Baseline8

  • The patches you add to the dynamic baseline stay in the baseline regardless of the new downloaded patches.
  • (Optional) Click Advanced to search for specific patches to include in the baseline.
  • Click Next.
  • On the Ready to Complete page, click Finish.

Baseline9

The new baseline is displayed in the Baselines pane of the Baselines and Groups tab

Create a Host Extension Baseline

Extension baselines contain additional software for ESX/ESXi hosts. This additional software might be VMware software or third-party software. You create host extension baselines using the New Baseline wizard.

Extensions can provide additional features, updated drivers for hardware, Common Information Model (CIM) providers for managing third-party modules on the host, improvements to the performance or usability of existing host features, and so on.

Host extension baselines that you create are always fixed. You must carefully select the appropriate extensions for the ESX/ESXi hosts in your environment.

To perform the initial installation of an extension, you must use an extension baseline. After the extension is installed on the host, you can update the extension module with either patch or extension baselines.
Note

When applying extension baselines by using Update Manager, you must be aware of the functional implications of new modules to the host. Extension modules might alter the behavior of ESX/ESXi hosts. During installation of extensions, Update Manager only performs the checks and verifications expressed at the package level.

Prerequisites

Connect the vSphere Client to a vCenter Server system with which Update Manager is registered, and on the Home page, click Update Manager under Solutions and Applications. If your vCenter Server system is part of a connected group in vCenter Linked Mode, you must specify the Update Manager instance to use, by selecting the name of the corresponding vCenter Server system in the navigation bar.

Procedure

  • On the Baselines and Groups tab, click Create above the Baselines pane.
  • Type a name, and optionally, a description of the baseline.
  • Under Baseline Type, select Host Extension and click Next.

Baseline10

  • On the Extensions page, select individual extensions to include in the baseline and click the down arrow to add them to the Included Extensions list.
  • (Optional) Click Advanced to filter the extensions to include specific extensions in the baseline

Baseline11

  • Click Next.
  • On the Ready to Complete page, click Finish.

Baseline12

  • The new baseline is displayed in the Baselines pane of the Baselines and Groups tab.

Baseline Groups

A baseline group is a collection of patch, upgrade, and/or extension baselines.

Procedure for Host Upgrade Baseline Group

  • Login to the vCenter server using vSphere client
  • Navigate to Home > Solutions and Applications > Update Manager
  • Click Create
  • Select Host Baseline Group, provide a name for the new baseline group

Baseline1

  •  Click Next
  • At the upgrade screen you can select a Host Upgrade Baseline or optionally Click the blue link at the bottom of the screen to Create a new Host Upgrade Baseline

Baseline2

  • Select Patch Baselines

Baseline3

  • Select Extension Baseline

Baseline4

Procedure for creating a Baseline Group for Virtual Machines and Virtual Appliances

  • Click Create

Baseline5

  • Add one upgrade baseline per type in this group

Baseline6

  • Finish

Perform orchestrated vSphere upgrades

index

Orchestrated Upgrades of Hosts and Virtual Machines

You can perform orchestrated upgrades of hosts or virtual machines in your vSphere inventory by using baseline groups. Baseline groups contain baselines for either hosts or virtual machines.

You can perform an orchestrated upgrade at the level of a container object or an individual object.

  • Orchestrated Upgrade of Hosts

Orchestrated upgrades let you apply upgrades, patches, and extensions to hosts in your inventory by using a single host baseline group.

If the baseline group contains an upgrade baseline, Update Manager first upgrades the hosts and then applies the patch or extension baselines. Because the upgrade runs first and patches are applicable to a specific host version, the orchestrated workflow ensures that patches are not lost during the upgrade.

  • Orchestrated Upgrade of Virtual Machines

You can use an orchestrated upgrade to upgrade the virtual machine hardware and VMware Tools of all the virtual machines in the vSphere inventory at the same time, using baseline groups containing the following baselines:

  • VM Hardware Upgrade to Match Host
  • VMware Tools Upgrade to Match Host

Upgrading the virtual hardware of the virtual machines exposes new devices and capabilities to the guest operating systems. You must upgrade VMware Tools before upgrading the virtual hardware version so that all required drivers are updated in the guest. You cannot upgrade the virtual hardware of the virtual machines if VMware Tools is not installed, is out of date, or is managed by third-party tools.

When you upgrade virtual machines against a baseline group containing the VM Hardware Upgrade to Match Host baseline and the VMware Tools Upgrade to Match Host baseline, Update Manager sequences the upgrade operations in the correct order, and VMware Tools is upgraded first.

During the upgrade of VMware Tools, the virtual machines must be powered on. If a virtual machine is in the powered off or suspended state before remediation, Update Manager powers it on. After the upgrade completes, Update Manager restarts the machine and restores the original power state of the virtual machine.

During the virtual hardware upgrade, the virtual machines must be shut down. If a virtual machine is powered on, Update Manager powers the machine off, upgrades the virtual hardware, and then powers the virtual machine on.

Manually download updates to a repository

images

Import Patches Manually

Instead of using a shared repository or the Internet as a download source for patches and extensions, you can import patches and extensions manually by using an offline bundle.

You can import offline bundles only for hosts that are running ESX/ESXi 4.0 or later.

Prerequisites

  • The patches and extensions you import must be in ZIP format.
  • To import patches and extensions, you must have the Upload File privilege. For more information about managing users, groups, roles, and permissions, see vCenter Server and Host Management. For a list of Update Manager privileges and their descriptions, see Update Manager Privileges.
  • Connect the vSphere Client to a vCenter Server system with which Update Manager is registered, and on the Home page, click Update Manager under Solutions and Applications. If your vCenter Server system is part of a connected group in vCenter Linked Mode, you must specify the Update Manager instance to use, by selecting the name of the corresponding vCenter Server system in the navigation bar.

Procedure

  • On the Configuration tab, under Settings, click Download Settings.
  • Click Import Patches at the bottom of the Download Sources pane.
  • On the Select Patches File page of the Import Patches wizard, browse to and select the .zip file containing the patches you want to import.
  • Click Next and wait until the file upload completes successfully.
  • After a successful upload, the Confirm Import page appears.
  • In case of upload failure, check whether the structure of the .zip file is correct or whether the Update Manager network settings are set up correctly.
  • On the Confirm Import page of the Import Patches wizard, review the patches that you have selected to import into the Update Manager repository.
  • Click Finish.
  • You imported the patches into the Update Manager patch repository. You can view the imported patches on the Update Manager Patch Repository tab.

Configure Smart Rebooting and upgrade vApps

vapppic

Configure Smart Rebooting

Smart rebooting selectively restarts the virtual appliances and virtual machines in the vApp to maintain start-up dependencies. You can enable and disable smart rebooting of virtual appliances and virtual machines in a vApp after remediation.

A vApp is a pre-built software solution, consisting of one or more virtual machines and applications, which are potentially operated, maintained, monitored, and updated as a unit.

Smart rebooting is enabled by default. If you disable smart rebooting, the virtual appliances and virtual machines are restarted according to their individual remediation requirements, disregarding existing startup dependencies.

Prerequisites

Connect the vSphere Client to a vCenter Server system with which Update Manager is registered, and on the Home page, click Update Manager under Solutions and Applications. If your vCenter Server system is part of a connected group in vCenter Linked Mode, you must specify the Update Manager instance to use, by selecting the name of the corresponding vCenter Server system in the navigation bar.

Procedure

  • On the Configuration tab, under Settings, click vApp Settings.
  • Deselect Enable smart reboot after remediation to disable smart rebooting.

vapp2

Remediating vApps

  1. Enter the VMs and Templates view (Ctrl + Shift + V)
  2. Highlight the vApp to upgrade
  3. Click on the Update Manager tab
  4. Right click within the frame, Attached Baseline Groups, and select Attach
  5. Select the Upgrade Baseline for your vApp, click Attach
  6. Click the Remediate button
  7. Select the Baseline to remediate against
  8. Select the appropriate virtual machines
  9. Click Next
  10. If necessary you may now adjust the schedule settings, task description, and task name. Optionally, if you are remediating against a single Upgrade VMware Tools to Match Host baseline, you may choose to Upgrade VMware Tools on power cycle. Click Next.
  11. At the Rollback Options screen, you may choose to snapshot the virtual machine before remediation. You may also choose to delete the snapshot after a successful remediation or keep the snapshot for a determined period of time. Enter the snapshot details and if you want to snapshot the memory. Click Next.
  12. At the Ready to Complete screen, review the scheduled remediation actions, and the click Finish

Link to vApp Information

http://www.electricmonk.org.uk/2012/05/15/vmware-vapps/

Configure a shared repository

images

Configure Update Manager to Use the Internet as a Download Source

If your deployment system is connected to the Internet, you can directly download ESX/ESXi patches and extensions, as well as virtual appliance upgrades.

Procedure

  • Connect the vSphere Client to a vCenter Server system with which Update Manager is registered, and on the Home page, click Update Manager under Solutions and Applications.
  • If your vCenter Server system is part of a connected group in vCenter Linked Mode, you must specify the Update Manager instance to use, by selecting the name of the corresponding vCenter Server system in the navigation bar.
  • On the Configuration tab, under Settings, click Download Settings.
  • In the Download Sources pane, select Direct connection to Internet.
  • Choose the type of updates to download by selecting or deselecting the check box next to the type of update.
  • You can choose whether to download virtual appliance upgrades and host patches and extensions. You cannot edit the download source location of the default ESX/ESXi patches and extensions. You can only enable or disable downloading.
  • (Optional) Add an additional third-party download source for virtual appliances or hosts that are running ESX/ESXi 4.0 and later.
  • Click Apply.
  • Click Download Now to run the VMware vSphere Update Manager Update Download task
  • All notifications and updates are downloaded immediately even if the Enable scheduled download checkbox is not selected in Configuration > Notification Check Schedule or Configuration > Download Schedule, respectively

updatemanager

Add a new Download Source

If you use the Internet as a download source for updates, you can add a third-party URL address to download virtual appliance upgrades, as well as patches and extensions for hosts that are running ESX/ESXi 4.0 and later.

Prerequisites

Connect the vSphere Client to a vCenter Server system with which Update Manager is registered, and on the Home page, click Update Manager under Solutions and Applications. If your vCenter Server system is part of a connected group in vCenter Linked Mode, you must specify the Update Manager instance to use, by selecting the name of the corresponding vCenter Server system in the navigation bar.

Procedure

  • On the Configuration tab, under Settings, click Download Settings.
  • In the Download Sources pane, select Direct connection to Internet.
  • Click Add Download Source.
  • In the Add Download Source window, type the new download source URL.

updatemanager2

Update Manager supports both HTTP and HTTPS URL addresses. You should specify HTTPS URL
addresses, so that the data is downloaded securely. The URL addresses that you add must be complete and contain the index.xml file, which lists the vendor and the vendor index.
Note: The proxy settings for Update Manager are applicable to third-party URL addresses too. You can configure the proxy settings from the Proxy Settings pane.

  • (Optional) Type a URL description.
  • Click Validate URL to verify that the URL is accessible.
  • Click OK.
  • Click Apply.
  • Click Download Now to run the VMware vSphere Update Manager Update Download task.
  • All notifications and updates are downloaded immediately even if the Enable scheduled download checkbox is not selected in Configuration > Notification Check Schedule or Configuration > Download Schedule, respectively.
  • The location is added to the list of Internet download sources.

Use a Shared Repository as a Download Source 

You can configure Update Manager to use a shared repository as a source for downloading virtual appliance upgrades, as well as ESX/ESXi patches, extensions, and notifications.

A shared repository is a location within your firewall where UMDS downloads patches or VA upgrades from various vendors. When the patches or VA upgrades are required for remediation, the system retrieves them from the Shared Repository rather than from the internet. It lets you create secure environments and save time

Network Shares are not supported as Update Manager does not have access to Network shares. HTTP URLs and Local Disks only

Prerequisites

You must create the shared repository using UMDS and host it on a Web server or a local disk. The UMDS version you use must be of a version compatible with your Update Manager installation.

Once you have configured UMDS and downloaded updates to a certain folder on another server, you can run the following to export the updates from this server to the Update Manager server on vCenter Server by running the following command

  • vmware-umds -E –export-store \\vCenterserver\SharedFolder

where shared folder is a local disk folder on the vCenter Server

Procedure

  • On the Configuration tab, under Settings, click Download Settings.
  • In the Download Sources pane, select Use a shared repository.
  • Enter the path or the URL to the shared repository.
  • For example, C:\repository_path\, https://repository_path/, or http://repository_path/

In these examples, repository_path is the path to the folder to which you have exported the downloaded upgrades, patches, extensions, and notifications. In an environment where the Update Manager server does not have direct access to the Internet, but is connected to a machine that has Internet access, the folder can be on a Web server.

  • You can specify an HTTP or HTTPS address, or a location on the disk on which Update Manager is installed. HTTPS addresses are supported without any authentication.

IMPORTANT You cannot use folders located on a network drive as a shared repository. Update Manager does not download updates from folders on a network share either in the Microsoft Windows Uniform Naming Convention form (such as \\Computer_Name_or_Computer_IP\Shared), or on a mapped network drive (for example, Z:\).

  • Click Validate URL to validate the path.

IMPORTANT If the updates in the folder you specify are downloaded with a UMDS version that is not compatible with the Update Manager version you use, the validation fails and you receive an error message. You must make sure that the validation is successful. If the validation fails, Update Manager reports a reason for the failure. You can use the path to the shared repository only when the validation is successful.

  • Click Apply.
  • Click Download Now to run the VMware vSphere Update Manager Update Download task and to download the updates immediately.
  • The shared repository is used as a source for downloading upgrades, patches, and notifications.

um2

Install and Configure Update Manager Download Service

What is UMDS?

VMware vSphere Update Manager Download Service (UMDS) is an optional module of Update Manager. UMDS downloads upgrades for virtual appliances, patch metadata, patch binaries, and notifications that would not otherwise be available to the Update Manager server.

For security reasons and deployment restrictions, vSphere, including Update Manager, might be installed in a secured network that is disconnected from other local networks and the Internet. Update Manager requires access to patch information to function properly. In such an environment, you can install UMDS on a computer that has Internet access to download upgrades, patch binaries, and patch metadata, and then export the downloads to a portable media drive so that they become accessible to the Update Manager server.

In a deployment where the machine on which Update Manager is installed has no Internet access, but is connected to a server that has Internet access, you can automate the export process and transfer files from UMDS to the Update Manager server by using a Web server on the machine on which UMDS is installed.

UMDS 5.1 supports patch recalls and notifications. A patch is recalled if the released patch has problems or potential issues. After you download patch data and notifications with UMDS, and export the downloads so that they become available to the Update Manager server, Update Manager deletes the recalled patches and displays the notifications on the Update Manager Notifications tab.

Installing UMDS

Pre-Requisites

  • It will not install on a Windows 2008 R2 Server running as a DC
  • You cannot upgrade UMDS 4.x to UMDS 5.1, but under certain conditions you can perform a fresh installation of UMDS 5.1 and use an existing patch store from UMDS 4.x. You can install UMDS only on 64-bit machines.
  • Before installing UMDS, you must create a database instance and configure it to ensure that all tables are placed in it. You must configure a 32-bit DSN and test the DSN from ODBC. If you are using Microsoft SQL Server 2008 R2 Express, you can install and configure the database when you install UMDS
  • You should not install UMDS 5.1 with an existing UMDS 4.x download directory if your environment contains both Update Manager 4.x and Update Manager 5.x instances. In such a case, you need a UMDS 4.x and a UMDS 5.x installation on two separate machines, in order to export updates for the respective Update Manager versions.
  • UMDS and Update Manager must be installed on different machines
  • Ensure that the machine on which you install UMDS has Internet access

Procedure

  • Insert the VMware vSphere Update Manager installation DVD into the DVD drive of the Windows server that will host UMDS.
  • Browse to the umds folder on the DVD and run VMware-UMDS.exe. (One of the first folders you will see!)
  • Select the language for the installation and click OK
  • (Optional) If the wizard prompts you, install the required items such as Windows Installer 4.5. This step is required only if Windows Installer 4.5 is not present on your machine and you must perform it the first time you install a vSphere 5.x product. After the system restarts, the installer launches again.
  • Review the Welcome page and click Next.
  • Read the patent agreement and click Next.
  • Accept the terms in the license agreement and click Next.
  • Select the database options and click Next.
  • If you do not have an existing database, select Install a Microsoft SQL Server 2008 R2 Express instance (for small scale deployments).
  • If you want to use an existing database, select Use an existing supported database and select your database from the list of DSNs. If the DSN does not use Windows NT authentication, enter the user name and password for the DSN and click Next.
  • Enter the Update Manager Download Service proxy settings and click Next.
  • Select the Update Manager Download Service installation and patch download directories and click Next.
  • If you do not want to use the default locations, you can click Change to browse to a different directory. You can select the patch store to be an existing download directory from a previous UMDS 4.x installation and reuse the applicable downloaded updates in UMDS 5.1. After you associate an existing download directory with UMDS 5.1, you cannot use it with earlier UMDS versions.
  • (Optional) In the warning message about the disk free space, click OK.
  • Click Install to begin the installation.
  • Click OK in the Warning message notifying you that .NET Framework 3.5 SP1 is not installed.
  • The UMDS installer installs the prerequisite before the actual product installation.
  • Click Finish.
  • Reboot

Setting Up and Using UMDS

You can set up UMDS to download upgrades for virtual appliances, or patches and notifications for ESX/ESXi hosts. You can also set up UMDS to download ESX/ESXi 4.x and ESXi 5.x patch binaries, patch metadata, and notifications from third-party portals.

After you download the upgrades, patch binaries, patch metadata, and notifications, you can export the data to a Web server or a portable media drive and set up Update Manager to use a folder on the Web server or the media drive (mounted as a local disk) as a shared repository.

You can also set up UMDS to download ESX/ESXi 4.x and ESXi 5.x patches and notifications from third-party portals.

To use UMDS, the machine on which you install it must have Internet access. After you download the data you want, you can copy it to a local Web server or a portable storage device, such as a CD or USB flash drive.

The best practice is to create a script to download the patches manually and set it up as a Windows Scheduled Task that downloads the upgrades and patches automatically.

Set Up the Data to Download with UMDS

By default UMDS downloads patch binaries, patch metadata, and notifications for hosts. You can specify which patch binaries and patch metadata to download with UMDS.

  • Log in to the machine where UMDS is installed, and open a Command Prompt window.
  • Navigate to the directory where UMDS is installed.
  • The default location in 64-bit Windows is C:\Program Files (x86)\VMware\Infrastructure\Update Manager.
  • Check the setup by typing vmware-umds -G

umdsg

  • Specify the type of updates to download by using the commands below
  • vmware-umds.exe -s –enable-host –disable-va

UMDSEnable

  • Specify the updates to download by using the commands below to delete the versions you don’t want leaving version 5.1.0
  • vmware-umds.exe -s -d embeddedEsx-5.0.0
  • vmware-umds.exe -s -d embeddedEsx-4.1.0
  • vmware-umds.exe -s -d embeddedEsx-4.0.0
  • Next run vmware-umds.exe -D

umds1

  • Next we need to export the Downloaded Updates to a removable device which has been given the drive letter F:\
  • Type vmware-umds.exe -E –export-store F:\
  • Verify that all files are exported to the portable media drive, and then safely remove it and connect it to the machine on which the Update Manager server is installed.
  • Modify the Shared Repository Path in Update Manager to F:\
  • Note: The path can only contain one directory level, otherwise it will fail.  For example the path should be d:\repository, but it cannot be d:\repository\patches.  When it is finally exported you can then move the repository to a physical media or any portable storage device.

UMDS Commands

umds

Identify Firewall Access Rules for Update Manager

images

Firewall Access Rules

If you access ESXi hosts through vCenter Server, you typically protect vCenter Server using a firewall. This firewall provides basic protection for your network.
A firewall might lie between the clients and vCenter Server. Alternatively, vCenter Server and the clients can be behind the firewall, depending on your deployment. The main point is to ensure that a firewall is present at what you consider to be an entry point for the system.

Update1

ESXi Security Guide

Please see Pages 23-25 for extra Port Information

ESXi Security Guide